This pipe was a challenge – more to come later…. The pipe on the table today is a nice-looking Prince. It has the right stem orientation, and the apple shaped bowl is on the petite side. I saw this Mastercraft Custom Made Prince on the online auction block in March of 2016, from a seller in Spruce Pine, North Carolina. There were 2 other pipes from the same seller that got my attention – a carved vineyard Meerschaum, and a Pickwick Arms straight Bulldog. My bids were good for each of the 3 pipes, and they came bundled heading to the online collection, For “Pipe Dreamers” ONLY! where pipe men and women can commission pipes whispering their names. The best part is that these pipes when adopted by new stewards, benefit the Daughters of Bulgaria, a work that my wife and I co-founded in Bulgaria which continues to help women who have been trafficked and sexually exploited.
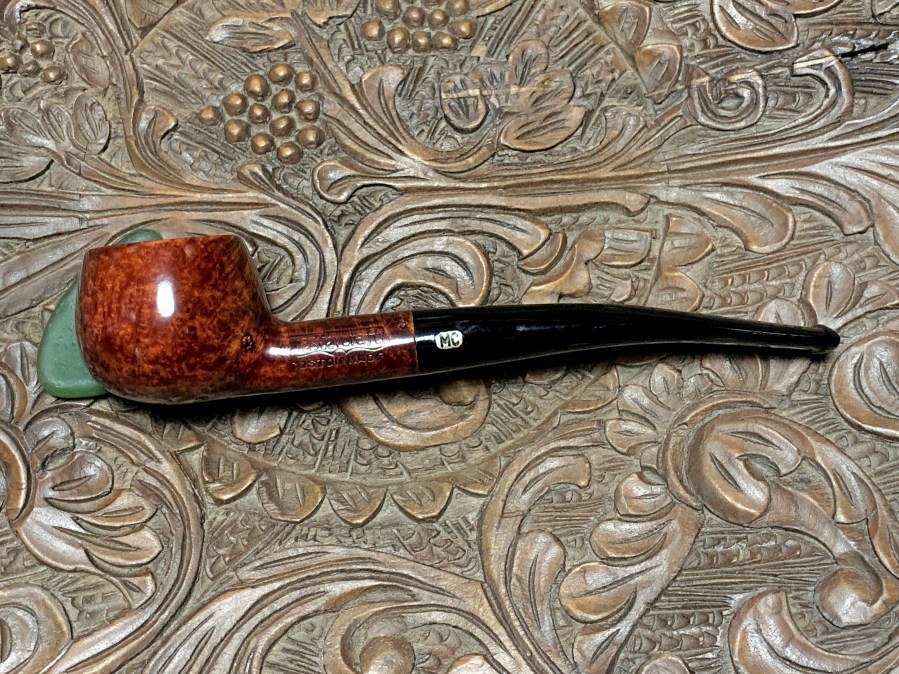
A Texas pipe man, who wishes to stay anonymous, has previously commissioned several pipes and I have enjoyed getting to know him over time. He has expressed his support for the Daughters on several occasions and this I appreciate very much. He heard the whisper of this Mastercraft Prince and another classic American pipe that few people collect in my experience, a Yello-Bole Filter Brush Panel. I love the challenge of trying to bring life back to pipes the will be passed by 99% of the time for pipes considered a little higher in the pecking order. Because of health concerns, he doesn’t put his pipes into service too often these days, but he still enjoys finding classic pipes to give them another chance. For this pipe man, that means they are displayed for him to enjoy. Here is the MC Prince that got his attention.

 The fancy MASTERCRAFT stamping encased in the banner, is in good condition except for the ‘M’ which is partially worn. Beneath this is stamped, CUSTOM MADE. The stem logo, MC is encased in a rounded white rectangle and is in good shape.
 The right side of the shank has stamped, IMPORTED BRIAR [over] ITALY, the COM (country of manufacturing).
 The first time I worked on a Mastercraft pipe I dove into the research which I found extremely interesting. I’m repeating that initial research here to remind me of the Mastercraft name and what this Prince’s roots are:
 The interesting thing to me about the Mastercraft name is that Mastercraft is not a pipe producer. Any pipe with Mastercraft stamped on it came from other pipe houses in the US or Europe and even from Israel. Mastercraft receives these pipes and then distributes them for sale. Pipedia’s Mastercraft article actually came in large measure from a thread posting by a ‘Ted’ (his last name was not listed as far as I could find) who was the former vice president of Grabow/Mastercraft. His recollections are fascinating to me because this kind of information is not usually available. What is also fascinating is that the ‘Mastercraft discussion’ was on ‘The Dr. Grabow Collector’s Forum’. I include the initial recollection from Ted with the interesting story about Mastercraft from his perspective and its interaction with the Grabow company:
It doesn’t appear it was ever a manufacturer and bought pipes from multiple factories — mostly French and English. It briefly survived the post war recovery and then was acquired by Grabow.
 The following is quoted from the thread:
First a confession. From 1974 till 1984 I had several positions with Mastercraft including Executive Vice President. I also worked for Grabow From 66 till 74 and from 84 till I retired in 91. In 91, with retirement, I was President and COO for the corporation that was called “Sparta Industries”. I have seen both sides of the “fence”, and even though I never left the “employ” of Grabow, my loyalties for 10 years were with M/C.
United States Tobacco (UST) (Skoal and Copenhagen) bought Grabow in 69′ from the Lavietes family. In ‘74 they bought M/C from Bernard Hochstein and moved it into the EXACT facility Grabow occupied. I was named “operations manager” and we were in the basement of a 4-story building in Sparta, NC.
M/C was STRICTLY an importer of pipes and pipe related merchandise. In ‘74 when M/C moved from NYC to NC the inventory of finished goods was stored in a facility in Winston Salem, NC. Lentz Moving and Storage. Stacked 10 feet high the inventory covered 180,000 square feet…. FINISHED. In my time at Grabow I had never seen that much finished stock, and the shapes, manufacturers, finishes. Heaven for a pipe smoker…. Damn right. You would have had to slap me really hard to get the grin off my face.
I’ll just list a few Manufacturers/names of the inventory.
- England
- Parker/Hardcastle (Dunhill)
- Orlick
- France
- Jeantet
- Jima
- Cherrywoods
- Italy
- GIGI pipe
- Radica
- Rossi
- Federico Rovera
- Emilio Rovera
- Santambrogio
- Brebbia
- Meerschaums from Austria
- Strambach
- Lighters from Japan
- Pouches and accessories from Hong Kong
- and the Israeli pipes from Mr. Hochstein’s sons.
Trust me…This is only a small sample of the things M/C had, and bought into inventory.
 Now the connection. Since M/C and Grabow shared a building, and I was an employee of Grabow we compared notes. Grabow copied a BUNCH of M/C items fully with my help and some skills I had developed.
First was Omega…A copy of a well pipe made by Federico Rovera (FERO.com) …. Freehand by the Alpha/Shalom factory… Meerschaum Lined from M. Gasparini, and later GIGI PIPE. These were originally imported by M/C for Grabow and stamped Grabow, but also stamped ITALY. Later models. Better finishes were made in the USA. Bucko…copied from M. Gasparini… (Gasparini, to my knowledge, is the only maker of leather covered in the world). If you buy a leather covered pipe it was, most assuredly, covered by M/G. And you thought the wood in the Grabow COLOR was bad….outta unrap one of these scrappers. There is a lot more. Questions will be answered following the presentation.
Now the other way. Grabow to Mastercraft. M/C never really had a source of continuing supply. The foreign manufacturers would make a line for a while and then quit. Never do it again, no matter how well it sold, no matter the demands we put on em’. Grabow gave M/C a source of stability, and a nice profit for both companies. A lot of these you will not have heard of, but maybe…. Seville, for M/C all smooth, for Grabow all rustic. Hillcrest…. Freehand, For M/C Andersen and (a few Mastersen), for Grabow, Freehand with a DRB tamp on. New finishes…New shapes, New bits…. Mastercraft showed Grabow how to use LUCITE for stems…. Royalton…. Again, these are just examples.
Ted also said: Several years before UST bought Mastercraft, M/C had acquired Marxman Pipes. A wonderful kind man, Bob Marx was still working as a salesman in NYC, and I was fortunate to make a few sales calls with him. You all remember Charles Atlas? Bob Marx was about 76 and had just been awarded the (I think) Atlas Award for being the finest speciman of manhood over 70 years old in NYC, or maybe the state.
M/C had some inventory of Marxman stuff, but not a lot. I know very little about Marxman. Did they make, import, or both?
 M/C was included in all the major Christmas catalogues… Sears… Spiegel…. Penney… Ward… Aldens. This was from about 70′ till 80′. We usually would have a 2 pc. Massa (pressed) Meerschaum set from Robert Strambach, A water pipe from Brebbia, a huge Well pipe (saw one on e-bay a few days ago), and various odds and ends to fill about 6 – 8 spaces.
Let me also say one more thing about the 180,000 sq. ft. That wasn’t all pipes. It included display cases for our sets, which were made in England, and took up lots of space. Regular boxes, bags, and display material were a part, and pouches and accessories took up quite a bit.
In about ‘78 UST put together a “premium products” salesforce. They sold, mostly to pipe shops, products that UST owned. Tobacco from a plant in Richmond, Don Tomas cigars from Honduras, House of Windsor cigars from Red Lion PA., and M/C pipes. I think the force was 11 or 12 men and this was the heyday for M/C. What we had what EVERYONE in the pipe business wanted.
After the salesforce was disbanded, M/C struggled some. This is about the time that Grabow and M/C realized what an asset we were to each other. Sales stayed pretty good for a while because of the relationships Judy Weinberger (NYC sales office and VP Mastercraft) and I had developed with the pipe shop owners. -TED-
Most of the Mastercraft pipes I have seen/bought at the bid place have an Algerian Briar stamping which makes them an attractive buy in this era. They are very reasonable, and everyone has been well made with a nice draw and fine centering.
____________________________________
Wow! I encourage anyone interested in the Mastercraft/Grabow story to read the thread in its entirety. Ted’s initial post above was August 1, 2008 (see: LINK). A ‘JoeMan’ in the thread above commented on the plethora of pipe names attached to Mastercraft that Ted referenced (above). Ted responded to this question in another thread on ‘The Dr. Grabow Collector’s Forum’ (see: LINK). I include his more exhaustive response below. This information is interesting because I recognize pipe names that one might see in old Tinderbox catalogues that are not identified as from a particular source, but simply a ‘Tinderbox Special’. Here is Ted’s list of names associated with Mastercraft:
Joe asked how many names I could remember from my time at Mastercraft. I’ll try. You’ll see that Mastercraft was much more than a branded line of pipes. Some names may surprise.
Mastercraft…
Handmade, Custom Made, Deluxe, Original, Executive, Colossal, Drycool, Compact, Bark Grain, Satin Grain, Sculptured, Popular, Standard, Custom Deluxe.
 Factory in Israel…
Shalom (had several sub names but we sold so few that I only remember Handmade, Satin Grain, Sandblast)
Alpha…. Andersen, Mastersen, Rex, Esprit, Ultra, Caprice, Handmade, Freehand, Comfit, Classic, Calabash, Citation, Pedistal, Supreme, Burl King, Dialite, Allegro, Century, Magnum, Tinder Box Jura, Nobility, and a few others, 721, 722, 723, 724 Narghilia (sp) depending on the number of hoses.
Warehouse…. Hardcastle (seconds from the Dunhill factory), Orlik, covered metal gift boxes for 1, 2, 4, 7, and 12 pipes, Jeantet, Jeantet Jumbo, Jima (saw one on Ebay yesterday). Bunches of unstamped natural finish pipes from France (we sold 4 dozen of these to every Tinder Box store in the country in 1979 and still had a bunch left), Small Cherrywoods, Tyrolean Cherry, Giant Cherry (Bowl the size of a football, 2 ft. shank).
Lloyds, Old Vic, Derby pigskin covered, Calfskin covered, Something fuzzy covered (didn’t want to know), Meerschaum lines from everywhere.
Seville, Seville Convertible, Seville Lucite, Seville Twin Bore, Royal Ascot, BB  Ascot, Lido, Lectura, Iceberg, Water Pipes..711,712,713,714 (depending on the number of hoses), Vest Pocket, Rolex, Mini Rolex.
Olive, Small, Medium, and Large Well Pipes (from FeRo), Tom Thumb, Brewster, Stetson, Stetson Southern, Dryfilter, Mellow Root, Carved Heads (bull, walrus, deer, etc.).
Massa Meerschaum, Massa Meerschaum Oil Cured, Meerschaum Top Bowls (for Viking like pipe), Calabash, Block Meerschaum Heads and standard shapes.
Shelves…. Hurricane, Sparkproof, Doodler, Golf, Legion of Honor, Dr. Bernard, Cigar Pipe, Jet Pipe, Radiator, Filtermaster, Syncromatic, Millard, Aldo Velani (several sub names that I don’t recall), Ladies Pipes.
0100, 0200, 0300, 0400, 0400R. Made by Grabow and used by Mastercraft as Private Label Pipes.
Whitehall…. Don’t remember many of these… Stubby, Sterling, Darby, Thermofilter, Several more. Sir Walter Raleigh Head.
Several Marxman brands in small quantities. Irish Green (yes it was), Peeps (Had a girlie picture in a small hole in the pipe).
5 kinds of vinyl pouches, 6 leather pouches, Watch Lighter, Rocket Pipe Lighter, and another 6 or so lighters, 2 disposable lighters. Every tool that could be imagined.
I’ll probably add a few more as I remember them. Not bad for 30+ years ago… ted
______________________________________________
A few take-aways for me from Ted’s reflections – first, as I stated above, so many of the ‘brandless’ pipes seen in catalogues such as Tinderbox and shop publications are actually pipes supplied through Mastercraft. Mastercraft did not produce pipes but relied on other manufacturers. I was also intrigued by the inter-connectedness between Grabow and Mastercraft and the mutually beneficial relationship. The listings of pipes above was also informative – what caught my attention is that Hardcastle was a second from the Dunhill production line.
Pipedia’s Mastercraft article has several examples of MC pipes (courtesy of Doug Valitchka). The very first example caught my eye because it appears to be identical to the pipe on the worktable. The example (pictured below) is labeled as an Apple shape. One could see it as an Apple, but I would call it a Prince all day long. The stampings on the left shank side are identical with ‘Mastercraft’ and Custom Made – except the Custom Made below is in cursive, ours in block lettering. The stamping on the right side of the shank is totally different – ALGERIAN BRIAR, ours: IMPORTED BRIAR. Also the COM is FRANCE, not ITALY. In fact, all the examples in the article were from France.
 Bill Burney’s description of the Prince shape is helpful to understand more of its uniqueness (https://pipedia.org/wiki/Prince):
With Mastercraft pipes, it’s enough to have an appreciation of the vast variety of pipes shapes, lines and sub-brands that were produced. The Prince on the table is an Italian production for the MC distribution. The listing above of pipe houses that produced pipes for Mastercraft are GIGI pipe, Radica, Rossi, Federico Rovera, Emilio Rovera, Santambrogio, and Brebbia. We’ll never know for sure which one 😊.
With a renewed appreciation for the Mastercraft story, I take a closer look at the MC Custom Made on the worktable. The chamber has mild cake build up and some lava flow on the rim. The real challenges are the fills in the stummel…there is a reason for the shellac finish, my beloved ‘Candy Apple’ finish. There is no debating that this block of briar was in the ‘low shelf’ box. Looking at the shank first, there is a cut visible on the top near the crook. Also visible above the stamping is a fill. A few more fills can be seen next to the shank facing.
 Looking at the top of the shank next to the Imported Briar stamping, a few more fills are visible.
 Honestly, I’m not believing what I am seeing. More fills and some not too small. At this point is when the name of this project took flight in my mind – “Pandora’s Pipe”. Why? Pandora’s Box was a beautiful attraction (probably a jar) with all the curses and evil omens which were released if one opened the box. To address the shiny, shellac, candy apple finish, would expose all the fills which would need to be examined and probably dug out and refilled AND refinished so that the new fills would be blended and not stand out (and there’s no way of knowing at this point if the pipe won’t be worse off after my ‘restoration’!) …. Pandora’s Pipe. I’ll need to give some thought to this. The pictures tell the story.
 The stem is another interesting challenge. It is not vulcanite – a rubber compound, but plastic. The texture is like, well, plastic, and one can see the molding lines on both sides of the stem. The tenon shows the molding lines on opposite sides.
 The button also has the dissection line running horizontally. The bit shows no tooth chatter, which is good news. I haven’t worked on too many plastic stems, so I’ll need to be careful not to be too aggressive and melt it.
 The stem also has a harpoon stinger that is seated pretty firmly. I usually take stingers out, but I’ll leave this one and allow the new steward to remove it if he chooses.
 To begin this restoration of this Mastercraft Custom Made (aka: Pandora’s Pipe), the chamber is reamed with the Pipnet Reaming Kit. Two of the four available blade heads are used. This is followed by scaping the chamber walls with the Savinelli Fitsall Tool. The last vestiges of carbon are removed by sanding using 220 paper wrapped around a Sharpie Pen.
 The chamber is inspected for heating problems, and none are found. Switching now to cleaning the external briar, a few pictures show the grime on the bowl.
 To clean, undiluted Murphy’s Oil Soap is used to scrub the external briar with a cotton pad.
 A knife helps scrape the crusted lava on the inner lip of the rim – carefully! Gouging the wood is not what I want to do. A brass wire brush helps as well. Brass is not invasive when used on the briar and adds some cleaning muscle.
 Next, the stummel is taken to the sink and the internals are scrubbed using shank brushes with hot water and anti-oil liquid dish washing soap. After a thorough rinsing, the stummel returns to the worktable.
 The internal cleaning continues with cotton buds and pipe cleaners with isopropyl 99%. It only took a few of each to confirm that the internals are clean and ready to go.
 After cleaning, the shellac, candy apple finish is still in place. The fills are also visible through the shell.
 To remove the shellac varnish, alcohol is first used. It removes some, but acetone did a good job cleaning off the chemical shell but did not remove the patina.
 Looking now at the fills as they are and not through the chemical shell, they are legion and some quite large. I counted 14 fills on the stummel needing to be addresses. I decide to leave the old fills that are near and overlapping the stampings on both sides of the shank.
 The moment of truth – the approach was inevitable. I start digging. I don’t take a picture of every old fill that is excavated with a sharp dental probe, but the following pictures give the general idea. Each pits is cleared of the old patch material making room for the new.
 The pits are cleared and ready to be filled with a new filler.
 The rim also has a fill that is cleaned out. Looking at the entire rim, there are many scratches – it’s in rough shape. The outer rim edge also has some dents.
 To address the scratches on the rim, 220 sanding paper is used to sand the rounded, inwardly sloping rim. Following the 220 paper, 470 paper is used to continue sanding and smoothing the rim.
 A rough spot is also identified on top of the shank near the crook. I don’t believe it’s a scratch but appears to be a ripple of old finish. To remove this 470 paper sands the ripple out without trouble.
 At the beginning of this project, when the plethora of fills were identified, the question of how to approach the fills started going around in circles in my mind. The squat shaped bowl is small and with 14 patches, that’s a lot of briar real estate impacted. My hope is to blend the patches as much as possible – a total disappearance of the patches is not possible, at least in my experience. The finish is a mahogany hue.
There are two approaches that I have in my tool box. If I use the more permanent and stronger patch, CA glue mixed with briar dust making briar putty, these patches will not go anywhere. However, the finished patch is always dark brown and will not absorb dye. The result is that the finish has to always go dark to blend the dark brown patches. Briar Putty patches are also shiny compared to the natural wood texture. Another approach is to use a water-soluble filler. I have used a water-soluble filler called Durham’s ‘Rock Hard Water Putty’, and my overall experience has not been good. This patch material can absorb a die, but it tends to erode during the restoration process. Wet dissolves it and sanding erodes it…. I would love to discover a 3rd option in approaching patches – an approach which has both the strength of Briar Putty and the capability of absorbing dye. I decide to give Durham’s another go with a few caveats in my mind based upon previous (not so good) experience: – Do not use moisture in sanding. – Sand lightly on the patches. – Apply only a thin coat of dye. Here we go. Mixing the Water Putty is easy. A small amount of water is placed in the plastic holder and small amounts of the powder is added while mixing. The directions say about a 3 parts water to 1 part powder is the goal.
 While adding and mixing, when the putty starts to thicken, about the consistency of molasses, a small amount is troweled to the pit that needs a fill.
 The mixture is pressed into the pits with the dental tool. The patches take some time but all 14 are filled. While the putty is still soft, the excess is wiped off as much as possible. All the white patches set against the mahogany backdrop isn’t pretty – Pandora??
 With the earlier caveats in mind, micromesh sanding pads are used to sand the entire stummel and to smooth the patches. Normally, between each pad, a moistened cloth wipes the stummel to clear away the dust and to give the pads traction. To protect the new patches, no moistening is done between each pad. The pads are dry and when sanding over a patch, easy does it!
 Next in the process is to apply dye to the stummel. I’m anxious to see how well the patches absorb the mahogany hue and if they hold up with the moistening from the application of the dye itself? First, the stummel is warmed with the hot air gun to open the grain to the dye pigment.
 Next, a pipe cleaner is used to apply the dye to the stummel. Normally, the aniline dye would be applied liberally and flamed, but to protect the patches, the stummel is given a simple dye wash. The pipe cleaner is as dry as possible and still spread dye. From the first perspective, the patches are seen very easily. Ugh, I had hoped for more initial blending from dye absorption.
 The newly dyed stummel is set aside for several hours to allow the dye to settle in. To remove excess dye, a cotton cloth buffing wheel is used to apply Blue Diamond compound to the stummel. With the rotary tool set to about 40% full power, my normal running speed, the compound is applied.
 The non-marred briar on this petite Prince bowl is quite beautiful. So much attention has been given to the patches, the briar backdrop has not come into focus. As the compound is applied, the excess dried dye is removed. The patches are avoided in toto.
 After the compound is applied, a cotton pad with alcohol is used to wipe the stummel to remove excess dye and to blend the new dye.
 The patches are still quite visible. I begin to try to blend the lighter patches, using a mahogany dye stick, but something else comes into view that stops the process.
 Disappointing to say the least, the reflection shows that the patches have eroded as well. Ugh. I’m committed to figuring this out…
 Each fill, except for a few, are dug out again. For the sake of brevity, only a few are shown.
 Again, the Water Putty is mixed and applied. What is different this time is that the stummel has already received the dye. I’ll address each patch individually without having to apply dye again to the entire stummel.
 The excess Water Putty is removed by applying micromesh pads. What I figured out is that with the first, most abrasive pad, 1500 grade, a drop of water is applied to the pad and spread with my finger. The slightly moistened pad is able to clear away the excess without eroding the patch itself. Each patch is sanded with all 9 micromesh pads starting with 1500 (slightly moistened) through 12000 (the rest dry). The following pictures give an idea of the early stages of clearing the excess. It’s not pretty.
 With the pits patched for a second time, to darken the patches a combination of dye sticks are used. I played around with it until it seemed to get the best results I could muster – two shades called mahogany and black dye sticks are used.
 At the end of the day, this Prince puppy still has patches that can be seen, and I have to fight my OCD perfectionism to say, enough is enough! But I wanted to use the water-soluble filler and see where it goes. One idea came to mind for next time – mix a small amount of dye into the Water Putty…. I’m still searching for a better way to patch.
 The plastic stem has been waiting. The stem has almost no issues except for minuscule marks which can be picked up in the reflection in the picture.
 The stem bypasses any sanding and will receive an application of Blue Diamond Compound. The stem and stummel are reunited and Blue Diamond is applied to the pipe. The compound avoids going over the patches on the stummel.
 The compound dust is then wiped away using a felt cloth in preparation for receiving the wax.
 Next, another cotton cloth buffing wheel is mounted onto the rotary tool set at the same speed, and carnauba wax is applied to the pipe. After this is done, the pipe is given a rigorous hand buffing with a microfiber cloth to remove excess wax and to raise the shine.
 Pandora’s Pipe was the image that came to mind when I began to work on this pipe. The patches have been minimized in their appearance, but this Mastercraft Custom Made Prince from Italy will carry them forward bearing witness to a pipe that would have been passed by, serves again. The lines of the Prince shape and the size of the bowl work together to provide a steward with an enjoyable time. Patches notwithstanding, the briar grain on this pipe is exceptional. A pipe man in Texas, commissioned this pipe, and he will have the first opportunity to claim him from the Pipe Steward Store benefiting the Daughters of Bulgaria – helping women and girls who have been trafficked and sexually exploited. Thanks for joining me!


Pingback: Bringing a KBB 1940s-1955 Yello-Bole Filter Brush Panel back to life – The Pipe Steward