I’m glad to be back at the worktable after a hiatus where my wife and I traveled from Colorado to the eastern side of the US. We traveled for 2 months putting 7546 miles on the car while pulling our small travel trailer. The primary purpose of our journey was to visit churches which have supported our service in Europe over the last 30 years and to generate support for helping churches in Ukraine during these difficult times. A wonderful by-product of our travels was also to enjoy the beautiful change of fall colors in the Northeast traveling through New York, Vermont and New Hampshire. Here is a picture of one of our stopovers on the western shore of the Chesapeake Bay. It was great traveling, but I’m glad to be back at the worktable continuing to work on the Yello-Bole that a Texas pipe man commissioned. I appreciate his patience and all those who have pipes in the queue!
The Yello-Bole came to me from a friend and fellow pipe man David Shain. ‘Shainy’ and I first met when we served together in Ukraine back in the 1990s and our paths have crossed here and there over the years. Shainy also got the ‘pipe and tobacco’ bug along the way and has become a well-known and respected contributor to the pipe community. Dave is known in the pipe community through his website, https://thepipery.com/ where he has come up with a great invention helpful to pipe men who are looking for a better and more efficient way to carry tobacco – The Pocket Jar that can be purchased at his website. Shainy is also well known and recognized for his support to our men and women in service which he named the ‘Free Pipe Project’. Just recently I saw a post on social media of another box that Shainy had packed from folks who had donated pipes and tins of tobacco heading overseas to the men and women of our armed forces. For any who would like to contribute to the Free Pipe Project, click on the link above.
 Dave’s generosity has also extended to the Pipe Steward when he gave me several pipes on my visit to northern Georgia some years back. It was a great time of reconnecting and catching up on life and family. I found out on that visit that Dave had been given in 2017 the Master of Pipes award from the Chicago Pipe Collectors Club for his charitable works through The Free Pipe Project.
 Some of the pipes Dave gave to me have already benefited the Daughters of Bulgaria after they were commissioned from the For “Pipe Dreamers” ONLY! online collection. The Yello-Bole Panel now on the worktable is the third pipe down in the picture below. Thanks again, Dave, for these pipes to help the Daughters of Bulgaria and for your pursuits with the Free Pipe Project.
 An anonymous pipe man in Texas commissioned the Yello-Bole along with a Mastercraft Custom Made Prince that turned out pretty well in spite of a bunch of challenges (See: Resuscitating a Mastercraft Custom Made Italy Prince (aka: ‘Pandora’s Pipe’).
 Here are the pictures of the KBB Yello-Bole with a cardboard backdrop when I first got them from Dave.


 The 9mm filter casing stem shows the original yellow circle dot logo above. Below, the stamping on the left side of the shank begins with the clover leaf with the letters KBB encased. To the right of this is stamped FILTER BRUSH [over] BY [over] YELLO-BOLE [over] IMPORTED BRIAR. To the right of the Yello-Bole stamping is the registered trademark.
 I enjoy refreshing my mind on the history of vintage pipes. Pipedia’s history of the Kaufman Bros. and Bondy (KB&B) company provides a good history to better appreciate the pipe on the worktable and the old ads give the right ambiance:
 In 1932 Kaufmann Bros. & Bondy (KB&B), est. 1851, expanded their program consisting of KB&B pipes, Reiss-Premier and Kaywoodie as the mainstay brand by introducing the Yello-Bole line. Yello-Bole was designed as an outlet for lower grade briar not used in Kaywoodie production. At that time KB&B produced their brands in Union City and in West New York, both New Jersey. Deviating from that, Yello-Boles were manufactured by The New England Briar Pipe Company in Penacook, New Hampshire to use this KB&B subsidiary to capacity.
As briar was hardly had during World War II, the KB&B Company embarked on a project of domestically grown briar wood, called Mission Briar or manzanita early in 1941. The Pacific Briarwood Company, a subsidiary founded for this purpose, began harvesting the burls growing on the slopes of the Santa Cruz Mountains of California. Though this wood is botanically the same as briar form the Mediterranean countries, the smoking characteristics were not quite as good, and the project was abandoned after the war.
Was it for that reason? Advertising from the 1940’s pictures the Yello-Bole “Honey Girl”, who gently urges the pipe smoker to smoke the pipe with “a little honey in every bowl.” In fact, honey was an ingredient of the material used to coat the inside of the bowl. It was said to provide a faster, sweeter break-in of the pipe.
In 1952, 101 years after the Kaufmann brothers had opened a small pipe shop in the Bowery section of New York City, Kaufmann Bros. & Bondy Company with all subsidiaries was purchased by an unknown company strange to pipe industry. (At least, the new owner was economical because the KB&B managers had to leave their luxurious bureaus on 630 Fifth Avenue, New York – the Rockefeller Center – for new rooms in the factory on 6400 Broadway, West New York.) This interlude ended after only 3 years in March of 1955, when S.M. Frank & Co. Inc. bought Kaufmann Bros. & Bondy, The Kaywoodie Company, Reiss-Premier Corp., The New England Briar Pipe Co. and – of course – Yello-Bole.
From the time of S.M. Frank’s purchase in 1955 until 1972 Yello-Bole was run as a separate company, as a division of the parent. Through this period, Yello-Bole, same as Kaywoodie, had its own officers, sales force and maintained the production facilities in West New York. These 17 years were probably the most glorious years in Yello-Bole’s history.
____________________________________________
From the article, KBB’s motivation behind the creation of the Yello-Bole brand (standing alongside of their primary brands, Reiss-Premier and Kaywoodie) was to provide an outlet for lower grade briar not used in Kaywoodie production. Yello-Boles were made of briar blocks that Kaywoodie passed on.
The Pipedia Yello-Bole article also provided a very helpful guide for narrowing the dating of a Yello-Bole pipe. The bullets represent the ‘Tips’ and my comment follows:
Tips for Dating Yello-Bole Pipes
- KBB stamped in the clover leaf indicates it was made in 1955 or earlier as they stopped this stamping after being acquired by M. Frank.
- Pipes from 1933-1936 they were stamped “Honey Cured Briar”
- Post 1936 pipes were stamped “Cured with Real Honey”
- Pipe stems stamped with the propeller logo were made in the 1930’s or 1940’s – no propellers were used after the 1940’s.
- Yello Bole used a 4-digit code stamped on the pipe in the 1930’s.
- Pipes with the Yello-Bole circle stamped on the shank were made in the 1930’s, this stopped after 1939.
- Pipes stamped BRUYERE rather than BRIAR it was made in the 1930’s.
From these tips in bold above, we can assume that the Yello-Bole on the table was made in 1955 or earlier with the KBB clover leaf stamping. The other possible indicator is the stamping with BRIAR rather than with BRUYERE which indicated production in the 1930’s. This could bracket our pipe from 1940s to 1955. Of interest is the absence of “Cured with Real Honey” stamping on our Yello-Bole, but with the addition of “FILTER BRUSH” stamping.
I searched high and low for information regarding the “FILTER BRUSH” and I found nothing in the regular places I search – Pipedia and Pipephil.eu. I did find threads in PipesMagazine.com forums where others were also trying to find some information about the FILTER BRUSH. One thread in particular dated March of 2016 (LINK) was helpful. Responding to the question about Filter Brush information, ‘beefeater33’ responded:
The filter brush was a rather uncommon model, not rare, but you don’t see them much. It actually had a brush in the stem when it was new, but most you see now the brush is long gone………
Here’s an old Worthpoint listing that shows one with the brush intact. Also some good info on the model, but I’m not sure how accurate it is….. http://www.worthpoint.com/worthopedia/unsmoked-kbb-yello-bole-filter-brush-dublin-clean
I followed the link to find pictures of an ‘Unsmoked KBB Yello-Bole Filter Brush Dublin’. Being ‘unsmoked’ shape was remarkable as I had seen other pictures of Filter Brush Yello-Boles in searches that weren’t in great shape. This ad also included pictures of the brush.
 The seller of this Yello-Bole dated it from between 1938 and 1950. He didn’t say how he came to this bracketing.
My guess is that the KB&B did a promotional line  for a time, I don’t know how long, where they included a brush with the pipe. One thought came to mind about this. The dating of this pipe would be concurrent with WW II when pipe production could have been leveraged toward deployed soldier’s need of having a cleaning tool. This is only a guess, but one of the ads in Pipedia (Ad, courtesy Doug Valitchka) might suggest that association might be a good possibility.
Unfortunately, like most of the Filter Brush Yello-Boles still out there, we have no brush. With a better understanding and appreciation of the classic 1940s/55 KBB Yello-Bole on the worktable, it’s time to take a closer look.
The bones of the Yello-Bole are good. The chamber has some cake buildup, and this will be removed to give the briar a fresh start and to look for the health of the briar. The rim is also covered with lava. The bowl surface is finished with lacquer which will be removed to get down to the natural briar. There are a few areas on the bowl that may need more work, but this decision will wait till after a cleaning.
 The stem has no oxidation and may point to a sheltered life in a drawer or down in the basement. There is tooth chatter on the bit which needs to be addressed.
 The metal filter casing ring appears to be scratched, but perhaps it’s only grime. Sanding or cleaning should be able to clean this up.
 Starting with basic cleaning, the stem’s airway is cleaned with pipe cleaners and isopropyl 99%. The cleaning expands using a small dental probe to excavate gunk out of the filter casing.
 This was followed by cleaning with a cotton bud and isopropyl 99% alcohol.
 Discoloration can still be seen on the metal surface in the internal cavity. To clean this an alcohol-moistened wad of steel wool is stuffed down the filter casing and then rotated.
 This picture shows the nice results.
 The external metal tenon and ring are also scrubbed with the steel wool (0000). The dental spoon helps to clear the grime around the base of the tenon.
 The internals of the stem and filter casing are clean and time to move on.
 Moving now to the stummel, the chamber shows some cake build up.
 The cake is reamed by using the smallest Pipnet blade head. This is followed by scraping the chamber with the Savinelli Fitsall Tool. The final remnants of carbon are removed by sanding with 220 paper wrapped around a Sharpie Pen.
 The chamber looks good and remnants of the ‘Yello’ bole can be seen.
 Moving next to cleaning the external briar, a few pictures (including the rim above) are taken to mark the starting point.
 It’s interesting to see the varnish finish deteriorating. This blemish may only be superficial and not a major problem with the briar beneath. We’ll see.
 Cleaning starts with undiluted Murphy’s Oil Soap scrubbing with cotton pads.
 Murphy’s Soap begins to break up the crusted lava over the rim. The Savinelli Fitsall Tool does a good job scraping the remaining crust without damaging the briar.
 A brass wired brush follows up cleaning on the rim. Brass wire is gentler on the briar while adding more muscle.
 After the scrubbing, the stummel is taken to the sink and the internals are scrubbed with hot water using shank brushes and liquid anti-oil dishwashing soap. Afterwards, the stummel is thoroughly rinsed and returns to the worktable.
 The cleaning continues on the internals with cotton buds and isopropyl 99% alcohol. A small dental spoon helps the cleaning by scraping the mortise walls and excavating tar and oils. The more that is excavated in this manner, the likelihood of saving a lot of cotton buds.
 The buds begin to emerge lighter, and the cleaning is brought to a halt.
 With the stummel external cleaning completed, I take a closer look at the briar surface. The varnish finish is obvious now with shiny patches revealing the vestiges hanging on.
 The largest issue appears to be this blemish just below the rim on the left side panel. There appears to be old fill material in the pit which will need to be removed and cleaned.
 This is the blemish on the front right panel that I referenced earlier. The area now shows a darkened spot which should be mitigated with sanding and polishing.
 The rim also shows some char stains on the inner rim edge and surprisingly on the outer edge.
 The rim is in rough shape with charring stains as well as a plethora of nicks on the rim surface and edges.
 To begin the stummel restoration, the old filler material on the left panel is dug out using a sharp dental probe. It leaves behind a large pit.
 Before patching the pit, acetone is used to remove the remnants of old ‘candy apple’ varnish on the briar surface.
 A cotton pad is used along with the light touch of 0000 grade steel wool moistened with acetone. Care is given to have a light touch over the nomenclature to clean off the old finish. The results look good. The shiny spots are gone with an even exposure of natural wood.
 Now the pit will be addressed. The pit will be filled with briar putty – a mixture of regular CA glue and briar dust. After placing scotch tape over the plastic mixing disk to help with clean up, a small amount of briar dust is placed next to a small amount of CA glue.
 The dust is slowly drawn and mixed into the CA with a toothpick. As more dust is mixed in, the putty thickens. When the viscosity reaches the thickness of molasses, the putty is troweled to the pit.
 The stummel is put aside to allow the patch to thoroughly cure.
 While the stummel is on the sideline, attention turns to the stem. There is tooth chatter on the upper and lower sides of the bit.
 To remove the light chatter and small nicks on the stem, 470 grade paper is used.
 The 470 grade paper is followed by wet sanding with 600 grade paper.
 Next, the full set of 9 micromesh pads are used starting with wet sanding using pads 1500 to 2400. This is followed by dry sanding with pads 3200 to 4000 and 6000 to 12000. Between each set of 3 pads, Obsidian Oil is applied to the stem to condition and to protect the stem from oxidation. I’m pleased with the way the stem cleaned up and now has that nice pop.
 With the stem finished with the basic sanding, the stummel is ready to continue after the patch has fully cured. Using needle files, the patch mound is filed down to the briar surface. This is then followed by sanding with 220 then 600 grade papers.
 Next, the rim needs to be cleaned up and the lines refreshed.
 To do this the stummel is topped starting with 220 paper. With the stummel inverted on the paper, it is then rotated in a circular motion.
 After several rotations, the major scratches have been erased and the rim lines refreshed.
 The 220 paper is replaced by the finer 320 paper and the stummel is again rotated. Then 600 grade paper is used for the finishing touches.
 The rim surface looks good, but there remains a dark charring ring around the interior rim edge.
 To address this, a wooden sphere is used to create what a call a ‘smart’ bevel. While pinching a strip of 220 paper around the sphere, the sphere is rotated in the mouth of the chamber. The hard wooden surface pressing the paper sands a nice bevel and helps to remove the dark briar.
 The same process is done with a strip of 600 paper and the results are nice. The rim looks good.
 Next, to remove fine scratches and nicks on the outer rim edge, sanding sponges are used. Light and fine sponges are used which are not majorly invasive providing just enough grit to clean up the briar.
 After the sanding sponges, the stummel is sanded with micromesh pads. Starting with pads 1500 to 2400, then 3200 to 4000 and finishing with pads 6000 to 12000. Between each pad the stummel is wiped with a damp cotton cloth to remove the briar dust and to provide traction for the next pad. I enjoy watching the grain emerge during each cycle. The grain is nice, and the patch will be the badge of honor as this elder Yello-Bole moves on to his new steward.
 To condition the briar and to bring out the natural hues, Mark Hoover’s Before & After Restoration Balm is what I use. After putting a small amount of the Balm on the fingers, the Balm is worked into the briar thoroughly. The stummel then sits for 15 minutes or so to all the briar to absorb the Balm.
 After the time has passed, I use a dedicated microfiber cloth to wipe/buff off the excess Balm. The dedicated microfiber cloth is then used to give other pipes in my personal collection a quick conditioning. It works great.
 After rejoining stem and stummel, Blue Diamond compound is applied to the pipe using a dedicated cotton cloth buffing wheel on the rotary tool at about 40% full power.
 After changing the wheel dedicated to Blue Diamond on metals, the metal tenon and ring base are buffed up as well.
 To remove the compound dust that accumulates on the surface, a felt cloth is used to wipe off the dust in anticipation of application of the wax.
 Next, with another dedicated cotton cloth wheel mounted on the rotary tool, carnauba wax is applied to the stem and stummel at the same speed. After the application of the wax the pipe is given a hearty hand buffing with a microfiber cloth to remove excess wax and to raise the shine.
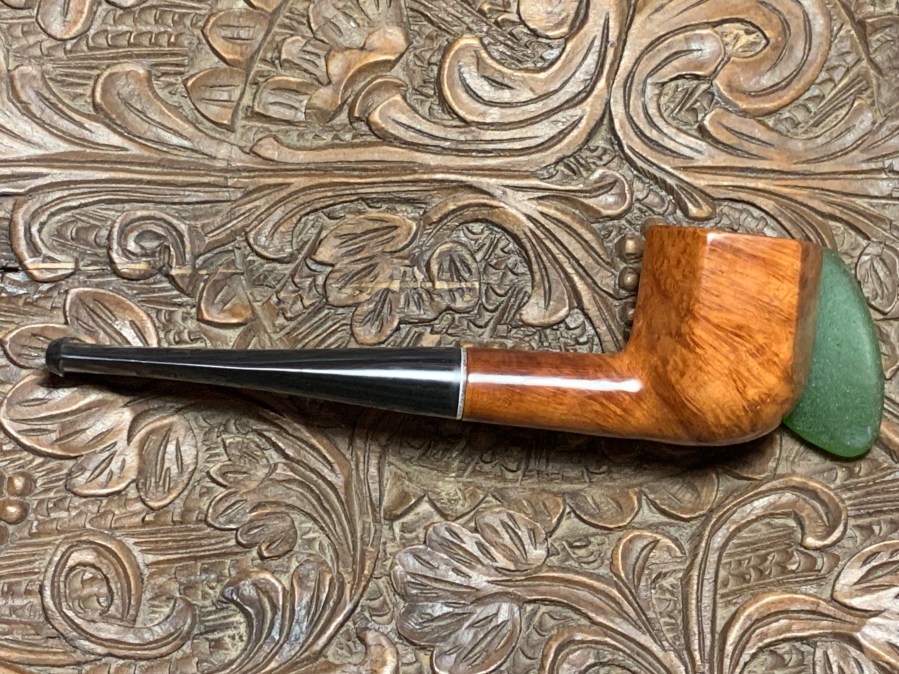
 This 40s to 1955 vintage KBB Yello-Bole Filter Brush Panel came out nicely. The grain is now visible and quite expressive. The Panel shape is attractive and provides a nice presentation of briar grain. The patch on the left side panel is visible and will continue to be his badge of honor for the years he has. The Texas pipe man commissioned this pipe and will have the first opportunity to claim the Yello-Bole from the Pipe Steward Store benefitting the Daughters of Bulgaria. Thanks for joining me!


