The Medico now on the table came to me from a friend and fellow pipe man Dave Shain. ‘Shainy’ and I first met when we served together in Ukraine back in the 1990s/early 2000s. Shainy has become a well-known and respected contributor to the pipe community and is known through his website, https://thepipery.com where he has come up with a great invention helpful to pipe men who are looking for a better and more efficient way to carry tobacco – The Pocket Jar that can be purchased at his website. Shainy is also well known and recognized for his support to our men and women in service which he calls the ‘Free Pipe Project’ where he sends donated pipes and tobacco to our men and women in the armed forces. On a visit to Dave in 2018 in Georgia, Dave gave me a collection of pipes that have already benefited the Daughters of Bulgaria after they were commissioned from the For “Pipe Dreamers” ONLY! online collection. The picture below shows the pipes Dave donated and the Medico now on the worktable is marked. Thanks again, Dave, for these pipes to help the Daughters of Bulgaria and for your pursuits with the Free Pipe Project.
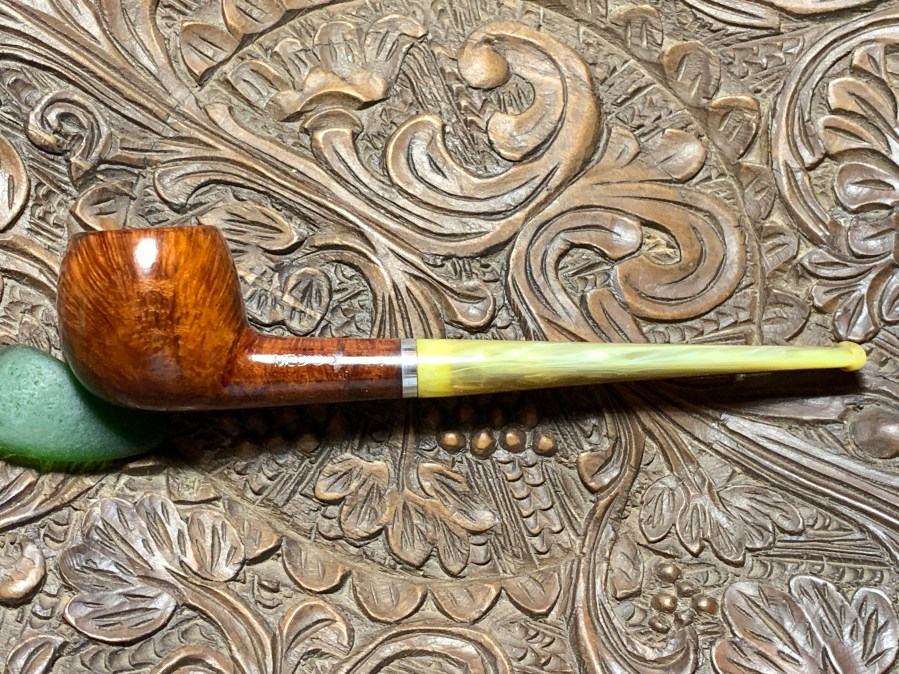
 This Medico is the second pipe that pipe man Darren, from Landenberg, Pennsylvania, has commissioned as a Christmas present under some fortunate pipe man or woman’s Christmas tree. Here is the Medico that got Darren’s attention.

 The nomenclature is stamped on the left side of the shank: MEDICO [over] IMPORTED BRIAR. The stem is stamped with an ‘F’ on the topside.
 There are Medico enthusiasts out there who collect these pipes and the Medico name perhaps is associated with being the consummate ‘Drug Store Pipe’ back in the day. Pipephil’s (LINK) uber short description of Medico is: “Medico is a brand of S. M. Frank & Co.” At the bottom of the myriad of Medico listings on Pipephil, a panel called, ‘No-name models’ seems to fit the bill. The stamping is simply ‘Medico’ and ‘IMPORTED BRIAR’. There is also an ‘F’ stamped on the top of the stem. However, our Medico No-name has no registered trademark “R”.
 Pipedia adds some additional information about the name (LINK) from Pipes, Artisans and Trademarks, by Jose’ Manuel Lopes:
Medico was created in 1933 and is still produced by S.M. Frank. The brand is famous for its pipe filters, which were launched in the same year. Since 1966, some models have been made in Brylon, a synthetic material, and others in briar. The brand was also sold by the English company Cadogan and Oppenheimer Pipe.
The history of Medico continues in the Pipedia article from TobaccoPipes.com:
When you trace the Medico tobacco pipes history, you have to trace it back to the origins of the company that created it. The company that originated the Medico brand is the S.M. Frank & Co. This company dates back to the year 1900. In that year, a man named Sam Frank began selling pipes and related tobacco products. Eventually, the company began making its own line of pipes. With the help of an experienced pipe manufacturer, Ferdinand Feuerbach, the company produced the popular Royal DeMuth and Hesson Guard Milano tobacco pipes. The company continued to grow well into the early part of the 1930s.
By the early 1930s, there were some concerns about the tars and nicotine found in tobacco smoke. In order to mellow out the flavor of hot tobacco smoke as well as to capture the tars and nicotine, the S.M. Frank & Co. introduced the Medico pipe filter. This is an absorbent paper filter that many people still use to this day. In order to accommodate the new filter, the company developed an accompanying brand of pipes known as Medico. That line of pipes continues in production today.
The interesting thing about Medico pipes from the information above is that the pipe was developed to be subservient to the filter! Every ad promoting Medico pipes in the Pipedia article also promotes the filter. I was interested to view the 1933 and 1934 patent information for the Medico filtering system. The predominant characteristic of the Medico pipe is the filter cavity is in the length of the stem.
 When I separated the stem and stummel of the Medico on the worktable, I was given an educational surprise when I found a filter (used) still inserted into the stem. The filter is quite long. The ruler’s measure is 2 ¼ inches.
 After looking down at the barrel of the stem, I can guess that a new steward would want to get some new filters or an air restrictor because the stem is wide open inside with the room accommodating the filter.
 The stem has also been an interesting adventure. I had originally called an acrylic stem because of the marbling in the stem’s coloring. Yet, it’s not quite acrylic because it’s not hard. The stem has a plastic look and feel to it, but not quite plastic. To try to figure out the material, I searched Pipesmagazine.com forums and discovered threads talking about Medico ‘nylon’ stems. On a thread, ‘ejames’ commented that nylon was used by Medico from the early/mid 1950s but did not know for how long. On another thread, ‘ejames’ described best practices for cleaning nylon stems. He said to use straight soap and water because alcohol can cause the material to soften and one’s fingerprint could be left on the surface. I will take this into consideration in the cleaning process!
One more mystery associated with the stem. The upper side of the stem is stamped with ‘F’. I have found no information about what this refers to – perhaps ‘F’ilter? I decided to send a note to Steve in Vancouver to see if he could help me with two questions: What material is this Medico made of – nylon? The second question was if he had any knowledge of the ‘F’ stamping on the stem. With Steve’s extensive Rebornpipes.com wealth of information, he was able to confirm that it is a nylon stem. The answer to the second question, however, was very helpful to understanding better of this ‘No-name’ Medico.
Steve sent two Rebornpipes posts which she light on the ‘F’ stamp. The bottom line is that the “F” stamp refers to the founder of Medico in 1933, S.M. Frank. The early Medico pipes were made by ‘F’rank. The first article was an excellent post by Anthony Cook (Midterm Exam #1: Repairing a Cracked Bowl on a Pre-1956 Medico Billiard | rebornpipes). Anthony’s brief comment about the Medico on his worktable was helpful to bracket the dating of the ‘Frank’ pipe: It’s an unnamed Medico billiard. The stamping on the shank reads simply “MEDICO” over “IMPORTED BRIAR” and the stem bears the “F” stamp found on some older Medicos. I learned from Dave Whitney, author of Old Briar, that the “F” stamp was probably discontinued in 1955, which gave me some idea of the pipe’s age.
The second article Steve sent had posted by him. (Frank Medico Imported Briar pipes | rebornpipes). I include what Steve wrote:
I decided to look on the normal sites to see what I could find out about this line. I to Pipephil’s website and found some information on the Frank Pipe Company with a white F logo (http://www.pipephil.eu/logos/en/logo-f4.html). The FRANK stamp is identical to the one that I am working on. I turned then to the second on the Medico Pipe line to see if there was any information on a pipe that was stamped like the one I was working on and sure enough found one. It is stamped the same as the one I am working on (http://www.pipephil.eu/logos/en/logo-medico.html). I did a screen capture of the Patent section. The Patent Number is the same on the second line. The logo on the stem is the same as the pipe I am working on.
 Steve’s Medico had more nomenclature information (Medico line and Patent No.) than the Medico on the worktable, but the key is the ‘F’ stamp that ties these different pipes together as being produced in the early Frank period, dating ‘F’ pipes from the 1930s (probably after 1934 the date of the Patent) to 1955, when the ‘F’/Frank stamp stopped being used.
With a better appreciation for the venerable ‘Frank’ Medico on the worktable, I take a closer look at the issues I see. The chamber has light cake which will be cleared. The rim has darkened with lava flow and what appears to be lighting practices. The rim surface is also uneven with divots.
The stummel has a number of dark spots. I’m not sure if it’s simply grime or if there are heating issues going on – or a combination of both? There are also some old fills that blend pretty well now but may become an issue through the cleaning process.
 The nylon stem has tooth chatter which will need to be addressed along with some staining in the airway.
 For this restoration, I’m starting with the stummel because the issues are more significant and may take more time. First, starting with reaming the chamber, a fresh picture is taken to mark the progress. It’s difficult to take a picture in the dark abyss!
 It takes very little time to clear the light cake. Only the smallest blade head was used from the Pipnet Reaming Kit. This is followed by scraping the wall with the Savinelli Fitsall Tool and the chamber cleaning concludes with sanding it with 220 paper wrapped around a Sharpie Pen.
 A quick inspection of the chamber reveals healthy briar and no indication I see of heating issues.
 Next, the external briar is cleaned using undiluted Murphy’s Oil Soap and a cotton pad. I’m anxious to see if the dark spots will clean off.
 The brass brush comes in handy for scrubbing the dark rim as well as the dark spots on the stummel.
 After the scrubbing, the pipe is taken to the sink where hot water along with liquid anti-oil dishwashing soap scrubs the internals with shank brushes. After the pipe is thoroughly rinsed it comes back to the worktable.
 The cleaning continues with the internals using isopropyl 99% alcohol with pipe cleaners and cotton buds. The internals were surprisingly clean and when the buds started emerging lighter, time to move on.
 The result of the cleaning is good. The contours of the rim are now visible. The stummel will need to be topped to smooth the rim and the inner rim edge will need sanding to remove all the dents.
 A lot of the finish was removed by the cleaning. The good news is the dark spots were grime discolorations and the brass brush helped to remove them.
 To remove the rest of the old finish, acetone is used with cotton pads. The acetone does a good job.
 Looking at the old fills on the briar surface, I’m hoping to salvage all the fills because they blend well. One fill though, has a small puncture that will need to be addressed. Another fill on the heel of the stummel has a small gap.
 Since the cavities are so small, I will attempt to repair the fills with a water soluable fill material and then touch them up later. Before doing this, first the rim will be addressed by topping it. The next two pictures show the starting place in the topping process to mark the progress.
 With 220 paper on the chopping board, the stummel is inverted and rotated over the surface several times.
 The first stop to take a look at the progress shows clearly the divots on the inner rim edge. More rotations follow.
 After a number of rotation cycles and inspections, the topping with the more abrasive 220 paper ceases. There are still significant divots in the inner rim edge visible and a few smaller ones on the outer edge.
 Next, the 220 paper is exchanged for 600 grade paper and several more rotations follow. The rim is looking good except for the inner edge divots.
 To address this a smart bevel will be introduced using a strip of 220 paper wrapped around a wooden sphere. The picture below shows the concept. With the paper wrapped around the sphere, the sphere is rotated within the mouth of the chamber. This produces a more uniform bevel.
 After applying the sanding sphere, a couple divots are still evident.
 These divots are sanded directly to smooth and blend using 220 paper wrapped around the Sharpie Pen. The Pen provides leverage during sanding.
 The results are good. The rim is much improved.
 Using the sphere again, 600 grade paper is next used to smooth out the bevel more. The full set of tools to clean and reshape a nice-looking rim.
 Next, to repair the minor holes in the fills, a natural wood filler is used. The purpose is simply to fill the miniscule gaps.
 Next, to clean the stummel surface and address the myriad of small scratches, sanding sponges are used. Sanding starts with a coarse pad, then medium, then light and finishing with fine. Sanding sponges do a good job without being as invasive as sandpaper.
 To blend the fills on the surface and to create a more uniform look, Fiebing’s Tan Leather Dye will be applied. Before starting, the metal band is covered with tape to protect it.
 The stummel is then heated with a hot air gun. This heats the grain and expands it helping it to be more receptive to the dye pigment.
 To apply the dye, a folded pipe cleaner acts as an applicator. Sections of the stummel are painted and then flamed with the lit candle. The dye is an aniline dye and when the wet dye meets the flame, the alcohol combusts and leaves the pigment behind. This paint and flame process goes on until the stummel is thoroughly covered.
 The newly dyed stummel is then put aside for several hours to allow the dye to settle in.
 With the stummel on the side, work begins on the stem with cleaning the airway. Taking the advice from ‘ejames’ from the Pipesmagazine.com forum, cleaning a nylon stem is better done with straight soap and water and avoiding alcohol. After the cleaning, it is brought back to the table. The stain that was noticed before might clean up.
 The first attempt to clear away the staining is to twist bristled pipe cleaners moistened with isopropyl 99% alcohol – the advice from PipesMagazine.com was abandoned to try to address the staining. The dental spoon also was scraped in the wide airway filter cavity. As the picture shows, grime was removed from the airway by hand turning a drill bit, but the stain remained.
 To create more abrasion in the cleaning process, 3 bristled pipe cleaners are twisted and mounted on the hand drill. After moistening the compilation of pipe cleaners with isopropyl 99%, the hand drill is carefully powered up for slow rotations while the pipe cleaners work up into the airway. The rotating goes on for a while but there is no improvement in the dark pigmentation.
 Next, a longer drill bit about the size of the airway is hand turned to draw it into the airway. This usually helps to excavate tar and oils off the airway surface. After retraction, there was a small amount of crud removed but there is no improvement to the coloration.
 With Perspex stems, alcohol is never used because it can cause spidering lines in the clear stem. The alternative to cleaning with alcohol is using God’s natural acidic solution: lemon juice. My wife had some lemon juice in the fridge, so I gave it a shot. I started with pipe cleaners. The picture below shows one, but I ended up coiling 3 in the end to put more friction in the airway. Cotton buds were also used to reach into the top of the stem to scrub with the lemon juice. After this use of lemon juice there was no improvement in the coloration though, by this time, the airway is undoubtedly the cleanest stem west of the Mississippi River.
 Moving away from the natural lemon juice, I decided to try big guns. Oxi products have stain removing qualities and I started very conservatively at first. Using a cotton bud, some Oxi was placed on the bud and scrubbed only the nearside of the airway at the shank-side of the stem. This is the long filter cavity so there is a good bit of room. My test scrubbing with the cotton bud showed no adverse effects, so the cleaning was expanded with the cotton bud reaching further into the airway.
 The Oxi clean was again expanded using coiled pipe cleaners carefully powered by the hand drill. The paper towel in the picture is to keep any of the fluid leaking out onto the surface of the nylon stem. After using Oxi, I thought that perhaps the top of the airway, in the wider filter cavity, could possibly be lightening up somewhat because it was easier to access and scrub. However, in the end I think I was hoping it was better!
 The last suggestion came from Steve. He recommended trying Comet – my wife had AJAX. These products have an abrasive component along with the beach-based soap. With some water in a dish, Ajax was sprinkled onto the cotton bud after wetting it in the water. As with the Oxi, I started conservatively scrubbing the top side of the airway (as shown in the picture below). The Ajax cleaning expanded to using pipe cleaners and coiled in the same way as earlier.
 After each application of cleaners, the stem was thoroughly rinsed with cool water and clean pipe cleaners rub through. The stem is clean but if the discoloration has lightened somewhat, it is only negligible. When my wife looked over my shoulder and commented that now the stem looked more like a horn stem to her. Hmmm, at this point, I prefer to look at it that way in a more ‘wow!’ perspective because nothing tried has turned back the hands of time for this stem.
 The bit has been chewed a bit with tooth chatter on the upper and lower sides.
 The years of use has also eroded the button so that there is practically no ‘hang ledge’ left, especially on the upper side.
 Addressing this first, to rebuild the button to create more ‘hang’, regular, clear CA glue is laid over the upper and lower button lip. To hold the button build in place, the CA is sprayed with and accelerator that causes it to cure more rapidly.
 After enough CA has been used, filing to shape the button starts with filing the slot facing with a flat needle file.
 After the slot facing is flat, the button lip is filed to make it smooth and even across the bit.
 Then, to create the ‘hang ledge’, a squared needle file continues to shape the lines of the button.
 The filing on the topside of the button is completed.
 The same procedure was used for the lower button shaping.
 Next, the button and bit are sanded with 220 paper to further smooth and shape the button and to remove the tooth chatter – upper and lower.
 The ‘F’ stem stamp is covered with painters’ tape to protect it from the sanding. Next, the sanding is expanded to the entire stem using 320 grade paper.
 The sanding continues with wet sanding with the finer 600 grade paper.
 The sanding continues into more of the polishing phase using micromesh pads. Starting first with pads 1500 to 2400, the stem is wet sanded. Following this, the stem is dry sanded with pads 3200 to 4000 and 6000 to 12000. To condition the nylon stem, Obsidian Oil is applied between each set of 3 pads The tape is also removed for the last set of pads which are polishing.
 The stem is put to the side and the stummel is brought to the workspace. It sat through the night allowing the new dye to settle in. Next, to ‘unwrap’ the stummel, Brown Tripoli, a more abrasive compound, is applied with a felt buffing wheel mounted to the rotary tool. With the speed set at about 40% full power, the unwrapping begins.
 I show a picture here of the grain being uncovered in contrast to the unwrapped briar.
 After the compound is applied, a felt cloth wipes off the compound dust that accumulates on the surface.
 I really like the hue that the tan dye produces. However, the fills contrast with the hue a little more than I like… ugh.
 I again look again at the pictures of the original pipe as I received it to see if I missed something. Pictures are always a bit subjective, but it’s what we have. As I look at the picture below, I detect a subtle bent toward more of a reddish hue that I didn’t pick up on before.
 Next, I look at the dyes in my inventory to see what might move us in a direction that is reflecting the original in some manner but also camouflaging the fills better. The hue I came up with is Mahogany. We will see if this helps us!
 The process is repeated as before – first the stummel is heated to open the grain to be receptive to the hue.
 Next, the process of painting and flaming continues until the entire stummel is thoroughly covered.
 After this, the stummel is put aside again to rest allowing the new dye to settle in.
 After some hours, the stummel rested. Next, using the cotton cloth buffing wheel dedicated to Brown Tripoli, as before, the stummel is unwrapped from the new topcoat of Mahogany. I like the results. The fills are still visible but the blending is much improved.
 After reuniting the stem and stummel, another cotton cloth wheel dedicated to the application of Blue Diamond compound is mounted onto the rotary tool. With the speed set at about 40% full power, the finer Blue Diamond is applied. At this point, the metal band is avoided because the reaction to the compound on metal turns black and can stain the briar.
 After the application of compound, the pipe is wiped with a felt cloth to remove the compound dust from the surface in preparation for the application of wax.
 Before applying the wax, the metal band and tenon/filter casing will be shined up. A cotton cloth buffing wheel dedicated to applying compounds on metal is mounted with the speed the same. Again, care is given not to over-buff onto the briar to avoid the black stuff getting on the briar.
 After the compound was applied, the felt cloth wipes off and buffs up the metal pieces.
 One final mini project before applying wax. Sometimes breaking a pipe in that has received a new finish, when the stummel is heated dye can leech off the stummel onto the hands. To lower this possibility, the stummel is heated up to emulate the first time the pipe is put into service.
 The stummel is then wiped with a cotton cloth to remove any dye that has leeched. Very little is detected.
 The final step is to apply the wax. After changing the cotton cloth buffing wheel to one dedicated to the application of wax, the pipe receives an application of carnauba wax. After the application of wax, the pipe is given a rigorous hand buffing to remove excess wax and to raise the shine.
 I enjoyed discovering the vintage provenance of this early Medico. The ‘F’/Frank stamp is the hallmark giving this pipe a date between 1934 and 1955. The grain came out in spectacular fashion and the Apple shape is classy. The nylon stem has its own contribution to the ensemble with its faux horn vibe, as my wife describes it. Darren commissioned this Medico ‘F’ Frank Apple and has the first opportunity to claim him from the Pipe Store benefitting the Daughters of Bulgaria – helping women and girls who have been trafficked and sexually exploited. A ‘Before & After’ reminds us how far we’ve come. Thanks for joining me!


Pingback: Christmas Tree Bound: Renewing a Stout French Made Pickwick Arms Bulldog – The Pipe Steward
Pingback: Resuscitating a French-made ‘Pipe’ Dr. Geo DePosee Horn Stem Paneled Bulldog – The Pipe Steward
Prewar Frank Medicos, said Frank above Medico, and had 2 patent numbers on them. So, the one you restored is post war.
LikeLike
Thanks for the information, Eric.
LikeLike