The next pipe came to me in August 2018 as part of what I have called the ‘French Lot of 50’. When my wife and I were still living in Bulgaria, I found a lot of 50 pipes for sale on French eBay from a seller in Paris. What attracted me to place a bid on this lot was all the unique shaped pipes I could see from the seller’s posted pictures. The pipes also included many pipes with horn stems which usually indicate WW2 era vintage pipes because of the shortage of rubber for stems. I made the purchase, and the pipes joined me in Sofia where they were posted in the For “Pipe Dreamers” ONLY! virtual ‘Help me!’ Baskets for pipe men and women to commission. Many of these pipes have already found homes and the Dr. Geo on the worktable will soon be added to that number. Here is the beautiful pile of pipes that got my attention: The Dr. Geo got the attention of Darren, a pipe man from Landenberg, Pennsylvania, who has commissioned many pipes from me in the past. Most of the pipes he commissioned were destined for others as gifts. Of this current batch of 4 commissioned pipes, three are for Christmas gifts which have been completed (Pickwick Arms Bulldog, Kiko Sportsman Meer-lined Leather Clad, Medico ‘F’ Frank Apple):
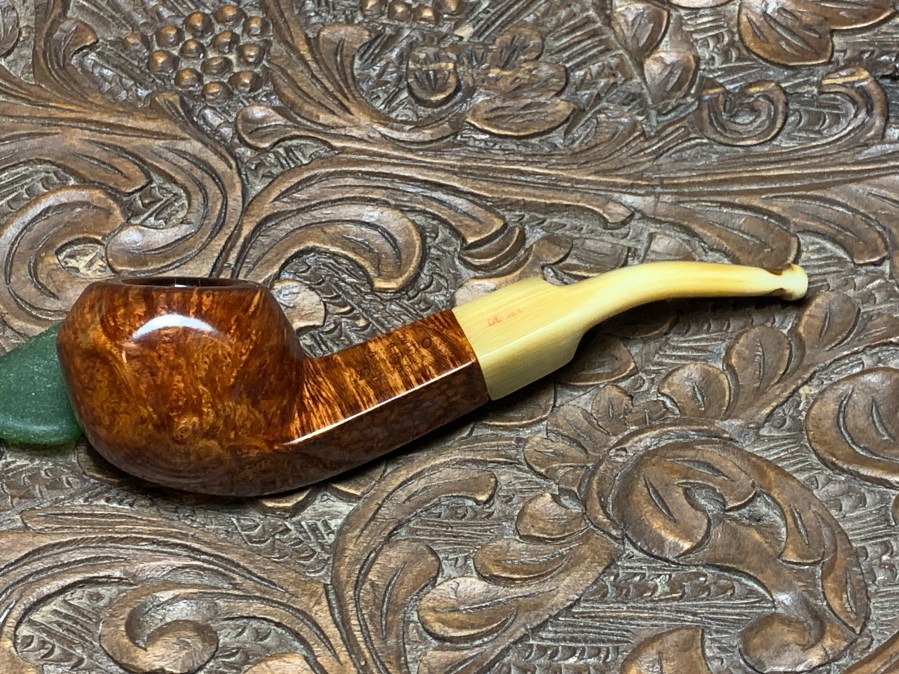
 However, this one of the four is also a gift, but a gift for Darren himself😊! Here are pictures of the Dr. Geo Deposee that Darren commissioned:

 The nomenclature is on the upper left shank panel: PIPE [over] Dr GEO [Dr. is a raised underscored small ‘r’ – over] DEPOSEE. The horn stem has DR GEO stamped in red.
 Pipephil’s panel gave some information confirming that it was of French origins from the Gichard & Cie Company.
 The two examples of the St. Claude made Dr. Geo pipes in the panel provide two different sub-names: DEPOSEE and SYSTEME DEPOSE. To understand the English translation, I used Google Translate and the latter was translated: Registered System. So, the idea with the single, DEPOSEE as is on our pipe is, REGISTERED. Whatever the particular system was, it had some legal recognition.
Pipedia adds some additional information in its list of French made brands. It lists the fact that Dr. Geo was produced in the 1940s by Guichard & Cie, and later sold by M. Marmet Regge, with Ebonite stems. Interesting to me is that my guess is that The Dr. Geo on the table was from the earlier, Guichard ownership with the specific reference to the use of Ebonite stems belonging to the latter. Our Dr. Geo has a horn stem, which most likely places it in the earlier dating period when rubber was in short supply during and post WW2.
In the French Pipe Brands & Makers A – D – Pipedia list Dr. Geo is described in this early period of the 1940s:
Dr. Geo 1940s from Guichard & Cie, and later sold by M. Marmet Regge, Ebonite stems
With a better understanding of the Dr. Geo name, it’s time to take a closer look at the 1940s vintage Dr. Geo. The cake is thick in the chamber. The rim also has thick crusted lava. The upper ‘done’ briar of the Panel shape is darkened from the former steward lighting his blend mainly from over the left side of the bowl.
 The bowl has a lot of grime and a goodly amount of nicks, but I do not see any old fills at this point.
 The horn stem needs TLC in a big way. The stem is grungy, and the bit has been chewed and deep compressions on both the upper and lower. I’m concerned that a pipe cleaner may have some difficulty poking through.
 One other issue I detect is that the stem is too loosely seated in the shank. The metal tenon is snug as it enters the mortise, but when fully seated, it loosens.
 To begin the restoration, the cleaning process begins on the horn stem. I’m anxious to see if a pipe cleaner can go through the airway. Using pipe cleaners and isopropyl 99% alcohol, I go to work. A couple of tries are unsuccessful pressing the pipe cleaners through the airway.
 A sharp dental probe is able to press through and clear out some debris.
 Finally, a pipe cleaner goes through. To clear and clean the air, the pipe cleaner moistened with isopropyl 99% alcohol is used by clamping one end in the table vise and rapidly pushing and pulling the pipe stem.
 The cleaning causes loose debris to come out of the stem. The next few pictures show how mangled the bit is.
 Unsurprisingly, the airway is visible with the dental spoon inserted in the airway.
 The cleaning continues with the stem and many pipe cleaners are expended before lighter cleaners begin to emerge.
 Next the stem is taken to the sink and the horn his washed with warm water and gentle soap – dishwashing liquid. The metal tenon is also cleaned using 0000 steel wool.
 To repair the bit Amber CA glue is used to fill in the canyons – upper and lower.
 First, an airway ‘guard’ is made by tightly wrapping a pipe cleaner with scotch tape. Then Petroleum Jelly is smeared over the tape. The pipe cleaner is inserted into the airway to keep CA glue from leaking into the cavity, which would not be a happy experience. The tape and the jelly are used to help prevent the glue from sticking to the pipe cleaner.
 The cleaner is guided into the airway and the hole looks like it will be adequately sealed. This is the lower bit.
 Some Amber CA is placed in the crevasse and immediately sprayed with an accelerator to hold the patch in place and to cure the glue quickly. The pipe cleaner can be seen now with the white background created by the pipe cleaner, but this will go when the pipe cleaner is taken out. This is the lower bit with the hole. The same process is used to fill the crevasse on the upper bit.
 As hoped for, after the crevasse has been fully filled with the CA glue and cured, with a bit of a tug the pipe cleaner is removed. I blew through the airway to make sure no CA glue leaked through. All is good – upper and lower.
 Next, using needle files, filing begins on the bit and button starting on the upper.
 The same filing works next on the lower bit and button.
 The filing process is completed. The side angle now shows a nicely proportioned and restored bit and button.
 Next, the bit and button are further smoothed with 220 paper – upper and lower.
 Next, sanding is expanded to the entire stem with 220 paper. The plastic disk is used to guard the facing from shouldering. The upper left saddle panel is not sanded at all to guard the Dr. Geo stem logo.
 The finer 320 paper is used next, upper and lower.
 Finer 600 grade paper is used next by wet sanding the stem.
 Moving next into the fine sanding/polishing phase, micromesh pads are used starting first by wet sanding with pads 1500 to 2400. This is followed by dry sanding with pads 3200 to 4000 and 6000 to 12000. Between each set of 3 pads the horn stem is wiped with Obsidian Oil helping to condition the dry material. First 1500 to 2400 upper and lower.
 Next, 3200 to 4000 – upper and lower.
 Lastly, 6000 to 12000 – upper and lower. The good thing about patching horn stems is that the horn material is rustic and earthy. The large patches are not a problem with the multi-colored motifs one sees with horn – it just adds to the rustic vibe.
 The stem is in great shape now and next the stummel needs cleaning. Reaming is first, but first a fresh starting picture to mark the progress. The cake looks like it is multi-layered as I survey the chamber.
 Only the smallest blade head is used from the Pipnet Reaming kit to remove much of the carbon cake.
 Next, the chamber is scraped using the Savinelli Fitsall Tool. It does a great job getting into the hard-to-reach places on the floor of the chamber.
 Finally, the chamber is sanded using 220 paper wrapped around a Sharpie Pen.
 The full set of tools and the pile of carbon is pictured. A quick inspection of the chamber shows no problems with heating issues.
 A few pictures show the dome of the Dr. Geo Panel. It has been charred and I’m hopeful that the black stain in the briar will come out with cleaning and sanding. The stummel is full of grime.
 Undiluted Murphy’s Oil Soap and a cotton pad are used to begin the scrubbing.
 The Savinelli Fitsall Tool also scrapes off lava flow from the rim.
 To clean more, a brass brush goes to work on the rim. Brass brushes are gentler with the briar yet add some muscle to the cleaning.
 The stummel is taken to the sink and using hottish water and anti-oil liquid dishwash soap, the internals are scrubbed with shank brushes. After a thorough rinsing, the stummel is taken back to the worktable.
 I should have known that cork lines the mortise but could not see before because of the grime. I’ve seen this before in pipes with horn stems and metal tenons, that the tenons are seated in a cork lining. I noted earlier that the stem was loose after inserting it into the mortise. The cork has deteriorated, and this will be a challenge to clean the internals and not cause greater degradation to the cork… we’ll see.
 Using cotton buds moistened with isopropyl 99% alcohol, the LONG cleaning begins. The small dental spoon also helps to excavate a LOT of tar and oils from the mortise walls. Reaching over the cork with the spoon is not easy when I can’t tell exactly when the cork lining ends.
 Well, I’ll spare you the details, but I call a halt to the cleaning at this point.
 As I feared, there’s even less of a cork lining now than before and the stem dangles out the mortise.
 The decision is made – I have never replaced a cork lining before, but now is a good time to figure this out. The small dental spoon brings a swift end to the remnants of cork left in the mortise.
 A small sanding drum mounted to the rotary tool fits perfectly into the mortise. With the power set to low, the sanding drum is inserted into the mortise very slowly and carefully. There is a very small enlarging of the mortise diameter with the action of the sanding drum, but this is not a problem.
 The mortise has been cleared of cork and thoroughly cleaned up to a point.
 The rest of the cleaning is now completed of the internals with cotton buds and isopropyl 99%.
 With the cleaning completed, a few pictures show a quick survey of the rim. The rim burning is significant especially on the rim’s right side – up in the picture below. In the second picture the cleaning removed some of the dome staining, but it’s still discolored. The second picture shows more clearly the deterioration of the inner rim. It has deteriorated because of charring.
 Old patches of finish remain on the stummel. The shiny spots show the finish.
 Before contining with the stummel, the new cork lining needs to be created. I have several corks that have been collected over the years. I find one that looks like a good candidate for. Thought has been given about how to do this and the only approach that I think will work is a simple concept: Reduce the cork down to a cylinder that will be able to be snugly inserted into the mortise, roughly the length of the metal tenon, or a bit shorter. Then, with the cork cylinder in place in the mortise, carefully drill out the diameter of the metal tenon. This is the theoretical picture in my mind, we’ll see how it works out in practice.
 To downsize the cork, the rotary tool with the larger sanding drum mounted does a good job. To keep the emerging cylinder as round as possible, the cork is rotated. The pictures show the progress. I end up putting a wet cloth below the action to catch a large amount of cork dust being thrown off.
 As the cork is whittled down, periodic testing of the cork sizing in the shank is done.
 Little by little the sanding continues. During the testing, careful is given not to get the cork stuck in the mortise during the testing. Pushing and pulling the smaller cork material may break it if I’m not careful.
 Finally, the cork is roughly the right size to fit snugly down the mortise. The handle is cut off and the end smoothed with the sanding drum.
 Wood glue is next applied around the the cork to cement it in place.
 With the cork inserted into the shank, the cork is pressed in the mortise as far as it will go. There is a small edge left protruding out the mortise. It is carefully sanded off with the sanding drum.
 Next, the drilling process starts with a small bit in the rotary tool to drill the initial hole. The bummer of this is that I don’t have a drill press to drill a hole with a little science behind it!
 Eyeballing the shank edges as guides as the drill bit is inserted – powered about 40% full power, I do a pretty good job it seems to me.
 Following the initial drilling, the next larger drill bits are hand turned to enlarge the hole incrementally.
 What happens after the first hand turned drill bit is that a bit of the outer cork breaks apart. Ugh.
 Ok, the name of the game is to go with the flow. To try to improve the appearance of the outer part of the cork, a round grinding ball mounted on the rotary tool is used.
 To try to minimize further issues with the cork, Petroleum Jelly is applied to the cork to help soften and condition it. I’m hopeful that this might make it a bit more resilient as the cork is drilled out.
 The next larger drill bits are hand turned to widen the hole. So far, OK.
 Transitioning from the drill bits, a burr is mounted in the rotary tool, and it helps to fashion the hole customizing it more for a good fit.
 As the cork hole expands, testing the stem proceeds slowly – not forcing the issue. Throughout the use of the burr, Petroleum Jelly is applied to the inner sides of the cork to condition and to help a good fit.
 The stem is finally fully seated into the mortise and the fit is good – not perfect. The ‘east/west’ perspective is spot on, but in the second picture, the ‘north/south’ perspective is a bit off, but I’m satisfied. It helps to firmly insert the stem facing against the shank.
 The view looking at the cork in the mortise is not pretty, but it works. I tried to cut the edges of the frayed cork, but the angle doesn’t allow a clean cut – but it works great!
 Switching now to the stummel proper, starting with the rim, the stummel it topped to see if most of the damage to the rim can be removed.
 After 220 paper is placed on the chopping board, the inverted stummel is rotated many time over the paper.
 The next pictures show the progress with the 220 paper. The rim is cleaning up nicely, but the right side still shows darkening. The rim is also a bit narrower at that point because of the briar deterioration.
 The 220 paper is switched to 320 grade paper and more rotations are executed.
 Finally, 600 grade paper is used.
 In the picture above, the inner rim edge still shows burning discoloration, and the inner edge deterioration is visible on the right side. To address this, sanding an inner edge bevel hopefully will remove most of the dark edges and create a truer round. A strip of 220 paper is wrapped around a wooden sphere. While pinching and holding the paper in place, the spere is rotated in the mouth of the chamber to create the bevel.
 After the 220 paper, the same is done with 600 grade paper.
 What a marked improvement! I like the results, but I’m concerned that the fainter scorched briar on the right side will become more visible as the wood is buffed and polished.
 Transitioning from the rim, the next pictures show the remnants of charred briar on the dome and the old finish.
 To address these, the stummel is scrubbed with acetone using a cotton pad.
 The acetone does a good job removing the old finish, but the darkened briar persists.
 To address the darkened briar and the myriad of minor scratches on the stummel, sanding sponges are used starting with a coarse pad, then medium, light, and fine grades follow. Not bad.
 Continuing next with micromesh pads, pads 1500 to 2400, 3200 to 4000, and 6000 to 12000 are used. After each pad, the stummel is wiped with a wet cotton cloth to remove the briar dust and to give the next pad more traction.
 Hmmm. The discoloration is still very evident on the rim. To address this and to hopefully mask it, the stummel will be stained. I would like to use a tan dye to keep the hue as close as possible to the original, but I’m concerned that this dye will still be too light and not mask the dark briar on the rim. The decision is to start with a tan and adjust if needed.
  First, the stummel is warmed using a hot air gun. This warming helps to expand the briar making it more receptive to the dye’s pigment.
 Well, I started with Fiebing’s Tan Leather Dye by painting the rim first with a folded pipe cleaner. With the dye covering the rim, I could see the dark briar with no difficulty. The decision was made to use Fiebing’s Light Brown Leather Dye instead.
 I didn’t take a picture of this…, but the rim was wiped down with alcohol to remove the tan dye as much as possible. The stummel was reheated with the hot air gun.
 Using the folded pipe cleaner, dye was painted onto sections of the stummel and flamed with the lit candle. The alcohol of the aniline dye immediately combusts when in contact with the flame and leaves behind the dye pigment. The process continues until the stummel has been thoroughly painted and flamed. The stummel is then put aside to rest allowing the new dye to settle in.
 The next morning, the newly dyed stummel is ‘unwrapped’ using the more abrasive Brown Tripoli compound. With a felt buffing wheel mounted on the rotary tool, the compound plows through the crust to reveal the grain beneath.
 This picture shows the unwrapping process.
 After applying compound with the felt wheel, the wheel is changed to a cotton cloth buffing wheel and Brown Tripoli is applied again. This second cycle using a cotton wheel continues to remove excess dye and seems to sharpen the grain presentation. The cloth wheel is also able to reach into the crook where the diamond shank and bowl meet. The felt wheel is not able to remove excess dye here as well.
 After the Tripoli is applied, the stummel is wiped with a cotton pad moistened with alcohol. As an aniline dye, wiping with alcohol will lighten the finish somewhat. I did want to lighten the finish to leverage it as close as possible to the original hue.
 With the horn stem and stummel now reunited, another cotton cloth wheel is mounted and Blue Diamond, a finer compound, is applied with a speed of about 40% full power.
 A felt cloth is used after application of the compound to wipe down the pipe to remove compound dust that accumulates on the surface. This is done in preparation for the application of the wax.
 Finally, after another cotton cloth wheel is mounted, carnauba wax is applied to the pipe. After applying the wax, the pipe is given a rigorous hand buffing to remove excess wax and to raise the shine.
 I am pleased with the way the French Made Dr. Geo turned out. The cork replacement in the shank was a challenge, but it functions well. Repairing the horn stem bit was also a challenge, but this guy is good to go again. The briar grain is made up of a lot of tightly wound bird’s eye grain. With the earthy, rustic appeal of the horn stem complimenting the grain, I think this Dr. Geo Deposse will serve his new steward well. Darren commissioned this pipe and will have the first opportunity to claim him in the Pipe Steward Store benefiting the Daughters of Bulgaria – helping women and girls who have been trafficked and sexually exploited. A ‘Before & After’ reminds us how far we’ve come. Thanks for joining me!


