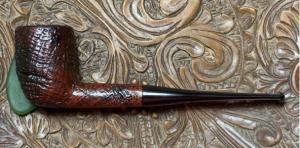
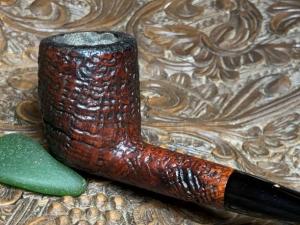
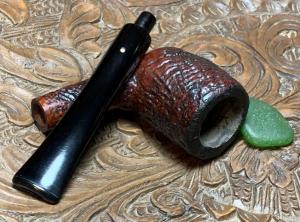
After driving 11,531 miles pulling our small travel trailer, we are safely back to home base in Golden, Colorado. I’m thankful for the safety we enjoyed and for the many folks we saw along the way. The primary purpose of our travels was to visit churches that have supported us for the 30 years we have served overseas in Europe. We also reconnected with family and friends along the way, which was great. We had many adventures, and this picture is at one of the many places we camped from New York State to Florida and many places in between! I was able to work on a few pipes during the travels, but my thanks go to all the pipe men and women who have waited patiently for their commissioned pipes in the queue 😊! The next 2 pipes in the queue are Dunhills that got the attention of Jeff. Jeff got MY attention when I found out that his first communication to me inquiring about the Dunhill was from the back of a plane somewhere over the Amazon! Jeff has an interesting job as a pilot flying for United Airlines. He shared that he’s from Havre de Grace, MD (right at the beginning of the Chesapeake Bay) with his wife and 3 dogs. His pursuits as a pipe man enjoying the pipe smoking hobby started about a decade ago. Jeff shared that he often flies into Denver to United’s training center and I’m hopeful that we can meet up sometime to share a bowl – or for me to hand-deliver the Dunhills he’s commissioned. The first is a wonderfully blasted Tanshell Billiard that is a beauty. Here are pictures of the first Dunhill.
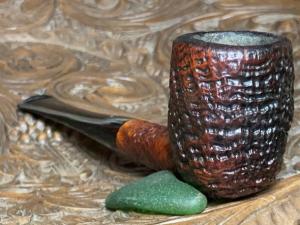
 The nomenclature of this Dunhill contains all the information that has been the trademark of perhaps the most collected pipes by enthusiasts. The shape number, 253 is stamped on the far left and indicates a Billiard. To the right of this is the F/T which indicates the stem style: Fishtail. Next, DUNHILL [over] TANSHELL. Tanshell is the finish which I’ll describe further below.
 Next, to the right, is stamped the COM: MADE IN [over] ENGLAND. Stamped next to ENGLAND is the dating indicator – a raised and underlined zero: 0 . The dating indicator will be explained further below. To the right of this is a circled ‘4’ indicating the size: medium to large bowl. The final ‘T’ corresponds again to the finish – Tanshell. Descriptions of all these nomenclature indicators can be found in the huge Dunhill article in Pipedia: Dunhill – Pipedia.
 The dot on the stem is the classic logo of Dunhill pipes.
 The finish of this Dunhill is a Tanshell. Pipedia’s (Dunhill – Pipedia) description of the Tanshell finish is helpful:
The first lot was distributed in 1952 (usually made using Sardinian briar). The prototype was called “Root Shell “, produced in 1951. The Tanshell is a light tan sandblast. Sardinian briar was used for this sandblast. There is a distinct contrast in the sandblasts using Sardinian as opposed to Algerian briar. The Sardinian is much denser and much harder. The resulting pattern, when blasted, is far more even and regular both in terms of the surface texture and the finish.
The TanShell was Dunhill’s fourth finish and its first major post-war line addition. Introduced in 1951/1952 the TanShell was a naturally stained sandblasted pipe made exclusively from Sardinian briar through the 1960s. The TanShell apparently was not simply a light stained Shell but rather was also the product of “certain processes [unrevealed] not previously employed.” Initially, it appears that the pipe was to be named the Root Shell and a stamp to that effect was ordered and received by Dunhill in May 1951. Ultimately, however, the name TanShell was settled upon but the stamp for the TanShell name was not received by Dunhill until the beginning of December. Thus, while the Tanshell was in production in 1951 it appears that most if not all TanShells made in that year did not enter into retail distribution until 1952 and were given a 1952 date code. Loring, J. C., The Dunhill Briar Pipe, The Patent Years and After (self-published, Chicago, 1998).
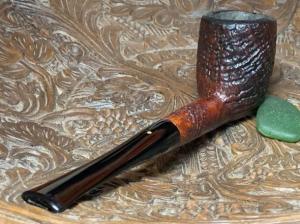
What stands out from this information about the Tanshell finish is the statement that the Tanshell finish was ‘usually’ made with a ‘Sardinian briar’ which is ‘denser and much harder’ than the more commonly used, Algerian briar. The result of this is that the blasting process with Sardinian briar leaves a more distinctive finish. This close-up picture of the blasted grain of our Tanshell I believe is the proof of this pudding 😊.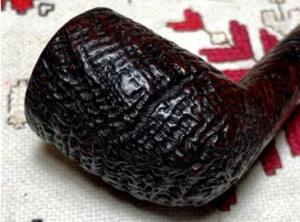 The picture below is a dated ad from the Pipedia article depicting the various Dunhill finishes. The Tanshell is described as a ‘Light Tan Sandblasted finish’. When I saw this ad, I was puzzled a bit because the Tanshell on the worktable is certainly not light tan but a rich darker hue. However, somewhere in the Pipedia Dunhill article (it is huge!) I recalled reading that over time and use the Tanshell finish would transition into a darker patina. This indeed, seems to be the case at this juncture with the Tanshell on the table.
 The history of the Dunhill name and pipe production is rich and well documented. To dive into the history more thoroughly, Pipedia is a good place to start (History).
  To possibly entice the reader to read further, this small excerpt is from Smoking Pipes (Smokingpipes (November 2006). A History of the Dunhill Brand) in the Pipedia History:
The challenge of a Dunhill history is to separate myth and legend from history. This, however, may be impossible. The story of Alfred Dunhill is so tied up with myth that the myths are now part of the history. Alfred Dunhill, being aware of this phenomenon, probably perpetuated many of such myths. Nonetheless, let us try and begin at the beginning in the early 1900s. Smokingpipes[25].
I believe that perhaps one of the factors that has made Dunhill pipes such a highly collectable pipe is that Dunhill from the beginning, used a system to date and categorize their pipes. Pipephil.eu has a very helpful Dunhill Dating Key (Dunhill dating key — Logos & Markings (pipephil.eu)) that is interactive and helps one drill down to discover the date of your own Dunhill. The first question asked in ‘Part 1’ in the Dating Key diagram below is, Your Dunhill pipe has a year suffix? Earlier, we identified our year suffix as a raised and underlined zero: 0 . Since we have a suffix, we follow the ‘Yes’ path. The next question is ‘Patent number?’ Beginning in 1955, Dunhill stopped placing the specific patent number on its pipes. Our pipe does not have a patent number on it so we follow the ‘no’ path. The next question in the gauntlet asks if “’DUNHILL’ stamping over ‘LONDON’?” Our pipe has DUNHILL [over] TANSHELL, so again we follow the ‘no’ path which indicates that our pipe was produced after 1954. A link is provided to ‘Narrow down your dating’ and the following panel appears. Our suffix is the Zero, which is followed by ‘smaller raised suffix’? This narrows the dating of our Tanshell to 1960. The Dating Key then provides some examples of Dunhill pipes produced that particular year.
 This is where it gets fun. A quick check with What Happened in 1960 – Significant Events, Prices, 1960 Top Movies, TV and Music (thepeoplehistory.com), has these US events perking to the top:
1960 Major News Events in History
- OPEC (Organization of Petroleum Exporting Countries) is formed
- Soviet missile shoots down the US U2 spy plane
- The United States announces that 3,500 American soldiers are going to be sent to Vietnam
- Construction on the Aswan High Dam in Egypt began
- President Dwight D. Eisenhower signs the Civil Rights Act of 1960 into law
- The United States Supreme Court decides the Boynton v. Virginia case
- 100,000 Join “Ban The Bomb” Rally on April 18th in London
- The first televise U.S. Presidential debate takes place between Kennedy and Nixon
- The classic American novel “To Kill a Mockingbird” by Harper Lee was published
- John F Kennedy wins presidential Election
To further understand the times our 1960 Dunhill was produced, these facts are added:
Cost of Living 1960 – How Much things cost
- Yearly Inflation Rate USA 1.46%
- Yearly Inflation Rate USA 1.1%
- Average Cost of new house $12,700.00
- Average Monthly Rent $98.00
- Cost of a gallon of Gas 25 cents
- Average cost new car $2,600.00
- 23-inch Television $219.95
- Piaggio / Vespa Scooter $319.95
- Can of Beef Ravioli 30 cents
- Loaf of Bread 20 cents
- Men’s Electric Shaver $20.30
- Polaroid Land Camera, looking back it seems quite expensive, but this was the only way to see your photo nearly instantly Polaroid Camera $93.45
- The latest in Danish contemporary furniture for the 60’s home Danish Contemporary Living Room Furniture $350.00
- Average House Price 2,530
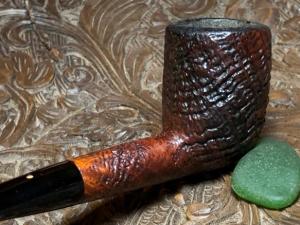
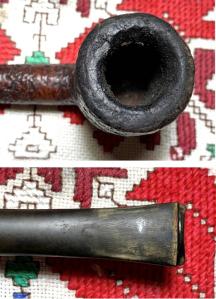
I wonder how much our Dunhill was in 1960😊? With a better understanding of the Dunhill Tanshell on the worktable, it’s time to take a closer look at the issues. The pipe appears to be in very good shape for a 64-year-old timer. The stummel has grime that needs cleaning. The bowl has a good bit of cake build up which will be removed to allow inspection of the chamber and to allow fresh briar to emerge. The rim also has thick lava flow, and we’ll see what the rim looks like after this is cleaned off. The front section of the rim also looks like it is worn down a bit over the years of wear. If this is the case, we’ll need to call it wounds of honor with the respect of an aged 1960 pipe. The stem has significant oxidation along with scratches and tooth compressions. Calcium buildup is also on the bit.
 To begin the restoration of this Dunhill Tanshell, the stem airway is cleaned with isopropyl 99% and with a few pipe cleaners.
 The cleaning is followed by placing the stem in a soak of Briarville’s Pipe Stem Oxidation Remover. The soak will last for several hours.
 Switching to the stummel, I go to work on the carbon cake. Using the Pipnet Reaming Kit, 3 of the 4 blade heads are used. The cake is unusually stubborn – it’s very hard and takes a bit of effort to chip away at the cake. I’m careful not to force the Pipnet blades but allow each to go at its own pace. I’ve broken blade heads when not patient.
 After the reaming, the process continues with the Savinelli Fitsall Tool by scraping the chamber and reaching to the floor working on the angles.
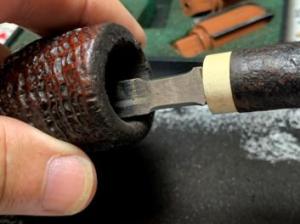 Finally, the chamber is sanded using 220 paper wrapped around a dowel rod.
 The full arsenal and the carbon residue that was removed.
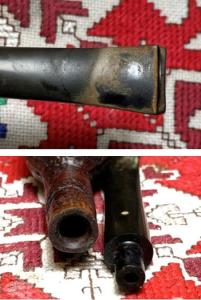
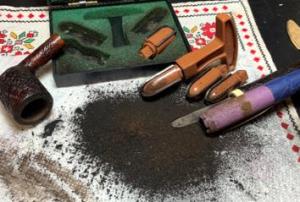 After wiping the bowl with a cotton pad, an inspection of the chamber reveals some heating issues. There are two areas that have fissures running vertically primarily at the front of the chamber. The following close-up pictures show the areas from different angles. This will need to be addressed after finishing the cleaning process.
 Next, the stummel is cleaned with undiluted Murphy’s Oil Soap using a cotton pad and a toothbrush to get the grime out of the crannies.
 The gentle use on the rim with a brass brush also helps to address the crusted lava on the rim. Brass is gentler on the wood but adds a bit of muscle to the cleaning.
 Next, the stummel is taken to the sink where the internal cleaning continues with warmish water and anti-oil dishwashing liquid. Shank brushes are used to do the scrubbing. After a thorough rinsing, the stummel returns to the worktable.
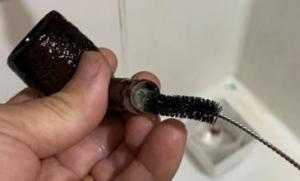 Interestingly, after the cleaning, the stummel now resembles closer the classic Tanshell characteristics of lighter briar showing through. For comparison, the second picture is an example of a Tanshell finish that the Pipedia article provides (Dunhill Tanshell – Pipedia).
 The internal cleaning continues with cotton buds and pipe cleaners moistened with isopropyl 99%. Not surprisingly, the internals were grungy. A small dental spoon is used to excavate tar and oils by scraping the mortise walls.
 At the end of things, the cotton buds started to emerge lighter, and the work was halted.
 To continue the internal cleaning process, the stummel is given a kosher salt and alcohol soak. This process helps to draw out the tar and oils from the internal briar and to remove ghosting. To do this, a cotton ball is first pulled and twisted to form a wick.
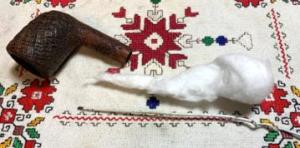 The wick is then guided down the mortise to the draft hole with the help of a stiff wire.
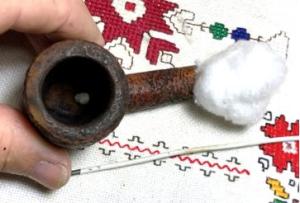 Next, the bowl is filled with kosher salt and placed in an egg carton to give it stability. Kosher salt is used rather than common iodized table salt because Kosher salt does not leave an aftertaste. With the stummel situated with the rim and the end of the shank roughly level, isopropyl 99% alcohol fills the bowl with a large eyedropper until it surfaces over the salt.
 After about 10 minutes, after the alcohol is absorbed, it is topped off once again and the stummel is set aside to soak for several hours through the night.
 The next morning, the picture shows the soiling of the cotton wick and the salt as oils and tar are drawn out of the briar refreshing the stummel.
 After the bowl was cleared of the expended salt, a few cotton buds and a pipe cleaner confirm that the kosher salt and alcohol soak did the job.
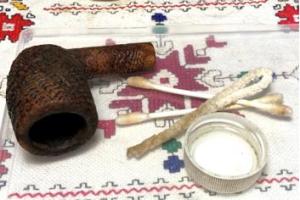 The briar seems dry to me and to help condition the briar, mineral oil is applied with a rag. I use Paraffin oil as a good, light oil. I met a master wood worker in Greece on one trip when we still lived in Bulgaria. His shop was full of fine wood carvings mostly made of olive wood. He was very helpful answering my questions on what he did to condition wood. He said to always use a mineral oil and said that animal or plant oils are to be avoided. His reason was that these oils can putrefy. Since then, I have always used Paraffin oil to help condition briar when it needs it. This briar looks like he enjoyed it 😊!
 Setting the stummel aside for now, the stem has been soaking in Briarville’s Pipe Stem Oxidation Remover. After the stem is fished out, it is rubbed briskly with a cotton cloth. The forceful rubbing helps remove the oxidation that was raised to the surface during the soaking process. The airway is also cleaned of fluid with a couple pipe cleaners and isopropyl 99% alcohol.
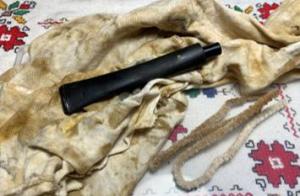 There are small compressions on both sides of the bit. Before sanding, the heating method is first used to minimize the compressions. Using a Bic lighter, the sides of the bit are painted with the flame. As the vulcanite rubber heats it expands, reaching for its original orientation – or closer to it. The before and after pictures show some improvements. First, upper:
 And, lower:
 To erase the remainder of the compressions and to remove scratches, 220 grit paper is used to sand the bit – upper and lower.
 Next, the sanding is expanded to the entire stem using the finer 320 grit paper.
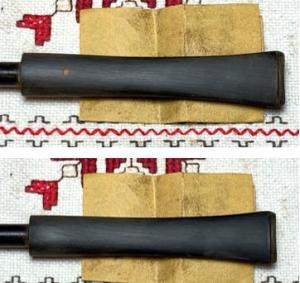 Following the 320 paper, the finer 600 grit paper is used to wet sand the entire stem. This is followed by applying 0000 grade steel wool to the stem.
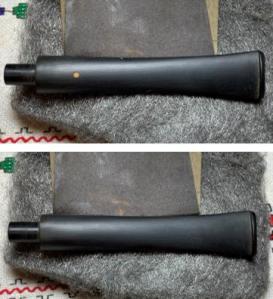 Next, the sanding transitions into more polishing using micromesh pads. First, the stem is wet sanded using pads 1500 to 2400 then dry sanded with pads 3200 to 4000 and 6000 to 12000 – 9 pads in all. Between each set of 3 pads, Obsidian Oil is applied. Obsidian Oil helps to condition the stem as well as to help prevent oxidation from developing. First, pads 1500, 1800, and 2400.
 Next, pads 3200, 3600, and 4000.
 Finally, pads 6000, 8000 and 12000. I love the way the glossy sheen emerges during the micromesh process. The stem looks great.
 With the stem now on the side, it’s time to address the heating issues in the chamber. Some fresh pictures of the fissures in the chamber indicate that the briar was overheated and over time the cracks and then fissures developed. Most of the issues are located on the front side of the chamber.
 A proven method of repairing this damage is using J-B Weld to fill in the fissures. J-B Weld is an inert, heat-resistant epoxy that is applied and hardens into a solid protective form. J-B Weld is easy to use. There are two compounds, Hardener and Steel, which are measured in equal parts then mixed. You have about 4 minutes to work as the mixture starts to set.
 I mix and use toothpicks to trowel and spread the mixture in the chamber over the damaged areas.
 Overrun in the chamber is not important as the excess is sanded leaving only the Weld filling the fissures and cracks. After applying the Weld over the problem areas, the stummel is placed in an egg carton until the J-B Weld is fully cured – in about 4 hours.
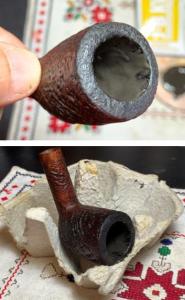 It’s been about 4 hours, and the J-B Weld has fully cured. To begin removing the excess epoxy, the sanding drum mounted on the rotary tool is used. The drum is applied to the chamber walls gently allowing the rotation of the drum to remove excess and to smooth the surface. This shortens the work time a good bit.
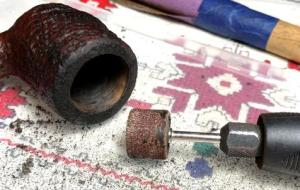 After the drum has done the heavy lifting, 220 paper wrapped around the dowel rod further smooths the chamber surface.
 I’m pleased with the outcome of this repair. The J-B Weld has filled the heat fissures, and the chamber is smooth to the touch. Later, a coating of ‘Pipe Mud’ will be applied to help encourage a new cake to develop helping to protect the briar.
 With the chamber repair completed, the exterior blasted surface is treated with Mark Hoover’s ‘Before & After’ Restoration Balm. This picture shows the condition of the surface as it is now.
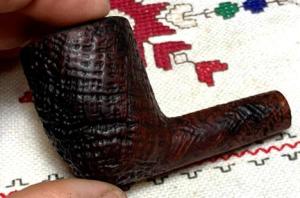 Mark’s Restoration Balm does a great job conditioning the briar and bringing out the natural grain hues. After taking some Balm on my finger, the Balm is thoroughly worked into the briar. I put it on a bit thick so that Balm reaches into the crevasses of the blasted surface. After working the Balm in, the stummel is set aside for about 20 minutes to allow the Balm to be absorbed.
 After 20 minutes, a microfiber cloth dedicated for this purpose is used to wipe off the excess Balm and to buff up the briar. The Restoration Balm seldom disappoints, and this time is no exception.
 Before the lights go off for the day, ‘Pipe Mud’ is applied to the chamber. Pipe mud is a mixture of cigar ash and water. The mixture is used to coat the chamber and when it cures, transforms into a solid coating that helps to cultivate a new cake layer. A cake layer is a good thing to have as it protects the chamber from heat. A proper cake should be about the width of an American dime. The cigar ash is placed in a plastic cup.
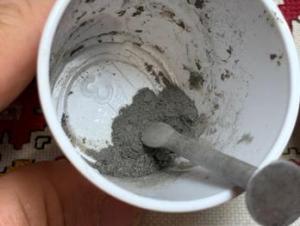 A small amount of water is added and mixed with the pipe nail. Too much water makes the mud too runny.
 The nail is used to trowel the mud into the chamber and then to spread the mud evenly around the chamber. It doesn’t take much. After the chamber is coated, the stummel is placed in the egg carton to allow the mud to cure through the night.
 The next day has come and we’re on the home stretch for this Dunhill Tanshell. The Pipe Mud has fully cured as it coats the chamber. The only word of advice for this Dunhill’s new steward is to gently clean the chamber after use with a folded pipe cleaner and not a metal pipe tool. The Pipe Mud provides a starter layer for a new cake to develop. We don’t want to damage this starter layer.
The stem has been waiting for attention. Before moving on, the stem will be polished using Mark Hoover’s ‘Before & After’ Fine and Extra Fine Polish. Starting first with the Fine Polish, some polish is placed on the finger and worked into the vulcanite rubber surface. There is a gritty texture to the polish and Mark’s claim is that not only does it further condition the rubber, but the polishes also remove more oxidation. After working in the polish and letting it sit a few minutes, it is wiped off with a paper towel. The same is done with the Extra Fine Polish. Mark’s polishes do a good job.
 Next, without reuniting the stem and stummel to avoid getting compound dust on the blasted stummel, Blue Diamond compound is applied to the stem using a cotton cloth buffing wheel on the rotary tool. The compound is a very fine abrasive that removes microscopic scratches and raises the shine. The speed is set at about 40% full power.
 After the compound is applied, the stem is wiped with a felt cloth to remove compound dust in preparation for application of the wax.
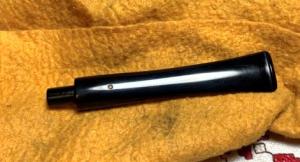 With stummel and stem reunited, a light application of carnauba wax is applied to the blasted stummel. The application is ‘light’ to not allow wax to collect in the distinctive crevasses of the blasted briar surface. Wax is also applied to the stem. After the carnauba has been applied, the pipe is given a rigorous hand buffing with a microfiber cloth to remove excess wax and to raise the shine.
 The blasting of this Tanshell is distinctive giving a full, 3-D view of the grain contours. The hue of the finish is classic Dunhill. I enjoyed working on this 1960 vintage Dunhill and he promises to provide decades more service to a new steward. Jeff commissioned this Dunhill and will have the first opportunity to acquire him from the Pipe Steward Store. All pipes restored for new stewards help to benefit the Daughters of Bulgaria (now called, Spring of Hope) helping women and girls who have been trafficked and sexually exploited. Thanks for joining me!