
The next pipe on the worktable I’ve been looking forward to. It will be the first time I’ve worked on a pipe produced in Norway. I acquired the Lillehammer in February of 2019 from a seller in West Hartford, Connecticut, in a Lot of 68 pipes. Here is a picture of the Lot of 68 from the seller that got my attention. The Lillehammer is on the very bottom of the 4th column. 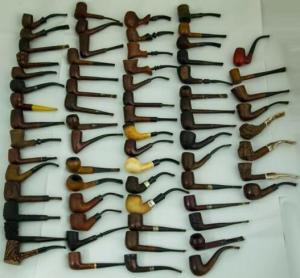 The Lillehammer got the attention of a very interesting pipe man originally from Australia. I became acquainted with N.R., when he reached out to me asking my help to identify the provenance of a pipe that held a hidden knife. Through our communications I discovered that N.R. is an expert in armaments and the history of arms. I discovered online that N.R. worked for ‘Armax: The Journal of Contemporary Arms’ in which he also was the editor (https://www.facebook.com/armaxjournal). This was very cool to discover!
 I was not able to help N.R. find more information about the ‘killer pipe’ he was researching, but I was able to help him find a pipe that he commissioned – a Gourd Calabash of Austria. In that write up (Mending Shank Cracks to Revive a Gourd Calabash – Austria – The Pipe Steward) I wrote:
As an academic, this listing of his biography was intriguing to me. Here is a portion:
N.R. Jenzen-Jones is a technical intelligence specialist and historian focusing on arms and munitions. He is the Director of Armament Research Services (ARES), the Editor of Armax: The Journal of Contemporary Arms, and the founder of Helios House Press. He holds a Visiting Fellowship in the School of Law, Policing and Forensics at the University of Staffordshire and was awarded the Buffalo Bill Center of the West’s 2022–2023 Resident Fellowship for his work with the Cody Firearms Museum…. (https://nrjj.academia.edu/)
Another thing I discovered about N.R. is that he travels a lot, and I was surprised and pleased when he sent me a picture commemorating when he first put the Gourd Calabash into service – a request I ask of new stewards of my pipes. It doesn’t get any cooler than this 😊! N.R. wrote this description of the occasion:
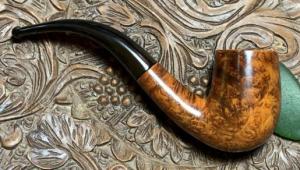
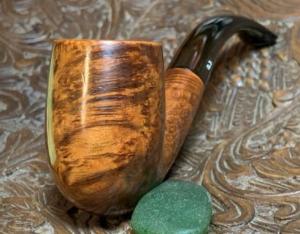
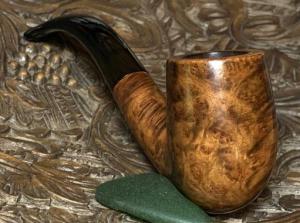
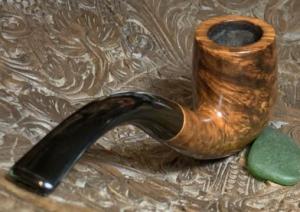
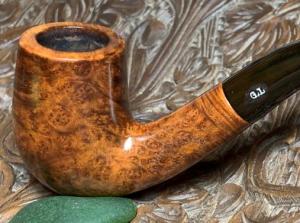
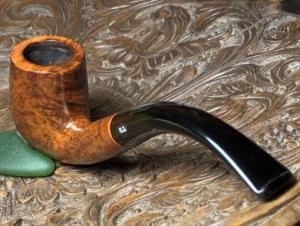
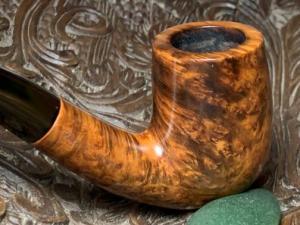
The image was taken in front of the Royal Exchange in London, immediately after I delivered a paper at the Bank of England titled “Coins & Cartridges: The Industrial Tools of State-building in Late 19th-century Afghanistan”.  That Gourd Calabash is on quite the ride I can see! N.R. came back to The Pipe Steward and not only commissioned the Lillehammer, but he also found two other pipes in the For “Pipe Dreamers” ONLY! online collection, a Savinelli Capri Root Briar Cherrywood and a Sunrise Amber Grain Vintage Briar 159 Apple. A portion of the proceeds of all the pipes restored help to support the Daughters of Bulgaria (now called, Spring of Hope) – a work that my wife and I co-founded helping women and girls who have been trafficked and sexually exploited. Here are pictures of the Lillehammer from Norway that got N.R.’s attention.
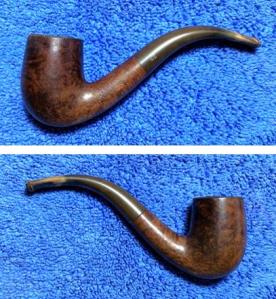
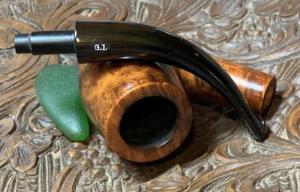
 The nomenclature stamped on the pipe is clear and crisp. Stamped on the left shank flank in an arch is: LILLEHAMMER [over] G.L [OVER] SUPER EXTRA.
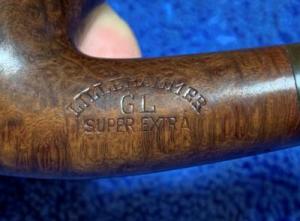 On the right side of the shank is stamped the COM: MADE IN NORWAY.
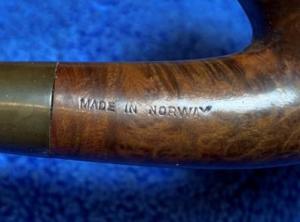 On the underside of the shank, near the shank facing is stamped the shape number: 61.
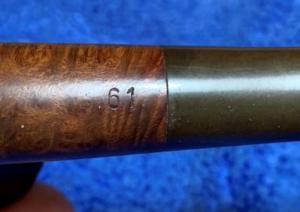 The stem logo is stamped with a smart, G.L.
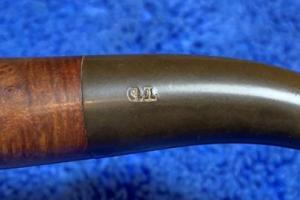 As mentioned earlier, this is the first pipe produced in Norway I’ve worked on and I’m looking forward to learning more about the Lillehammer name. I learned very quickly from the Lillehammer Pipedia article (Lillehammer – Pipedia) that the GL stem logo contain the initials for the founder, Gudbrand Larsen, of the company in Lillehammer, Norway in 1844. Since this is my first look at Lillehammer pipes, I enjoy repeating much of the Pipedia article here which is from Jan Anderson’s book, Scandinavian Pipemakers:
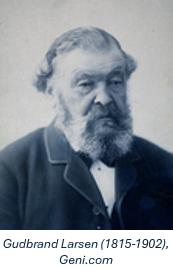 In the 1830’s a young Norwegian woodcarver named Gudbrand Larsen saw some pipes made from meershcaum. He though they were beautiful and wanted to make pipes like that, but he could not obtain the material. So, he decided to go where it was to be found.
Larsen went to Eskisehir, Turkey, to learn all about meerschaum. But the most beautiful pipes in those days were not made there but in France, so he continued his journey to Marseille, where he found work in one of the most famous factories at the time. In 1844 he returned to Norway and started a small factory for meerschaum pipes in the town of Lillehammer. The pipes garnered a good reputation from the first.
Gudbrand’s son, August, followed in his father’s footsteps and joined him in the business. However, father and son did not get along very well, so Junior–as August usually was called–did like his father once had, he traveled to learn more about pipe-making.
Junior understood that briar, not meerschaum, was the material of the future, so during his journey he studied the subject carefully, first in England and then in France.
In Paris Junior earned a position with a pipemaker of good repute and became highly respected in his work. However, Gudbrand was getting old and considering retirement, so he asked his son to come home and take over the family business, an offer Junior willingly accepted. As a businessman Junior was even more successful than his father, and during his period of leadership the business prospered.
In 1902 Gudbrand Larsen died at almost 90 years of age. Then Junior passed away a dozen years later, in 1914. His death was followed by some unstable years for the factory because it lacked competent management. And World War I had just started on the continent, which made it difficult to obtain raw material.
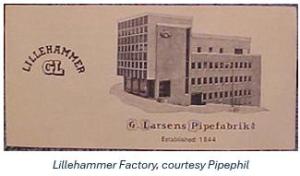 In 1916 the factory was bought be a company that appointed new management, and a long, stable period of successful expansion had begun. That period was to last for almost half a century. The main part of the production was briar pipes, but they also continued to make some meerschaums.
Problems at the factory began again at the end of the 1960s, when sales slowed dramatically. The main reason was the “fancy pipes” had become very popular, and Larsen’s of Lillehammer had nothing to offer there. Something had to be done, and two steps were taken. In the middle of the 1970s the Danish company Kriswill was bought, and in that way, they obtained access to that company’s more modern shapes. A new designer was also employed, but these efforts were not sufficient, and in the 1979 the factory closed.
The Lillehammer production began to falter in the 1960s, which was a time when many pipe companies were struggling to stay above water. What’s interesting is that the ‘culprit’ described for the downturn was the development of the Freehand movement coming out of Denmark. To try to catch up, Lillehammer purchased Kriswill, bringing in their stable of more ‘modern’ shapes to help the company be more competitive. Unfortunately, these efforts fail and the Pipedia article reports the factory closed in 1979.
Last Christmas I gave myself a present of ‘Pipes – Artisans and Trademarks’ by Jose’ Manuel Lopes. I’m proud to have a copy. I was interested to read the information about Lillehammer there. It describes that after the acquisition of Kriswill, the factory permanently closed in the 80s. Interestingly, Pipephil’s Lillehammer entry says that the Danish Kriswill acquired Lillehammer and not the other way around…. ( Li-Ln — Pipes : Logos & Markings (pipephil.eu))? On Pipephil’s section on Kriswill pipes, it describes Lillehammer as a sub-brand of Kriswill for a short time…. (Kn-Kz — Pipes : Logos & Markings (pipephil.eu))
One more bit of information comes from Lopes’ Lillehammer article (‘Pipes – Artisans and Trademarks’) in a footnote to his entry coming from ‘Pipes and Tobaccos’, vol. 1, no. 4, winter 1996-97. The note says,
“Owing to the elevated production costs in the country, the factory was sold, first to a German company and then to Stanwell” – which continues to make a line with this name in Denmark. I tried to find this back issue of Pipes and Tobaccos magazine, to get the back story, but was not able.
Sometimes when you’re doing research on a pipe, conflicting information from sources creates questions. Here’s mine: Did Lillehammer acquire Kriswill or did Kriswill acquire Lillehammer? What exactly is the Danish involvement and how does this impact the potential dating of a pipe?
I decided to check out Rebornpipes and Steve’s take on the history of Lillehammer. Steve had worked on Lillehammer pipes and I looked at his post called, New Life for a Bastia Billiard 408 made by Lillehammer Pipes Norway (New Life for a Bastia Billiard 408 made by Lillehammer Pipes Norway | rebornpipes). Here is the attractive Lillehammer Bastia he restored. Bastia was a lower quality production of Lillehammer and as usual, Steve’s research was stellar and added a source I had not found. In Steve’s research he quoted from an article from the Pipe Club of Sweeden (http://www.svenskapipklubben.se/en/pipemakers/bard-hansen/) by Jan Andersson about a pipe maker, Bård Hansen, who “followed the tradition of the Lillehammer Factory and was trained by a retired engineer from the Lillehammer Factory thus tying him to the brand.” I’ve included the part of the article in Steve’s blog with the relevant lines in bold that he used for his pipe:
In a Swedish tobacco shop, even in small places in the province, there were usually a fair number of pipes in the 50s and 60s with stems from aluminum. But even for the more traditional pipesmoker, who wanted a pipe from wood and ebonite, there was a lot to choose from. Ratos was the dominant brand, but for those who were willing to spend a little extra, there were usually at least a few more exclusive pipes – pipes in green or blue-checked boxes. Those pipes came from Norway, from G.L. Larsens pipe factory in Lillehammer.
Lillehammer pipes were found in two qualities, Bastia was a little cheaper and Lillehammer GL was for the truly discerning pipesmoker. Later I have learned that there were also more expensive and finer qualities, even one called Best Make, but those luxury pipes were never found in the shops in the small town where I lived. Lillehammer pipes were easily recognizable, they usually were rather slim and with a long stem, which was the fashion at the time. So while a true English gentleman smoked a Dunhill with the white dot on the stem, Norwegian or Swedish pipesmokers preferred an elegant Lillehammer.
We will not go into detail about the interesting story of Lillehammer, but unfortunately we can see that from the beginning of the 70s, it rapidly went downhill for the factory. They bought the Danish company Kriswill but that was not a success, nor was the new series of shapes created by the pipemaker Thorbjørn Rygh. So G.L. Larsen’s pipe factory in Lillehammer had to close, deeply missed by many of us. This feeling persists to this day, which is particularly evident in the great interest in the Lillehammer pipes at auctions and collector’s markets.
This excerpt is good to help us understand the esteem in which Lillehammer pipes were held in that day. I especially enjoyed the comment comparing the English man’s affections for Dunhill with their white dot with a Scandinavian’s affections. The Norwegians and Swedes preferred an elegant Lillehammer over a Dunhill 😊. What follows are Steve’s final conclusions regarding the provenance of his Lillehammer pipe on his worktable:
Gathering the data together from my research I have learned that the pipe I have on my worktable is made by Lillehammer prior to the buyout by the Kriswill Company with the hope that it would offer new markets for the Lillehammer brand. The Bastia was the cheaper of the lines and interestingly it also bears GL stamping tying it to the higher end pipes from the factory.
With the conflicting information I had seen in Lopes, Pipedia and Pipephil, Steve’s conclusion aligned with Lopes and Pipedia’s information about Lillehammer. I decided to send Steve a note with these questions:
First, can you clarify who bought whom?
Second, in the blog that is linked above, you concluded that your pipe was made before the Kriswill acquisition – which would then date your pipe from mid 70s or earlier. My question is how did you reach that conclusion? I can’t find any indication that the markings of the Lillehammer pipes changed when Kriswill came into play, and they were still produced in Norway until the factory closed (1979 – Pipedia). The question is how to determine whether a Lillehammer dates or predates Danish control??? Does this make sense? Appreciate your thoughts!
As always, Steve’s response was both timely and helpful. Here is Steve’s ‘under the hood’ reasoning shaping his conclusions noted above:
The stamping GL identifies it with Gudbrand Larsen, the founder of Lillehammer. Also, the classic shape puts it pre-innovations from the Kriswill time. To me the Swedish article’s description of the petite pipe (classic shape) with a long stem fit the pipe I was working on and linked it to LIllehammer as well. All of these pointed to an early time frame. The other piece of the puzzle was the two lines of Lillehammer – the cheaper Bastia and the higher end Lillehammer. That information seems to pre-date the purchase of Kriswill and the introduction of the new shape initiatives.
So, to summarize here are the salient points
- The GL stamp on the pipe links it to the time before the buyout and probably put it in the 60s or early 70s
- The classic shapes faded with the innovation of Kriswill shapes as a means of selling more pipes. That change came with the freehand craze out of Denmark again 70s
- The Lillehammer pipes came out in two lines – the cheaper Bastia (in this case marked with a GL which is a bit of an anomaly as the cheaper line did not usually bear that mark) and the more expensive Lillehammer which were both in classic shapes. To me this also signals an earlier and pre-purchase time.
I think the confusion as to who bought whom lies in the contradiction of the Pipephil article which says Kriswill bought Lillehammer and the opposite claim in the Pipedia article. From what I can find in the Swedish article and Pipedia Kriswill was purchased by Lillehammer to stem the tide of lessening sales. I think Pipephil is incorrect and both Pipedia and the Swedish article are correct. As for the purchase by Stanwell I did not go that far but memory seems to click with that. Hope that helps.
Steve’s reasoning resonates with the data and what makes the most sense. One of the factors that I had not considered in the question of dating was that with the acquisition of Kriswill the entire line of Lillehammer pipes leveraged toward trying to get a foot in the Freehand movement and because of this, classic shapes (elegant 😊) fell by the wayside. With the Kriswill acquisition, that would put our Lillehammer’s production pre-dating the Danish which took place in the early 70s. Was our pipe produced in the early 70s, 60s or perhaps the 50s? We don’t know for certain, but my sense is that it leans to the older dating. Thanks again, Steve, for your insights!
Within the Pipedia article was a link to a Lillehammer Catalog for 1970. I found it both interesting and helpful to further understand the provenance of the pipe on the table. I clipped sections of the catalog that are relevant to our pipe. The first page speaks of the quality rating that was used for Lillehammer pipes. Our pipe has stamped on the left side of the shank: SUPER EXTRA.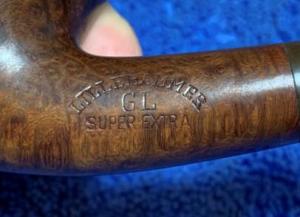 Super Extra was described in the 1970 clip found below. The top shelf of the Lillehammer pecking order was those pipes stamped with SUPER EXTRA. As I’m looking at the pipe on the worktable, I’m not going to have any qualms placing this Lillehammer on the top shelf.
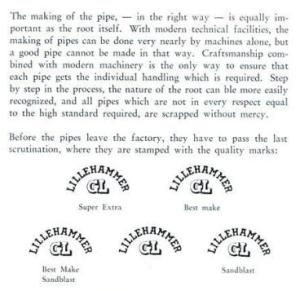 Lopes describes the Lillehammer ranking in his ‘Pipes Artisans and Trademarks’:
Throughout its history, the company – one of the last pipe makers in Norway –, in addition to using meerschaum, produced small and medium sized classics in briar, as well as the second-choice brands of Bastia and Old Briar. Grading (ascending): “GL”, GL Best Make”, “GL Super Extra”.
One other tidbit of information from another page in the 1970 catalog was concerning the shape number. Our Lillehammer’s shape number is 61. This page has our shape 61. I also love the period pictures included in the catalog. I like the sweeping lines from stern to bow of this classic of Lillehammer. A very attractive pipe.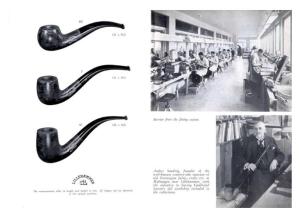 One more factoid in case you’re wondering. Where is Lillehammer, Norway? Courtesy of Google Maps, Lillehammer is north of Oslo marked with the red carrot. The reason I have a heart on Oslo is because I was able to go see the Decathlon in Oslo with some colleagues several years ago.
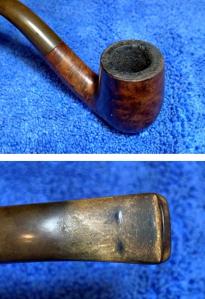
 With a better appreciation for the Lillehammer name and the pipe that’s on the worktable, it’s time to look at the pipe itself. The pipe is on the diminutive side consistent with what we know about Lillehammer. The dimensions are Length: 5 1/4 inches, Height: 1 7/8 inches, Rim width: 1 1/8 inches, Chamber width: 3/4 inches, Chamber depth: 1 5/8 inches. The cake buildup is moderate in the chamber and the rim is covered with a crusted lava which needs to be removed and cleaned to reveal the condition beneath.
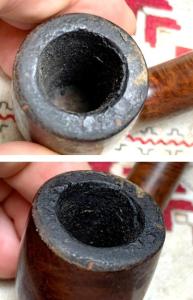 There are nicks and scratches over the stummel surface. This Lillehammer looks like he’s got some age.
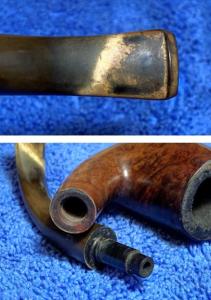
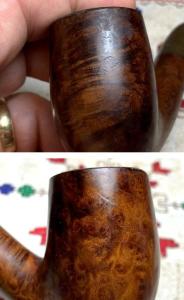 The stem has deep oxidation, and the bit has significant calcium deposits on the bit surface. There are a few significant tooth compressions on the upper bit.
 The restoration of the Lillehammer starts with cleaning the stem airway. It only takes 2 pipe cleaners moistened with isopropyl 99% to do the job.
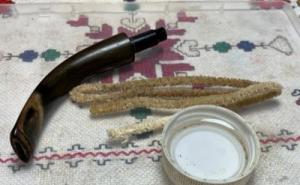 With the significant presence of oxidation in the vulcanite and the bit’s calcium deposits, before putting the stem in the soak to address the oxidation, I give the stem a head start.
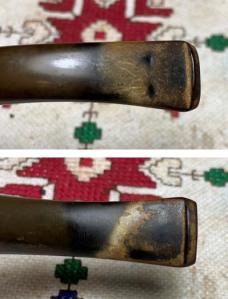 Using 000 grade steel wool, I work over the vulcanite surface to remove the surface layer of crud on the bit and stem to give it a head start dealing with the oxidation.
 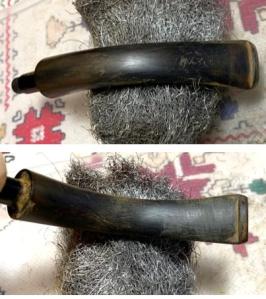 Next, the stem is placed in www.Briarville.com’s Pipe Stem Oxidation Remover for several hours to address the oxidation.
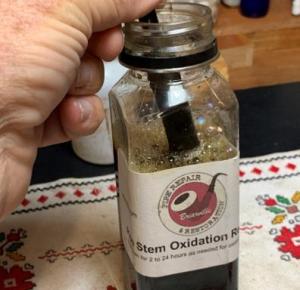 After the soak, the stem is rubbed aggressively with a cotton cloth to wipe off the raised oxidation. Afterwards, the airway is cleaned of the Oxidation Remover with a pipe cleaner moistened with isopropyl 99% alcohol.
 Switching now to cleaning the stummel, a picture shows the chamber and the rim – each needing to be cleaned.
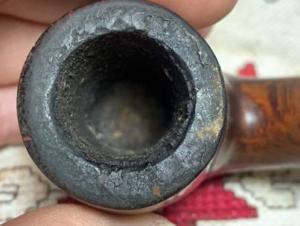 In usual fashion, I start by reaming with the smallest blade head in the Pipnet Reaming Kit. The cake is like a rock, and I’m concerned about breaking the blade. The Kleen Reem Pipe Tool is called into service. With its expanding metal blades, I’m able to make some progress.
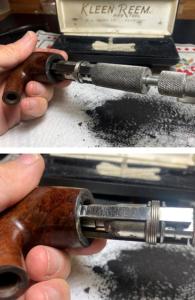 After the Kleen Reem tool plows first, the Pipnet blade heads do a better job continuing to clean the chamber surface. I end up using two of the four blade heads available in the Kit.
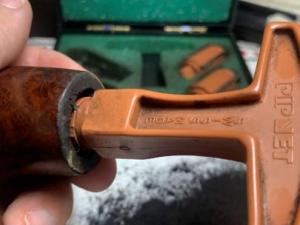 This is followed by scraping the chamber with the Savinelli Fitsall Tool. This is a great tool that is hard to find. I found one come up on eBay several years ago and in the bidding process, I would not be denied 😊. The Tool gets to the difficult angles at the floor of the chamber.
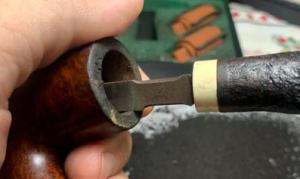 It is also useful in this case to carefully scrape the crusted lava flow over the rim.
 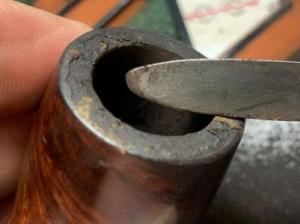 Finally, the chamber is sanded with 220 paper wrapped around a dowel rod.
 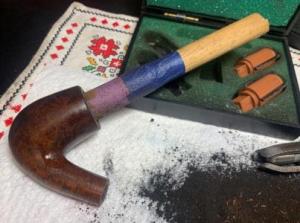 All the tools are used, and the pile of residue is shown.
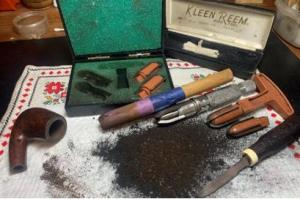 After the chamber is wiped with a cotton pad, an inspection reveals healthy briar with no heating issues.
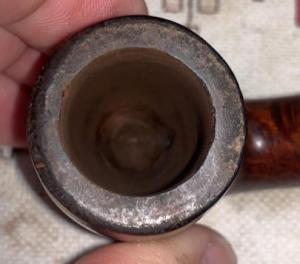 Continuing with the cleaning, the external briar is cleaned using undiluted Murphy Oil Soap and a cotton pad. A few starting pictures help to mark the progress of removing the grime. The rim was already scraped earlier to remove the crusted lava.
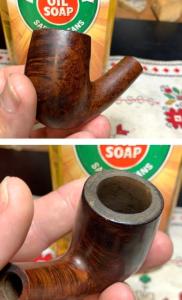 The cotton pad is used to scrub and the grime coming off is easy to see.
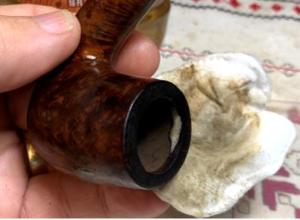 To clean the rim further, the brass brush is used to add muscle to the cleaning. Brass is gentler on the briar but helps to clean the difficult areas.
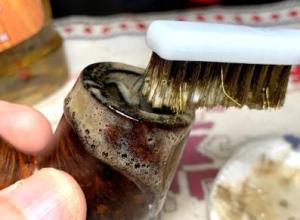 Next, the stummel is taken to the sink to start the cleaning process on the internals using warm water, anti-oil liquid dishwashing soap and shank brushes. After the scrubbing, the stummel is rinsed thoroughly to remove the soaps.
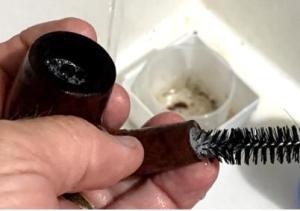 The stummel returns to the worktable and the cleaning continues.
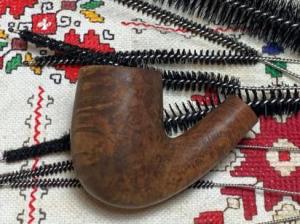 The internal cleaning continues using pipe cleaners and cotton buds moistened with isopropyl 99% alcohol. The cleaning is helped by scraping the mortise with a small dental spoon. This helps to remove the tar and oils that build up.
 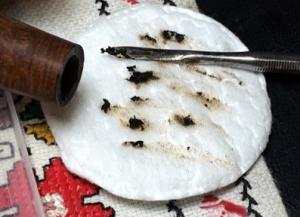 It took quite a bit of time, but the buds began to emerge lighter, and the job is called for now. The internal cleaning will continue later with an alcohol and salt soak. The entire pile of used cleaners and buds on display!
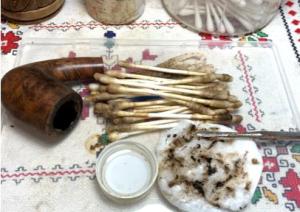 With the basic cleaning of the stummel complete, a closer look reveals some issues. The rim is in a rough shape. The following pictures show the front of the rim which has worn away and practically the entire circumference is nicked, dinged and rounded.
 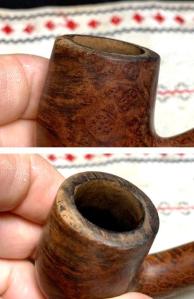 Another issue is the dark ring around the inner rim from the burning in the chamber.
 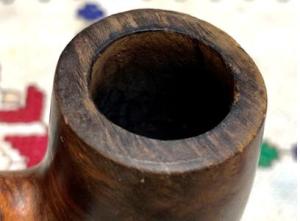 The stummel itself has normal nicks here and there from time and use.
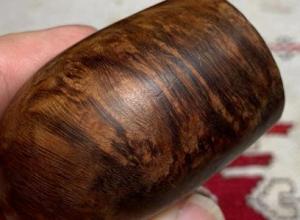 To clean the rim and to reestablish crisp lines, the rim is topped starting with 220 grit paper on the chopping board. The topping only will remove enough to clean the edges. With the stummel inverted on the paper, it is rotated several times. I’m careful to keep the pressure evenly distributed as I press down. I don’t want to dip into the soft areas on the rim.
 After the first cycle of rotations, this picture shows the high and low spots on the rim. Where the sanding happened, that is the high part. The edge on the rim’s edge, especially the front, needs a more rotations before this worn area blends into the rim.
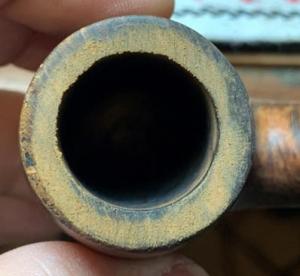 After several more rotations on the 220 grit paper, I stop the sanding. You can still see the small imperfections on the rim’s edge, but I believe these will be erased with the light sanding on the stummel to clean the nicks and dings. I don’t want to remove more of the briar off the top than is necessary.
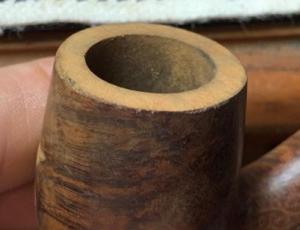 Next, the rim is topped using 600 grit paper. It looks good.
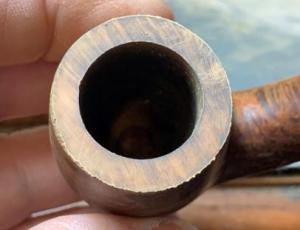 Next, sanding sponges are used to clean the stummel surface of the small nicks and dings. I like the sponges because they form to the shape. I only use the medium, light and fine grade sponges to clean things up but not remove the patina. The more this grain comes out strikes me that this is a dark, older briar.
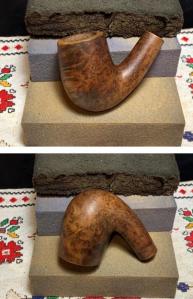 Next, the sanding continues but transitions more to polishing with the fine micromesh abrasives. The stummel is dry sanded with pads 1500, 1800 and 2400, then 3200, 3600 and 4000, and finally, 6000, 8000, and 12000. Between each pad the stummel is wiped with a moist cloth to remove the dust and improve the traction for the next pad.
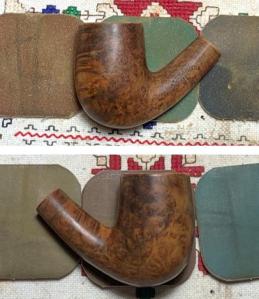
 Next, Mark Hoover’s ‘Before & After’ Restoration Balm is worked into the briar. The Balm does a great job bringing out the natural hues of the briar. After the Balm has been applied thoroughly, the stummel is put aside for about 10 minutes for the Balm to do it thing.
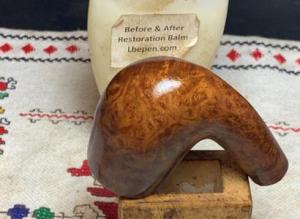 After the time has passed, the stummel is wiped and buffed up with a dedicated microfiber cloth. I like what I see.
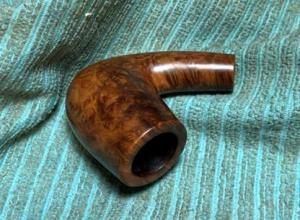 Before progressing further with the stummel, the internal cleaning continues with an alcohol and kosher salt soak. This passive cleaning helps to draw out the tars and oils in the briar, to remove ghosts of the past and refresh the briar. A cotton ball is used to form a wick.
 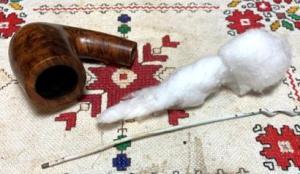 The cotton ball is pulled and twisted and then is guided down the mortise through the draft hole with the help of a stiff wire.
 Kosher salt then fills the chamber and the stummel is placed in an egg carton for stability and to angle the stummel so that the rim and shank facing are roughly parallel. Using a large eye dropper, isopropyl 99% alcohol fills the chamber till it surfaces over the salt.
 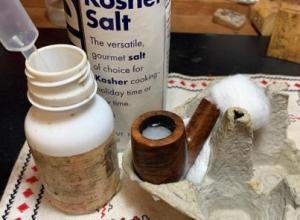 After the stummel sits for some minutes, the alcohol is absorbed into the cotton wick and then is topped off. The soak will sit through the night.
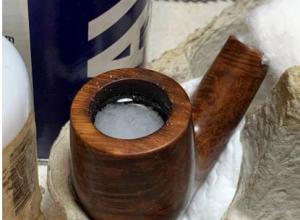 Turning to the stem, a fresh set of pictures show a tooth compression on the upper bit. The lower bit looks good.
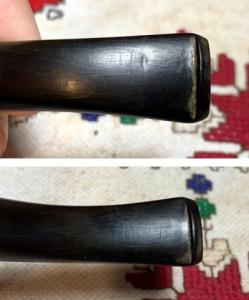 Using the heating method, to minimize the compression, the bit is painted with the flame from a Bic lighter. As the vulcanite rubber heats, the physics takes over and the rubber expands to reclaim its original form – or closer to it. The flame is painted quickly back and forth over the surface to avoid burning or charring the rubber. I’ve learned the hard way that too much flame in one place can cause problems. The compression has been minimized enough that simple sanding should erase it without needing to patch it.
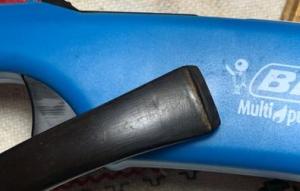 To do the sanding, 220 grit paper sands the bit upper and lower to remove the compressions and roughness.
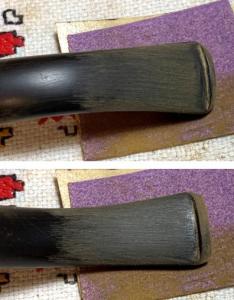 This is followed by sanding the entire stem with 320 grit paper careful to sand around the GL logo. A plastic disk is used to guard the stem facing from ‘shouldering’. Shouldering is when the edges of the stem facing are sanded and become rounded.
 The 320 paper is followed by wet sanding the stem with 600 grit paper and then applying 0000 grade steel wool.
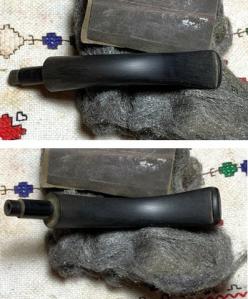 All 9 micromesh pads are used next to dry sand the stem. To condition and guard the stem from oxidation, Obsidian Oil is applied between each pad – 1500, 1800, 2400/3200, 3600, 4000/6000, 8000, 12000.
 Following the micromesh pads, ‘Before & After’ Fine and Extra Fine Polish are applied to the stem. Starting with the Fine Polish, with a small amount on the finger, the polish is worked into the surface and then wiped off and buffed with a paper towel. The same is done with the Extra Fine Polish. The stem looks great.
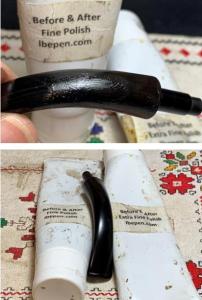 The next day, the stummel soaked through the night in an alcohol and kosher salt soak. The picture shows the soiling in the salt and the cotton wick as the oils and tars are drawn out of the briar.
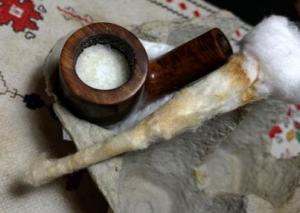 After the salt has been cleaned out of the chamber, a few cotton buds and a pipe cleaner confirm that the internals are clean and refreshed for a new steward.
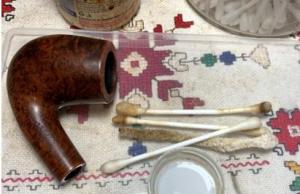 One more mini project before reuniting stem and stummel needs addressing. The GL stem logo needs to be refreshed. The lettering is deep and crisp so there shouldn’t be any problems.
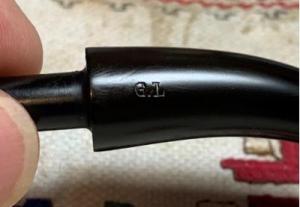 A small dollop of white acrylic paint is placed over the lettering.
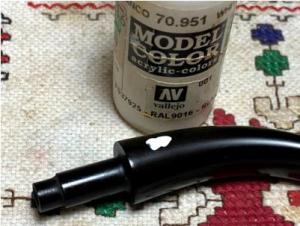 A cotton pad is used to dab the wet paint to spread it and it quickly dries.
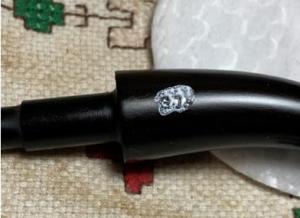 Next, the side of a toothpick is used to go over the top of the logo to remove excess paint. The point also helps to fine tune by scraping out the excess closer to the lettering.
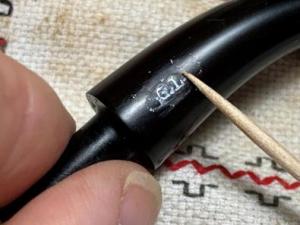 I think the logo looks great. The G.L is ready to go again.
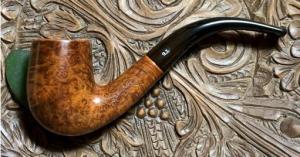
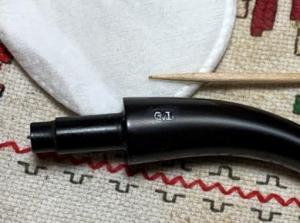 Now the homestretch. The Lillehammer stem and stummel are reunited. After a dedicated cloth buffing wheel is mounted on the rotary tool and set at about 40% full power, Blue Diamond compound is applied to the pipe.
 A felt cloth is used to wipe off the compound dust that accumulated during the process. This is in preparation for the application of the wax.
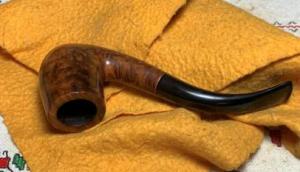 After another cotton cloth buffing wheel is mounted at the same speed, Carnauba wax is applied to the pipe. After the wax, a microfiber cloth is used to give the pipe a rigorous hand buffing to remove the excess wax and to raise the shine.
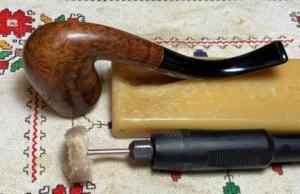 My first experience restoring a Lillehammer GL of Norway was a leaning experience. The ‘Super Extra’ stamping on the shank was Lillehammer’s way of saying that this Bent Billiard lived on the top shelf of their offerings. I can see why Scandinavian pipe men passed on Dunhills for an elegant Lillehammer. The dating of this pipe predates the Danish influence and so was produced in the 50s, 60s, up to the early 70s. The patina on this pipe is a dark, rich hue and the grain is beautiful. Thanks, Steve, for your help in putting the Lillehammer timeline in better focus and thanks N.R. for commissioning this pipe giving me the opportunity to dive into the Lillehammer name. N.R. commissioned this pipe and will have the first opportunity to claim him from the Pipe Steward Store. A large part of the proceeds of each pipe restored go to help the Daughters of Bulgaria (now called, Spring of Hope) – helping women and girls who have been trafficked and sexually exploited. A ‘before & after’ picture reminds us how far we’ve come. Thanks for joining me!
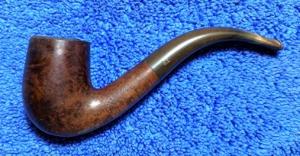


Pingback: Refreshing an Elegant Chapuis Comoy Sunrise Amber Grain Vintage Briar 159 of France – The Pipe Steward