
The next pipe on the worktable is the second of three pipes that N.R. has commissioned. The first pipe was a Lillehammer GL Super Extra 61 Made in Norway which came out beautifully (New Life for a Classic Lillehammer GL Super Extra 61 Made in Norway – The Pipe Steward).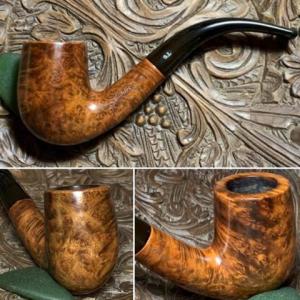 The Savinelli Capri Root Briar that got N.R.’s attention comes from the same Lot of 68 I acquired in February 2019 from a seller in West Hartford, Connecticut. This Lot has brought some very nice pipes which are finding their way to new stewards. The Savinelli is on the very top of the second column. All these pipes are in the For “Pipe Dreamers” ONLY! online collection available to be commissioned benefiting the Daughters of Bulgaria (now called, Spring of Hope). This effort my wife and I co-founded when we lived in Bulgaria helping women and girls who had been trafficked and sexually exploited. A large amount of the proceeds of pipes restored and adopted helps this work.
 Here are pictures of the Savinelli that got N.R.’s attention.
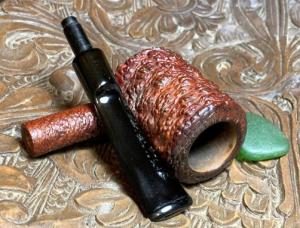
 The nomenclature is stamped on the smooth briar panel on the shank’s underside: SAVINELLI CAPRI [over] ROOT BRIAR. To the right of this is the Savinelli shield logo.
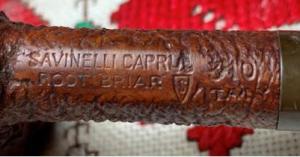 To the far right is stamped the shape number ‘310’ [over the COM] ITALY.
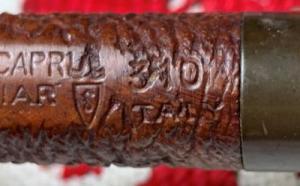 The Savinelli shield logo is stamped on the upper side of the saddle stem.
 In my communications with N.R. I first referred to this Savinelli as a Poker shape. However, technically it is called a Cherrywood because the stem is bent – ever so slightly in this case. Here is Bill Burney’s helpful description from Pipedia (Cherrywood – Pipedia)
 Savinelli is perhaps the most well-known Italian pipe house and the history is interesting. Pipedia’s Savinelli article is extensive (Savinelli – Pipedia) and begins with these paragraphs as a teaser:
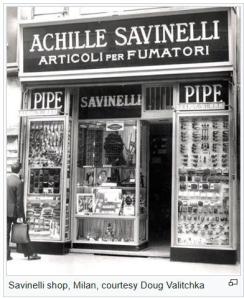 1876 was a year of breakthroughs: Thomas Edison patented the mimeograph, Julius Wolff-Eastport canned sardines for the first time, Alexander Graham Bell made the first telephone call, Pyotr Ilyich Tchaikovsky completed Swan Lake, Melville Bissel patented the first carpet sweeper, Mark Twain published Tom Sawyer, and in Milan, Italy, Achille Savinelli opened one of the first shops exclusively focused on tobacco and smoking accessories.
That last item may seem relatively unimportant in the global scheme of advancements, but for those of us who love pipes, it was a monumental achievement, made even more difficult by the Italian government, which held a monopoly on tobacco. In addition, Achille was convinced that briar pipes represented the future of pipe smoking at a time when the market was dominated by clay and meerschaum. It may not have been obvious in 1876, but Achille Savinelli’s commitment to briar pipes would prove to be visionary.
He soon began designing his own pipes (different from the styling we associate with Savinelli today) and arranged their manufacture by local pipemakers in the Varese district of north-west Italy. The pipes became so popular that some were exhibited at the 1881 Esposizione Industriale Italiana (Italian Industrial Exposition)—the precursor to today’s Milan Fair, one of the largest trade fairs in the world.
There is much more in the Pipedia article for those wishing to dig deeper. Pipephil’s description of Savinelli is brief and to the point:
Achille Savinelli Sr. opened in Milano (1876) a store dedicated to smokers. In 1890 his son Carlo Savinelli succeeded him for about 50 years. The grandson of the founder, Achille Savinelli Jr. (1918-1987) in association with Enea Buzzi started pipe production in Brebbia. They split in 1953, Savinelli setting up its own factory in Molina di Barasso.
Giancarlo Savinelli (4th Savinelli’s generation) is currently (2011) managing the company.
Another great place to go for the history of Savinelli is to their own website (Savinelli Pipes | Our History). What I especially like about their presentation of ‘Our History’ is not only the history described, but the period pictures. Here are a few. The Capri Root Briar is an attractive line of Savinelli with an extreme rustication. The Pipedia article has some examples of Capri Root Briar pipes which are helpful to see in their pristine condition (Examples and Details, courtesy of Doug Valitchka).
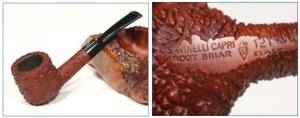 The shape number on our pipe is 310. The ‘official’ Savinelli Shape Chart pictures our shape but labels it as KS, or King Size. I believe that this means that the 310 shape comes not only in the standard size (ours), but also in the larger variety.
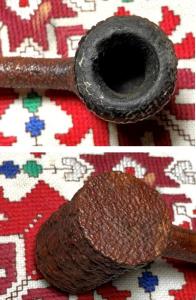
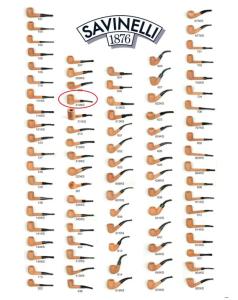 Looking now at the Savinelli Capri Root Briar on the table, the chamber has a good bit of cake build up and this needs addressing.
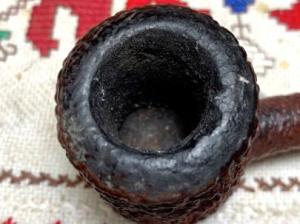 The rim has a crusted layer of lava over it and this needs to be removed to see what lies beneath.
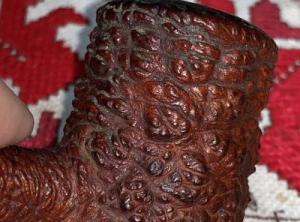
 The Root Briar rusticated surface is about as rough as you can get and there is grime in the crevasses. This rough finish is really quite eye catching and promises a great experience especially for those liking the tactile detail.
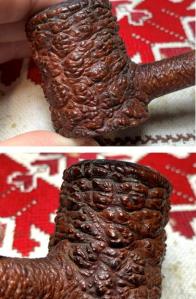 The slight bent saddle stem has very thick oxidation and calcium deposits on the bit – upper and lower. The oxidation presents as a deep olive-green hue. The vulcanite stem should be black.
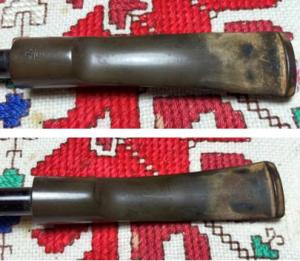 Along with the deep oxidation and calcification on the bit, there is tooth chatter and a couple of bite compressions on both upper and lower sides.
 To begin the restoration of this Savinelli Capri Root Briar Cherrywood, the stem airway is cleaned using pipe cleaners moistened with isopropyl 99% alcohol.
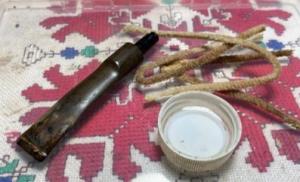 The oxidation in the stem is next. Since the oxidation is so heavy, a 000-grade steel wool will attack the oxidation on the surface before putting it into the soak. This picture gives a good idea of what happens to rubber when exposed to the sun’s UV rays.
 The steel wool is applied over the entire stem except for the stem logo. The scraping goes around the Savinelli Shield – I certainly don’t want to damage it 😊.
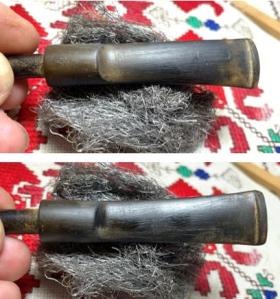 With the steel wool scraping finished, the stem is placed in a soak of Briarville’s Pipe Stem Oxidation Remover and it will to do its work through the night.
 The next morning the stem is fished out of the Oxidation Remover. The picture below shows the raised oxidation on the surface.
 A cloth is used to rub the stem aggressively wiping away the layer of raised oxidation. I concentrate rubbing over the saddle where the logo is to remove as much as possible. I do not plan to sand the logo so removing oxidation in this passive way is the way to go. The Briarville Oxidation Remover does a good job.
 What I saw earlier as 2 compressions on the upper and lower bit sides turn out to be one on the upper. The lower bit is in good shape.
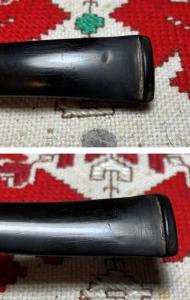 To reduce the severity of the compression, the heating method is used. With a Bic lighter, the bit is painted with the flame. As the vulcanite rubber heats it also expands reaching toward its original position – or closer to it. Well, I used the flame several times but there was not much improvement.
 It is possible that sanding could erase the compression but there is a point when sanding the bit removes too much of the vulcanite and that’s when patching the compression is the best path forward. This compression was marginal, so I decided to patch it. After cleaning the bit with alcohol, a small drop of Starbond Medium-Thick Black CA glue fills the compression. The stem is then put aside to allow the glue to cure.
 While the stem is on the side, it is time to clean the stummel starting with reaming the chamber. The chamber has a cake build up which a fresh picture shows and to mark the progress.
 Using the Pipnet Reaming Kit, 3 of the 4 available blade heads are used.
 After the reaming, the chamber is further cleaned with the Savinelli Fitsall Tool which scrapes the walls and reaches the floor of the chamber.
 Finally, the last vestiges of carbon cake are clean by sanding the chamber with 220 grit paper wrapped around a dowel rod.
 The full arsenal of tools used to clean the chamber is shown along with the pile of carbon.
 With the chamber cleaned, a quick inspection of the chamber reveals healthy briar. There are no indications of heating issues.
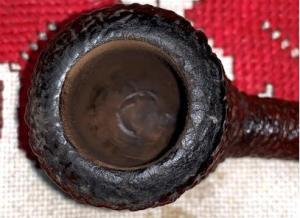 Next, the external briar surface needs to be cleaned. The Capri Root Briar has a myriad of nooks and crannies for grime to build up and hide. The rim is also covered with crusted lava flow. A few starting pictures are taken to mark the progress.
 The cleaning begins with undiluted Murphy Oil Soap scrubbing the surface with a cotton pad. This is followed by using a bristled toothbrush to get into the nooks and crannies.
 A brass brush is also helpful working on the rim. Brass is not as invasive as other methods but adds some scrubbing power to the effort.
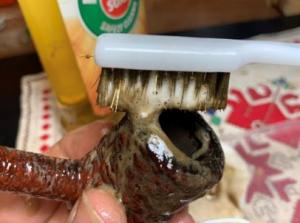 Next, the stummel is taken to the sink where the cleaning continues on the internals. Using warm water and anti-oil liquid dishwashing soap, the internals are scrubbed with shank brushes. After the scrubbing, the stummel is thoroughly rinsed and returned to the worktable.
 At the worktable, my initial impressions of the stummel after the cleaning are that the rim still has dark staining, and the finish has thinned over the stummel surface. I will take a closer look at these after the cleaning is completed.
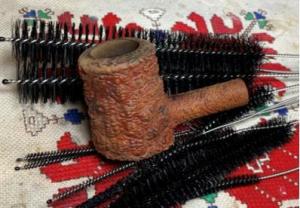 Continuing with the internal cleaning, cotton buds and pipe cleaners are used and moistened with isopropyl 99%. A small dental spoon helps to scrape the mortise walls to remove tars and oils on a larger scale. This excavation helps to save cotton buds.
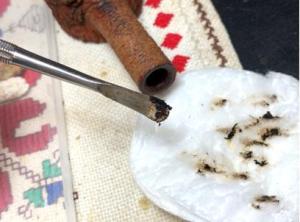 The buds finally begin to emerge lighter and the internal cleaning is done.
 With the basic cleaning completed, I take a closer look at the stummel. As I mentioned above, the cleaning reveals some splotching where the finish seems to have thinned. In the pictures below they are darker and lighter spots here and there.
 The rim has issues. It is stained with dark charring from lighting practices over the years. This pipe was well loved in the rotation, but not cleaned well. The front of the rim also has a ‘bald’ spot where the rim rustication is worn down. This is the lightened area. The back of the rim is also worn but not as much. Circling the entire rim are the remnants of dark wood. From this angle, one can see a dark spot on top of the shank which may indicate that the finish is worn.
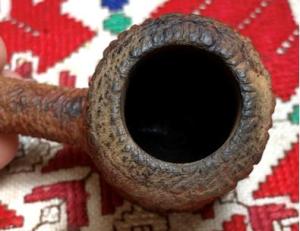 Here are the challenges that are faced at this point: Do I apply dye to spruce up the Root Briar finish? And, how to address the issues of the rim. The main issue with the rim is safeguarding the remaining rustication on the rim and yet try to remove the staining to some extent. With a smooth briar, this is where you would top the stummel or sand it a bit more aggressively. This is not the path with this rim’s finish. The picture below shows what became more of a rapid-fire approach and I didn’t take pictures at each transition. My thinking was to apply a very light sanding that might break up the char stain and clean the rim. I started with a light touch sanding with the 1500 grit micromesh pad. This did very little. I then transitioned to a VERY light touch sanding with the medium then light sanding sponges. Finally, a very soft rubbing with the 220 grit paper was used – dragging the paper on the rim more than sanding. The 220 grit also was used to sand on the inner rim edge to mitigate the dark ring. Not shown in the picture is the cotton pad moistened with alcohol and scrubbing the rim.
 There might be a marginal improvement, but this is as far as I’m willing to go. Whatever ghosted charring that remains on the rim will be marked off as a sign of honor of his years in service 😊. We all limp along in some ways in this life😊.
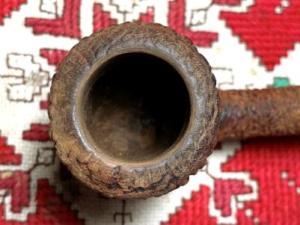 Next, the condition of the finish on the stummel is in view. My choices here are to apply a dye to freshen the darkish tan finish, or to apply Mark Hoover’s ‘Before & After’ Restoration Balm and live with the results. The rim needs help beyond what the Balm can do, and the decision is made to apply Fiebing’s Tan Leather Dye. Instead of applying the dye and flaming it as I usually do with aniline dyes, with this Root Briar surface the dye is washed on using a folded pipe cleaner. The Tan Leather Dye is a good match I belieive. After the dye is applied, the stummel is put aside allowing the dye to dry and settle in.
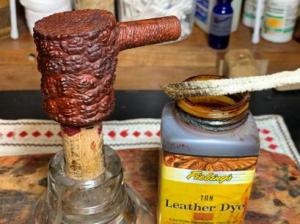 Turning again to the stem, a patch on the upper bit has cured and a flat needle file files it down flush with the stem surface.
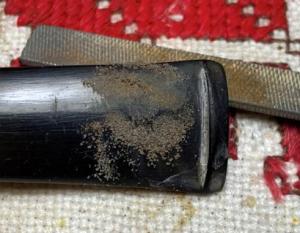 Before sanding, both the upper and lower button lips are refreshed with a square needle file.
 The bit is now sanded with 220 grit paper. The small patch is visible in the rough.
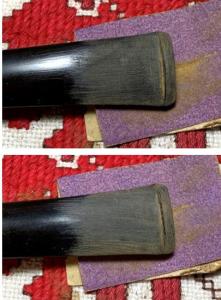 Next, the sanding is expanded to the whole stem using 320 grit sanding paper. During the sanding, the Savinelli Shield logo is avoided. A disk is used on the shank facing during the sanding to prevent the shouldering of the edges.
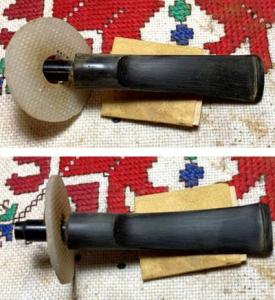 Continuing the sanding, 600 grit paper is used to wet sand the stem. This is followed by applying 0000 grade steel wool. Throughout, the stem logo is avoided.
 Next, the full set of 9 micromesh pads are used. All are dry sanded starting with 1500, 1800, 2400, then 3200, 3800, 4000, and lastly, pads 6000, 8000, and 12000. Between each pad Obsidian Oil is applied to continue conditioning the stem and the oil protects the vulcanite from oxidation.
 The stummel has been sitting on the side for some hours to allow the new dye to settle in. When a pipe is first put into service with new dye, when the stummel heats up the dye can possibly leach onto the steward’s hands. To minimize this possibility, the stummel heated with a hot air gun to emulate the inaugural smoke.
 After heated, a cloth is used to wipe rigorously removing the leaching dye – hopefully! The cloth in the picture is used for this purpose and the color is not from the Savinelli 😊.
 To help blend the rim with the stummel, a Mahogany dye stick is used. This helps to darken the bald spot that was still showing. I did not get a picture of what I was seeing. After applying the dye stick, a cotton pad moistened with alcohol is used to wipe the rim to help blend the dye.
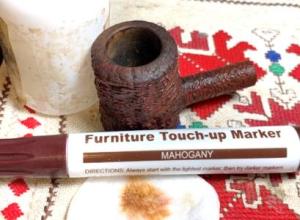 On the homestretch – since no compound is applied to the stummel because of the roughness of the surface, Blue Diamond compound is applied to the stem alone. To use compound on the stummel would soil the surface with dust that would then need to be cleaned…. Not a good idea.
 After application of the compound, a felt cloth is used to wipe off the dust accumulated on the surface.
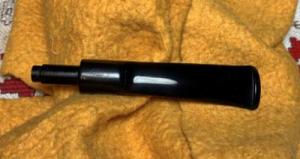 One mini project left to do. The Savinelli Shield logo on the stem needs refreshing. In the picture below the logo can be seen in the reflection. The logo is thin on the bottom of the shield. When the logo is thin, instead of using white acrylic, which is thicker, Rub’n Buff is a good alternative. It will adhere to the surface much more efficiently and the gold is almost indistinguishable from white.
 A small glob is rubbed over the logo with a toothpick and then rubbed off with a cotton pad.
 I buff it up a bit with a microfiber cloth. I like the results.
 A dedicated cotton cloth buffing wheel is mounted on the rotary tool with the speed set at about 40% full power and carnauba wax is applied to stem and stummel. Because of the roughness of rusticated surface, more time is given to concentrate in one area to make sure the wax has been absorbed into the briar. I don’t want to leave excess wax gunked up on the craggy surface. After application of the wax, a microfiber cloth is used to give the pipe a good hand buffing to remove excess wax and to raise the shine.
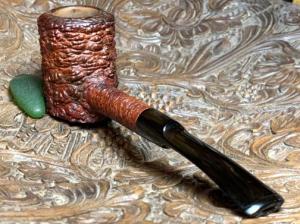
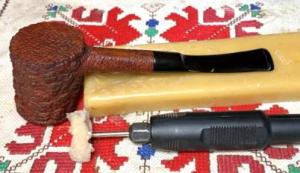 This Savinelli Capri Root Briar came out great. I was concerned that applying the Tan Leather Dye had darkened the hue too much. As I look at the ‘before’ picture below, the opposite is the case. The patina remains intact with a deep rich hue – brighter and crisper now. The Capri Root Briar rustication is superb providing much to see and touch. The dimensions of the Cherrywood are Length: 5 3/4 inches, Height: 1 3/4 inches, Rim width: 1 3/8 inches, Chamber width: 3/4 inches, Chamber depth: 1 1/2 inches. This is the second of three pipes commissioned by N.R. and he will have the first opportunity to claim the Savinelli from The Pipe Store. Part of the proceeds of all the pipes restored benefit the ongoing work of the Daughters of Bulgaria (now called, Spring of Hope) helping women and girls who have been trafficked and sexually exploited. Thanks for joining me!


Pingback: Refreshing an Elegant Chapuis Comoy Sunrise Amber Grain Vintage Briar 159 of France – The Pipe Steward