
The next pipe on the worktable is a classic Custombilt, a brand that always recalls a campfire in a rustic setting for me. It came to me in February 2019 in a Lot of 68 pipes from a seller in West Hartford, Connecticut. This Lot of 68 pipes has provided and continues to offer up some nice pipes. Here is the Lot of 68 and the Custombilt is marked with the arrow. One of the things I like about restoring pipes is getting to know pipe men from all over the world. Robert comes from Sarasota, Florida, and first saw my posts on Rebornpipes. He first reached out to me in 1921 inquiring whether I worked on family heirloom pipes. He also mentioned that he enjoyed my write up chronicling my first pilgrimage to Jackson, Mississippi’s, The Country Squire (A Road Trip and a Visit to The Country Squire Tobacconist in Jackson, Mississippi | rebornpipes) and that he hoped to visit someday since he had family in Jackson. Even during these earlier communications with Robert, he gave me a standing invitation to stop by if I made it down to the West Coast of Florida:
Dal, enjoyed your recent blog post to the Country Squire! I have family near Jackson and plan to go some day. I replied to your blog post. Long story short, you and yours are welcome to stay a spell on the west coast in Sarasota when visiting Florida. Amazing world class beaches, numerous pipe and cigar shops… we have a pool and hot tub. My wife was a missionary in Greece for several years. Born again believers.
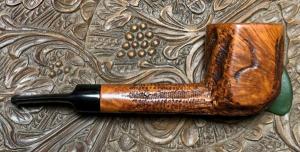
It was good to discover that Robert and his wife were fellow believers in Jesus and that his wife served in Greece as a missionary – a special relation to us having lived in Bulgaria for 15 years, Greece’s northern neighbor. Later on, at the end of 2023, after more communications, Robert donated some of his pipes to benefit the Daughters of Bulgaria which I appreciated very much. These pipes are still waiting to be posted in the For “Pipe Dreamers” ONLY! online collection for pipe men and women to commission – I hope to do this soon! After a few years of communicating with Robert, who has children and grandchildren, Robert decided to commission a few pipes 😊. The Custombilt Panel got Robert’s attention, and he commissioned it along with a Pre-Republic Peterson. I call this Custombilt a Panel because of the flat panels on either side of the bowl, but the length of the stem reminds one of the Lovat shape in the Canadian family – a Paneled Lovat?? Here are pictures of the Custombilt.
 The nomenclature is crisp and clear on the left side of the shank: Custombilt [in fancy cursive over] IMPORTED BRIAR.
 I’ve researched the American made Custombilts before this one and I always find the history of Custom-Bilt/Custombilt interesting. A succinct accounting of the history comes from Pipephil’s entry (Cos-Cz — Pipes : Logos & Markings (pipephil.eu)):
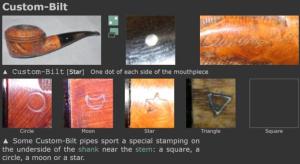 Chunky bowls with rough carving or gouges.
Tracy Mincer stopped making Custom-Bilt pipes in the early 1950s. The trademark was successively bought by Leonard Rodgers (1953), Consolidated Cigars (1968) and Wally Frank Co. (early 1970s). The later began to produce again his version of the pipe in 1974 or 1975 at Weber pipe factory (NJ). In 1987, the pipes were made out of the Butz-Choquin factory (France) and then Mexico until the late 1990s. Currently (2010), the Custombilt name is owned by Tobacalera of Spain which is part of Altadis.
It is generally admitted (but not proved) pipes stamped “Custom – Bilt” (with the hyphen) are from the Mincer era. The name might have changed from Custom-Bilt to Custombilt (without the hyphen) in 1946.
For more information about Tracy Mincer see: Tracy Mincer, The Doodler, Holeysmoke.
If the information above is accurate, the hyphenation in an indication of dating with the name transitioning from Custiom-Bilt to Custombilt in 1946. I looked for any of the special character stampings shown above but found none.
Pipedia’s Custom-Bilt article (Custom-Bilt – Pipedia) drills down in greater detail primarily through reviews of William E. Unger, Jr.’s book, The Custom-Bilt Pipe Story by Richard Esserman and Tony Soderman. I appreciated reading each reviewer’s comments, but I wish the book was still available! The link in the article comes up empty to find the book itself. From Richard Esserman’s review, he annotated each iteration of the Custom-Bilt history which I’ve arranged more in chronological order. Added to these groupings, are pictures provided which are the unique stampings that are thought to be from these different Custom-Bilt periods.
- 1934 – Tracy Mincer starts the Custom-Bilt Pipes.

- 1946 – Name changed to Custombilt after Mincer began association with Eurgene J. Rich, Inc.
- 1953 – Mincer developed severe financial problems in the early 1950s and stopped making Custombilt and lost the name as the company was purchased by Leonard Rodgers.
- 1968 – Company was sold to Consolidated Cigars.
- 1970s (early) – Wally Frank Co. purchased the trademark and started producing their version of Custombilt in 1974/1975 at the Weber factory in New Jersey. 1987 – Pipes made at the Butz-Choquin factory (France) and then in Mexico until late 1990s.


- Currently – Custombilt name is owned by Tobacalera of Spain
The Pipedia article provides another ‘Stamp#5’ which is rare and not in view with our Custombilt. Based upon the information given, our Custombilt appears to be Stamp #2 of the Wally Frank period. Another look at our pipe’s nomenclature is an exact match to the example above which, according to the timeline above, the Wally Frank period expands from early 70s to the late 90s. HOLD THE PRESS – What one will not be reading in this write up is my research drilling down into the Wally Frank history to see if I can determine which period this ‘Wally Frank Custombilt’ was produced. The reason you won’t be reading it is because I discovered that the Pipedia Custombilt article is either misleading or wrong regarding the nomenclature stamps related to the Wally Frank era. This I discovered when I went to Rebornpipes to see if I could learn something new about the Wally Frank era Custombilt pipes from one of Steve’s posts. I discovered that fellow restorer and Rebornpipes contributor, Kenneth Lieblich, had recently restored a Custombilt that got my attention immediately because it looked very much like my ‘Panel Lovat’ but was a straightforward Lovat.
 Kenneth did a top notch job resorting it and I enjoyed reading the write up (Restoring a Very Handsome Custombilt Lovat | rebornpipes). Not only did Kenneth’s Lovat resemble mine, but the nomenclature was identical to the Panel on the worktable.
 What I discovered from Kenneth’s research put in question the conclusion I had come to based upon the Pipedia information. Specifically, that the pipe on my table was of the later Wally Frank era. Kenneth was not relying on the Pipedia article but had Bill Unger’s book as his primary resource. Here’s is what Kenneth wrote:
The history of Custombilt pipes is an interesting one and the most comprehensive source of information comes from Individual as a Thumbprint: The Custom-Bilt Pipe Story by Bill Unger. It is a very good book. Since the last time I worked on a Custombilt, I acquired a copy and it is an excellent resource on these pipes – as well as an entertaining read.
Unger’s book gives us some good information about the dating for this pipe. He displays five different logo stampings and this particular pipe corresponds to stamp number two. Unger writes:
The second stamp, which was used during the Eugene Rich years, from 1946 through 1952 (at the latest; it could have been 1950 or 191), is also quite unmistakable. Custom-Bilt became Custombilt in 1946, and the stamp reflects the major advertising campaign that was undertaken. The script letters do not slant, but the major feature is the big, looping C, which extends over the t (although, in some cases, it extends just to the top of the t). The t has a longer cross than on the Custom-Bilt stamp, but a shorter one than would be used during the Wally Frank era. Remember that the Eugene Rich-era stamp was used on pipes still being made in [Tracy] Mincer’s Indianapolis factory.
After reading this excerpt from Unger’s book there was obviously something out of alignment. This description of Stamp #2 pointed to pipes produced in the Eugene Rich era from 1946 through 1952, and not the later Wally Frank era. I reached out to Kenneth to help with my confusion. I wrote:
…You have a distinct advantage of having Unger’s book at your disposal. I do have a question about the dating. You said in your post that the pipedia article essentially agreed with what you had read in Unger’s book. However, in the pipedia article, it references 2 stamps used during the Frank period. It gives an example of a picture of a possible number two stamp which matches your pipe exactly. It also matches mine. Without Unger’s book, I understood this stamp number two to be one of the two stamps used during the Frank era. And thus dated my pipe during the Frank period. I hope this makes sense!…. The Pipedia article has no mention of this detail about Eugene Rich years from 1946 through 1952. Would you please look at the Pipedia article again and confirm my confusion about stamp number two? Is there confusion about stamp number two in the article which seems to indicate that there were two Wally Frank era stamps? Or, is Pipedia wrong? Or am I missing something??
Kenneth graciously got back to me and wrote:
Hopefully this information will clarify things for you.
The Unger book shows images of five different stampings. Number One is the Tracy Mincer era (1938-46). Two is the Eugene Rich era (1946-52). Three and Four are the two stamps from the Wally Frank era. Five is a bit of a mystery to Unger.
The image that Pipedia provides, stated “Might be example of Stamp #2 of the Wally Frank Era pipes. This stamp has the top arch of C extend to the top of t”. This is misleading. It is NOT the second of the Wally Frank era stamps (which would be #4 in the book). It is Stamp #2 from the book, which is the Eugene Rich era.
So, if that photo on Pipedia matches your pipe exactly, then it is from the Eugene Rich era.
Hope that helps.
Kenneth
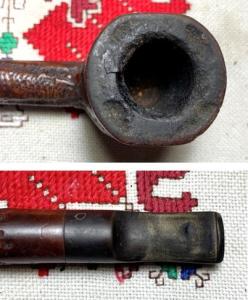
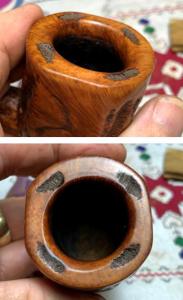
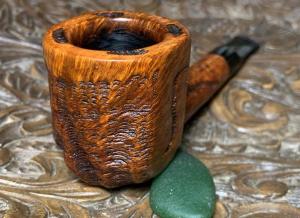
Kenneth also sent me a picture of Unger’s Stamp Number Two (from Page 92 of Unger’s book) which settled the matter for me.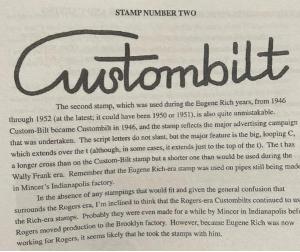 With much gratitude to Kenneth for his help and a better understanding of the Eugene Rich era (1946-1952) Custombilt on the worktable, it’s time to look more closely at the issues. The chamber has moderate cake that needs to be removed and the rusticated rim, almost a plateau as broad as it is, is covered with crusted lava flow. I can see the outlines of 4 rusticated patches carved on the plateau, but what lies beneath remains to be seen.
 With this Custombilt, there is a contrasting of smooth and the rusticated, rough surface which is nice. The smooth surface of the panels has normal dents and small scratches that should be cleaned up.
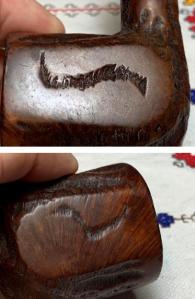 The smooth briar on the shank and heel also has normal wear and needs the grime to be cleaned.
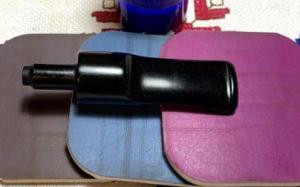
 The stem has thick oxidation and calcification on the bit with some tooth chatter and some bite compressions on the upper bit.
 To begin bringing this Custombilt back to life, the stem airway is cleaned with a couple of pipe cleaners moistened with isopropyl 99% alcohol. I notice that the airway is rather tight which would probably create a stronger draw when in service.
 Next, to address the oxidation, the stem is placed in a soak of Briarville’s Pipe Stem Oxidation Remover for several hours.
 With the stem soaking, the stummel is next. The chamber has fairly thick carbon cake build up which needs to be removed to allow fresh briar to emerge and to allow the new steward to create his own protective cake. Another picture shows the starting point to mark the progress.
 To begin, all 4 of the blade heads are used from the Pipnet Reaming Kit to ream the chamber. The first 2 blades did not contact the cake wall. This is a large chamber!
 After reaming, the Savinelli Fitsall Tool is used to further scrape the chamber walls.
 Finally, to remove the last vestiges of carbon buildup, the chamber is sanded with 220 grit paper wrapped around a dowel rod.
 The final picture of all the tools used, the excised carbon, and the clean chamber. An inspection reveals healthy briar beneath the carbon cake – no heating issues are detected.
 Next, the external briar is scrubbed using undiluted Murphy Oil Soap and a cotton pad. A bristled toothbrush is also used to clean the rustication furoughs.
 A brass brush is also used on the plateau. The crust is thick and stubborn. The Savinelli Fitsall Tool is also used to scrape the plateau to remove the crust.
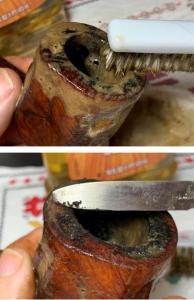 Next, the stummel is taken to the utility sink and the internals are scrubbed using warm water, anti-oil liquid dishwashing soap and shank brushes.
 After scrubbing, the stummel is rinsed thoroughly and returned to the worktable.
 The internal cleaning continues with pipe cleaners and cotton buds moistened with isopropyl 99%. A small dental spoon also is used to scrape the mortise walls.
 After the buds and cleaners begin to emerge lighter, the job is called complete.
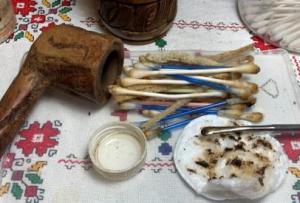 With the basic cleaning completed, I take a closer look at the stummel. The rim or plateau has taken a beating. The four rusticated carvings on the rim have been worn down by the lava crust and lighting practices of the former steward. I need to clean out the fine wire carvings in the rusticated patches to see if that will help things.
 I’ve marked the picture to focus on what I’m seeing. The forward inner rim wall is worn from charring so that it slopes down toward the chamber. The front of the outer rim has also worn down.
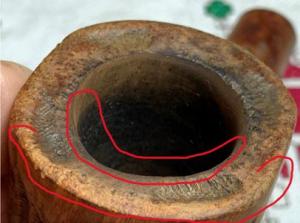 The rim’s edge also has knicks and cuts around the circumference.
 The stummel also has small scratches, but the rustication is great in contrast to the smooth panels.
 Starting on the plateau, a sharp dental probe does a good job scraping out the wire cut furrows. The first picture shows the worst rustication patch on the back right of the rim. All the wire marks run in toward the chamber. Using the dental probe, I run the point down each furrow removing loose debris and giving a bit more definition to the rustication. The great thing about Custombilt pipes is that its hard to make a mistake because the whole pipe has the rough look which we all love about these pipes.
 After methodically ‘plowing’ each wire rusticated furrow, a soft brass brush is used to sweep the rustication. I think it looks a lot better than it did before.
 To continue working on the plateau, the entire surface is rough, and the inner edge of the chamber has a dark char ring. The outer edge also has nicks. To address these issues the stummel will be topped.
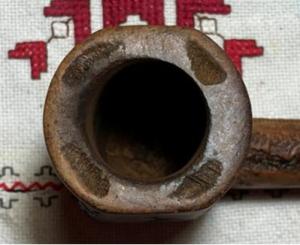 It won’t be possible to top the stummel fully because the deterioration of the briar on the front of the chamber edge that falls away. To remove this area fully and remove the char staining, the topping would probably remove the rustication patches on the rim as well. So, the goal is to clean the rim as much as possible without erasing the rustication. With the stummel inverted on 220 grit paper, it is rotated over the paper a few times to see what the lay of the land is.
 With only a few rotations, this gives me an idea of the high and low areas are on the rim. The large dark area on the front of the chamber edge will not be erased by the topping.
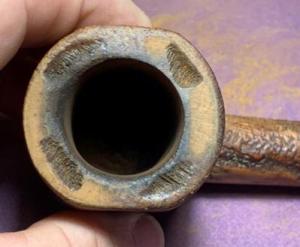 After several more rotation cycles, I bring the topping with 220 paper to a halt. The deterioration on the front edge of the chamber is evident. The char ring continues to the back left of the chamber edge. There still are nicks and rough areas on the outer edge of the rim as well, but strategic sanding on the edge should clean this up.
 To address the dark char ring and the deterioration on the front, 220 paper wrapped around the dowel rod is used to strategically sand the dark areas.
 I like the results. The briar is still darker on the front of the chamber edge, but it has a better chance of blending in later during the ongoing process of sanding and polishing – at least this is my hope!
 The stummel is again topped with the finer 600 grit paper on the board.
 The outer edges of the rim have some rough spots.
 To address these, the edge is strategically sanded using 220 paper followed by 600 grit paper. Overall, I like what I see.
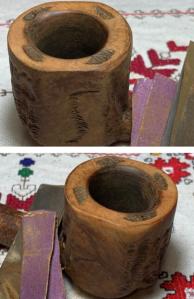 Next, to address the nicks and scratches on the smooth briar, sanding sponges are used starting with a coarse sponge followed by medium, light and then finishing with fine.
 Continuing with the sanding as it transitions to polishing, micromesh pads are used. With each pad the stummel is dry sanded and after each pad the stummel is wiped down with a moist cloth to remove the dust and to give the next pad more traction. Starting first with pads 1500, 1800 and 2400.
 Next, pads 3200, 3800 and 4000 are used.
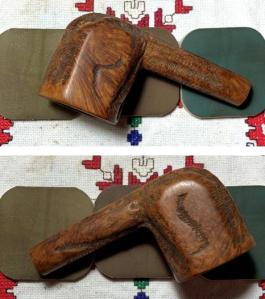 Finally, pads 6000, 8000 and 12000 are used. I love the smooth briar grain contrast with the rustication. It makes is pop.
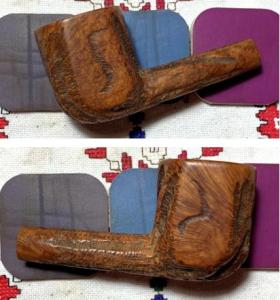 It’s time to apply Mark Hoover’s Restoration Balm, but before doing so, there is an old fill in the rustication that lightened through the cleaning process. To make sure it blends well, an oak hued dye stick is used to darken the area.
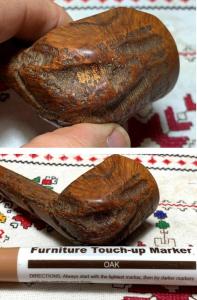 Next, an application Mark Hoover’s ‘Before & After’ Restoration Balm deepens and enriches the natural hues. I can say that I look forward to this step in the process to see the briar emerge. Because of the rustication, a fair amount of Balm is placed on the fingers and worked into the briar. Special attention is given to make sure that the Balm is worked into the rustication as well. After all is applied, the stummel is set aside for about 20 minutes to allow the Balm to do what it does.
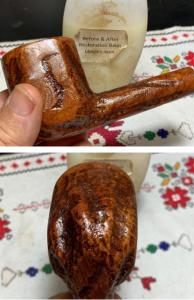 After the time is done, I use a paper towel to remove the excess Balm and then a dedicated microfiber cloth is used to continue to wipe and buff up the stummel. I like what I’m seeing!
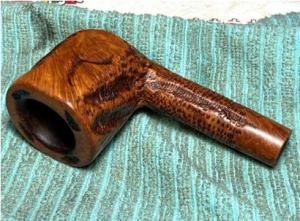 The stem has been soaking in Briarville’s Pipe Stem Oxidation Remover for several hours. After fishing it out of the fluid, the stem is rubbed briskly with a cotton cloth to remove the raised oxidation. The Oxidation Remover did a good job.
 The vulcanite is rough, and the upper bit has a bite compression. The lower bit looks good.
 The heating method is used first to try to minimize the compression on the upper bit. Using a Bic lighter, the bit is painted – back and forth with the flame to heat the vulcanite. As the vulcanite rubber heats, it expands allowing the compression to regain its original form or closer to it. The heating did help some and sanding should work out the remainder of the compression along with the rough surface over the stem.
 Using 220 grit paper the entire saddle stem is sanded. A disk is used on the shank facing to guard the sanding from shouldering the facing.
 Next, 320 grit paper is used.
 Next, the stem is wet sanded with 600 grit paper, and this is followed by applying 0000 grade steel wool.
 After the steel wool, the stem is sanded with the full set of micromesh pads. After each pad, Obsidian Oil is applied to the stem to help condition the vulcanite and to protect it from oxidation. First, pads 1500, 1800, and 2400 are applied. This is followed with pads 3200, 3800, and 4000. Finally, pads 6000, 8000, and 12000 are applied.
 To further condition the stem, Mark Hoover’s ‘Before & After’ Fine and Extra Fine Polishes are used. Starting first with the Fine Polish, some is placed on the finger and then worked into the vulcanite.
 After a few minutes the excess is wiped off with paper towel and then the same process is done with the Extra Fine Polish. The stem looks great.
 On the home stretch. Blue Diamond compound is applied to the stem alone. The compound is a fine abrasive that does a great job polishing, but I’m not going to apply it to the stummel. All the compound dust would foul the rustication and need to be cleaned. So, only the stem receives the Blue Diamond, and I separate the stem from the stummel again to do this. With a dedicated cotton cloth buffing wheel mounted on the rotary tool, the compound is applied at about 40% full power.
 To remove the compound dust from the stem, a felt cloth is used to prepare the stem for wax.
 Now, with stem and stummel united, carnauba wax is applied to the entire pipe. The wax is applied in the rustication as well and extra rotations of the wheel make sure the wax is not clogging up anywhere. After application of the wax, the pipe is given a rigorous hand buffing to remove excess wax and to raise the shine.
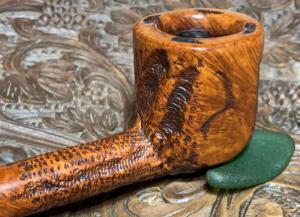
 In the interest of full disclosure — I was almost finished taking the final presentation pictures and as I looked at the final picture, I had the sinking feeling that I was not happy with the results. The picture below was the last picture showing what had been glaring at me for some time. The black char stain area did not blend in as I had hoped and the black area, especially on the front of the chamber edge was glaring at me. Earlier I had been concerned that removing the char stain would mean removing too much briar would and up leaving the rim imbalanced, with an out of round chamber and possibly messing up the Custombilt rustication.
  As I looked at and puzzled over the damaged area, I recalled that I had referred to the pipe’s broad rim as a plateau which is the usual description used with Freehands. One of the things that I like to do with Freehands that have plateaus with briar peaks, is to sand the extending briar on the chamber side of the peaks so that when a steward is enjoying his (usually Danish) Freehand, he enjoys an additional view of grain real estate on the inside of the plateau. This was the seminal idea that began to germinate in my mind that I hoped would not only clean up the ugly blackened char stain but also add a touch of class to this Custombilt. A leap of faith… 😊
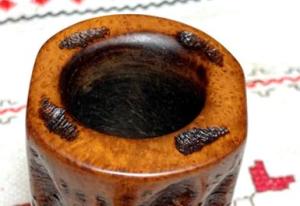 To do this, the sanding drum was mounted on the rotary tool, and with the drum I carefully shaped the chamber walls to even things out as much as possible with a better symmetry. The drum worked on the edge removing char stain and fashioning the receding chamber so that there wouldn’t be a large briar hump because of the removal of briar at the rim. To remove the stain fully, the sanding/sculpting butted up to both forward rustication patches trying to blend the movement of the rim edge with the rustication.
 It took some time and patience, but the sanding drum sculpting and shaping did a good job. The picture below is looking toward the front of the chamber. You can see that briar was removed up to the edges of the rustication but salvaged it and I believe it looks good.
 The sanding drum shaping progressed around the entire chamber to clean the char stain and to achieve as much symmetry as possible sloping the chamber wall so that the loss of briar on the rim is not as obvious.
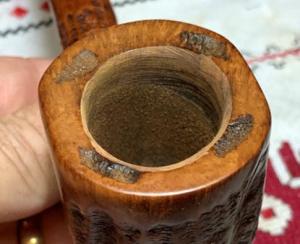 Looking down on the plateau, with the front of the plateau at the bottom of the picture, you can easily see the slope from the plateau to the chamber. This is where the Freehand briar peak real estate idea comes in – I was hoping.
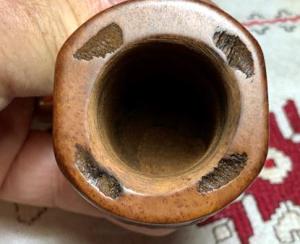 After the sanding drum, 220 grit paper was used to smooth and shape the inner chamber/plateau followed by 320 and 600. Then the full set of 9 micromesh pads were applied. I was smiling the whole way as I saw the grain emerging and the transformation of an eye sore rim into a Custombilt ‘Freehand’ plateau 😊.
 All I can say is, Wow! What a transformation. I’m glad that the black char kept glaring at me….
 After the addendum work was completed, the pipe was again given a rigorous hand buffing after wax was applied to the plateau.
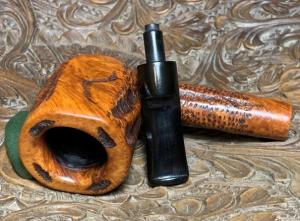
I’m thankful to Kenneth for helping me to unravel the nomenclature on this 1946 to 1952 Eugene Rich era Custombilt. The dimensions of this Panel ‘Lovat’ are Length: 5 15/16 inches, Height: 2 inches, Rim width: 1 1/2 inches, Chamber width: 7/8 inches, Chamber depth: 1 3/4 inches. Robert commissioned this Custombilt and has the first opportunity to claim him from the Pipe Steward Store. A large portion of the proceeds of pipes sold help to benefit the Daughters of Bulgaria (now called, Spring of Hope) – helping women and girls who have been trafficked and sexually exploited. Thanks for joining me!


Dal, As usual a fine example of bringing an old pipe to look great.
I have a question about your using the different grits on the stems. This comes from restoring my 55 Chevy and the stainless steel. We (auto restorers) will sand the next finer grit in a different direction from the preceding one going in a “X” pattern. Do you do this with the different grits of paper or sand in the same direction?
Slava Ukraine
Bill Scott
LikeLike
Dal, As usual a fine example of bringing an old pipe to look great.
I have a question about your using the different grits on the stems. This comes from restoring my 55 Chevy and the stainless steel. We (auto restorers) will sand the next finer grit in a different direction from the preceding one going in a “X” pattern. Do you do this with the different grits of paper or sand in the same direction?
Slava Ukraine
Bill Scott
LikeLiked by 1 person
Hey Bill, thanks for your words. No, I haven’t done an X pattern as you described. Essentially, the sanding progresses successively to such a fine grit, ending with Blue Diamond compound in my case, that the vulcanite has become that glossy smooth that we want. Thanks for sharing this though, gives me something to consider 🤠.
LikeLike
Pingback: New Life for a Pre-Republic Peterson’s De Luxe MADE IN IRELAND 6 Billiard – The Pipe Steward