
(Hold the press! Well, I didn’t wait long enough and this post went out before I received a note from well-known Peterson expert, Mark Irwin. Please see the addendum and the conclusion for Mark’s comments on the dating of this Peterson’s De Luxe)
The next pipe on the worktable is a Peterson’s classic. This is the second of two pipes that Robert of Sarasota, Florida, has commissioned. I am thankful to hear from Robert after I inquired about hurricane Milton hitting Florida. He shared that he and his family were safe after the hurricane made a direct hit where they live. Now, clean up and repairs on their home…. The first pipe Robert commissioned was an attractive Custombilt IMPORTED BRIAR Panel that turned out great (Unraveling the Nomenclature of a Custombilt IMPORTED BRIAR Panel – The Pipe Steward). I love the rustic vibe the Custombilt gives. I appreciate Robert’s patience getting to work on his second commission. After completing the Custombilt, my wife and I took off to do some camping up in the beautiful Rocky Mountains as the aspen leaves were changing. Of course, one of my favorite pipes, my first restoration, came along for the ride and was put to good use.
 Robert is a self-described, ‘Peterson nut’ and was attracted to this Pre-Repubic Billiard he found in the For “Pipe Dreamers” ONLY! online collection. The Peterson came to me from a seller in West Hartford, Connecticut, in February 2019 in what I call the Lot of 68. The Peterson’s De Luxe is marked with the arrow. The Lot of 68 has provided many treasures to new stewards and more are waiting to be adopted!
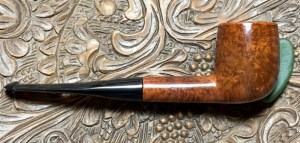
 Here are pictues of the second pipe Robert commissioned helping to support the Daughters of Bulgaria, now called ‘Spring of Hope.’

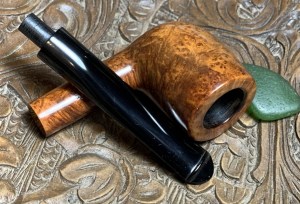
 The nomenclature on the left side of the shank is thinning. Stamped is Peterson’s [over] De Luxe.
 The right-side stamping is much crisper: MADE IN [over] IRELAND. To the right of this is stamped the shape number, 6. I found no logo stamping on the stem.
 The Peterson story is well-known, and Peterson’s pipes are perhaps among the most collected pipes. The Peterson website (Peterson Pipes and Accessories) provides a great look at the current lines of pipes Peterson is producing. On the home page, this brief history is provided:
About Kapp & Peterson, How The Story Begins: In 1874, just one year after receiving a prize medal for his efforts at the 1873 London International Exhibition, German émigré Frederick Kapp moved his pipe retail operation from London to Dublin, Ireland, where he opened a new tobacco and pipe shop, making and selling pipes crafted from meerschaum as well as briar root, a relatively new material to the market. Within a year, Frederick employed a young Latvian woodworker named Charles Peterson to help with production and repairs.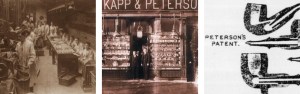 A much more detailed historical accounting is provided by Pipedia (Irwin Rewrite-Peterson – Pipedia) for those who desire to dig deeper into the Peterson story.
The dating of Peterson pipes can be somewhat straightforward, but questions always seem to come up. The Peterson’s De Luxe on the worktable is a Pre-Republic Peterson. PipePhil (Peterson: historical pipes — Pipes: Logos & Markings (pipephil.eu) succinctly describes the different eras of Peterson production with dates:
1875 – 1915: Patent Era
1915 – 1949: Pre Republic Era (Irish Free State, Made in Eire, Made in Ireland)
1950 – Present: Republic Era (Made in the Republic of Ireland)
1991 – Present: Modern Era (Tom Palmer buys over Peterson)
Pipedia has a Peterson Dating Guide: A Rule of Thumb, by Mike Leverette that is helpful in drilling down into the characteristics of pipes from the Pre-Republic era. I’ve highlighted the portion relevant for the pipe now on the table:
During the years of Kapp & Peterson’s business operations, the country of Ireland has undergone several name changes and K&P’s stamping on their pipes reflects these changes. Knowing these changes, a Peterson pipe can be roughly dated and placed in “eras.”
- The Patent Era was between the years of K&P’s formation until the expiration of the patent; 1875 through approximately 1910. Though for our purposes we will list this era as 1875 through 1922. Peterson pipes made during the majority of this period had no “Country of Manufacture” (COM) stamped on them. However, later in this period, say around 1915/16, Peterson began stamping their pipes “Made in Ireland” in a block format.
- The Irish Free State was formed on 15 January 1922. So, the Free State Era will be from 1922 through 1937. Peterson followed with a COM stamp of “Irish Free State” in either one or two lines, either parallel or perpendicular to the shank’s axis and extremely close to the stem.
- Eire was formed on 29 December 1937. The Made in Eire Era will be from 1938 through roughly 1940? or 1941? For dates with ?’s, see below. Peterson now stamped their pipes with “Made in Eire” in a circle format with “Made” and “Eire” in a circle with the “in” located in the center of the circle. This COM was used during the years of 1938 – 1940? /41?. Later they stamped their pipes with “Made in Ireland” in a circle format (1945? – 1947?) and still later with “Made in Ireland” in a block format (1947? – 1949). The “Made in Ireland” block format came in either one line or two lines.
- The Republic Era is from 1949 until the present. The Republic of Ireland was formed on 17 April 1949. From 1949 to present the stamp for this era is “Made in the Republic of Ireland” in a block format generally in three lines but two lines have been used with or without Republic being abbreviated.
Taking another look at the COM nomenclature on the shank’s right flank, we see the stacked MADE IN IRELAND in block format placing this Pre-Republic Peterson as Post WW2 being produced around 1947 to 1949 according to Mike Leverette’s ‘Rule of Thumb’ information above. Taking the middle of that span of years, I wonder what was going on in the world in 1948? In 1948, several significant events occurred worldwide (generated by AI):
- Israeli Declaration of Independence123
- Apartheid began in South Africa2
- Mahatma Gandhi was assassinated in India3
- The United States Congress ratified the Marshall Plan, approving $17 billion in European aid3
- The State of Israel was created, admitting over 200,000 European war refugees3
- The British railway network was nationalized to form British Railways4
- Burma gained independence from the United Kingdom4
To get a feel of 1948, a few of the vintage cars will help to place the Peterson in time and space 😊—a Chevy and a Pontiac Torpedo ‘Silver Streak’. One more car – a 1948 Rover 75 Six Light Saloon would have been on the roads of Ireland in 1948 with a pipe man puffing on his Peterson 😊.
And one more factoid: On October 11, 1948, the Cleveland Indians defeated the Boston Braves in Game Six to win the World Series. (Cleveland Indians defeat the Boston Braves to win the 1948 World Series).
I will note here that I found what appears to be some counter-opinions in the dating for Pre-Repubic pipes. In the Pipedia Peterson Irwin Rewrite (Irwin Rewrite-Peterson – Pipedia) the dating of the De Luxe on the table could be earlier than what was stated above – from 1922 to 1938:
Prior to 1920 it was rare for a country of origin to be stamped on the pipe, just Peterson’s Dublin on the band. After 1921/22, if it is stamped “MADE IN IRELAND” and the “Made in” is stacked over “Ireland” or “MADE IN EIRE” or several other forms, it was made between 1922 and 1938. A considerable number of Peterson pipes were stamped “Irish Free State”. From about 1930 to 1949, most of the pipes (those which were stamped) were stamped “Made in Ireland”.” If the stamp reads “MADE IN IRELAND” in a circle, the pipe was made between 1939 and 1948. These are all “prerepublic” pipes. I can tell you that the mark “Irish Free State” was adopted in 1922; and replaced by “Eire” in 1937 and then by “Republic of Ireland” in 1949.
Whether we take an ‘early’ or ‘later’ dating or a combination of both, the pipe on the worktable is still a Pre-Republic and a collectable pipe.
 To find some information about the De Luxe line, I found a copy of a 1938 Rogers Imports Catalog from a great Peterson website – Peterson Pipe Notes (136. Filling the Gap: The 1939 Rogers Import Peterson Catalog & Download – Peterson Pipe Notes). This catalog predates our pipe if we take the 1947-49 dating but is current if we consider the earlier dating. Even so, the page I found pictures a Peterson’s De Luxe which appears that it could be the same stout Billiard shape number 6 which I found on this clipping from Peterson-Shape-Chart.pdf (above) looking at what is called the ‘Classic Range’. To see the entire chart, follow the link.
In the catalog below, the De Luxe Billiard on the top left is a spitting image of what is on the table. To me, this Billiard has a strong, masculine vibe to it. I noticed also that these pipes do not have the Peterson logo on the P-lip stem as with the pipe on the table. What also caught my eye is that some vendor hand wrote new upward ticking prices for each of the pipes listed in this catalog for distributors. The lettering is small and what follows is the text describing the Peterson’s De Luxe line:
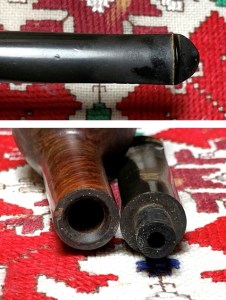
PETERSON’S DE LUXE — The magnificent result of Peterson’s exclusive “charring” process on centuries’ old briar that is flawless. A very limited number of these pipes are made annually, for such perfection in briar and grain pattern are rare. De Luxe is brushed with a deep-hued oil, charred and dried over a flame. Its matchless, mellow smoking quality is further enhanced by Peterson’s “Bone Condenser,” and Patent Lip stem of hand-fashioned Para-Vulcanite. The deep walnut finish glows with warmth.  Our pipe does not have the ‘bone condenser’ described. The following picture was found in another blog at Peterson Pipe Notes (238. Documenting A Late Patent / Irish Free State DeLuxe Billiard – Peterson Pipe Notes) by Mark Irwin showing his Peterson’s De Luxe shape number 5 with the “special bone extension” which is absent on our stem. I can’t be sure, but I suspect that it’s possible that our stem’s extension may have been clipped off. I noticed that the tenon seems a bit shorter than usual and rougher at the end than expected. This thought, only a guess.
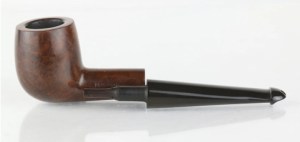 With a deeper appreciation for the Pre-Republic Peterson’s De Luxe on the worktable, it’s time to take a closer look at the pipe. The chamber’s cake buildup needs removing to allow the new steward to create a fresh protective cake.
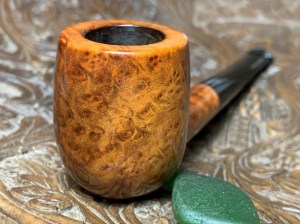
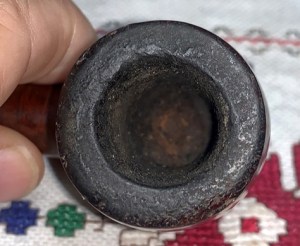 The rim has seen better days. The crusted lava flow is thick and there are chip and dents on the rim’s edge. The condition of the rim will be better known after the stummel is cleaned.
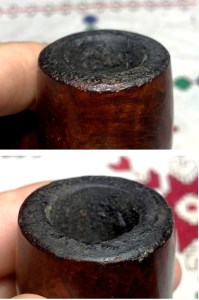 The briar looks flawless – I see no fills. There is the expected grime to be cleaned and small nicks and dents on the surface that need addressing.
 The stem has some oxidation that I’m able to detect with the naked eye. The P-lip bit, both upper and lower, has some calcification and tooth chatter. You can also see a pit midway up the stem on the upper. The lower side has an small protrusion midway up the stem. These need to be addressed.
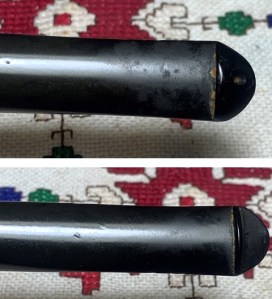 Here is a closer shot of the pit on the upper side.
 To begin the restoration of this old timer Peterson, the P-lip stem airway is cleaned with pipe cleaners and isopropyl 99% alcohol. It only took a few cleaners to do the job. Getting the pipe cleaners in the P-lip button is a challenge but can be done.
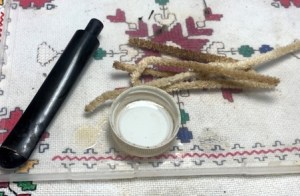 Next, to address the oxidation in the stem, the stem is dropped in a soak of Briarville’s Pipe Stem Oxidation Remover for several hours.
 Turning now to cleaning the Peterson’s stummel, the chamber is reamed with the Pipnet Reaming Kit using 2 of the 4 blades available. While using the second blade, I became concerned that I might break the blade because the cake was like concrete.
 To continue the reaming, I switched to the metal Kleen Reem Pipe Tool. I found this reamer several years ago at a flea market in Kentucky during one of our travelling trips to the eastern side of the Mississippi River. The tool will not break with its metal arms. The tool works by turning the knob on the end which expands the arms against the chamber wall. It works well plowing the concrete cake.
 To further fine tune the reaming, the Savinelli Fitsall Tool scrapes the chamber wall and gets into the angles at the floor of the chamber.
 Next, the chamber is sanded with 220 grit paper wrapped around a dowel rod.
 The full arsenal used to clean the chamber, and an inspection of the chamber reveals healthy briar with no heating issues.
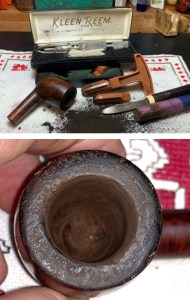 With the chamber completed, the cleaning transitions to the external briar and the rim. A few starting pictures show the starting point.
 Undiluted Murphy Oil Soap is used to scrub the stummel using cotton pads.
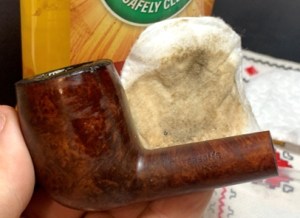 The rim is crusted with a stubborn lava flow. To loosen the crust, a soft brass brush is used to scrub, and this is followed by carefully scraping the rim with the Savinelli Fitsall tool.
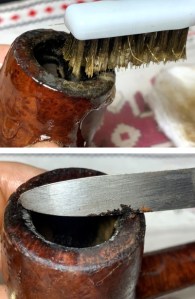 Next, the stummel is taken to the utility sink where the internals are scrubbed with warm water and with shank brushes using an anti-oil liquid dishwashing soap. After the scrubbing, the stummel is thoroughly rinsed and returned to the worktable.
 The stummel cleaning continues with cotton buds and pipe cleaners working on the internals. Well, every pipe is dirty that comes to the worktable. And others are more than dirty. This one belongs to the latter category. The cotton buds and pipe cleaners did not seem to make a dent. But when I started to excavate using the small dental spoon the gunk just kept on coming…. The picture represents the third dive into the mortise scraping the tar and oils off the walls.
 The buds began to emerge lighter after much crud was removed. To continue the cleaning process, I’ve already decided to give this stummel an alcohol and kosher salt soak at the conclusion of this work day and let it soak through the night. The next picture is not for the faint of heart 😊.
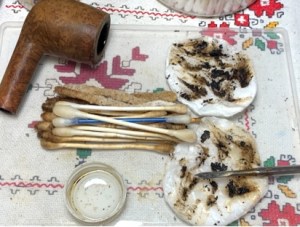 With the cleaning suspended for the time, I take a closer look at the stummel’s condition after the cleaning. The stummel looks good after the cleaning except for the rim. The cleaning was successful in showing the damage to the rim. The following pictures show the damage.
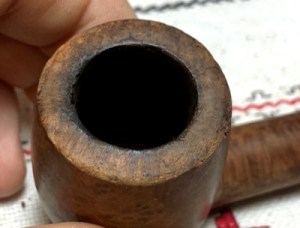 The next picture shows the view from stern to bow. The rim edge has worn away on the back side of the stummel. Looking to the front of the rim, the charring from lighting the bowl is evident with a black ring going around the inner rim circumference but is especially charred at the front.
 The next view is the bowl’s left side – the damage to the rim continues to the outer edge with much worn briar.
 Finally, from the front of the bowl looking to the back.
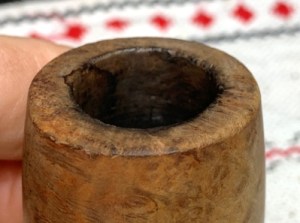 One of the issues in the restoration of vintage pipes is preservation of briar and the aged patina from briar that has developed with the decades. There is no way around topping the bowl to remove the damaged briar – scuffs and charring, but the mode of operation is to remove as little briar as possible. This picture is the starting point.
 To top the stummel, 220 paper is used on a chopping board with the stummel inverted.
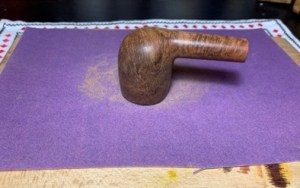 After several rotations on the 220 grit paper, the progress is visible in relationship to the damaged areas. The back edge of the outer rim shows the severely worn briar with the rough edge. The second picture shows the back worn edge and the damaged charring on the front inner edge.
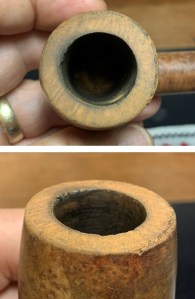 After several more rotations, the decision in reached to stop the topping with the coarser 220 paper. There remains a good deal of rough briar on the back edge which I’m hoping can be sanded.
 The topping is continued with 320 paper on the board then 600 grit paper.
 The char damage around the inner edge of the rim is evident especially on the front.
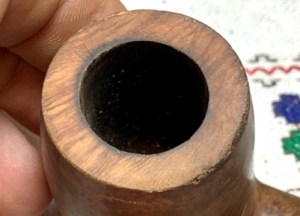 To address this charring, the inner edge of the rim is beveled using a wooden orb as a firm backing to the sanding paper. Using the orb cuts a sharp, even bevel which is attractive and hopefully erases the blackened damaged briar.
 With strips of sanding paper held around the sphere, the spere is rotated in the gulf of the chamber starting with 220, then 320 and then 600 grit papers. Looking at the results below, the beveling removed the burnt edge. I like it.
 Next, the outer edge needs to be sanded. The next pictures show first the back of the rim and then toward the front of the rim. I have my concerns that a light sanding of the edge won’t be enough.
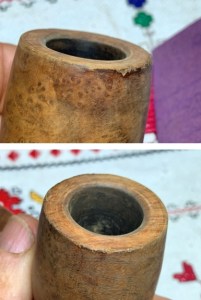 Starting with 220 paper, then 320 and 600, the edge is lightly sanded.
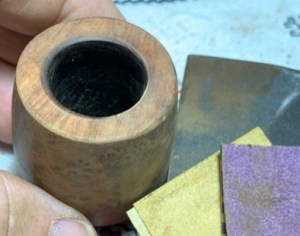 After sanding the edge, not shown is a return to the topping board for a light sanding with 220, 320 and 600 papers. I did this to even out the sanding on the edge – so the outer edge didn’t look like it had been beveled. Overall, I am very satisfied with how the rim has shaped up. One problem persists – the picture shows a dent on the edge of the rim that will not surrender with the amount of sanding I’m willing to apply. I do not want to continue sanding because this is removing more briar than what I want to give up.
 To address this, I patch the small cut with briar dust putty. A very small amount of CA glue is mixed with briar dust (forgot to take a picture of this) and then using a toothpick, the putty is placed on the dent. The stummel is then set aside to allow the patch to cure.
 When the patch has cured, the mound is lightly sanded with 220 then 320 grit papers.
 Then, to blend the patch, the stummel is again topped using only the finer 600 grit paper. The edge is also sanded with a piece of 600 paper. The rim repairs look great.
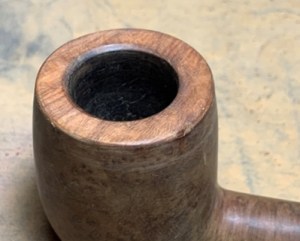 I feel like I’m on a roll. To clean up the briar and to address small scratches from normal wear, sanding sponges are used. To help preserve the aged patina only the medium, light and fine sponges are used to do the job. The coarse sponge is not used.
 Next, the full regimen of 9 micromesh pads is used to sand/shine the stummel. After each set of 3 pads, the stummel is wiped with a damp cloth to clear briar dust and to give the following pad more traction. The pads are applied first with pads 1500 to 2400, then 3200 to 4000, and finally with pads 6000 to 12000. I am amazed at how the rich, dark patina emerges through the process. The wooden deepens and darkens naturally through the process. Very nice.
 Before transitioning to the stem, as I mentioned earlier, the stummel will be given a kosher salt and alcohol soak to further clean the tars and oils from the internal briar. The process also removes ghosting and in my opinion, sweetens the briar. The first step is to twist and pull a cotton ball to form a wick. The wick serves to draw the tars and oils from the briar of the mortise and airway.
 Using the stiff wire, the cotton wick is guided up the mortise through the draft hole as the picture below shows. I bring the cotton wick this far not allowing salt crystals to move up the airway. The wick also draws the alcohol into the mortise from the salt in the chamber.
 The stummel is then placed in the egg carton with the rim and the shank facing roughly level. After filling the bowl with Kosher Salt, isopropyl 99% alcohol is used to fill the bowl until it surfaces above the salt. Kosher Salt is used because it does not leave an aftertaste as does regular iodized table salt.
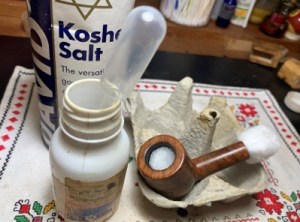 After a few minutes, the alcohol is drawn into the salt, and it again is topped off with isopropyl 99%. The stummel is then set aside to allow the soak to do its work through the night.
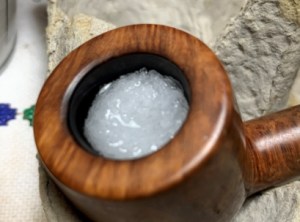 The next day, the soiled wick and salt indicate that some cleaning has happened. I had dumped and cleared away the yellowed salt before taking the picture.
 A few cotton buds and a pipe cleaner confirm that the internals are cleaned and refreshed ready for a new steward.
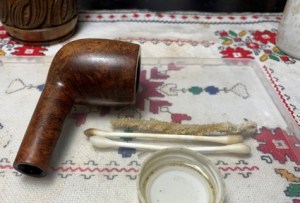 To bring out the deep, rich natural hues of this Pre-Republic, Mark Hoover’s ‘Before & After’ Restoration Balm does a great job. After placing some Balm on my finger, the Balm is worked into the briar. After this is done thoroughly, the stummel is set aside for about 10 to 15 minutes to allow the Balm to do its work.
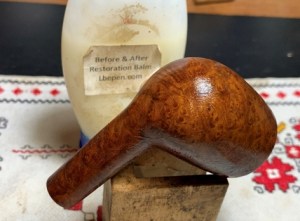 After the elapsed time, the excess Balm is wiped off and then buffed up with a dedicated microfiber cloth. This cloth has become impregnated with the Balm residue and serves as a quick refresher for pipes in my collection. I like the results.
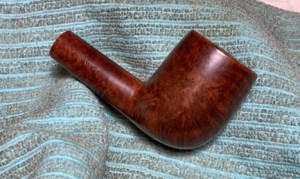 Turning now to the stem, it has been in a soak of Briarville’s Pipe Stem Oxidation Remover through the night. After fishing the stem out of the fluid, it is rubbed aggressively with a cotton cloth to remove the oxidation that was raised in the soak. A pipe cleaner moistened with isopropyl 99% alcohol is used to clean the airway of the fluid. I like the results.
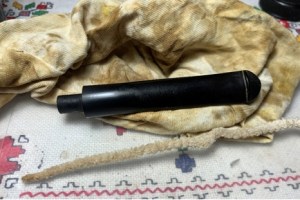 Looking now at the condition of the P-lip stem, the upper side of the stem has a bite compression on the bit and about halfway up the stem there’s a pit in the vulcanite. I believe the bite can be sanded with 220 paper and be erased. However, I’m concerned that the small pit is a bit too deep for sanding. The underside of the stem has some blemishes, but these should be addressed with sanding alone.
 The pit on the upper side is filled with a small drop of Black Medium-Thick CA glue and then put to the side allowing the patch to cure.
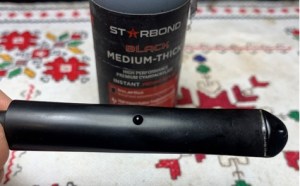 When thoroughly cured, the excess patch mound is filed carefully with a flat needle file.
 After the patch is filed down flush with the stem surface, the stem is sanded with 220 grit paper about 2/3s up the stem. I don’t sand the entire stem because the upper 1/3 has no issues and the next round of sanding will be sufficient.
 While sanding with the 220 paper, the P-lip button edges are filed with a square needle file to refresh the lines.
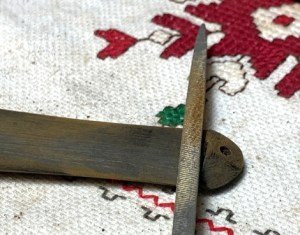 Next, the entire stem is sanded with 320 grit paper. A plastic disk is used as a ‘shouldering guard’ to avoid shouldering the shank facing edges.
 The 320 paper is followed by wet sanding with 600 grit paper then 0000 grade steel wool is applied.
 The sanding is followed by applying the full set of 9 micromesh pads in sets of 3 – 1500,1800,2400 – 3200, 3800, 4000 – 6000, 8000, 12000 grits. Between each pad, Obsidian Oil is applied to condition the stem and guard from oxidation. I love watching the glossy reflection develop in the vulcanite surface.
 To condition the stem further, Mark Hoover’s ‘Before & After’ Fine and Extra Fine Polishes are applied to the vulcanite. Starting first with the Fine Polish, some is placed on my finger and then worked into the vulcanite. After this is done, a paper towel is used to wipe off the excess. The same is done then with the Extra Fine Polish and after a thorough application, the excess is wiped off with a paper towel.
 Now on the home stretch! With the stem and stummel rejoined, and after mounting a dedicated cotton cloth buffing wheel onto the rotary tool with the speed set at about 40% full power, Blue Diamond compound is applied to the pipe.
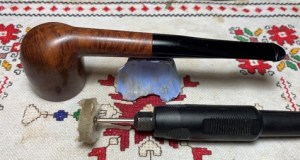 Compound dust accumulates during this process and to remove it in preparation for application of wax, a felt cloth is used to wipe off the dust.
 Next, another dedicated cotton cloth buffing wheel is mounted at the same speed, and carnauba wax is applied to the pipe. After the application, the pipe is given a rigorous hand buffing with a microfiber cloth to remove excess wax and to raise the shine.
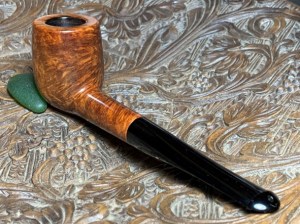
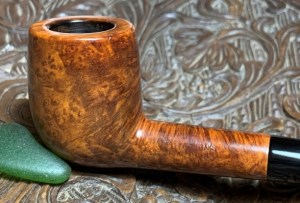
 This Pre-Repubic Peterson’s Deluxe is a gem dating between 1923 to 1949. The briar is flawless, and it has a strong manly vibe as a workhorse Billiard. The grain patterns are full of bird’s eye and swirls. The dimensions are Length: 6 1/8 inches, Height: 1 3/4 inches, Rim width 1 1/4 inches, Chamber width: 3/4 inches, Chamber depth: 1 11/16 inches. I’m pleased with how this guy turned out and Robert, as the commissioner, will have the first opportunity to claim the Peterson from the Pipe Store. A large percentage of the proceeds of pipes restored help to benefit the Daughters of Bulgaria (now called, Spring of Hope) a ministry in Bulgaria my wife and I co-founded helping trafficked and sexually exploited women and girls. Thanks for joining me!
ADDENDUM: During the process of researching the dating of the Peterson’s De Luxe, I described conflicting information about the dating in Pipedia and Pipephil. What I didn’t write above is that I first sent a note to Steve Laug (www.RebornPipes.com) asking for help to clarify the conflicting information. Steve encouraged me to reach out to Mark Irwin, a well-known expert on Peterson pipes and author. My question to Mark was to help clarify the dating of this ‘Pre-Republic’ MADE IN IRELAND pipe. I appreciate his response – Thanks Mark!:
Pipedia’s article is a mash of misinformation, I’m afraid, LOL. Jim Lilley had a number of errors in his original articles, some of which were ironed out when Smokingpipes.com (Laudisi Enterprises) bought K&P in 2018. My research has been confined to the PetersonPipeNotes blog and the big The Peterson Pipe: the Story of Kapp & Peterson book (2019). However, I can tell you somewhat about your shape 6 billiard. The DeLuxe stamp came into being c. 1912, by which time the first patent had expired. The MADE IN IRELAND stamp is of absolutely no help in dating, aside from the fact that it was never used in the Patent era. It has appeared in every era since. That being said, it was constantly used by K&P’s US distributor, Rogers Ltd., from 1938-1968. I would say this pipe is a typical Rogers import for the US dating from the first decade of the Early Republic (1948-1958). As it came from a client in the US according your post, this is most likely the case.


I love those old Peterson Deluxe pipes! Nice work with the wooden ball to create the beveled edge, perfect!
LikeLiked by 1 person
Thanks, Al, I was pleased with how it came out, and it is a solid piece of briar. I think his new steward will be very happy.
LikeLike
Fabulous write-up, as always. Love reading these, Dal. Your passion for detail is unrivaled. Best,Todd
LikeLike
Thanks, Todd! I appreciate your encouragement!! This venerable Peterson came out looking like a young man 🙂
LikeLike
Pingback: Fashioning a ‘Middle Earth’ Churchwarden from a Rusticated Orphaned Bowl – The Pipe Steward