
The next pipe on the worktable came to me from a pipeman in Lakewood, Colorado, who was reducing his collection. I met him when he placed for sale online a Zero Gravity recliner which I went to check out. When I pulled into his driveway, he was sitting comfortably in his own chair with a bowl stoked in his hand. Of course, conversation ensued, and not only did I buy the recliner but also several of his pipes when I discovered he was reducing the numbers in his collection. Since he needed to find the boxes which were stored here and there, another visit was planned after Ron located the boxes holding the pipes.
My wife went with me to look at the pipes in Lakewood. During our conversations, we discovered that Ron’s background was in intelligence in the US AirForce then with NSA. His family was in East US, but he settled in the Denver area after a government job brought him West. We discovered he goes to a Baptist church nearby after we saw his well-worn NIV Bible on the end table and devotionals. Ron shared that he had a rough background but was thankful to the Lord for his life now. Ron loves single malts – Glenmorangie is his favorite and he indulges in dirty martinis – an avocation I also share! He had a myriad of Tom Clancy books on the shelves :-). I love this picture of Ron with pipe in hand and the dude in the picture looking on. When Ron brought out the box of pipes, I discovered very quickly that Ron had an affinity for Freehands. Most were in good shape but there were some cracked shanks as well and rogue fancy stems. The Prominence is marked with the arrow along with the myriad of other Freehands.
 I was glad to have met Ron and to become the steward of his pipes for a time until other pipemen hear their whispers 😊- I adhere to the Harry Potter maxim for wands (and pipes!): The pipeman doesn’t choose the pipe but the pipe chooses the pipeman. Kevin heard the whisper of this Danish Prominence when he found it in the ‘For “Pipe Dreamers” ONLY!’ collection. This is the second pipe Kevin commissioned. The first was a ‘Middle Earth’ Churchwarden which I was happy to fashion for him (Fashioning a ‘Middle Earth’ Churchwarden from a Rusticated Orphaned Bowl – The Pipe Steward) and it turned out great.
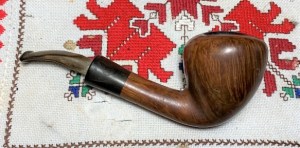
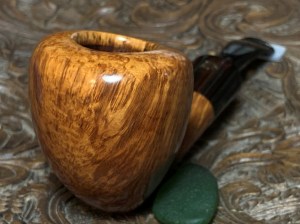
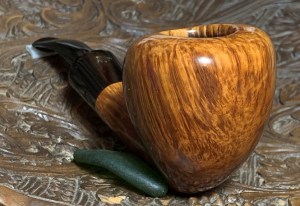
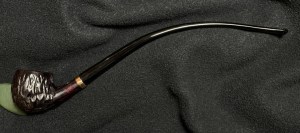 When Kevin reached out to me to commission the Prominence, his only commentary was that he really liked the big size and that it had a great shape. I’m in full agreement. Each commission helps to support the work of the Daughters of Bulgaria (now called, Spring of Hope) which my wife and I co-founded when we lived in Bulgaria helping women and girls who had been trafficked and sexually exploited. Here are pictures of the striking Prominence.

 Some of the nomenclature has thinned. The stampings are located on the underside of the shank parallel with the shank facing. Stamped is: PROVINENCE [over] Ⓐ. To the right of this is stamped: ④ [over] HAND MADE [over] IN [over] DENMARK.
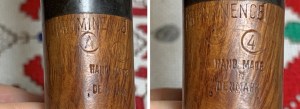 The short fishtail stem is mounted in a shank extender or ferule and on the ferule is stamped a stem logo of a crown. The crown has thinned.
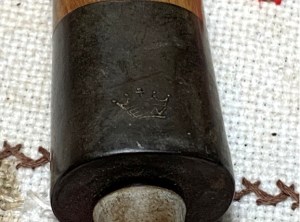 It takes little digging to discover the provenance of this striking classic shape leaning Freehand. The crown logo pictured above has BW pressed into the crown’s base pointing directly to Ben Wade. This picture is from Pipephil’s vast logo collection (Crowns & letters — Pipes: Logos & Markings).
 Prominence was produced by the renowned carver and pioneer of the Freehand movement, Preben Holm during the Danish Ben Wade production era. Pipedia describes the genesis of the Ben Wade name (Ben Wade – Pipedia):
The company was founded by Benjamin Wade in 1860 in Leeds, Yorkshire, where it was located for over a century. Ben Wade started as a pipe trader, but yet in the 1860’s he established a workshop to produce briar pipes. The pipes were made in very many standard shapes – always extensively classic and “very British”. Many models tended to be of smaller dimensions. Ben Wade offered a very high standard of craftsmanship and quality without any fills. Thus, the pipes were considered to be high grade and a major competitor to other famous English brands. The often-heard comparison to Charatan seems to be a little bit inadequate because those days’ Charatans were entirely handmade.
The Pipedia article goes on to describe how the Leeds factory was destroyed during WWII and production was slimmed down through the years. In 1962, Ben Wade was purchased by Lane Ltd. but when production decreased at the factory in Leeds, it was closed in 1965. Lane also owned Charatan and assimilated the Ben Wade production with the Charatan which marked a period when Ben Wade stamped pipes were of a much lower quality. The last chapter of the London based Ben Wade is the Dunhill acquisition:
Herman G. Lane’s heirs had no special interest in either Charatan or in Ben Wade and sold it to Dunhill Pipes Limited in 1978. Now, Dunhill had no need of machine-made series pipes like the Ben Wade as performed by Charatan / Lane since their own Parker–Hardcastle factory in Walthamstow had abounding capacities to turn out secondary pipes. Thus, this was Ben Wade’s second end. Charatan’s Prescott Street factory was closed by no later than March of 1982 and Charatan was allowed to languish and discontinued in 1988.
It’s helpful to recount the UK history of Ben Wade to better appreciate and understand the Danish transition and how Preben Holm’s business needs joined with his artistic prowess entered the story of Ben Wade. The Pipedia article continues with the ‘Ben Wade turns Danish’ chapter and I include this section in its entirety because it homes in on our pipe’s origins:
Young Copenhagen master pipe maker Preben Holm had made a meteoric career heading a pipe manufacture employing 45 people at the age of 22! But around the turn of 1970/71 he was in major financial difficulties. His US distributor, Snug Harbour Ltd. in New York City, left him in the lurch. Holm had three unpaid invoices on his desk and another large shipment was ready for the USA, when Snug Harbour’s manager told him on the phone that there was no money at all on the account to pay him. So, the Dane went to New York for an almost desperate search for a new distribution partner. He made contacts with Lane Ltd. and met Herman G. Lane in February 1971. Lane Ltd. had no interest in Holm’s serial pipes produced at that time but so much the more in the hand-carved Freehands because the hype for Danish Freehands and fancies in the States was still on its way to the climax then. The meeting resulted in an agreement to start a cooperation. Lane insisted on improving the quality considerably and in return he assured to be able to sell essentially larger quantities.
Holm went back home to work on new samples with all-new designs and altered finishes for Lane. Both Lane and Holm agreed that it would be unwise to sell the pipes under Preben Holm’s name as long as Snug Harbour had a considerable stock of Preben Holm pipes and might sell them pipes at very low prices just to bring in some money.
So, on Mr. Lane’s proposal it was determined to use the name Ben Wade belonging to Lane Ltd. Lane spent considerable amounts of money for advertising the new brand in the big magazines– the centerpiece being whole-page ads showing a very exclusive Seven Day’s Set.
The cooperation with Lane Ltd. proved to be an eminent business success for both partners. Within a very short time Ben Wade Handmade Denmark sold in much larger quantities and at higher prices than they had ever dreamed of. And the hype these Freehands and fancy pipes caused went on unbroken long after Herman G. Lane deceased. Preben Holm – obviously much more brilliant in pipe making than in pipe business – was in major troubles again in 1986 and had to sack most of his staff. The Ben Wade production was significantly lowered but continued until his untimely death in June of 1989.
Up to now Preben Holm made Ben Wade pipes are a cult and highly sought for on the estate markets.
To have a Preben Holm pipe in one’s collection is for some like adding your Dunhill birthday year pipe. The number of Preben Holm creations out there is finite, they are no longer being produced since his passing in 1989. The dating of the Ben Wade Preben Holm on the table would be in between the Lane meeting in 1971 and his passing in 1989. I have a Preben Holm and enjoy it every time his bowl is packed and lit and it’s time to settle back and consider life and one’s part in it.
Pipedia’s article about Preben Holm adds to our appreciation for his pipe on the table (Holm, Preben – Pipedia):
 Preben Holm (1947 – 1989) has set some marks in pipe history. Just before his 16th birthday in 1963 he sold pipes to the legendary Pipe-Dan shop and at the age of only 22 he headed 45 employees. He was among the first Danish artisans who made “Danish pipe design” famous in the USA in the 1960’s. More than that he was one of the very first carvers who exceeded this moderate Danish Design which based on the classical shapes. “Chasing the grain” they turned out wild and dramatic fancy pipes. Combining smooth with blasted surfaces, showing big areas of the original bark at the top of the bowl and at the end of the stem, these pipes were quite shocking to many elder and more conservative pipe smokers.
When he started to sell his pipes to Lane Ltd. under the Ben Wade label, he caused a hype fairly beyond comparison. Especially in the U.S., as most of his pipes were sold there.
There are examples of the Prominence line in Pipedia (all courtesy of Doug Valitchka), but no information about the line itself. However, what jumps out immediately looking at the examples below, is that the Prominence line showcased Freehands with a definite classic shape bent. Both examples also have the shank extension with a shorter, compact stem. Overall, to me a very nice-looking line of pipes.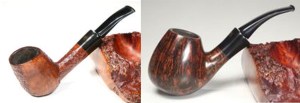 The nomenclatures for each of these Prominence pipes are like ours in that they have circled grading codes stamped. In the picture below on the left, there are circles containing an A and a 2. On the right, I see only what appears to be a circled A. All are stamped with the COM: ‘HAND MADE IN DENMARK’.
 To find more information about the Prominence line itself, the search was broadened beyond Pipedia and Pipephil. I landed on very helpful information at Stummels.com where a Prominence A3 is described in detail. The blogger seemed to know what he was talking about, and I include his information and a picture of the pipe he was describing (Preben Holm Ben Wade Prominence A3 — Stummels):
Gorgeous and elegant “PROMINENCE A3” by Preben Holm for Ben Wade. The Prominence line of Danish Ben Wades were beautiful, graceful pipes that hewed a bit closer to traditional shapes than many of Holm’s wilder, freeform pieces. They came stamped with grading designations, comprising a letter and a number. I have searched for definitive documentation on the meaning of these markings but have found nothing.
However, I have found several other examples from the series and have come to the conclusion that only the “A” pipes were sold as Prominence. I can find no other “letters”. I have found a pattern among the As regarding the numbering. It appears to me that the “1” pipes all had fully rusticated finishes. “2”s have a bit less rustication and some smooth paneling. “3”s have still less rustication, and the one or two “4”s I have found are completely smooth with exceptional graining. So – an amateur’s deduction, but I feel good about it. I believe this pipe was sold among the higher end of the series. Regardless of what the stamps mean, this pipe is a very fine piece. Dramatic flame graining surrounds the stummel and splashes up the shank. Stampings are crisp.
The flat, short stem is a bit of a surprise (no pun intended), as I am accustomed to Danish fancy-style stems on Preben Holm pipes. Researching other pipes in the series has confirmed, however, that it is, indeed, an appropriate stem for the pipe, and by all appearances, the original. Condition of the stem is very good, and it fits well into the ferrule.
The information is helpful and if accurate, the A-4 on the worktable points to confirmation of the ‘Prominence’ line and that it is a smooth briar pipe. I found some other interesting information from a few threads in PipesMagazine. One of the questions that comes up is whether Preben Holm himself carved a pipe or others he supervised. Here are the thoughts of ‘toobfreak’ in a March 6, 2017 thread (https://pipesmagazine.com/forums/threads/ben-wade-prominence-pics.56420/):
That fashion of grading I’m not familiar with, but to me, the most important thing there is that it says Hand Made Denmark. That suggests to me that Preben Holm had something to do with the pipe, at least closely supervised it if not outright did the finishing touches on it. He was very picky about anything associated with his name and rejected a great many pipes for the slightest defect.
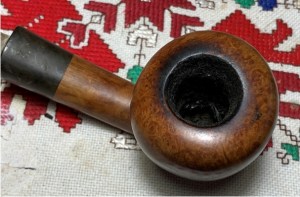
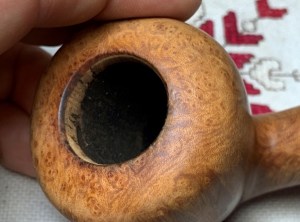
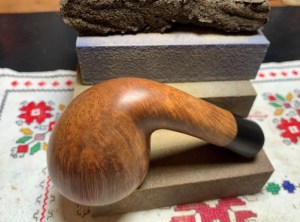
With a better understanding of the provenance of the Ben Wade Preben Holm Prominence on the worktable, it’s time to take a closer look at the pipe itself. The large bulbous bowl with the vertical straight grain encircling it, confirms that the mantra “Follow the grain!” shaped this pipe into existence. The feel of the bowl in my palm makes me wonder why I didn’t keep this Danish specimen for myself! Alas, I cannot keep them all 😊. The chamber has fairly thick carbon cake build up that needs to be removed to allow fresh briar to emerge. The rounded plateau has char residue from the former steward’s (Ron’s 😊) lighting practices of pulling the flame over the back side of the bowl.
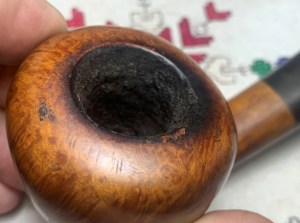 The stummel has grime needing to be cleaned and normal scratches and dents that need addressing. The picture below shows some divots on the shank’s left flank that may need to be patched.
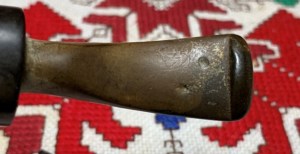
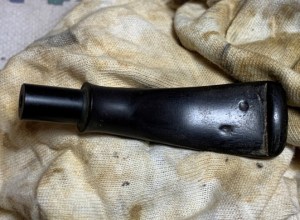
 I’m afraid that the Ben Wade crown logo is worn too much for it to be refreshed to a more pristine state. However, even a thin logo is better than none and with the cleaning of the vulcanite shank extension, the logo will be guarded.
 The short stubby stem is classy but has deep oxidation in the vulcanite along with bite compressions on both the upper and lower bit.
 This is where the restoration of this Preben Holm Prominence begins. The stem’s oxidation needs to be addressed but first, the airway is cleaned with pipe cleaners moistened with isopropyl 99% alcohol. One pipe cleaner is sufficient.
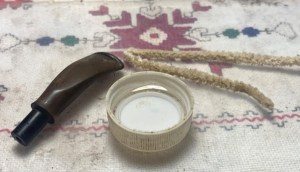 Next, the stem is placed in a soak of Briarville’s Pipe Stem Oxidation Remover for several hours. A pipe cleaner is left in the airway as a tether for easier retrieval later.
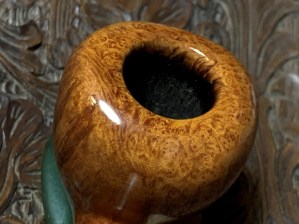
 Next, looking at the chamber, the carbon cake build up is significant and needs to be cleared out for the new steward to form a fresh cake which should not be more than the width of a US dime. As I look at the plateau, I’m gazing at the spiraling bird’s eye grain. Bird’s eye grain is the cross-cut view of the vertical grain running up the bowl. Very nice.
 To clean away the carbon cake buildup, the Pipnet Reaming Kit is used. Of the 4 blades available, 3 were used.
 The cleaning continues with the Savinelli Fitsall Tool by scraping the chamber wall to remove more carbon cake.
 The last vestiges of cake are removed by sanding the chamber wall with 220 grit paper wrapped around a dowel rod.
 The full set of tools are shown with the carbon cake that was removed.
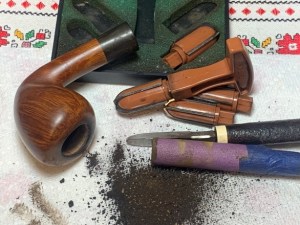 An inspection of the chamber reveals no heating problems.
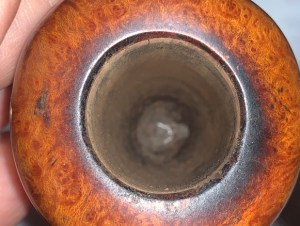 Next, the external smooth briar surface is cleaned using undiluted Murphy Oil Soap. A few pictures show the starting point.
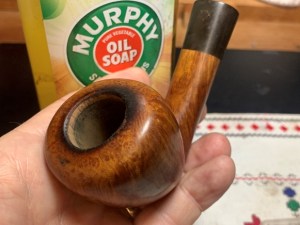
 The grime is visible on the cotton pad after scrubbing the surface.
 A soft brass brush along with my thumbnail help to scrape the lava flow on the plateau.
 After the external scrubbing, the stummel is taken to the utility sink to work on cleaning the internals. Shank brushes are employed using warm water and liquid anti-oil dishwashing soap to scrub the internals. After the scrubbing, the stummel is thoroughly rinsed.
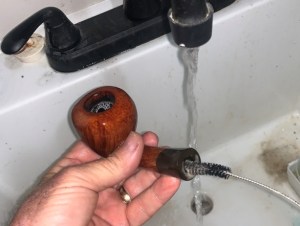 Back on the worktable, the next step is to continue the internal cleaning.
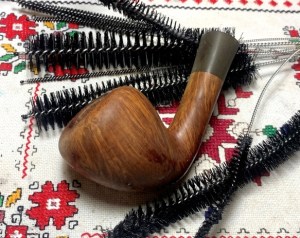 The internal cleaning continues by using cotton buds and pipe cleaners moistened with isopropyl 99% alcohol. A small dental spoon was also used to scrape tars and oils mainly from the mortise. The airway was surprisingly clean and with little effort, the internals were looking good.
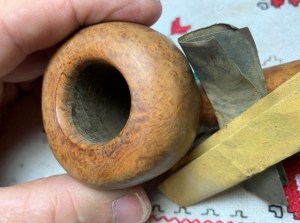
 With the basic cleaning completed, a closer look at the plateau shows that the cleaning did a great job. The lava flow that was crusted on the plateau was removed. What remains is a dark ring around the edge of the plateau and darkened briar on the plateau itself.
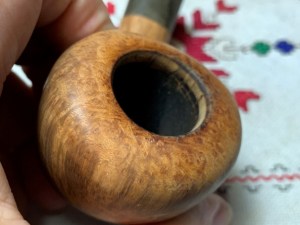 Noted earlier were some skins or divots on the left side of the shank toward the underside. These are a bit too deep to remove by simply sanding. To do so would be to create a sanded indentation on the side of the shank because a good bit of briar would need to be removed. These divots need to be patched.
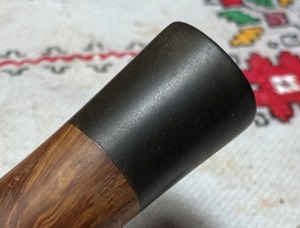
 The vulcanite shank extension exhibited more oxidation than I saw before. The challenge with cleaning the shank extension is the potential degradation of the crown logo. As I look at it after a simple cleaning with a soft cotton pad, it appears like it’s not doing well. It’s still there but by the skin of his teeth 😊.
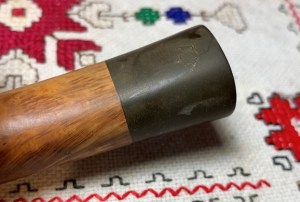
 To begin, the ring around the inner edge of the plateau is a result of burning. It happens and to address this, 220 paper is used to lightly sand the edge. You can see the lighter wood beneath the ring from the earlier sanding with 220 wrapped around the dowel rod.
 To address the ring, first 220 grit paper gently sands to round the edge minimally to remove the ring. Light sanding is also applied (very lightly) around the plateau adjacent to the edge where there was slight darkening from lighting.
 Next, 320 then 600 grades were used to further smooth and bring out the grain on the inner lip. This is one of the fringe benefits that I like to do with Freehands. This thin strip of smooth briar ringing the upper chamber will continue to be sanded and polished and it will enhance the ‘steward’s view’ very nicely. I like it.
 With the plateau cleaned, the attention is directed to the issues on the side of the shank. These appear not to be dents where the wood is pushed in, but punctures. Sanding will require too much briar to erase these injuries.
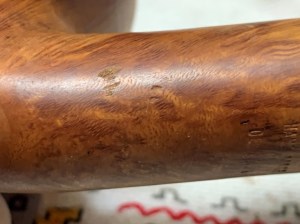 To patch the wounds, briar dust and clear CA glue are used to create a putty. After a small blob of glue is placed on the scotch tape – for easy cleanup, a small mound of briar dust is placed next to it.
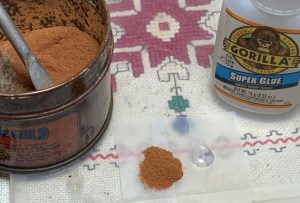 A toothpick is used to mix. A small amount of the briar dust is pulled into the CA and mixed. A bit more of the dust is pulled in and mixed until it reaches a thickness that allows the patch material not to run. The toothpick is used to trowel the mixture to fill the punctures. The stummel is then put to the side allowing the patch to cure.
 After the patch has cured, needle files are used to file the patch mounds flush with the briar surface.
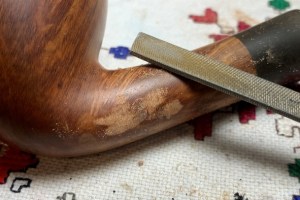 To further smooth the surface, 220 paper is used next.
 The 220 grit paper is followed by 320 and 600 grade papers. The repair looks good.
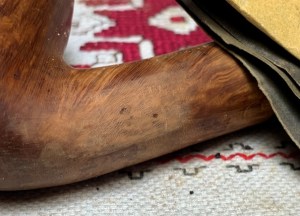 Another issue is cleaning the vulcanite shank extension while safeguarding the stem logo. The vulcanite is rough with oxidation.
 To address the oxidation, instead of soaking in Briarville’s Pipe Stem Oxidation Remover, the cotton pad is moistened with the Oxidation Remover and the extension is rubbed with the pad. It doesn’t do much to help.
 Staying away from the logo, the shank extension is next sanded with 320 grit paper.
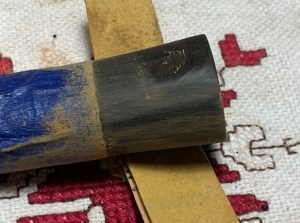
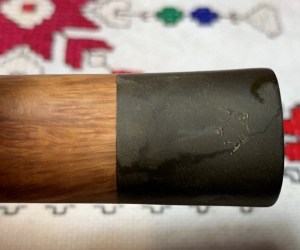
 The 320 grit paper is followed by 600 grit paper and 0000 grade steel wool. The sanding did a good job removing the oxidation.
 Next, to clean the stummel surface of normal scratches and nicks, sanding sponges are used starting with a coarse sponge then graduating to medium, light and fine sponges. The grain on this pipe just doesn’t quit!
 The sanding transitions to polishing during the micromesh process. The stummel and vulcanite shank extension are sanded with micromesh pads in sets of 3 starting with pads 1500, 1800, 2400, followed by 3200, 3800, and 4000. Lastly, pads 6000, 8000 and 12000 are applied. To hit two birds with one stone, after each pad the vulcanite extension receives an application of Obsidian Oil to condition and to protect it from oxidation. Between each pad the stummel is also wiped with a damp cloth to remove dust and to give the next pad more traction.
 Next, Mark Hoover’s ‘Before & After’ Restoration Balm (www.Lbepen.com) is applied not only to the briar but also to the vulcanite extension. Mark’s Balm brings out and deepens the natural hues. After some Balm is placed on the fingers, it is worked into the briar and extension. After it has been applied, the stummel is set aside for about 15 minutes to allow the Balm to do its job.
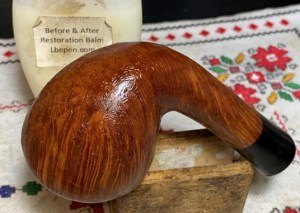 After the time has passed, a dedicated microfiber cloth is used to wipe away the excess Balm and to buff up the shine. My, oh my.
 The short fancy stem has been soaking in Oxidation Remover for several hours. When the stem is fished out, the picture shows the oxidation raised on the surface.
 A cotton cloth is used to rub the surface aggressively to remove the raised oxidation. The soak did a pretty good job, but the stem is still in need of sanding for oxidation and repair.
 To clear the Oxidation Remover fluid from the airway, a pipe cleaner moistened with isopropyl 99% is run through.
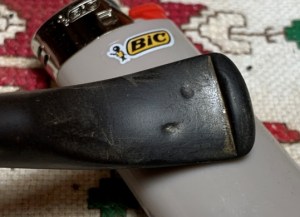
 There are bite compressions on both the upper and lower sides of the bit. The upper compressions are not as severe as the lower compressions. It appears that the former steward (Ron 😊) smoked this pipe hands free and with the size of the stummel, it took quite a clinch to hold things in place. To try to minimize the compressions the heating method is used first. ‘Before’ pictures are first taken to compare with the results. When the vulcanite rubber is heated the physics of it expands as it warms, reclaiming to some degree its original disposition. Using a Bic lighter the bit is painted with the flame – upper and lower, to heat the vulcanite. After the heating, ‘After’ pictures are taken to compare. The upper bit shows some progress, and I believe sanding alone will erase the compressions.
 The more severe compressions may have improved some, but nowhere near enough to sand alone.
 In preparation for the patches on the lower bit, it is cleaned with a cotton pad moistened with isopropyl 99%.
 I use Starbond Black Medium-Thick Cyanoacrylate (CA) glue to patch the compressions. Drops of CA are placed in each compression and then the stem is put aside allowing the patches to cure.
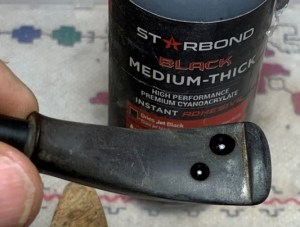 After the patches have cured, I go to work filing the upper and lower bit. Even though the upper bit did not receive a patch, the upper bit is filed with a flat needle file as well as a square file to address the bite compressions. The button lip is also refreshed.
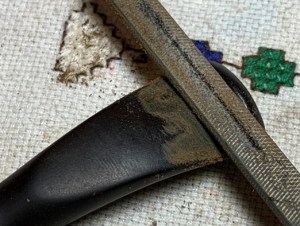 The lower bit is filed as well. The lip is refreshed, and the patch mounds are filed down flush with the vulcanite surface.
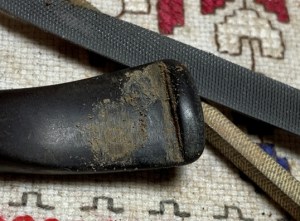
 The results are good – both upper and lower.
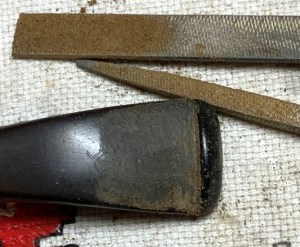
 After using the files, sanding expands to the entire stem with 220 grit paper addressing the file marks but also to remove the extant oxidation in the vulcanite.
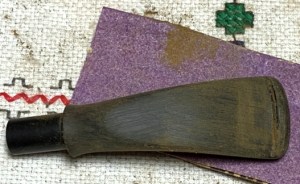
 Following the 220 paper, 320 paper is used to sand the stem.
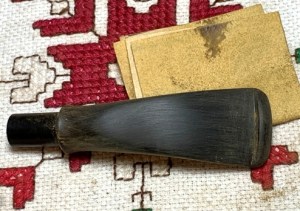
 Wet sanding follows with 600 grit paper. 0000 grade steel wool is applied to finish the major sanding.
 Next, the stem is sanded/polished with the entire regimen of 9 micromesh pads in sets of 3. Between the sanding with each pad, Obsidian Oil is applied to the stem to condition it and to guard against oxidation. First, pads 1500, 1800 and 2400.
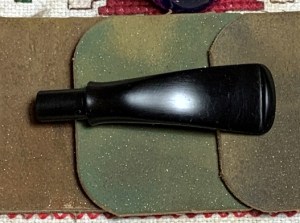
 Next, pads 3200, 3800, and 4000.
 Finally, pads 6000, 8000, and 12000. The stem looks great.
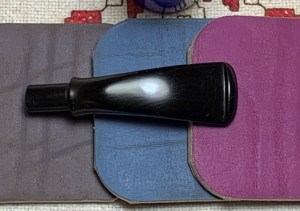
 The Ben Wade crown stem logo is very thin. I will try to refresh it as much as possible. First, the logo area is cleaned with alcohol to remove any oils helping the thin troughs to be more tactile.
 I know that using white acrylic will not help the situation. My experience with white acrylic is that if the logo troughs are too thin, the paint is too thick to grab. Even though its not white, European Gold Rub ’n Buff is used because it grabs much better in thin troughs. Even though the paint is gold, it’s not that noticeable. A small amount of the Rub ‘n Buff is placed over the logo with a toothpick.
 A cotton pad is used to ‘rub’ the excess paint off. A toothpick is also used to remove paint residue around the logo to help sharpen it. The Rub ‘n Buff helped a good bit.
 Now, on the homestretch. The Prominence stem and stummel are reunited and after a dedicated cotton buffing wheel is mounted on the rotary tool, with the speed set at about 40% full power, Blue Diamond compound is applied to the pipe.
 A good bit of compound dust accumulated over the pipe’s surface during the application of the compound. To clean the dust and to prepare the surface for the wax, a felt cloth is used to wipe off dust.
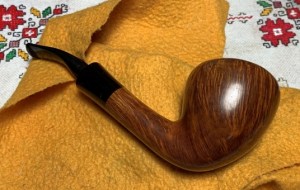 With another dedicated cotton buffing wheel mounted at the same speed, carnauba wax is next applied to the entire pipe. After the application of the wax, the pipe is given a rigorous hand buffing with a microfiber cloth to remove the excess wax and to raise the shine.
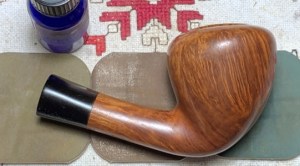
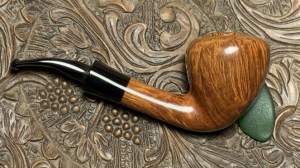
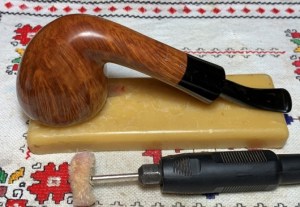 All I can say is, ‘My, oh my!’ I’m not sure I’ve worked on a pipe with more stunning grain than this Preben Holm Ben Wade Prominence. The vertical grain runs up the bowl and explodes in a showcase of beautiful bird’s eye grain. The Prominence line was considered an upper shelf line and is unique in that the motto, ‘Follow the grain!’ was applied to pipes which are considered more closely related to classical shapes. This pipe certainly follows the grain and whether Preben Holm fashioned this pipe or only attended to the finishing touches, I can’t help but imagine that it brought him a smile of satisfaction when the final touches were applied. The dimensions are Length: 5 7/8 inches, Height: 2 1/4 inches, Plateau width: 1 7/8 inches, Chamber width: 15/16 inches, Chamber depth: 1 7/8 inches, and weighs in at 71gr. Kevin commissioned this pipe and will have the first opportunity to acquire him from the Pipe Store. A large portion of the proceeds of pipes restored help the Daughters of Bulgaria, now called ‘Spring of Hope’ – helping women and girls who have been trafficked and sexually exploited. Thanks for joining me!


Please pray for the people of Ukraine
www.Voice-of-Ukraine.com
www.CratesForUkraine.com
