
The next pipe on the worktable is a beauty. The Stanwell Hand Made came to me in what I call the Lot of 68 that I acquired from an online estate auction from a seller in New Hartford, Connecticut, in February 2019. The pipe is marked among other pipes that are still waiting to be adopted! Pipeman Michael comes from Colorado’s southern neighbor New Mexico, living in the city of Santa Fe. I first began to correspond with Michael when he reached out to me with the stems of heirloom pipes he had inherited from his grandfather when he was 13. I usually do not do pipe repairs, but these pipes were his grandfather’s, and I decided that it would be good to set the stems and their bowls back on the right path 😊. Michael sent the 5 stems, and I was able to bring them back to pristine condition returning them to be reunited with their bowls. Micheal’s reaction was music to my ears when he laid his eyes on the stems. His response was to search through the ‘For “Pipe Dreamers” ONLY! collection and a Stanwell whispered to him. When he wrote to me about commissioning the Stanwell, I discovered why this Stanwell was special to him. This is what he wrote:
The first briar I ever smoked was a Stanwell. It was one of about 8 pipes I inherited when I was 13. I became obsessed with the pipe world and read everything I could get my hands on (which wasn’t much in 1984). At 14 I used to hang out at the local independent tobacconist, where I wanted to learn everything I could. I think I was something of a curiosity to the two fellows who ran it. Both of them were very kind to me, and I’m still in touch with one of them. From there, it turned into a life-long love of the hobby. As mentioned in a previous email, that old Stanwell of my grandfather’s is the only pipe I’ve ever lost, and I haven’t had a Stanwell since. So, it will be great to add such a nice one back to my collection. My collection is mostly very traditional English shapes and brands, with a few Danish and Italian exceptions to keep things interesting.
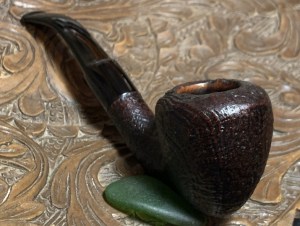
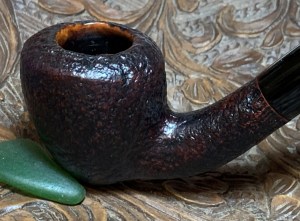
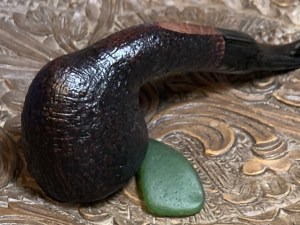
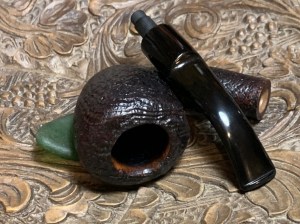
It doesn’t get any better than this. If you did the math, Michael is in his mid-50s, and I found out that he teaches theology at a local parochial high school to freshmen and sophomores (14 to 16 years old!)! My admiration for Michael increased a few points when I learned this. Micheal’s wife also is a ‘teacher’, rather a professor at the University of New Mexico School of Law. Michael said that they do not have children but enjoy their 3 rescue dogs and are involved in the community that serves stray, abandoned and rescued dogs. I’m pleased that Michael heard the whisper of this Stanwell that will in part fill the gap left by his grandfather’s Stanwell that was lost. Here are pictures of the Stanwell Hand Made in Denmark 23:
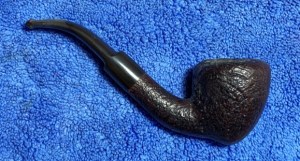


 The nomenclature is stamped on the smooth briar shank underside. The stamping is a curved STANWELL [over] HAND MADE [over] IN DENMARK. To the right of this is stamped ‘23’, the shape number. There is no Stanwell stem logo stamped on the stem, but the fit seems good at a glance, and it could be original. If the stem once had a Stanwell logo, it has passed into pipe history which is a shame.
 I told Michael that when this pipe came out of the box from New Hartford, Connecticut, I thought long and hard about making this Stanwell a member of my personal collection…, but alas, I can’t keep them all! Pipephil.eu (Stanwell — Pipes : Logos & Markings) gives the nuts-and-bolts version of the Stanwell name:
Brand & factory were established in 1942 by Poul Nielsen. The company has been owned since 2000 by Nordisk Tobaks Kompagni A/S.
The factory in Borup crafted all Stanwell pipes from 1965 until 2009. From 2010 on the pipes are crafted by Barontini (Italy) except for the limited editions.
Production (2007): 115 000 Pipes/year.
For the Stanwell on the worktable, the shape number 23, helps to place this specific pipe in the stream of Stanwell’s history. Pipedia’s Stanwell Shape Numbers and Designers has a great list which was created by Stanwell collector, Bas Stevens. Steve Laug of Rebornpipes wrote the introduction to this list on Pipedia which I repeat here:
“In my experience Bas Stevens is one of the foremost authorities on Stanwell pipes. Whenever I find a shape, I need information on, or a pipe that I need help identifying the shape or the carver I email Bas and he has the information readily at hand. I picked up this shape listing from him some time ago and it identifies the shape by number and by designer. I found it extremely helpful so I wrote Bas and asked if I could post it here. Bas granted gracious permission and below is what Bas has provided. “
– Steve Laug of rebornpipes, September 2013.
Steve also has Bas’ list posted on RebornPipes (Stanwell Shapes – Compiled by Bas Stevens | rebornpipes). The listing on Pipedia continues to be dynamic as new shape numbers are discovered or produced by Stanwell. Bas’ list in Pipedia has the following for the shape number 23:
- Two versions of this shape number:
a) Straight billiard (early 1950s – see catalog).
b) Bent strawberry with a rounded rim and saddle stem, by Sixten Ivarsson.
Stanwell is known for recycling shape numbers but there is no confusion about which 23 is on the worktable. I would have described the shape as an Acorn shape, but Strawberry is good too. The key bit of information from this entry is that the pipe on the table is a Sixten Ivarsson pipe. If there was ever an iconic name in Pipedom, it would be his. Pipedia’s Sixten Ivarsson article is worth the read to more fully appreciate his impact on the pipe world and the pedigree of the 23 on the worktable. This is the opening statement from the Pipedia article (Ivarsson, Sixten – Pipedia):
The Grand Old Man of Danish Pipe Making died in the Spring of 2001.
Denmark is a small country with only 5 million people. Why has this small country become one of the metropols of the pipe World? One of the reasons was Sixten Ivarsson and his new and creative work.
 When a great man, who has almost become a living legend among pipe smokers, leaves this world, the time is appropriate for a review of his life and his significance in the pipe world. There are two different approaches for this purpose: You can look at the merits of the person in his surroundings or you can look at the movements and development in the surroundings that made his merits possible. Both approaches will be used in this retrospective article.
The story of Sixten’s entrance into the pipe world has been told several times, a short version was found in P&T, winter 1997, so this article will just remind you of his entrance and then focus on his influence.
The article looks at Sixten’s growth and experiences as a young man who was good with his hands fixing and making things. The article continues (Ivarsson, Sixten – Pipedia) with how Sixten Ivarsson came into the pipe making business:
Shortly after the war, Sixten had made himself a pipe from the root of an elm tree. He went to a pipe repair shop (Suhr’s pipe repair shop) to have a stem mounted. But fortunately, the repair man was ill for a long period. Sixten offered to fix his pipe himself, but first he had to fix the lathe which was out of order. He fixed both so well that right away he was offered work as a repairman. For some years he repaired countless numbers of pipes. Later he said that in this period he learnt all about how pipes should not be constructed.
Before the real (English) pipes were back in the market, it was possible to buy briar, possibly from France. One day a customer came into the shop with a pipe in his hand asking if they could get him another pipe like this. Sixten answered that it was impossible to get the original pipe, but he was able to make a copy. The customer was satisfied with the pipe that Sixten made, and Sixten was now both repairman and pipe maker.
The first shapes that he created were not far from the classic, traditional English shapes, only a little more slender and with angles that were not always 900 for a billiard. Jumping forward, Sixten’s reputation developed during the years after WWII and this is where Poul Nielsen, founder of Stanwell pipes, encounters the blooming Danish artisan beginning a relationship lasting over 4 decades. The article continues (Ivarsson, Sixten – Pipedia):
When Poul Nielsen one day visited Suhr’s he immediately fell for Sixten’s pipe shapes to be used for his own machine made pipes, now called Stanwell. This became the beginning of a long and fruitful collaboration that lasted for more than 4 decades.
In Stanwell’s first regular catalogue at least the first 10 shapes are creations from the hand of Sixten. A precondition of this was that Stanwell had bought their first copy fraisers in 1948-49 which were able to copy Sixten’s shapes. The collaboration with Stanwell lead to the independence of Sixten – as the first individual pipe maker/carver in Denmark.
Pipedia’s article Stanwell Shape Numbers and Designers referenced earlier, has a compilation of all the shape numbers attributed to Sixten Ivarsson in the Stanwell line of pipes. The list is impressive.
Sixten Ivarsson: 01 (Nefertiti), 01 (Pick Ax), 02, 06, 07, 09, 10, 11, 13, 15, 17, 19, 20 (Boat), 20 (Bent Dublin), 21, 22, 23, 24, 25, 30, 32 (Free Hand), 33, 34, 35 (Bent Free Hand), 37, 38, 41, 43, 48, 55, 59, 62, 63, 64, 70 (Free Hand Volcano/Sitter), 75 (Billiard w/oval shank), 79, 82, 85 (Bent e), 86, 87, 90, 91R, 95, 96, 105, 110, 119, 124, 2606, POY 1993.
The Sixten Ivarsson ‘style’ is distinctive. The following 2 pages are from Pipedia’s Ivarsson, Sixten article showing the Pipe-Dan catalog from 1960-62 providing pictures of Sixten Ivarsson pipes which I believe characterize his unique contribution (File:Pibedan 61 62.pdf, courtesy Danishpipemakers.com):
 I found a page in a later undated catalog in the same article showing a picture of a smooth briar 23. The 23 is in the right column and the second pipe down. The rounded rim and ‘strawberry’ shape are the same minus the blasted surface (which I prefer😊) and unfortunately, the Stanwell Crown stem logo which has disappeared into pipe legend.
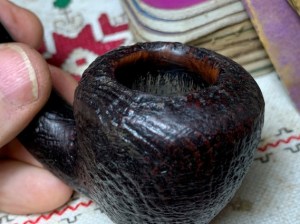
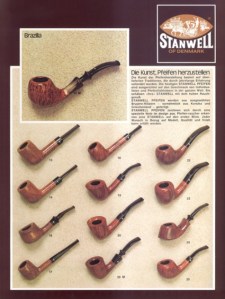 With a better understanding of Stanwell and the lineage of Sixten Ivarsson pipes, it’s time to look at our Strawberry 23 on the table. The chamber has medium cake and will be cleared to allow fresh briar to emerge, to inspect the chamber for heating damage, and to allow the new steward to develop a fresh protective cake layer. A cake layer need not be more than the width of a US dime.
 There is grime and lava flow over the blasted rounded rim and this needs to be cleaned.
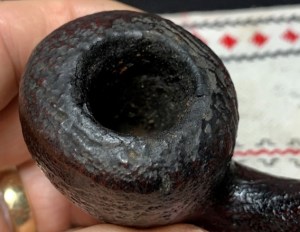 The blasted surface is in great shape and will be cleaned to remove grime.

 The stem has a tooth compression on the upper bit and tooth chatter on both the upper and the lower.
 There is residual oxidation in the stem and expected wear – nicks and dents.
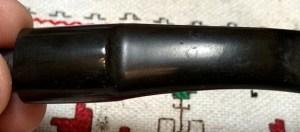 To begin the restoration of this Stanwell Hand Made the stem’s airway is cleaned with pipe cleaners moistened with isopropyl 99%. The bend in the airway is tight and it takes a bit of effort to push the pipe cleaners completely through the airway. In time, the airway is clean.
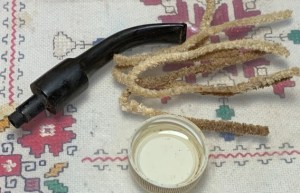 To address the oxidation in the vulcanite, the stem is put in a soak of Briarville’s Pipe Stem Oxidation Remover. The stem will soak for several hours.
 Turning next to the stummel, the chamber is reamed using the Pipnet Reaming Kit. Three of the 4 available blades were used.
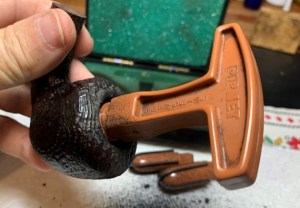 Next, the Savinelli Fitsall Tool continues the cleaning by scraping carbon cake off the chamber wall and reaching down into the angles of the chamber floor.
 The last vestiges of carbon are removed by sanding the chamber with 220 grit paper wrapped around a dowel rod.
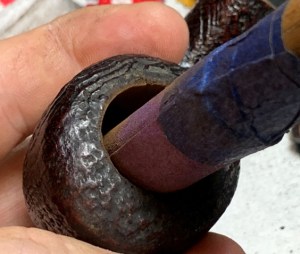 The full arsenal of tools used is shown and the pile of carbon cake which has been removed.
 A quick inspection of the chamber reveals healthy briar with no heating issues.
 Next, the blasted briar surface is scrubbed with undiluted Murphy Oil Soap and a cotton pad.
 To address the lava flow over the rounded rim, a soft brass brush is used. The brass brush adds some muscle to the cleaning but is not overly invasive.
 The cleaning continues with the internals by taking the stummel to the sink. Using anti-oil liquid dishwashing soap, the internals are scrubbed with shank brushes.
 After the scrubbing the stummel is thoroughly rinsed and returned to the worktable.
 The internal cleaning continues using pipe cleaners and cotton buds moistened with isopropyl 99% alcohol. A small dental spoon helps by scaping the mortise wall to remove tars and oils. The cotton pad shows that there wasn’t a great deal of grime scraped off by the spoon. Later, to make sure the pipe is fresh and fully clean, the stummel will will enjoy an alcohol and kosher salt soak.
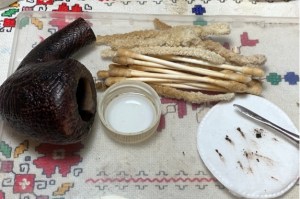 The cleaning of the stummel did a good job but left some thin patches in the finish over the front of the rounded rim.
 To address this bald spot, a mahogany dye stick is used to darken the light patch to better blend with the finish. I did a small test patch first to make sure my selection of mahogany was good.
 Next, to condition and protect the briar surface, Mark Hoover’s ‘Before & After’ Restoration Balm is used (Lbepen.com). With some Balm on the fingers, it is worked into the briar and then set aside for 10 or so minutes allowing the Balm to be absorbed.
 After the time has passed, a dedicated microfiber cloth is used to wipe the stummel removing excess Balm and buffing it up. As usual, the Balm did a good job. The blasted surface looks great.
 To continue cleaning the internals of the stummel, the stummel is given a kosher salt and alcohol soak. This soak helps to draw out tars and oils from the briar and helps to remove extent ghosting. First, a cotton ball is pulled and twisted to form a wick.
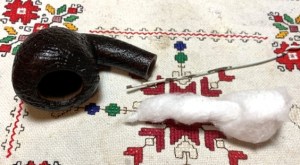 The wick is then inserted into the mortise and guided through the airway with the help of a stiff wire. The end of the wick is inserted through the draft hole at the base of the chamber. The wick helps to draw out the tars and oils during the soak.
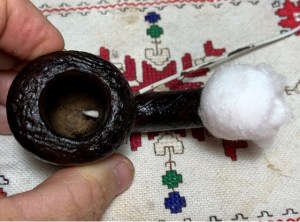 The chamber is next filled with kosher salt and placed in an egg carton to give stability and to orient the stummel so that the end of the shank and the rim are roughly level. Kosher salt is used because it leaves no aftertaste as does regular iodized table salt. With the stummel situated in the egg carton, a large eye dropper is used to introduce slowly the isopropyl 99% alcohol into the chamber until is surfaces over the salt. This grade of alcohol is used because it is purer and as it evaporates leaves no taste.
 After about 10 or 15 minutes, the isopropyl 99% as been drawn into the salt and cotton wick and the bowl is topped off once again with alcohol. The stummel will soak through the night. Lights out.
 The next morning, the wick is extracted. The salt and the wick are both soiled indicating that the soak did the job.
 After the salt is cleared away, I blow through the mortise to make sure no crystals remain. To make sure that the soak was successful, one pipe cleaner and cotton bud confirms that the stummel is clean and ready for a new steward.
 With the stummel put to the side, it’s time to bring the stem up to speed. It has been soaking in Briarville’s Pipe Stem Oxidation Remover. After fishing it out of the soak, the stem is rubbed briskly with a cotton cloth to remove the oxidation that surfaced. The soak did a good job.
 In the picture above a couple of pipe cleaners moistened with isopropyl 99% were used to clear away the Briarville fluid from the airway. As before, it was a bear getting the pipe cleaners through the airway. There is a method to expand the airway in a tight bend like this pipe that I have used in the past. A pipe cleaner is worked into the bend. The vulcanite is then heated with a hot air gun just at the point around the bend. The purpose is not to ‘unbend’ the stem, but to enlarge or loosen the airway. When the vulcanite is heated it becomes supple, and when this happens the pipe cleaner is moved back and forth a few times to enlarge the airway path.
 When the movement of the pipe cleaner frees up, the stem is taken to the sink and some cool water flowing over the heated area cools the vulcanite holding it in a more favorable disposition.
 To check the bend, the stem and stummel are reunited. The general rule of thumb for stem bending is that the end of the stem should be on a parallel plane to the horizontal plane of the rim. It looks like we’re still good.
 When I rejoined the stem and stummel, I noticed that the stem was not seating nicely with the shank. There is a gap at the bottom of the union indicating that the top half of the shank/stem junction is ‘fat’ and therefore pushing the bottom out. As I look at this gap, the thought I have is that I don’t believe Sixten Ivarsson would have allowed this pipe to leave the shop like this. I had first thought this stem was original but that the logo had been sanded or buffed off over time. This often happens to the dismay of purists 😊. The characteristic that had caused me to believe this stem was an original was that the flat underside of the shank – the nomenclature panel was matched by an exact flat underside of the saddle as it tapered from the shank. It is a great match in this respect if this stem is indeed a replacement. Either way, whether it is an original that slipped out of the shop or a replacement, the gap needs to be addressed or else I won’t sleep tonight.
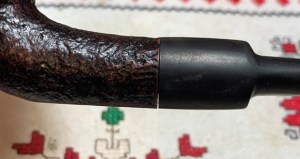 The approach to creating a flush union between the shank and stem facing is to sand the ‘fat’ part of the stem facing away allowing the gap to lessen. This sounds simple but in my experience this process can go wrong in many ways and the junction can become even more problematic. With this Stanwell, the fat is the upper side of the saddle stem facing. A strip of 220 sandpaper is cut and notched in the center to allow the sanding around the tenon.
 The paper is fit over the tenon with the sanding side toward the stem facing. When the stem is pushed into the mortise the sand paper is wedged between the shank and stem facing. While holding the paper in place, the stem is rotated back and forth (not a full 360!) so that the only sanding action is on the fat top half.
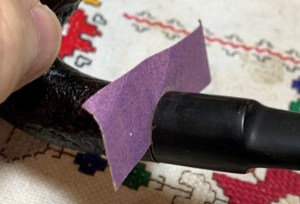 It takes a few cycles of this sanding and then checking to gauge the closing gap to make sure we’re on the right track. I admit that there is no perfection on this side of heaven, but I’m thankful that the gap between the shank and stem facing looks 100% better now. I can sleep tonight.
 Continuing with the stem’s condition – the lower bit looks good except for roughness.
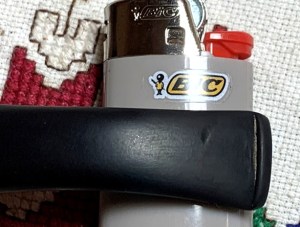
 The upper bit has a bite compression. To remove or lessen the compression, the heating method is used. A Bic lighter paints the surface with the flame and as the vulcanite rubber heats it expands reclaiming its original orientation, or closer to it. From the before and after pictures, the heating did reduce the compression so that only sanded is needed to remove the compression.
 Next, both the upper and lower bit are sanded to remove the compression and to address the roughness. The button is also sanded.
 The next picture was taken earlier when looking at the lower gap. I also noticed from this picture that there is a hump on the upper saddle which adds another non-original point if one is counting. The sides and underside of the stem are in good alignment.
 To address this ‘hump’ 220 paper is used to sand. First, a protective layer of painter’s tape is wrapped around the shank. The hump is sanded down so that if one were to draw a line along the top of the shank onto the top of the saddle the transition is smoother and more uniform. The union now looks much better. The gap is gone and the shank to saddle transition is much better.
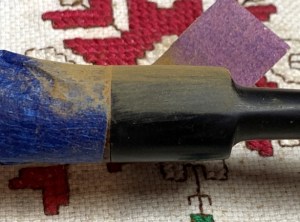 The sanding is next expanded around the entire saddle to make sure everything is uniform and to remove any vestiges of oxidation.
 The sanding with 220 is then expanded to the entire stem to address any leftover oxidation and scratches in the vulcanite.
 After the 220 paper, the stem is sanded with the finer 320 paper.
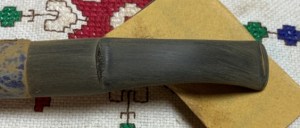
 Finally, the primary sanding process finishes by wet sanding with 600 grit paper and this is followed by applying 0000 grade steel wool.
 The sanding transforms next into sanding/polishing with the full set of 9 micromesh pads. Between each pad, Obsidian Oil is applied to the stem to guard it from oxidation and to further condition the stem. The oil also provides better traction for the following pad. First, the stem is sanded with pads 1500, 1800, and 2400 grades.
 Following this, the stem is sanded with pads 3200, 3600, and 4000.
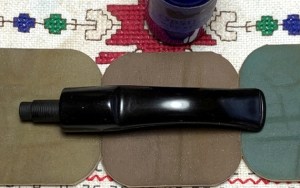
 Finally, the stem is sanded with pads 6000, 8000, and 12000. The stem looks good.
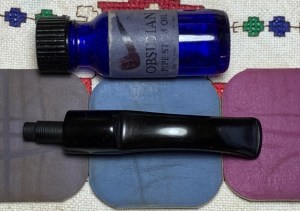
 To further condition and polish the stem, Mark Hoover’s ‘Before & After’ Fine and Extra Fine Polishes are applied to the stem. Starting with the Fine Polish, some is placed on the finger. The picture shows what the Fine Polish looks like and how much is used. It doesn’t take much.
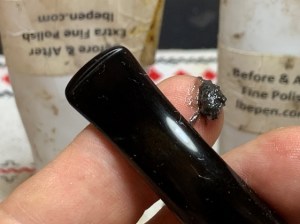 The polish is then worked into the vulcanite rubber surface and put aside for a few minutes.
 After a few minutes, the excess polish is wiped off with a paper towel. Next, the Extra Fine Polish is applied in the same manner. After the time has elapsed the excess is wiped off. The stem looks great.
 Now, the home stretch. After mounting a dedicated cotton cloth buffing wheel onto the rotary tool, the speed is set to about 40% full power and Blue Diamond is applied to the stem. Blue Diamond is a very fine abrasive that polishes very well. Compound is not applied to the rough blasted stummel surface because the compound dust would get lodged in every nook, cranny, and crack and it would not be fun cleaning it.
 To remove the compound dust which had accumulated on the surface, a felt cloth is used.
 Well, it happens. Oxidation can be deep and stays beneath the radar during the sanding and appears after the fine polishing is done. That is what has happened with this stem. With the pictures lightened for better viewing of the oxidation, the first picture shows a patch on the top of the stem.
 On the underside, there are oxidation patches running along the edges. Ugh….
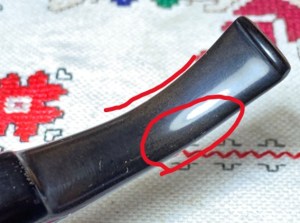 So, what does one do when at this point? One starts over. I return to sanding the stem with 220 grit paper, then 320, 600, 0000 steel wool, micromesh pads 1500, 1800, 2400, 3200, 3600, 4000, 6000, 8000, 12000 and then Blue Diamond compound. I’m satisfied this time around that the oxidation has been tamed.
Before proceeding to the application of wax, one mini project is left to do. With Freehands, even with this more classical shaped Freehand, I like to create an ‘Steward’s view’ patch of smooth briar grain on the inner edge of the rim.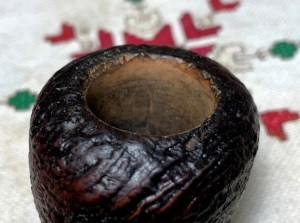 The inner rim’s edge is sanded through 220, 320, 600 papers, and with the full set of 9 micromesh pads to arrive at a nice-looking rim.
 Next, after mounting a dedicated cotton cloth buffing wheel with speed at 40% full power, carnauba wax is applied to the entire pipe. After the application, the pipe is given a rigorous hand buffing to remove excess wax and to raise the shine.
 This Stanwell Hand Made 23 was interesting digging into the story of Danish artisan, Sixten Ivarsson and how his story intermingles with Stanwell’s. Stanwell calls the 23 shape a Strawberry with a rounded rim. The blasting of this Strawberry is beautiful providing a tactile 3-dimensional view of the subtle grain pattern. The inner rim patch of smooth grained briar is a nice touch contrasted with the darker, blasted rim. The dimensions are Length: 5 5/8 inches, Height: 2 inches, Rounded rim width: 1 1/2 inches, Chamber width: 15/16 inches, Chamber depth: 1 3/4 inches, Weight: 51g. Michael commissioned this pipe to fill the gap left by the loss of his grandfather’s Stanwell and as the commissioner, he has the first opportunity to claim the Stanwell in the Pipe Store. A portion of the proceeds of all pipes restored are used to support the Daughters of Bulgaria, now called, Spring of Hope – helping women and girls who have been trafficked and sexually exploited. Thanks for joining me!


Pingback: Rescuing a Barok Bruyere of St. Claude Pickaxe from the Mother of All Pipe Injuries – a Cracked Bowl – The Pipe Steward