The next pipe on the worktable came to me in the Lot of 68. In February 2019 a seller located in West Hartford, Connecticut, placed this lot on eBay and my final bid won the day. These pipes were placed in the ‘For “Pipe Dreamers” ONLY! online collection where pipemen and women can find and commission pipes to be restored to benefit the Daughters of Bulgaria now called, Spring of Hope. The Savinelli Punto Oro is circled below in the photo I saw that day. The Punto Oro got the attention of pipeman Kent. When I asked Kent about him and how he found out about The Pipe Steward, he wrote:
Also, I heard about you through the pastor at my church, Michael -. A little about me, I live in the western Pennsylvania countryside on a homestead with my beautiful wife and 6 kids. I enjoy hunting, fishing, gardening and hiking to the local swimming hole with my family. Thank you for helping the helpless and vulnerable in Bulgaria. If done in the name of Christ, you’ll be storing up treasure in heaven.
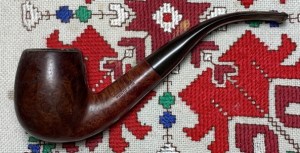
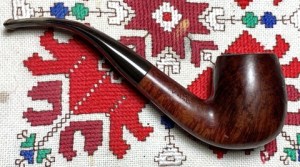
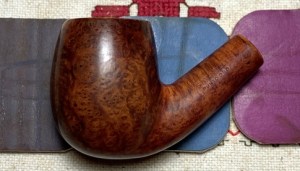
I appreciate so much Kent’s words and I’m glad to add this pipe to join his outdoor activities. Here are pictures I took of the Punto Oro in 2019. I have described the pipe as a Bent Egg and what I love about this pipe are the sweeping swan neck lines – a very attractive shape.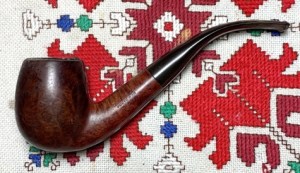


 The nomenclature is stamped on the left side of the shank: SAVINELLI [over] PURNTO ORO.
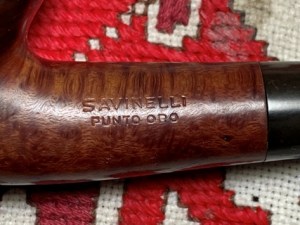 On the right side of the shank is stamped the Savinelli shield logo. To the right of this is the shape number ‘602’ [over] ITALY.
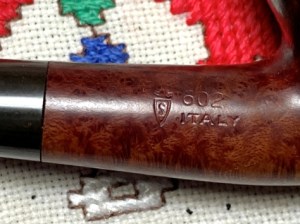 Pipedia’s Savinelli article has a large Shape Chart which shows the 602. The picture below is a clipping of part of the chart with the 602 circled.
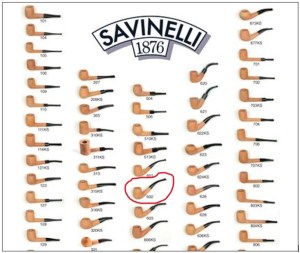 If one translated ‘Punto Oro’ they will discover that it means “Gold Point’. The Gold Point points to the stem logo pictured below which is brass not gold 😊.
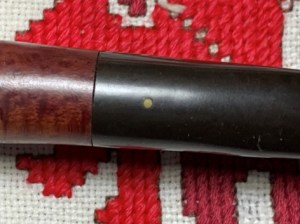 Savinelli is perhaps the most well-known Italian pipe maker with a reputation for quality of pipes over volume produced. Pipedia’s Savinelli article summarizes well the origins of Savinelli going back to 1876 with the founder, Achille Savinelli:
Achille Savinelli opened one of the first shops exclusively focused on tobacco and smoking accessories.
That last item may seem relatively unimportant in the global scheme of advancements, but for those of us who love pipes, it was a monumental achievement, made even more difficult by the Italian government, which held a monopoly on tobacco. In addition, Achille was convinced that briar pipes  represented the future of pipe smoking at a time when the market was dominated by clay and meerschaum. It may not have been obvious in 1876, but Achille Savinelli’s commitment to briar pipes would prove to be visionary.
He soon began designing his own pipes (different from the styling we associate with Savinelli today) and arranged their manufacture by local pipe makers in the Varese district of north-west Italy. The pipes became so popular that some were exhibited at the 1881 Esposizione Industriale Italiana (Italian Industrial Exposition)—the precursor to today’s Milan Fair, one of the largest trade fairs in the world.
Achille Sr. spent 14 years cultivating the company and building a strong customer base before passing the reigns to his son, Carlo, who ran the store for the next 50 years. Carlo increased the store’s exposure by building relationships with clients throughout Milan. He knew his customers and their tastes, and he adapted his service and promotional talents to meet their individual demands. Driven by Carlo’s hospitality and the comfortable atmosphere he created, the Savinelli shop soon became the principal meeting place in Milan for pipe enthusiasts, where smokers could exchange opinions and discuss their own experiences—all with pipe in hand.
Jumping forward to post WW2 in the Pipedia article the company developed further:
Savinelli Pipes began production in 1948 and, although the pipes were of a superior quality and unique in their aesthetic, the brand wasn’t an immediate success. Few new brands are. It takes time for the public to catch on. Retailers were skeptical of placing Italian pipes alongside their best sellers from England or France, and customers, in turn, were hesitant to purchase a Savinelli over pipes by already established, foreign brands. Achille Jr. stood by his product, however; he knew it was only a matter of time before the world realized that these pipes were of a far superior quality, capable of competing with even the most well-established pipe manufacturers in the world. As it turns out, he was right. In less than a year, Savinelli pipes gained prestige in markets all across the world—heralded for their delicate balance of innovation and tradition, of form and function. Savinelli pipes were placed alongside the likes of Dunhill and Comoy’s in tobacconists from the United States to Europe, and, in time, this exposure modified Italy’s reputation; it was not only the premier exporter of briar, but now a premium source of fine briar pipes.
The Punto Oro line of Savinelli pipes is a higher shelf pipe according to most who know something about Savinelli pipes. From the Savinelli website focusing on the history of Savinelli (Discover the pipes that made Savinelli’s history) the Punto Oro line was created in the late 1950s:
The PUNTO ORO pipe was the first pipe created immediately after the factory opened in 1958 by Achille Savinelli. This pipe has always represented the Savinelli brand, embodying elegance, seriousness, and tradition. It is made of excellent quality briar with a beautiful grain. It’s important to note that finding briar with the necessary characteristics for a PUNTO ORO pipe is very challenging; only 1.2% of the global selection meets the criteria for this series, which is why not all models in our production are available. The stem is made of acrylic and features the classic gold dot.
A thread in Pipesmagazine.com (http://pipesmagazine.com/forums/topic/opinions-sought-savinelli-punto-oro) gives the general impression that the older Punto Oro pipes were on the upper shelves of Savinelli offerings, just under the Guibileo D’Oro and older Autographs. The Punto Oro catalog ad above from Pipedia describes the quality of this Savinelli line and the processes involved in producing the quality finish. I found interesting that the ad describes the two finishes available with the Punto Oro line (see at the bottom of the ad) – “Rich Mahogany and genuine Sandblast”. With the smooth surface Punto Oros, the hue is mahogany – the pipe on the table fits this described hue very nicely!
With a renewed appreciation of Savinelli and the quality Punto Oro line, taking a closer look at the Bent Egg on the table, the chamber has moderate cake, and the rim has a hard crust of lava flow.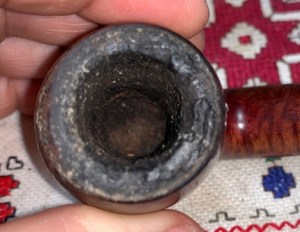
 There is also a scrape spot on the front of the rim. It appears that the former steward was accustomed to knocking his pipe on a hard surface to clear the ashes….ugh.
 There are also some pits in the briar on the heel of the pipe. This needs to be addressed.
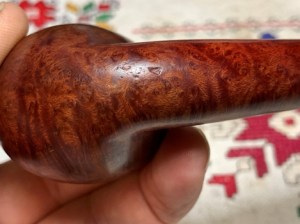 The stem has oxidation and along with some tooth compressions on the bit, there is thick calcification.
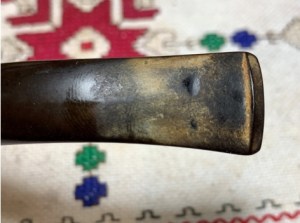
 To begin the restoration of this Punto Oro, the stem airway is cleaned with pipe cleaners and isopropyl 99% alcohol. I noticed in the cleaning that the pipe cleaners have a challenge moving freely through the airway. I’ll keep my eye on this.
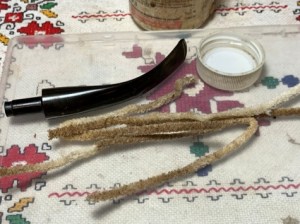 To address the oxidation, the stem is placed in a soak of Briarville’s Pipe Stem Oxidation Remover. The stem will soak for several hours.
 With the stem on the sidelines, attention is now on the stummel. The chamber has a thick cake which will be reamed out to reveal fresh briar. Here is a fresh picture to mark the starting point.
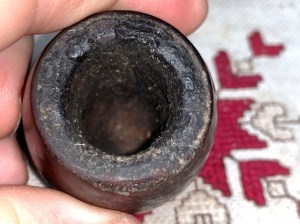 I use 2 of the 4 blades available in the Pipnet Reaming Kit to work on the chamber. Usually, reaming is a straightforward process. However, it was a challenge with this project. The first blade head, the smallest, had great difficulty cutting to the floor of the chamber. The next larger blade head, pictured below, would only cut about a third of the way down the chamber. The cake was hard as a granite slab, and I was concerned about breaking the blade.
 I next switched to my vintage Kleen Reem Pipe Tool which is metal and less likely to break. It was still a very stiff challenge cleaning away the carbon. My guess is that the former steward maintained the top half of the chamber but only did a cursory job on the lower chamber thus allowing a hard cake to develop. The Kleen Reem Pipe Tool’s metal cutting arms expand as the knob on the top is turned. Starting first with the retracted configuration, the tool reaches down the chamber as far as it goes. As the tool is rotated and plowing the cake, the knob is turned, and the arms gradually expand cutting more carbon.
 Even the Kleen Reem Pipe Tool was not clearing all away. Switching next to the Savinelli Fitsall Tool, the tool was used to dig into the hard surface and break up the cake. After doing this around the chamber, I returned to both the Pipnet Tool and the Kleen Reem Tool to ‘plow’ more. Gradually, the tools make it down the entirety of the chamber.
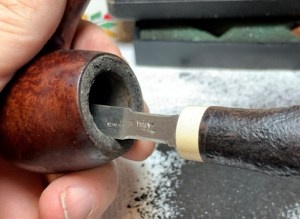 The final step was to sand the chamber first with a coarse 120 grit paper wrapped around a dowel rod then the same with a 220 grit paper pictured below.
 The picture below shows all the tools used and the pile of carbon cake removed from the chamber. Not an easy one…
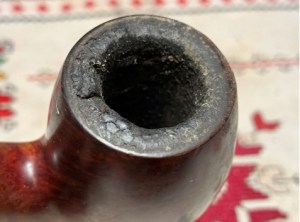
 A quick inspection of the now-cleared chamber shows healthy briar with no heating issues.
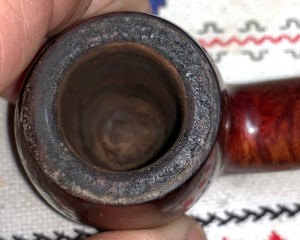 Moving next to clean the external briar, a few pictures showing the grime and dirt over the surface are next.
 The cleaning will also address the crusted lava over the rim.
 Using undiluted Murphy Oil Soap, a cotton pad is initially used to scrub the stummel.
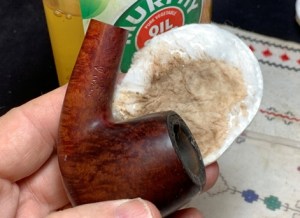 A brass brush is also used to scrub the rim. Brass is used because it is gentler on the briar yet adds needed muscle for the cleaning process.
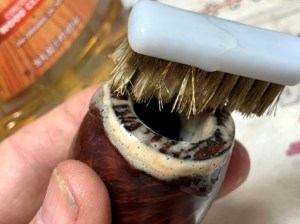 The cleaning transitions to the internals going to the utility sink. Using warm water, the internals are scrubbed using shank brushes and anti-oil, liquid dishwashing soap. My soap of choice is Dawn. After the scrubbing, the stummel is given a thorough rinse and taken back to the worktable.
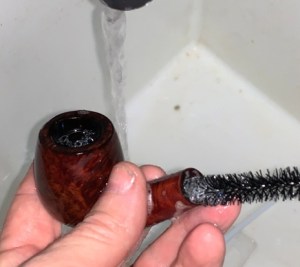
 The cleaning of the internals continues with cotton buds and pipe cleaners moistened with isopropyl 99%. With the ½ bent drilling of this pipe, the first drilling creating the mortise runs parallel to the shank. The second drilling is the airway angling up toward the chamber floor. This drilling creates a reservoir at the bottom of the primary drilling which collects the moisture. There’s a lot of gunk collected there. A small dental spoon helps by excavating tar and oil off the mortise wall and down into the reservoir.
 It took quite a few cotton buds to make progress. To clean the internals further and to freshen the internal briar, later I will give the pipe an alcohol and kosher salt soak.
 With the primary cleaning complete, I take a closer look at the stummel’s condition. Starting at the top, looking at the rim, there is much discoloration and the smart bevel ringing the inner ring is black from the lighting and lava.
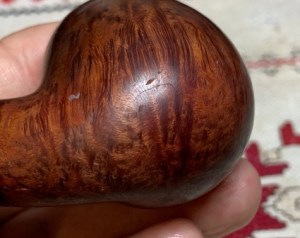
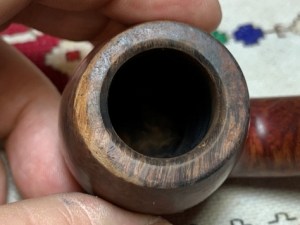 The ‘skin’ on the front has removed a good bit of briar.
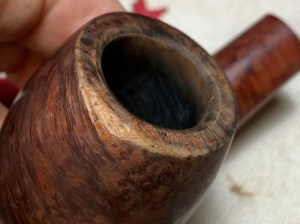 To address the rim’s condition, the stummel is topped using 220 grit paper on the chopping board. The goal is to refresh the lines of the rim and to clean it. It will be a challenge to erase the skinned edge on the front of the rim with topping alone. To do so I would have to remove more briar off the rim than I want. Sanding will be necessary as well. With the stummel inverted, the stummel is rotated over the paper.
 After several rotations, the picture below shows the progress. The blackened bevel pops in contrast as the rim lightens with the topping.
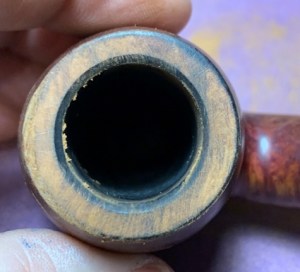 After several more rotations, enough briar has been sanded for now.
 The skin on the front seems even more significant after the initial topping.
 To address the skinned area, 220 grit paper gently and strategically sands the area. The sanding removes the rough area and tapers the area toward the rim.
 After sanding the skinned area, the lines on the rim need to be refreshed once more. The stummel returns to the topping board and is rotated again a few times over 220 grit paper.
 The restored rim looks good. The damage on the front of the rm has been mitigated.
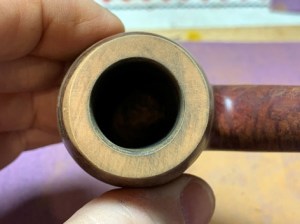 The 220 grit paper is replaced with 600 grit paper and the stummel is rotated over the paper.
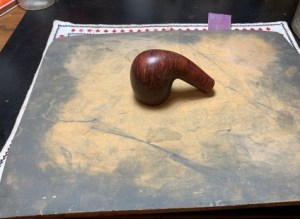 The front is also sanded with the 600 grit paper to match the rm.
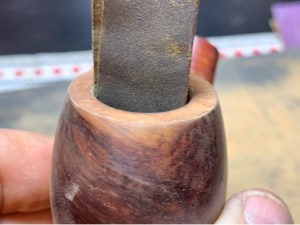 The rim looks good. The next step is to refresh and restore the smart bevel. Through the topping process the bevel has been reduced. The thin black line can still be seen.
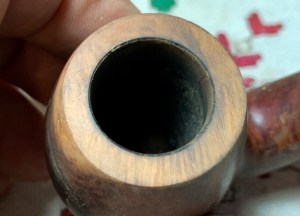 To recreate the bevel, a wooden orb is used. With the orb straddling the bowl, 220 grit paper is pinched between the orb and the inner rim and rotated. The hard backing pressing the paper cuts a sharp bevel.
 To match the rim, 600 grit paper is applied to the inner rim with the orb in the same manner. The rim looks great – quite the transformation.
 Next, the pits on the heel need attention. There is a very large pit that is too deep for sanding.
 To try to reduce the severity of the larger pit with the hope of simply sanding it away, one method is to super heat and steam the area to cause the pit to lessen. Using a hot iron, a moist cloth is placed over the pitted area and the iron is pressed against the cloth. This causes the moisture in the cloth to convert immediately to steam, and this hot steam is forced into the wood. Wood is very porous microscopically and it absorbs the moisture and expands like a sponge.
 After steaming the pits several times, unfortunately, the process didn’t help. The pit is still too deep to sand away.
 To address the pits, a mixture of briar dust and regular CA glue is used to fill the pits. This Briar Putty is made by drawing the briar dust into the CA glue and mixing with a toothpick.
 To thicken the mixture a bit more, briar dust is drawn in and mixed until it reaches the viscosity of molasses. The toothpick is used to drop putty into the pits. The stummel is put aside for a time to allow the patches to cure.
 After the patches have fully cured, a flat needle file is used to file the patch mound flush with the briar surface.
 Followng the filing, the patch area is sanded with 220, 320 and 600 grit papers.
 Next, to help remove small scratches and nicks on the surface, sanding sponges are used. Only the 3 least abrasive sponges are used – medium, light and fine.
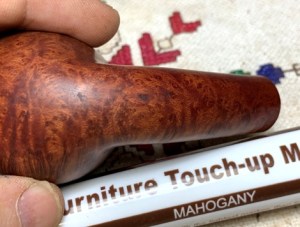
 Before moving to the micromesh sanding, the lighter hue of the sanded rim, skinned front and heel repair need to be brought into alignment with the stummel hue. The Savinelli Punto Oro ad above describes the finish as mahogany for the smooth briars.
 I fished the mahogany dye stick out of the basket and tried a small test on the heel patch on the underside. It looks pretty good. The stick is then used to apply dye to the rim and patch, and it looks great. The micromesh process will also help to blend the new dye with the host finish.
 Using the full regimen of 9 micromesh pads, the stummel is sanded starting with pads 1500, 1800, and 2400. The second set of pads are pads 3200, 3600, and 4000. Finally, pads 6000, 8000 and 12000 are used. Between each pad, the stummel is wiped with a moist cotton cloth to clear the briar dust and to give the following pad more traction.
 As I mentioned earlier, the internal cleaning of the stummel will continue with an alcohol and kosher salt soak. This process helps to draw out tars and oils and to freshen the briar. The first step is to create a cotton wick by pulling and twisting a cotton ball.
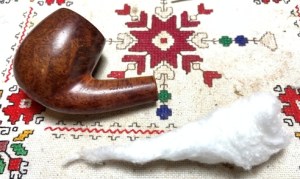 With the help of a stiff wire, the wick is guided down the mortise into the airway. Then kosher salt fills the bowl and the stummel is placed in an egg carton to provide stability and to angle the stummel so that the rim and shank facing are level. Kosher salt is used rather than regular iodized table salt because it doesn’t leave an aftertaste.
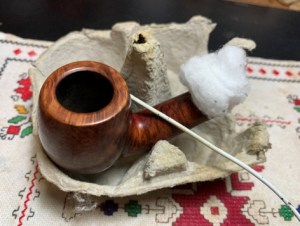 Next, a large eye dropper is used to fill the bowl with isopropyl 99% alcohol until it surfaces over the salt.
 After about 10 minutes, the alcohol is topped off once more after it has been absorbed into the stummel. The stummel is put aside to soak through the night – time to turn the lights off.
 The next morning the soak appeared to do the job. The wick and salt are soiled, indicating that the tar and oils have been pulled out of the internal briar.
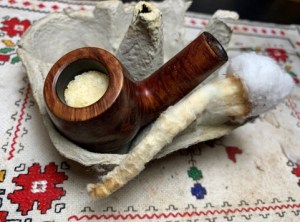 After the used salt is removed from the bowl, a few cotton buds and pipe cleaners clean up the remaining residue. A sniff test of the bowl reveals a nice fresh smell.
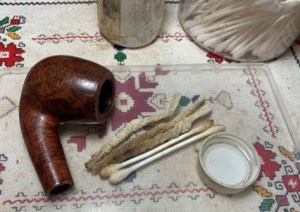 Before transitioning to the stem, the stummel is treated with Mark Hoover’s ‘Before & After’ Restoration Balm (www.Lbepen.com). Mark’s product works great conditioning the briar and bringing out the deeper rich hues of the wood. A starting picture marks the progress.
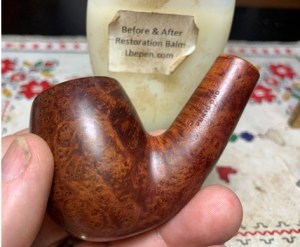 A small amount of the Balm is placed on the fingers, and I work the Balm into the briar surface and then set the stummel aside for about 10 minutes to allow the Balm to do its work.
 The Balm does not disappoint. After the time elapses, a dedicated microfiber cloth is used to remove the excess Balm and to buff the surface. I like the results – the briar grain has deepened and the grain patterns jump out.
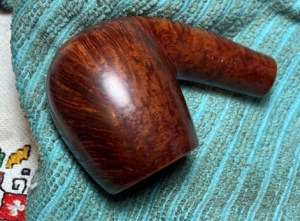 The stem has been soaking in www.Briarville.com’s Pipe Stem Oxidation Remover. When the stem is fished out the picture shows the oxidation that has been raised.
 The stem is then rigorously rubbed with a cotton cloth to wipe off the raised oxidation. The stem looks good. A few pipe cleaners moistened with isopropyl 99% are used to clear the fluid from the airway. I noticed again as I was forcing the pipe cleaners through the airway that it was very difficult. The bend of the stem is tight, and it takes a good amount of poking and pushing to push the cleaner through.
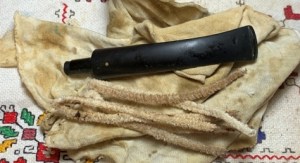 Before moving further with the stem this issue needs addressing. To loosen the airway and open it, a pipe cleaner is forced through the airway.
 The pipe cleaner acts to guard the integrity of the airway as the vulcanite stem bend is warmed with the hot air gun. When the vulcanite warms it becomes supple, and the stem begins to straighten. I allow it to straighten and while straight, I move the pipe cleaner back, and forth which helps to loosen the airway grip. Following this, the hot air again warms the bend and when the vulcanite is supple, I gently recreate the proper bend with the pipe cleaner in place. The stem is then allowed to cool with the pipe cleaner inserted.
 After the stem cools and the bend is fixed, the pipe cleaner is removed. To make sure the bend is at the correct orientation, the stem and stummel are reunited. The general rule of thumb is the end of the stem’s bend – the bit – should be parallel with the horizontal plane of the rim. I think I hit the mark. The pipe cleaner now runs through the stem a bit easier which helps the future steward to keep it clean.
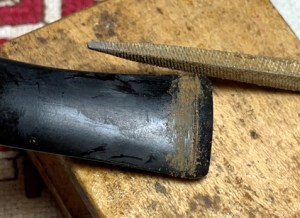
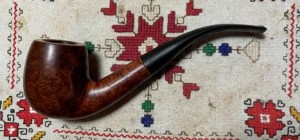 Looking now at the stem. The upper bit has a significant bite compression which needs to be addressed.
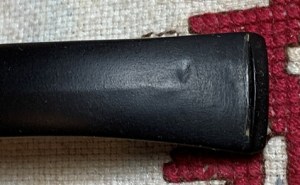 The lower bit looks good. The bit has some tooth chatter, but sanding will take care of this.
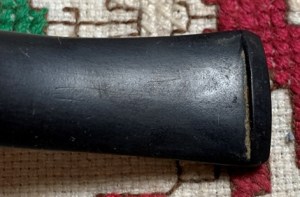 To address the compression, the first approach is to use a Bic lighter to paint the compression with the flame to heat the vulcanite. The hope is that as the vulcanite warms, the compression will expand to its original position. As the picture shows, the compression did not respond to the heating method.
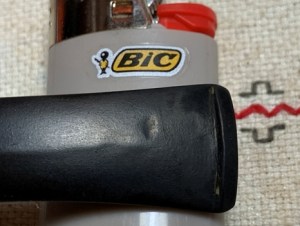 The compression is too deep to remove by simply sanding, so it needs to be patched. Medium-Thick Black CA glue is used to fill the compression. After the area is cleaned with a cotton pad and alcohol, a small drop of CA is applied to the compression and the stem is put aside allowing the patch fully to cure.
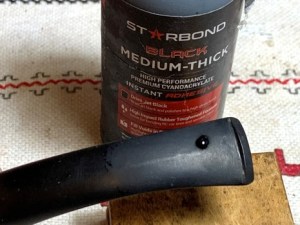 After the patch has cured, a flat needle file is used to file the patch mound flush with the vulcanite surface.
 While filing, a square needle file is used to sharpen and refresh the button – upper and lower.

 Next, the bit, upper and lower, is sanded with 220 grit paper.
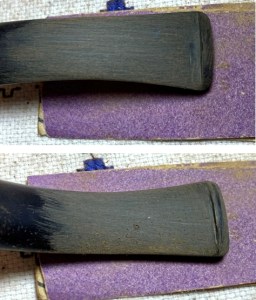 The sanding is expanded to the entire stem using 320 grit paper. A plastic disk is used to guard the shank facing from shouldering during the sanding process.
 600 grit paper is used to wet sand the entire stem at the sink. This is followed by applying 0000 steel wool.
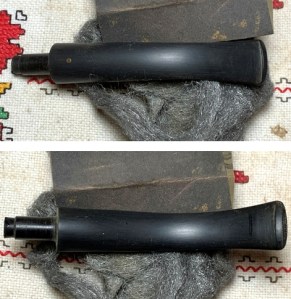 Following the general sanding, the stem is sanded with micromesh pads and between each pad Obsidian Oil is applied to condition the stem and to guard from oxidation. The first set of pads used are pads 1500, 1800 and 2400.
 The next set of pads are pads 3600, 3600 and 4000.
 The final set of pads are pads 6000, 8000 and 12000. I love the pop resulting from the micromesh process.
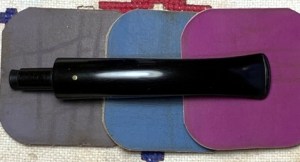 To further polish and condition the vulcanite stem, Mark Hoover’s ‘Before & After’ Fine and Extra Fine Polishes are used. First, a small amount of Fine Polish is placed on the fingers and then worked into the vulcanite stem.
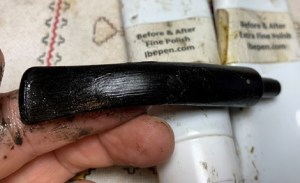 After working in the Fine Polish, the excess polish is wiped off with a paper towel. The same process is repeated with the Extra Fine Polish. The stem is looking great!
 The stem and stummel are reunited and after a dedicated cotton cloth buffing wheel is mounted on the rotary tool, with speed set at about 40% full power, Blue Diamond compound is applied to the entire pipe.
 The compound leaves behind a lot of dust that can be seen.
 To remove the dust and prepare the pipe for the application of wax, a felt cloth is used to clean the surface.
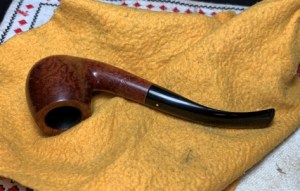 Next, with another dedicated cotton cloth buffing wheel mounted with the speed the same, carnauba wax is applied. After this, the pipe is given a rigorous hand buffing with a microfiber cloth to remove excess wax and to raise the shine.
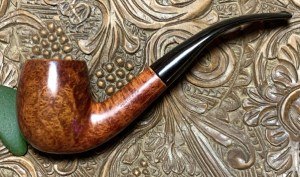
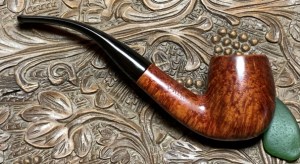
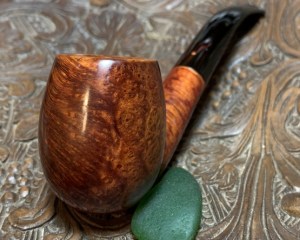
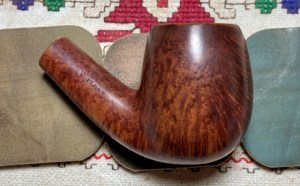
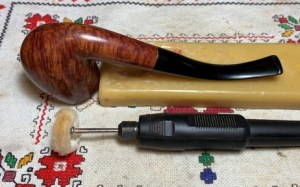 I’m pleased with the way the Savinelli Punto Oro turned out. The grain stands out with large bird’s eye grain and vertical fire grain. The swan neck sweep of the pipe’s shank transitioning into the stem is classy. Kent commissioned this pipe and will have the first opportunity to claim him from the Pipe Steward Store. A portion of the proceeds of all pipes restored help the Daughters of Bulgaria (now called, Spring of Hope) – helping women and girls who have been trafficked and sexually exploited. Thanks for joining me!