This resurrection project cannot be descibed as a mere restoration. It started in August 2021 when my wife and I returned to Bulgaria a year after leaving this our home of 15 years. One of our special places we visited and a place of respite during our time in Bulgaria was a little lazy fishing town on the Black Sea Coast, Sozopol. We spent many memorable holidays there and we decided to return during this visit. To the north of Sozopol is Bulgaria’s second largest city, Burgas, which has a center walking street great for strolling and finding a restaurant. One of the mandatory activities when we did a day excursion to the walking street was to go to an antique shop I discovered some years earlier where they always seemed to have pipes in the nooks and crannies of the hole in the wall shop. On this particular day, the front window looked as inviting as ever as the siren call of potential pipe treasures wooed me inside.
 The shop is a very small, compact rectangular cubicle with treasures in all directions. When I enter an antique shop looking for pipes my practice is to never ask if there are any pipes. I enjoy the poking and peeking through the shelves and boxes to unearth a pipe here and there. Usually, pipes are grouped together in a place this small – most often in a coffee can or some such container.
 After rummaging through the stacks, I did find a coffee can and some pipes scattered around and started assembling and ranking the top contenders near the front door where the shop lady was sitting. The lady attending the shop was not the owner. I had met him on previous trips to the shop. Negotiations took a little time as she had to track down the owner on the phone and explain the situation.
 At the end of the negotiations, seven pipes were settled on at a price that everyone could live with. The Oom Paul dominating the center of the picture below was without doubt a ‘symapathy acquisition’ because when I saw the huge block of wood with a loose stem hanging on, my first words were, ‘Bless his heart…’ The stummel looked as if it had been burnt and there was a skelaton nomenclature recognizable – ‘by Lorenzo’, which caught my attention. I could only make out part of the nomenclature, but the gargantuan size and Oom Paul shape eclipsed the rough condition of this ash heap pipe with this ‘Pipe Dreamer’ question: What could this pipe look like??? From the shop in Burgas, Bulgaria, the ‘Bless his heart’ pipe found his way to the For “Pipe Dreamers” ONLY! collection and now to the worktable in Golden, Colorado.
 The Oom Paul was the second pipe pipeman Justin commissioned. The first commission, a beautiful Thompson Meerschaum (An ‘Old Time Recipe’ Rim Repair for a Thompson Genuine Block Meerschaum GT. Britain Dublin) came out great.
 When Jusin asked about the Goliath ‘Bless his heart’ Oom Paul and what the estimate to restore him would be, this is what I wrote before I disciphered the Lorenzo nomenclature:
Lorenzo Spilxxx Pxxx Goliath Oom Paul – Oh my! There’s a story behind this one. I found him in Bulgaria and when I first saw him, I fell in love with this guy. I’ve never seen a pipe this big – Oom Paul, and I’ve seen few pipes in worse shape. He looks like someone tried to burn him in the fireplace or something. There are what appear to be scorch marks on the surface. There’s a small crack over the nomenclature, Lorenzo, that isn’t a stress trauma but burn damage to the briar. I think the stem is original, but it’s loose and the tenon/filter cavity (9mm) is broken. The chamber definitely has issues, but the full story will not be known to the world until the old carbon cake is cleared away. I put this pipe in the Pipe Dreamers section to see if anyone could dream big enough. Perhaps you can . I would love to try to help him out of ICU. Putting an estimate is difficult because he’s going to take a good bit of work, and only God knows for sure what he’ll look like in the end. The minimum estimate I give for just about any pipe is $60 because of the time involved. If he turns out better than anyone including me expects – a pipe this size and style – $120. But if he turns out much better but not fireworks, probably $80. If it continues to be ‘bless his heart…’ then $60 and if you don’t want him, I’ll probably keep him just because . I love projects like this.
After writing this ‘true confession’ to Justin, his response about commissioning his two pipes was short and sweet: “I’m gonna say let’s go for it on the Meer and the Oom Paul. I like to dream big.”
I appreciate Justin’s Pipe Dreamers heart. Here are pictures of the Lorenzo Goliath Oom Paul that got Justin’s attention (and mine😊) which benefits the work my wife and I co-founded in Bulgaria – Daughters of Bulgaria (now called, Spring of Hope). We worked with women and girls who had been trafficked and sexually exploited.


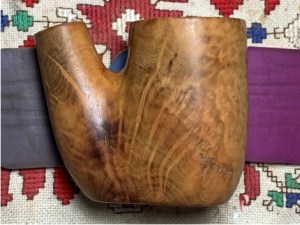
 I have looked at this nomenclature under a microscope and what I could make out was: Spilxxx Pxxx [over] BY LORENZO. I’m not at all sure beyond the Spil…
 The stem logo apears to be a S and a P overlaping.
 The stem logo is problematic. Knowing for sure that the pipe was produced by Lorenzo, the Lorenzo stem logo is a ‘L’. Each time I’ve looked at this pipe – in Burgas and again pulling it out when Justin asked about it, I’m thinking that this might not be the original stem. However, even though the stem seating is wobbly, the bent saddle stem fits the shank diameter perfectly and the bend is where it needs to be. My first step is to search the Pipedia Lorenzo article (Lorenzo – Pipedia) to see if I could find any reference to a Lorenzo line that started with Spilxxx. I didn’t find ‘Spilxxx’ but I did find ‘Spitfire’.
Lorenzo Pipes became a cult throughout the 1970s and 1980s. In order to strive for another cliche than the gentleman with the stronger statue: the pipe smoking university student of these years, clothed in turtleneck pullover and NATO-parka, can actually not be conceived without a Lorenzo! Well, to be sure he had to select his Lorenzo very carefully from the show-cases in order to find one with less than six blinking fills. Lorenzo dealt very generously with putty. All the same, the pipes smoked very good-natured, they were considered to be hypermodern and flamboyant and, perhaps best of all, they gave you the indispensable highbrow touch!
A somewhat more bargain series was given its own brand name: Spitfire. Spitfires displayed 1:1 transferred Lorenzo models (mainly for 9mm filter) as well as smaller, more classically shaped pipes. These were also extremely popular. Lloyd’s was strictly a Lorenzo second.
Ah! The Pipedia article had some examples of the ‘Lloyd’s’ Lorenzo line but no ‘Spitfire’ examples with a SP stem logo. The next stop to track down a Spitfire line was to Pipephil’s Lorenzo information panel (Lor-Lt — Pipes : Logos & Markings) . Success! The Lorenzo information gave a condensed history of the Lorenzo name when the company started just after the close of WWII in 1946. The pay dirt was the “See also” at the bottom of the panel. A link to the Lorenzo ‘Spitfire’ line was listed along with other lines and names related to Lorenzo. The link revealed an information panel that confirmed the both the Spitfire line as well as the stem logo of our Oom Paul. The stem logo example on the top is identical to the stem on the worktable. The impression is more ornate than the second example below it. The description uses a word I had never seen before: Logo: interwoven “P” and “S” axialy oriented. My spell checker corrected the word to: ‘axially’ which points to it having a common axis point. The stem logo and the fancy cursive ‘Spitfire’ with the long underscore tail are a match.
 The Pipedia ‘Lorenzo’ article provides information regarding the history of Lorenzo pipes which is somewhat different than the small blurb found in Pipephil. It is worth the read (Lorenzo – Pipedia). Here is Pipedia’s accounting of the earlier history most likely written by someone whose first language was not English:
Following Rossi (1886 in Barasso) and Ceresa (1897 in Cassano Magnano) the third pipe manufacture in the Lombardian province of Varese was established in 1900 in the picturesque city of Gallarate by two brothers. Fratelli Lana (Lana Bros.) produced briar pipes for the Italian market under their own brand name.
In 1922 Fratelli Lana went into a close co-operation with the merchant’s family Tagliabue from Milano. Sales outside of Italy began immediately and the demand throughout Europe steadily increased. By 1939 the manufacturing had grown to factory size with 120 persons employed – a considerable number for the time. The program remained unchanged for decades: cheap, unpretentious budget pipes for the mass markets. Most of them didn’t even have any stampings besides “Genuine Bruyere” or similar. A large share of the production emerged as fabrications for other firms so that an own style of the Lana pipes was hardly recognizable.
After WW II the world of the briar pipe wasn’t the same anymore and especially Italian firms suffered from the ravages. In 1946 Tagliabue took over Fratelli Lana and changed the name to Manufattura di Pipe Tagliabue. Shortly before 1950 Lorenzo Tagliabue became in charge of the company’s management. He had closely studied the first successful steps of the newly established Italian brands like Castello and Brebbia and began to design new models of his own in an unmistakable style. Simultaneously the previous segment of the cheap, cheaper, cheapest bulk pipes was left and pipes reflecting to more elevated standards were produced.
From 1969 on Lorenzo Tagliabue changed the brand’s name to Lorenzo Pipes. The reason currently quoted is another pipe making firm named Tagliabue.
The later history of Lorenzo describes the ownership jumping around with the current ownership since 1988 being Riccardo Aliverti and his wife Gabriella.
From the Pipedia excerpts above, the provenance of the Spitfire line of Lorenzo was not a top shelf pipe but popular and was most likely produced in the 1970-1980s. The Spitfire line also had the characteristic of having 9mm filter stems. I found one more factoid from the Lorenzo article that might shine some light on this Oom Paul shape produced by Lorenzo:
The newly issued Lorenzos [1970s] mostly showed extremely strong forms in designs appealing greatly and massively. Thick, “beefy” walls of the bowls and broad and strong stems were significant for them. As contemporary ads said, these pipes were “Made for real men with strong hands”. Many had a flattened bottom to sit on the table. Next to the unusual shapes, the patina effect of the silk mat surface combined with a bold red or a bright orange staining gave the pipes their distinctive look. The most successful model was a big Oom Paul that was executed in numerous variations.
Our pipe has a flattened bottom, a matte finish, a bright orange staining and is an Oom Paul. Unfortunately, no picture examples were offered of an Oom Paul, but this Volcano shape gives a good idea what was in mind with the finish. The Oom Paul shape could be described as an iconic shape which pipemen usually hope to have one in their collections. Bill Burney’s information from Pipedia (Oom Paul/Hungarian – Pipedia) is helpful understanding the history and characteristics of the ‘Uncle’ Paul.
 Pipedia also has an extensive article by Ben Rapaport (The Odyssey of the Oom Paul – Pipedia) diving into the history and intrigue of the Oom Paul. I had the opportunity to correspond with Ben who graciously gifted me a bag of bone tenons. Here is a teaser paragraph from his Oom Paul article which is a worthwhile read:
Many soldiers and prisoners in the Second Boer War often carved their pipes from scratch, rummaging around and using whatever hard wood was available; these pipes were often erroneously called Trench art. The preponderance of pipes attributed to this war in private collections and museums, however, were the aforementioned, factory-finished pipes, and the vast majority were Oom Pauls. Encamped and imprisoned soldiers carved their personal messages in English or Afrikaans, and etched or incised unit designations, heraldic crests, military engagements, names of leaders, dates, and other information related to the many campaigns and skirmishes between the British and the South African Dutch. What is sure is that the Oom Paul pipe symbolized the Boer War, and it was into this very pipe shape that these symbols were carved.
Before looking in more detail at the plethora of issues our Spitfire has, I’ve decided to preserve the nomenclature as it is by only cleaning the surface with no abrasive sanding. If he survives serving another steward, this will be a reminder of where he came from and a badge of honor – a survivor with character.
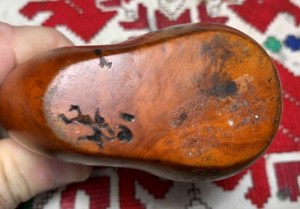
Where to begin? The dimensions of this Goliath are Length: 7 inches, Height: 2 7/8 inches, Rim width: 1 7/8 inches, Chamber width: 1 1/8 inches, Chamber depth: 2 3/8 inches, Weight: 129g.
The chamber will need a few ounces of baccy to fill it!! I love it. That should give a new steward plenty of time for reflection on life, family and one’s path to God.
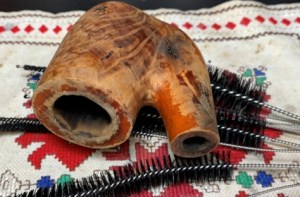
Overall, the stummel needs to be cleaned to get down to the bare bones. Pictures tell the story…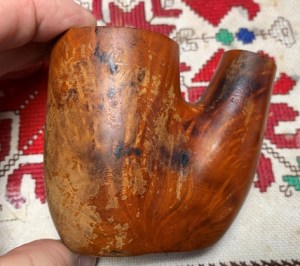

 The stem has a cracked 9mm filter housing, and this will be replaced with a solid Delrin threaded tenon.
 To begin, we start with the 2 3/8 inches deep cavernous chamber. Pictures have a difficult time showing the thick cake.
 Using the Pipnet Reaming Kit I go to work. With the chamber at the rim measuring 1 1/8 inches across, the 4 blades in the Kit quickly run their course – the chamber is broader than the largest blade. The chamber balloons out some as you move down so that the blades were not reaching across the chamber. I ended up scraping the edge of the chamber using the larger blade to begin removing the cake.
 I decided to bring out my Kleen Reem Pipe Tool to see if it would reach across the expanse.
 Again, the chamber was too wide for the full effect of rotating the tool with its metal arms fully expanded.
 It came down to scraping the walls with the Savinelli Fitsall Tool to break through and clear the carbon cake wall.
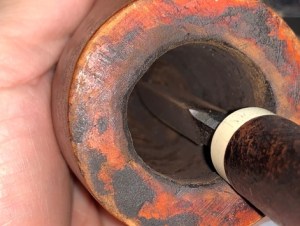 After scraping the cake, coarse 120 grade sanding paper was wrapped around the dowel rod to sand the chamber. This was followed by sanding with 220 grit paper.
 A huge pile of cake was taken out of the chamber and the full set of tools needed to do it.
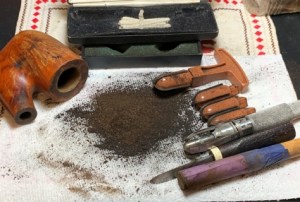 Surprisingly, the chamber briar looks OK. There are no major heating issues that I could see, but there are some veins in the chamber wall which happens. These are not significant.
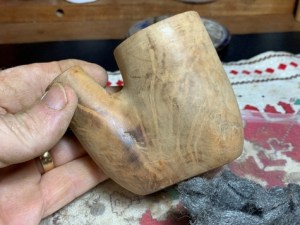
 Next, the external surface needs to be cleaned to see what will persist and what will come off. A few pictures remind us of the carnage😊. I can’t get over how bad the pipe looks.


 Using undiluted Murphy Oil Soap, the stummel is scrubbed with a cotton pad. The white cotton pad reveals the grime coming off.
 The soft brass brush was also used to scrub on the rim and rough spots over the stummel.
 The rim is also carefully scraped with a pocketknife. Care is given to not gouge the rim.
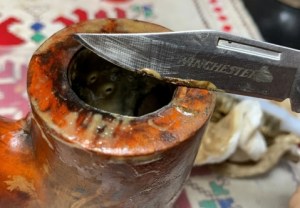 After the external surface is scrubbed the stummel is then taken to the utility sink and the internals are scrubbed with warm water, anti-oil liquid dishwashing soap and shank brushes. After working on the internals, the stummel is thoroughly rinsed and brought back to the worktable.
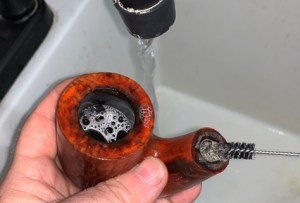
 To continue cleaning the internals, cotton buds and pipe cleaners moistened with isopropyl 99% are used. A dental probe is also helpful to scrape the mortise walls removing tar and oils. This picture is the first ‘scoop’ of many….
 To help remove grime from the airway, a drill bit is used to excavate. The drill bit is rotated and gradually moves toward the floor of the chamber. The grooves catch the crud as the bit rotates through the airway.
 There seems to be no end to the grime coming out of the internals. I put on surgical gloves some way back – ugh.
 After many cotton buds and pipe cleaners, the cleaning is not complete, but I had anticipated soaking the stummel in acetone to remove all the old finish. This soak will also expedite cleaning the internals. Working on it at this point has removed as much grime as possible before the soaking.
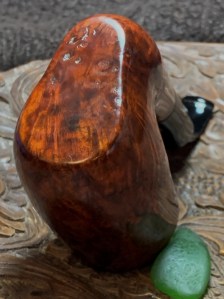
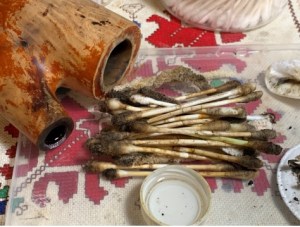 Up to this point in the cleaning process, a look at the stummel shows the contrast between where the finish remains and where it shows the natural briar. The dark spots remain which appear to me to be burns but I can’t be 100% about this. There are also old fills here and there.
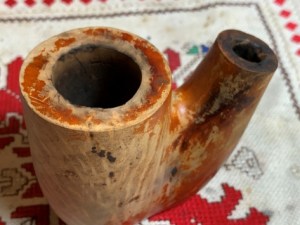


 My wife helped by providing me with a larger glass jar that could be sealed to soak the goliath stummel in acetone. The stummel will soak for several hours to loosen the old finish and to clean the internals.
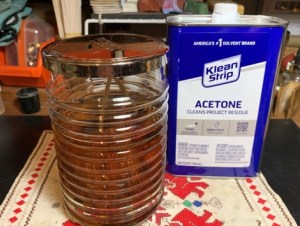 Turning now to the bent stem, the airway is cleaned with pipe cleaners and isopropyl 99%. Cotton buds are also used inside the filter cavity. While cleaning, more of the tenon cracked off.
 I decided to go ahead and remove the rest of the tenon to be able to clean the cavity. A small saw is used to finish the job.
 Ugh – unfortunately, while sawing the tenon off, the shank facing was scratched. I’ll need to smooth this out again after finishing the cleaning process.
 Along with the pipe cleaners and cotton buds, the filter cavity was scraped with a small dental spoon which removed a good amount of grime. The airway is clean and time to move on.
 A Derlin threaded tenon will replace the filter housing which I personally prefer. The threaded diameter is wider than the cavity, which is good. The filter cavity will be expanded to accommodate the new Delrin tenon.
 First, the shank facing is sanded using 320 and 600 grade paper to smooth it again after removing the filter tenon. Not shown is that I also sanded the facing with micromesh pads – 1500 to 12000, 9 pads in all.
 To enlarge the filter cavity to mount the new tenon, a few drill bits are used. The bits are hand-turned carefully to remove vulcanite. The smaller bit is used first enlarging the diameter. This is then followed by the next larger bit.
 The threaded part of the tenon fits nicely – not loose and a bit snug.
 Regular CA glue is spread sparingly over the threads and mounted on the stem. It looks great.
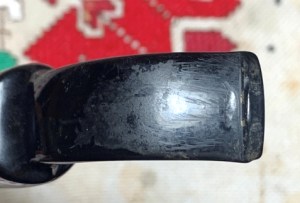
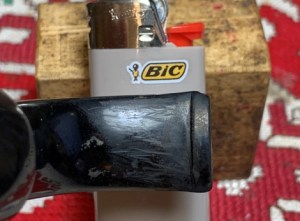
 Continuing with the stem, both the upper and lower bit and button show some biting and compressions. There are rough abrasions and scratches as well. To help lessen the compressions, the heating method was used. A Bic lighter was used to paint the bit with flame. As the vulcanite heats, the vulcanite expands. As the comparisons show, the heating did not help this time.
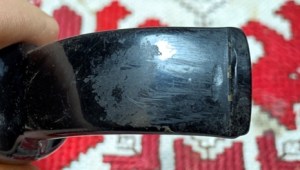


 After cleaning the bit with alcohol, Medium-Thick Black CA glue is used to fill the compressions – upper and lower. An accelerator is used to quicken the curing time.
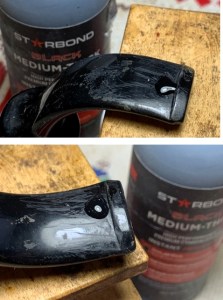 Both flat and square needle files are used to file the patches flush with the stem surface. The button is also refreshed – upper and lower.
 The bit is next sanded with 220 grit paper to smooth and further blend the patches and to sand away the multitude of scratches and roughness.
 The sanding is expanded to the entire stem using 320 grit paper. The sanding goes around the SP stem logo.
 Next, the entire stem is wet sanded with 600 grit paper, and this is followed by applying 0000 steel wool.
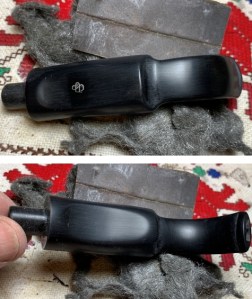 The sanding transitions to polishing by applying the full regimen of micromesh pads. Between each pad, Obsidian Oil is applied to the stem to condition the vulcanite and to guard against oxidation. The first set of pads are 1500, 1800, and 2400. The second set are pads 3200, 3600, and 4000. The final set of pads: 6000, 8000, and 12000. Wow! I love the way the shine pops.
 Through the night the stummel soaked in acetone to remove the last vestiges of the orange stain and to continue to clean the internals which were about as nasty as I’ve seen. After taking the stummel out, the first few cotton buds and some scraping on the mortise walls reveal that the soak unhinged a lot of crud…oh my.
 The internal cleaning continues with many buds, pipe cleaners and excavating tar and oils with the dental probe and the crud continues… I decided to let the stummel soak more in the acetone. There seems to be no end to the crud.
 Before returning the stummel to soak, there is still old stain hanging on which the soak has softened.
 Using 000 and 0000 grades steel wool, dipped in the acetone, the remaining dye is removed.
 The day is ending and the stummel goes back into the acetone soak and the lights go out.
 The next morning, more of the same – after taking the stummel out of the acetone soak, pipe cleaners and cotton buds were employed with isopropyl 99% to continue cleaning the mortise and airway. What I discovered along the way was that the cotton buds were emerging lighter between the mortise down the airway to the draft hole. The buds were able to navigate that far. But when I inserted pipe cleaners all the way down to the floor chamber, they were picking up all kinds of grime.
 Taking a closer look at the floor of the chamber, I discovered a problem. The next picture is difficult to decipher but what I discovered is the drilling of this Oom Paul is extending lower than the floor of the chamber which creates a hole and collection point for all kinds of crud. After making the photo lighter, the arrows surround the drill hole that extends beneath the chamber floor.
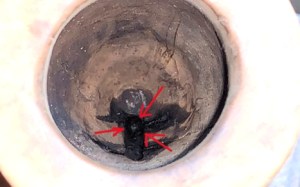 The stummel is flipped over with the airway drilling now on the top. The pipe cleaner was inserted through the draft hole with about 1/8 inch of the end of the cleaner not visible in the picture as it disappeared beneath the chamber floor.
 Because of the angle of the picture, you wouldn’t be able to tell that the pipe cleaner is about 1/4 inch exposed after coming through the draft hole. The end of the pipe cleaner in this photo is above the drill hole even with the floor of the chamber. You can see in this photo and the one above that where the cleaner enters the chamber the briar appears to have chipped or worn off with some cracks. The draft hole is positioned a bit too high off the chamber floor. This most likely creates a scenario where tobacco is being left unburned with excess dottle resulting.
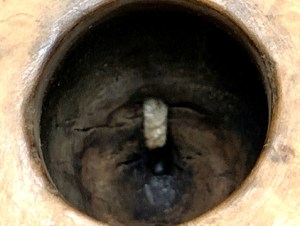 The plan developing in my mind is to use J-B Weld to repair the problems. J-B Weld is a heat-resistant inert epoxy that has proven helpful for many projects. The photo below lays out the plan. The lower circle represents the sub-floor drill hole. The first phase will be to fill the sub-floor hole with J-B Weld up to floor level. Next, to build up the chamber floor a small amount which has eroded over the years of cleaning. The next phase will be to fill the chipped and eroded briar with J-B Weld (the upper oval) resulting in pushing the draft hole down closer a bit to the floor of the chamber (green).
 To begin, scotch tape is rolled around the end of a pipe cleaner with some Petroleum Jelly coating it.
 The pipe cleaner is then inserted into the airway out the draft hole. The pipe cleaner serves to guard the airway from becoming obstructed during the process J-B Weld application. The jelly and tape help the pipe not stick.
 Mixing the J-B Weld is straight forward. Equal parts of J-B Kwik Weld Steel (left) and Hardener (right) are placed on the mixing area – on top of scotch tape which helps with the cleanup. The directions say that we have about 4 minutes from the time of mixing that the mixture begins to set.
 A toothpick is used to mix the J-B Weld.
 The small dental spoon is then used to trowel the mixture (carefully!) to the chamber floor and then is tamped down filling the drill hole. This takes a bit of time and careful patience. I don’t want the Weld where it doesn’t need to be.
 After the hole and chamber floor are built up, some Weld is spread across the upper area of the draft hole filling in cracks and the chips or erosion. While the Weld is still pliable, the pipe cleaner is twisted and moved up and down a bit to make sure everything is good with the airway. The stummel is then set aside to allow the Weld to cure fully in about 4 hours, but after a while the stummel can be handled while the curing process continues. After the Weld fully cures, the sanding will smooth the Weld to blend with the curvature of the chamber.
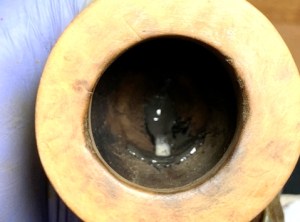 After a while, work continues with the stummel. There are some pits that need to be filled, but there are also some configurations in the briar that appear to be rustication marks. These add to the character of the Lorenzo Spitfire, so I’ll leave them as they are.
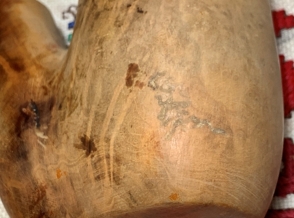
 The right side at the shank/bowl crook has a deeper pit and a smaller one on the left side of the bowl.
 Both are cleaned with a sharp dental probe to remove loose debris.
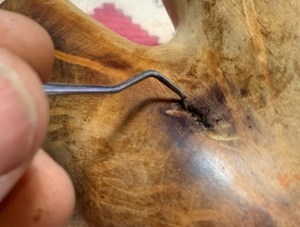
 Next, Briar Putty will be used to fill the pits. Briar dust and regular clear CA glue are mixed to create the putty.
 A toothpick is used to mix by drawing briar dust into the glue and mixing until it thickens to about the viscosity of molasses.
 The toothpick is then used to trowel the putty to fill the pits. The stummel is then put aside to allow the fills to cure.
 Once cured, needle files are used to file the patch mounds down.
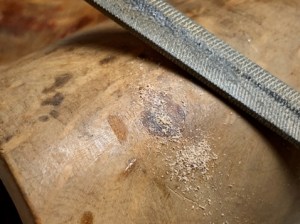
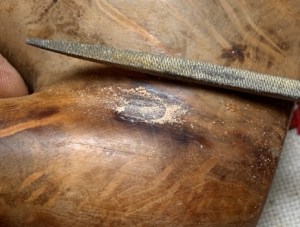 Each patch is then smoothed out further with 220 grit sanding paper.
 Unfortunately, on the larger patch, gaps on either side of the of the patch emerge that need to be addressed.
 This time a drop of CA glue is placed on each end-pit and briar dust is sprinkled over the patches.
 As before, after curing, the patches are filed down then sanded with 220 grit paper.
 With the patching completed on the stummel surface, attention is switched to the rim. The rim’s internal circumference is out of round and blemishes from the wear and tear this pipe has been through.
 The pipe is headed to the topping board to refresh the rim, but another small challenge surfaces. The shank is longer or higher than the rim and this presents a challenge with the normal practice of rotating a stummel on the topping board.
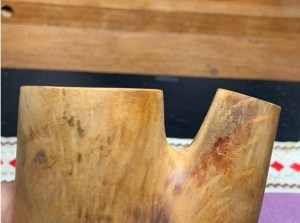 The remedy is to hang the shank over the edge of the board and drag the stummel back-and-forth over 220 grade paper. Not the easiest process but doable. Care is given to keep the rim flush against the paper and not tip the stummel during the back-and-forth movement. To tip the stummel would result in a rim not level.
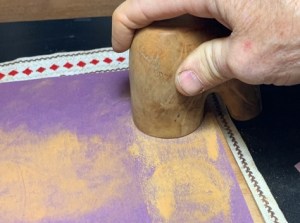 After several cycles the topping with 220 is sufficient.
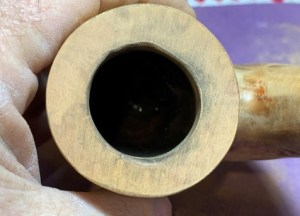 Next, the same is movement is done with 320 then 600 grade paper on the board. Now we’re beginning to see some grain come through. The circles are huge bird’s eye patterns which should come out more during the sanding process.
 From the picture above, the out-of-round chamber opening is obvious. To address this a small wooden orb is used to cut a sharp bevel. This will help clean the inner rim and to create a more evenly rounded internal rim.
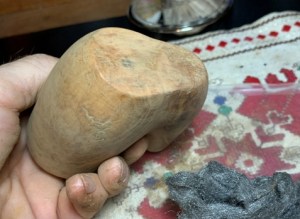
 To cut the bevel, a strip of 220 grit paper is placed between the wooden orb and the rim. The paper is then pinched and the orb rotated along the edge of the rim.
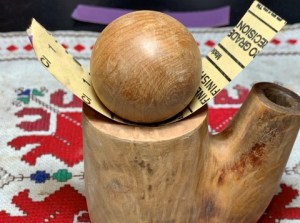 After rotating the paper around the inner rim, the results are good.
 Next, the same process is done with a strip of 600 grit paper. The rim looks great. Quite a facelift for this Oom Paul.
 Next, the stummel is sponge sanded with a coarse, medium, light and fine sponge. There is a bit of old finish left over but I’m not concerned about this. It is close to the nomenclature which I’ve been guarding. The grain came out in the sanding, but the block still has interesting coloring, but a whole lot better than when we began.
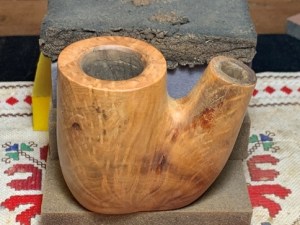
 Next, the full set of 9 micromesh pads are used. Between each pad, the stummel is wiped down with a moist cloth to remove the briar dust and to give the following pad more traction. The first set of three pads are 1500, 1800, and 2400 grit.
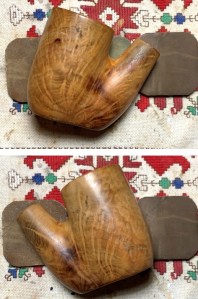 The second set of pads are 3200, 3600 and 4000 grit pads.
 The final set of pads are 6000, 8000 and 1200 grit pads.
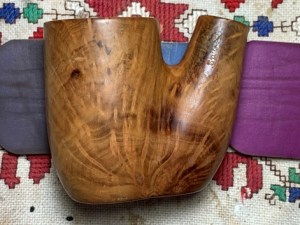
 Before applying dye to the stummel, the J-B Weld has thoroughly cured in the chamber. The patch needs to be sanded and smoothed.
 A sanding drum is mounted on the rotary tool and the drum makes short work of the excess J-B Weld. Not pictured is following the use of the drum, to fine tune the floor was sanded with 220 paper wrapped around the dowel rod.
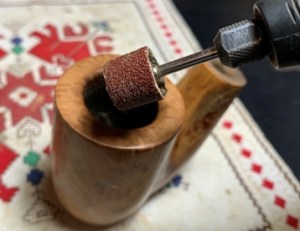 I’m pleased with the repair to the air draft system. Finding and filling the hole I believe will make a big difference in the smoking characteristics and help to keep the pipe clean.
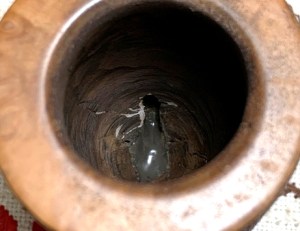 The Lorenzo Spitfire line employed an orange finish to make it more distinctive and ‘cool’ during the 70s. I have Fiebing’s Orange Leather Dye to continue this theme. I will improvise a bit and add a small hint of Fiebing’s Black Leather Dye to the Orange which I believe will give the orange a richer depth and help to tease out the grain patterns. This will also help to mask the dark patches of briar over the surface. The dyes are mixed in a small glass.
 To help the briar grain be more receptive to the dye pigment, the stummel is heated with a hot air gun.
 After the stummel has warmed, a folded pipe cleaner is used to paint the dye onto a section of the stummel. While the aniline dye is still wet, the lit candle ignites the alcohol in the dye and the alcohol immediately combusts leaving behind the pigment in the grain. The process is repeated until the entire stummel has received the dye. A second round repeats the process to make sure the stummel is fully dyed. The stummel is set aside allowing the new dye to settle in.
 The next morning it’s time to ‘unwrap’ the newly dyed stummel. I use the description of unwrapping because one never knows for sure how the dye was received. The flamed crusted layer is ‘plowed’ off using a coarser felt buffing wheel along with the coarser Brown Tripoli compound. The speed of the rotary tool is about 40% full power.
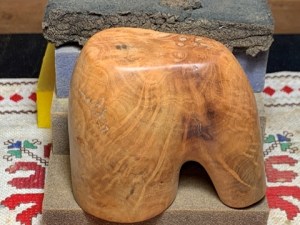
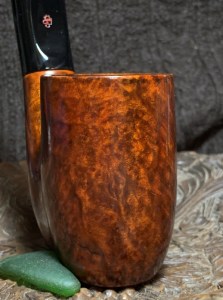
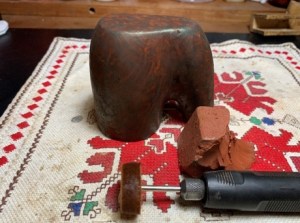 The unwrapping reveals how the dye pigment was received by the grain and the result is more definition in the grain. The grain is spectacular. It looks like fire – great motif for a ‘Spitfire’.
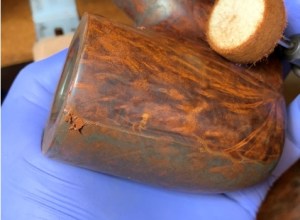 After the heavy-duty plowing is done by the felt wheel, it is exchanged for the softer cotton cloth wheel and Brown Tripoli is applied once more over the entire stummel at the same speed. This repeat with the cotton wheel is done for two reasons. First, it can reach into the tight crook at the shank/bowl junction to reach left-over flamed dye crust that the felt wheel was not able to reach. The second reason is to remove more excess dye and bringing out a sharper grain definition.
 After the Brown Tripoli, the stummel is wiped with a cotton pads moistened with alcohol to help blend the new dye, remove excess dye and to lighten the finish somewhat.
 After seeing the results above, I like the new distinctive grain definition. However, I decided to apply another application of the Fiebing’s Orange Leather dye without black to add more orange hue to the finish. This time however, it is a simple ‘wash dye’ which paints the stummel with dye without flaming it. The hour is late and the stummel is set aside to allow the dye to settled in through the night.
 The next morning, before continuing with the stummel polishing process, the stem needs to be reseated into the mortise after the tenon replacement. The tenon is a bit larger than the mortise and is sanded down for a good fit.
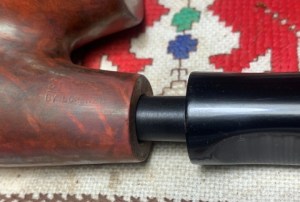 To save a little time, the sanding drum on the rotary tool is used very patiently. I give a light touch allowing the drum to rotate around the tenon to remove the diameter evenly but careful not to remove too much. You can’t replace what’s removed!
 Following the sanding drum, the tenon begins to find its way into the mortise and 220 sanding paper continues the sanding to fine tune and customize the tenon fit.
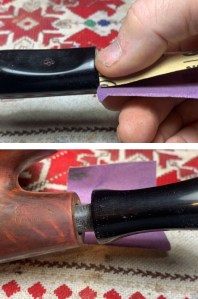 The seating goes slowly, and the stem seems to run into an obstacle very close to the finish line.
 The tenon’s diameter is a bit broader at the shank base and to provide some room for this, the inside edge of the mortise is beveled with 130 grade paper.
 This does the trick. The seating of the new tenon is snug and not loose. What a difference!
 The orange dye wash was applied the night before. Again, to remove the excess dye and fine tune the grain definition, Brown Tripoli compound is applied using a cotton cloth buffing wheel on the rotary tool set at 40% full power.
 Again, the dye is blended and excess removed with a light wiping of a cotton pad moistened with alcohol.
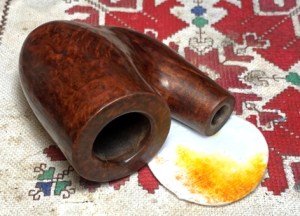 Next, with another dedicated cotton buffing wheel mounted, the finer Blue Diamond compound is applied to the entire pipe – stem and stummel.
 A felt cloth is used to remove the compound dust that has collected on the surface during the Blue Diamond application.
 I like the enhanced orange of the stummel with the additional application of dye. One of the pitfalls of doing a dye wash is that the new dye more easily can leech off onto his new steward’s hands when the pipe is first put into service with the heating of the stummel. To help mitigate the possibility of leeching, the stummel is warmed with a hot air gun to emulate the inaugural use of the pipe.
 When the stummel has heated up, the stummel surface is wiped rigorously with a cotton cloth to remove dye that has leeched during the heating. This will not 100% remove the possibility of a bit of dye on the steward’s hand, but it should reduce it.
 The next mini project needed before applying the wax to this huge Oom Paul stummel, is to apply a mixture of plain yogurt and activated charcoal to the chamber which creates a starter cake to protect the chamber briar. After the chamber floor repair with J-B Weld and with a few heating veins in the chamber, I like to apply the mixture to the chamber.
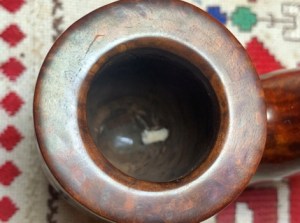 A dollop of plain natural yogurt (no flavors) is placed in a small bowl along with activated charcoal.
 The pipe nail tool is used to mix the batch and by adding some charcoal the mixture thickens enough to not run. The blob shown on the pipe nail is a good consistency.
 Using a dental spatula and the nail, the mixture is troweled into the chamber and spread. A pipe cleaner blocks the draft hold from getting clogged. After the mixture is spread evenly over the chamber, the stummel is set aside for a few hours allowing the mixture to cure resulting in a surprisingly hard and durable cake starter to help protect the chamber briar. One word of caution to the new steward, DO NOT use a metal pipe tool to scrape the chamber after putting this guy into service. This will remove the protective layer. Instead, use a folded pipe cleaner to ‘rub’ the chamber wall. This will do the job and remove the ashes.
 While the stummel is to the side, the next mini project is to refresh the overlapped, SP stem logo. The pictures of the Spitfire line show a red lettering. The picture below shows the remnants of red. We’ll see what we can do.
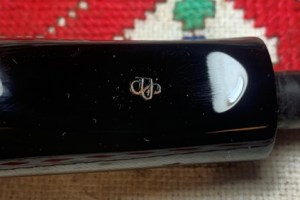 I first tried to refresh the lettering with a red Magic Marker, but this did not work. The ink would not adhere to the surface. The next attempt was with Testors red enamel paint which should have a better capacity to stick but is a bit more difficult to use and not make a mess. A pointed cotton bud is used to do the job.
 With very little paint on the very tip of the cotton bud, holding my breath, the tip applies the paint inside the troughs of the lettering. I didn’t want to use too much paint and accidentally pool the paint inside the letters…
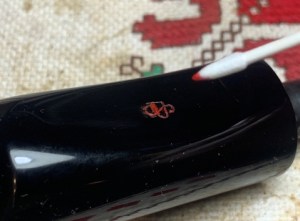 The result is good. The red paint has behaved itself and the logo looks good. My, this Lorenzo Spitfire has come a long way.
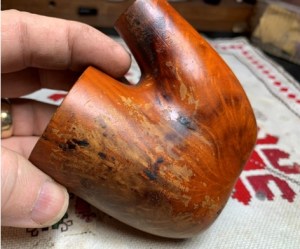
 The home stretch – next another dedicated cotton cloth wheel is mounted on the rotary tool with speed at 40% full power. Carnauba wax is then applied to the pipe – stem and stummel. Following this, the pipe is given a rigorous hand buffing using a microfiber cloth to remove excess wax and to raise the shine.
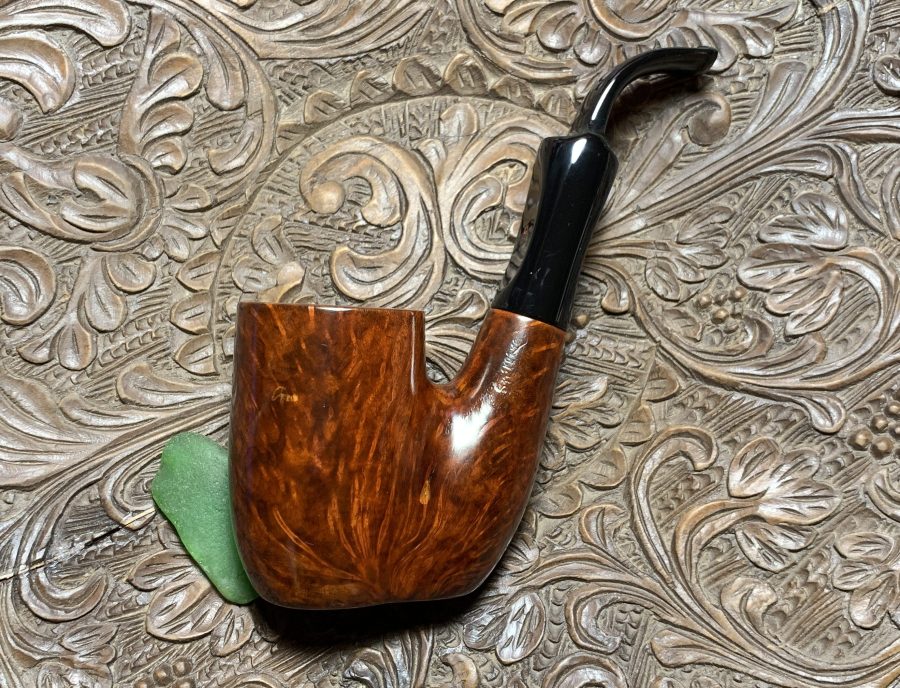
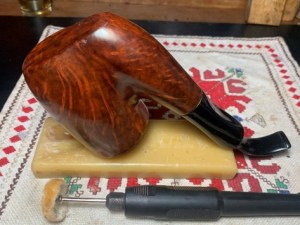 My, oh my! This ‘Bless his heart’ pipe has risen from the ash heap to begin, yet another lifetime. The Spitfire theme fits this, Lorenzo Oom Paul. He brings with him some of the scars of his former life, but he’s ready to go again. The tenon was replaced, the finish was replaced, the transformation could not have been more complete – yes, a resurrection. Justin receives the ‘Pipe Dreamers’ award for seeing the potential in this Lorenzo Spitfire Goliath Oom Paul. As the commissioner, he will have the first opportunity to claim him from the Pipe Store. A portion of all the proceeds benefit the Daughters of Bulgaria (now called, Spring of Hope) – helping women and girls who have been trafficked and sexually exploited. The comparison photo reminds us how far we’ve come. Thanks for joining me!


Wow! What a makeover! You have the patience of Job.
LikeLiked by 1 person
That is a compliment beyond measure 🤠. This one is special. Thanks!
LikeLike
Pingback: New Life for a Classy Big-Ben Royal-Silver 445 Made in Holland – The Pipe Steward
Pingback: The First of Four Gifts From Bulgaria: A Prince Amled Danmark Freehand Pickaxe – The Pipe Steward