The next pipe on the worktable had to wait a bit for me to get back to the worktable. My wife and I made a trip to the Greek island of Rhodes that was both work and play. The work was attending a Europe Area Retreat for the mission we have served with for the past 33 years. It was great seeing fellow missionaries that we have known and with whom we have worked for several decades. This was especially meaningful since we’ve decided that it’s time to transition. I don’t like calling it ‘retirement’, but I just don’t have the same amount of tread on the tires these days and it’s time to transition to the next chapter of life that God has for us. The ‘play’ part of our trip was a week at the small seaside hamlet of Lindos, also on the Island of Rhodes. It was close to paradise, and we were thankful for the rest. Of course, I enjoyed a bowl or two 😊. The ’patient’ pipe came to me via the Lot of 68 that I purchased in February 2019 from a seller in West Hartford, Connecticut. Here are the pictures I saw in 2019 with the Handmade marked among the rest of the 67.
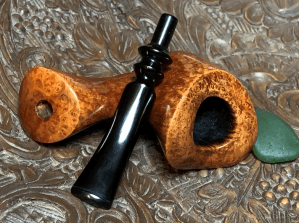
 Pipeman Gary has commissioned many pipes from the For “Pipe Dreamers” ONLY! online collection and I DO appreciate his patience while my wife and I enjoyed the Greek Isles! Gary is from Four Oaks, North Carolina, and his collection of pipes has grown a good bit as he has moved toward his own retirement. I appreciate that he enjoys helping to support the Daughters of Bulgaria (now called, Spring of Hope) with his commissions. A portion of all proceeds of pipes restored go to help support the work that my wife and I co-founded when we lived in Sofia, Bulgaria. Here are some pictures of the next pipe Gary has commissioned. The Freehand also sports a nice touch of sculpting that gives the smooth briar some texture.

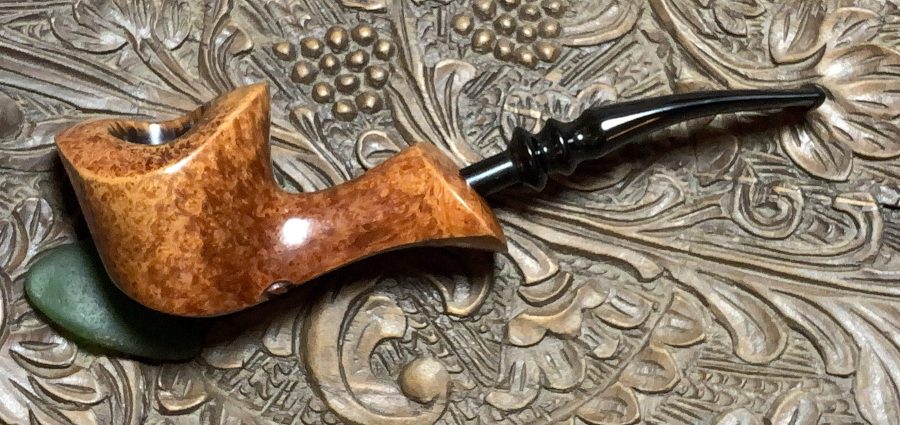
 The only indication of the provenance of this Freehand is a strong stamp on the underside of the Freehand shank: HANDMADE IN DENMARK.
 Several Danish craftsmen stamp their Freehands with ‘HANDMADE IN DENMARK’ so there’s no way to know for sure who crafted this Freehand. The Freehand shape is an interesting shape – if one can call it ‘a’ shape. I like Bill Burney’s description of the Freehand in his excellent inventory of pipe shapes in Pipedia. Here’s what he says about the ‘Freehand’ (See: Freehand – Pipedia).
 Looking at the pipe itself, for a Freehand, its size is on the more mid-range side as far as Freehands go and this makes it a very nice fit in the palm. With a bit guard, it could serve hands free as well. The dimensions are Length: 6 1/2 inches, Height: 1 7/8 inches, Plateau width: 1 5/8 inches, Chamber width: 3/4 inches, Chamber depth: 1 3/8 inches. The condition is generally good. The chamber has a light carbon cake buildup which will be cleaned to allow fresh briar to emerge to form a new cake.
 The smooth plateau has a nasty lava build up which may have charred and darkened the briar beneath. The former steward was not kind in this respect. After cleaning, we will see what we have.
 The stummel is a beautiful piece of briar. I see no fills but only normal grime and some light nicks and scratches.
 The fancy stem shows little oxidation but some rough tooth chatter on the bit.
 To start, the stem airway is cleaned using pipe cleaners and isopropyl 99% alcohol. It only took a few cleaners to do the job.
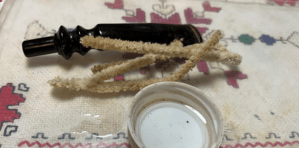 Following this, the stem is placed in a soak of Briarville’s Pipe Stem Oxidation Remover to address any latent oxidation. A pipe cleaner helps to retrieve the stem.
 Switching to the Freehand stummel, first the chamber is reamed using the Pipnet Reaming Kit. A fresh starting picture measures the progress.
 As often happens when reaming a Freehand, the chamber is not as uniform as classical shapes. The chamber tapers inwardly more abruptly with a conical shape. The first and smallest blade is used from the Pipnet Kit, but the job calls for my Kleen Reem Pipe Tool. I found this old boy at a Flea Market in Kentucky during one of our travels.
 The Kleen Reem Tool has expanding blade arms that are great at conforming to the tapered chamber. The knob on the end of the tool gradually turns, expanding the blades as the tool is rotated. It does a good job.
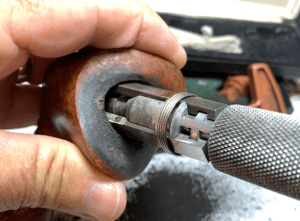 This is followed by scraping the chamber further using the Savinelli Fitsall Tool.
 Finally, the last vestiges of carbon are removed by sanding the chamber wall with 220 paper wrapped around a Sharpie Pen. I like to give the upper contours of the chamber a more thorough sanding to allow the grain to appear on the inner edge of the rim where the Freehand plateau juts up. This small peek at grain on the inner edge is a nice touch for a Freehand.
 The final picture of the tools used and after an inspection of the briar, there are no heating issues in the chamber.
 In the picture above, the lava crust on the plateau started to crumble somewhat on the edge from the reaming process. To continue scraping the plateau to remove the crust, the Savinelli Fitsall Tool has a nice edge that plows the crust but doesn’t gouge the briar.
 Next, using undiluted Murphy Oil Soap, the stummel is scrubbed using a cotton pad.
 A brass brush continues the cleaning process on the plateau. The brass bristles add some additional scrubbing force to remove the staining without being too invasive to the briar.
 Next, the stummel is taken to the utility sink and using liquid, anti-oil dishwashing soap, the internals are scrubbed with shank brushes and warm water. The soap of choice is Dawn. Even though the picture is somewhat blurred, it gives the idea of what is happening. After a thorough rinsing the stummel is taken back to the worktable.
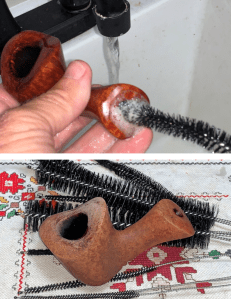 The cleaning continues with the internals using pipe cleaners, cotton buds and isopropyl 99% alcohol. A small dental spoon helps to scrape the sides of the mortise to excavate the tar and oil.
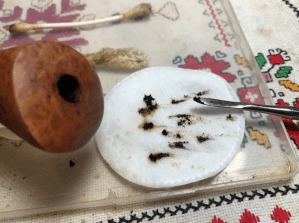 After a time, the cleaners and buds emerge lighter, and the job is completed.
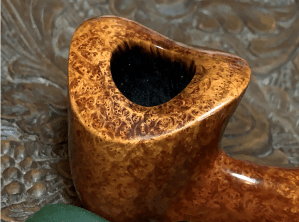
 Looking at the stummel after the cleaning reveals vestiges of charring coloration around the chamber edge. There is a profound difference between where we started and what the plateau looks like now.
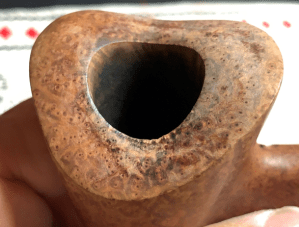 To address the plateau, all 4 sanding sponges are used starting with coarse, then medium followed by light and fine. With the stummel surface, only the finer two sponges are used – light and fine. This helps to clean up the small scratches that happen from normal wear. I like what I see – what a difference with the plateau!
 Continuing with the stummel sanding, micromesh pads are used. Between each pad, the stummel is wiped with a damp cloth to remove the briar dust and to give the next pad more traction. The first three pads are grades 1500, 1800 and 2400.
 The second set of 3 pads are 3200, 3600 and 4000 grades.
 The last set of pads are grades 6000, 8000 and 12000. Wow – I love to see that grain emerge!
 Mark Hoover’s ‘Before & After’ Restoration Balm (www.Lbepen.com) is a product that brings out the natural hues in a way that simply is great. After putting some Balm on the finger, the Balm is worked into the briar and then set aside for about 15 minutes to all the Balm to do the work.
 After the time elapses, a dedicated microfiber cloth is used to wipe off the excess Balm and buff up the shine. I like it.
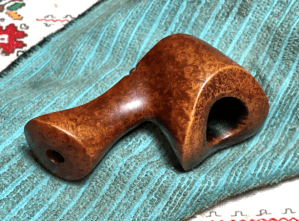 The stem has been in a soak for some hours to remove oxidation. After fishing the stem out of the Oxidation Remover, a cloth is used to vigorously rub the surface of the stem to remove the raised oxidation. A few pipe cleaners moistened with isopropyl 99% are used to clear away the fluid from the airway.
 The bit looks good – almost no tooth chatter.
 The upper and lower bit is sanded with 220 paper to remove what’s left of the tooth chatter.
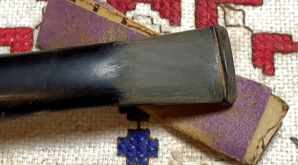 Using 320 grade paper, the sanding is expanded up to the end of the stem base – upper and lower.
 Next, the stem is wet sanded using 600 grade paper and this is followed by applying 0000 grade steel wool.
 Micromesh pads are employed next. Between each pad Obsidian Oil is applied to the stem to condition it and to guard against oxidation. Pads 1500-2400, 3600-4000, and 6000 to 12000 are used.
 With the stem and stummel reunited, a dedicated cotton cloth buffing wheel is mounted on the rotary tool. With the speed set at about 40% full power, Blue Diamond is applied to the pipe.
 After application of the compound, compound dust residue remains on the surface. A felt cloth is used to wipe the surface in preparation for the wax.
 Finally, with another dedicated cotton cloth wheel mounted, carnauba wax is applied to stem and stummel. After applying the wax, the pipe is given a rigorous hand buffing to remove excess wax and to raise the shine.
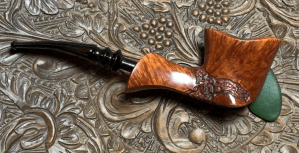
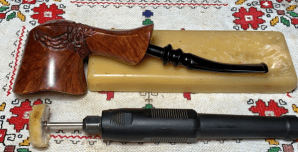 This Handmade in Denmark Freehand is a beauty. We do not know which Danish craftsman fashioned this pipe, but the quality is evident. The bird’s eye grain is compressed and emerges over the plateau which is the diagonal grain pushing itself out. The shape shows off the curved plateau and subtle sculpting is a nice touch. Gary commissioned this pipe and has the first opportunity to claim it at the Pipe Store. With this pipe, with all pipes restored, a portion of the proceeds go to help support the work of the Daughters of Bulgaria, now called Spring of Hope – helping women and girls who have been trafficked and sexually exploited and developing prevention programs to keep men, women and children safe. Thanks for joining me!
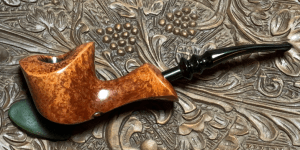


Please pray for the people of Ukraine that there would be a just end tot the war. We know many in Ukraine, dear friends who continue to pray asking God to end the war and to give them freedom from tyrany.

That grain is exquisite ! Well restored.
LikeLike
I was amazed how nicely that grain appeared. Thanks, Doug!
LikeLiked by 1 person