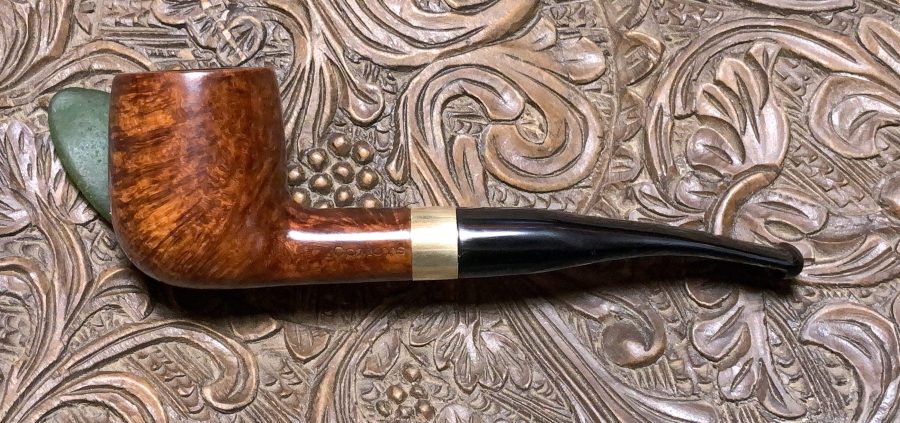
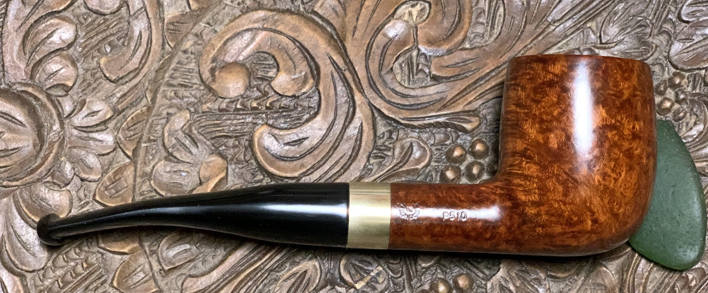
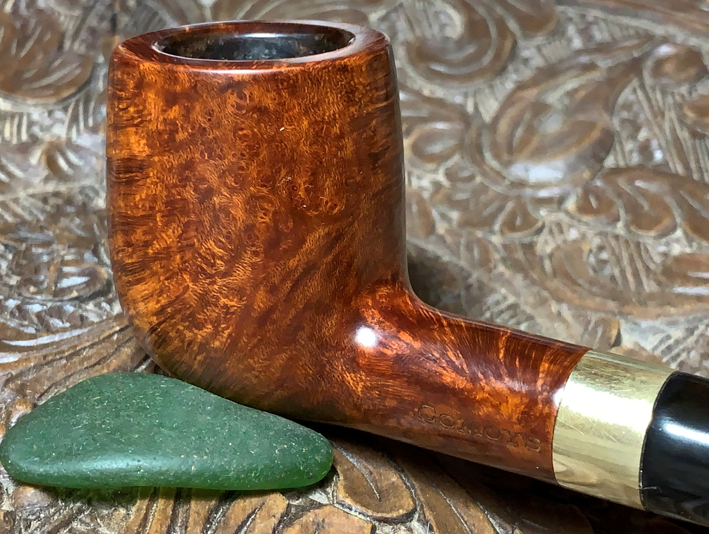
The Lot of 66, as I have called it, was probably my first large acquisition of pipes. I saw the Lot on eBay in September 2017. The by-line by the seller in Georgetown, Texas, was this: “Huge Lot of 66 Smoking Pipes, Pre-Owned, Pre-Smoked and Deeply Loved.” The final tag caught my attention. The seller was a lady by the name of Pat who worked at a community thrift store called the Caring Place that seeks to help folks less privileged. I placed my bid on the auction block and at the end of the day, the Lot of 66 made its way to the For “Pipe Dreamers” ONLY! online collection. I decided to write to the Caring Place to find out if anyone could tell me about the pipes – who may have donated them to be sold? I wrote and described what I do as The Pipe Steward – restoring and selling pipes for the Daughters of Bulgaria – helping women and girls who had been trafficked and sexually exploited. Pat responded to my inquiry with no specific information but that she believed it to be from a single donor since the pipes were in the same boxes. My guess, based upon what she said, was that ‘grandpa’ passed, and the family had his pipes and most likely didn’t know what to do with them. So, they boxed his pipes and donated them to an establishment that was helping people. I have only a few pipes left of the original Lot of 66. I’m pleased that my stewardship of Grandpa’s pipes has continued to help folks in need and also placing his pipes in the care of new stewards so that his pipes can serve again. The Comoy’s now on the worktable is somewhere in this picture of the Lot of 66 and ready to find a new home. Pipeman John comes from the Kansas City area, and he is forgiven for the fact that he is a diehard KC Chiefs fan. The truth be known, he does have a whole lot more bragging rights than I do being a life-long supporter of the Miami Dolphins. The Chiefs have been dominant over the past years and this I respect 😊. I have appreciated getting to know John over the years via email and I’m hoping someday to take him up on his offer to stop by and enjoy some world-famous KC BBQ with him and his wife. From my conversations with John, I discovered that he and his wife love to travel – something we share. On his list is to visit our one-time home, Bulgaria, where my wife and I spent 15 great years. John reached out to me about commissioning two pipes. One is a beautiful Ben Wade Deluxe Hand Made Denmark Freehand and the other is a workhorse Billiard – a Comoy’s Made in London England P510 – D. Here are pictures of the first of John’s commissions – the Comoy’s.
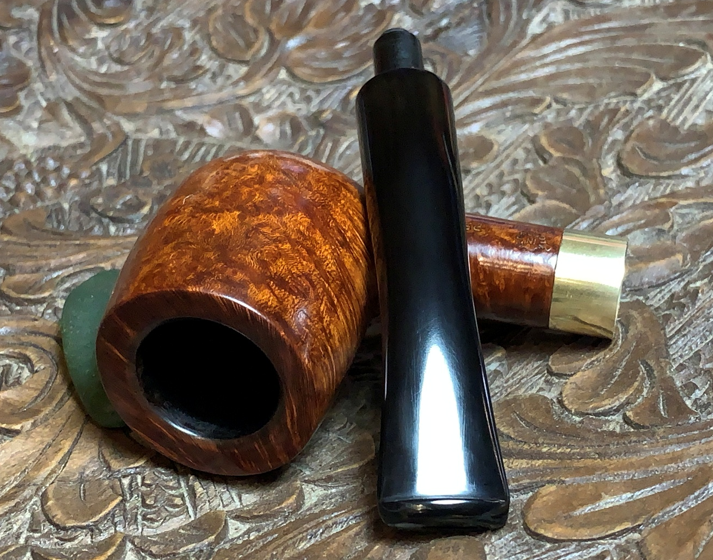
 The shank’s left flank is stamped with COMOY’S.
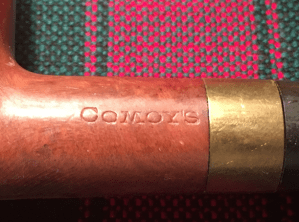 The right flank is stamped with a circled, MADE (forming the top of the circle), LONDON (forming the bottom of the circle) with IN in the middle of the circle. Beneath the circle ‘MADE IN LONDON’ is stamped in a straight text: ENGLAND. To the right of this is stamped the shape number: P510.
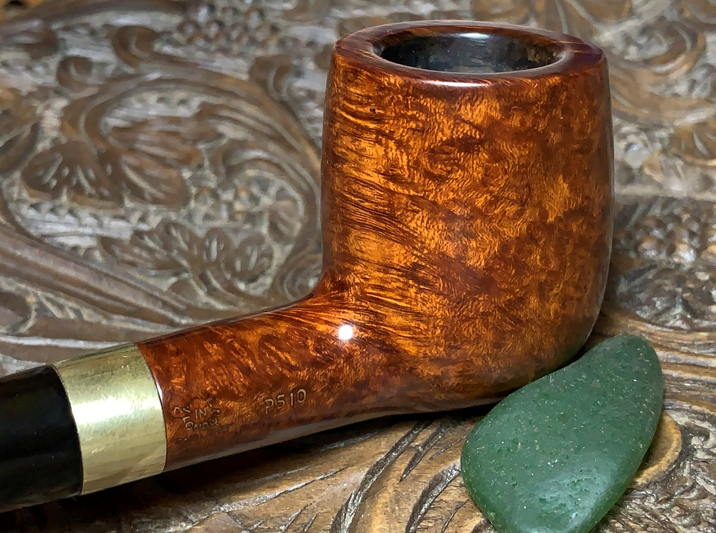
 Stamped on the underside of the shank, near the brass band, is a letter – could be R or D. I’m not sure at this point what the letter is or what it signifies. There are no other markings on the brass band. There is also no Comoy’s ‘C’ on the stem which raises questions in my mind – is this a replacement stem?
 The history of the Comoy name borders on the complex when one looks at the French side of pipe making, which was born in Saint Claude. Then, when you add that the ‘French connection’ moved across the Channel opening shop in England, things become more complex. Pipephil’s picture of the ‘English French pipe connection’ shows the ‘inter-relatedness’ of the pipe industry community. Comoy’s is in the main bloodstream of this bond. The online version of this diagram (LINK) is interactive and worth a look.
 The Pipedia Comoy history written by Derek Green (A History of Comoy’s and A Guide Toward Dating the Pipes) churns through the history beginning in 1850 with the birth of Henri Comoy in Saint Claude. There are more details and dates in this early Comoy history that go beyond the scope of this write up and for one interested, the link is above.
Jumping ahead a few years after the family crossed over to the UK, the history continues with the creation of H. Comoy & Co. Ltd:
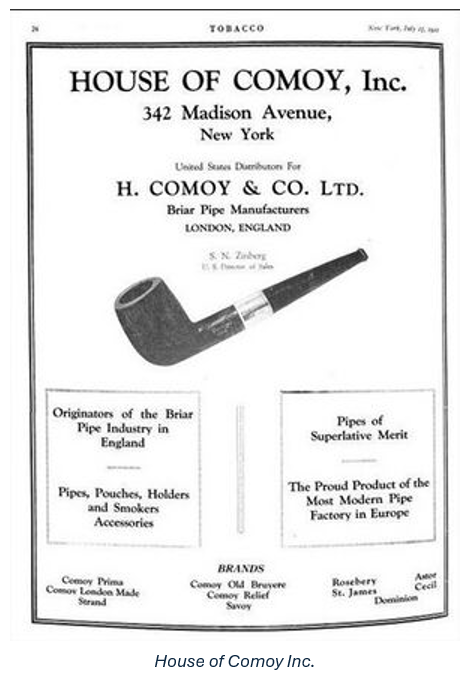
Comoy & Co. Ltdwas established in 1914. It was a partnership between Henri, his sons Adrien and Paul and his nephews Louis and Charles. Earlier, in 1910, the workshop on the site had been extended and by 1913 the address was 2 and 4 Newcastle Place. In the 1914 London Directory, H. Comoy & Co. Ltd now occupied an imposing building at 72 to 82 Rosebery Avenue, not far from the previous premises.
The company expanded into the USA. Louis, Charles Chapuis, Paul and Adrien Comoy made many trips to New York. In 1921, the New York branch, The House of Comoy, was opened at 342 Madison Avenue in New York. It was entrusted to Samuel Nathan Zinberg, born in 1882, director for the United States, who died in 1937.
 At the very beginning of the 1920s, the French market was served by Chapuis-Comoy, founded in 1922 in Saint-Claude by Louis, Charles and Emile Chapuis in partnership with Adrien and Paul Comoy. Henri Comoy died at the age of 74 on 25 January 1924 in London (Finchley) and was buried on 30 January in St Marylebone Cemetery, leaving the Company in the hands of his sons and nephews.
In 1929, H. Comoy&Co. Ltd became part of Cadogan Invesments Ltd, created by the Oppenheimer Group, which at that time already owned a number of very important and well-known brands such as Maréchal & Ruchon (GBD), Civic &Co Ltd, BBB de Frankau, Sina, Verguet Frères, Orlik and Loewe.
During the 1940s, WW2 saw the pipe industry all but stopped when the factory was converted from pipe manufacturing to the production of armaments. We pick up again with Green’s Comoy history in the 1950s when the pipe industry was picking back up:
After the war ended in 1945, it was an uphill struggle for all British companies to once again get established, and it was not until 1950, and the opening of a new purpose built factory in Aldershot, that production nearly met demand….”
“…The main manufacturing companies in the merger known as Cadogan Investments Ltd were Civic, Comoy’s and Marechal Ruchon & Co Ltd, and in the early 1960s manufacture came under one management, but the marketing departments continued working independently for a number of years…. Comoy’s remained a family owned company until it was finally taken over by Cadogan Investments during the early 1980’s. Cadogan have continued to manufacture Comoy pipes to the present day and, under Michael Adler, the Comoy brand is their flagship and efforts are being made to once more re-instate the well known quality of the brand….”
The Cadogan acquisition of Comoy’s in the early 1980s was a result of the struggling pipe manufacturing industry, but for Comoy’s it marked the end of an era and the downward slide of Comoy’s reputation for quality pipes. In fact, Derek Green ended his history with somewhat of a Comoy’s collectors’ lament:
“…The collector of Comoy pipes is really only interested in those pipes made before Comoy was finally taken over by Cadogan in the early 1980’s and I have therefore concentrated on that period. I have also, for the purpose of this article only briefly mentioned some of the other brands made by Comoy’s such as Cecil, Every Man, Town Hall, Guildhall etc, where they can contribute some evidence to help in dating…”
Pipedia’s ‘Comoy’s Dating Guide’ (Comoy’s Dating Guide – Pipedia) is helpful for dating in broader categories and not as specific as one expects from the Dunhill brand. The good news for the collector of this Comoy’s Billiard is that it is pre-Cadogan and according to what we have seen above, places the pipe in the late 70s and earlier. The indicator that this Comoy’s is ‘pre-Cadogan’ is found in the shape number 510. From Comoy’s Shape Number Chart – Pipedia we find this information:
Comoy’s pipes were given shape numbers in the 1909 catalogue and also names for each shape, but it would seem that these numbers were NOT stamped on the pipes until sometime in the 1920s. The earliest known is from 1925. The shape numbers are all 3 digits until after the Cadogan acquisition of Comoy’s in 1979, when some shapes were introduced with 4 digit numbers. However, they may have been introduced earlier in 1976, 1977 or 1978.
The year of the Cadogan acquisition is more specific – 1979, with 4-digit shape numbers possibly being introduced beginning in 1976. With this information, the outside bracket for the dating of our pipe is no later 1976 to 1979.
The Comoy’s Dating Guide – Pipedia provides 4 helpful general principles in dating a Comoy’s:
- The way that the Comoy name was stamped on the left side of the pipe
- The way that the “Country of origin” stamps appeared
- The introduction of and different ways that the inlaid C was formed on the stem
- The name of the pipe and when these names were introduced and/or discontinued
The 4th principle above is not relevant to our pipe because it has no additional ‘production line’ name in addition to Comoy’s. Looking specifically at principle #1, the way the ‘Comoy’ name was stamped, the earlier dating periods provided in the Dating Guide (1900 to about 1919, 1917 to 1938, 1940s) do not match our pipe. However, ‘From the 1950s’ does:
Now the Comoy’s stamp can be found in three variants:
- A simple block-letter style without serifs but with the C larger than the other letters and the apostrophe before the “S”.
- A return to the slightly more fancy block letters with serifs and the apostrophe. (It seems that some grades carried different stamps, or at least that the stamping changed in different years for some grades.)
- A simple block-letter style without serifs and without the apostrophe and with the “C” the same size as the rest of the letters. This stamp was probably not used very long.
- A simple block-letter style without serifs but with the apostrophe before the “S” and with the “C” the same size as the rest of the letters.
Number 2 above seems to fit our pipe. Here again is our Comoy’s stamp. The description is: A return to the slightly more fancy block letters with serifs and the apostrophe.
There are some key indicators narrowing the field down. First, the description in #1 above describes block letters with the ‘C’ larger than the rest of the letters. Yet, this description says ‘No serifs’. Description number #2 describes a slightly fancier block letter, which fits ours, but it doesn’t repeat the characteristic of the larger ‘C’ which our stamp has. It’s possible that the larger ‘C’ carries over from principle #1 to #2, but the key is the presence of the serifs. A serif is the horizontal line beneath and above the letter. The ‘M’ and the ‘Y’ above have serifs. These characteristics provide an earlier dating bracket for our Comoy’s during the 1950s to the latter bracket in the late 1970s.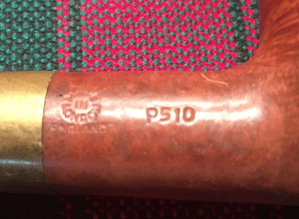 The second general dating principle is: The way that the “Country of origin” stamps appeared. The Dating Guide provides a description of the ‘Made in London England’ matching our pipe:
Made in London England Appears in two versions. This is again stamped in a circle with “MADE” at the top, “IN” in the middle, and “LONDON” at the bottom, with “ENGLAND” in a straight line beneath. It can be assumed that this stamp was first used in the export drive in the early 1950s. On a Bulldog Sandblast from the early 50s the Comoy name no. 2 above was used together with “MADE IN LONDON” over “ENGLAND”. There are no known examples of pre-WW II Comoy’s stamped in this way. The second version is the same as above but in a “rugby ball ” shape. This shape is verified on Comoy´s “Extraordinaire” pipes.
This information confirms the dating bracket that this pipe was manufactured from the 1950s to the latter part of the 1970s. It could indicate an earlier dating within the brackets with the push to expand export to the US in the 1950s as the company was climbing out of the WW2 depression.
There is one last dating principle from the Comoy’s Dating Guide that is relevant to our pipe: ‘Inlaid “C” or lack therein. I mentioned earlier that the lack of a “C” stamp on the stem raised questions about whether the stem is a Comoy’s factory stem or a replacement. The stem now mounted is a perfect fit and size for the Billiard stummel but lacks the classic Comoy’s “C” logo. I approached this question in two ways. First, I sent Steve, with his vast Rebornpipes.com experience asking whether he had ever seen a line of Comoy’s pipes that did not have a “C” inlay in the stem? The second path was to research the shape number P510 to see if this might give some insight. While waiting for Steve’s reply, I drilled down on the shape number.
The first interesting thing about the shape number is that it is prefixed with the letter ‘P’. Looking at Comoy’s Shape Number Chart – Pipedia, the ‘P’ usually points to a Panel style shape, but ours is not a Panel. However, there is some mystery twisted into this. The article describes that pre-Cadogan pipes often had letters stamped into their briar. The second bullet below is relevant to our pipe:
On pre-Cadogan pipes additional letters can be found after the three numbers:
- M on Meerschaum lined pipes.
- P on Panel shaped bowls. This may not always be the case as I have now seen a photograph of a non panel Shape 309 with a P.
- C on some shapes with curved bits. This does not seem to be universal for all curved bits and it would appear to be mainly on Princes and Bulldogs.
- F believed to indicate a “Fishtail” bit. Verified on an early 1930s Virgin Briar with the shape number 206F and a fishtail bit exactly like the Dunhill F/T, that was not introduced until 1950.
So, leaving the meaning of the ‘P’ in the Comoy’s mystery drawer, I switched to the mystery letter on the underside of the shank. I could not find any letter that seemed to match what I could see on the underside of the shank – ‘D’ or ‘R’ – not sure. This remains a question.
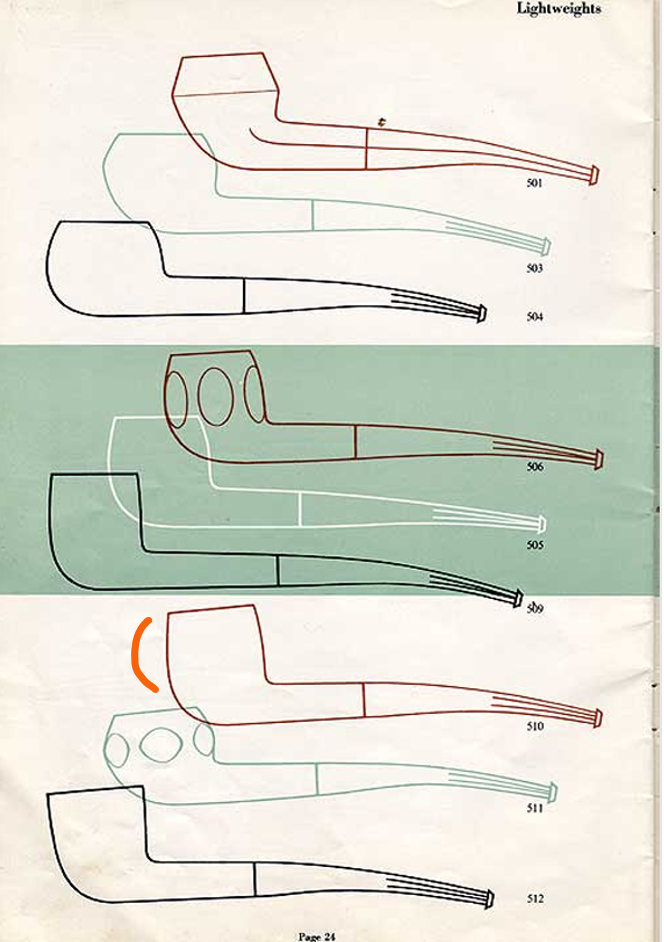
Next, turning attention to the shape number 510, I discovered that the charts and descriptions included in Pipedia’s Shape Number Chart article (Comoy’s Shape Number Chart – Pipedia) revealed no shape 510. One chart skipped from 509 (Billiard, 1/8 bent, Lightweight) to 511 (Prince, 1/8 bent, Lightweight). I almost gave up on finding an example of the 510 until I followed an off-site link at the bottom of the main Pipedia Comoy’s article (A PDF copy of Comoy’s Pipe Compendium, courtesy Michael DiCuccio) that showed a 510. The page is labelled ‘Lightweights’ (below) and paralleled the 500s described in the chart above. As with the 500s above except for one, the 510 has a 1/8 bend. This does not match the straight Billiard on the worktable – ugh. The 510 in the chart below does not seem to match the 510 I’m looking at on my worktable. At this point, unless I hear something from Steve that counters this information, it would seem that our stem is not an original but an excellent replacement – a REALLY good replacement.
I am thankful for the reservoir of knowledge Steve has with his years of working on pipes on Rebornpipes. Steve’s response to my questions about the stem’s origin, the strange stamping of D or R on the underside of the shank and the prefix P on the shape number. Here are his responses to these questions:
As for your question. I have seen the P on the Comoys but don’t think it means panel. I have seen it on billiards, pots and princes. I wonder if it could refer to the finish. All I have seen had factory bands.
I have seen stems without the c and I think they were factory. Possibly a cheaper line. Your stem could have straightened over time.
I was told by an old repairman that D on the underside was a note on stem replacement size and shape. Others have said it is the craftsman’s initial. I think the stem replacement size is probably correct.
Steve
This information was invaluable by providing explanations for each question dogging me about this Comoy’s. Based on this information from Steve, there’s no reason to doubt that the stem is a factory stem and not a replacement. What is interesting too, is that the D on the stem’s underside most likely is a mark indicating information for a stem replacement and the possibility that the stem over the years could have lost its subtle 1/8 bend. The P on the shape still is a bit foggy but all the parts of the pipe, including the band, are Comoy’s factory products. Nice! and thank you Steve for your help!
With a better understanding and appreciation for the Comoy’s on the worktable, it’s time to take a closer look at the issues. This Comoy’s has seen better days – he’s pretty beat up. The chamber has thick cake build up which will be removed to allow fresh briar to emerge and to inspect the briar for heating issues. There is a good bit of damage to the rim with a thick lava crust and darkened briar from charring. The front of the bowl’s rim edge has eroded from charring. There are nicks and dents all around the bowl circumference. It’s a mess.
 The heel has also seen better days. The entire heel and running down the shank is rough briar – nicks and dents. It looks like the former steward knocked the stummel to loosen the ashes??
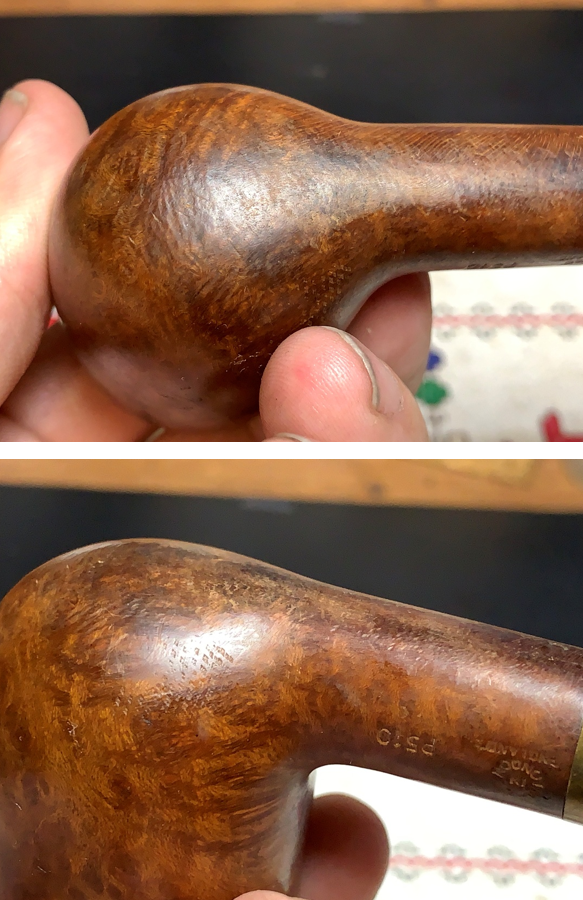 There are a few more noticeable scratches on the bowl and shank.
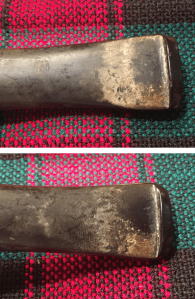
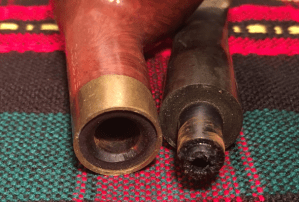
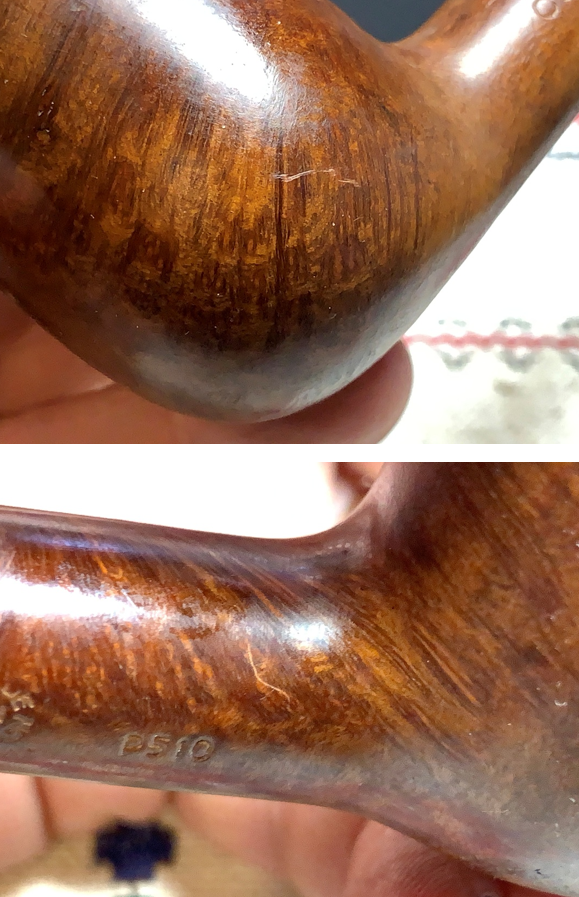 The bit has some button damage and calcification. The entire stem is rough though I don’t detect a lot of oxidation.
 When I first saw the brass band, I wondered if it was a repair band for a shank crack. The band slipped off easily. There is no shank crack and from the perfect inset laith cut around the shank to seat the band, makes it apparent that it was done with skill. I will clean the band with some bling and re-seat it, adding a bit of class to this beleaguered Comoy’s.
 To start the restoration, the stem airway is cleaned with pipe cleaners and isopropyl 99% alcohol.
 To address oxidation, the stem is placed in a soak of Briarville’s Pipe Stem Oxidation Remover using a pipe cleaner in the airway to help retrieve the stem later.
 Turning to the stummel, a fresh picture shows the cake buildup to mark the progress.
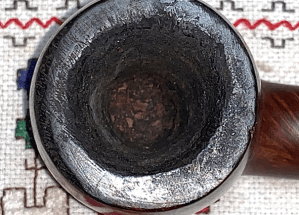 I start reaming the chamber using the smallest of the 4 blades of the Pipnet Reaming Kit, but I soon realize that the cake is as hard as a brick. After putting the Pipnet blade aside because I do not want to break it, the metal Kleen Reem tool is used to make some headway. The tool has expanding metal blades that will not break. The knob on the top of the tool is turned to expand the blades plowing more cake. The job takes a good amount of time switching back and forth between the Kleen Reem tool and the Pipnet blades.
 After the Kleen Reem tool broke through the brick layer, the Pipnet blades made more progress by finally reaching the floor of the chamber. The following two larger Pipnet blades were also used – 3 in total.
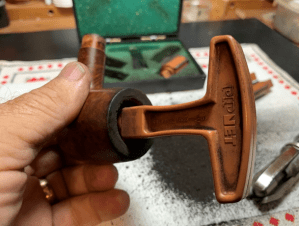 The Savinelli Fitsall Tool continues to clean by scraping the chamber wall.
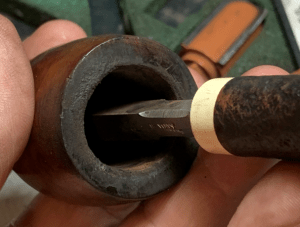 The final step is sanding the chamber with 220 grade paper wrapped around a dowel rod.
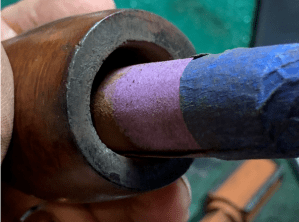 There was a lot of carbon removed from the chamber – one of the more difficult reaming jobs plowing through the brick I have had in a while!
 An inspection of the chamber reveals, amazingly, healthy briar – no heating issues.
 The cleaning transitions to the external briar and the rim. A few pictures show the start to measure the progress.
 Using undiluted Murphy Oil Soap and a cotton pad, the external surface is scrubbed to address the grime.
 The rim is in rough shape. The sharp edge of the Savinelli Fitsall Tool works well scraping the black crust off the rim.
 The internal edge of the rim is charred, and the tool scrapes the dead charred briar off. All the damaged wood has to be removed to allow the healthy briar to emerge.
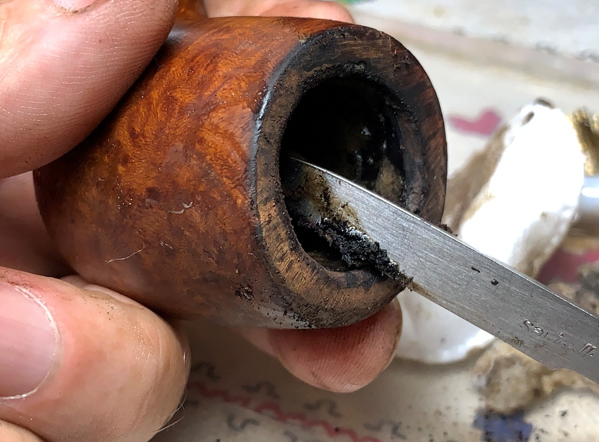 The brass bristled brush also helps add some force to the cleaning.
 After the external scrubbing the stummel is transitioned to the utility sink where the internals are scrubbed. Using shank brushes and warm water, an anti-oil liquid dishwashing soap is also used to clean. After the scrubbing and a thorough rinse, the stummel is transported back to the worktable.
 The internal cleaning continues using cleaners and cotton buds moistened with isopropyl 99% alcohol. The internals are grungy. A small dental spool excavates tars and oils from the mortise wall.
 Many buds and cleaners are used and there is a marginal improvement with the buds and cleaners emerging lighter.
 With the late hour having arrived, the internal cleaning will continue with an alcohol and salt soak through the night. This soak helps to clean the stummel but also refreshes the briar. To do this, first a cotton ball is pulled and twisted to form a wick which serves to draw the tars and oils out of the internal briar.
 Aided by a stiff wire, the wick is guided down the mortise and emerges at the draft hole.
 Next, the chamber is filled with kosher salt. Kosher salt is used because it does not leave an aftertaste like regular iodized table salt. It also refreshes the briar – helps with cleaning. The stummel is situated in the egg carton with the rim and shank facing roughly parallel. Isopropyl 99% alcohol is then introduced into the chamber with a large eye dropper until the alcohol surfaces over the salt.
 After a few minutes, the alcohol has been absorbed into the salt and cotton wick, and it is again topped off. The stummel is put aside for the night.
 The next morning, the kosher salt and wick are soiled, indicating the results of the soak through the night.
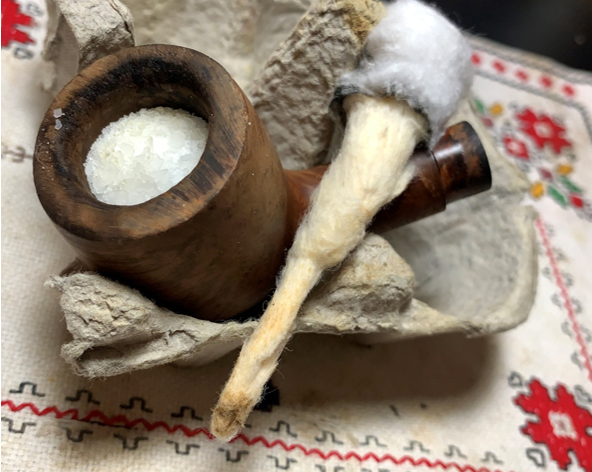 After the salt was cleared from the chamber, a few more buds and cleaners with isopropyl 99% were used to clean the last vestiges of grunge. The whiff test revealed a clean, sweet smell with no ghosts lurking in the closet.
 With the cleaning completed, a closer look at the stummel and especially the rim reveals a good bit of work to do. The picture below shows the rim’s deteriorated state. The black on the inner rim’s edge was extensive charring damage which resulted in the loss of briar on the inner edge. Because of this, you can see that the rim surface is now narrower on the severely damaged side than the opposite side of the rim.
 The front of the bowl’s outer rim edge has also deteriorated so that there is now a slope over the edge (lines) rather than the original rim lines (dots) were.
 The stummel has wear and tear over the heel and nicks throughout! This is where the tension one always faces arises in restoring pipes: restoration vs preservation. When one has a vintage pipe, as much as possible we want to preserve the pipe in its vintage state – when possible. The challenge with this vintage Comoy’s is that he’s too beat up to preserve. Restoration is needed if he’s going to serve a new steward again.
 To address the rim’s damage and to reestablish clean lines, the rim needs to be topped – a lot. This will remove enough of the rim briar to regain the lost rim area. A starting picture helps to see the progress.
 With the stummel inverted on 220 paper, the stummel is rotated over the paper.
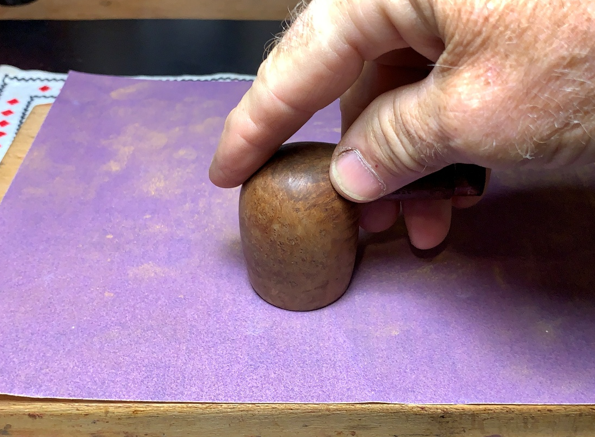 I like watching the progress. The first cycle of rotations was only a few to show the contours of the damage. The narrowed sections on the rim are distinctly contrasted after a few rotations. The progression will see the narrowed sections widening as the sanding continues.
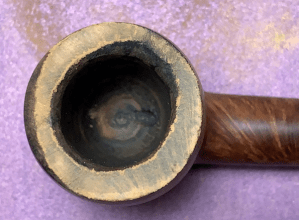 After a lot of rotations, the rim is widening at the damaged areas and the rim is still showing darkened charred wood.
 After many more cycles the rim has come to the place where I’m satisfied with the progress.
 The paper is exchanged next for finer 320 paper and several more rotations follow.
 Finally, after several rotations over 600 grade paper, the rim is presenting nicely. The charred wood is minimized, and the rim width looks more uniform and balanced. However, the circle of the chamber is out of round and there are vestiges of dark briar around the inner rim edge.
 To address the out of round inner edge and the darker briar, the inner rim will be given a smart bevel. I call it ‘smart’ because a hard surfaced orb is used to cut the bevel so it’s sharp and distinct. A soft bevel would be simply using the pressure of the thumb sanding the inner edge which results in more of a rounded bevel. Using a wooden orb, a strip of 220 paper is pinched between the orb and the mouth of the chamber and rotated.
 The same approach is used with strips of 320 and 600 grade paper.
 Quite the progression! I like it. 😊
 With the rim in better shape, another closer look is directed at the stummel. There are blemishes all over the surface. To address this, sanding sponges are used. Four sponges are used starting with a coarse sponge, then medium, light and fine. With the first two coarser sponges, care is given to sanding around the nomenclature. With the finer two, a light touch is given over these areas. Wow! The sponges cleaned up the briar nicely and the grain is looking good.
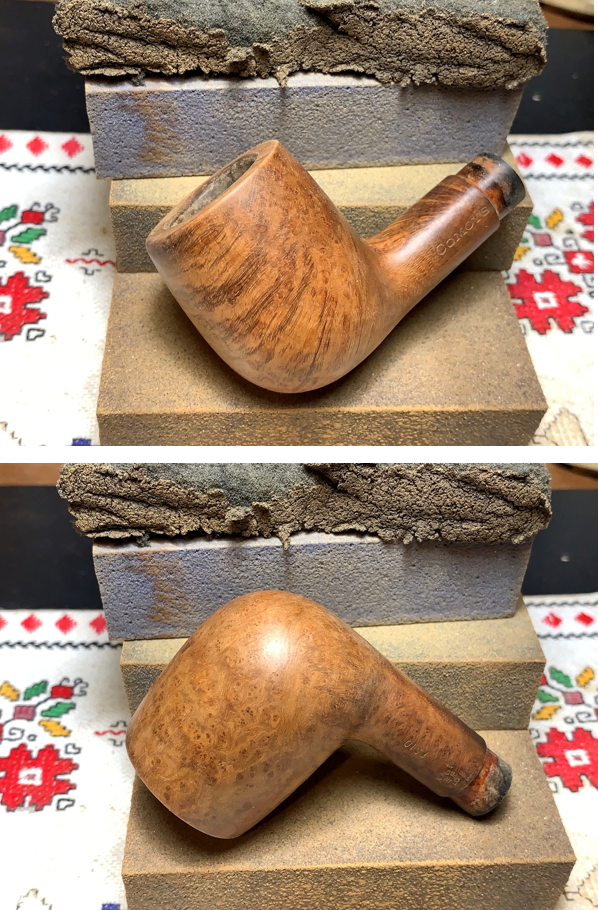 Moving next to the micromesh pads, 9 pads are applied to the stummel. Between each pad, the stummel is wiped with a damp cloth. This removes the briar dust and gives the following pad more traction. The first set of 3 pads are grades 1500, 1800 and 2400.
 The second set of pads are grades 3200, 3600, and 4000.
 The final set of 3 pads are grades 6000, 8000, and 12000.
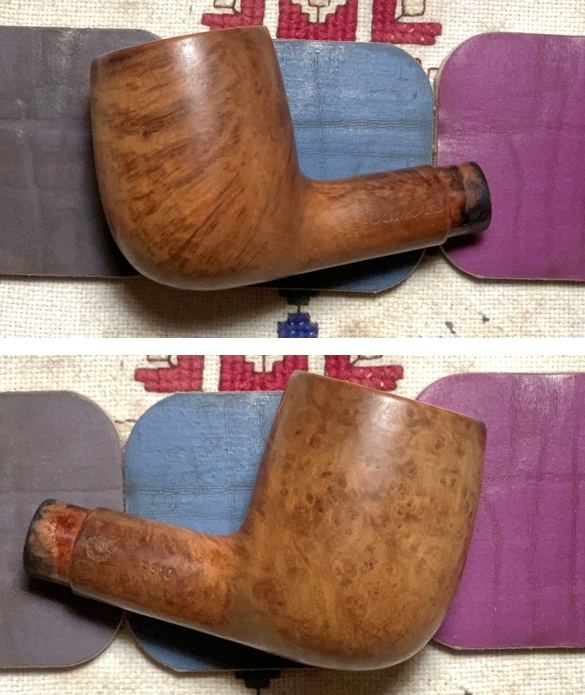 The stummel has cleaned up nicely and we are miles from where we began. However, a few issues bother me. Through the micromesh cycles vestiges of dark stained briar from the charring became more noticeable. In the picture below you can see some darkening of the briar on the rim which will not go away. Even if more sanding was applied, there’s no way to know how deep it goes.
 This picture shows the shadow of darkening on the front outer edge of the rim. During the micromesh process I noticed a fill that was not seen earlier. The fill is solid, but now that I see it in the lightened briar after sanding, is more noticeable.
 It didn’t take long to make the decision to apply a dye to the stummel to help mask the char stains and the old fill. A fringe benefit to applying a dye is that it helps to bring more contrasting to the grain and generally results in a nice ‘pop’. Fiebing’s Light Brown Leather Dye will be used. The first step is to heat the stummel to expand the grain. This helps the briar to be more receptive to the dye pigment.
 The aniline dye is painted onto the stummel in sections with a folded pipe cleaner. While the dye is still wet, the alcohol in the dye is ignited with the candle and it immediately combusts leaving the pigment behind. The stummel is painted a section at a time and flamed.
 After the stummel has been covered with the dye, it is set aside for several hours to allow the new dye to settle in.
 With the stummel on the sideline, attention switches to the stem which has been in a soak of Briarville’s Pipe Stem Oxidation Remover. When the stem is fished out, the picture below shows the raised oxidation that wasn’t visible before the soak.
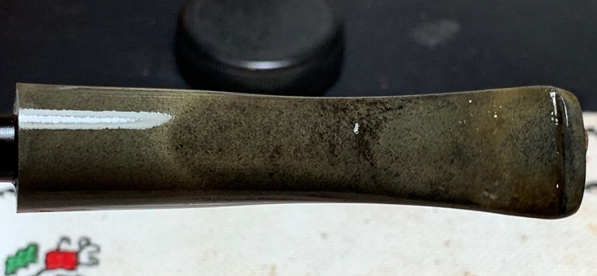 A couple of pipe cleaners moistened with alcohol clean the airway of the oxidation remover fluid and a cotton cloth is used to rub the stem rigorously to remove the raised oxidation.
 The stem looks good after the removal of oxidation. The bit has a slight bite compression on the upper and lower and on the button. These are mild and sanding should do the job.
 The entire stem is sanded with 220 paper and to protect the shank facing from shouldering a plastic disk I fabricated is used.
 The sanding continues with the finer 320 paper.
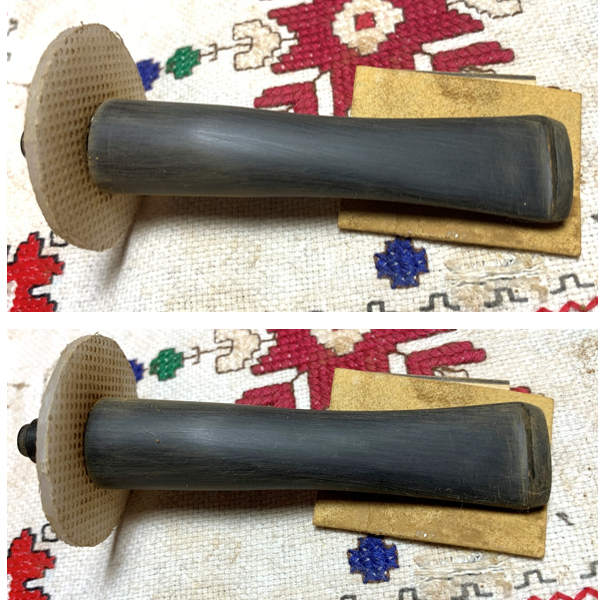 Next, the stem is wet sanded with 600 grit paper, and this is followed by applying 0000 grade steel wool.
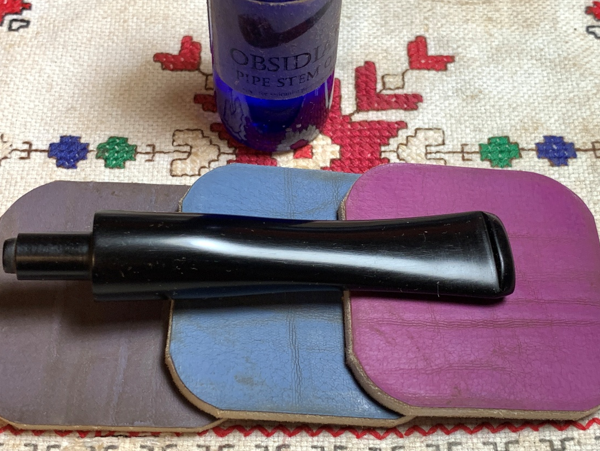
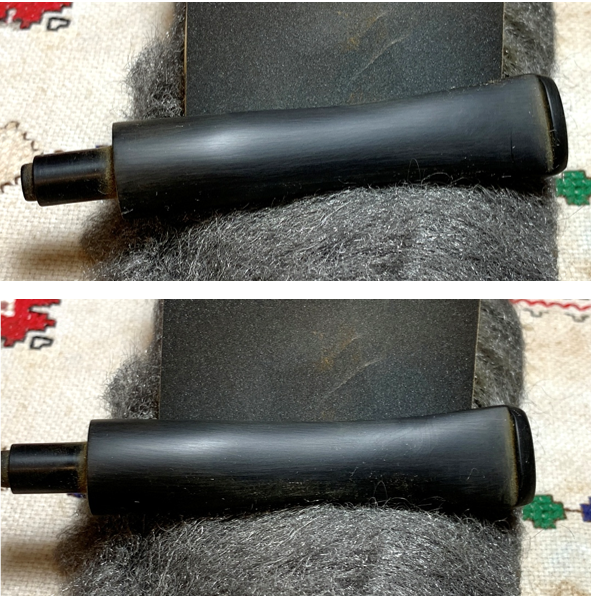 The next step in the sanding process is to use micromesh pads. Between each pad the stem is wiped with Obsidian Oil which helps condition the stem and protect against oxidation. Micromesh pads are used: 1500 to 2400, 3200 to 4000, and 6000 to 12000.
 Mark Hoover’s ‘Before & After’ Fine and Extra Fine Polish (Lbepen.com) does a good job conditioning the vulcanite. After putting some of the Fine Polish on the fingers, the polish is worked into the stem surface. After a few minutes of working it into the surface, the Fine Polish is wiped off with a paper towel. The same is done with the Extra Find Polish. The stem looks great.
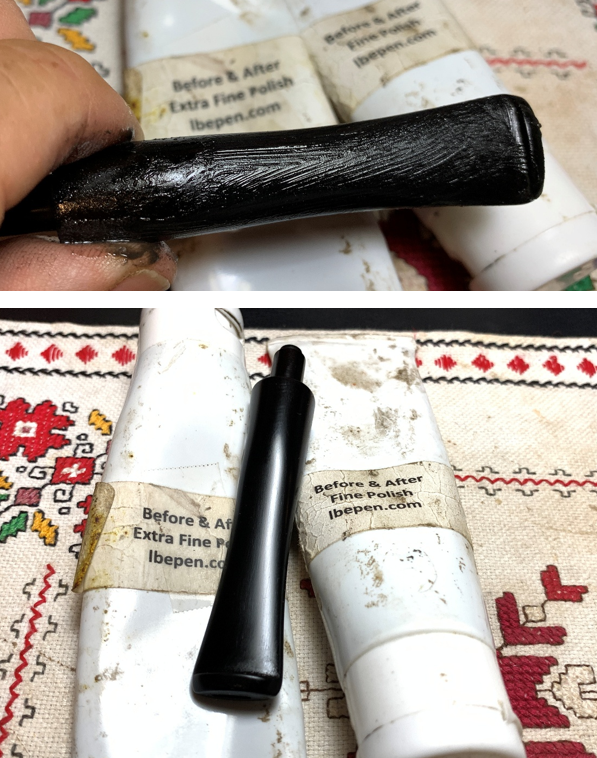 Next, the brass band needs some TLC dealing with the tarnish.
 First, Brasso is used to chemically remove the base tarnish. The product is applied with a cloth and rubbed into the metal. After a bit, a dry cloth is used to wipe the polish off and to buff it up.
 Next, White Compound is used to bring out the shine. A dedicated cotton cloth buffing wheel is used. This is important because compounds have different grit, and buffing metal always leaves a black residue.
 The band receives the White compound and then is buffed up with a microfiber cloth. It’s difficult to take a picture of shining metal, but as the picture shows, the brass is now mirror reflective. Not bad 😊. I call this the ‘bling factor’.
 The newly dyed stummel has been resting for several hours and it’s time to ‘unwrap’ the crusted flamed surface. A felt buffing wheel is used to do the plowing with Brown Tripoli compound. Both the felt wheel and compound are more abrasive to do this initial clearing away of the flamed dye.
 I enjoy the unwrapping to see how the grain responded to the dye pigment. I like what I see.
 Brown Tripoli is used again but the felt wheel is replaced with the softer cotton cloth buffing wheel. This additional application of Brown Tripoli with the cotton cloth wheel helps to fine tune the grain definition by removing more excess dye resulting in the sharpening of the grain. The cotton wheel also can better reach into the crook where the bowl and shank come together. The felt wheel is not able to get into these tighter quarters to remove the flamed dye.
 After the application of the compound, the stummel is wiped down with a cotton pad moistened with alcohol. Doing this helps to blend the new dye and continue to remove excess dye. It also lightens the hue a smidgen.
 After the stem and stummel are reunited, the finer Blue Diamond compound is applied to stem and stummel. For now, the brass band is not yet mounted because it’s easier to apply the compound with it unmounted.
 The compound leaves a lot of fine compound dust on the surface. A felt cloth is used to wipe away the dust preparing the surface for wax.
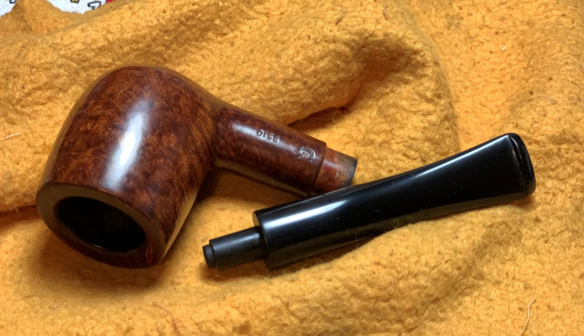 At this point, the brass band needs to be mounted. To do this, a small drop of CA glue is applied to the tip of a toothpick and then the toothpick carefully applies and spreads the glue around the interior of the band. The glue is applied to the middle so that it doesn’t squeeze out and get on the shank when the band is mounted.
 With the glue applied to the band, the band is carefully mounted and then pressed down evenly against the table to seat fully on the shank.
 One last mini project before applying the wax. One of the interesting discoveries in the research is that Comoy’s Shape Chart describes the 510 as having a 1/8 bend. The 1/8 bend seems to be one of the characteristics that sets the 500s apart along with them being described as ‘lightweights’ – indicating a smaller pipe in the lineup. The 1/8 bend is the characteristic bend ascribed to a Prince shape which is a classy shape. The subtle bend on our 510 coupled with the band leverages toward that ‘touch of class’ motif. I had a good bit of time to think about Steve’s comment that the subtle bend could have been lost along the way. Therefore, in keeping with the ‘spirit’ of the 510, I decided to introduce a classy 1/8 bend to the stem.
 After a pipe cleaner is inserted into the stem to maintain the airway integrity – even though probably not needed with this bend – the vulcanite stem is warmed gradually with the hot air gun. After a time the rubber becomes supple and a gentle bend is introduced.
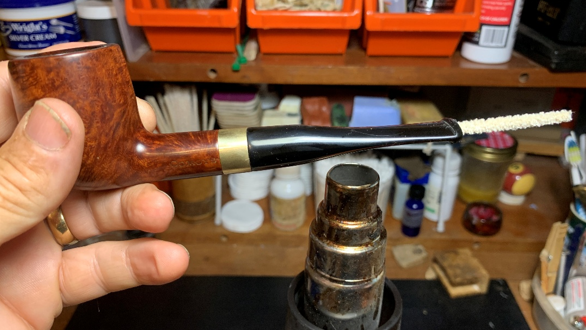 While holding the bend in place, the stem’s end is dipped into a bowl of cool water that I prepared beforehand. The cooling of the vulcanite rubber helps hold the bend in place. The picture below of our 510 next to the Comoy’s template looks impressive. I like it a lot. I don’t know how the stem straightened but it looks like its back home now.
 The last step is to mount a dedicated cotton cloth buffing wheel to the rotary tool set at about 40% full power. Carnauba wax is applied to stem and stummel, avoiding the band. This is followed by giving the pipe a rigorous hand buffing with a microfiber cloth to remove excess wax and to raise the shine.
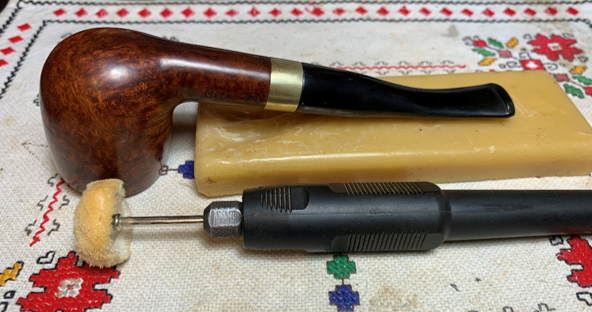 There’s something about seeing a classic being restored to its former glory. I love it in cars, airplanes and pipes. This Comoy’s 1/8 510 has certainly re-found his classic beginnings. The rim was a mess and the stummel not much better. Appling a dye was the right decision. The grain pops and the lines of the pipe, from the bowl to the button are classy. The band adds to the ensemble with its bling. John commissioned this Comoy’s Made in London England and has the first opportunity to claim him from the Pipe Store. Part of the proceeds of all the pipes restored go to help the Daughters of Bulgaria (now called, Spring of Hope) helping women and girls who have been trafficked and sexually exploited and creating programs to prevent men, women and children from being compromised. A ‘before & after’ reminds us how far we’ve come. Thanks for joining me!


Pingback: New Beginnings for a Preben Holm Ben Wade Deluxe Hand Made Denmark Freehand – The Pipe Steward