Darryl reached out to me with a request to bring new life to his Dr. Grabow Omega. What caught my attention was that he’s a neighbor here in Colorado. He lives north of where I reside here in Golden, the home of Coors beer – in Longmont, Colorado. The email he sent has the subject line, “Bringing life back to my pipe?” Here is what Darryl wrote:
My name is Darryl xxxx, I found you on rebornpipes.com…
I was looking to see if there were people out there who could potentially help with refinishing or reviving “old” tobacco pipes. I was happy to stumble upon an article that you did a while back (found here) where you happened to do not one but TWO of the brand / model I was looking to have revived!
I have a Dr. Grabow Omega from the mid-late 90’s. I bought it and used it when I was just a teenager! Feels like a lifetime ago as I’m 44 now and looking to pick the pipe back up and use it again (properly this time! 😊).
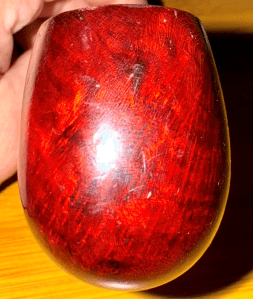
The link Darryl included in his note was a Dr. Grabow Omega pictured below that was liberated from its thick shellac or ‘candy apple’ finish to reveal some very nice grain beneath.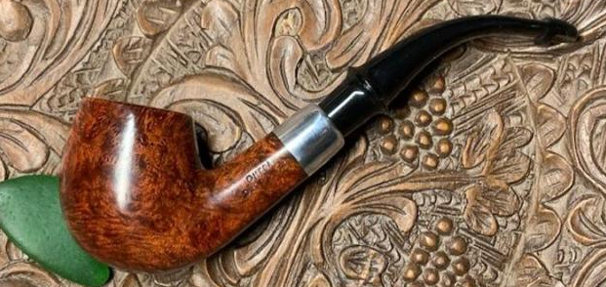 I usually work only on pipes that are commissioned from the Pipe Steward’s ‘For “Pipe Dreamers” ONLY!’ collection because I have a long queue of pipes waiting for my attention, and very patient pipemen waiting for their pipes. But because Darryl was a fellow Coloradan, and the prospect of hand delivering a pipe and sharing a bowl was possible with this project, I proposed to Darryl that he too, put his name in the queue and wait for the Omega project to work its way up to the worktable. Darryl was in no hurry and was willing to get in line. I found out that he is a family man and that he and his wife have a 15-year-old son along with two little dogs – Bean and Tippy. Living in Colorado it didn’t surprise me when he said he liked all things “shooting” with hunting and fishing – and riding dirt-bikes/ATVs in the mountains. He also wrote this describing how he returned to pipe smoking after dabbling as a teen:
Smoking a pipe again kind of blind-sided me – TBH. I did it (kind of) as a joke as a 17–20-year-old “kid” (I’m 44 now, brother! 😊). I thought it looked funny to see a young guy smoking a pipe, and so did my buddies that did it with me! I’m SO glad that I kept my first (and only) pipe, too! I really appreciate things in life that hold a sentimental value… and this one sure does. I don’t plan to smoke a ton, to be very honest with you… but I would like to try the hobby again now that I can afford different kinds of equipment and tobacco. I’m pretty stoked to see where this road leads me.
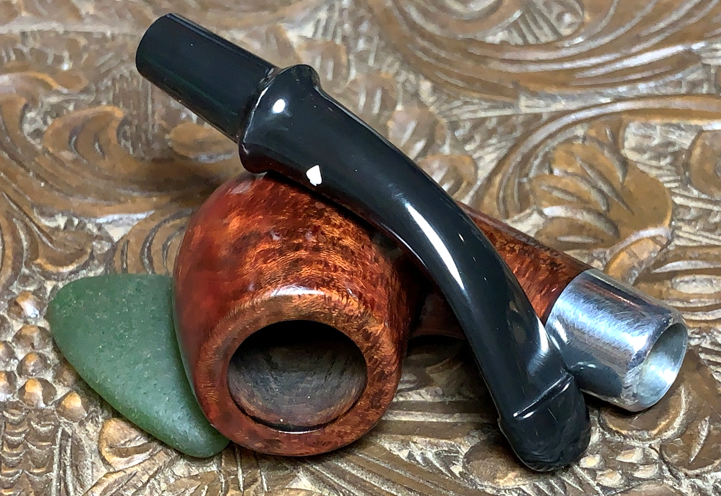
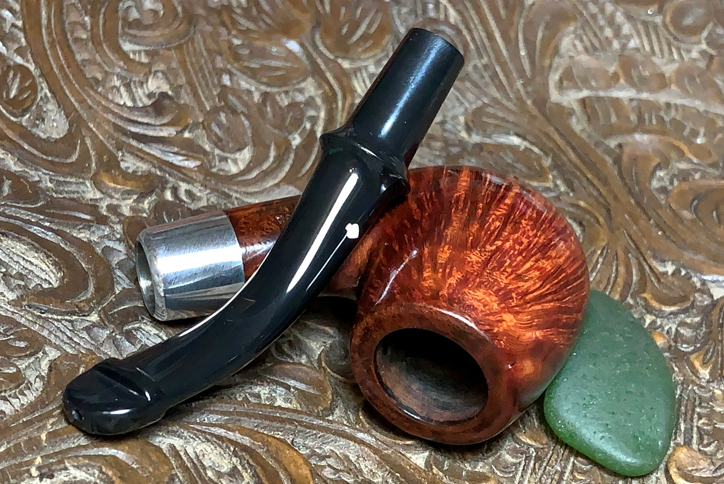
I could understand why this Dr. Grabow was a special keepsake for Darryl and he sent these pictures of his teenage Omega to give me an idea of its condition.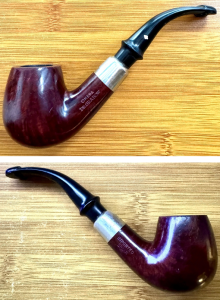
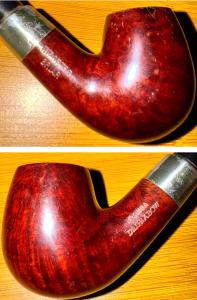
 Darryl asked that I remove as much of the nicks and scratches as possible and to remove the dark stain in favor of something lighter that would produce more grain pop. He also was hoping to replace the stem with a factory replacement or if not, to revive the original. The bane of Dr. Grabow Omegas is that they were produced with plastic stems instead of the customary vulcanite rubber. They were, after all, considered a ‘drug store’ pipe, inexpensive and within the financial reach of even a teenager😊. After we communicated back and forth a few times, Darryl did contact Dr. Grabow and was able to secure a new plastic stem which he sent along with the pipe.
The other main issue which is what I’ve discovered with the earlier Omegas I’ve worked on is that the Dr. Grabow factory finish is a thick varnish or shellac, or as I refer to it – a ‘candy apple’ finish. What this produces is a chemical shine and not the pleasing presentation of natural briar. The hue beneath the thick candy apple finish is a deep reddish leaning hue that is not bad looking – to me it is reminiscent of a Dunhill finish, but please don’t tell Dunhill collectors that I said this! After going back and forth with Darryl about the finish, we decided to emulate the approach I did in the previous Omega projects. Before starting the upgrade, I always like to pay respect to the Dr. Grabow name as I did in the first Omega project:
The Lewis B. Linkman Co. started in 1892 (Pipedia). Yet, the name, Dr. Grabow, was used for the first time in 1930 or 1931. Since this is my first Dr. Grabow to restore, I find the story of the ‘Dr. Grabow’ name interesting because the Doctor is a real doctor! From Pipedia’s article on the history of Dr. Grabow (and photo courtesy of Doug Valitchka):
 Dr. Paul E. Grabow was a general physician in Chicago, located at 2348 N. Seminary Ave. Some doors north at No. 2400 was the drug store owned by Mr. Brown, a personal friend of Dr. Grabow. Grabow and Brown, both fond of fly-fishing, would often sit together in the early evening hours in a back room of the drug shop talking to one another and enjoying their pipes. Before long, they were joined by Mr. Linkman, owner of M. Linkman & Co., a large pipe factory located one block west on W. Fullerton Ave., at the corner of Racine Ave. These three gentlemen shared common interests and became fast friends.
During one of their evening get-togethers in 1930, Linkman mentioned he would introduce a new type of pipe soon that exhibited what he felt were fine improvements that greatly improved the pipe smoking experience. He was still looking for a good name and believed his pipes would sell better if they bore the name of a physician. (1) Linkman asked his friend Dr. Grabow if he would permit him to use his name. The good doctor felt flattered by the idea a pipe should be designated for him and consented. A formal agreement was not made, nor were there any contracts signed or royalties paid to Dr. Grabow for the use of his name; it was, according to one of Dr. Paul Grabow’s sons, Milford, a “friendly understanding” and Linkman expressed his thanks by sending Dr. Grabow numerous pipes throughout Dr. Grabow’s lifetime. (see The Legend of Dr. Grabow). Also interesting of note are the various instances where Dr. Paul Grabow stated that he developed, or helped develop, the Dr. Grabow brand of pipes. This was a tactic used to convince people that a pipe developed, endorsed, and used by a medical physician would be ‘more healthful’ than a pipe that was not developed by someone in the medical community.
Pipedia’s article also provides some specific information about the genesis of the Omega line (Dr. Grabow Models (Series,Line) Names Through the Years – Pipedia):
– OMEGA (Previous speculated to be 1975, but user Jim Amash purchased his Omega in June of 1974) — Omega was a copy of a well pipe imported from Italy.
In my previous research I found some comments about the Omega line on Pipes Magazine Forum. They discussed Dr. Grabow Omegas’ cost, quality, and appeal, with these positives and negatives:
Positives: An Omega was the first briar pipe that I ever owned. It still gets regular use and like Brewshooter, I have no complaints with it. Bowl size is a little bit smaller than I like, but it makes for a nice quick smoke, and the military mount makes it really easy to clean. I have Savinellis that I have easily paid four times more for, and sure, they smoke a little bit better, but in terms of a good smoking instrument, the Omega will do you well as long as it is smoked properly and maintained properly.
Negative: One thing I noticed about my Omega is that it had a heavy varnish or clear coat. I sanded it and gave it a nice wax. It seems to breathe a little better now and I like seeing more of the grain. I also gave the band a bit of a brushed look with some fine grain sandpaper. It’s a nice little pipe for that quick smoke.
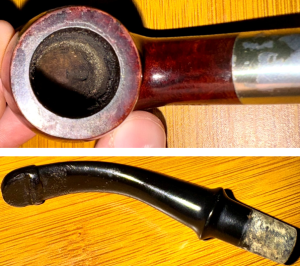
The approach with Darryl’s Omega will be to strip down the candy apple finish by soaking it in acetone to remove the shellac finish. There are some pits and old fills beneath the shellac, and these will be assessed after the old finish is removed. First, the stummel will be cleaned. The picture below shows almost no cake buildup in the chamber.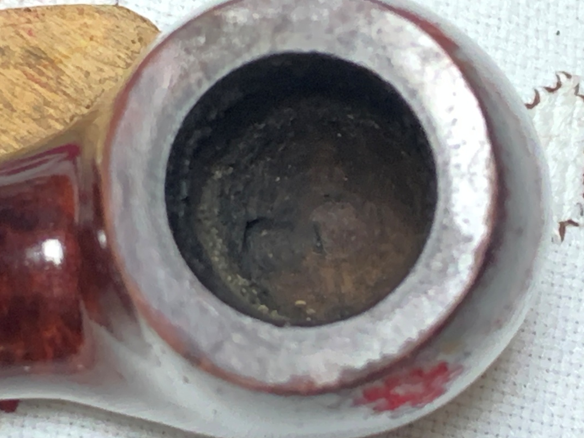 To start, the chamber is reamed with the Pipnet Reaming Kit using one blade. The Savinelli Fitsall Tool is next used to scrape the chamber, getting down at the floor. Finally, the chamber is sanded with 220 grit paper wrapped around a dowel rod. A small amount of cake was removed. Darryl was thankfully not a heavy teenage pipe smoker!
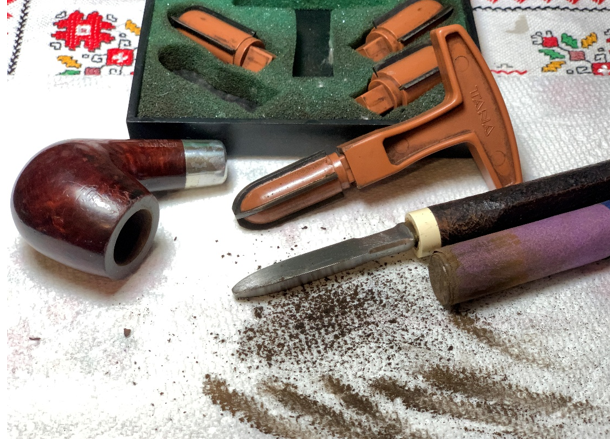 An inspection of the chamber shows no heating issues with fresh briar to form a new cake.
 I will forgo cleaning the external briar since the bowl will be soaked in acetone. Next, the internals are cleaned using cotton buds and pipe cleaners moistened with isopropyl 99% alcohol. As with the chamber, the internals are pretty clean and only a few buds and cleaners are needed.
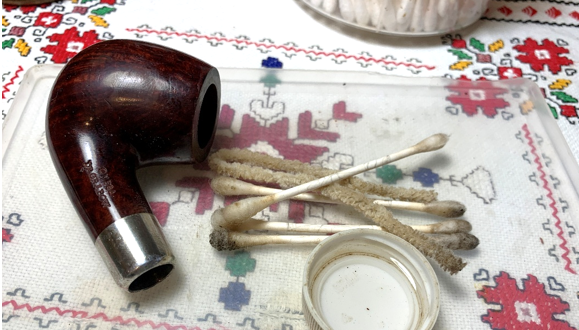 Next, the stummel is placed in a soak of acetone to help soften the candy apple finish.
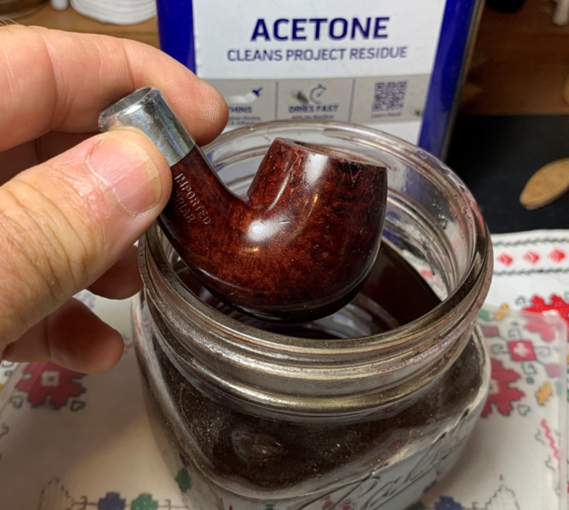 The stummel soaked in the acetone through the night to soften the finish. When I fished the stummel out of the acetone, what I found was the finish blistering on the briar surface. In the previous Omega projects, I never saw this great example of what the thick shellac finish looks like. Wow!
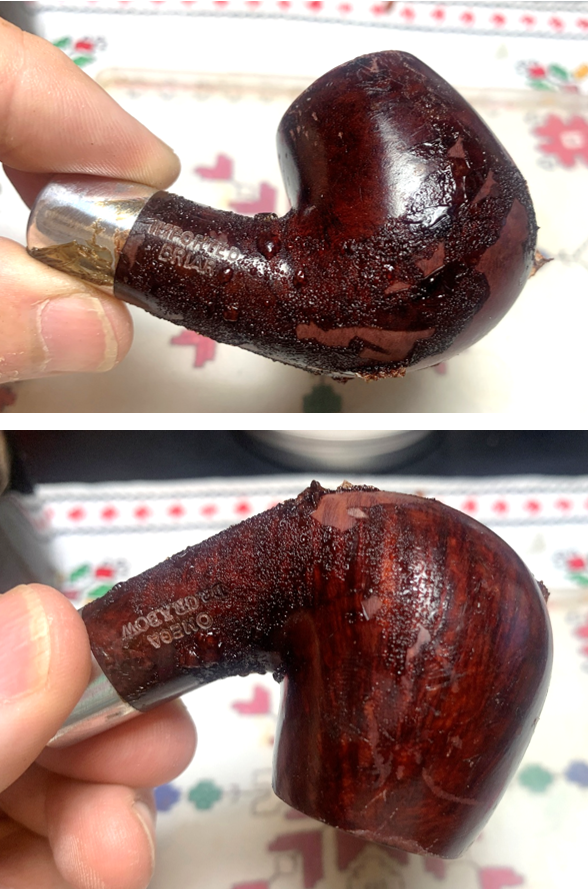 A cotton pad removes the loose bubbled finish.
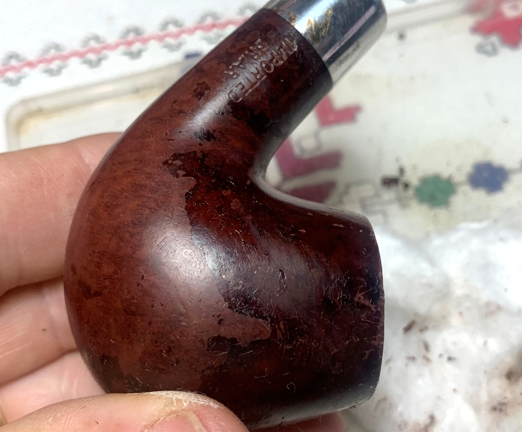 The removal process is continued with 0000 grade steel wool moistened a small amount with acetone. A surprise result from the acetone soak is that it also cleaned the corrosion I saw on the nickel shank cap. Not bad.
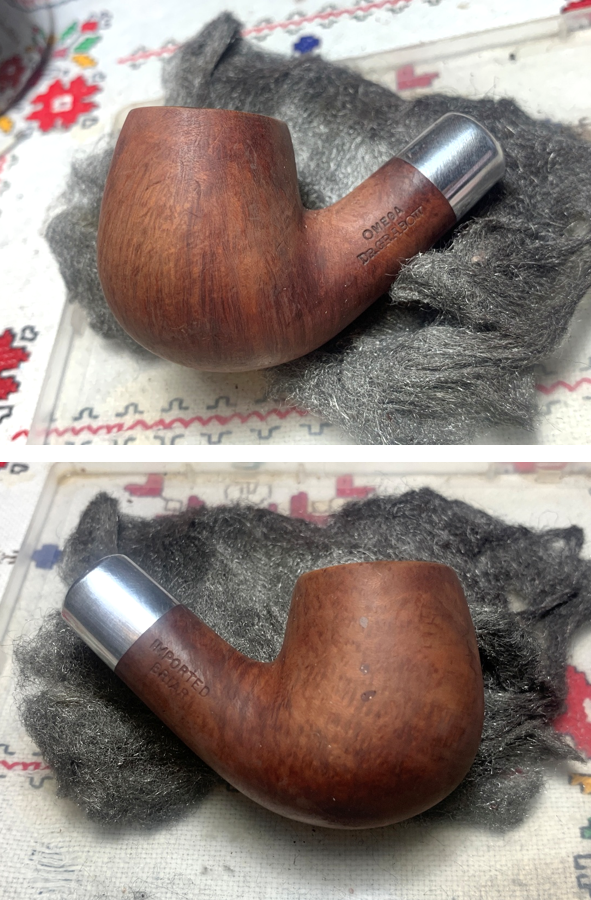 With the finish removed, a closer look at the briar surface shows some scratches, but the stummel is in good shape overall. One positive aspect of a hard-shell finish is that it protects the briar.
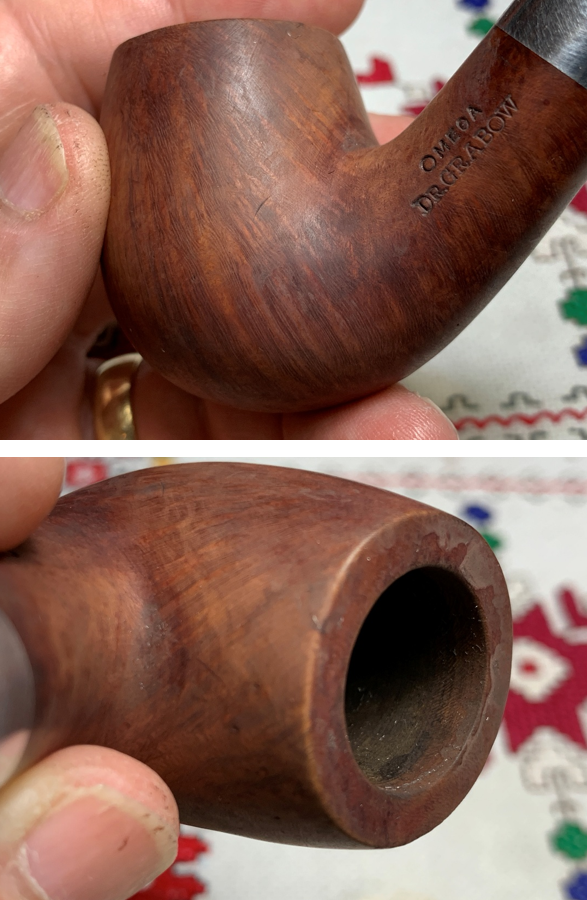 Upgrading a Pipeman’s First Pipe as a Teenager – A 1990s Dr. Grabow OmegaThe fills appear also to be solid, which is good news.
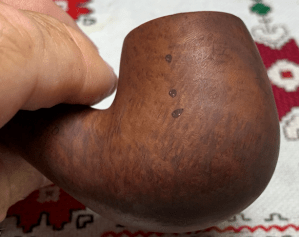 To clean the small scratches, sanding sponges are used starting with a coarse sponge followed by a medium, light and fine. Painter’s tape is used to protect the shank cap from sanding.
 Next, micromesh pads are used to bring out the natural grain more. Between each pad, the stummel is wiped with a damp cloth to remove dust and to give the next pad more traction. First, pads 1500, 1800 and 2400 are used.
 The next set includes pads 3200, 3600 and 4000.
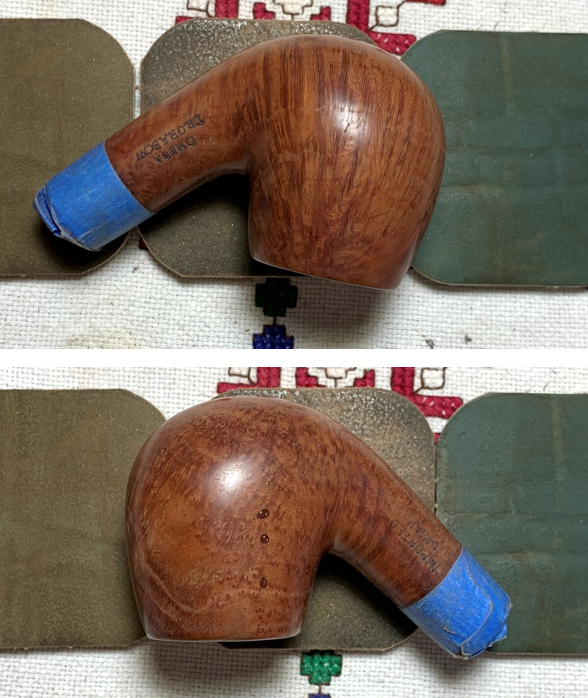 The final set of pads are grades 6000, 8000, and 12000. The grain for this ‘drug store’ pipe is not bad. Very nice straight vertical grain emerged during the micromesh process.
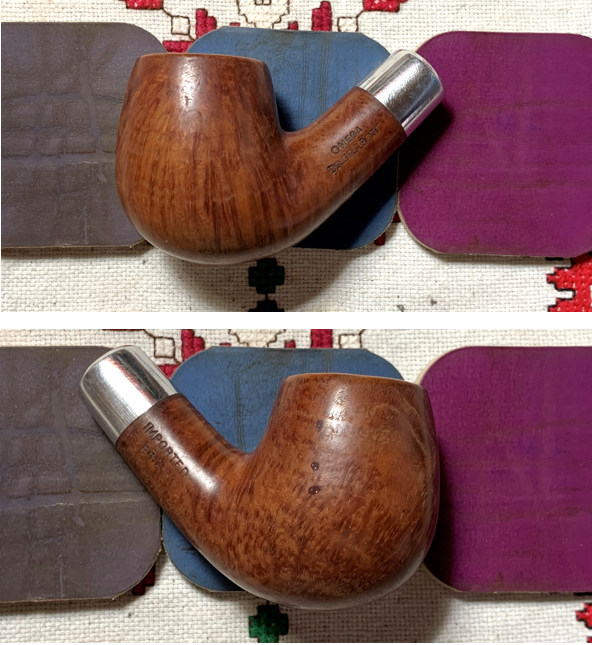 The next step is to apply dye. With my last Omega project that came out well, the undercoat was a mixture of 2/3-part Fiebing’s Dark Brown Leather Dye and 1/3-part Fiebing’s Black Leather Dye. With aniline dyes, that is, alcohol based – it is possible to lighten the dye if needed by wiping the stummel with alcohol. Following the application of the dark under coat, Fiebing’s Red Leather Dye will be washed over the dark. This will bring out the reddish hue of the original Omega motif, but hopefully with more grain pop resulting. The first step in the process after wrapping the nickel shank cap with a new piece of tape, the stummel is heated with a heat gun. Warming the briar causes the grain to expand, allowing it to be more receptive to the dye pigment.
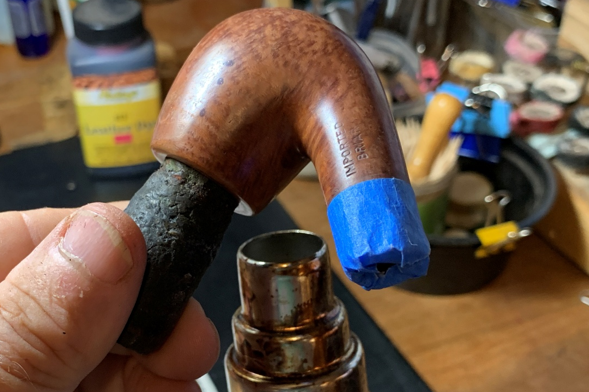 The Black and Dark Brown Fiebing’s Leather Dyes are mixed into a small shot glass. I decided at the last moment to change the ratio to a 50/50 mixture instead of a 2/3 to 1/3. A folded pipe cleaner then paints the dye onto the stummel a small section at a time. The wet dye is then flamed using the lit candle. The aniline dye immediately combusts when in contact with the flame and the alcohol burns off leaving the dye pigment behind. Section by section the stummel is painted and flamed. A second round of dye is applied for good measure and the stummel is set aside allowing the new dye to settle in.
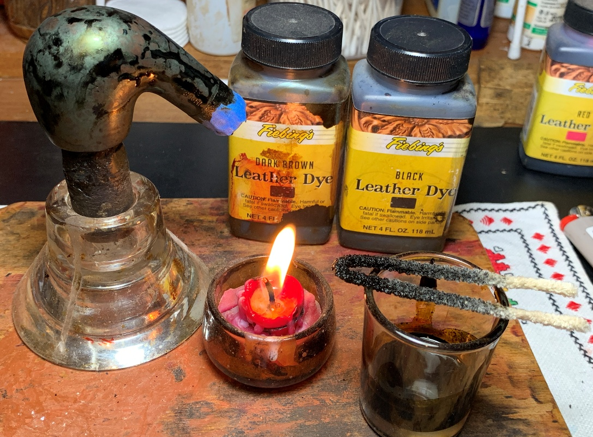 The newly dyed stummel ‘rested’ through the night allowing the dye to settle in. Now, it’s time to ‘unwrap’ the first dye application removing the flamed crust. To do this, a coarse felt buffing wheel is mounted onto the rotary tool. Then, the coarser Brown Tripoli is applied to the stummel with the rotary tool set at about 40% full power.
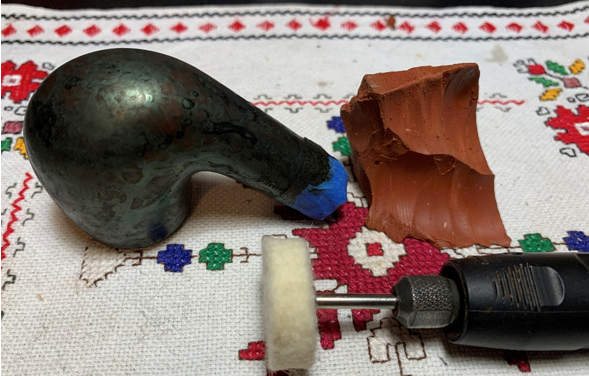 The entire ‘unwrapping phase’ took about 1:15. I enjoyed watching the grain emerge and seeing how the dye pigment was received. The grain has darkened considerably and will pop better after the process is complete.
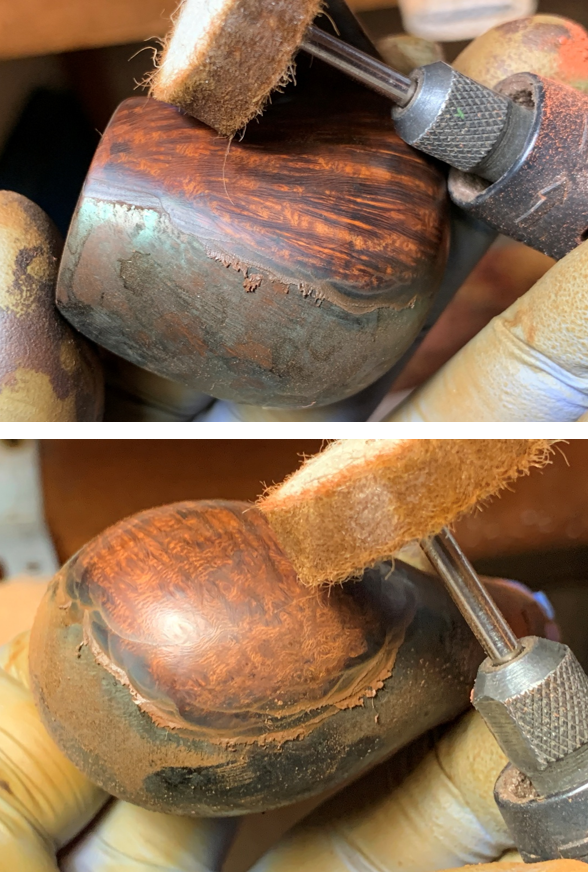 After the primary plowing is completed using the felt buffing wheel, the stummel is wiped down with a cotton pad moistened with alcohol. The reason for doing this is to continue to remove excess dye from the surface and to blend the new dye.
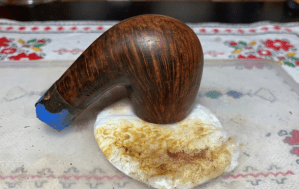 The felt wheel is exchanged for a cotton cloth buffing wheel and another round of Brown Tripoli is applied to the surface. This is done for a few reasons. The softer brush continues to remove excess dye, and this helps to sharpen and fine tune the grain presentation. The other reason is that the felt wheel is unable to reach into the crook of the shank, but the cotton cloth wheel can remove excess dye there.
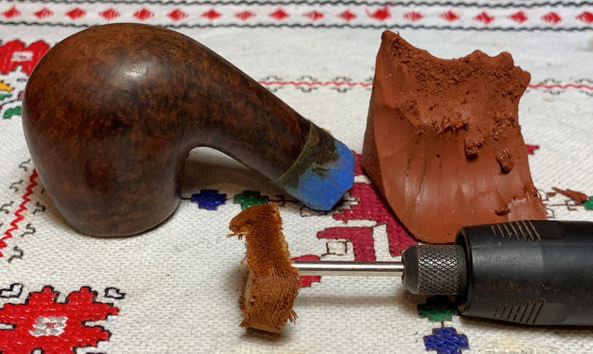 Again, the stummel is wiped down with a cotton pad moistened with alcohol to remove excess dye.
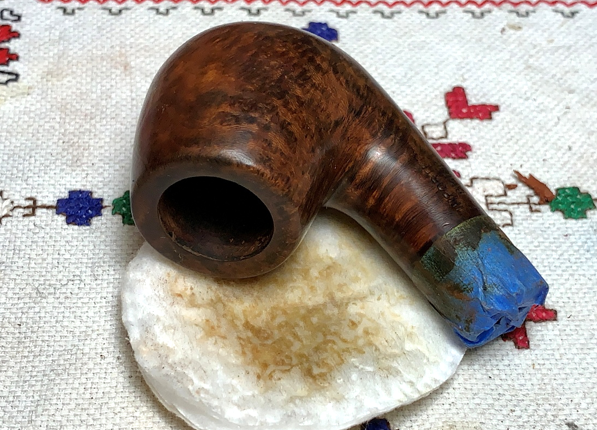 Next, the second phase of dye application is done using Fiebing’s Red Leather Dye. This is the first time that I’ve used Fiebing’s Red which is an aniline dye. Previously, I used a straight water based red dye. I’m interested to see how the aniline dye behaves. As before, before the application of the dye, the stummel is heated with the gun to warm the briar helping the grain to be more receptive to the dye.
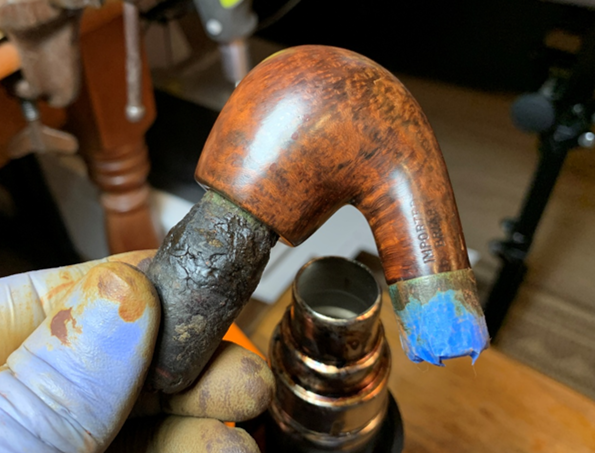 Instead of doing the flaming process, a dye wash is done. A folded pipe cleaner is used simply to apply the red dye making sure the entire surface is covered. A second application is done to make sure the job is done right.
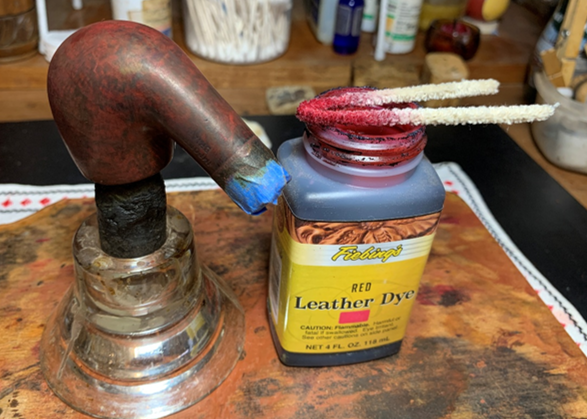 After the red dye has had time to rest – a few hours – Blue Diamond compound is used to remove the excess dye. With a dedicated cotton cloth buffing wheel mounted with the speed at about 40% full power, the compound is applied.
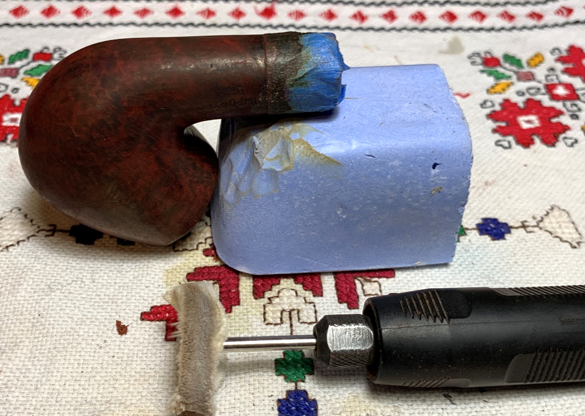 To remove the compound dust in preparation for the application of wax, a felt cloth is used wipe the stummel. The protective tape is also removed from the nickel shank cap.
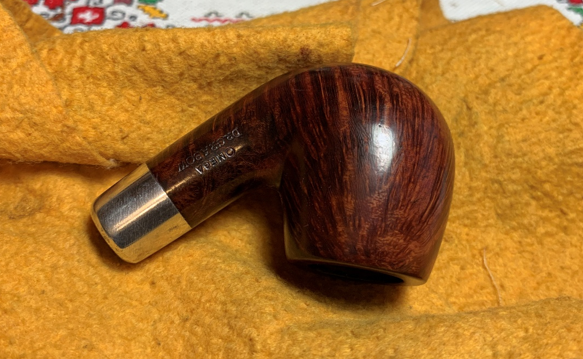 Part of the process of applying dyes is the removal of excess dye. The goal is that the dye is sealed in the grain and not laying on the surface. One last step to help prevent the leeching of new dye, is to warm the stummel and wipe it. This emulates the first time the pipe is put into service. It can happen that when the briar heats for the first time in use, dye can come off on the steward’s fingers – not a happy experience. It happens, but this process tries to guard against this initial leeching of new dye.
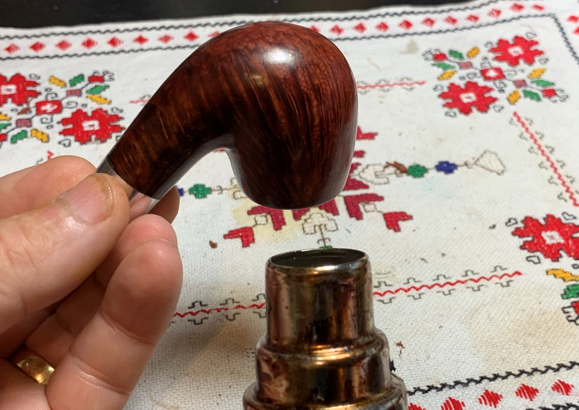 After the stummel is heated, it is wiped rigorously with a cotton pad to remove leeched dye. You can see a small amount of dye has come off on the pad.
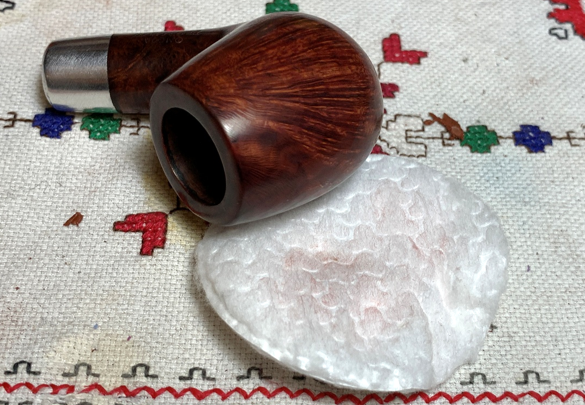 One last step before applying wax. The nickel shank cap cleaned up nicely after the soak in acetone – this was a surprise to me. To add a little more bling to the cap, Green compound is applied to the cap with a ‘metal’ dedicated cotton cloth buffing wheel. As you can see on the wheel and the compound, polishing metals always produces a black residue which can stain the briar if one is careless.
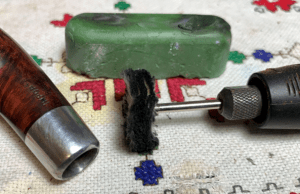 The results are good after buffing the cap with the felt cloth.
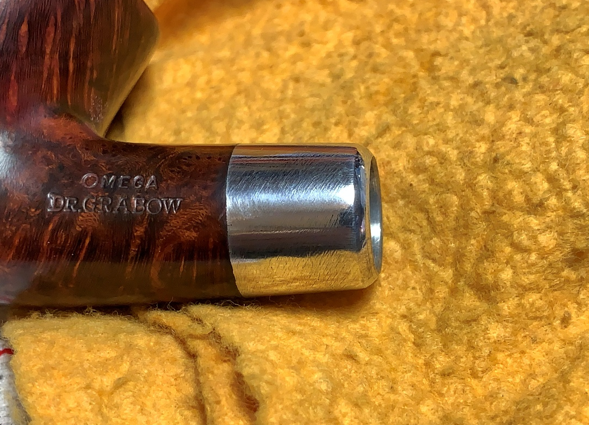 Finally, with another dedicated cotton cloth wheel mounted at the same speed – 40% full power, carnauba wax is applied to stem and stummel – the nickel cap is avoided. After the application of wax, the pipe is given a rigorous hand buffing to remove excess wax and to raise the shine.
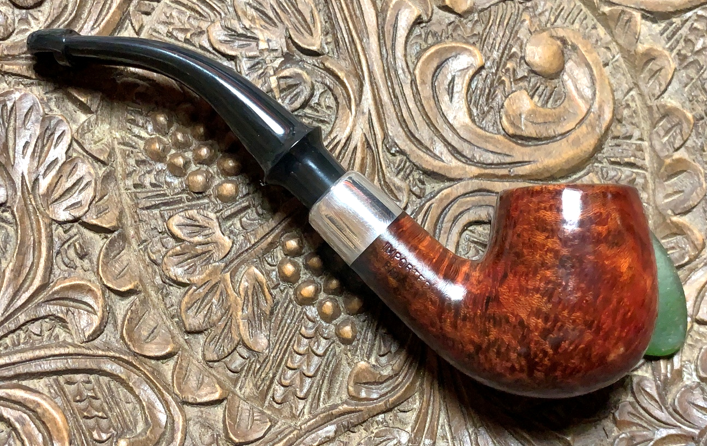
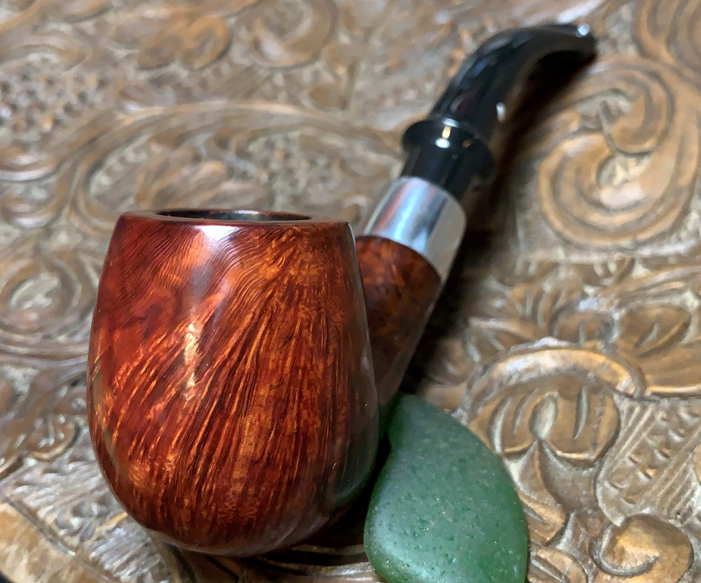
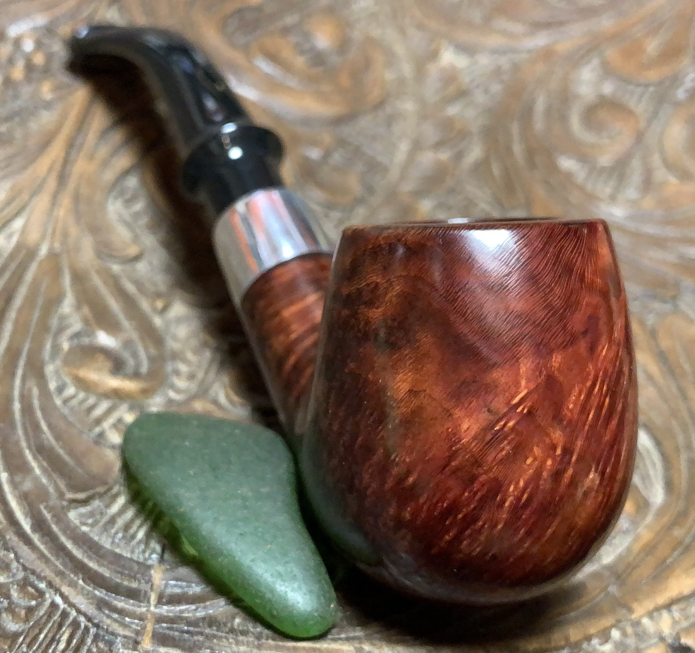
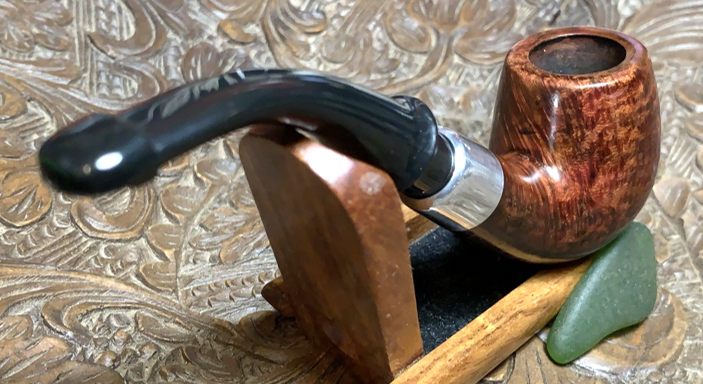
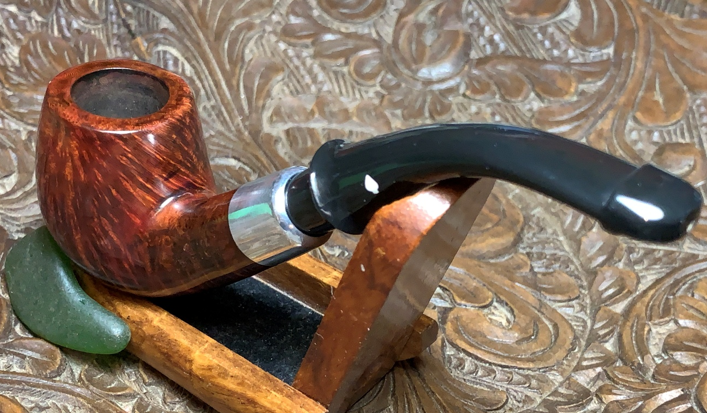
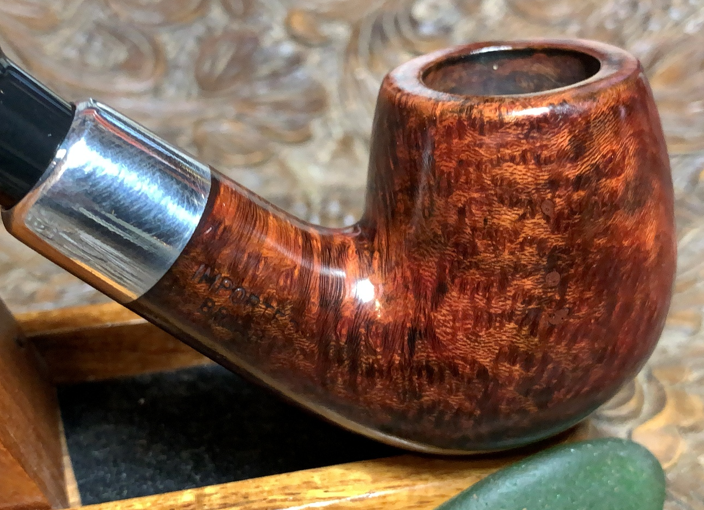
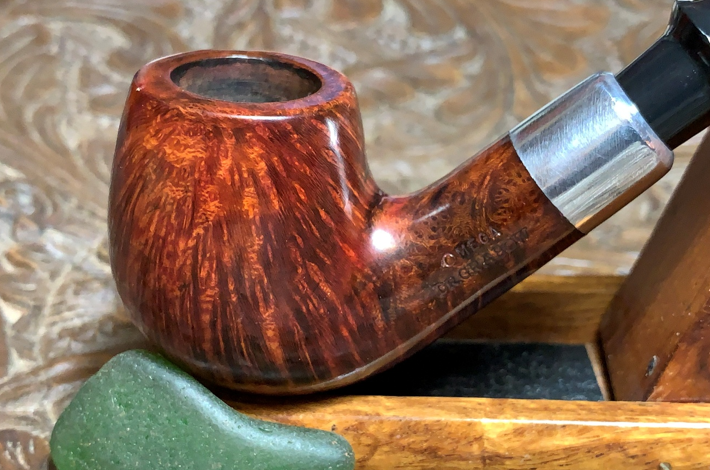
 Darryl’s first pipe is an iconic Dr. Grabow Omega which he wants to keep with him for a long time. His hope was to lighten the bowl a bit so that the grain would have more pop. I would say that this Omega’s upgrade has pop firing on all cylinders. A portion of the proceeds of this pipe, along with all the pipes I restore, go to help a work that my wife and I co-founded during our years living in Bulgaria. The Daughters of Bulgaria, now called ‘Spring of Hope’, is dedicated to helping women and girls who have been trafficked and sexually exploited. Programs are also created to prevent exploitation of children, women and men. Thanks for joining me!