I’m thankful for the Pipemen and women who wait patiently for their commissioned pipes to make their way to the worktable. After ‘officially’ retiring at the end of August, my wife and I continue to be as busy as ever. One of our most enjoyable avocations, which requires the patience of pipemen and women, is our love of traveling. We just returned to home base, Golden, Colorado, after a month long, 4410-mile road trip that took us to the Northeast of the US, pulling our 20’ camping trailer, enjoying the beauty of God’s autumn creation, with the changing of leaves and visiting family along the way. Another highlight was seeing Niagara Falls and camping on the Canadian side. Another huge, bucket list visit was to go to the University of Michigan’s ‘Big House’ for their homecoming game playing the Wisconsin Badgers. My eldest son lives in Dearborn, Michigan with his Mich alumna wife, whose family had 4 season ticket seats for us to join 111K others during Michigan’s homecoming celebration. Visiting the Big House was on my Bucket List and since I’m retired now, the invitation to go could not have come at a better time! We had to dress like the hometown folks to blend in. When in Rome…. 😊
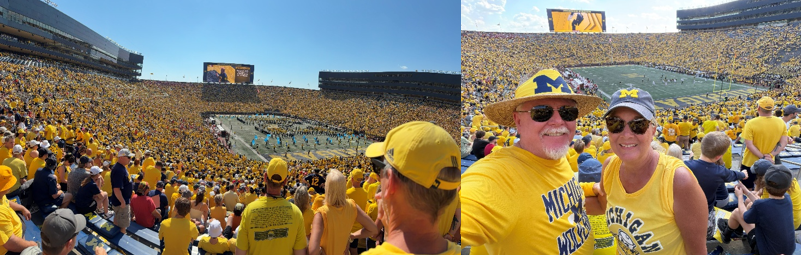 I’m back to the worktable and the vintage Kaywoodie that is next is a sweet pipe and a unique offering of Kaywoodie. Pipeman Donald lives south of Golden in Ken Caryl but is originally from Ohio. He describes himself as a ‘preschooler’ when it comes to tobacco pipes. As a ‘preschooler’ he experimented with crafting his own pipes using cherry, walnut and hard maple and regularly dives into pipe and tobacco forums. I would not describe this as a preschooler activity! We also share an appreciation for a classic tobacconist in nearby Englewood – Edwards Pipe and Tobacco Shop. Donald also shared that he served in the USAF in the sphere of weather equipment and radar and has worked for 25 years in a company where he is a fiber optic laser subject matter expert. As a family man, he has 3 kids and 2 grandchildren. This makes Donald a blessed man in my book.
Two pipes got Donald’s attention which he commissioned. A portion of the proceeds of all pipes sold helps benefit a work my wife and I co-founded when we lived in Sofia, Bulgaria – the Daughters of Bulgaria, now called Spring of Hope. This effort helped women and girls who had been trafficked and sexually exploited. Donald likes Kaywoodies and the two he commissioned are nice. Next in the queue is a Kaywoodie Shellcraft 565 Blasted Meerschaum Lined Lovat. The first on the worktable is a vintage and classic diminutive Kaywoodie Standard 050B. I acquired this Kaywoodie in January 2021 in Liberty, Missouri, on a road trip returning to Colorado after spending Christmas with family in Florida. My wife and I enjoy exploring antique stores as we travel and the Liberty Antique Mall provided some pipes for me to consider on this trip. The picture above shows a Pipe Pickers hope – pipes in the wild. The Kaywoodie is at the very top nestled in the pipe rack. The picture below shows all the pipes I brought home and eventually posted on the For “Pipe Dreamers” ONLY! collection for pipemen and women to commission.
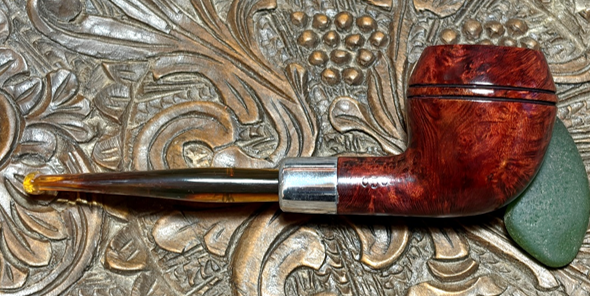
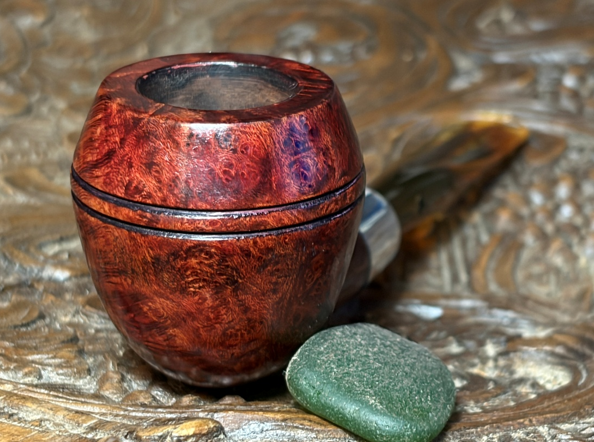
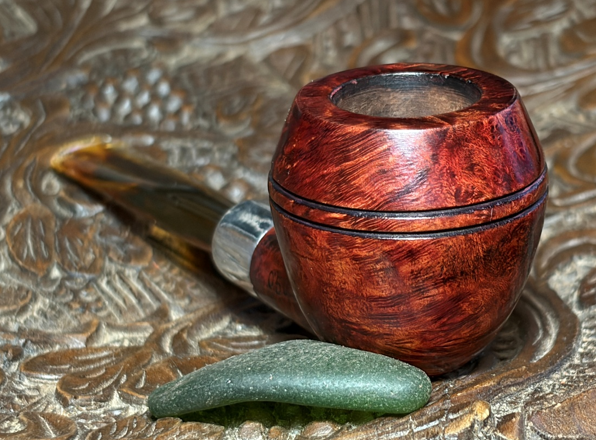
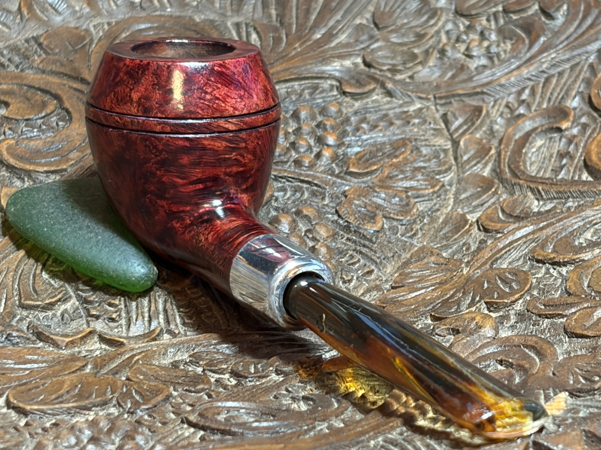
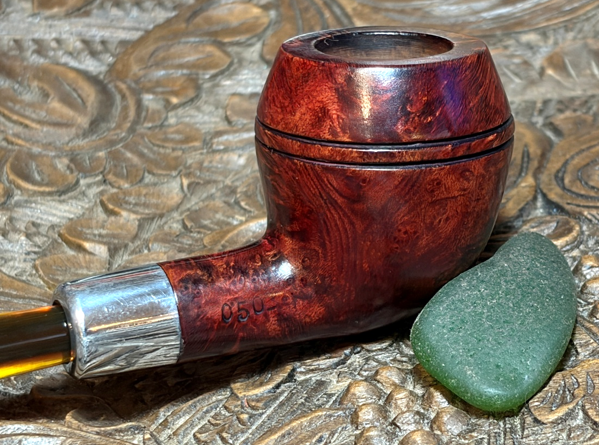
 Here are pictures of Donald’s first commission.
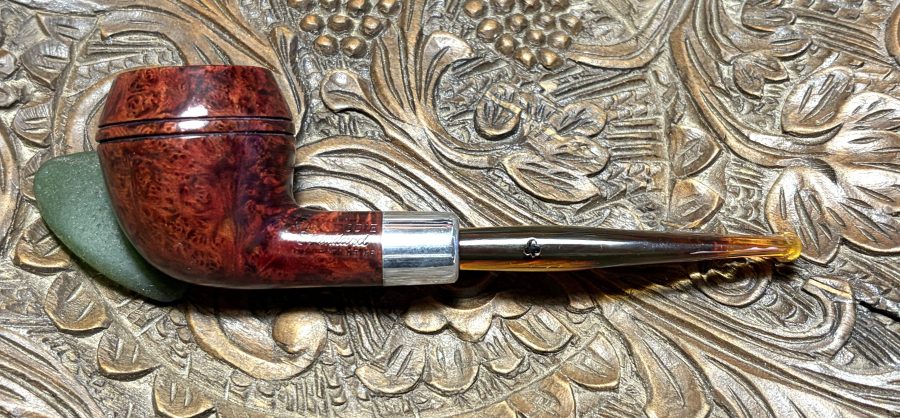
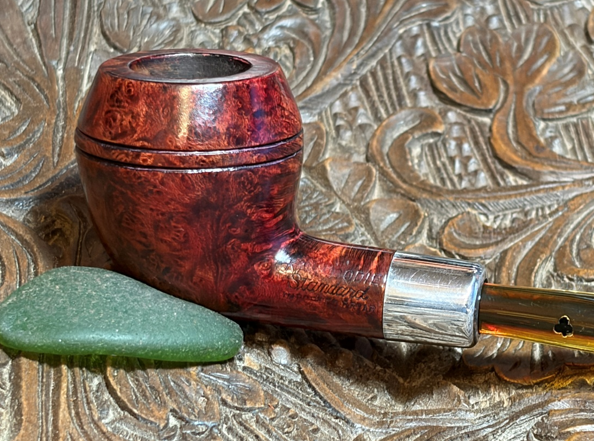

 The nomenclature stamped on the left shank flank is clear and crisp except for the Kaywoodie ‘Y’ which has thinned. The nomenclature is KAYWOODIE [over a cursive] Standard [over] IMPORTED BRIAR.
 On the right side of the shank is stamped: 050B.
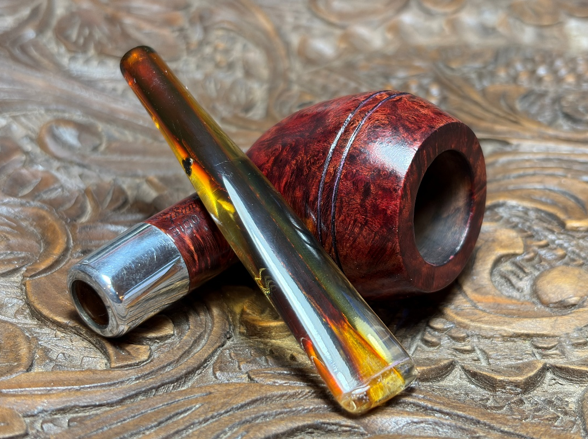
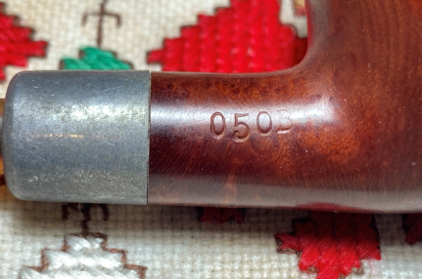 The bayonet stem appears to be acrylic with a beautifully inlaid black Kaywoodie clover or club (if you prefer cards) logo.
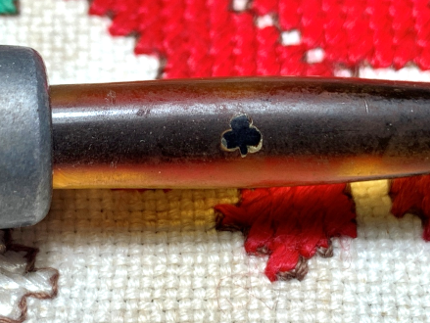 The Kaywoodie story is fascinating going back to when it was known as KB&B. The Pipedia Kaywoodie article was written by Bill Feuerbach III who I’ve had the privilege of interacting with when I reached out to him for information on another Kaywoodie project originally posted on Rebornpipes before I had my own website (Bringing to Life a Unique Kaywoodie Natural Burl 33 – Another Legacy Pipe of a Great Grandfather | rebornpipes). A compressed history description can always be found at Pipephil (Early Kaywoodie — Pipes : Logos & Markings):
Kaywoodie began as a line of pipes offered by KB&B (Kaufman Brothers & Bondy) in 1919 (see also Dinwoodie). Ultimately, KB&B changed its corporate name to “Kaywoodie”. It became a brand of S. M. Frank & Co from March 1955.
For the deep dive, Bill Feuerbach’s Pipedia article is a must read (Kaywoodie – Pipedia). This is where I began my research. The first question I had when I looked at this Kaywoodie was the shape number: 050B. I could not find this shape number in any of the Kaywoodie shape lists and there are many. What I did find was a 50B in a number of the catalogs which consistently pointed to a Medium Bulldog with a round shank – the second pipe in the 1947 catalog below (Kaywoodie_1947.pdf) is a good example. The only thing this 50B has in common with the pipe on the worktable is that it is a Bulldog stummel.
 The nomenclature also indicates that it is a ‘Standard’ grain which is used with many shapes and lines.
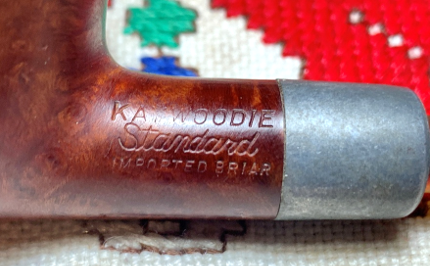 At the end of the Pipedia Kaywoodie article is a link for an offsite document called Kaywoodie Pipe Names (Kaywoodie_Pipe_Names.pdf). I clipped the section of the page that gives the information about the ‘Standard’ grain quality. It was introduced in 1950 and continues to describe the grain quality in several Kaywoodie lines.
 The following chart is from the 1970-71 Kaywoodie Shape Chart, originally courtesy of the now defunct ChrisKeene pages but posted in Pipedia: Collector’s Guide to Kaywoodie Pipes – Pipedia. The relevant shapes are listed across the top – the 50B is listed – and the relative price point values on the left. Let us say, Standard quality Kaywoodie lines were affordable for college students depending on Dad’s stipend to make ends meet!
 All the data so far about the nomenclature of our pipe is general – it does not identify the line of this unique pipe. The next step to try to turn up more information was to see if I could find a picture of the pipe in the Pipedia article. There are a bunch of pictures in the main Kaywoodie article, but no pipe with the unique characteristics of a bayonet or military mounted stem, an aluminum shank ferrule and what appears to be an acrylic stem which I originally thought might be Bakelite. At the end of the main Kaywoodie article are links to historic Kaywoodie catalogs – 1937, 1947, 1955, 1964 and 1970. Next, I took the plunge looking through each catalog to find THE PICTURE that might help identify our pipe. Since the Standard grade was introduced in 1950, I started my search in the 1955 catalog, looking only at the pictures. Finding nothing, I moved on to the 1964 catalog and that’s when I THINK I’ve hit pay dirt (Kaywoodie_1964.pdf)! The catalog’s quality isn’t great, but what I see gives me pause. The page clipping below shows a Tuckaway line. The pipes all have the metal ferrules and the second pipe down is obviously the Bulldog. The bayonet stem has the same shape – bowing out midway and then tapering down to the button. The heading has a ‘New!’ indicator along with information about the stem: “Push-bit contruction”. The ad picture of the Tuckaway pipe on the top appears to have the clear stem – acrylic. This dealers set comes with a pocket pouch for each pipe. Not bad!
 With a name now to refine and focus the search, I’m able to discover additional information. First, I return to the Kaywoodie Pipe Names document that gave information about the Standard grain time frame to see if Tuckaway was listed. This time the whole page is posted below (Kaywoodie_Pipe_Names.pdf). More helpful information is discovered. Marked in the red box are listed the various Tuckaway grain designations. The Tuckaway Standard is described with the production dating of 1961 to 1966.
 I love it when one discovery begins a domino effect for more discoveriies. With Tuckaway now part of the equasion I recalled reading about Tuckaway when looking for the 050B shape number. In the intro to the Kaywoodie Shape Numbers (Kaywoodie Shape Numbers – Pipedia), exceptions to the normal numbering protocols are described for both the iconic Kaywoodie Chinrester and low and behold, the Tuckaway! Here’s what is says:
Tuckaway pipes will have three digits, starting with “0” followed by the appropriate two digit shape.
This solves the shape number question. I was able to unearth one more gold mine of information from Pipedia’s Guide to Kaywoodie Pipes (Collector’s Guide to Kaywoodie Pipes – Pipedia) in the section entitled, ‘Notes on Kaywoodies Introduced between 1955 and 1968’.
Tuckaway. The 1955 catalog shows a Drinkless Tuckaway that was simply a smaller version of other Kaywoodie styles. The Tuckaways of the 1955-1968 period had military mountings, filter-free see-thru bits, and were packaged in a leatherette case. Available in Standard, Relief Grain, and Super Grain grades ($6-$8, depending on grade). Miniatures. Two-inch miniature replicas of “their big brother”, complete with the Drinkless fitment and Synchro Stem. The catalogs show these as individually-cased pipes but multiple pipe sets were apparently available. Price: $5.
From this entry, it seems that Kaywoodie had produced two versions of the Tuckaway pipes. One version was simply a miniature of the ‘big brother’ indicated by the shape number minus the 0. The other version I am deducing is like the one on our table that was introduced in 1961 with the unique characteristics of the ‘see through’ stem, military mountings, etc. What caught my attention was that the 1955 Kaywoodie catalog was cited as having the example of the first version Tuckaways – simply miniatures of various pipe shapes. When I went through the 1955 catalog earlier looking for clues to identify the line I was looking only at pictures. I decided to go back to the 1955 catalog and take another look. Well, bigger than an elephant in the room I discover the page dedicated to 1955 Tuckaway pipes which are pictured below. As advertised, these Drinkless Tuckaways were indeed miniatures with vulcanite stems just like their big brothers and probably would have 4 holed metal stingers if we could see an example. The ‘version 2’ Tuckaway ad that I first discovered, boasted that the Tuckaway pipe set was ‘New’ – which most likely meant that they were not simply miniatures but had new characteristics and even came with a leather pouch!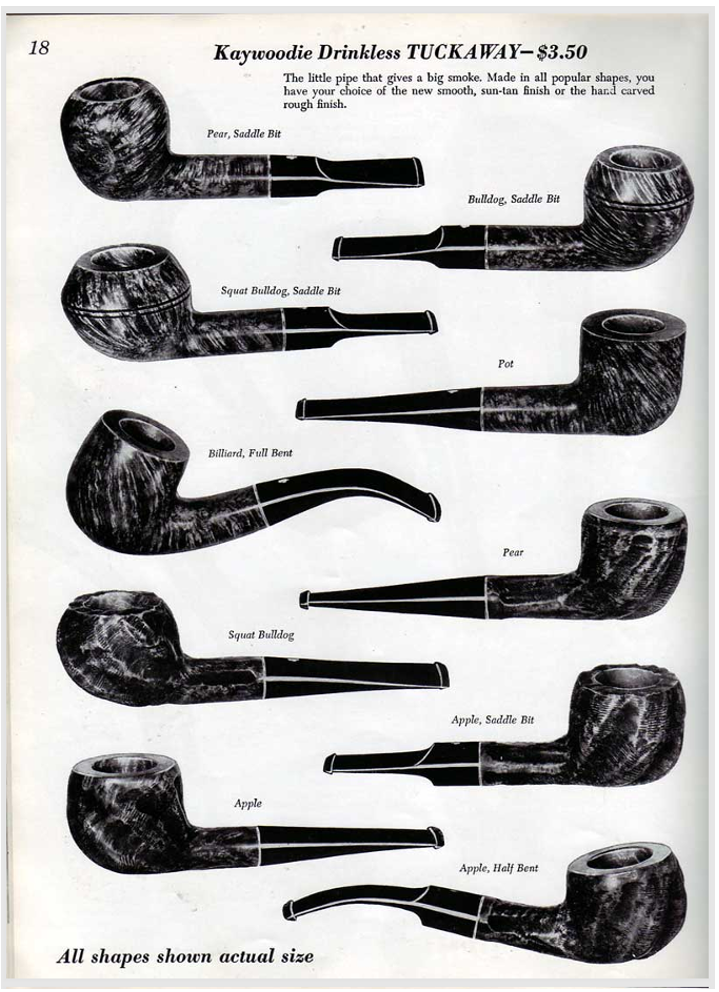 I love research projects like this when I discover the provenance of a pipe from the pages of history preserved. Now, the Kaywoodie on the table is not just an interesting little quirky pipe, but now he has an identity and I can safely say, I’ve seen no other like him. So, perhaps we can say he’s even rare and he deserves another go at it. With a deeper appreciation for this Kaywoodie Tuckaway Standard Bulldog, it’s time to take a closer look at the pipe itself. The stummel’s finish looks pretty good overall. The chamber has a light cake which will be cleaned for the new steward to develop a new cake protective layer.
 The rim shows some darkening from the lighting practices of the former steward.
 Generally, the finish hue is really attractive – I like the patina. There are a few dents on the smooth briar stummel surface which light sanding should take care of.
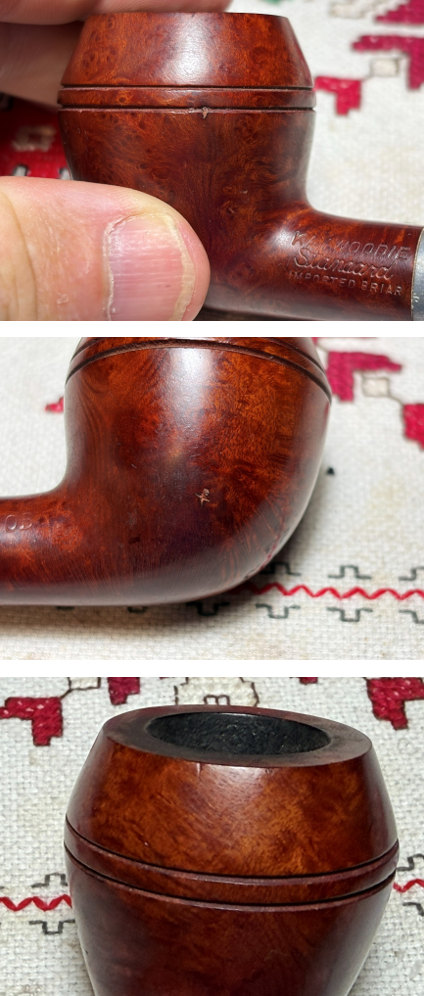 The acrylic stem has been mauled. It appears that the former steward loved this pipe and used it a good deal hands free by the looks of the severe chatter on both upper and lower sides. If the original stem was clear, the airway staining is also significant and it will take a good bit of effort to lighten it up.
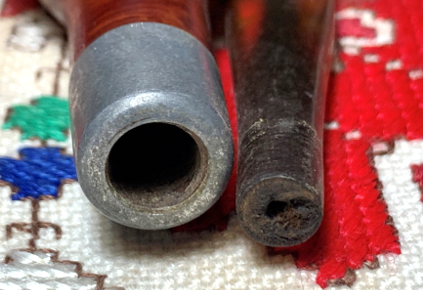
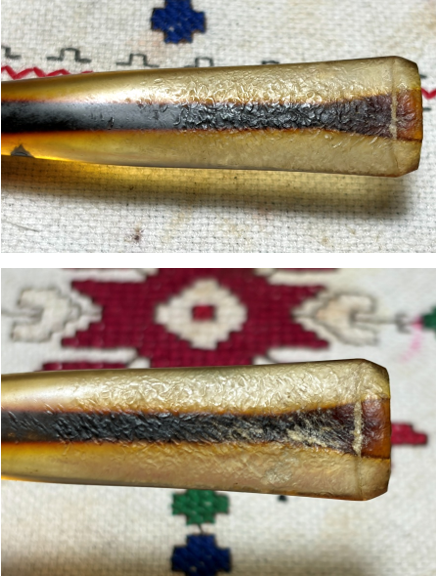 Sometimes I’m not sure if a fitment is nickel or aluminum. This shank cap appears to be aluminum for a couple of reasons. The oxidation is a rough greying effect and there is no magnetic pull for aluminum. There is a small amount of magnetic pull with nickel. The cap needs to be cleaned to bring it back to a nice shine.
 To begin, I decide to tackle the stem. Using pipe cleaners and isopropyl 99%, I go to work. I discover very quickly that the inner airway stain is not going to budge at all with alcohol and pipe cleaners. Next, to add additional torc to the cleaning, the bristled pipe cleaner is locked in the vice and then holding the other end, the stem is moved quickly back and forth. No progress is made.
 Next, Soft Scrub is used with its bleach base. I’m hopeful that a soak overnight might make some progress.
 The next day, the Soft Scrub soak didn’t make a dent. It’s looking like the stem will continue to show this stain even though the airway is clean as a whistle. The tars and oils that have set in the airway over the years have been absorbed into the acrylic itself. One last idea is to give the stem another long soak in an Oxyclean mixture. Oxyclean is also used to raise oxidation in vulcanite stems. We’ll see if it helps the stained acrylic.
 With the stem in the soak, I continue with the stummel. First, the chamber is reamed with the Pipnet Reaming Kit. I fresh start picture is shows the light carbon cake buildup.
 With the reaming kit, the smaller 2 of the 4 blades available are used.
 While reaming, the aluminum shank cap came loose which makes cleaning it a lot easier.
 Reaming is followed by using the Savinelli Fitsall Tool which scrapes the harder to get places at the floor of the chamber.
 Finally, the chamber is sanded with 220 grit paper which removes the final vestiges of carbon cake.
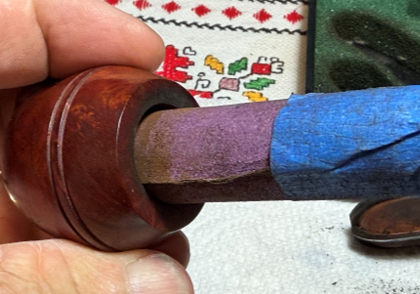 The full arsenal of tools is shown followed by a healthy chamber – no heating issues.
 Next, the external briar is cleaned. First, a picture is shown of the lava flow on the aft part of the rim to mark the progress.
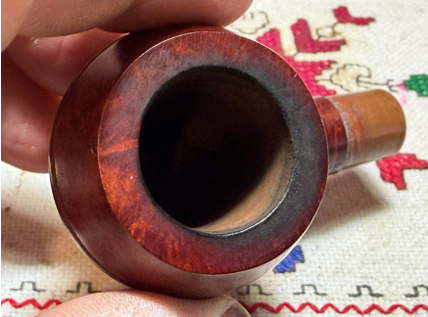 The cleaning starts with undiluted Murphy Oil Soap and a cotton pad. A sharp dental pick helps by running along the dome grooves removing caught debris.
 The darkened charred area of the rim is scrubbed with a brass brush. The brass brush is helpful by applying a bit more muscle to the cleaning but is not too invasive to the briar.
 After the scrubbing, the stummel is taken to the utility sink where cleaning of the internals begins. Shank brushes are used with anti-oil liquid dishwashing soap and warm water. After scrubbing, the stummel is rinsed thoroughly and returned to the worktable.
 Next, the cleaning of the internals is continued with pipe cleaners, cotton buds and isopropyl 99% alcohol. A dental spoon also is used to scrape the mortise wall to remove tar and oil gunk. But as the picture shows, the internals were in pretty good shape.
 With the stummel cleaned, attention is turned back to the stem. It has been soaking overnight in a solution of Oxyclean. After fishing the stem out of the soak, the airway was cleared with a bristled cleaner and then a smooth pipe cleaner moistened with isopropyl 99% alcohol to clean the Oxyclean solution. As you can see from the picture below, it made no progress on erasing the stain. At this point, this stain becomes a sign of this Kaywoodie Tuckaway’s journey 😊. Moving on.
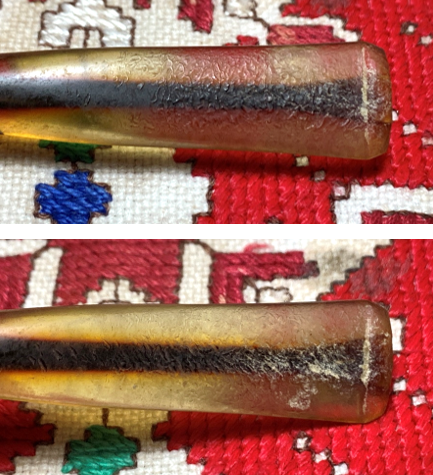
 The stem is chewed all the way up to the midsection – severe tooth chatter. The underside of the bit also is severely chewed and compressed at the bit (second photo). The whitish residue shows this area on the lower bit.
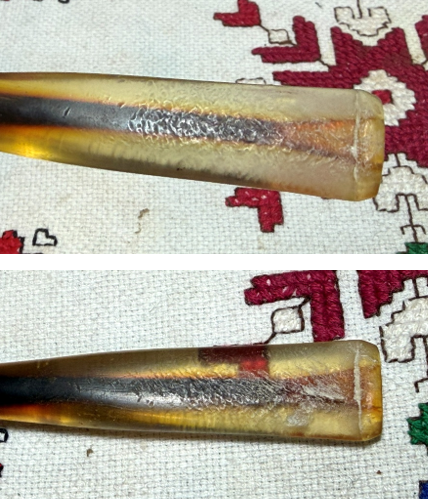 Before applying patch material to the area on the underside of the stem, I want to first give the stem an initial sanding with 220 grit paper. By doing sanding first, the areas not smoothed then become candidates for a patch with clear CA glue. Another reason to sand first is to minimize the visual damage. The patch material is clear and it’s good to clean up the stem as much as possible so that the damage is not sealed underneath the clear patch. The goal with patching on clear acrylic is to not see the patch at all, but the stem beneath the patch. 220 grit paper is used on the entire stem and looking at the lower bit, the cavity is visible with the dust collected.
 The sanding with 220 grit paper is done for the moment.
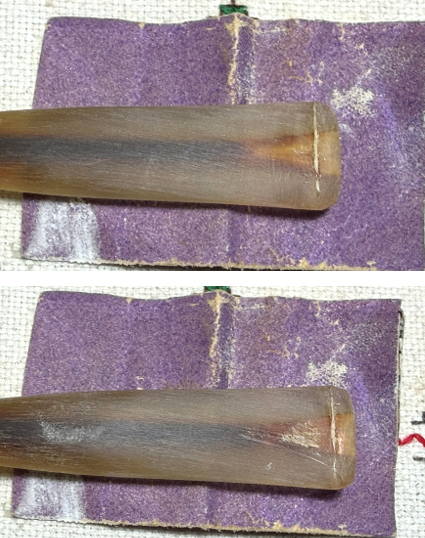 The bit is wiped with a cotton pad moistened with isopropyl 99% to remove the sanding debris.
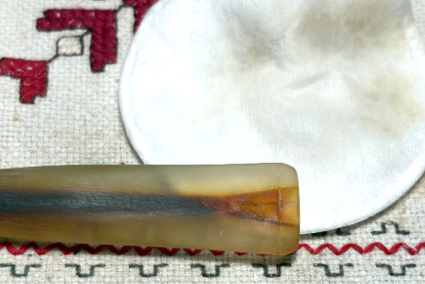 First, CA glue is applied to the lower bit filling the damaged compressed area. The button is also given a coat of CA glue to build up the worn button. After applying the CA patches, the patches are sprayed with Starbond Accelerator to quicken the curing process.
 The upper button lip is also given a coat of CA glue to build it up and then sprayed with accelerator.
 Using flat and square needle files, the patch mounds are filed down. The button lips are also filed to help shape the button.
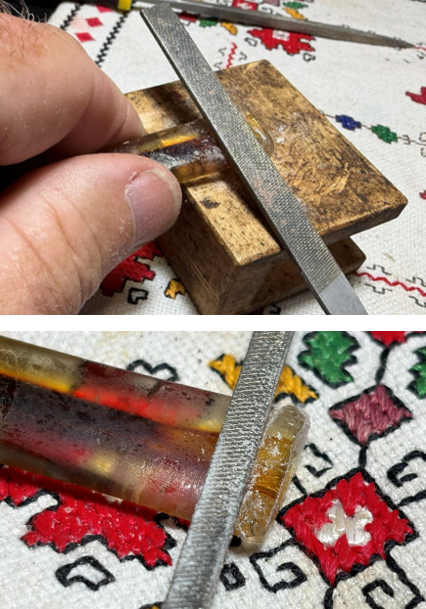 After filing, the bit and button are sanded with 220 grit paper to erase the file marks and to smooth the surface.
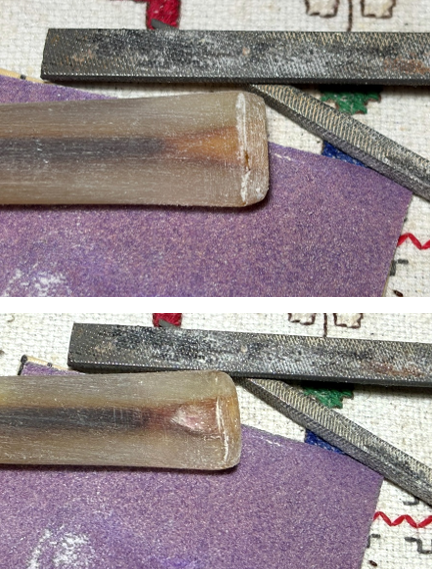 The entire stem is sanded next with 320 grit paper.
 Next, the stem is wet sanded with 600 grit paper and then 0000 grade steel wool is applied. The second picture show the underside of the stem and bit where the main damage was. This is a good example of what I mentioned earlier about the patch material being clear so it shows the damage that was beneath the patch. Unfortunately, the damaged area is still visible, but the bit is now smooth as a baby’s butt. 😊
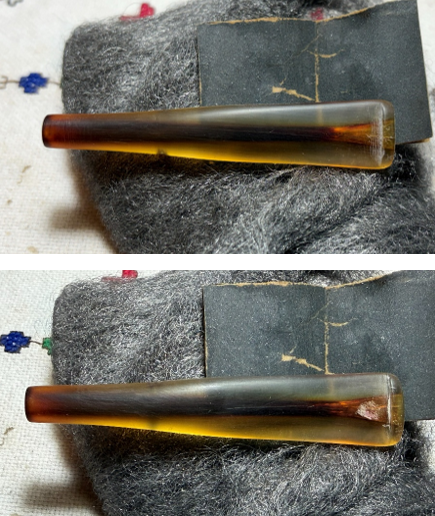 Continuing with the stem, next the stem transitions from sanding to polishing with the full regimen of 9 micromesh pads. Between each pad, Obsidian Oil is applied to the stem. First, pads 1500, 1800 and 2400 grades are used.
 The second set of 3 pads are 3200, 3600 and 4000 grits.
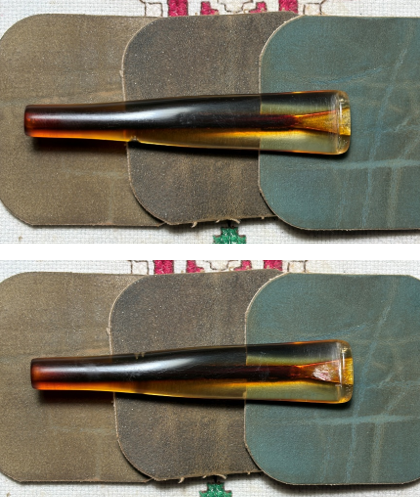 Finally, pads 6000, 8000 and 12000 are applied. The stem has come a long way from the mauled state it was in. The patch on the underside of the bit is still visible but the stem is good to go.
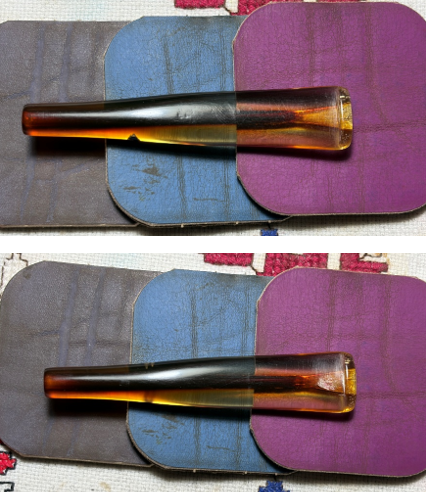 After the cleaning of the stummel, much of the finish on the rim came off. This is touched up a bit with a Maple dye stick.
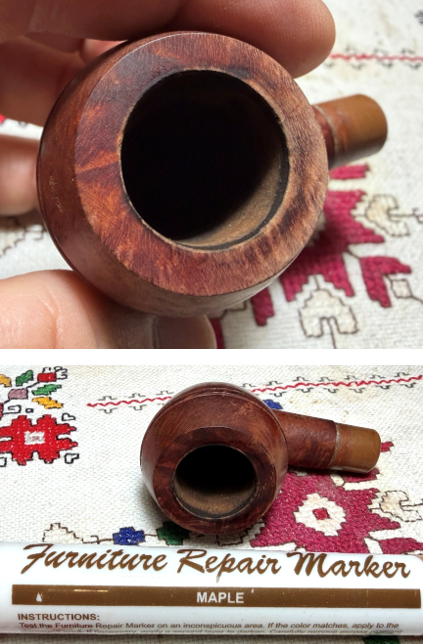 I had noted a few blemishes in the briar earlier. After looking at them again, I believe they are small enough that sanding with micromesh pads will address them adequately. The stummel is next sanded with micromesh pads and between each pad the stummel is wiped with a damp cotton cloth to remove the dust and to give the next pad better traction. The first set of pads is 1500, 1800 and 2400 grits.
 The second set of pads are 3200, 3600 and 4000 grits.
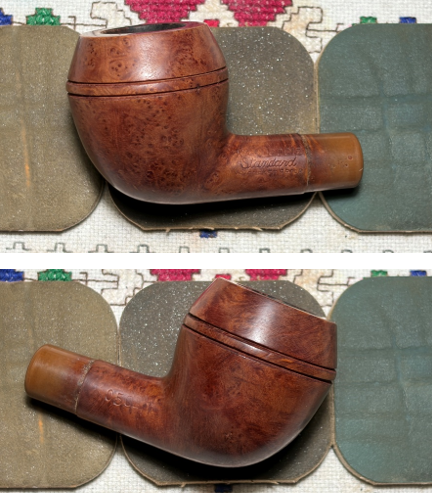 Finally, pads 6000, 8000 and 12000 are applied.
 At this point in the process, after the stummel cleaning and sanding with micromesh pads, it’s apparent that the original finish has faded significantly. The original factory finish was a reddish hue (pictured on the left) and we’re now looking at a brown/tannish hue which does not catch the eye. I have worked on some Kaywoodie 500s in the past that had very similar finishes – if not the same (Renewing Paw’s Kaywoodie “500” Round Shank Bulldog – The Third Pipe of a Great Grandfather’s Legacy | rebornpipes). We’ve come to the point of decision regarding applying a fresh dye.
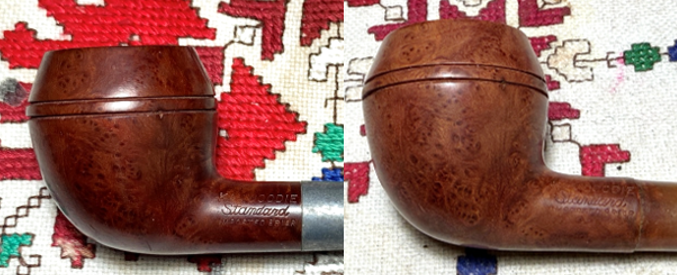 It doesn’t take long to decide in the affirmative. The approach that I took with the Kaywoodie 500 was to apply an undercoat of black or dark brown followed by an overcoat of red. The purpose of the undercoat is to bring out more grain definition and then the hue is set by the overcoat. This should emulate the factory finish having some ‘pop’ as when it came from the factory back in the early 1960s. To help prepare the surface, the stummel is wiped with acetone on a cotton pad to remove residual finish.
 Next, the briar is prepared to receive the undercoat which will be Fiebing’s Black Leather Dye. First, the stummel is warmed with the hot air gun. This heating helps to expand the grains resulting in the grain being more receptive to the dye.
 Next, Fiebing’s Black Lether Dye is applied using a folded pipe cleaner in sections to the stummel and then ‘flamed’. The dye is an aniline dye and while it is still wet, the flame of the candle ignites the alcohol in the dye and it immediately burns off leaving behind the dye pigment. The painting and flaming section by section continues until the entire stummel has been covered. A second cycle is done to make sure the covering is complete.
 The stummel is set aside for several hours to allow the new dye to settle in. In this case, overnight.
 The next day, it’s time to ‘unwrap’ the stummel to discover how the grain absorbed the black undercoat dye. To do this, a coarse felt cloth wheel is mounted on the rotary tool and with the speed set about 40% full power, Brown Tripoli compound is applied to the stummel to ‘plow’ the thick crusted layer of dye.
 The following pictures show the process of removing the excess dye from the briar surface leaving only the newly darkened and enhanced grains. The transformation is quite amazing to see the grain emerge. It takes a good bit of time and patience to go over the stummel surface applying the compound and purging the felt wheel often to soften it by running it on the edge of the lapboard I use for working during this process.
 After the felt wheel did the main plowing, the excess dye removal process is refined by again applying Brown Tripoli compound but this time using the softer and faster cotton cloth buffing wheel. The rotary tool speed is set faster to about 50% full power and the compound is applied again. The reason I do this a second time but with a cotton cloth wheel is two-fold. First, the felt wheel is not able to reach into the tight crook where the shank and bowl come together. The cotton cloth wheel is able to remove the excess dye there. Secondly, as the cloth wheel goes over the briar with the compound, even more excess dye is removed and it sharpens the grain even further.
 After wiping the stummel with a paper towel to dislodge compound caked on the surface and cleaning the Bulldog dome grooves, the undercoat finish is done.
 The next step is to apply Fiebing’s Red Leather Dye to steer the hue in the direction of the reddish Kaywoodie factory hue. Two approaches are stewing in my mind. Applying the overcoat of red can be done either with a simpler dye wash or by flaming as was done with the undercoat. A dye wash is done by applying the dye to the surface and just letting it dry. This is followed by a lot of buffing and heating of the stummel to remove as much as possible the potential of dye leeching. This is particularly an issue with new dye. When the pipe is first put into service and heated, the new dye can come off on the stewards hand – not good. This time I decide to apply the red aniline dye by flaming and then remove the excess dye in the same way as with the undercoat. First, the stummel is wiped with a cotton pad moistened with alcohol to remove any excess dye and as before, and heated with the hot air gun.
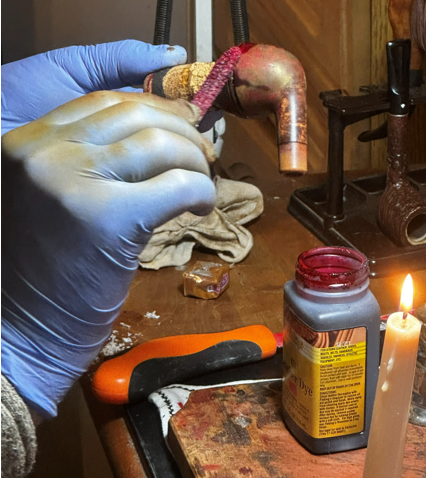
 As before, the stummel is painted section by section with Fiebing’s Red Leather Dye and while the aniline is still wet, the alcohol in the dye is ignited with the candle. Mid-stream, a new candle was put into service. Well, this doesn’t happen often! My wife was sneak peeking around the corner and caught me ‘painting and flaming’ the red dye. I can’t take a picture of this process with my hands full! This is a picture of the process and me in my ‘happy place’!
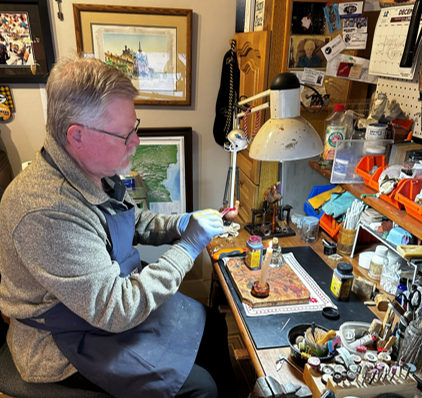
 After the dye has been applied, the stummel is set aside to allow the new dye to rest and settle in.
 One mini project can be addressed next. The aluminum shank cap is oxidized and dull. The main concern with polishing aluminum is that it is a soft metal and easily scratched. I start by cleaning the cap with a 1to1 solution of white vinegar and water.
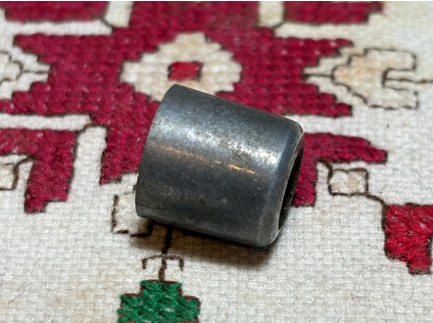 Following the vinegar cleaning, to address the thick oxidation white compound is used with a new cotton cloth buffing wheel. Not shown is that after applying the white compound, green compound also is applied which really brought out the gloss.
 After polishing, a microfiber cloth is used to buff the shank cap. The picture below shows the amazing transformation – nice! 😊
 After resting for several hours, the red wrapping is ready to unwrap using Brown Tripoli compound and a felt buffing wheel.
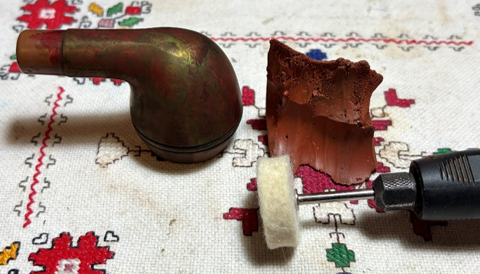 Following the unwrapping, the stummel is wiped with a cotton pad moistened with alcohol. This is done to help blend the new dye and to remove excess day.
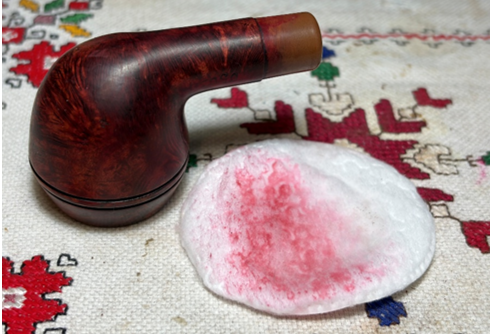 The rotary tool is next mounted with a dedicated cotton cloth buffing wheel and Blue Diamond compound is applied to both the stummel and to the stem. The speed of the rotary tool is set at about 40% full power.
 A felt cloth is used to wipe away the compound dust that collects on the surface during the application of compound.
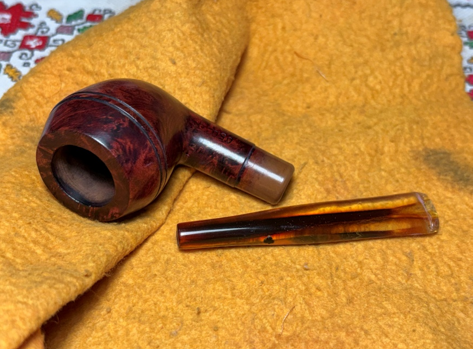 One additional step to help prevent the new dye from leeching is to emulate when the pipe is first put into service. The stummel is heated with the hot air gun which encourages leeching.
 Instead of leeching onto the stewards hands, the stummel is wiped with a paper towel while hot to remove the excess dye. There was surprisingly little red on the paper towel which is good news.
 The final step before applying wax is to remount the aluminum shank cap onto the shank. Using regular clear CA glue, some glue is placed on the end of the toothpick. The toothpick then circles the inside of the shank cap to spread the CA. Not too much CA is used because glue being squeezed out when the cap is mounted is to be avoided. It looks great!
 The final step is to mount another dedicated cotton cloth buffing wheel to the rotary tool and with the same speed, carnauba wax is applied to the stem and stummel – minus the shank cap. The pipe is then given a rigorous hand buffing with a microfiber cloth to remove excess wax and to raise the shine.
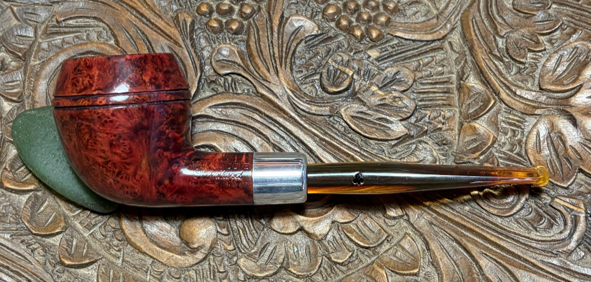
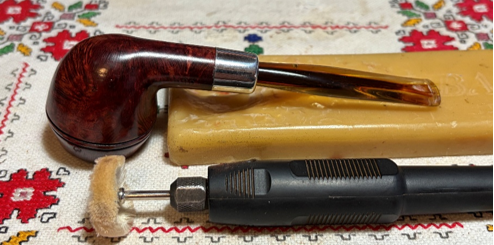 The transformation of this Kaywoodie Tuckaway Standard Bulldog is quite amazing. The value of the process of applying a black undercoat then a red surface coat can be seen in the comparison pictures. The grain pops and the red tone is almost exactly the same as the Kaywoodie factory. The restored cap and stem complete the picture. I enjoyed digging into the provenance of this early 1960s Kaywoodie Tuckaway which was designed to be a lightweight pocket pipe. Pipeman Donald commissioned this pipe and as the commissioner, will have the first opportunity to claim him from the Pipe Steward Store. A portion of all proceeds of pipes sold are used to support the work of the Daughters of Bulgaria (now called, Spring of Hope) – helping trafficked and sexually exploited women and girls. Thanks for joining me!
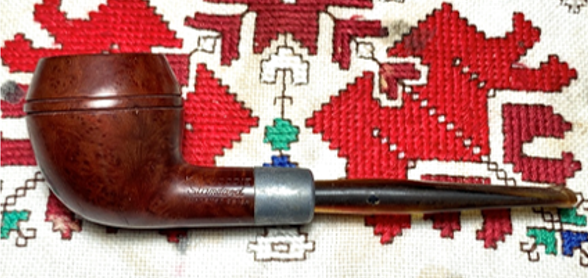


Pingback: A Kaywoodie Tuckaway Dublin Restoration – NebraskaPeteGeek