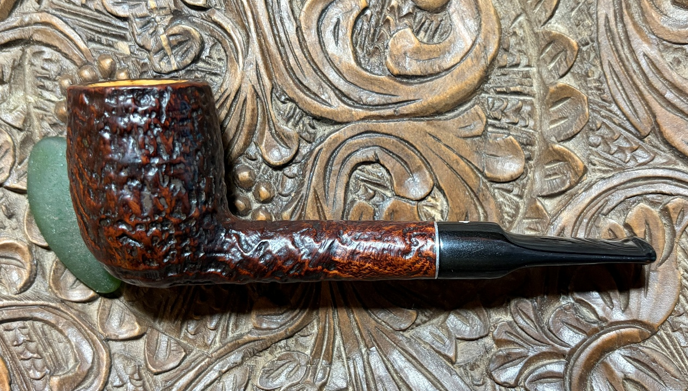
The next pipe on the worktable is another Kaywoodie commissioned by pipeman Don, who lives in nearby Ken Caryl, Colorado. The first pipe Don commissioned was a gem – a rare Kaywoodie Tuckaway which was produced in the early 1960s. Here is a before and after picture to show the transformation of this Tuckaway. The next Kaywoodie commissioned by Don came to me from a generous pipeman who has also commissioned pipes from The Pipe Steward and has donated pipes to be used to benefit the Daughters of Bulgaria, now called Spring of Hope. My wife and I cofounded this effort when we lived in Bulgaria. The aim was to reach out to women and girls on the streets who had been trafficked and sexually exploited. When these pipes arrived here in Golden, Colorado, I took the picture below that shortly joined other pipes in the For “Pipe Dreamers” ONLY! online ‘Help ME!’ baskets. The next Kaywoodie is shown on the bottom.
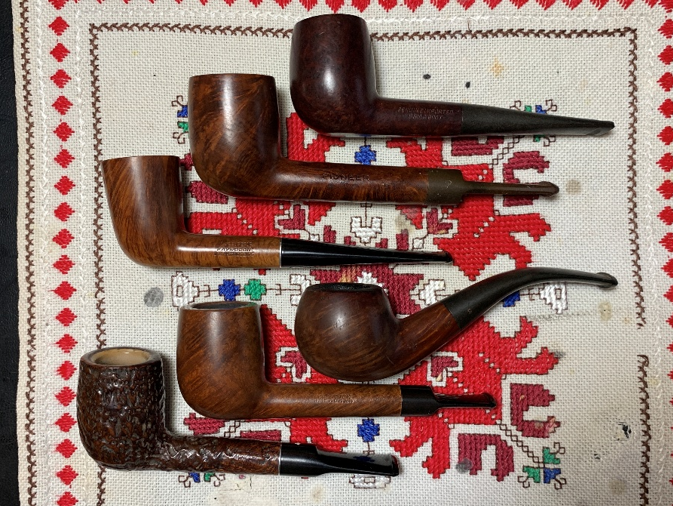 I found out from the generous pipeman that this Kaywoodie belonged to the father of his sister-in-law after he passed away in his late 50s. He said that her memories of her father always included a pipe. The generous pipeman wrote:
He always had a pipe in his mouth, and all her memories of him included a pipe. He was a white-collar worker, smoked at work and at home. She has fond memories of the smell and being around him as he enjoyed his pipe. They lived in Dallas, Texas.
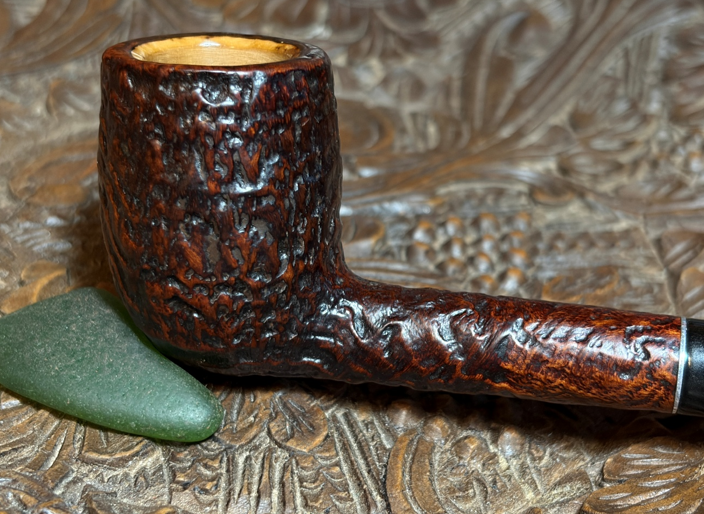
Here are more pictures of the Kaywoodie Shellcraft 5651S Meerschaum lined Blasted Billiard being passed on to a new steward.
 The nomenclature is stamped on the smooth briar panel on the underside. Starting to the far right is stamped: SHELLCRAFT [over] KAYWOODIE. To the left of this is stamped: IMPORTED BRIAR.
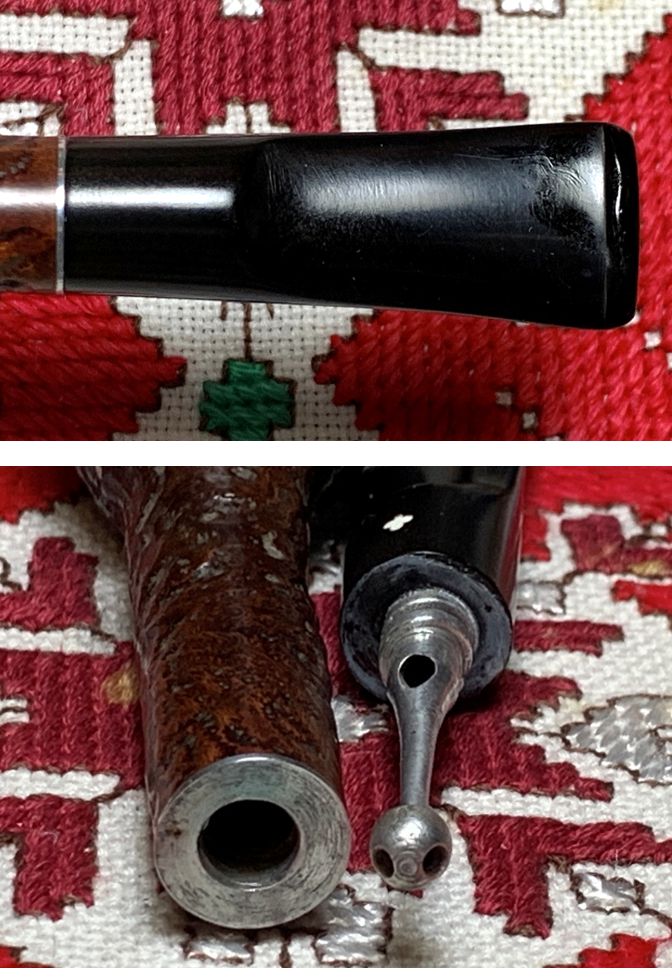
 In the interest of full disclosure, this pipe was listed in the For “Pipe Dreamers” ONLY! listings as a Lovat, a member of the Canadian family of pipes. Added to this, initially I only saw the shape number 565 stamped on the underside as shown in the picture below. I discovered in the research that I had missed a few markers that pointed to this pipe’s provenance in a different direction. To the right of the 565 (missing the 1) is stamped a very faint S. The ‘S’ is a standard marker for ‘saddle stem’. I’ll explain more below.
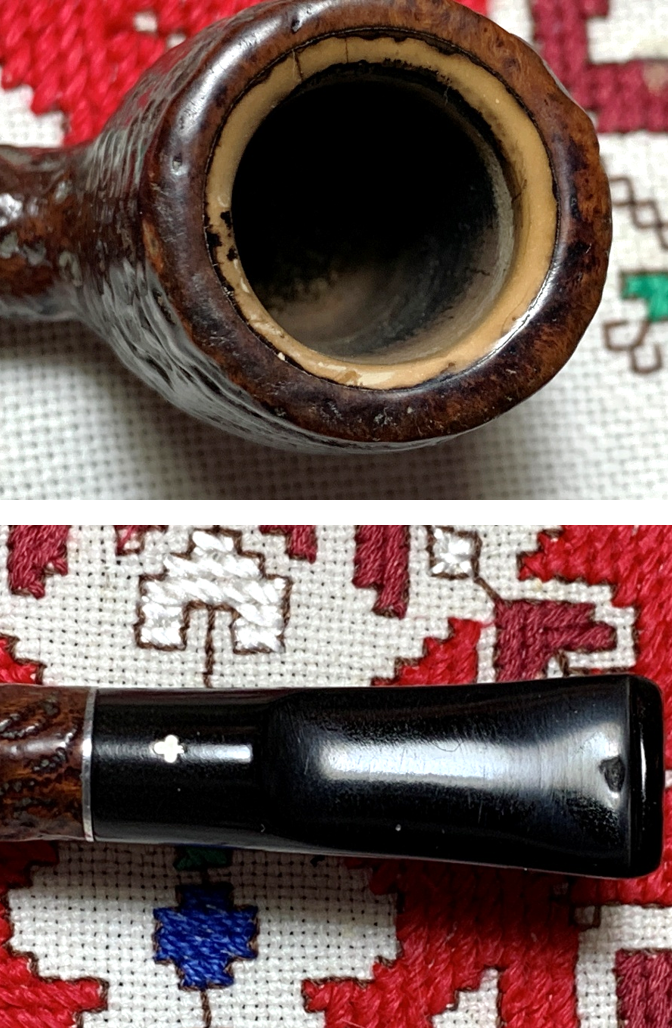
 The Billiard’s saddle stem has the inlaid Kaywoodie clover logo resting on the top of the saddle stem.
 To discover more about the Kaywoodie Shellcraft line and the origins of this pipe, I started with a basic search of the shape number 565. Turning to the Pipedia Kaywoodie Shape Numbers (Kaywoodie Shape Numbers – Pipedia) I found no 3-digit shape numbers listed. Next I went to the Kaywoodie ‘Tapatalk’ Forum (3 Digit Shape numbers – kaywoodie) by kwguy (aka Bill Feuerbach). Bill Feuerbach gave a historical background of why and when the Kaywoodie shape number system transitioned from 2 digits to 3. Here’s what he said:
Maybe a little background is in order. In 1972, we closed the West New York factory having completed construction of our new 197,000 square foot factory in Yapank on Long Island. The plan was to move all pipe production there, but in the interim, the Medico factory in Richmond Hill Queens would handle the final sanding and finishing of all of the Kaywoodie, Yello-Bole and Medico pipes. The thought was eventually those operations would also shift to Yapank as skilled workers could be trained to handle those operations. (A down turn in the pipe market in the seventies doomed the new plant, but that’s another story)
Having the three lines being finished in one building would create confusion if there were two shape numbering systems. So, a new 3 digit system was adopted. The Medico 3 digit system was also changed at this time. This list will have three columns of numbers. The first will be the “new” three digit number, used on all Kaywoodie and Medico pipes from 1972-1980. (We stopped stamping shape numbers in 1980) The second column is the Kaywoodie two-digit number, and the third column is the original Medico 3 digit number, all of which refer to the same shape.
Based upon this information, the dating of the Kaywoodie Shellcraft on the worktable would be between 1972 to 1980 (when shape number ceased) since this was the period of 3-digit shape numbers. However, this was not lining up with other markers from the pipe.
The first obvious dating marker that didn’t gel with the 1972 to 80 dating was the Drinkless metal stinger. Our Drinkless stinger has the coveted 4-hole ball on the tip. According to Pipephil (Document: Kaywoodie’s Drinkless patent — Pipes : Logos & Markings) the Drinkless fitment was introduced in 1924 under the Patent #213598 and until 1931 had push bit stem. If you look closely in the picture on the right, you will notice the patent number stamped into our stinger. Again, according to Pipephil (Document: Kaywoodie’s 3 hole stinger), the precise date that Kaywoodie switched from 4 hole stingers to 3 can’t be precisely determined but also stated, “Four hole stingers MAY STILL occur on pipes in the 60’s”. I take this observation to mean that by the 1960s, 4-hole stingers were the exception not the rule. If this is the case, then a dating of the Shellcraft with a 3 digit shape number in the 1970s does not jive. Next, I transition from the stinger to look specifically at the Shellcraft line. I discovered that Pipephil points to 3 iterations of Kaywoodie Shellcraft pipes. The first is describe below as ‘The Drinkless Shellcraft’ (Early Kaywoodie — Pipes : Logos & Markings). This is the first production that came out with the new Drinkless fitments in 1924 but had a push tenon not the threaded metal fitment that came later.
 The next iteration, Shellcraft (Kaywoodie series from L to Z — Pipes) was crafted in the early 1930s with the Synchro-stem system – the metal fitment that was threaded and inserted into the shank. This version also introduced the white clover on top of the stem instead of the Drinkless logo on the first version. The panel below also describes that the early version was rusticated whereas the current version was blasted. We are now describing our Shellcraft on the worktable. The third version of Shellcraft was much later in the 2000s and was produced in Italy and has no relevance to our research. The question in my mind now is regarding dating: How long was the middle version of Shellcraft produced by Kaywoodie?
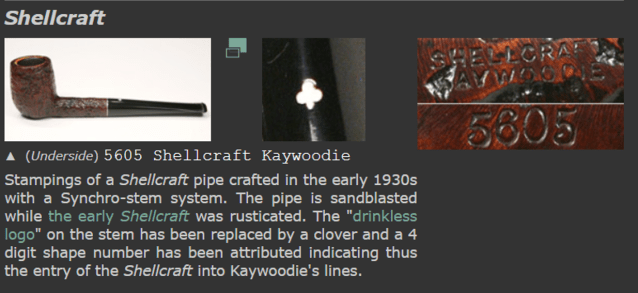 Another clue surfaced that helped to bracket when our Shellcraft was produced. In the initial introduction information that Pipephil provides on Kaywoodie (Early Kaywoodie — Pipes), there is a paragraph describing the evolution of the cloverleaf logo on Kaywoodie stems. Here is the information:
The cloverleaf logo: the round logo (black cloverleaf in white circle or white cloverleaf in black circle ) was first used in 1937. Up until the late 40’s this logo was used on all of the upper grades pipes. The concomitant use of the plain white cloverleaf and the disk inlaid logo continued until the early 80’s.
Up until the late 1940’s/early 50’s, the logo was on top of the stem. After that the logo was moved to the side of the stem (exceptions exist).
Our logo is on the top of the saddle stem. Of course, exceptions exist, but this piece of information helps to place the dating’s outside bracket – produced no later than the 1940’s and early 50’s. At this point I decided to jump over to www.Rebornpipes.com and check out if Steve can add any information about the Kaywoodie Shellcraft that I hadn’t already seen. A quick search brought me to a familiar post that I’ve referenced several times with past projects. Steve reposted a great post by Troy which I’ve used in the past repairing Meerschaum: Old Time Meer Lining Repair Method On a Kaywoodie Shellcraft #5651 | rebornpipes. My focus in the past on this post had been on the Meerschaum repair process NOT on the pipe which was the subject of Troy’s repair – a Kaywoodie Shellcraft #5651! Steve provided the link that took me to Troy’s website to see the original post (Old Time Meer Lining Repair Method On a Kaywoodie Shellcraft #5651 – Baccy Pipes). What I discovered was the golden nugget that answered questions for which I had no answers and WHY my assessment of our shape #565 was not describing a Lovat. Here’s what troy wrote about his Shellcraft:
I recently acquired this 1930’s 4 digit Kaywoodie Shellcraft #5651 from Ebay. Being a pre-World War II sandblast and one of my favorite Kaywoodie shapes (51). I decided to bid on it. The blast looked really nice and looked in general really nice shape.
My main concern was it had a meer lining that was damaged about the rim. This is most likely why I won the pipe so easily and with a low bid. I thought well it shouldn’t be that hard of a repair and the seller told me in a message that he could not see any cracks in the bowl. Well we were both wrong, but we will get to that. Stem had some tooth marks and the seller had listed the stinger was cut. Again no problem i thought , easily fixed. Unscrewed the stem and it was indeed cut.
I did some research on the Shellcraft line and they seem to be a rarer Kaywoodie line. I have seen a few on the pre- 1930’s push stem rusticated version’s but was not familiar with the post 1930’s sandblasted synchro stems.
From Pipephil
“The pipe is sandblasted while the early Shellcraft was rusticated. The “drinkless logo” on the stem has been replaced by a clover and a 4 digit shape number has been attributed indicating thus the entry of the Shellcraft into Kaywoodie’s lines.”
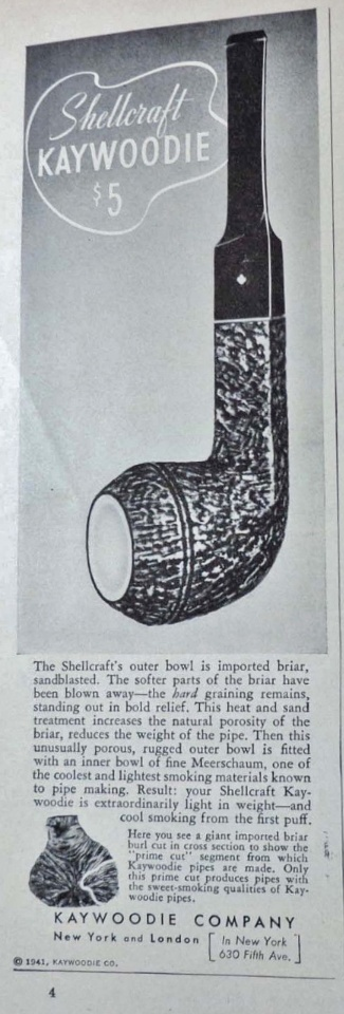 I did some digging in online Magazines on Google and could only find one ad from Popular Mechanics dated Dec.1941. In the 1930’s- early 1940’s five dollars would be about almost a 100 dollars today.
Seems they were made up until the beginning of World War II. All the 1930’s-1941 examples I have found seem to be meer lined and carry the prefix of 56. The pipes are not stamped meer lined so if you run across one be careful with the reamers so that you don’t crack them, they seem to fall prey to that from the only few I could find any pictures of.
I clipped the 1941 ad that Troy had found in the December edition of Popular Mechanics. Troy had assessed that 1941 dollars were worth about 100 dollars when he posted in 2017. My check for 2025 dollars placed the value of the Kaywoodie Shellcraft at about $107!
I haven’t seen the ‘examples’ Troy referred to, but his assessment was that the Shellcraft was produced up to the beginning of WWII which was when briar was in short supply. However, the bit of information that caught my attention the most was that he described the Shellcraft line as having a prefix of 56! It was like the lightbulb went off in my mind. Earlier Troy described his pipe:
I recently acquired this 1930’s 4 digit Kaywoodie Shellcraft #5651 from Ebay. Being a pre-World War II sandblast and one of my favorite Kaywoodie shapes (51).
If the first two digits are a special prefix pointing to the Kaywoodie Shellcraft line – 56, then the final two digits point to the actual shape number – 51. But the last time I looked at the nomenclature, my Shellcraft only had three digits…. until I looked again with a closer focus. Unbelievable. What I thought was a scratch was a faint 1. I have the exact same Shellcraft as Troy except for the addition of the “S” – saddle stem. With this new information I return to the Kaywoodie Shapes Chart I referenced from Pipedia which comes from the Kaywoodie Forum (Kaywoodie Shape Numbers – Pipedia) and it describes the 51S as: Large billiard, saddle stem. Not a Canadian Lovat.
 The shape #51S is described above as being produced in various lines from 1938 to 1970. The earliest Kaywoodie catalogs available in Pipedia start with the 1937 catalog which is one year earlier than the introduction of the 51S – large billiard with a saddle stem. So, I look through the next earliest catalog in 1947 (Kaywoodie_1947.pdf), and my search is rewarded with an example of a 51S – the last pipe on the page below.
 The Kaywoodie Shellcraft appears to be a rare bird. If our dating is consistent with Troy’s observations, our pipe was most likely produced beginning in 1938 into the 1940s. To conclude this deep dive into the provenance of our Kaywoodie Shellcraft, the 1941 Popular Mechanics ad that Troy found provides us with Kaywoodie’s appeal to the 1930s and 40s pipe man, why he needs to shovel out an expensive $5 for a pipe:
The Shellcraft’s outer bowl is imported briar, sandblasted. The softer parts of the briar have been blown away—the hard graining remains, standing out in bold relief. This heat and sand treatment increases the natural porosity of the briar, reduces the weight of the pipe. Then this unusually porous, rugged outer bowl is fitted with an inner bowl of fine Meerschaum, one of the coolest and lightest smoking materials known to pipe making. Result: your Shellcraft Kaywoodie is extraordinarily light in weight—and cool smoking from the first puff.
With a greater appreciation for the Kaywoodie Shellcraft on the worktable, it’s time to take a closer look at the pipe itself. There is no doubt in my mind that this pipe was well loved and cared for. For a pipe that’s about 85 years old, it’s in pristine condition. The Meerschaum lining, unlike Troy’s ailing Shellcraft, appears to be in good condition. There are normal ‘aging’ lines and discoloration on the Meerschaum rim, but the Meerschaum appears to be solid.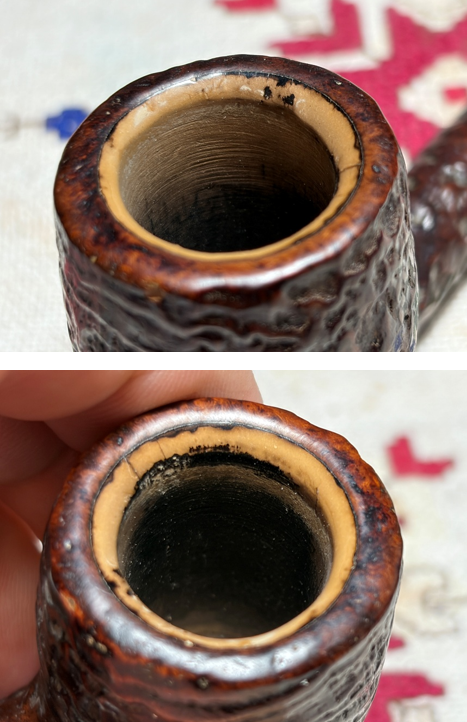 The blasted surface is very expressive and needs normal cleaning.
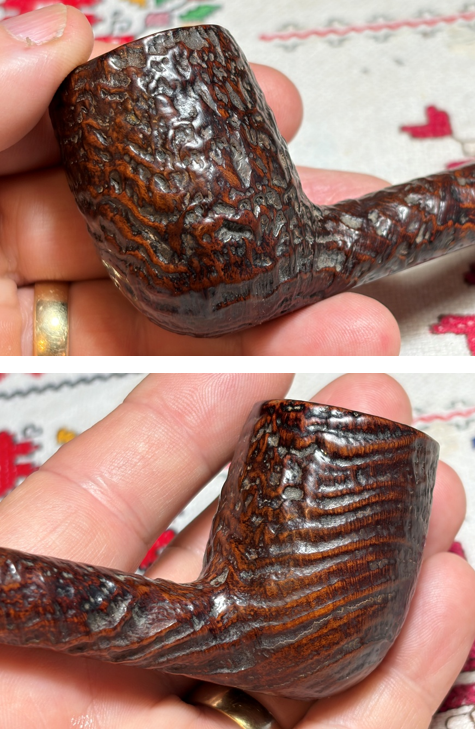 There are two chips on the edge of the rim in the front and back which needs attention.
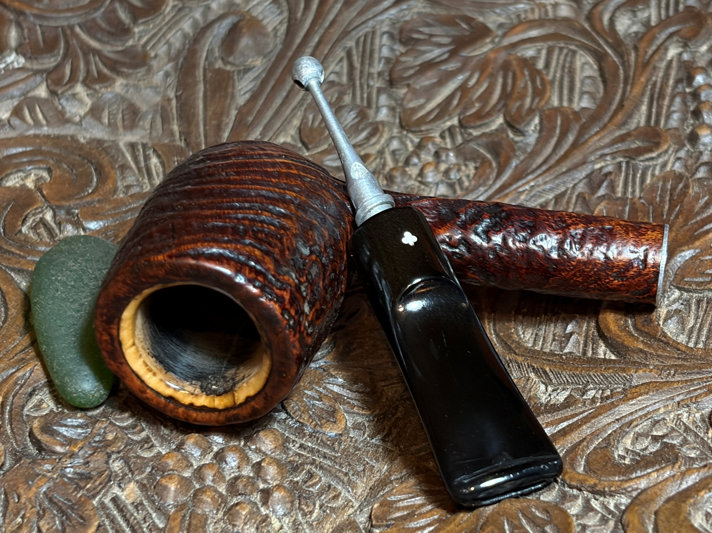
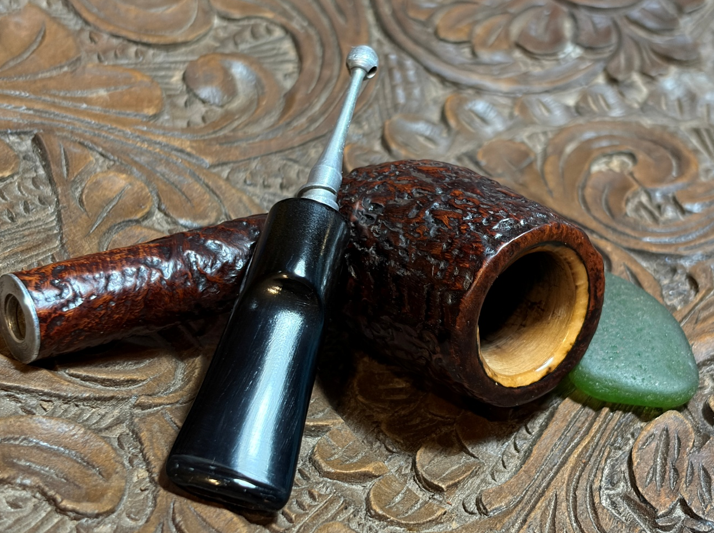
 The short saddle stem has no oxidation but has some bite compression on the upper and lower bit and button.
 To begin refreshing the pipe, the Meerschaum chamber is given a very light sanding. The approach with Meerschaum is ‘less is more’. The chamber is lightly sanded with 220 grit paper wrapped around a Sharpie Pen. The thin Meerschaum rim inside the briar is given a very light sanding. It’s not a problem to have coloration in the Meershaum on the rim with a nice yellowish patina. This sanding provides a cleaning of the Meerschaum surface. A note for a new steward: A protective cake is not needed with Meerschaum and the Meerschaum should be cleaned to avoid the growth of a cake. Also, never use a metal reaming tool on the Meerschaum lining – it will most assuradly crack. Simply scrape the wall lightly with a folded pipe cleaner or lightly scrape with a pipe tool after each use.
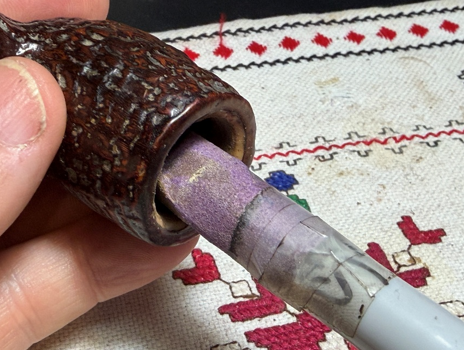 Next, the external blasted briar is cleaned with Murphy Oil Soap and a cotton pad. After the scrubbing, the stummel is taken to the sink and the exterior surface is rinsed with cool water.
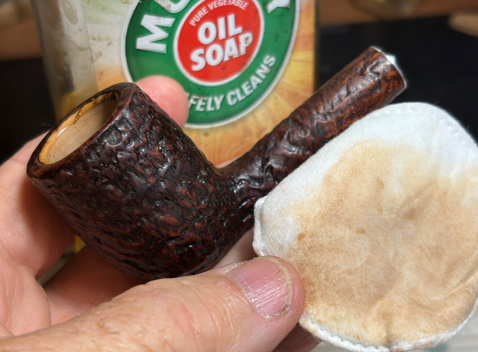 The internal cleaning begins with cotton buds moistened with isopropyl 99%. The internal walls are also scraped using a small dental spoon excavating tars and oils. The internals were pretty nasty, and it took a lot of cotton swabs and excavating to get the job done.
 The chips on the front and back of the rim need to be addressed.
 The chips are touched up with a Mahogany dye stick. The rim looks good.
 To condition the blasted briar, Mark Hoover’s ‘Before & After’ Restoration Balm is used (www.Lbepen.com). The Restoration Balm does a great job bringing out the natural hues and conditions the briar. After some of the Balm is placed on the fingers, it is worked into the briar thoroughly. The stummel is then set aside for about 10 minutes for the Balm to be absorbed and do what it does.
 After the time has passed, the excess Balm is wiped off with a dedicated microfiber cloth and buffed up.
 The stem is next. The airway did not take much effort to clean with pipe cleaners moistened with isopropyl 99% alcohol.
 There is a bite compression on the top side of the bit. In the picture below, the button has been clenched a bit.
 To try to minimize the compressions, the vulcanite is painted with the flame of a Bic lighter. As the rubber warms, physics cause the rubber to expand and regain its original form or closer to it. As the pictures show below, this approach did not help a great deal this time.
 To address the compressions, first black CA glue fills the large bite compression on the upper bit. The lower bit has compression on the button lip. Black CA glue is laid over the area. The patches are both sprayed with an accelerator to quicken the curing process and to hold the patches in place.
 After cured thoroughly, a square needle file goes to work to remove the excess patch material and to refresh the button lip edges – upper first.
 And then the lower bit is filed.
 Next, 220 grit paper is used to sand and smooth the filing marks – upper and lower.
 The same is done next with finer 320 grit paper – upper and lower.
 Moving to the finer sanding, the lower stem in wet sanded with 600 grit paper and followed by applying 0000 grade steel wool.
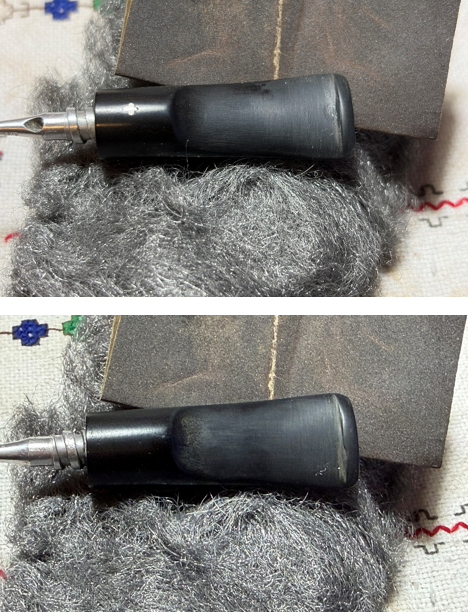 After an inspection of the lower button lip, there remains a divot into the lip. I noticed during the sanding of the button, that both upper and lower button lips were thinning so that the hang edge was not very useful.
 The decision is made to build up both upper and lower button lips with black CA glue. This will also fill the divot on the lower side.
 After the button build patch is cured, 220 grit paper is used to sand and shape.
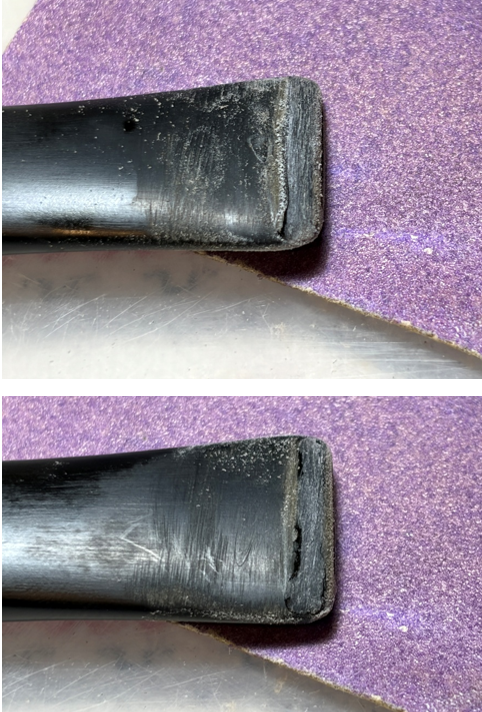 Again, 320 grit paper is used on the lower stem.
 Again, the lower stem is wet sanded with 600 grit paper and steel wool is applied. I like the button now much better.
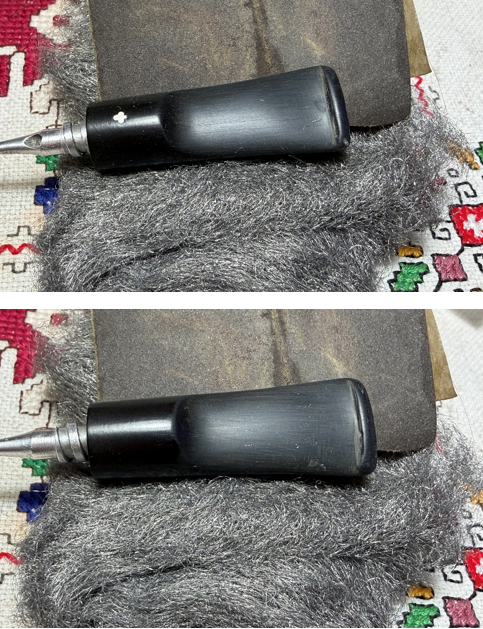 Sanding extends now to the whole stem with micromesh pads. To condition the stem and to help prevent oxidation, after the application of each pad, a light touch of Obsidian Oil is applied to the stem. The first set of 3 pads are pads 1500, 1800, and 2400 – upper and lower.
 The second set are pads 3200, 3600 and 4000 grades.
 The last set are 6000, 8000 and 12000 grade pads.
 To further condition and polish the stem, Mark Hoover’s ‘Before & After’ Fine and Extra Fine Polishes are used. First, the Fine Polish is worked into the vulcanite with the fingers. It has a grittier texture that the Extra Fine. After the Fine Polish has been worked in, the stem is wiped with a paper towel and the same is done next with the Extra Fine Polish. After working it in, the stem is wiped again with a paper towel to remove the excess polish. The stem looks great!
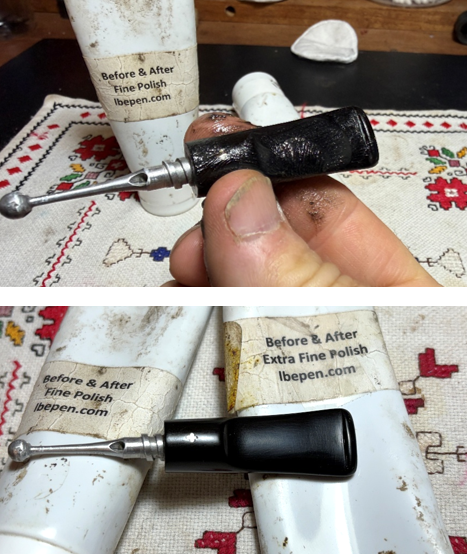 The final polishing with the stem takes place using the fine abrasive, Blue Diamond compound. A dedicated cotton cloth buffing wheel is mounted onto the rotary tool and with the speed set at about 40% full power, the compound is applied.
 A good bit of compound dust is generated by the application, and the stem is wiped down with a felt cloth to clean the dust and prepare the surface to receive the wax.
 After the stem and stummel are reunited, the final step is to apply carnauba wax lightly to the blasted Shellcraft stummel and to the stem. Another dedicated cotton cloth wheel is mounted and at the same speed, the wax is applied. After the application, using a microfiber cloth, the pipe is given a rigorous hand buffing to remove excess wax and raise the shine.
 When I began this project, I had no idea what a venerable pipe this Kaywoodie Shellcraft 5651S was. And it’s NOT a Lovat but in the Kaywoodie universe, a large Billiard with a saddle stem. The dating of this pipe is from 1938 to the 1940s. The production was interrupted most likely by the Second World War. The blasted briar texture reveals its age and is pleasing to the eyes. The Meerschaum lining of the Shellcraft is frosting on the proverbial cake. I’m thankful to the generous steward who passed his sister-in-law’s father’s heirloom to be passed on to a new steward. Pipeman Don commissioned this pipe and as the commissioner, will have the first opportunity to claim the Kaywoodie Shellcraft from the Pipe Store. A portion of the proceeds of all pipes restored help the work of the Daughters of Bulgaria, now called, Spring of Hope. Thanks for joining me!