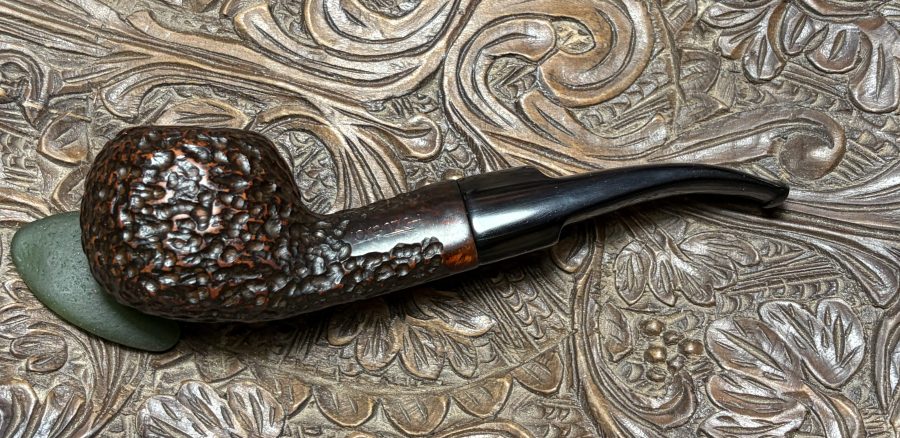
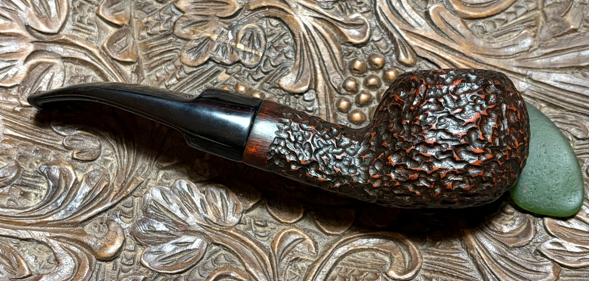
This is the third pipe Justin commissioned destined to be a gift for one of the fellows in his church home group or perhaps to his father. I came upon these pipes from Bulgaria in August 2021 and why did Justin want these 4 pipes found on the same pipe picking expedition in the coastal city of Burgas? His desire was to have all the Bulgaria pipes under one roof with his friends and Dad. Why pipes from Bulgaria? One of his fellows receiving a pipe, Drew with his family, worked with us for a few years in Sofia, Bulgaria’s capital city. Some of my fondest memories of Drew and Marianna were when our team (rather large!) met in their flat for special occasions, like Thanksgiving or Christmas. When they departed from Bulgaria returning to the US to reside in Alabama, they were greatly missed and appreciated. Here’s the link to Justin’s first commission for the full story (The First of Four Gifts From Bulgaria: A Prince Amled Danmark Freehand Pickaxe) and pictures of Gifts #1 and #2. The third pipe is a Lorenzo of Italy. I like the shape – a Bent Tomato that has a broad stocky shank and stem which gives it a muscular appearance. Here are pictures of the Lorenzo when I brought it home after acquiring it from one of my favorite antique shops in Burgas, Bulgaria:
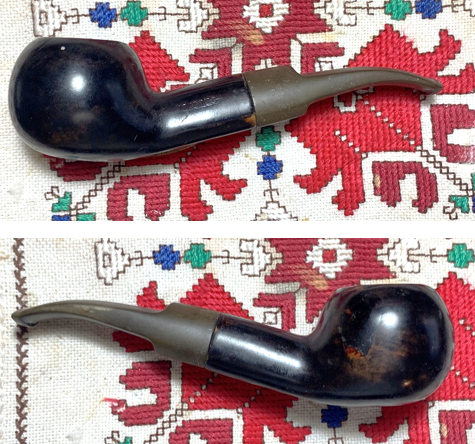

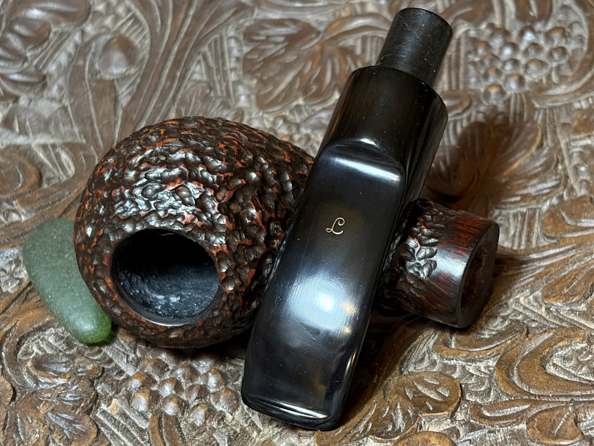
 The nomenclature is stamped on the left side of the shank with the classic: LORENZO underlined by the long base of the ‘L’. The final ‘O’ also has the pipe extending from it.
 On the flat underside of the shank is stamped the Lorenzo line: ARCETO [over] 8778 – the shape number.
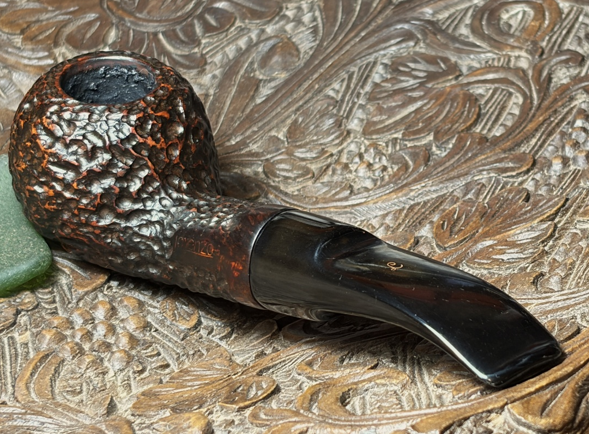
 The stem has stamped on the top the cursive ‘L’ logo which is in pretty good shape.
 I’ve worked on several Lorenzo pipes and have enjoyed their uniqueness and ‘flamboyance’. Lorenzo pipes have a reputation for being ‘on the edge’. Pipedia has a helpful article devoted to the history of Lorenzo (Lorenzo – Pipedia) and several examples of Lorenzo pipes. To refresh my memory and to appreciate the Lorenzo name and story, I’ve included much of the Pipedia information about the history of Lorenzo:
Following Rossi (1886 in Barasso) and Ceresa (1897 in Cassano Magnano) the third pipe manufacture in the Lombardian province of Varese was established in 1900 in the picturesque city of Gallarate by two brothers. Fratelli Lana (Lana Bros.) produced briar pipes for the Italian market under their own brand name.
 In 1922 Fratelli Lana went into a close co-operation with the merchant’s family Tagliabue from Milano. Sales outside of Italy began immediately and the demand throughout Europe steadily increased. By 1939 the manufacture had grown to factory size with 120 persons employed – a considerable number for the time. The program remained unchanged for decades: cheap, unpretentious budget pipes for the mass markets. Most of them didn’t even have any stampings besides “Genuine Bruyere” or similar. A large share of the production emerged as fabrications for other firms so that an own style of the Lana pipes was hardly recognizable.
After WW II the world of the briar pipe wasn’t the same anymore and especially Italian firms suffered from the ravages. In 1946 Tagliabue took over Fratelli Lana and changed the name to Manufattura di Pipe Tagliabue. Shortly before 1950 Lorenzo Tagliabue became in charge of the company’s management. He had closely studied the first successful steps of the newly established Italian brands like Castello and Brebbia and began to design new models of his own in an unmistakable style. Simultaneously the previous segment of the cheap, cheaper, cheapest bulk pipes was left and pipes reflecting to more elevated standards were produced.
From 1969 on Lorenzo Tagliabue changed the brand’s name to Lorenzo Pipes. The reason currently quoted is another pipe making firm named Tagliabue
 I especially enjoy reading how the Lorenzo reputation grew for producing ‘manly’ pipes as the quality of Lorenzo pipes improved after WW2. I’ve put in bold the characteristics which seem to be consistent with our Lorenzo Arceto:
The newly issued Lorenzos mostly showed extremely strong forms in designs appealing greatly and massively. Thick, “beefy” walls of the bowls and broad and strong stems were significant for them. As contemporary ads said, these pipes were “Made for real men with strong hands”. Many had a flattened bottom to sit on the table. Next to the unusual shapes, the patina effect of the silk mat surface combined with a bold red or a bright orange staining gave the pipes their distinctive look. The most successful model was a big Oom Paul that was executed in numerous variations.
Lorenzo Pipes became cult throughout the 1970s and 1980s. In order to strive another cliche than the gentleman with the stronger statue: the pipe smoking university student of these years, clothed in turtleneck pullover and NATO-parka, can actually not be conceived without a Lorenzo! Well, to be sure he had to select his Lorenzo very carefully from the showcases in order to find one with less than six blinking fills. Lorenzo dealt very generously with putty. All the same, the pipes smoked very good-natured, they were considered to be hypermodern and flamboyant and perhaps best of all, they gave you the indispensable highbrow touch!
The latter and current history of Lorenzo concludes the Pipedia article:
In 1983 Lorenzo Tagliabue came to bitter grief: his little daughter, the only child, died of cancer. He lost all interest in the business and retired still in 1983, leaving no heirs who wished to continue the business. Lorenzo Pipes was licensed for and continued for a shorter period by Comoy’s of London (Cadogan / Oppenheimer Group). Then Lorenzo Pipes almost disappeared, and Lorenzo Tagliabue passed away in 1987.
But this wasn’t the end. In 1988 Riccardo Aliverti and his wife Gabriella purchased all rights to the Lorenzo trademark from the Tagliabue family and production of the renown Lorenzo Pipes resumed.
The Aliverti family is involved in pipemaking since Romolo Aliverti, the father of the current owners, joined the Lana Brothers in 1920. He later reached the rank of technical director. No wonder that his son Riccardo showed an interest in pipe making. Riccardo began learning the pipemaking trade in 1954 at the age of fourteen under his father’s watchful eyes and succeeded him as technical director upon his father’s retirement in 1973.
Today the third generation of the Aliverti family is working for the company. Massimo Aliverti, Riccardo’s son, has been with the company as sales director since 1991. He works closely with his father and knows all phases of production. Massimo has established a broad customer base for Lorenzo around the world.
As far as the informations are reliable, Lorenzo’s better lines (One Star, Two Star, Three Star, Moscato, Spumante and the Grand Canadian) are made in Italy while the cheaper ones (New Era – Riesling, New Era – Poggio, Angera, Angera Satinato, Cadry, Churchwarden, Filtro, Arena, Cadore, Sport PS and Garden) are made in Albania by Tomori to benefit from the rich deposit of briar in Albania.
The article concludes with the various lines Lorenzo has produced over the years. Unfortunately, the Arceto line is not mentioned in the Pipedia article or in PipePhil.eu, another good place to look for information. SMS Pipes (Lorenzo Pipes :: SMS Pipes) also has a large selection of Lorenzo pipes but no Arceto line listed.
Without a reference to the Arceto line, I looked online for the meaning of Arceto, which I assumed was Italian. I discovered that it does not have a meaning per se, but it is a proper name, most likely a location in Italy. After searching on Google Maps, I discovered that Arceto is a district in the town of Scandiano. This town is known for the Castle of Arceto.
 A little searching and I found this information (Castle of Arceto: A Medieval Fortress in Scandiano, Italy – Ancient History Sites):
Castle of Arceto: A Medieval Fortress in Scandiano, Italy
The Castle of Arceto is situated in Arceto, a district within the municipality of Scandiano in modern-day Italy. This medieval fortress was established in the lowlands and first appeared in historical records toward the end of the 9th century, reflecting its early importance in regional defense and governance.
In 962, the Holy Roman Emperor Otto I granted the castle to the bishops of Reggio Emilia, indicating its strategic and ecclesiastical significance. Over time, the fortress came under the control of the Da Fogliano family, who maintained possession for several generations. In the early 15th century, the Este family, a powerful ruling dynasty in the region, took control of the site. In 1414, they granted the castle to the Boiardo family, who began extensive construction projects, reshaping the structure to suit their needs.
By 1441, Niccolò III d’Este, Marquis of Ferrara, officially invested Bernardina Lambertini with the castle, directing that ownership would then pass to her son, Feltrino Boiardo. Family disputes arose decades later between Matteo Maria Boiardo and Giovanni Boiardo, resulting in the County of Scandiano being divided in 1474. Giovanni received Arceto along with other lands. The division was formally recognized by the Este ducal authorities in 1475 and again in 1490. After the death of Count Camillo Boiardo in 1499, these territories, including Arceto, were consolidated once more under Giovanni Boiardo’s leadership.
One last bit of information was interesting. I asked ChatGPT the etymology of Arceto and this is what it said:
Etymology (possible meaning origin):
The name Arceto likely comes from a Latin or pre-Latin root. Several linguists think it derives from:
- “Arx” or “arcis”, meaning fortress or stronghold, reflecting the presence of a castle or fortified settlement.
- Or from “archetum”, meaning a place with arches or arched structures (though this is less certain).
So, Arceto doesn’t have a direct dictionary translation like “love” or “tree.” Instead, it’s best understood as a place name, possibly meaning “fortified place” or “castle area.”
I know this is probably more information than anyone wanted to know about the word Arceto, but it’s interesting to me that during some phase of the Lorenzo history and ownership, this line of Lorenzo pipes was associated with a name that represents strength and security – a fortress. Perhaps, for whichever of Justin’s mates receives this pipe, when he goes through the ritual of choosing a blend and packing the chamber, what might come to mind are the words of Luther’s hymn, ‘A might Fortress is our God, a bulwark never failing….”
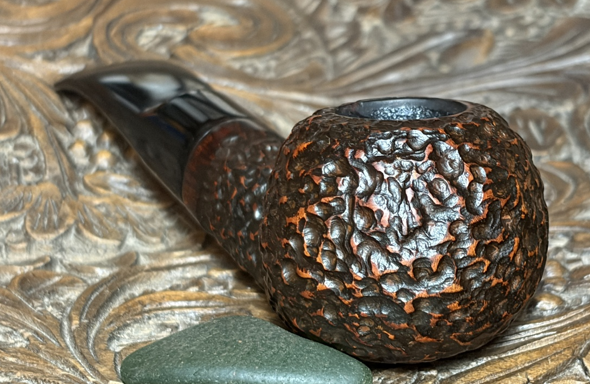
With a better appreciation of the Lorenzo Arceto now on the table, it’s time to look at the issues. The chamber has very little cake build up, but the finish is chipped off the rim. The motif of this Arceto is solid black, but there are thin or ‘bald’ spots where the dark finish is worn off. There are also sunken pits from old fills visible. On to of the shank in the photo below is an example.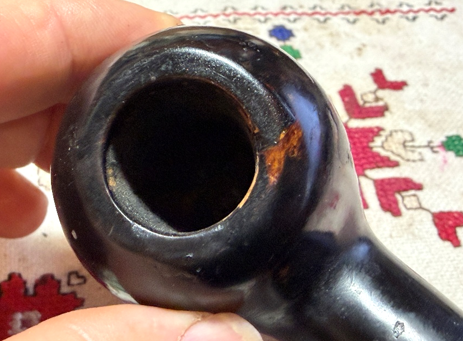 There’s a good bit of scratching all over the bowl.
 This photo of the shank shows an old fill needing attention, scratching and finish thinning by the shank facing.
 The stem has uber oxidation. When it is that deep olive green you know you have some work to do.
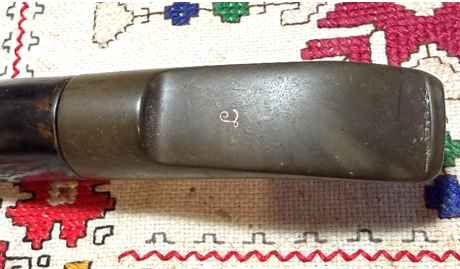 The upper and lower bit has tooth chatter and the lower has some deeper bite compressions that need addressing.
 To begin the restoration, the stem needs cleaning before addressing the oxidation. With large 9mm filter housings, you know that there’s going to be a lot of crud packed in. I go to work with a small dental spoon to dig the crud out by scraping the sides of the filter housing. Unbelievably, I needed two cotton pads during the excavation – ugh! A word to the new steward – clean the filter housing often whether a 9mm filter is used or an air restrictor.
 The excavation is joined by cotton buds and pipe cleaners moistened with isopropyl 99% to clean the filter housing and airway. When the cleaners and buds start lightening up the job is finally done.
 Now, to address the oxidation, the stem is placed in a soak of Briarville’s Pipe Stem Oxidation Remover (www.briarville.com). A pipe cleaner is left in the airway for easier retrieval later.
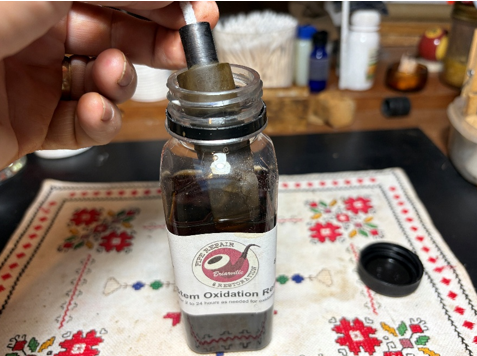 Turning now to the stummel, the chamber has very little cake build up as shown in the photo below.
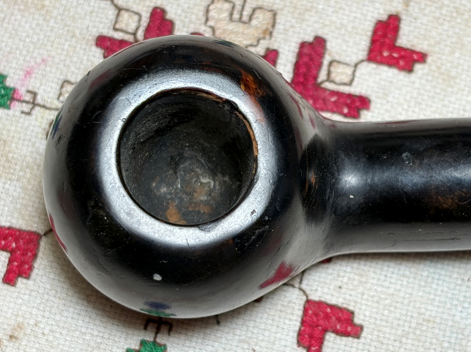 Using the Pipnet Reaming Kit, the first 2 smaller blades were used to ream. The Savinelli Fitsall Tool was then used to scrape the chamber walls. The last step was sanding the chamber with 220 grit paper wrapped around the dowel rod.
 After the chamber was cleaned, an inspection of the chamber showed no heating issues.
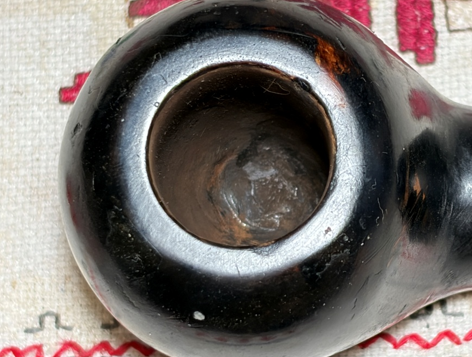 However, I discovered that the chamber had been patched. I assume the patch to be a heat resistant epoxy because it’s in good condition. However, the stummel cleaning in water will confirm that it’s an epoxy. If the patch is water-based, it will dissolve when wet. If this happens…we’ll be patching the chamber with J-B Weld. The article above about the Lorenzo practice of using a lot of putty when fashioning their pipes, seems to be true of this Lorenzo. By the looks of the chamber, I do not believe this was a post heating issue patch but probably a fault discovered in the briar block after the chamber was drilled in the factory. There’s nothing really to do with this chamber patch. When I do a chamber patch, J-B Weld is used. I usually follow the new patch by giving the bowl a cake layer starter with either ‘Pipe Mud’ or a mixture of yogurt and activated charcoal. I’ll do the same with this patch later.
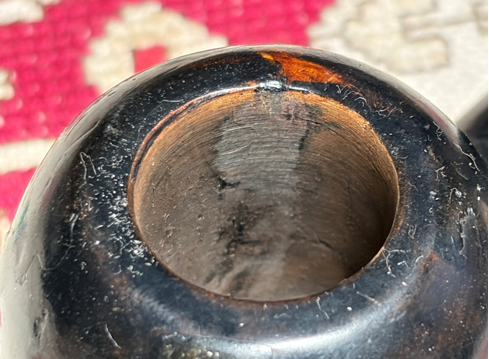 The cleaning continues next by using Murphy Oil Soap on the external briar surface.
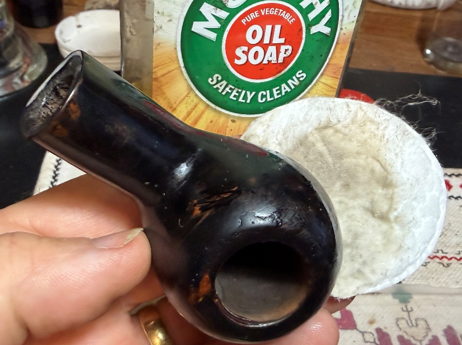 After scrubbing with the cotton pad, the stummel is taken to the sink using warmish water to begin cleaning the internals. Shank brushes with anti-oil, liquid dishwashing soap is used to scrub. After a thorough rinsing, the pipe is taken back to the worktable.
 The internal cleaning continues with cotton buds and pipe cleaners moistened with isopropyl 99% alcohol. A small dental spoon was used as well. When I began digging with the spoon, there seemed to be no end to the grunge. If someone were to tell me that this pipe had never been cleaned, I would believe them.
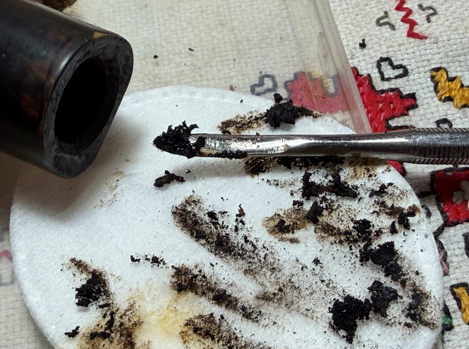 As I scraped the mortise walls with the spoon, I could hear a ‘crunch’ which is what I hear when scraping cake off the chamber walls. It seems that the moisture and gunk began to fossilize! It took many pipe cleaners, cotton buds and excavating to start to see the buds and cleaners lighten. The photo below shows the results.
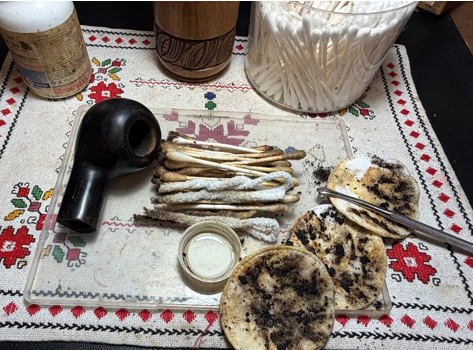 Since this pipe was so dirty, I decided to give it a soak of alcohol and kosher salt to further clean and freshen the internals. The salt freshens the briar and helps to remove any lingering ghosts of tobaccos past. The first step is to create a wick by pulling and twisting a cotton ball. The cotton wick helps to draw out the tars and oils from the internal briar.
 With the help of a thick wire, the wick is guided through the mortise and out the draft hole blocking any salt from getting into the airway. The rest of the cotton wick is stuffed into the mortise.
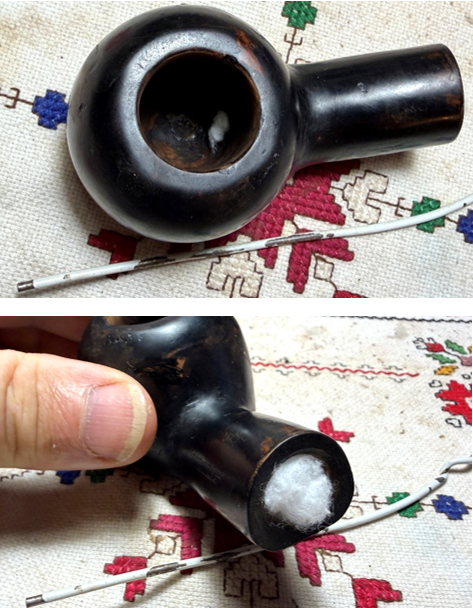 The bowl is filled next with kosher salt and placed in an egg carton for stability and situating the stummel so that the rim and shank facing are roughly parallel with each other. Kosher salt is used because it doesn’t leave an aftertaste like regular iodized table salt. A large eye dropper is used to fill the bowl with isopropyl 99% alcohol.
 After a few minutes, the alcohol is absorbed into the salt and wick, and the alcohol is topped off once more. The stummel is set aside to allow a long soak through the night.
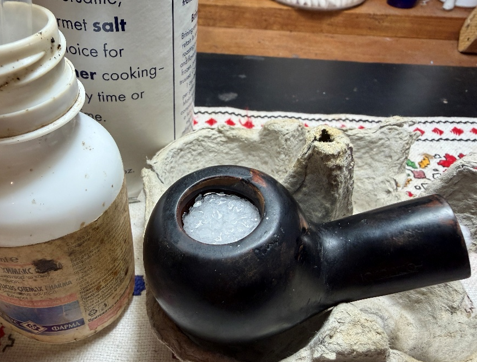 Before turning off the lights, the stem that had been soaking in Briarville’s Pipe Stem Oxidation Remover is fished out. The lightened photo below shows the oxidation that was raised during the soak. A pipe cleaner moistened with isopropyl 99% alcohol cleared away the Oxidation Remover fluid from the airway.
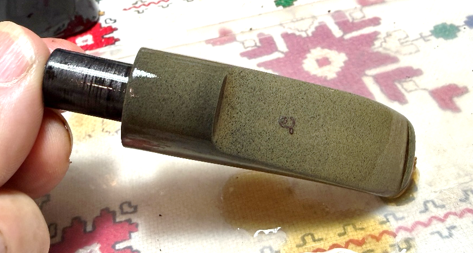 A dedicated cloth is used next to rub the vulcanite aggressively to remove the oxidation. Wow, what a difference and what was surprising was the original red coloring of the Lorenzo ‘L’ logo emerged. With the oxidation, it appeared to be white.
 After wiping away the raised oxidation, I decided to get a jump on conditioning the vulcanite. I applied a generous amount of a mineral oil, Paraffin oil to the stem and put it aside and turned off the lights.
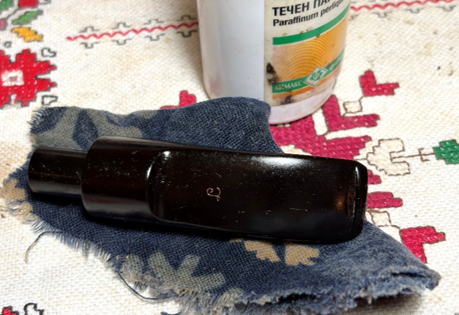 The stummel’s kosher salt and alcohol soak went through the night and the next morning I pulled the wick out – it tore a bit, and I had to use a hooked dental probe to remove all the wick. The soiling on the salt and the wick is evidence of the night’s work. The salt is dumped in the waste and any vestiges of salt left in the chamber are removed.
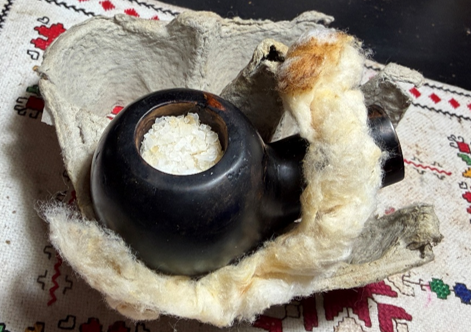 To make sure all is clean a couple of cotton buds and pipe cleaners confirm this along with a whiff test.
 With the cleaning completed, it’s time to take a closer look at the stummel surface and the chamber. Earlier I had expressed concern for a large chamber patch with what I believed to be a heat resistant epoxy and not a water based filler. The patch survived cleaning, and it is good to go again. I know, it’s as ugly as sin, but it’s solid and that’s what counts when the tobacco is burning.
 With the picture above and the photos beneath, the condition of the stummel surface has not changed – it’s still a mess; BUT much has changed regarding my approach to mending this Lorenzo. What I love about restoring pipes is that every single pipe proclaims its brokenness and each is different. In my mind I’m always thinking ahead – what’s next? As I thought about this Lorenzo, it dawned on me that the finish was a solid black – not a stained back, which is big difference. Lorenzo is known for LOTS of fills and with the black paint on this one, who knows what’s lurking beneath the paint? What’s visible now gives pause about what might be underneath and then, how to fix it?
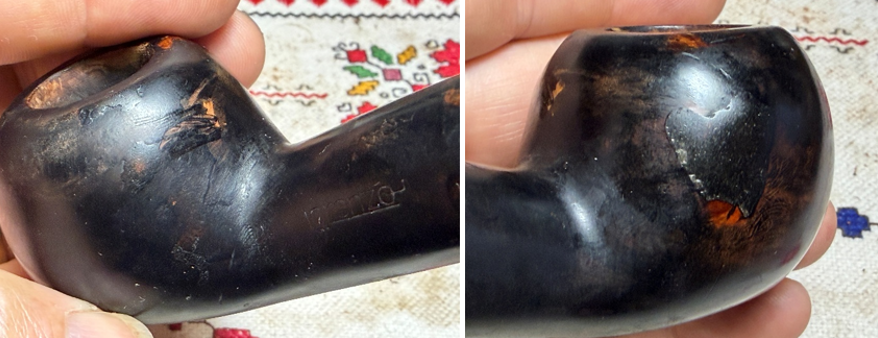 I reached out to Steve with his vast knowledge of just about everything related to pipe restoration with the paint vs. stain conundrum and some pictures of the Lorenzo. Here are our back and forth interchanges and I’ve highlighted statements that are particularly relevant:
Hey Dal, The finish like that is likely painted. You cannot match a paint to it as the spots you repair will blister and peel when smoked. If you choose to leave it then the flaws will remain as travel scars. If you want you can remove the paint and stain with black to highlight the grain. My experience with Lorenzo painted pipes is that the paint covers many fills! Steve
Ha! I’m discovering the fill factor on this one. Your second paragraph I’m assuming you mean ‘replace’ and ‘remove’? What would happen if the current finish, with scars, was given a medium sanding to rough up the finish (make fill repairs as needed) and then the dark covered with black dye?? What do you think that would do? Dal
Worth a try. The other thing you could do is just rusticated the puppy and then stain with black stain. Steve
This response started the ‘rusticate the puppy’ thought processes. Another thing I love about restoring pipes is that their needs push you down the path of your own development. While I really like rusticated and blasted pipes with their additional tactile experience and rustic attractiveness, I had never tried my hand at rusticating a pipe. Of course, Steve has rusticated many pipes and has posts and essays on the subject which I started digesting from www.Rebornpipes.com. Here are our last interchanges:
Steve, I have taken a look at a couple of your posts about the rustication process. Do you have any wisdom to share with regard to the best practices?
Beauty is you can’t wreck it. I leave a taped area on the shank end, so it does not get damaged. You can do the rim smooth or rusticated. You can do it with the Dremel or hand tools. Steve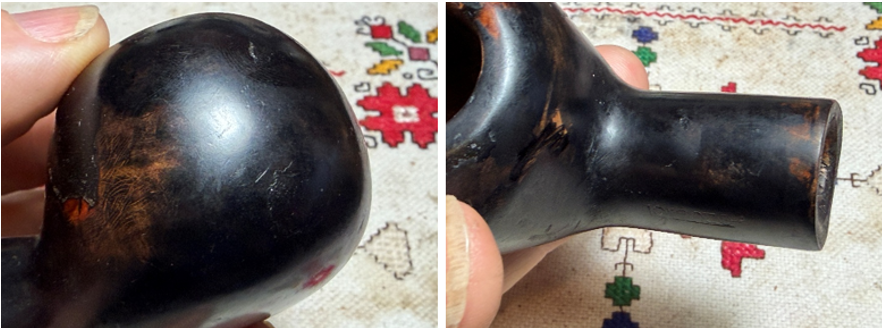 After reading many of Steve’s posts about rustication, one in particular was helpful in consolidating the information he had culled through his experience. His essay, Procedure for hand rusticating a pipe | rebornpipes described the process along with example photos of pipes before and after restoration and the various tools he had tested.
 I do not have any of the fancy tools Steve has designed and picked up, but I do have a rotary tool and some burrs and plenty of cadaver bowls to try out and see how it feels and looks with different burrs, patterns and movments. I also experimented with some dyes and flamed them, brass brushed them and waxed them to give me an idea of what might look good for the Lorenzo.
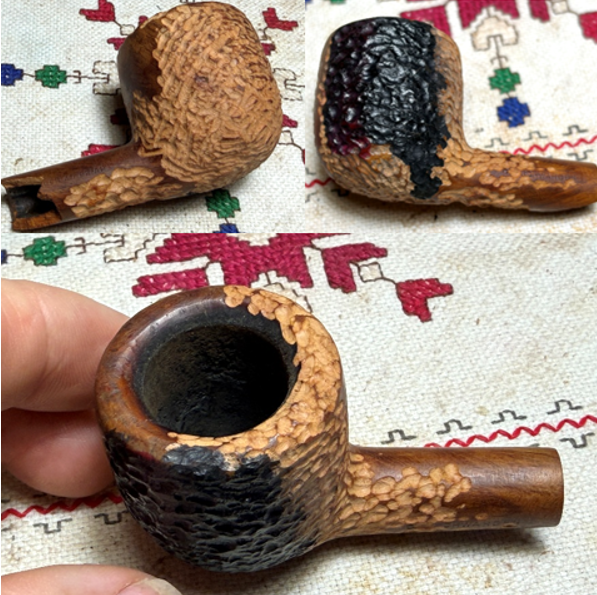 As I was having fun exploring what were new techniques to me, I was also thinking about whether Justin would like this huge departure from the original Lorenzo motif. I wrote to Justin with these options, and I was looking forward to his response to hopefully giving his blessings for a new direction. Here is a portion of my note to Justin:
The finish is a total black with paint from the Lorenzo factory. This is not a stain. The issue is that I can’t match the paint and if I try to throw some black paint on it, when it heats while smoking, the paint will bubble or blister. I’ve run through the options and there aren’t many. One option is to polish it and send it on its way with the scars of the past. Another option is to strip off the finish and start over (sanding, fill pits,etc) and stain it black which would reveal grain and all the fills. Lorenzo is famous for using a lot of fills and that’s why they paint the stummel. I could just apply the stain but there’s no guarantees about what I will find when the paint is stripped. The last option which I think is best is to rusticate the briar. This means to introduce a texture to the wood with burrs on the rotary tool. After the rustication, I would apply a black aniline dye to the rustication. Rustication will obliterate any fills and problems with the briar surface because it’s like plowing the field. This changes it from a smooth surface to a tactile surface which I like, and it can be more of a rustic vibe.
Justin’s reply came quickly with a ‘thumbs up!’ on rustication, but then he also added a suggestion which was great: “What about a brown rusticated instead of a black?” and he included a link that took me to Smoking Pipes.com that showed a picture of a hansom rusticated Savinelli. Wow! My response to Justin was also a thumbs up. This Savinelli rustication appears to be either a dark base with the peaks of the rustication sanded to set the contrast or perhaps another lighter wash? I’m looking forward to seeing how this will turn out with the Lorenzo Tomato. I plan generally to follow Steve’s process directions from Procedure for hand rusticating a pipe | rebornpipes and the first step is to clean the surface with acetone to make sure all the grime of off. Well, more than grime came off wiping the surface with a cotton pad and acetone.
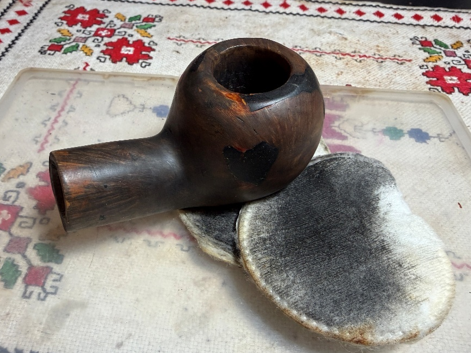 The old paint started dissolving revealing all the fills that were hidden beneath the paint. My, oh my. It is apparent that rustication was the only way to rescue this Lorenzo Arceto after this revelation. The first photo shows a beautiful vertical splay of grain – if only there weren’t the huge black patches! The second photo shows a very dull, bland display and the third, some bird’s eye pattern.
 Before starting the rustication, the nomenclature is covered with painter’s tape along with a ¼ inch of the shank’s end. The tape is to create a protective boundary to work up to but not trespass.
 I have a number of burrs to use and I choose the burr that I hope will best emulate the Savinelli pattern or at least move us in that direction. I have to be honest – before I started the rustication I took a deep breath as I prepared to bring havoc to this stummel. But then I remembered all Lorenzo’s ‘beneath the paint fills’ and felt somewhat relieved! I started on the side and worked my way to the bottom, then to the other side. I tired to follow an orderly randomness over the surface with the burr by poking, then a little drag, and another poke here and there. Having the darker finish as the backdrop was helpful in seeing where I was. I wanted the rustication to be deep enough to be able to create the contrast and depth of hues.
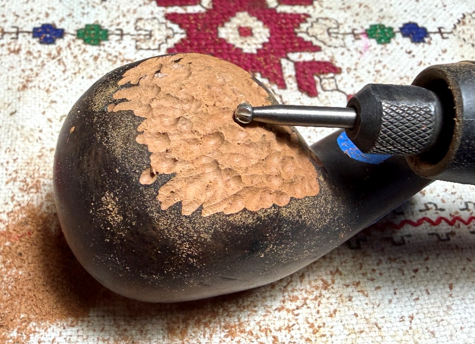 As I completed the heel of the stummel, you get an example of a runaway burr…thankfully, not near the tape. During the process, I would often back the burr off and take a bird’s eye view in. There were times when I would see patches that seemed to be too shallow. I would reapply the burr to bring some deeper valleys for better ‘random’ uniformity.
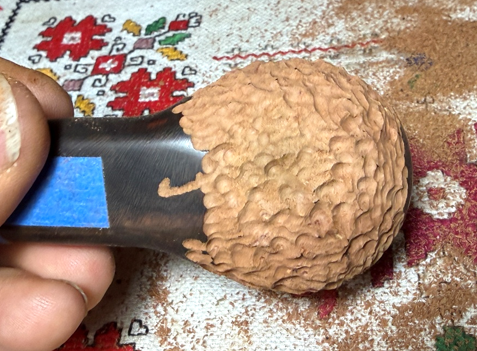 I stayed away from the rim until last so that I wouldn’t go over the chamber edge and try to give the rim some definition in the rusticated landscape. I also avoid the inner edge of the rim to not create and divot.
 When I had finished the rustication, I took off the tape and carefully worked the rustication a bit closer to the nomenclature. I didn’t want a square edged smooth briar panel but in the spirit of a more rustic vibe, create less uniformed smooth briar patches encasing the nomenclature and banding the shank facing.
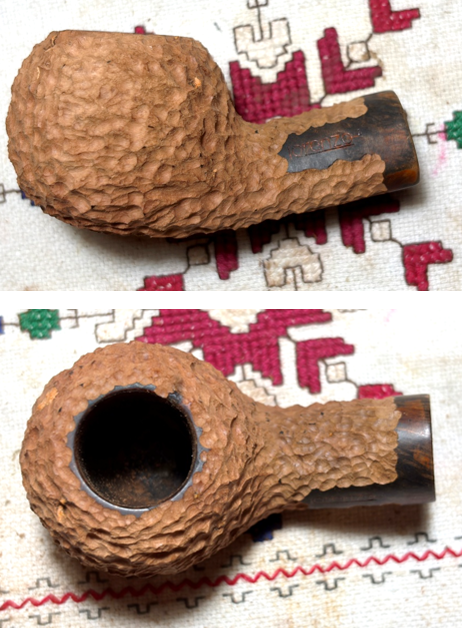
 Next, the brass brush is used aggressively to clear the wood chips and clean the rustication patterns. I’m liking what I’m seeing. The patterns are tighter than the Savinelli, but with a smaller more compact Tomato shape, the pattern looks good.
 To clean the surface further and prepare it for a dark base stain, the stummel is wiped down with isopropyl 99% alcohol using a cloth. Before applying the base dye, I decided to apply all 9 micromesh pads, 1500 to 12000, to the smooth briar patches to enhance the contrast between rough and smooth – I love contrasts. Thankfully, there are no fills in these smooth briar patches.
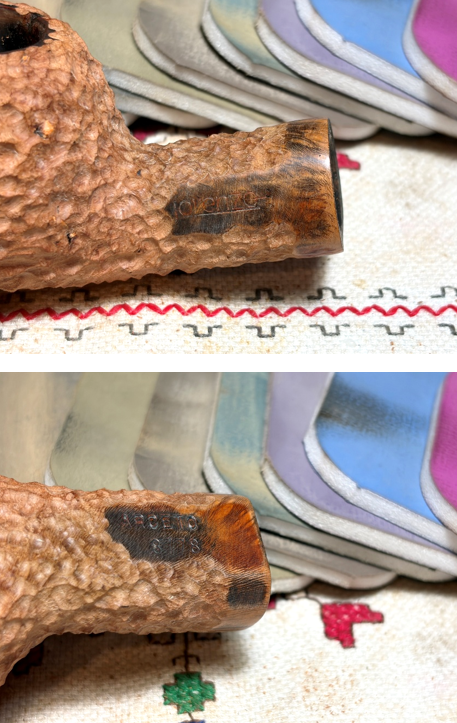 After finishing the micromesh polishing, it appears that the old black finish is still present in these smooth patches. Using acetone on a cotton pad my suspicions are confirmed. I scrubbed a good bit and finally placed the shank in a soak of acetone hopefully to clean out the residual black dye.
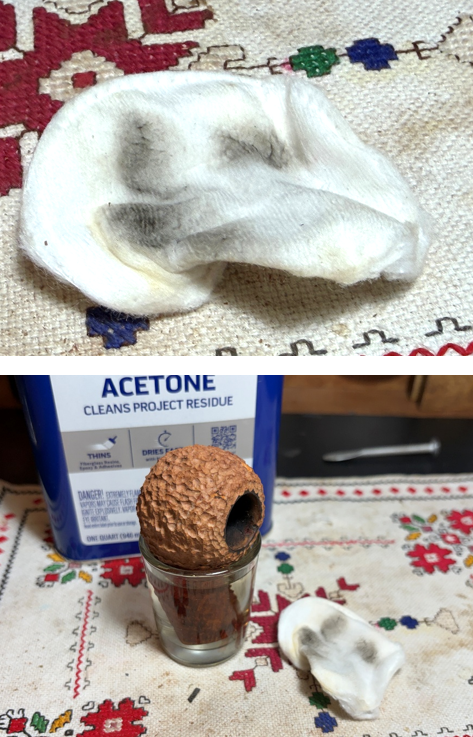 While the shank is soaking, attention is turned to the stem. Both the upper and lower bit have bite compressions – the lower more severe. The first approach to addressing these compressions is the heating method. The flames of the lighter paint both upper and lower bits warming the vulcanite. The rubber expands as it’s heated and this helps the compression to regain their former positions – or closer to it. The following before and after photos compare the progress. The upper bit compressions did lessen in their severity.
 The lower bit compressions may have lessened some, but neither upper nor lower bit compressions will go away by simply sanding.
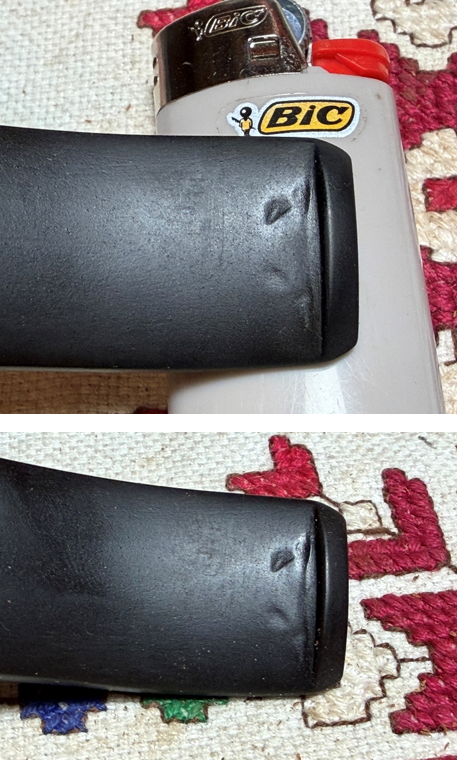 Using Black CA, each compression is filled and sprayed with Starbond Accelerator to hold the patches in place and to quicken the curing process.
 After cured, needle files are used to level the patch mounds until flush with the vulcanite surface.
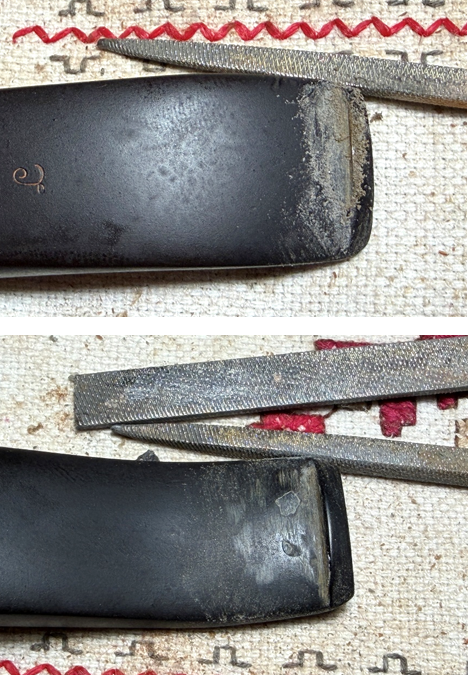 To remove the file marks and to further smooth the bits, 220 grit paper is used.
 The sanding is expanded to the entire stem with 220 grit paper. This helps to remove residual oxidation and the roughness from small scratches and pits. The Lorenzo ‘L’ logo is avoided during the sanding process.
 The sanding continues with the whole stem using the finer 320 grit paper.
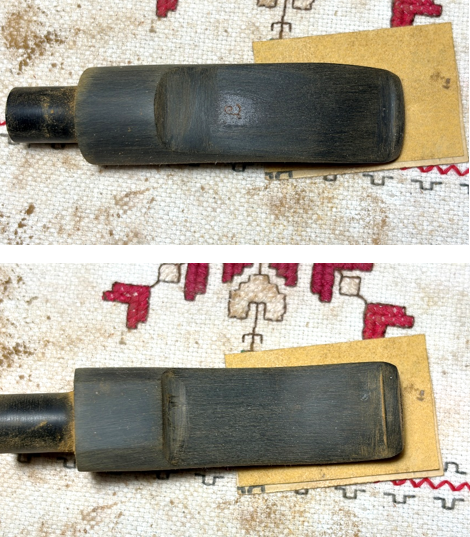 Next, the stem is wet sanded using 600 grit paper and this is followed by applying 0000 grade steel wool.
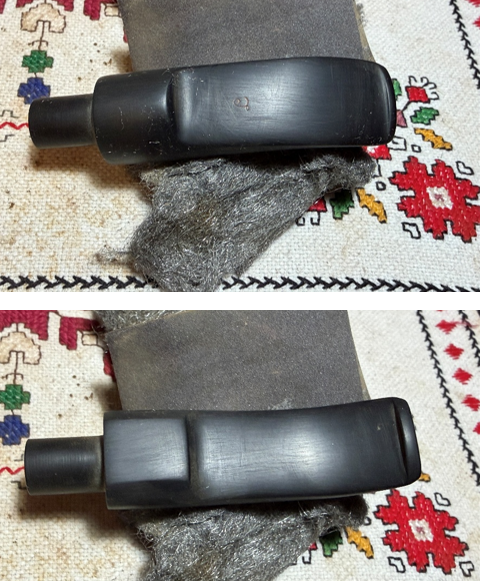 The sanding transitions to polishing during the micromesh process. Between each of the 9 pads, Obsidian Oil is applied to the stem to further condition it and to guard the vulcanite from oxidation. The first set of pads are grits, 1500, 1800 and 2400.
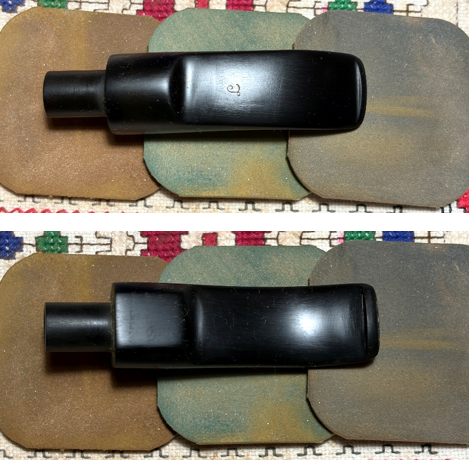 The next set of pads are grades 3200, 3600 and 4000.
 The final set of pads are grades 6000, 8000, and 12000.
 The stem is put to the side. The shank had been soaking in acetone to lighten up the smooth briar and It helped a bit. The residue dark finish would not come off as much I had hoped, but overall, it won’t be an issue. The next step is to apply a dark base coat of dye. Fiebing’s Dark Brown Leather Dye is used for this.
 The cotton dobber is used to apply a goodly amount of the dye to the rusticated surface in sections and the briar absorbs the dye with gusto. The wet aniline dye is then flamed to ignite and burn off the alcohol and to set the dark pigment deep into the briar. The flaming burns longer than usual because so much dye is absorbed. Section by section the dye is applied and flamed until the stummel surface is covered. I take a good look to make sure none of the valleys have been missed.
 Per Steve’s ‘Procedure’, the next step is to lighten the peaks of the rustication using Brown Tripoli compound. I start with the cotton buffing wheel, but it was not doing the job. After this, a coarser felt wheel was mounted onto the rotary tool, and the compound was applied. The smooth briar patches also received Brown Tripoli with the felt wheel.
 The photos below show marginal lightening of the tips but not as much as I’m aiming for. The lightening that is there gives a very nice, deep contrasting which I like a lot, but I’m looking for more distinctive peaks.
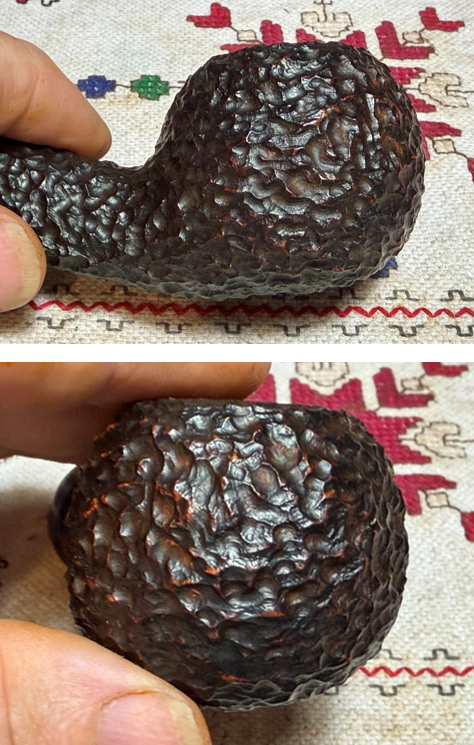 To lighten the peaks of the rustication 320 grit paper is used to lightly sand the peaks. I like these results much better.
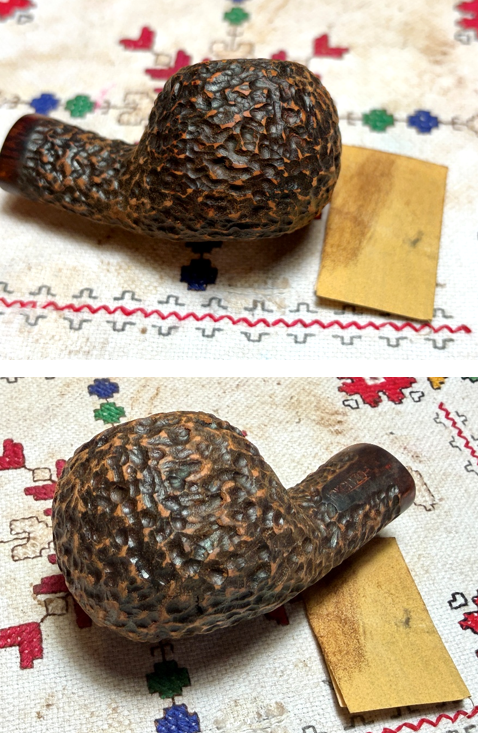 Next, the topcoat of dye is lighter – Fiebing’s Tan Leather Dye. As before, the swab applies a good amount of dye in a section, and the aniline dye is flamed. The alcohol cooks off leaving the dye pigment behind. After progressing section by section, until the stummel is covered, I take another look and apply dye at light points and flame.
 After the dye has thoroughly dried, Steve’s directions are to lightly buff the pipe with White Diamond compound. After I started with the cotton cloth buffing wheel and White Diamond, I realized that it wasn’t have the effect that I was aiming for. The dye was not being cleared to show the peaks to create the contrast I was wanting. Even so, I continued with the cotton cloth wheel because it was doing a great job clearing the excess flamed dye crust in the valleys and crevasses. After finishing with the cotton cloth wheel and White Diamond, I switched from a cotton wheel to again using a more abrasive felt wheel and Brown Tripoli as I had earlier. Applying Brown Tripoli with the felt wheel improved the situation considerably. It’s probable that Steve’s directions were not getting the effects I was aiming for because of the equipment used. Steve uses large buffing wheels applying compounds and waxes. I have always used a smaller, compact rotary tool because I started restoring pipes when we lived in Bulgaria on the 11th floor of our formerly Soviet ‘blok’ apartment building. So, I had to adjust my methods working in a very small area. After finishing with the felt wheel, I simply ran the cotton cloth wheel over the rusticated surface without adding more compound. This was done to clean the surface of the residue from the application of Tripoli that had gotten compacted in crevasses and valleys.
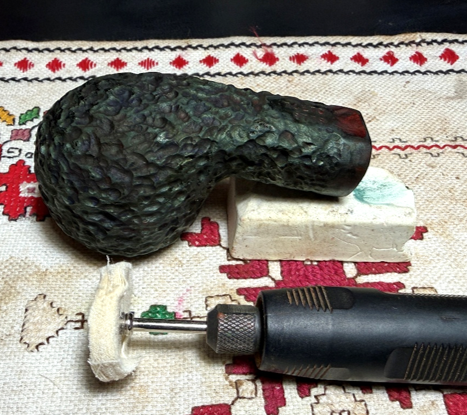 There has been a lot of new dye applied to the stummel and to mitigate the chances of dye leeching onto the new steward’s hands when the pipe is first put into service is to emulate the heating of the bowl. Using the hot air gun, I heat the bowl so that its hot to the touch – emulating the pipe in service. Then the bowl is rubbed very aggressively with a paper towel to remove the dye that has leeched because of the heating. I repeated the warming and wiping a few times and hopefully, this will lessen the possibility of leeching later.
 This project has taken a good bit of time and effort, and I feel like I’m finally rounding 3rd base. Next, after mounting another dedicated cotton cloth wheel with the speed at about 40% full power, Blue Diamond compound, a finer abrasive, is applied lightly to the smooth briar on the stummel and to the stem. I separate the stem and stummel during this process so that the stummel doesn’t get fouled with compound dust again.
 After the application of compound, a felt cloth is used to clear away compound dust from the stem and stummel.
 Again, another dedicated cloth wheel is mounted, and carnauba wax is applied to the smooth briar and the stem. After the application, they were wiped with a microfiber cloth to remove excess wax and to raise the shine.
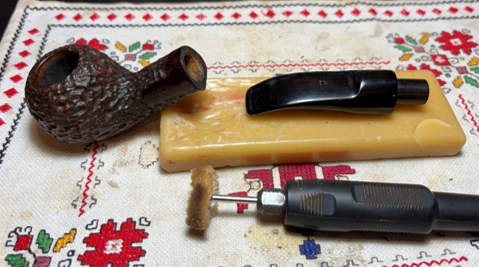 Steve’s directions at this point were to condition the rusticated stummel with either an application of Halicon wax or apply olive oil. I decided to use the oil idea but instead of a ‘living’ oil I like to use mineral oils. In this case, Paraffin oil is applied to the surface with a small cloth. I provide an ample amount of oil so that the oil permeates the rough surface getting into the tight nooks and crannies. Wow, the briar drinks the stuff up!
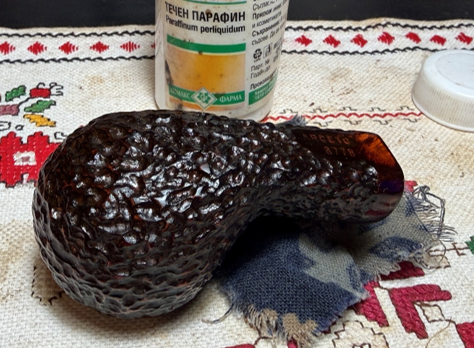 One mini project that I mentioned a LONG time ago was to create a cake starter layer in the chamber to cover the epoxy repair discovered while reaming. The repair is solid, but I did want to cover it with a cake starter.
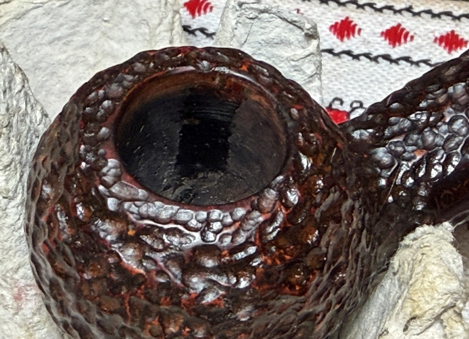 One method of making a starter cake is using plain yogurt (no flavors or additives) and activated charcoal. A small amount of yogurt is placed in the cup along with some activated charcoal. It doesn’t take much of either and I usually have plenty left over.
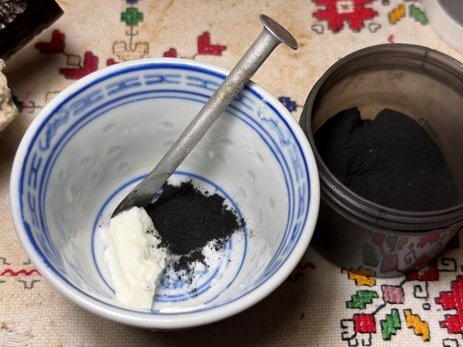 The pipe nail tool is a good mixer. The charcoal is added to thicken if it seems to runny. When applied to the chamber wall you want it firm enough so that it stays in place and not move with gravity.
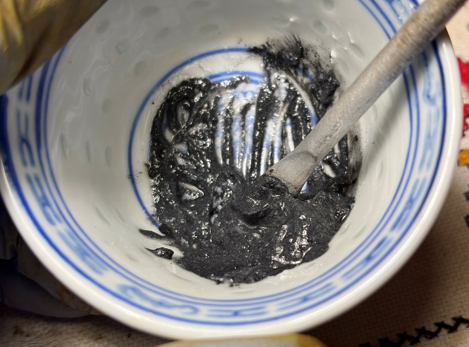 You can see that a pipe cleaner has been inserted through the draft hole to guard against any blockage. When the yogurt and charcoal mixture is right, the pipe nail tool does a good job troweling the mixture to the chamber and spreading it around so that it’s not in globs. I usually start by placing some of the mixture at the floor and work it up toward the rim with the nail so the mixture thins as it spreads. More mixture is added until the chamber is covered up to the rim. The stummel is then set aside to allow the cake starter layer to fully dry. Amazingly, it turns into a very hard durable surface. However, the new steward should NOT use a metal tool to scrape the chamber after use until a new durable cake develops. During this formative stage, a folded pipe clearner does a great job cleaning the chamber by rubbing it on the wall. After the cake starter dried, the entire pipe was given a brisk hand buffing with a microfiber cloth to raise the shine.
 All I can say is, what a transformation! The decision to rusticate this fill-full Lorenzo Arceto Bent Tomato was spot on and to move from a black to a brown finish was good. As I compare the Lorenzo as it is now to the picture of the Savinelli example Justin sent as an idea, there are important differences that rendered our results. First, the rustication design or pattern that I created with the Lorenzo is much tighter and intricate with the result that the peaks are more pointed or defined. This gives a more subtle contrasting than the Savinelli in my view. Another result of this is that the finish turned out darker because of the tighter configuration. Darker, yes, but the Lorenzo’s contrasting is very attractive and nuanced and in my view, classier. However, Justin is the final judge of this! This is his third commission of pipes from Bulgaria destined to be gifts for special pipemen. A portion of all proceeds from the sale of pipes benefits the Daughters of Bulgaria, now called Spring of Hope. Thanks for joining me!
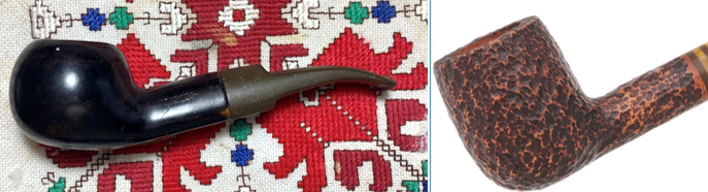


Looks great Dal. I like the look of the rusticated surface. The contrast is nice. Well done. You will have to do another soon
LikeLike
Looks Great Dal. Nice job on the rustication it shows the contrast very well and the fills have disappeared.
LikeLiked by 1 person
Thanks for your help, Steve!
LikeLike