It has been fun and a privilege to restore pipes commissioned by Justin which he chose as gifts for 3 good friend in his church home group and his father. All these pipes were ‘picked’ by me in August 2021 in the coastal city of Burgas during a visit to our former home in Bulgaria. The full story of this visit to one of my favorite antique shops in Bulgaria is in the write up of gift pipe number #1 (The First of Four Gifts From Bulgaria: A Prince Amled Danmark Freehand Pickaxe ). Here are the ‘before & after’ photos of the first 3 pipes ready for their new stewards. The last pipe Justin commissioned is a handsome unbranded Meerschaum-lined Bent Billiard with a P-lip stem. Here are pictures after I got the pipe home from Bulgaria.
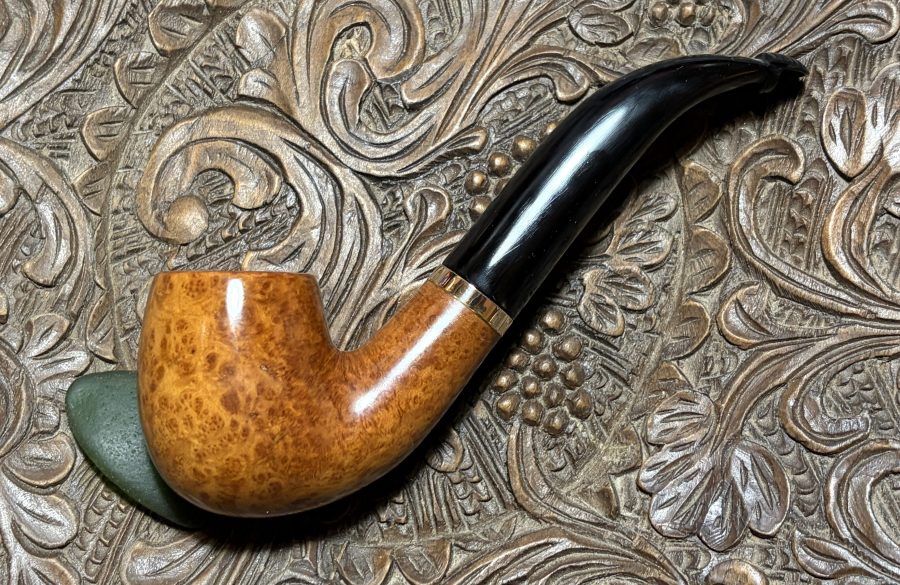
 The only stamping on the pipe is on the shank’s underside – 327 – which I assume is a shape number. The ‘3’ is a bit ify so it could be simply 27.
 With this pipes being unbranded, it would most likely have been crafted by a larger pipe manufacturer for a 3rd party purchaser. The FAT P-lip stem is practically hollow obviously designed for a fairly large 9mm filter reminiscent of the German manufacturer, Denicotea. You don’t usually see many P-lips on unbranded pipes in my experience. The only way to possibly identify a manufacturer is to search through all the shape charts and see if a 327 (or 27) matches the shape on the table. Unfortunately, after going through every shape chart I have, I found no match. I decided to send a note to Steve at www.RebornPipes.com to see if he’s seen any thing like this Unbranded pipe with the FAT P-lip which is hollow all the way down to the bit bend.
Steve’s response suggested another German manufacturer that was a competitor of Denicotea – Oldenkott which he’s seen with P-lips. I looked at Oldenkott’s article in Pipedia (Oldenkott – Pipedia) to see if I could gain any concrete information that would point to our pipe. I could find none. So, we continue…
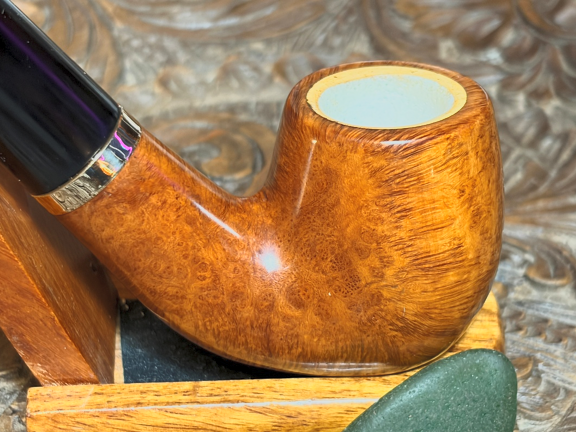
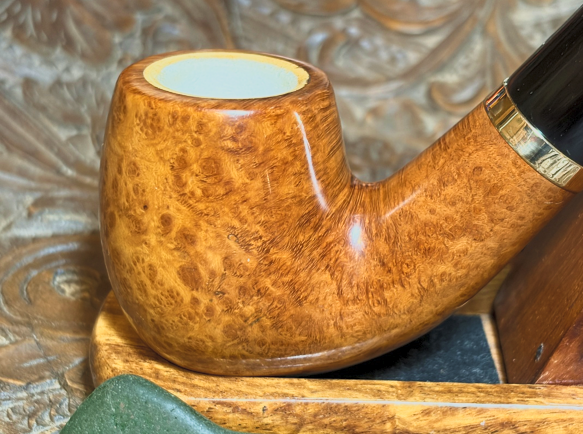
The Bent Billiard has a nice feel in the palm and is nicely balanced. Looking at some of the issues I see, the Meerschaum lining looks to be in good shape. Meerschaum, after it has been put into service, has normal discoloration which I will lightly clean up by sanding the chamber. I see no problems with the Meerschaum at this point. The rim has some dents as well. The stummel also has normal pits, dents and scratches of wear. I did find something that I’ve never seen before. Imprinted on both sides of the bowl appears to be a stamp or impression of something…. They are only visible in the light’s reflection. Yet, looking right at them with the eye, they disappear. Perhaps a secret Knights Templar rune?? Have you noticed the amazing grain? The lower picture showcases beautiful bird’s eye and the horizontal flame grain on the first photo – not bad.
 I also noticed that the there is a gap between the shank and the stem facing. Often, the cleaning of the pipe helps to rectify this. I’ll keep my eye on it.
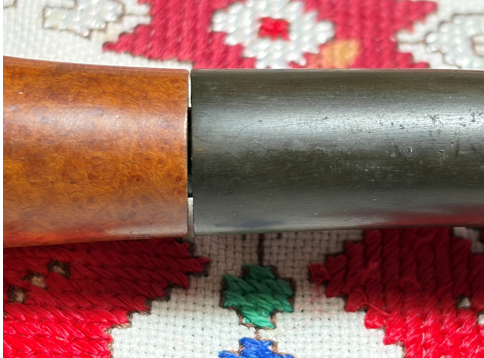 The P-lip bit does not have any significant tooth compressions to deal with, which is nice. There is some calcification on the lower bit, and the stem has thick oxidation.
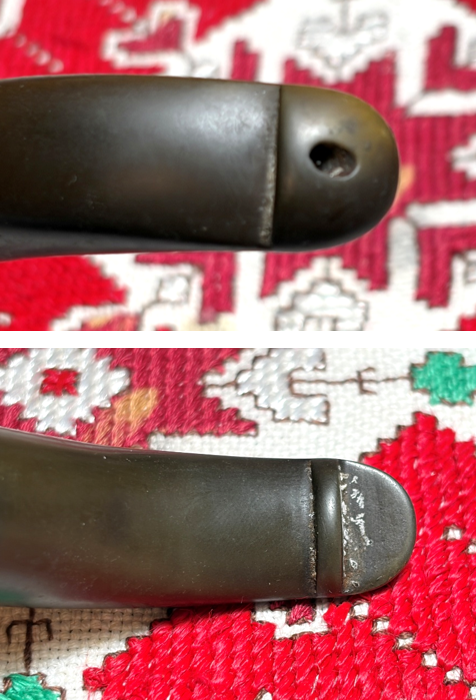 The upper stem shows the thick oxidation as well.
 To begin the cleaning process, as I mentioned above, I discovered that the fat P-lip is hollow down to the bend in the bit. From the 9mm tenon to the closure near the bit there is a lot of open space – enough space to swallow the standard 1.5” long pipe filter.
 Well, here we go again with another 9mm cleaning effort. Before I get to the pipe cleaners and cotton buds moistened with isopropyl 99% alcohol, the small dental spoon is used to reach deeply into the stem cavity to scrape the sides. The muck was plentiful!
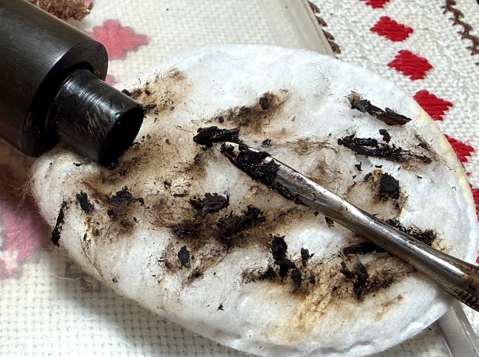 I had to quit to head to my doctor’s appointment, and I wasn’t close to finishing the internals of the stem. I did something that I’ve not done with stems before to continue the cleaning – much like giving the stummel a salt and alcohol soak with a cotton wick. I pulled and twisted a cotton ball and formed a cotton wick that I guided into the stem and pushed down as far as it would go. Using the large eye dropper, I infused the cotton with isopropyl 99% so that it would help break down the grunge and hopefully move the cleaning down the road.
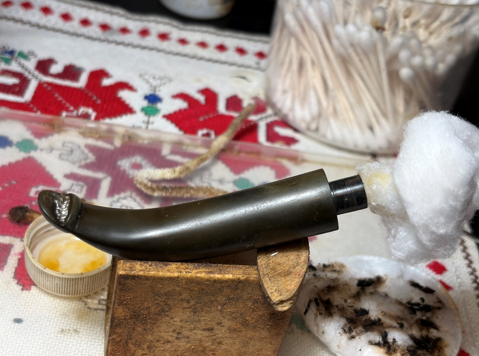 Later in the afternoon I returned to find the wick had helped.
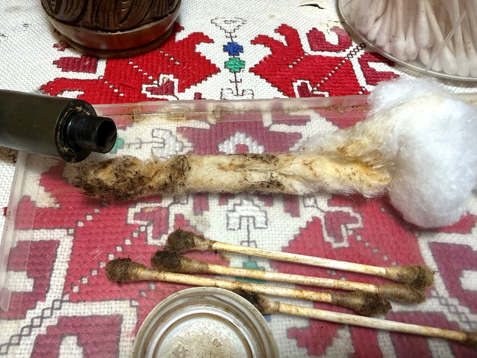 The pipe cleaners navigated and cleaned the P-lip without too much difficulty. Many cotton buds, pipe cleaners and scraping finally began to see lighter cotton buds begin to emerge. A word to the new steward – clean the stem regularly!
 With the stem clean, to address the oxidation, the stem is placed in a soak of Briarville.com’s Pipe Stem Oxidation Remover.
 With the stem soaking, attention is turned to the stummel. The first order of business is to clean up the chamber. There is discoloration in the chamber which is not a problem but can be cleaned up some. The rim also has stain marks which will be addressed.
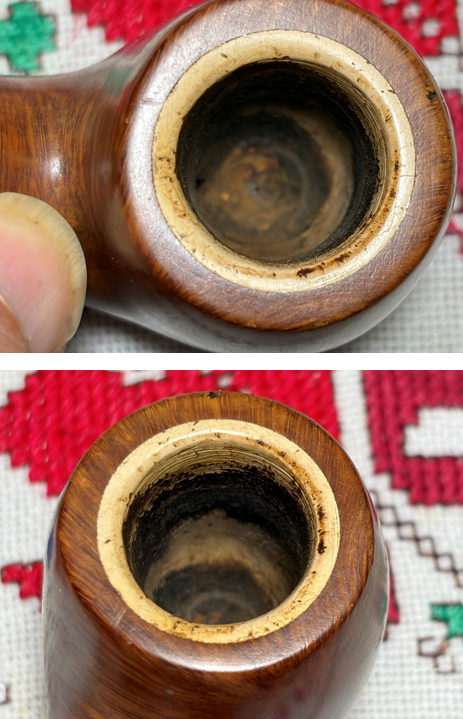 Working with Meerschaum, the motto always is, ‘less is more’. Using 220 grit paper wrapped around a dowel rod and Sharpie Pen, the chamber is lightly sanded.
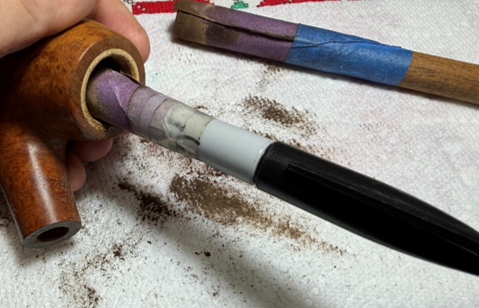 My goal is to remove the discoloration as much as possible but also to smooth the Meerschaum clearing away any carbon build up. A piece of 220 grit paper is also used to clean the rim. After sanding, an inspection of the chamber appears that the Meerschaum is in good condition.
 Next, the external briar is cleaned using Murphy Oil Soap and a cotton pad.
 After a good scrubbing, the stummel is taken to the sink to work on the internals using warmish water, anti-oil liquid dishwashing soap and shank brushes. After scrubbing, the stummel is rinsed and taken back to the worktable.
 The cleaning of the internals continues using pipe cleaners and cotton buds moistened with isopropyl 99% alcohol. As the photo shows, a good amount of cleaners and buds were used. When they started emerging lighter the cleaning is completed.
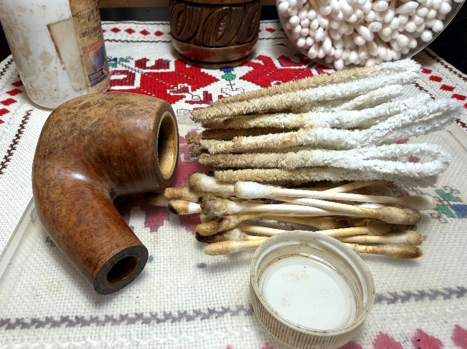 Taking a closer look at the briar surface, I see that most of the old finish has come off. The residual finish is shinier and darker than the bare briar.
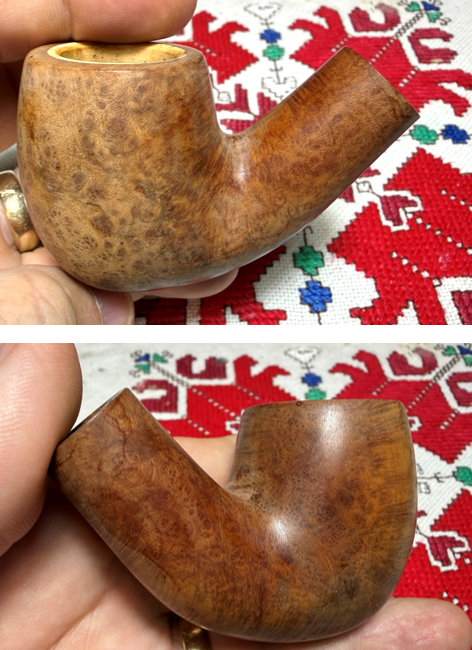 A cotton pad and alcohol completely removes the old finish.
 I find one fill that looks like it needs to be repatched. The arrow is pointing this out. The circle is around the ‘runes’ I pointed out earlier – on this side of the bowl and what appears to be a matching impression on the other side. I’ll keep my eye on these during the sanding process to see if that takes care of them.
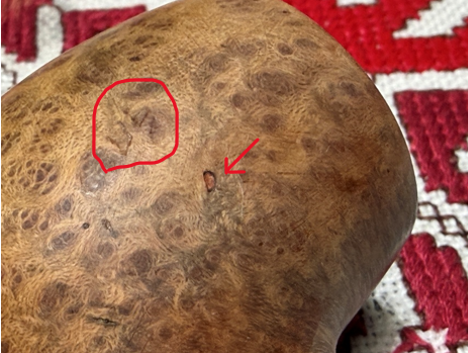 To repatch the fill, first the old fill material is dug out with a sharp dental probe.
 After wiping the area with alcohol to clean, a small drop of CA glue is placed on the pit and then sprinkled with briar dust to give the patch some texture.
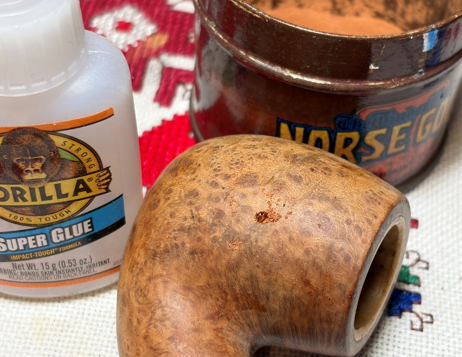 After the patch fully cures, the mound is filed with a needle file flush with the briar surface. Following the filing, the patch is sanded with 220 grit paper, keeping the sanding footprint as small as possible.
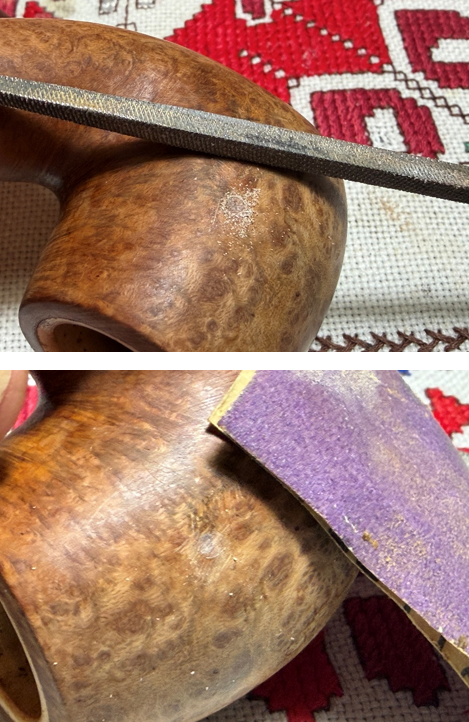 To clean the surface and to address the small scratches and dings, sanding sponges are used. Coarse, medium, light and fine sponges are used. After sanding, I checked the sides of the bowl and the runes are gone.
 Next, the stummel is sanded/polished with micromesh pads. Between each pad, the stummel is wiped with a moist cloth to remove the dust and to give the next pad better sanding traction. The first set of 3 pads are grades 1500, 1800 and 2400.
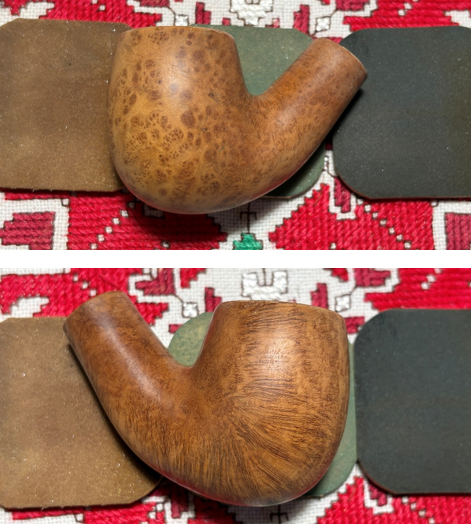 The second set of pads are grades 3200, 3600 and 4000.
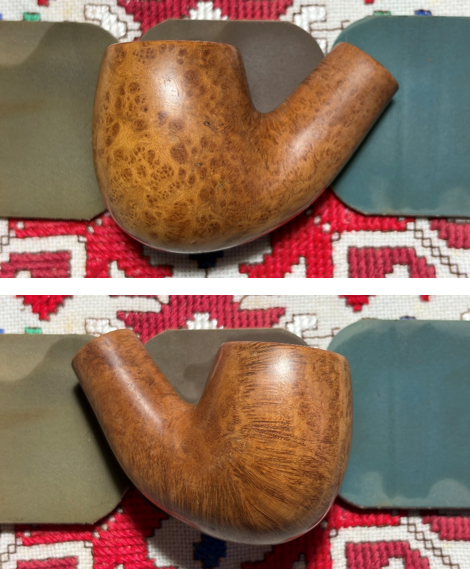 The final set of 3 pads are grades 6000, 8000, and 12000.
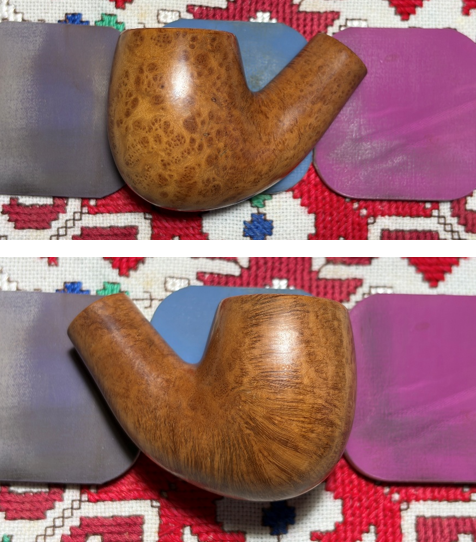 The grain on this stummel is spectacular. To bring out the natural hues more and to condition the briar, Mark Hoover’s ‘Before & After’ Restoration Balm is used (www.Lbepen.com). A small amount is placed on the finger and then worked into the briar. The stummel is then put aside for 10 minutes to allow the Balm to be absorbed.
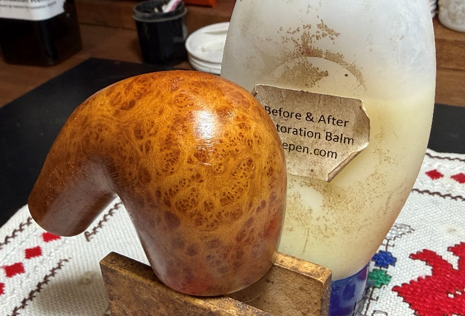 After the time elapsed, the excess Balm is wiped off with a dedicated microfiber cloth and buffed up. I like what I’m seeing!
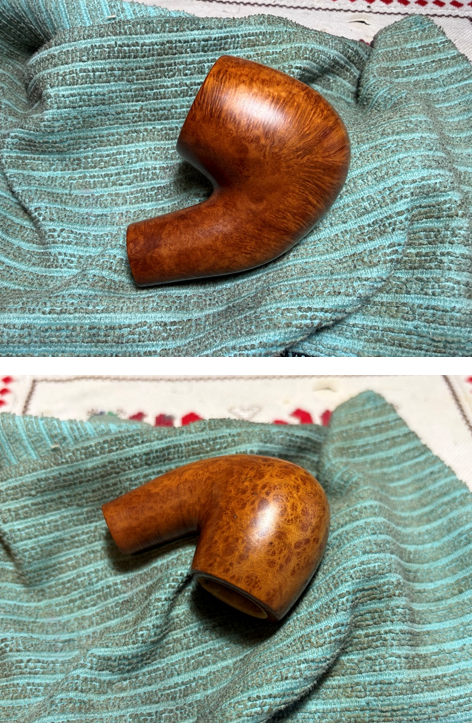 Transitioning now to the stem, it had been soaking through the night in Briarville’s Oxidation Remover. After it was fished out, the inside of the stem was cleaned with a pipe cleaner and cotton bud moistened with isopropyl 99% alcohol. The exterior of the stem was rubbed vigorously with a cloth to remove the oxidation that had been raised through the soak. The soak did a very good job.
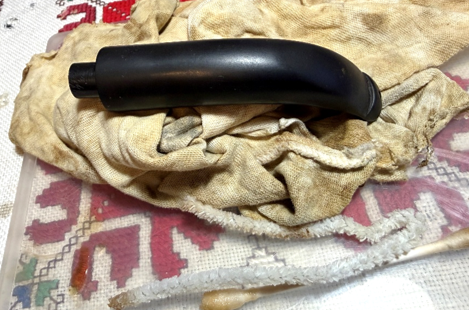 Looking more closely at the upper bit, there is a small bite compression right at the base of the button lip. To help reduce the compression, the heating method is used. The flame of a Bic lighter paints the area moving the flame back and forth – not holding it still in one place which can burn the rubber. As the vulcanite heats, it tends to expand moving back to its original position or closer to it. The before and after picture shows an improvement. Simple sanding should erase the compression.
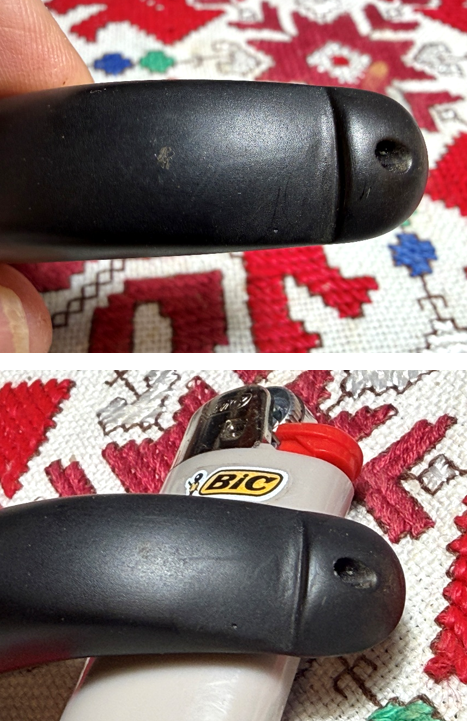 The button and bit are sanded with 220 grit paper – upper and lower.
 The stem is rejoined with the stummel with a shoulder guard in place. Sanding is then expanded to the entire stem using 220 grit paper. The guard helps to avoid creating a rounded edge on the stem facing as the sanding butts up against the guard.
 The sanding continues with 320 grit paper.
 The stem is then taken to the sink where it is wet sanded with 600 grit paper and then this is followed by applying 0000 grade steel wool.
 Well, it was going so well until it wasn’t… With the stem sanded, I had transitioned back to looking at the gap between the stem and shank facing that I had seen earlier. I was considering an approach to the and then I saw what changed everything…
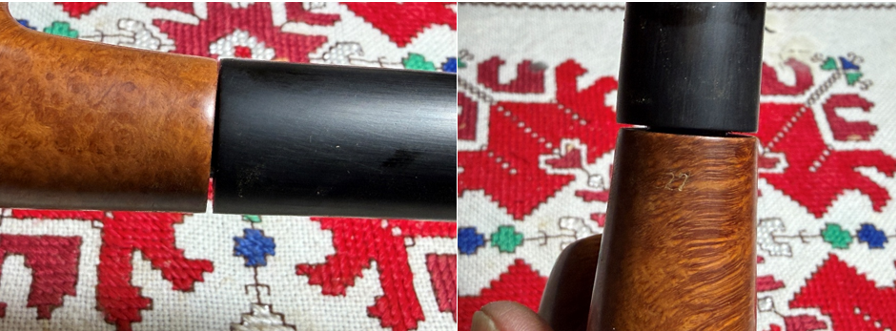 I took a look at the chamber for no reason, and I saw what is tantamount to ‘Pipe Roadkill’ – you know you don’t want to look but you just can’t help yourself. The Meerschaum lining had given way in the lower 1/3 of the chamber. Ugh….. After wiping away the tears, I took some photos to start assessing what I was seeing. There is a portion of the lining that is gone and signs of a larger fault above it where crack lines can be traced.
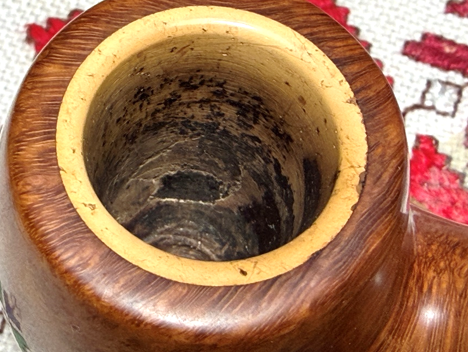 What amazes me is how thin the lining is – paper thin. I did not see any of the Meer debris, and it appears that it didn’t crack off but wore off through the years of use and my sanding may have pushed it over the edge.
 The following photos show the different perspectives looking at the lining to assess what to do next. There’s heavily discolored Meer circling the lower third of the chamber. To see if any of the dark areas are actually looking at briar and not Meerschaum, I run my finger over the entire lining. I can feel the edges of the break that I’ve already discovered, but everything else is smooth indicating that its all Meerschaum. However, how thin is the Meerschaum in the different quadrants and with one fault threatening to expand, what is the integrity of the Meerschaum lining? This is where a pipe’s condition is in ICU and to do nothing is tantamount to tossing the pipe in the waste bucket because when the integrity of a Meer-lined pipe goes, so goes the pipe. However, there is hope for salvaging this pipe.
 On a number of occasions, I have had the opportunity to use pipeman Troy’s ‘Old Time Meer Lining Recipe’ with good success. Troy was working on a Meer-lined Kaywoodie Shellcraft that had some issues with the lining. This is what he wrote (Old Time Meer Lining Repair Method On a Kaywoodie Shellcraft #5651 – Baccy Pipes):
I had read and heard from other pipe restores that an old late 19th-early 20th century druggist recipe for fixing broken meerschaum was egg whites and finely ground chalk, so that was what I was going to try and fix the meer lined rim with. It is said to have about the same porous properties of meerschaum and imparts no taste to the tobacco.
The mixture of egg white and plain white chalk provides a great Meer-like material that is strong and has characteristics that emulates Meerschaum’s composition. Here was Troy’s assessment of the Recipe after testing his repaired Shellcraft several times to see how the repair behaved:
I decided to smoke the pipe often for the next few days to see how durable it would be and if it would crack under heat before posting on the blog.
After several days of running my new favorite burley blend Low Country Natural Virginia & Burley (Blended by C&D) I am very pleased with the results.
Although I was not impressed at first, as the first couple of bowls were rather hot but it settled down after a few more bowls. After getting some seasoning and thin cake I can say it smokes really well and much cooler. No cracks are appearing as well. I get a good taste from the tobacco, and the repair is not impacting the taste of it at all. I cannot tell that the bowl lining is not pure meerschaum by smoking it.
Troy’s post has been used to follow the approach he utilized and with the projects that I’ve used the ‘Recipe’ I’ve been able to tune my approach with value-added experience. I have to give a disclaimer: The material is NOT Meerschaum but emulates the characteristics of Meerschaum very well. You could call it a ‘faux Meerschaum’ as well. Troy’s general approach is to mix the egg white and chalk together and coating the chamber with several layers of the Recipe. I believe the layering is most likely a key to the strength of the faux Meerschaum.
How do I approach this Meer-lined bowl? The question that has been mulling over in my head is how extensively do I utilize the Recipe in this situation? The break and threat of more breakage is in the lower third of the bowl.
- Do I just apply the Recipe only over the localized trauma?
- Or do I apply the Recipe around the circumference of the lower third?
- Or should I apply the Recipe over the entire Meer-lining – floor to rim?
Please forgive my poor drawing ability! What I’ve tried to illustrate are the issues that I’m concerned about created by the questions above. The Meer-lining is represented by the layer with the XXX. On the front lower part, the solid circle represents the damaged area. Here are my concerns:
- First, if the Recipe is used only on the damaged area, then two issues could happen. Notice the arrow pointing to the wedge created by the native Meer surface and the Recipe patch. This bump could be a problem getting knocked and caught by a pipe tool.
- Well, why not taper the patch up the chamber so that it smooths out the wedge? The concern with this is that when you taper the Recipe layer it becomes thinner which means it’s also weakening with each thinning millimeter. This could potentially increase the likelihood of the Recipe chipping.
- The same two concerns are true if the Recipe is applied to the circumference of lower third of the bowl – represented by the addition of the Recipe layer on the backside of the bowl in the drawing.
 The third option is to apply the Recipe layer over the whole Meer-lined bowl (drawing below). This approach avoids the wedge and taper concerns. It also addresses the question of whether the thinning of the Meer-lining is a concern for other parts of the bowl – this we can’t see. The downer part of this option is that all the Meerschaum is covered by the Recipe layer. This is where the question becomes: Do we want a pipe that will be stronger and have another life or not? In my view there’s no choice but to go for life!!
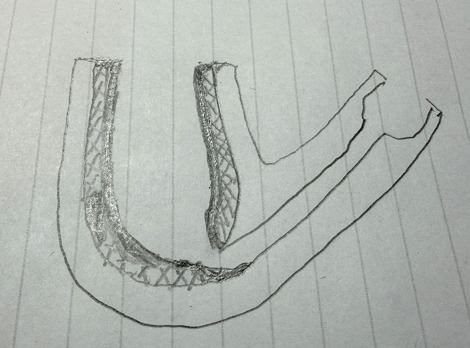 It was helpful for me to write out the issues and thought processes in ‘real time’ and to discover a direction after laying out the facts and concerns. Following the general steps in Troy’s post, the first step is to mask the pipe to protect it from getting a Recipe splash on it. To do this painters tape is used. I leave a small gap of briar exposed on the rim to allow a bit of overlapping over the native Meerschaum. I’ll clean this up after everything is done.
 I’ve cracked the egg and separated the white. My supply of pulverized supply of chalk looks to be running a bit low.
 The first coating of the Recipe is thin to allow the mixture to fill the cracks, faults and pits in the Meerschaum. Troy described the first coat as a 1 to 1 ratio of white to chalk. I put about a teaspoon of each in a smaller bowl and mixed it with the pipe nail tool.
 When the mixture seemed about right, a finger is dipped into the Recipe mixture and then applied around the chamber wall and over the rim. I forgot to mention, I had inserted a pipe cleaner through to the draft hole to guard against blockage. This first application needs to set for about 2 hours to dry and harden before I apply another coat.
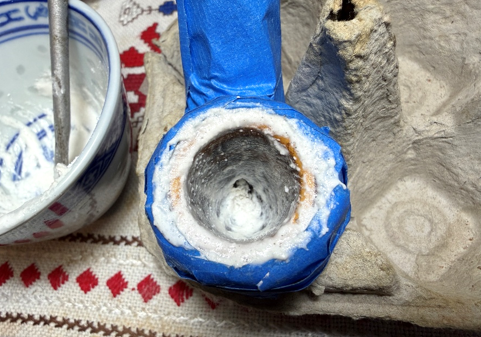 After a few hours, the next application is applied and since the hour is late, the stummel will go through the night allowing the Recipe to dry and harden.
 The next morning, more Recipe is mixed with egg white and charcoal. I made this mixture a little thicker and after applying it to the chamber with my finger and let the Recipe set for about 6 hours or so. I think one more application will be needed after this.
 After several hours, the final application of the Old Time Meer-lined Recipe was applied. I added some chalk to the final mixture to thicken it a bit more and applied it around the chamber with my finger. I will let this final application cure through the night to make sure it’s fully dried and hard.
 About 18 hours later, after my 8 year-old granddaughter’s birthday party last night and going to Costco this morning to get all the trimmings for our Thanksgiving dinner – I’m ready to go to work again on the stummel. The Recipe has fully dried and is hard. The pipe cleaner did the job of keeping the airway open.
 First, the process of sanding the chamber begins with 220 grit paper wrapped around the dowel rod.
 After doing the rough sanding in the chamber, a piece of 220 paper is used to start sanding away the mound of Recipe on the rim. The goal for this is to again find the rim so that the tape can be removed.
 The sanding started to uncover some briar on the rim so it’s time to remove the tape carefully. With the tape removed, I now have a general orientation to guide further sanding on the rim.
 Next, the 1500 grade micromesh pad worked on cleaning the excess Recipe on the briar rim and the 220 paper is used to start gently sanding the faux-Meer on the rim to clean and smooth.
 With the rim better defined, more sanding continues to smooth and round the chamber.
 Next, I started gently sanding the rim with the finer 320 grit paper. Since the native Meerschaum is flush with the briar rim, I noticed that the sanding started uncovering the Meerschaum. I decided to go with the flow and uncover the native Meerschaum on the rim. Initially, I was concerned that this might be a problem aesthetically but after some progress I liked the idea that Meerschaum would be visible – a badge of the glory of the past and a reminder that he carries his scars forward.
 Using 320 grit paper wrapped around the dowel, more sanding smooths the chamber.
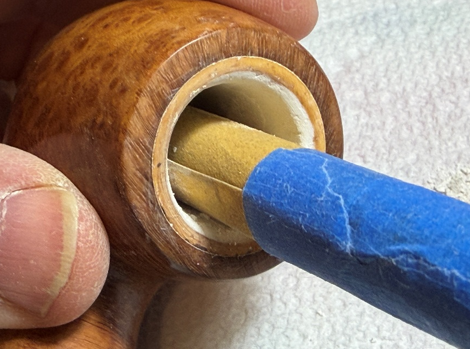 The floor of the chamber is cleared of loose faux Meer with the dental spoon. The draft hole is cleared as well. The lower floor is also sanded with 320 paper.
 Well, perfection is never part of the equation, but this faux-Meerschaum liner from Troy’s Old Time Recipe is this pipe’s chance to go again. Overall, I’m pleased with the lining. A word for the new steward – do not use a metal pipe tool to scrape the chamber UNLESS care is given not to dig into the new faux-Meer lining. Troy’s practice was to allow a very thin carbon cake to develop.
 To bring the rim back up to snuff, all 9 micromesh pads are used – 1500 to 12000.
 With all the tape and dust, the stummel is buffed with a micromesh cloth and ‘Before & After’ Restoration Balm is again applied to the stummel. After about 10 or so minutes, the excess is wiped off with a microfiber cloth, and the briar is buffed up.
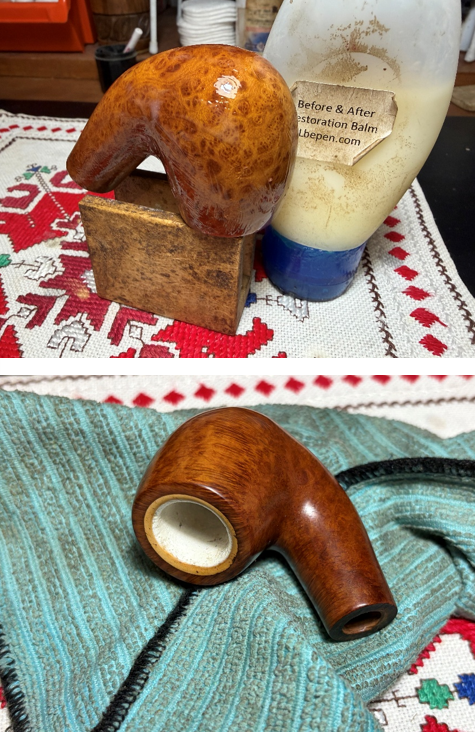 It’s been quite the detour – about 3 days’ worth of detour! We were looking at the next challenge when I discovered the fault in the Meerschaum lining. I had noticed earlier that the there was a rather daunting gap between the shank and the stem facing. I was hopeful that cleaning would rectify the problem, but it didn’t. My first thought was that the tenon was contacting the foot of the mortise, where the airway drilling begins, and this was the obstruction. I measured the tenon and compared that to the depth of the mortise and determined that there was sufficient spacing for the tenon to seat. In the end, it became clear that the stem’s drilling was cattywampus. The drilling of the mortise is angled down a degree or so too much so that the top of the shank and stem butt-up to each prematurely and this leaves a gap on the lower shank side. The photo on the left shows this. The photo on the right shows the huge gap on the underside.
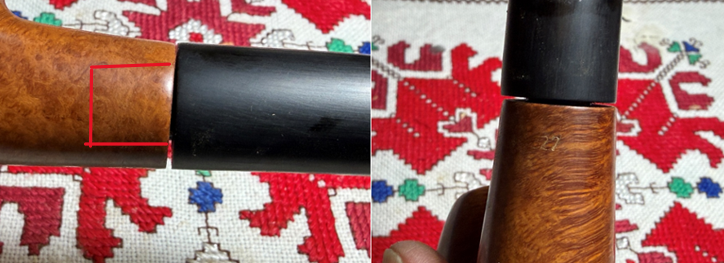 The usual way of addressing this kind of problem is to insert a piece of sanding paper between the shank and stem facing at the ‘high point’ – which is the top side in this case. With the paper pinched between the two and the rough side facing the shank, the shank is rotated back and forth so that the top of the shank is being sanded down. This sanding down at the high point helps to reduce the gap on the opposite side of the shank/stem. This is the usual approach but there are many ways this approach can get into trouble where you keep sanding and sanding and the shank and stem facing never seem to come together flush. There’s another way of addressing this where the gap is masked using a band or shank cap. I found a copper cap that I think will work great.
 Before using CA glue to do a test run, I know the top of the shank/stem is where the contact point is. The cap is mounted on the shank and angled so that the top of the cap is touching the shank, but the lower side is not. The stem is then mounted and pressed into the cap which pushes against the lower side of the cap flush. There is no gap visible.
 The photo below is looking down onto the shank cap. The gap is absorbed behind the copper cap which now serves as an extension. This is much better than the sanding approach in this situation.
 This next time is for real. The cap is glued with regular CA glue. The way this is done so glue does not squeeze out when the cap is mounted on the shank is to put a small amount of glue on the tip of a toothpick. The toothpick holds the glue on the tip which is then run around the inside circumference of the copper cap. This spreads a thin layer around the inner cap. The cap is then quickly mounted with the top side against the shank facing and allowing the stem to push the lower side of the cap toward the shank facing until the top of the stem and cap come together. Not only is the gap gone, but the band adds a bit of bling class to the unbranded pipe. I like it.
 With the copper band mounted, it needs to be shined up a bit. The shank is covered with painters’ tape to protect the briar from the black substance that is generated by applying compound to metals. Green compound is used with a dedicated cotton cloth buffing wheel with the speed set at about 40% full power.
 The following photo shows what can happen if the briar is not covered. The black can stain the briar.
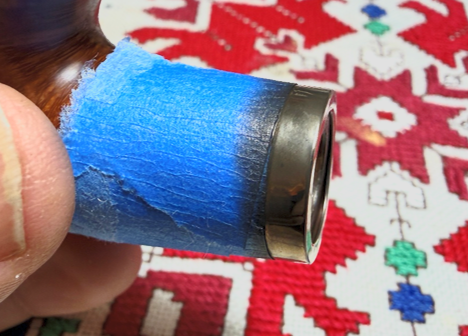 Wow! The tape is removed and the copper band is buffed with a microfiber cloth. The bling factor just went up a few degrees.
 Next, another dedicated cotton cloth wheel is mounted, and Blue Diamond compound is applied to both the stem and stummel – avoiding the band.
 The compound generates a lot of dust. This is wiped off with a felt cloth to prepare for application of the wax.
 Another dedicated wheel is mounted on the rotary tool and carnauba wax is applied to the stem and stummel – avoiding the band. After the wax, the pipe is given a rigorous hand buffing to remove excess wax and to raise the shine.
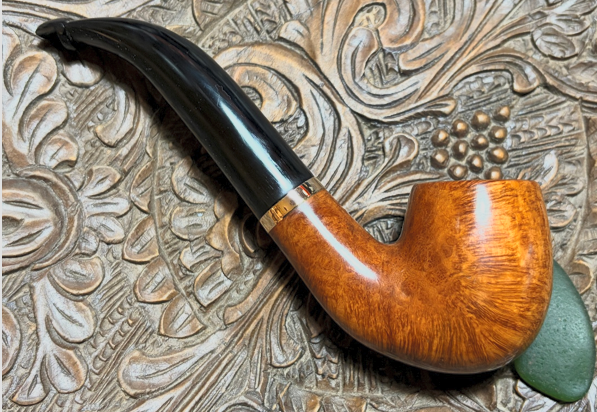
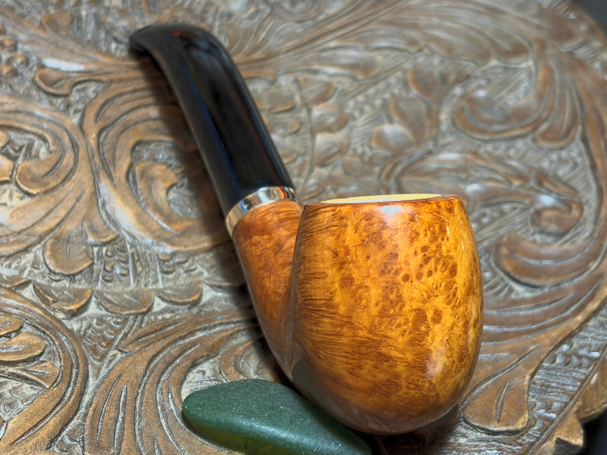
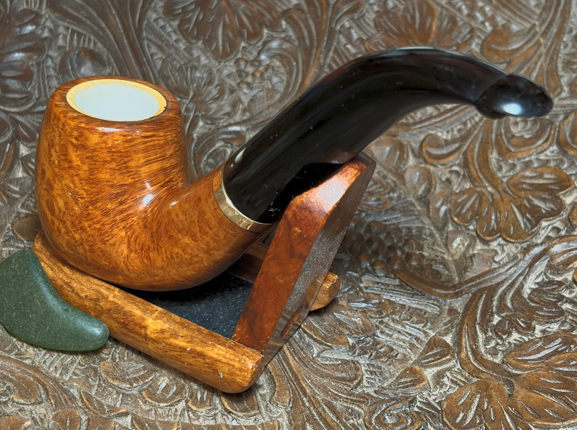
 When one starts a restoration project the many twists and turns cannot always be predicted. This Unbranded Meerschaum-lined Bent Billiard has turned out well thanks to Troy’s Old Time Recipe which was a game changer. Otherwise, this beautifully grained pipe would have gone into the bucket. The grain is an eye catching panorama of tight bird’s eye, flame and horizontal grain patterns. The addition of the copper band on the P-lip stem adds a touch of class. Justin commissioned this pipe from Bulgaria as a gift for a special pipeman – either his father or one of 3 friends in his home group. Amazingly, all 4 pipes Justin commissioned will make it for Christmas! A portion of the proceeds of this pipe will help support the work of the Daughters of Bulgaria, now called Spring of Hope. This week is Thanksgiving and I am thankful for friends, family and faith in a God who saves. Happy thanksgiving and thanks for joining me!
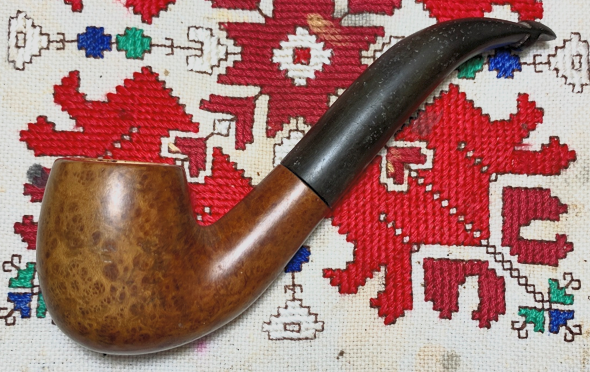


Please pray for the people of Ukraine! I have many dear friends there who simply desire freedom, to raise their children in peace and to worship God with His people.
