The classic Gourd Calabash on the table came to me a few days before Christmas in 2018, when my wife and I were in the US from Bulgaria to celebrate the holidays with family. I was anxious to do some ‘pipe picking’ and so the family went on a ‘picking’ day together. One place we visited was the Homestead Antique Mall in Arvada, Colorado – a suburb of Denver. I know all pipe pickers have experienced this one time or another – you can be scanning and rescanning the cases, shelves, cans – hoping that your ‘radar’ is wired in correctly enabling you to see the hidden treasures. I usually focus on what I call ‘guy’ displays with the customary, cans, knives, brass knuckles, ash trays and sometimes a pipe or two. I couldn’t believe my eyes when I looked at a ‘ladies’ display case and next to antique plates and other things that I can’t remember, sat the Gourd Calabash with the Meerschaum cup intact and what appeared to me to be a strangely bent stem. The tag had a good price on it and the Gourd Calabash returned to Bulgaria with me and eventually joined the ‘For “Pipe Dreamers” ONLY!’ collection benefiting the Daughters of Bulgaria. I also found another exquisite pipe at the same place – a Sculpted Sultan Meerschaum which my son-in-law, Niko, later commissioned and is in his collection now (See: Refreshing an El – Iş Sculpted Sultan Meerschaum found in Denver). Overall, a very good day pipe picking for me.
 I found the pipe man who was interested in the Gourd Calabash had a very interesting story. To give more life and interest for each restoration post, I like to ask those who commissioned pipes something about themselves to add to the pipe’s story – the next chapter of a pipe’s journey. N.R. responded to my inquiry with a question of his own that was surprising and intriguing as well. He wrote:
I’m originally from Australia but have lived all over the world. At the moment, I am splitting time between Mexico and the UK, with frequent trips to the US. I actually stumbled across your site during some research for an article I have been working on, examining pipes used to conceal weapons of different sorts. On that note, you may actually be able to help me with a quick question: have you ever seen a pipe with this precise ‘T’ marking on the stem? I know several brands have used a ‘T’, but this looks a little different to most I’ve seen. It could be one of a few, but I couldn’t narrow it down. From the other available images, there appears to be no other markings on the pipe. Any thoughts gratefully received!  Of course, I responded to his inquiry to try to identify the ‘killer pipe’ for his article but was not able to help conclusively. The stinger on this ‘T’ was designed to do some damage. I mentioned to N.R. that it wasn’t difficult to find him online where I discovered that he is an expert in armaments and the history of arms. I found that he works for ‘Armax: The Journal of Contemporary Arms’ in which he is also the Editor (https://www.facebook.com/armaxjournal).
 As an academic, this listing of his biography was intriguing to me. Here is a portion:
N.R. Jenzen-Jones is a technical intelligence specialist and historian focusing on arms and munitions. He is the Director of Armament Research Services (ARES), the Editor of Armax: The Journal of Contemporary Arms, and the founder of Helios House Press. He holds a Visiting Fellowship in the School of Law, Policing and Forensics at the University of Staffordshire and was awarded the Buffalo Bill Center of the West’s 2022–2023 Resident Fellowship for his work with the Cody Firearms Museum…. (https://nrjj.academia.edu/)
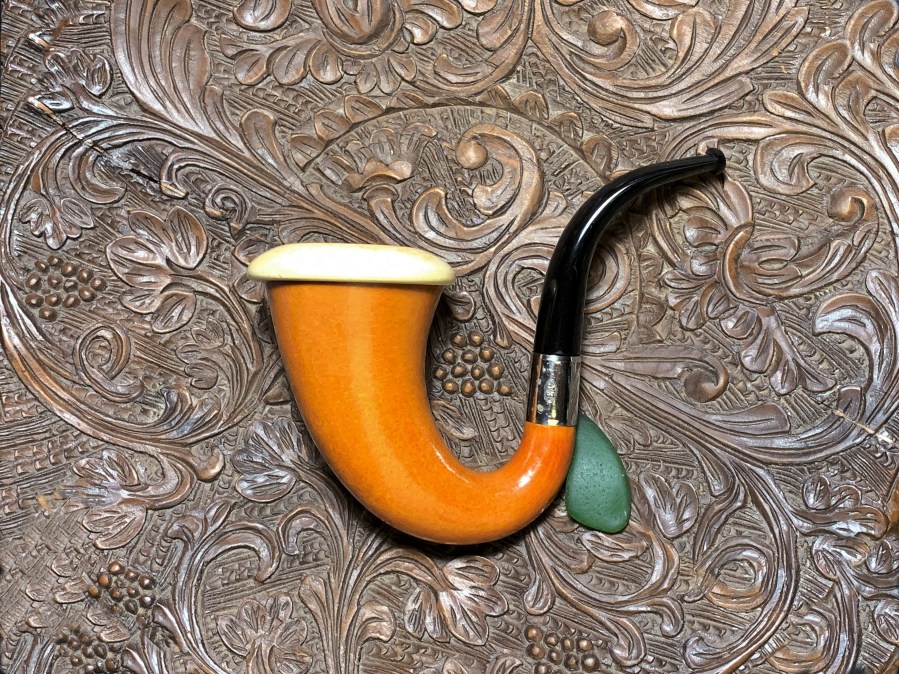
I took special note of the last accomplishment listed in the excerpt above – N.R.’s work with the Cody Firearms Museum which is located to the north of Colorado in Wyoming. My wife and I just went through Cody during a Pacific Northwest camping trip we did in June. If I would have known of this earlier, we would have surely stopped! (https://www.facebook.com/CodyFirearmsMuseum). I’m happy to add the Gourd Calabash to N.R.’s arsenal of pipes. It’s only fitting that I include a picture of N.R. I found online – I think it tells a story 😊.  Here are pictures of the Gourd Calabash Austria that got N.R.’s attention.


 The only marking on the pipe is stamped on the stem – the COM: Austria.
 The only other marking is on the long band which can almost be called a ferule – ‘EP’ is set in a bordered oval. This EP indicates the band is electroplated.
 Before jumping into the questions that emerge about the provenance and condition of the Calabash, I am reminded of Gourds that I have restored previously and the mystique surrounding Calabash Gourds being the special pipe of none other than Sherlock Holmes (which I do not believe to be true 😊). From previous research I discovered more about the gourds used for pipe making:
Most likely, the gourd now on the table came from South Africa. In his newsletter, ‘Save the Calabash’, Thomas Martin provides some good research regarding this question of the Calabash gourd. He wrote:
Calabash has come to represent a shape not a gourd.
Nobody would expect an apple shaped pipe to be made from an apple. Like “calabash” the name represents the shape not the material. The Calabash pipe used to actually be made from a gourd (Lageneria vulgaris). To my knowledge, there are no makers of real Calabash pipes in the United States and so I decided to make it my goal to give it a try. Having made a handful or two of briar pipes, I learned that finding good briar is the challenge that Rainer Barbi calls “the dance.” I can tell you, finding a Calabash gourd, although not impossible, is far more difficult.
Current wisdom suggests that acceptable gourds can only be grown in the Ladismith region of South Africa. When Calabash proliferated, they were cultivated for the specific purpose of becoming a pipe. Presently, if you can find a farmer that grows the gourd, he doesn’t grow it or shape it to be a pipe. In North America they are grown mostly for crafters. In Africa they are grown for crafters and for more utilitarian use.
If one wants to know more about gourds, the making of a Calabash, different kinds of Calabash pipes and Hollywood’s contribution to the mystique, he can look at http://calabashpipe.com/. I enjoy period ads that describe pipes through a historical lens. Not only does one see a pipe on display, but the descriptions and sales pitches are often like hopping into time machines and getting a peek at a time that is no more. The following page was from a ‘Meerschaum Pipes by Pioneer’ (LINK) catalog circa 1940. Pioneer was owned by the American pipe giant, Wally Frank. I like this ad because it gives expression to the age-old mantra of pipe smokers everywhere (the ‘holy grail’) – the Gourd Calabash provides, of course, the coolest, driest smoking pipe in the universe and is described in the text as truly an heirloom pipe – which I believe is true. The text in the ad also provides a description of the process of securing gourds, the celebrities who have these pipes and the last statement I like: “…a combination of Nature’s handiwork and man’s creativeness.’ I would only exchange ‘Nature’s’ with ‘God’s’. I also found the sizing chart interesting. The gourd on the worktable would be a size 5!
 Earlier I mentioned that questions emerged regarding the Gourd Calabash Austria on the table. The first question is the band or ferrule. It is marked with EP which indicates that is electroplated. According to Wikipedia, electroplating:
…is a process for producing a metal coating on a solid substrate through the  reduction of cations of that metal by means of a direct electric current. The part to be coated acts as the cathode (negative electrode) of an electrolytic cell; the electrolyte is a solution of a salt of the metal to be coated; and the anode (positive electrode) is usually either a block of that metal, or of some inert conductive material. The current is provided by an external power supply.
The ferule on the table most likely is nickel plated. The same Wiki article provides some historical details as well:
Electroplating was invented by Italian chemist Luigi Valentino Brugnatelli in 1805. Brugnatelli used his colleague Alessandro Volta‘s invention of five years earlier, the voltaic pile, to facilitate the first electrodeposition. Brugnatelli’s inventions were suppressed by the French Academy of Sciences and did not become used in general industry for the following thirty years. By 1839, scientists in Britain and Russia had independently devised metal-deposition processes similar to Brugnatelli’s for the copper electroplating of printing press plates.
The question that first emerged was what appeared to be an ‘EP’ ferrule with some age to it, but the age seemed not to match the other parts of the Calabash. I sent a note to Steve tapping into his Rebornpipes.com experience to get his thoughts. His response also touched on the other questions I was having:
Hey Dal
Electro plating was done in the early 1800s in Italy… have a look on Wikipedia.
That pipe is nowhere near that old… The stem stamped Austria makes me wonder if it is an early 1900s pipe but the bowl and meer do not look that old.
Near EP bands have a diamond around them rather than an oval… Not seen that before.
Steve
Steve’s observations reflect that he thinks the ‘Austria’ marking on the stem could possibly place the stem’s dating in the early 1900s but that the gourd and the Meerschaum do not appear to match this older dating. The picture below reveals what seems to be the disconnect that Steve described. The ferrule and stem seem to be consistent with an earlier dating in the 1900s. However, the gourd and the Meerschaum cup do not seem to cooperate with a dating that early. The inner gourd surface is not pristine but shows normal soiling. The cork shows almost no wear or deterioration, almost always seen on pipes that have weathered many more years of use – if one projects back to the early 1900s. Added to this, the Meerschaum cup has had quite a bit wear, but on closer inspection, I discover the number ‘193’ in pencil – most likely an inventory marker. This to me leverages toward a younger dating – certainly not early 1900s but it’s not a new cup either. After sending Steve a picture like the one above, his response summarized what I was thinking:
You are right, I think. The gourd and cork do look new. The stem fit is also odd and seems to match the band and the bend is wrong. I bet they use a replacement stem from somewhere and a band from somewhere and cobbled together a pipe.
The strange orientation of the stem bend was also in the conversation, but his conclusion seems to be spot on – this Gourd Calabash was cobbled. The stem and ferrule are most likely from an older period. Steve also remarked about the ferrule marking that the EP encased in a circle was new to him. Steve indicated that what one normally sees is the ‘EP’ encased in a diamond. However, the gourd and Meerschaum seem to be newer, but not necessarily ‘new’.
I can’t say with any certainty what the actual provenance of a cobbled pipe is, but what we MAY have is a scenario where the original gourd was lost (early 1900s?). If I had the remnants of an early 1900s Calabash Gourd, I would certainly desire to repurpose the dated artifacts even if it meant being cobbled with newer components. This is only my best guess, but when this cobbled Calabash is finished, with the stem bent to a proper orientation and everything cleaned up and mended, I hope it will be a beautiful mixture of new and old – like wines for different palates!
With a better understanding of the Gourd Calabash Austria on the table, looking more closely at the issues it has, the most obvious challenge is the broken gourd shank beneath the ferrule. With the ferrule being from an older vintage, it was obviously put in service to reinforce the gourd at the break. Another possible scenario is that the older cobbled stem was forced into a shank that it didn’t exactly fit and hence the crack and the need of the ferrule…😊 The Meerschaum cup has seen some use. The surface of the cup has pitting and chips, and the fire chamber has had use, but seems to be in good shape.
 The stem has light oxidation and some minor tooth chatter. The rubber surface is also rough.
 To begin, the airway is cleaned with a few pipe cleaners and isopropyl 99%. After the airway is clean, to address the minor oxidation, the stem is placed in a soak with Briarville’s Pipe Stem Oxidation Remover.
 After several hours, the stem is fished out of the Oxidation Remover. Very little raised oxidation can be seen on the stem. Even so, the stem is rubbed rigorously with a cotton cloth. More ‘rubber black’ is visible on the cloth than the brown oxidation residue. To clear away the fluid from the airway, a pipe cleaner moistened with isopropyl 99% is also run through the airway.
 I notice also how rough the rubber texture is. I’m not an expert on rubber compounds, but the texture is reminiscent of older pipes that I’ve worked on in the past. The rubber has more of a charcoal character than a smooth, glossy feel.
 Putting the stem to the side for now, taking a closer look at the gourd shank break is next. Before proceeding with the cleaning of the gourd or Meer-cup, I want to see if the break can be helped. Up to this point, the thinking was to leave the ferrule alone and not mess with it, not wanting things to be worse. However, after looking more closely at the shank, there seems to be gaps between the cracks which may need more attention.
 After gently putting some pressure on the ferrule, it rotated slightly letting me know that it was not glued. The question is: Will the ferrule come off enabling me to see things more clearly? With a soft touch and gentle rotation of the ferrule, the ferrule was removed easily. It was a good decision to take it off. The cracks are exposed and have expanded some by looking at the widening gap. It is quite possible that the gourd cracks will lengthen as well if they are not addressed. I’m not sure what the white powdery material is collecting between the ferrule and gourd, but perhaps the metal reacting to moisture and time… OR, it could be the remnants of glue being used to affix the ferrule.
 The white substance is inside the ferrule as well.
 The shank is cleaned using undiluted Murphy’s Oil Soap with a cotton pad. It takes some scrubbing, but the crusted white stuff begins to break up as the soap penetrates.
 Using a cotton bud moistened with alcohol, the inside of the ferrule is cleaned as well.
 With Murphy’s on the table, I decide to expand the cleaning to the entire gourd. The gourd is in good shape, but grime smudges can be seen here and there.
 The cotton pad is used with Murphy’s Oil Soap to scrub the gourd surface. Murphy’s does a great job. It’s not acidic and gently cleans the gourd.
 To rinse the soap, the sink and faucet are not used avoiding water running into the gourd and moistening the shank cracks too much. A cotton cloth is moistened with water and the soap is wiped off. The gourd looks good.
 With the cracks on the shank, I do not want to take the chance of them creeping and getting larger. At this point, both cracks are still hidden by the ferrule. The larger one has crept up to the edge. To prevent the continued creeping, the gourd is treated as I would a briar pipe. Using a 1mm drill bit, counter-creep holes are drilled at the end of each crack and then filled with CA glue. This helps to block the crack and keep it where it is. For the larger crack, the end of the crack is obvious.
 The counter-creep hole is drilled (not through the gourd) and it looks good.
 The smaller crack is a bit inaccessible on the crook side of the shank. A magnifying glass helps to identify the end of the crack and since it’s so minuscule, a sharp dental probe is used to press a guide hole at the end point. This allows me to guide the drill bit more easily.
 Since the gourd is fully dried or seasoned, there is no ‘play’ when I press on the shank trying to close the gaps. Forcing the closure of the gap may cause more problems. Instead of closing the gap, CA glue is used to fill the gap to solidify the shank’s integrity. A line of CA is traced down the gap and gravity helps the CA to settle more deeply in the crack. An accelerator is then sprayed on the crack to immediately cure the CA holding it in place. This process is repeated a second time – laying at line of CA down the partially filled gap and then spraying with accelerator. The gap is pretty much filled with CA at this point.
 One line of CA is also laid along the crack inside the shank. A toothpick helps to spread it and then it is sprayed with the accelerator to hold it in place.
 The same procedure is done with the smaller crack – CA glue placed over the crack on the external surface and in the mortise.
 Flat and curved needle files are used to file down the CA glue patches. Since the ferrule will be covering the shank, there isn’t a concern for the optics. The goal is to form a quasi-smooth surface for the ferrule to adhere to when mounted. I have intentionally left a layer of cured glue broader than the crack itself. The reason for this is that I believe it will add additional strength and integrity to the mended shank.
 Looking inside the crook of the shank at the smaller crack, the filing is finished.
 The patch mounds in the mortise which are addressing the internal cracks also need filing. This is more important than the external optics since the stem needs to be reseated. A rounded needle file goes to work on the patches in the mortise.
 Cone and cylinder-shaped grinding stone tools are mounted on the rotary tool are also used to help smooth out the patch mounds in the mortise.
 The smoothing process is halted for now. More work needs to be done to allow the tenon a nice, snug fit into the mortise. I mount the ferrule to make sure there are no snags before actually mounting the ferrule permanently.
 With the ferrule again free of the shank, I use a tarnish remover to help start the cleaning process of the electroplated ferrule. It is easier to use this product without the ferrule mounted to avoid any damage to the gourd.
 After applying the tarnish remover with a cotton pad per directions the ferrule is rinsed with cool water. The metal shined up some and the pitting will probably not be removed. These marks continue as badges of honor for the years of service the ferrule has provided. 😊
 The next step is to buff/polish the ferrule by applying Blue Diamond compound which is a very fine abrasive. A cotton cloth wheel dedicated to application onto metal is mounted on the rotary tool. Applying compound on metal always produces a black residue which is pretty nasty stuff – visible on the compound block and on the wheel. To make applying the compound a bit easier, it is mounted over a cork.
 Wow! The compound buffing brought out a reflective shine – though the badges of honor are still visible.
 Next, the ferrule is mounted over the gourd shank. CA glue is placed inside of the ferrule about half way. In doing this, as the ferrule is mounted, the wet CA glue will stay within the covered area and not squeeze out onto the gourd.
 The CA is applied, and the ferrule is mounted with the EP facing the side.
 Continuing with cleaning, the inside of the gourd shows darkened patches indicating that it has been used a good bit.
 Using flat dental spoons, the sides of the inner gourd walls are scraped to remove some of the collected grime.
 The scraping got the main stuff, but it would be very difficult to clear away everything. The inside of the gourd is wiped with a damp cotton cloth to remove dust.
 The cork on the edge of the gourd is important because it holds the Meerschaum cup in place. It is important to keep the cork conditioned. When cork dries out, it is more likely to deteriorate, crack, and lose its ability to grip the Meerschaum cup.
 To recondition the cork, some Petroleum Oil is placed on my finger and then spread over the cork, and it is absorbed. The cork likes the treatment a lot!
 The cork is in good shape now. My attention returns to the vintage stem which still needs to be seated in the mortise.
 Returning to the grinding cylinder mounted on the rotary tool, the cylinder is used carefully to enlarge the mortise. The goal is for the grip to be snug, but not loose or too tight. Care if given to go slowly, testing the tenon’s fit often so that too much isn’t removed.
 After testing the fit several times – pay dirt. The grip feels good. The ferrule and the stem seem to match perfectly.
 From the beginning, the stem’s orientation has been like scratching fingernails on a chalk board to me. Of course, you have to have so many decades under your belt for that analogy to have any meaning! The following ad comes from a 1941 George Yale catalogue which I found in the Chris Keene Directory (LINK) of pictures that used to be on his website – now defunct. The Gourd Calabash on the top shares the same profile as the Gourd on the table. The crook is much tighter (compared to the example at the bottom). A tighter crook requires a sharper bend in the stem to bring it to a proper orientation. The predominant orientation of a Gourd Calabash tends to be a few degrees above parallel with the top of the cup. I love the price marked on these Calabashes!
 I took a few minutes to sketch what needs to happen with the Calabash’s stem. It will not be easy as the stem is thick, and the texture of the rubber may lend to it not bending as easily as other stems.
 A sketch is simply a guide and the reality of what the stem chooses to do is yet to be seen!
 To heat the stem a hot air gun is used. A pipe cleaner is inserted through the airway to help hold its integrity while bending. There are two alignments to be concerned about – the obvious axis we call the ‘bend’, but the other is that the stem can twist during the process, and the button will be out of alignment. The block of wood helps to bend the stem after it’s heated and softens.
 After heating the stem with the hot air gun (by continuously rotating it to avoid charring it), the stem gradually becomes supple, and is gently bent over the block of wood. When the bend seems right, the stem is held in the new orientation and dipped into a bowl of cool water (which was prepared beforehand) to cool it and solidify the bend. The first comparison with the sketch below shows that a bit more angle is needed to bring it closer to a few degrees above the parallel plane.
 After heating again, the block of wood is exchanged with the cue ball which has a rounder curve to it. The cue’s characteristics help to achieve the arching bend which is rounder instead of a sharp bend nearer to the button.
 This heating cycle gets closer. The bend is almost right, and the arc of the bend is rounder.
 The third and final heating cycle achieved a very nice curve in the bend. The angle feels right as I held the pipe in hand and practiced a mock session with the Calabash. I like it – a lot!
 Earlier I mentioned the other axis point when bending – a stem can twist resulting in the button being crooked. I inspected the Calabash’s stem for this as well. On first look, it looked like the stem had twisted, but looking down the shaft of the stem to/through the shank is a straight line. What this Calabash has is a gourd shank that angles a bit to the left. This is God’s imprint and this I cannot correct 😊.
 With the stem’s bend finished, time to begin sanding the rough surface of the vulcanite or rubber stem. There appears to be no tooth chatter on the bit, so the coarser 220 paper is bypassed for 470 paper. As soon as the sanding begins, what I noticed earlier about the older nature of the stem having a different rubber compound in confirmed – almost charcoal-like. The residue on the sanding paper illustrates this clearly. The sanding removes the rough surface of the stem. Care is given to protect the AUSTRIA stamping.
 The 470 sanding is done. The layer of charcoal has been removed for the most part.
 To continue the sanding and polishing of the stem, the stem is wet sanded using 600 grade paper. This is followed by applying 0000 grade steel wool. Throughout, care if given in protecting the AUSTRIA stamping. The stem has started looking very nice.
 Next, the full number of 9 micromesh pads are used to sand/polish the stem. After the sanding of each pad, Obsidian Oil is applied to the rubber and worked in. Obsidian Oil will help condition the rubber as well as provide UV protection from the sun – guarding against oxidation. I love watching the glossy pop emerge through the micromesh process.
 One more step with the stem at this point to further condition it. Mark Hoover’s ‘Before & After’ Fine and Extra Fine Polishes do a good job. First, the Fine Polish is placed on my finger, and is worked into the rubber. After massaging it into the rubber thoroughly, a paper towel is used to wipe it off. Next, the Extra Fine Polish is applied in the same way and wiped off and buffed. The stem looks great!
 Next, the Meerschaum cup has minor cake buildup in the chamber. The picture below also shows the chipping and pitting in the Meerschaum. At this point, during the chamber cleaning and sanding, the chips on the edge of the chamber will be addressed.
 The Savinelli Fitsall Tool does a good job of scraping the Meerschaum chamber to remove the thin buildup.
 The chamber is also sanded using a Sharpie Pen with 220 grade paper wrapped around. The sanding will not remove the darkness of the Meerschaum, but it smooths it and removes residual carbon buildup.
 The chamber looks good. Some initial sanding was done on the edge of the rim, and it looks better, but chips remain at this point.
 The mushroom dome of the Meerschaum cup is not in good shape. There is extensive chipping over the entire surface.
 The next pictures draw in closer to see not only the chips but the myriad of nicks and cuts.
 The Meerschaum is sanded first with 220 paper to do the heavy lifting. This is followed by sanding with 470 paper.
 The sanding has smoothed the surface considerably – not perfection. There are still some pits that linger. What’s interesting to see is the vestiges of the patina hanging in there.
 Next, all 9 micromesh pads are used to continue sanding/polishing the cup from 1500 to 12000. Between each micromesh pad, the Meerschaum surface is wiped with a damp cotton cloth to remove the Meer-dust and to give the following pad more traction. My, oh my – I’m taken by how the surface transformed from a chalk-like feel and appearance to one that could be mistaken for porcelain. What is also surprising is the patina. The eggnog yellow has popped out saying something about the age of this Meer-cup. I said earlier that it is probably a younger portion of the cobbled Calabash, but it has had enough use to develop a very nice Meerschaum patina, which increases its value and collectability.
 My, oh my – I’m taken by how the surface transformed from a chalk-like feel and appearance to one that could be mistaken for porcelain. What is also surprising is the patina. The eggnog yellow has popped out saying something about the age of this Meer-cup. I said earlier that it is probably a younger portion of the cobbled Calabash, but it has had enough use to develop a very nice Meerschaum patina, which increases its value and collectability. Nice.
 To bring out the shine and patina further and to protect the Meerschaum, the Meerschaum will be treated with an application of beeswax. Beeswax protects the Meer surface as well as encouraging a rich patina. I have Bulgarian beeswax that came along when my wife and I came back to the US.
 The beeswax is heated with the air gun and when it liquifies, it is applied to the surface with a horse hair brush (which will not melt). The Meer cup is also warmed with the hot air for a more even application of the melted wax.
 As the melted beeswax is applied with the brush, the wax congeals very quickly as it cools on the Meer surface. The wax is caked on the surface when the process is finished. It takes some work removing the excess, congealed wax, using a cotton cloth.
 As the excess comes off, the surface buffs nicely. Finally, with all the excess removed, I use a microfiber cloth to give the cup a hearty hand buffing. The Calabash’s Meer cup is now ready for a gourd!
 With the gourd back on the table, the next step is to help condition it. I use Mark Hoover’s ‘Before & After’ Restoration Balm on briar, and it does amazingly conditioning the wood and bringing out the natural hues. The Gourd Calabash will get the same treatment. A picture is taken first before application to compare.
After placing some Balm on the fingers, it is rigorously worked into the gourd surface until the entire surface has been covered. The gourd is put aside for about 15 minutes to allow the Balm to do its thing. After the time has passed, a microfiber cloth is used to wipe the excess Balm and to buff the surface. I like the results. The rich butterscotch color catches the eye.
 Next, Blue Diamond compound is applied. Using a new cotton cloth buffing wheel mounted onto the rotary tool, for the gourd, the speed is set lower than my usual about 40% full power – 25%? The speed is decreased to be gentler with applying the finely abrasive Blue Diamond compound to the gourd. Blue Diamond is then applied to the stem at the normal 40% full power.
 During the application of the compound, I was amazed how the compound brought out even more shiny gloss from an already shiny gourd surface. It’s more difficult to see in a picture so I try to identify the glossier area where the compound has been applied – the lower right quadrant has received the compound. The 3 horizontal dots mark the upper reach of the area and the 3 vertical dots mark the reach of the movement going from right to left across the gourd surface. The ‘X’ signifies the entire left quadrant pictured that has not received the compound polishing. The second picture shows the same orientation without markers. Whether the border of glossier gourd can be seen in the pictures or not, I can and so will the new steward.😊
 After application of the compound on the gourd bowl and stem, a felt cloth is used to wipe off the compound dust that has accumulated on the surfaces during the application. This is done in preparation to receive the wax.
 With another cotton cloth wheel mounted, and the speed turned up a bit more for the gourd and the normal speed of 40% for the stem, carnauba wax is applied. The gourd loves the wax 😊. After application of the wax, the gourd and stem are given a rigorous hand buffing to remove excess wax and to raise the shine. The pipe is then reassembled with the Meerschaum cup and stem.
 Even though the Gourd Calabash Austria may indeed be cobbled, the results speak to a new pipe ready to go. The most daunting aspect of the restoration was the broken shank. The repair is solid and the newly properly bent stem is seated securely. The Meerschaum patina came out more nicely than one would expect for a Meerschaum cup. The gourd, forming the foundation of the Calabash, is beautiful showcasing the depth of color and long curves that one expects from a Gourd Calabash. The ‘EP’ ferrule, completes the ensemble with a touch of class. N.R. commissioned this Gourd Calabash and will have the first opportunity to acquire him from the Pipe Steward Store benefiting the Daughters of Bulgaria – helping women and girls who have been trafficked and sexually exploited. Thanks for joining me!


Hi!
I have exactly such a pipe with exactly the same markings on the stem and on ferrule! I bought it on ebay quite a long time ago and I don’t remember the exact description, but it seems it was mentioned that the pipe is given 50-60 years of the 20th century. I’m not sure the seller was sure of it himself. I like your dating to the early 1900s more, especially since my gourd and meershaum cup look much older than yours.
My pipe doesn’t have any problems requiring repairs other than having to replace the cork. Could you give me instructions on how to do this and where to find the right material?
I would really appreciate your help!
Best Regards,
Daniel
LikeLike
Daniel, thanks for your note. I have not had to replace the cup cork like this before, but the depth of the cork looks to be about 3/16” to 1/4”. I would find on Amazon or Hobby Lobby a cork tile and cut a strip to circle the inner gourd and cement it with a wood glue. My thoughts, hope it gives you some ideas.
LikeLike
Thanks for reply! I solved the problem: I bought a cork stopper of the desired outer diameter on ebay and drilled the middle. This cork ring I glued instead of the old one.
LikeLiked by 1 person
Fantastic! Glad to hear this.
LikeLike
Pingback: New Life for a Classic Lillehammer GL Super Extra 61 Made in Norway – The Pipe Steward
Pingback: Refreshing a ‘Seahorse’ Rusticated Dublin of Italy – The Pipe Steward