The next pipe on the worktable was part of a Lot of 4 pipes that were on the online auction block from Giussago, Italy, in January of 2017. Three of the 4 pipes were similar in that they sported red, glossy shellac-like finishes. It seemed to point to the affinity of the former steward’s taste in pipes. My final bid was sufficient to bring the Lot of 4 from Italy to Sofia, Bulgaria, where my wife and I lived. The pictures on line were not good, so when the pipes arrived, I took this picture of the Lot. The top 3 are the red finish pipes. From the top: a Chacom Radford’s Seventy-Six, Machiavelli Cambio and a Vuillard Concord 3S. The non-red finish on the bottom was a Denicote DeLuxe Regatta. The Chacom and Denicote are still in the For “Pipe Dreamers” ONLY! collection waiting for their adoptions. The Vuillard Concord has found a home and turned out great (See: A Challenging Refinish of a Vuillard Concorde 3S of St. Claude Chubby Billiard), but dealing with the ‘candy apple finish’ was a challenge.
 Nebraskan pipe man, Greg reached out to me regarding the Machiavelli Cambio and the Chacom Radford’s Seventy-Six in the same Italian Lot of 4. I appreciated what Gary said when I asked how he found out about the restorations I do. He said that he had been following the posts I had done on Facebook Groups and was also drawn by our trips to Europe and Ukraine. Greg also shared that he was close to retirement, and he shared that he understood my plea for patience as commissioned pipes made their way to the worktable. My wife and I appreciate the beauty of Nebraska. Living now in Colorado, we have traveled through and camped in Nebraska many times.
I sent Greg my observations of both pipes and in the end, the Machiavelli was commissioned. Here were my observations of the pipe he chose:
Machiavelli Cambio Ball – This is a very nicely shaped Ball. The bones are pretty good. There are some blemishes on the briar, but to me, the main issue is the candy apple finish which I don’t like a lot. To me the shellac finish detracts and obscures from the natural briar. What I would do is to remove the finish and start over – still seeking to match the original color – which is a festive hue.
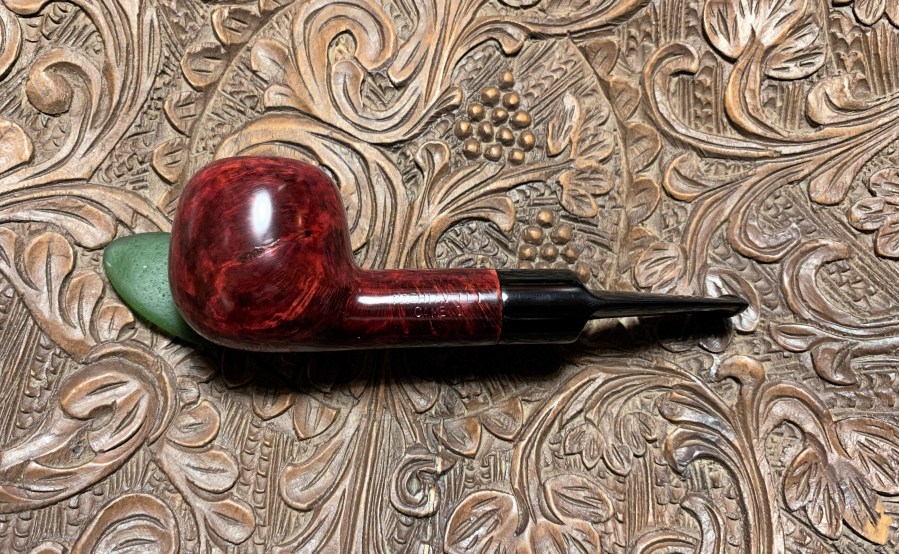
Here are pictures of the Machiavelli Cambio Ball that got Greg’s attention. 


 The provenance of the pipe is stamped clearly on the left shank flank: MACHIAVELLI [over] CAMBIO. I could locate no other stampings indicating a COM or a logo on the stem.
 Precious little is available about the source of the Machiavelli name. Pipedia simply references it under Italian Pipe Brands & Markers M – Q as: Machiavelli with ‘????’ listed next to the name. Pipephil lists a bit more including some examples of Machiavelli pipes and stem logos. Pipephil flies the Italian flag in the corner, but there is no information about the manufacturer or history.
 I found a few examples of Machiavelli for sale on the various online forums, but no description that could help me drill down into any specifics. I also searched my copy of, ‘Who Made That Pipe’ by Wilczak and Colwell and found no reference. This seems to be one of those cases where the provenance of a pipe is what it is. The good news is, this Italian Machiavelli Cambio Ball is an attractive pipe. The name “Machiavelli” harkens back to an Italian by the name of Niccolo’ Machiavelli of the 14/1500s. From Wikipedia:
Niccolò di Bernardo dei Machiavelli[a] (3 May 1469 – 21 June 1527) was an Italian diplomat, author, philosopher and historian who lived during the Renaissance. He is best known for his political treatise The Prince (Il Principe),  written around 1513 but not published until 1532, five years after his death.[9] He has often been called the father of modern political philosophy and political science.[10]
Machiavelli’s maxims perhaps can be summarized in the statement, ‘The ends justify the means.’ Also from Wikipedia:
After his death Machiavelli’s name came to evoke unscrupulous acts of the sort he advised most famously in his work, The Prince.[12] He claimed that his experience and reading of history showed him that politics have always been played with deception, treachery, and crime.[13] He also notably said that a ruler who is establishing a kingdom or a republic, and is criticized for his deeds, including violence, should be excused when the intention and the result are beneficial to him.[14][15][16] Machiavelli’s Prince has been surrounded by controversy since it was published. Some consider it to be a straightforward description of political reality. Others view the Prince as a manual, teaching would-be tyrants how they should seize and maintain power.[17] Even into recent times, some scholars, such as Leo Strauss, have restated the traditional opinion that Machiavelli was a “teacher of evil”.[18] The term Machiavellian often connotes political deceit, deviousness, and realpolitik.
If we take this general sense of what Machiavellianism is known for and add the ‘Cambio’ to it, it makes for an interesting identity for this pipe. The base meaning of Cambio in Italian is ‘change’. From the Wiki quote above, Machiavelli was the ‘Teacher of Evil’ plus ‘Change’. I’m not sure I want to postulate any further!
The Machiavelli Cambio on the table, as I said previously, has a ‘candy apple’ red finish which has some skins and fills. My experience with pipes with this kind of finish is that there is no way of dealing with these issues without starting over – strip the finish, deal with the briar imperfections, and reapply a finish. The good news is the new finish will showcase natural briar grain and not a chemical gauze finish. The stem holds a 9mm filter or air restrictor and is in pretty good shape. I see no oxidation and the upper button lip has a bite compression and the lower bit has a slight tooth compression. To begin, even though I detect no oxidation, the stem airway is cleaned with pipe cleaners and isopropyl 99% and then placed in a soak of Briarville’s ‘Pipe Stem Oxidation Remover’. The airway cleaned up with no difficulty. However, the filter cavity required many cotton buds to clean. Then, the stem is dropped in the Oxidation Remover for several hours.
 There is almost no cake build up in the chamber. Even so, the chamber is cleaned to allow fresh briar to emerge.
 The chamber is reamed with the smaller 2 of 4 blade heads available in the Pipnet Reaming Kit. This was followed using the Savinelli Fitsall Tool to scrape the chamber walls. Finally, the chamber was sanded with 220 grade paper wrapped around a Sharpie pen.
 An inspection of the chamber reveal no burning problems.
 The pictures below show the skins, scratches, and nicks in the bowl’s surface. The picture below shows a large injury to the left side of the bowl. All the pictures also show the reflection of the light off the shellac finish. There is no way that I know of to repair an injury like what is seen below, with the shellac, candy apple finish.
 Since the shellac finish needs to be removed and start over, there is no need to clean the external surface. With this bypassed, the stummel goes directly to the sink where the internals are scrubbed with anti-oil liquid dish washing soap and shank brushes. After the scrubbing, the internals are thoroughly rinsed and the stummel returns to the worktable.
 Next, excavation begins on the crud and grunge of tars and oils in the mortise. A small dental spoon is used to scrape, scrape, scrape the mortise walls. The pictures tell the story. Restoring pipes is not only glory! To the degree that the grunge is excavated to the degree I save on pipe cleaners and cotton buds.
 The buds finally start emerging lighter. I’m not concerned. The next step in soaking the stummel will remove any vestiges of tars and oils. The internal cleaning had more to do with not soiling the acetone that comes next.
 With the stummel cleaned, the next step is to remove the candy apple finish in order to get down to the actual grain. The shellac finish actually obscures natural briar. The thick shellac finish usually does protect the briar, but the normal scratches that a pipe receives with use, often is scratching the finish itself and can’t be repaired. The stummel is placed in a mason jar of acetone to do the job.
 As expected, after a night of soaking in the acetone and fishing the stummel out, it looks exactly as it was before the soak. The finish is still intact, and the gloss of the chemical shine is still there. It looks the same, but the soaking does soften the finish enabling an easier removal.
 With a little elbow grease, 000 grade steel wool is used to scrub the finish after dipping a bit of the steel wool in acetone. It does take some effort, but the red gradually gives way to the natural briar beneath.
 As I work around the bowl, the picture below shows the contrast with the last remaining remnants of the finish.
 Since the stummel will be refinished with a red leaning dye, I’m not as concerned about removing all the old finish over the nomenclature. I do remove the shellac layer with 0000 steel wool and a cotton pad but leave some of the coloring.
 Taking a quick survey of the bared briar, the grain is much more visible as well as the imperfections in the briar itself. The dome of the Ball shape looks great. There are small scratches around the edge which will clean up nicely with sanding.
 The large/long fill on the left side of the bowl is visible and accessible.
 The other two areas are just above the crook to the right – which has parallel grain imperfections which are partially filled with old material.
 The second is a fill on the top of the shank.
 For each of the problem areas, a sharp dental probe is used to dig out the old fill material.
 After cleaning all 3 areas with a cotton pad and alcohol, I take another close look at the larger crevasse. It’s a good-sized grain vein imperfection. Both the long hole below and the parallel imperfections are from imperfections in the block of briar and not injury. The wounds run parallel with the grain.
 Next, the pits will be filled with briar putty. After placing a mound of briar dust and regular clear CA glue on the mixing palette, on top of scotch tape to help with clean up later, the putty is formed by mixing the briar dust and CA glue.
 This process is done gradually. Using a toothpick, briar dust is gradually pulled into the glue with the toothpick while mixing it as I go. More dust is pulled in and mixed until it reaches the consistency of molasses. If too much is pulled into the mixture, it will harden very quickly and often smoke. It’s a chemical process with CA glue. When this happens, one starts over.
 When the molasses consistency is reached, the toothpick is used to trowel the putty to fill the holes. With the larger one, after placing the putty over the crevasse, the end of the toothpick is used to knead the putty making sure it fills the entire crevasse. To help the larger patch hold in place while working on the others, a bit of briar dust is sprinkled over the fill.
 The same is done with the other 2 fills. The stummel is then set aside allowing the patches to thoroughly cure.
 With the stummel on the side, I transition to the stem which has been soaking for several hours in the Briarville Pipe Stem Oxidation Remover. No oxidation could be seen when it was put into the soak, but I do this for good measure. After the stem was fished out of the soak, a cotton cloth was used to rub the stem surface rigorously to remove any raised oxidation. A pipe cleaner moistened with isopropyl 99% was also run through the airway to clear away any fluid remaining.
 The upper button lip has been compressed and this needs to be addressed before moving forward.
 A medium-thick Black CA glue is used to do the patch. A drop of CA is placed over the bite compression. A toothpick is used to kneed and spread the glue to make sure there are no gaps exposed on the edges of the patch. The patch is then put to the side allowing it thoroughly to cure.
 After the patch has cured, a squared needle file is used to file down the patch as well as to refresh the button – upper and lower.
 The bit is also sanded with 220 paper to smooth and to blend the patch further.
 The entire stem is sanded using 470 paper using a disk to guard the stem facing from shouldering.
 The sanding is continued with wet sanding with 600 grade paper and then 0000 grade steel wool is applied. At this point I do a quick inspection to make sure the patch looks good before proceeding to the micromesh sanding/polishing. All is good – the patch is invisible.
 To further polish the stem to bring out the gloss, micromesh pads are used in sets of three – 1500 to 2400, 3200 to 4000 and 6000 to 12000. Between each pad, to condition the vulcanite and for UV protection keeping oxidation from developing, Obsidian Oil was applied.
 With the stem at this stage, it is put aside, and attention is turned again to the stummel. The patches have cured, and needle files are used to file the patch mounds flush with the briar surface. First, the large patch on the left side of the bowl is addressed.
 Getting this close to the crook required help from a round needle file as well.
 Folowing the needle files, each patch was sanded with 220 paper to remove the file tracks and to continue to smooth and blend the patches.
 Next, to address the myriad of small scratches and pits, sanding sponges are used to sand the stummel. A coarse, 2 medium and a fine grade sponges were used.
 After the sanding sponges, a divot is detected on the rim.
 The divot is quickly dispatched with 220 and 470 grade papers and followed again with 3 sanding sponges – minus the coarse sponge. The rim looks great.
 The restoration of the stummel has come to the point of the application of dyes. I use Fiebing’s aniline dyes which have worked well. In previous restorations dealing with red candy apple finishes I figured out how to approach the scenario where you apply an exotic dye, like a reddish hue, but you don’t want to lose the natural grain presentation in the process. Steve’s (Rebornpipes.com) and Charles Lemon’s (Dad’s Pipes) advice and write ups (See: LINK) were invaluable as I was first trying to figure out things. Steve has also done a ‘Re-staining Estate Pipes – A Pictorial Essay’ which was helpful. The general principle is to first do an ‘undercoat’ of either dark brown or black dye which is applied to the wood but is then sanded off for the most part. The grain, however, absorbs the dye and when the sanding is complete, the grain is more distinctive and is able to be seen more easily when the ‘overcoat’ of dye is applied. The ‘overcoat’ is the red-leaning dye. For the Machiavelli, I will use Fiebing’s Oxblood Leather Dye.
 First, the stummel is wiped with a cotton pad and alcohol to clean the surface.
 The stummel is next heated with the hot air gun. Doing this warms the briar and the grain expands allowing it to be more receptive to the dye’s pigmentation. A cork works as a good handle.
 With everything needed for applying wax on the chopping board, a folded pipe cleaner is used to paint the black aniline dye onto the stummel in sections. While the dye is applied it is then ‘flamed’ using a lit candle. The candle immediately ignites the alcohol in the dye, and it burns off leaving behind the dye pigment in the wood.
 The stummel is methodically painted with the dye and flamed after each application until all has been thoroughly covered.
 Next, the stummel is put to the side for several hours allowing the newly dyed wood to rest.
 After several hours, the undercoat black dye is ready to be unwrapped. Essentially, the dye will be sanded off using 470 grade paper. The residual dye pigment should be absorbed into the grain allowing the grain to have a greater contrast than before.
 Sanding takes some time. While sanding with the 470 paper, a cotton pad moistened with alcohol is used often to wipe off the surface to help keep it clean of the large amount of dust from the sanding. It also allows me to peak at what the grain is looking like. The stummel doesn’t look very nice at this point, but that’s not the goal now.
 The sanding next transitions to micromesh pads using all a 9 pads – 1500 to 2400, 3200 to 4000 and 6000 to 12000 grades. Between each pad, to clear off the dust and give the following pad better traction, the stummel is wiped with a cotton cloth which has been moistened with water.
 The goal of the undercoat was to bring out the contrast with the grain. This has been done nicely. Next, the ‘overcoat’ is applied. The same process is used by first warming the stummel with a hot air gun to help the wood to be more receptive to the dye.
 Fiebing’s Oxblood Leather Dye is what is used for the overcoat. I have used the Oxblood dye on previous projects requiring a red-leaning hue over the darker undercoat. Oxblood isn’t a straight fire engine red but has deeper, warmer tones resulting from the mixture of burgundy and brown. I like the more subdued results that I’ve gotten in the past. With the stummel now heated, a folded pipe cleaner paints the Oxblood dye onto the stummel one section at a time. While the dye is wet, the lit candle is used to combust the alcohol in the aniline dye. This burns off the alcohol leaving the pigment behind.
 After the dye has been thoroughly applied (3 times over), the stummel is set aside allowing it to rest through the night. Allowing this ‘resting’ seems to help the new dye to be absorbed and settle into the wood – hopefully not leeching on the fingers later when the pipe goes into serve.
 The next morning, I’m looking forward to seeing how the briar received the Oxblood dye. To unwrap the crusted flamed dye, a cotton cloth buffing wheel is mounted on the rotary tool with the speed set a bit higher than normal – about 50% full power. Brown Tripoli, a coarser compound, is applied to the stummel. The coarser compound and the increased speed of the buffing wheel does the job of plowing the excess dye.
 I pause in the unwrapping to show what I see. The goal is to remove the excess dye with the compound, but I’m also watching for dark spots or ‘blobs’ on the uncovered surface. I will go back and concentrate the buffing on these spots to make sure that they are not excess dye spots but actual denser areas of grain – which are quite prevalent on the block of briar.
 After the Brown Tripoli application and removal of the flamed crust, the surface is wiped down with a cotton pad and alcohol. Doing this continues the process of removing excess dye, but also helps to blend the new dye.
 Next, the finer Blue Diamond compound is applied to the entire pipe after stem and stummel are reunited. Another cotton cloth buffing wheel is mounted onto the rotary tool and the speed is slowed back to the normal speed I use – about 40% full power.
 To clear away the compound dust that is generated while applying it, a felt cloth is used to wipe the pipe.
 After rejoining the stem, I notice what I had noted earlier, the fit of the 9mm filter tenon is loose. It’s only a bit loose when it’s at the proper orientation. If one rotates the stem an eighth or quarter turn, it’s a proper snug. My, the stem looks good in the picture!
 To address this slight looseness, fingernail epoxy is used. The bottle’s name is ‘Hard As Nails’ and I assume ladies use it to cover designs on their nails and to strength their them. One can also use CA glue as an epoxy – allowing it to cure results in a hard epoxy surface. The nail epoxy comes with a small brush that is used to paint the tenon keeping the coating as even as possible. To keep the epoxy even and not gathering to one side or the other, it is set vertically. The stem is left for about an hour allowing the epoxy to cure and harden.
 While the stem is on the side, one more process helps to prevent the new dye from leeching on the steward’s hand when the pipe is put into service. When the pipe is first put into service, the heating of the bowl can cause fresh dye to come off and onto the hand. Not fun. To emulate this inaugural time of fellowship a pipe man has with is new pipe, the stummel is heated with the hot air gun.
 After the stummel is thoroughly heated, it is rigorously wiped with a cotton cloth. Surprisingly, I see no residue coming off onto the rag. Good news.
 The nail epoxy has cured and the first attempt to seat it into the mortise met with some resistance. To remedy this, 0000 steel wool is used to fine tune the tenon. After the fine tuning, the stem’s fit was good. The looseness is gone.
 One last step. With the rotary tool mounted with another cotton cloth wheel, carnauba wax is applied to the stem and stummel. After the application of the wax, the pipe is given a rigorous hand buffing to remove excess wax and to raise the shine.
 There is some mystery surrounding the provenance of this Machiavelli Cambio of Italy. I enjoyed digging as far as I could go. Removing the old finish and replacing it with an undercoat of black and then an overcoat of Oxblood, was a challenge, but the results are worth the effort. The grain is a twirl and swirl matrix which is no longer obscured by the heavy shellac finish. The larger gash on the left side of the bowl is still visible, but no longer an eye sore. The Ball shape is hearty with the bowl filling the palm with no problem. The pipe promises a lot of fellowship with one’s favorite blend. Greg commissioned the Machiavelli and will have the first opportunity to claim him from the Pipe Steward Store benefiting the Daughters of Bulgaria – helping women and girls who have been trafficked and sexually exploited. Thanks for joining me!


Nice work, Dal. The way you addressed the surprise fills was helpful. Thanks for all you do for the #DaughtersOfBulgaria
LikeLike
Appreciate it Darren.
LikeLike
Nicely done. Can’t wait to get it and try it out. Glad I could help.
LikeLiked by 1 person
Thanks, Greg. He had some challenges, but he lives on! Take good care of him😊.
LikeLike