One of the things that was on my ‘genuine’ Bucket List was to take my wife back to Mexico. Beth grew up in Mexico where her parents were missionaries in the state of Guererro where the city of Acapulco is located. During her years there her family lived in Acapulco, but more years were spent in a small village on a farm where life was simpler. My Bucket List now has a check on ‘Mexico’. We did not return to where she lived, but we enjoyed time in Cancun and rented a car (with my son and his wife who joined us) going out into the jungled Yucatan peninsula where we enjoyed exploring Myan cities, pyramids and tasting the wonderful cuisine 😊along the way. Of course, I took my Altinay Meerschaum along and met some interesting pipe fellows!  But now I’m back to snowy, cold Golden, Colorado, ready to go on the next pipe in the queue. Last fall my wife and I embarked on what became a 5000 mile plus road trip that took us from Colorado to the Northeast through New York, Vermont and to New Hampshire. We hit it perfectly to see leaves changing into brilliant fall colors reminding us of the wisdom of God in His creation. Along with seeing the colors, we visited partnering churches and family members along the way. Near Keene, New Hampshire, we visited Aunt Ruthie, my wife’s aunt, and continued enjoying the colors there, visiting and indulging in REAL maple syrup – home harvested and processed! The picture below shows the homestead where my wife’s aunt lives.
 Scott also married into the family as I had. He married Sharron, my wife’s cousin, and they came over to visit while we were at Aunt Ruthie’s. During our visit and meal, Scott and I connected when we discovered that we both had pipes in common. After explaining that I was a pipe collector and restorer as The Pipe Steward, I showed Scott some pipes that I had with me during our travels that were available to be commissioned helping the Daughters of Bulgaria. Scott heard the whisper of an smart looking unbranded pipe with the COM, Made in London England. I originally described the pipe as a Cauldron Shape but as I look at it now, it has all the hallmarks of a Briar Calabash shape. Here is the attractive Briar Calabash that got Scott’s attention.

 The only markings on the pipe are on the shank’s right flank: MADE IN [over] LONDON ENGLAND.
 The dimensions of the pipe are Length: 5 3/4 inches, Height: 1 3/4 inches, Rim width: 1 7/16 inches, Chamber width: 7/8 inches, Chamber depth: 1 7/13 inches – ample room for tobacco. Bill Burney’s descriptions of pipe shapes are always interesting. The panel below comes from Pipedia (Calabash – Pipedia) providing the unique characteristics of a Briar Calabash.
 The general condition of the pipe seems to be good. The chamber has thick cake that needs to be removed to allow fresh briar to emerge, and a new cake developed. The rim has a thick lava crust that looks challenging. We’ll see what the condition of the rim is beneath.
 The stummel surface needs cleaning. There are a few small fills that a closer look will be given after the cleaning. The surface also appears to have a glossy, ‘candy apple’ finish which needs addressing if it persists after the cleaning.
 The stem has minor oxidation and calcification on the bit. I don’t see any tooth chatter – nice.
 To begin the restoration of this unbranded Briar Calabash Made in London England the stem’s airway is cleaned with pipe cleaners and isopropyl 99% alcohol. After a couple of cleaners, the airway is clean, and the stem is placed in a soak of Briarville’s Pipe Stem Oxidation Remover fluid to address the minor oxidation.
 While the stem is soaking, the next step is to clean the chamber. A fresh picture shows the thick cake in the chamber.
 Using the Pipnet Reaming Kit, the chamber is reamed using 3 of the 4 blade heads available. This is followed by scraping the chamber wall with the Savinelli Fitsall Tool and then the chamber is sanded using 220 grit paper wrapped around a Sharpie Pen.
 After the chamber is wiped with a cotton pad, a quick inspection reveals no heating problems in the chamber.
 Next, the outer surface is cleaned using undiluted Murphy’s Oil Soap scrubbing with a cotton pad.
  The rim is covered with a thick lava crust that takes the help of the edge of the Savinelli Fitsall Tool to scrape off. The blade is kept as flat as possible on the rim surface so not to gouge the briar.
 A brass brush helps to clean the surface as well. The brass does not damage the briar but adds muscle to the cleaning.
 From the worktable, the stummel is taken to the sink where the internal cleaning starts with shank brushes and anti-oil dishwashing liquid with warm water. After scrubbing for a time, the stummel is thoroughly rinsed and returns to the worktable.
 The internal cleaning continues next using isopropyl 99% with pipe cleaners and cotton buds. A small dental spoon helps by scraping tar and oils off the mortise wall. Later, the cleaning will continue with a kosher salt and alcohol soak.
 An inspection of the briar surface reveals that the shiny finish I saw before is gone. The cleaning removed the old finish, and the clean, natural briar is looking good. There are a few small fills that seem to be solid.
  The rim cleaning turned out nicely.
 To clean the briar surface further and to remove small scratches, sanding sponges are used. Bypassing the coarse sponge, the stummel is sanded with the medium, light, and fine sponges.
  Next, the sanding/polishing continues using micromesh pads – pads 1500 to 2400, 3200 to 4000 and 6000 to 12000. Between each pad a damp cotton cloth is used to wipe off the dust giving the following pad more traction.
 After completing the first set of micromesh pads, imperfections on the rim emerged that I’m afraid will only be amplified if I continue through the micromesh process. Time for a small detour to address these marks.
  To erase the imperfections the stummel is topped using 600 grade paper. With 600 grit paper on the chopping board, the stummel is rotated several times.
 An inspection after the topping shows that the imperfections have been removed and the refreshed lines on the Calabash rim look good.
 The rim is again sanded/polished with the first set of 3 micromesh pads and the sanding continues with the remaining micromesh pads.
 The grain has come out very nicely from the micromesh process. I like the gentle curves and angles of the domed rim. To bring out the natural briar hues further, Mark Hoover’s ‘Before & After’ Restoration Balm always does a great job. After putting some balm on the fingers, the Balm is worked into the briar. The stummel is then put aside for 10 to 15 minutes to allow the Balm to be absorbed.
 After the time has passed, a dedicated micromesh cloth is used to wipe off the excess Balm and to buff up the briar. The Balm has not disappointed. I like the results.
 One of the benefits of using a dedicated cloth to remove the Balm is being able to give pipes in my own collection a Balm go-over. This goliath Peretti Egg enjoys an application of the Balm with the Briar Calabash.
 Before transitioning to the stem, as I mentioned earlier, the internal cleaning will continue with a kosher salt and alcohol soak. This cleaning helps to draw out the tar and oils from the internals and sweetens the briar. To do this, a cotton ball is twisted and pulled to fashion a wick that is then guided down the mortise to the draft hole. The cotton wick helps to draw out the tar and oils.
 The bowl is then filled with kosher salt and placed in an egg carton to keep it steady and to angle the stummel so that the rim and the end of the shank are level. Kosher salt is used because it doesn’t leave an aftertaste as regular iodized table salt. Next, isopropyl 99% alcohol fills the bowl until it surfaces over the salt.
  After a few minutes the alcohol is absorbed, and the alcohol is topped off. The stummel will now soak for several hours and let it do its thing!
 The stem has been soaking for several hours in the Stem Oxidation Remover. After fishing the stem out a picture shows the greenish oxidation that has been raised on the surface.
 A cotton cloth is used to rigorously rub and wipe the stem to remove the raised oxidation. The results look good.
 A pipe cleaner moistened with isopropyl 99% alcohol is run through the airway to remove residual Oxidation Remover fluid.
 There is one small tooth compression on the upper bit that I did not see earlier. To remove or lessen the compression the heating method is used. Using the flame of a Bic lighter, the surface is painted in a rapid back-and-forth motion with the flame. The flame is moved so not to scorch the rubber. As the vulcanite rubber warms, the material expands seeking its original disposition or closer to it. The before and after picture shows that the heating lessened the compression so that it should easily sand out.
 The lower bit has no distinctive compressions, but it is rough from normal use.
 To clean the bit and to remove the compression on the upper side, 320 grit paper is used.
 After the 320 grit paper, the stem is wet sanded with 600 grit paper. After this, 0000 grade steel wool is applied to the entire stem.
 Continuing with the sanding and transitioning into polishing, micromesh pads are used. First, the stem is wet sanded with pads 1500 to 2400. This is followed by dry sanding with pads 3200 to 4000 and 6000 to 12000. Between each set of 3 pads, Obsidian Oil is applied to condition the vulcanite and to protect it from oxidation. I enjoy watching the glassy sheen emerge through the process.
 The stummel soaked through the night with the kosher salt and alcohol passively cleaning the internals. The next morning, the picture shows the soiling of both the salt and the after it was removed from the mortise.
 After the salt is expelled and the bowl wiped out with a paper towel, a blow into the mortise dislodges any remaining salt crystals. To confirm the cleaning success, a single cotton bud and pipe cleaner indicates the internals are as clean and fresh as I know how to make them!
 On the home stretch – Next, after reuniting stem and stummel, Blue Diamond compound is applied to the entire pipe after a dedicated cotton cloth buffing wheel is mounted on the rotary tool and with the speed set at about 40% full power. The compound is a very fine abrasive that removes microscopic scratches and shines the briar nicely.
 The process of applying the compound produces a lot of dust on the surface. A felt cloth is used to clear this dust off in preparation for the application of the wax.
 With another dedicated buffing wheel mounted and remaining at the same speed, carnauba wax is applied. After this, the pipe is given a rigorous hand buffing to remove excess wax and to raise the shine.
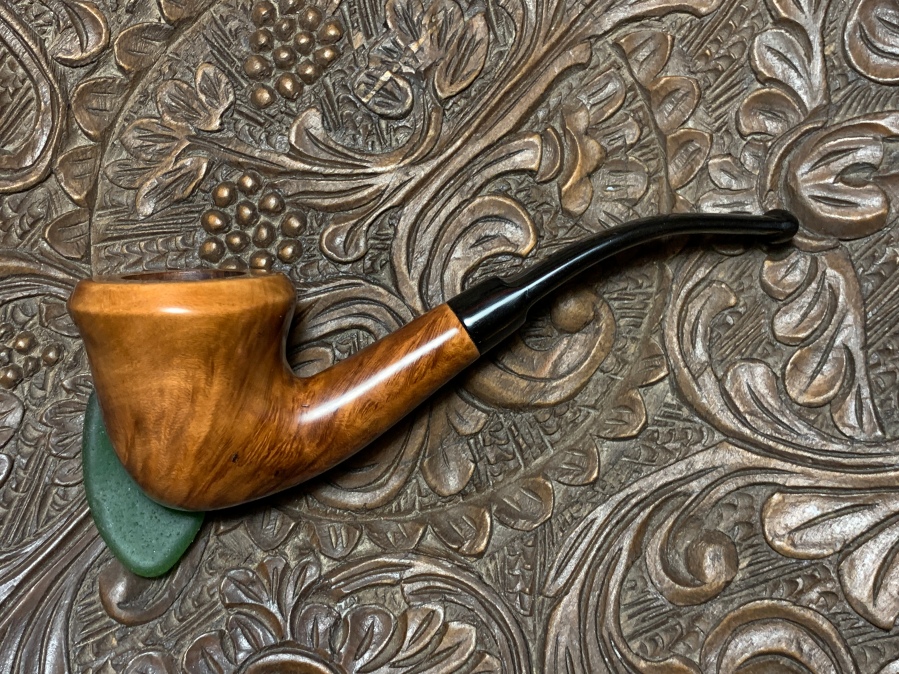
 This unbranded Made in London, England, Briar Calabash spruced up quite nicely. As a smaller to medium sized pipe, it has great potential to be a hands-free as a pipe man works in the shed or over the worktable. The lines and curves of the Calabash dome are nice, and the vertical flame grain gives the eyes something to consider as one packs the bowl with a favorite blend and cradles it in the palm. Scott commissioned this Briar Calabash and will have the first opportunity to acquire him from the Pipe Steward Store helping to benefit the Daughters of Bulgaria – helping women and girls who have been trafficked and sexually exploited. A large portion of the proceeds of each pipe helps to support the Daughters. Thanks for joining me!


Nicely done, Dal. In particular, I enjoyed your notes on missing (then correcting), the tooth compression on the upper bit. No matter how carefully I inspect my own pipes, a fresh view and better light brings improvement (similar to a walk with Jesus). Great work — and a cool story about your trip to Mexico!
LikeLiked by 1 person
Thanks so much! Unfortunately, I only have access to your WordPress moniker and not your name!! Appreciate your words.
LikeLike