
My wife and I continue our 4-month road trip that began in Golden, Colorado, camping with our small travel trailer. We have been in the Allegheny National Forest enjoying (finally) some gentle sunny dry weather. This morning, we got our ‘steps’ in and enjoyed looking at this finger of the Allegheny Reservoir at the Kiasutha Recreational Area where we are camping. Here’s a picture from this morning.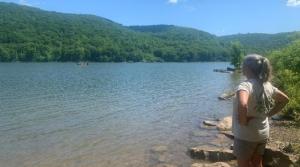 I’ve been doing these mobile restorations with my tools and supplies packed in 3 DeWalt containers working in our portable gazebo, Clam, which from the picture below, represents my ‘Happy Place’ for the moment courtesy of Elon Musk’s Starlink technology which you can narrowly see in the background. I have a smile on my face also because I’m able to indulge in a bowl at this workstation which I cannot do inside in our Colorado home 😊. In case you’re wondering, Lane 1Q in a small hand’s free Billiard I picked up on eBay? Why is it special? The nomenclature stamped on it is STANTON. When I saw it for next to nothing on eBay, I figured I would add a pipe to my collection with my name on it.
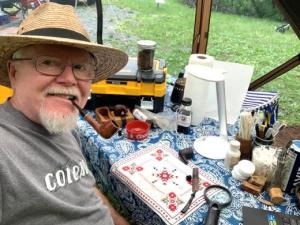 The next pipe on the mobile worktable came to me with the hope that it could be repaired. Pipe man James, from the Xenia, Ohio, commissioned 3 very nice pipes some months ago – Peterson’s Dublin Sterling Silver Meerschaum, Thompson Genuine Block Meerschaum GT. BRITAIN Brandy, Søren Hand-Carved Made in Denmark Freehand, and all came out very nicely. Just before my wife and I embarked on this road trip in April, James reached out to me not to commission another pipe, but to ask if a very nice Stanwell could be salvaged.
The Stanwell belonged to a friend, who wished to remain anonymous, who had recently lost her husband of 50 years. James explained that she had a few pipes of his that she wanted to restore for her son. When she attempted to remove the stem from the Stanwell the shank crumbled. James asked me if there were any options for repairing this. James sent pictures – I can only imagine how his friend felt, who wanted this heirloom of her husband’s legacy to pass on to their son. I generally do not do repairs, since the queue for commissioned pipes keeps me busy enough, but this was one of those special occasions where I made the exception. Since we were leaving for our road trip in about 2 weeks, I knew that I had to decide quickly to get things moving before we departed. After agreeing to work on the Stanwell, James put the pipe in the post, and my first action was to send a note to Reborn Pipe’s Steve Laug with James’ pictures to get his thoughts. As always, Steve’s help was soon coming. He had also worked on a Stanwell where the shank extension crumbled and he sent the link (Replacing a Shattered Shank Extension Stanwell 643 Rhodesian | rebornpipes). This project helped put the work in context for me, which was a great help. Steve also suggested that I reach out to Tim West (https://jhlowe.com/) for a shank extension.
Tim has been a great help in getting the right supplies for projects in the past and this time was no different. Could I get a replacement for the Stanwell before we leave on the road trip? After reaching out to Tim with my time crunch issues and pictures sent by James and shank dimensions (sent to me by James), Tim suggested that I use a tortoise shell acrylic stem and customize it down for the Stanwell. The tortoise shell is the same hue as the original. I took Tim’s advice and he put it in the mail to Colorado.
Well, all the parts of the puzzle came together and arrived before the road trip commenced. In the picture below the Stanwell and the replacement tortoise shell saddle stem Tim sent are shown. Earlier, I glued the loose pieces of the shank extension together to give me an idea what the original was.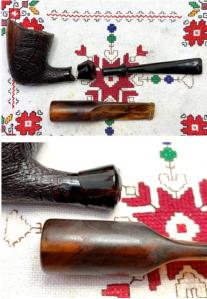 When the Stanwell arrived from James for his friend, I took note of the provenance of this Stanwell. Stamped on the underside smooth briar panel is stamped, STANWELL [over] Antique (in fancy script). To the right was the shape number, 62. ‘Antique’ was a bit of a challenge making out because the middle of the stamping has thinned considerably.
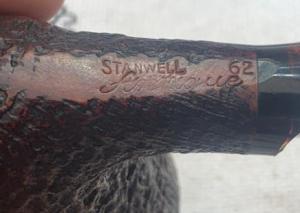 I must admit a partiality to the Danish Freehand genre. They are pipes that have shape appeal as well as the eye-catching presentation of the briar. This pipe is no exception. This Stanwell is special because its shape number, 62, points to a legend having fashioned it – Sixten Ivarssen. Steve’s posting of Stanwell Shapes – Compiled by Bas Stevens (Shape numbers and designers of Stanwell pipes | rebornpipes) is a great compilation of Stanwell shapes and their artisans. In these listings, the number 62 was used twice by Stanwell. Here is Bas Stevens’ description:
- Two versions of this shaper number
a) Liverpool, medium size.
b) Freehand, Plateau top, saddle mouthpiece, by Sixten Ivarsson.
‘b’ is what is on my worktable now. Pipedia’s article about Sixten Ivarsson’s life and work by Jakob Groth (Ivarsson, Sixten – Pipedia) is well worth the read to understand how this man, who died in 2001, has impacted the pipe industry. Here is one small entry from Groth’s article that I thought would be appropriate to help understand the provenance of the Stanwell on the worktable:
When a great man, who has almost become a living legend among pipe smokers, leaves this world, the time is appropriate for a review of his life and his significance in the pipe world. There are two different approaches for this purpose: You can look at the merits of the person in his surroundings or you can look at the movements and development in the surroundings that made his merits possible. Both approaches will be used in this retrospective article.
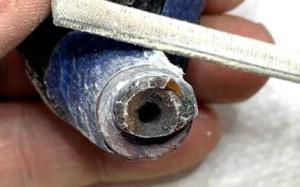
With a better understanding and appreciation for the Stanwell ‘Antique’ on the worktable, it’s time to put the pieces together. I have had plenty of time to think about the approach (with the help of Steve’s posting). The starting point is to clean the remaining acrylic off the shank facing but, in the process, to also protect the nub and the integrity/sharpness of the facing. The nub is the briar protrusion on the shank facing over which the shank extension is fit. Since the acrylic adhering to the facing and nub was cemented, removing the remaining acrylic is not an easy slam dunk. The approach I will use is to use needle files and sanding to remove the material slowly. The temptation for me is to use a sanding drum and rotary tool to speed the work…. To provide a safety buffer, the shank is first wrapped with painters’ tape for an accidental slip.
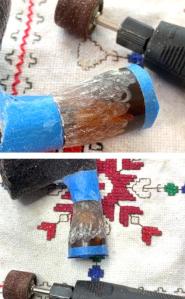
 As the filing process starts on the bottom of the shank where there is the most acrylic remaining, I do not file exactly on the shank facing border. A ridge is carefully created as the filing begins near to the tape border but leaving an acrylic buffer. There are two reasons for this. First, the acrylic buffer acts as a guide for the file as it progresses around the circumference of the nub. The second reason is that removal of the acrylic and the glue fastening it to the wood shank facing must be carefully removed so as to not damage the geometry of the facing – flat!
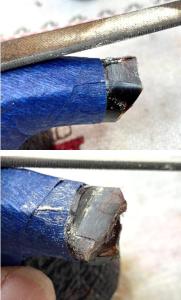 The filing gradually works around the nub center. These pictures show the gradual progress. The challenge is to remove acrylic material but guard the briar beneath.
 After filing so far, the depth of the acrylic excess is miniscule. To better see where the briar begins on the shank facing, the tape is removed. At this point, a square needle file joins the flat needle file to better clean the 90 degree angle at the base of the nub/facing merging.
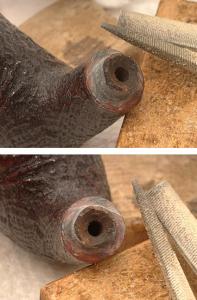 This picture shows the thin acrylic barrier that was used to do the heavy duty filing around the nub.
 Now, this layer is slowly removed to reach the briar of the shank facing.
 I’ve come to a place where the acrylic layer is so thin that the filing has a very light hand. I decided to stop the filing knowing that I may need to return to this point as the shank extension is being fitted. The challenge is to maintain a flush fit with the end of the extension as it joins the shank facing.
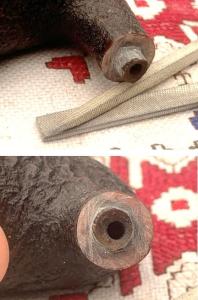 To smooth a bit more and to remove more of the remaining acrylic and to round the nub, the nub is sanded by pinching 220 paper around the nub and rotating. This has been done several times and it looks good.
 I stop short of filing briar and switch to using cotton wipes with acetone to remove more of the acrylic and the glue that fastened it to the shank. Steve had done this successfully in his Stanwell repair, but I’m not sure this is having an impact.
 I stop at this point realizing that I might need to return to this point and continue the sanding after cutting and fitting the shank extension. The goal is a complete flush union with the new acrylic extension.
 The Tortoise Shell acrylic saddle stem that Tim West sent now needs to be cut down to begin the fashioning process.
 My estimate for the length of the original extension is about 1 inch. I decided to allow a bit of wiggle room and mark the cut point at 1 1/8 inches with the Sharpie Pen.
 To provide an even cut line, painters’ tape is wrapped around the saddle of the stem.
 A small-toothed saw is used to do the cutting. If I had a band saw at my disposal, cutting a straight line would not be an issue. However, cutting by hand is always a bit of a challenge. The sawing was done patiently without pressing too much torque because I wanted to avoid the acrylic cracking or splintering like glass. This was especially the case as the sawing was nearing completion and the acrylic was thinning toward the edge.
 I must tell the truth here – my breath was held while sawing, but the cut looks pretty good, but not perfect.
 Well, from the picture above in the Allegheny Mountains, my wife and I broke camp and headed southeast to Calledonia State Park near hallowed ground in American history – Gettysburg, Pennsylvania. I was not able to continue work on the Stanwell there, but my wife and I enjoyed meeting with friends who live in Gettysburg and who provided an excellent tour and commentary of the Battlefield area. Words are inadequate to both describe the loss of life among brothers and the significance this battle had in shaping the country we now protect. In the lower picture, standing in the graveyard only feet from where Lincoln gave his Gettysburg Address was a sobering highlight for me.
 Our road trip continued after the days we were near Gettysburg to near Washington DC where my wife and I spoke at Harvester Presbyterian Church in Springfield, Virginia. Our 7000 plus mile tour has been blessed by meeting with friends and family, but also meeting at churches which have supported us over the years and to give a report about our brothers and sisters who are in Ukraine and their churches, themselves fighting for the freedoms that we now enjoy. After church on Sunday, we took a quick driving tour through the heart of our republic. Again, trying to absorb the history shaped and reflected all around us, a highlight after being in Gettysburg was seeing the Lincoln Memorial in the background through the WW2 Memorial.
 Our road trip continued after leaving the Washington DC area. My wife and I trekked across the Chesapeake Bay Bridge to the Eastern Shore of Maryland to camp at Janes Island State Park. The Bay Bridge that we crossed held another interesting part of our travel log. We were delayed in stand still traffic on the west side of the bridge along with hundreds of other motorists heading east on US 50. When the traffic started moving and as we were going over the bridge itself, we got a view of the largest, most packed container ship that I had ever seen. We discovered on the news later that this was the container ship that had collided with the Francis Scott Key Bridge in Baltimore. It was being escorted by several Coast Guard ships.
 With the weather cooperating, I’m able again to continue working on the Stanwell, thankful that I’m separated from the plethora of bugs filling the air by our ‘Clam’! Thanks to Google Maps App, the blue dot marks the spot looking out over the marshes to the Chesapeake Bay.
 With the travel log caught up, it’s time to continue fashioning a new shank extension for this beauty of a Stanwell heading to a son from his mother to remember his dad. The next step in the process is to enlarge the mortise of the new extension. The view shows the diameter of the airway of the tortoise shell saddle stem that Tim sent. It must be enlarged to the diameter of the original.
 The method of doing this is to enlarge the airway of the modified saddle stem by introducing a gradual enlargement of drill bits that widen the diameter of the airway. Starting first with the next larger bit that will not go through the hole, it is mounted on the power drill. I discovered that the smaller bits were able to gentle power through the extension with no issue. I was ready to do the process with a more cautious hand turning approach, but this was not needed as I started.
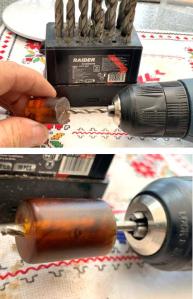 As the process continued into the larger bits, I discovered a few things. The larger bits would begin to seize and catch if the drill rotation slowed down or stopped during the process. This was probably due to the acrylic heating up.
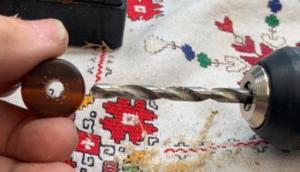 As the bits grew larger, the hole was drilled with a combination of gently powering the rotation and hand turning. The diameter of the hole was getting closer to where it needed to be as it is test fitted over the nub.
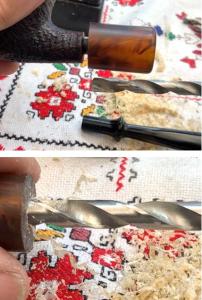 To avoid the possibility of the end cracking, with the larger bits, the final ‘push through’ was done by hand turning the bit and holding the bit still while turning the extension.
 I used 12 drill bits to do the job. However, too my chagrin, it should have ended with 11.
 The final drill bit used was one too many as it opened the hole a bit too much. The fit over the nub is good, but looking closely, there’s a gap between the extension and shank facing on the lower side. More sanding will be necessary to remove the gap so that the union is flush. This was the possibility that I mentioned earlier and so it’s not a surprise.
 However, the stem was not expected not to fit. I know I just used a double negative… The diameter of the mortise is a hair too large, and the fit is too loose for the stem. The original must have had a very small taper to provide the grip for the fancy stem.
 However, all is not lost! The worst-case scenario at this point is that I simply ask Tim to send another stem and I start over. However, I believe there is a way to salvage the current work with a good result. Before sanding and fitting the extension onto the shank facing, I will work on tightening the mortise. To do this, clear nail polish is used to coat the inside wall of the extension. Clear nail polish is essentially an epoxy that cures very hard. With a good amount of polish on the brush, the polish is brushed into the mortise and then the extension is rotated like a barrel. This causes the wet polish to spread and cover the inside in a more uniform manner. After applying several applications of polish and rotating, the extension is set vertically. The shadows in the picture indicate that the day is ending and the polish is left to cure overnight.
 The shadows are coming from an amazing sunset looking across the marsh and Chesapeake Bay.
 The next morning, the fancy stem snugged up nicely in the mortise. This is good news.
 Now, with the stem seated, the work shifts to the shank facing so that the flat, factory end of the saddle stem – now extension, is flush against the shank facing. In the picture below, you can see a gap on the lower side as well as the shiny edge of the shank facing where a very thin layer of old acrylic is still evident and needs to be carefully removed.
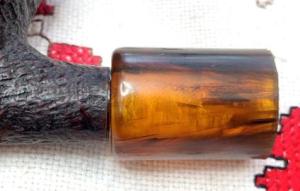 This part of the process causes me to shake in my boots a bit. In my experience, creating a flush union with the shank facing is not as easy as one might think. Using needle files and sandpaper, the process is slow and patient. Too much sanding or filing can create a cattywampus fit that’s hard to correct.
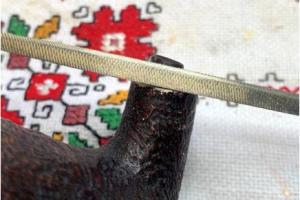 The approach also included pinching 220 grit sanding paper between the shank facing and extension and carefully rotating the stummel. This approach sands off the high points helping to achieve a good flush fit.
 Well, I’ve done all the fiddling I’m going to do to clean and create a flush union between the shank facing and extension. The full arsenal of tools is shown.
 The next step is to glue the rough acrylic extension to the shank. Regular CA glue is used which will provide a strong bond. To create a better bond, the glue end of the acrylic extension is roughed up a bit with 220 grit paper.
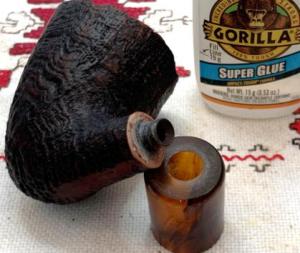 A good amount of CA is first applied in the airway of the extension which will mold around the shank nub. Then more CA is spread sparingly with a toothpick over the shank facing. The goal is to use enough CA for a good bond without the glue squeezing out between the extension and shank. After applying the CA, the extension is carefully seated on the shank and to allow it to cure evenly, the stummel is set with the shank vertical.
 After the CA has cured, it’s time to start shaping the extension. Painters’ tape is used to protect the shank from sanding. About an 1/8 inch is the depth of the ‘dome’ on the end of the original extension. A piece of painters’ tape is wrapped around the end of the new extension to ‘save’ that 1/8 inch for shaping. The sanding will taper up from the shank to this tape border. The unsanded end will then be rounded or beveled to match the original extension – hopefully 😊.
 A sanding drum is mounted on the rotary tool and the gradual process of sanding away the excess begins.
 The method that I use is to rotate the sanding around the extension but focusing on the shank end first. This is done to allow the taper to gradually develop and then to extend the taper gradually by sand it uniformly to the taped border on the end. The next several pictures show the shaping process.
 At this point, the extension is looking pretty good. As much as possible, fat or uneven places are sanded with the sanding drum. While using the drum with the rotary tool, I don’t put too much pressure on the sanding drum which allows a patient shaping. I don’t want to ‘gouge’ out too much. You can take the acrylic away, but you can’t replace it!
 Next, the tape is removed from the 1/8-inch end. In the picture you see the coarse 120 grit paper ready to go to work to bevel off the edges to create a rounded or domed end.
 However, during the shaping process using the rotary tool and drum, I discovered that it would shape slowly and gently if used correctly. To save time, the rotary tool was used.
 I’m very pleased to see the way the dome shaped up. Not bad!
 With the rough shaping completed, the smoothing begins with sanding with 220 grit paper.
 Sanding continues next with 320 grit paper.
 Finally, the main sanding is completed by wet sanding with 600 grade paper and then 0000 grade steel wool is applied.
 You can tell by the shadows in the pictures, the sun is again dropping over the Chesapeake Bay. The sanding/polishing continues with using the full set of 9 micromesh pads: 1500 to120000. Between each pad, Obsidian Oil is applied to the extension and then wiped off with a paper towel. I like to do this to condition the acrylic and to raise the shine as I go. The stummel is also conditioned and hydrated with a gentle application of mineral oil with a cloth – Paraffin oil to be exact.
 The restoration of the new Stanwell extension is completed with the application of Blue Diamond compound with a cotton cloth buffing wheel mounted to the rotary tool – at about 40% full power.
 With the stem and stummel reunited, the entire pipe is given an application of carnauba wax and then given a rigorous hand buffing to remove excess wax and to raise the shine.
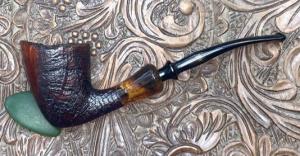
 Nothing gives me more joy than to see a stately pipe like this Sixten Ivarssen Stanwell, be restored to his new steward. This pipe, that will be received by a son from his mother, will provide a solid remembrance of a father who is no longer with us. We are but stewards of our pipes and of the life that God has gifted us. My gratitude goes to Steve (www.RebornPipes.com) for his help in this project and to Tim West at J. H. Lowe & Co. | Tobacco Smoking Pipe Maker (jhlowe.com) for his input along the way. The pipe helps to support the work of Spring of Hope Foundation (www.SpringofHope.bg) formerly known as the Daughters of Bulgaria Foundation. A ‘before’ picture helps to remind us how far we’ve come. Thanks for joining me on this second ‘road trip’ restoration!


Absolutely a beautiful restoration, my brother in Christ!
LikeLiked by 1 person
Appreciate your words. I enjoyed doing this one, even while we traveled!
LikeLike
Great work and exciting adventures on the road!
LikeLike