I have come to the age when days become numbered, and the vista of life past has become more distant than what lies ahead. The Bible in Proverbs says, “Gray hair is a crown of glory; it is attained along the path of righteousness” (16:31). Well, by God’s grace, I now have gray hair, and I travel life with the full awareness that faith in Christ provides the righteousness needed to enter the doorway of the next life. When Steve Laug (www.RebornPipes.com) introduced me to the artform of restoring pipes and this passion took hold in my life, I adopted the moniker, ‘The Pipe Steward’. Why? I came to realize that pipes outlive their stewards and not only have their own stories from their unique nomenclatures, but also from the stewards they served over the years. Those stories, often, are recounted by loved ones when they hold the pipes in hand after the steward has passed on and they say, “Remember when….” So many memories of these pipe men are associated with pipes that served them through the years. I went to the small Presbyterian college on Lookout Mountain in Georgia, called Covenant College. Jan was a student there as well. So many years later after we left those halls, Jan reached out to me from Lookout Mountain, where she has lived all these years raising a family and now grandchildren, asking if I could advise her regarding some 90 pipes left in the estate of her stepfather (who was a father to her), Joe Coulter. She said that Joe left a large collection, and that his son had taken most of the pipes, but she had the remainder and needed advice as to what to do with them. The caveat she held close was that she wanted Joe’s pipes to not just be sold off for the money, but that they would be passed on in some manner that would honor his full and consequential life.
As Jan and I communicated, it became clear that The Pipe Steward would be a good vehicle for passing Joe’s legacy on through his pipes. I believe it was confirming and comforting to Jan that a portion of the proceeds from pipes that I restore also help broken people, the Daughters of Bulgaria. This connection would be consistent with and complement the life that Joe had lived. In September of 2022, my wife and I were travelling in the eastern U.S. and we stopped by Jan’s house on Lookout Mountain to gather Joe’s pipes and bring them back to Colorado.
I have been waiting to begin posting Joe’s pipes online in the For “Pipe Dreamers” ONLY! collection until I decided how best to honor Jan’s requests and honor Joe’s legacy. When I received a special request for a 1959 birthday/anniversary pipe, the only pipe I had in my inventory that matched that request was one of Joe’s pipes – a 1959 Dunhill Shell Briar Bulldog. The decision was made then to begin posting Joe’s pipes and this, the first of his pipes to be restored, would provide the opportunity to write the story, ‘passing from one pipe man to another.’
I reached out to Jan asking her to send a paragraph about Joe that I could use to help us understand the man he was. Her response was, “I’m sorry this is so long. Joe was larger than life and it is hard to reduce him to a paragraph.”
And so, it is…. This is what I received from Jan:

Joe Carroll Coulter
Although Joe Coulter was not my biological father, he will always hold the place of father in my heart. Joe Coulter did not have an easy life. He lost his mother the day he was born in rural NC in 1932. He lost his father soon after. Distant relatives finally agreed to “take” Joe and his older brother because they needed help on their farm.
Joe served two terms with the Air Force, then was appointed to the NSA where he was in charge of Asian Affairs. Joe’s analytical mind and extraordinary communication skills served him well in all of these endeavors. His professional life took an unusual turn, and he was ordained into the Episcopal priesthood after attending the Virginia Seminary. Joe pastored several churches in the Southeast and was a “fill-in” priest for the remainder of his days.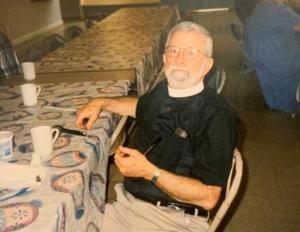 Joe finally realized that his life’s calling was to walk with thousands of those suffering from addictive illnesses. His greatest professional accomplishments were as the founder and director of the Duke Energy Employee Assistance Program. Joe received numerous awards and acknowledgements for his tireless work and was in high demand as a speaker across the country.
 “Papa Joe”, as he was affectionately known to his many friends and family, was a UNC Chapel Hill Tarheel through and through. He faithfully cheered for every Carolina basketball and baseball team, in winning and not so successful seasons.
Joe was a lover of jazz, filling the family room with more records, cassettes, CDs, and videos than you could shake a stick at. Joe loved to sit on the screened porch, in a cloud of smoke from one of his beloved pipes, his foot tapping to a favorite beat while he entertained anyone and everyone with stories that kept his audience mesmerized for hours. Joe was an avid reader and had an uncanny ability to remember everything he read. He painted pictures with words, and when he told a story, you felt like you were walking through it with him. He had a quick wit and easy smile. He would look you in the eye and you knew you were seen. He listened intently and always left you with a little word of wisdom. Joe hugged everyone, and you walked away feeling cared for and smelling a bit like his favorite blend.
Joe had many things he was passionate about and many things he did well, but his fierce love for his family was always his driving force. Perhaps it was his childhood -being orphaned, never feeling loved and never feeling like he belonged – but that was not the story at the end of his days. Joe proudly flashed the pictures of his beloved family – two children, six grandchildren, two great grandchildren and me – everywhere he went. We all knew that Papa was there and would do anything for us. Joe’s funeral was shocking. The church was standing room only. Hundreds of people stood in line to have the chance to tell my mother and me how their lives had been forever changed because of Joe. Joe and my mother poured out their lives for those trapped in addiction, without hope of change. I can see him with a pipe in his hand and that gleam in his eye, thrilled that his prized pipes are being used to continue the work of ministering to broken and hurting people.
You know when you get to a place where you have gray hair, it might also be a good time not to put off any longer seeking professional assistance which is needed to navigate through financial matters. We want those years to be GOLDEN retirement years! My wife and I met Chanel on our first trip to Peak Financial Management just north of Golden in Broomfield, Colorado. Chanel, whose title is the ‘Relationship Manager’, met with us along with Nick, our newly acquired financial manager. I have to say, this was the best investment I’ve made in a long time going to Peak 😊. I’m sleeping more soundly these days as a result. Nick and Chanel did the customary interview for new clients and that was when they learned about The Pipe Steward. Quite some months later, Chanel reached out to me with this request:
Hi Dal, this year is my hubby and I’s 25th anniversary; I am wondering if you might be able to find a cool pipe made in 1999 for me to commission for him as a gift. If you need any more information or don’t think it’s possible, please let me know. Thanks! C.
My first thought was, ‘Wow, what a great anniversary gift!’ However, the only pipes that have consistent dating systems are Dunhills and I had no Y2K Dunhills in my inventory. Doing the math, this would be Chanel and Bob’s 25th wedding anniversary! If my memory serves, 25ths traditionally have silver in the gifting theme…for a pipe man, pipes are always silver standard! When I responded to Chanel explaining the characteristics of Dunhills and dating and that I had no pipes dated 1999, she was not deterred. Chanel responded:
Thanks – I know it’s not the longest milestone but one I want to commemorate! How about a pipe from 1959; his bday year? Maybe this pic will help. He has quite a few that look like the one he is smoking. He loves Sherlock Holmes and Lord of the Rings (has one of those long skinny pipes like Gandalf used.) I’m not sure how to pick one since I’m sure there is a science and feel to what pipe guys like so any suggestions would be good! 🙂 With pipe man Bob’s reflective pipe pose staring back at me with pipe fixed and wind chimes in the window’s reflection, I went back to the inventory with the hope of the anniversary pipe being transformed into an anniversary/birthday pipe. I almost dropped when I saw a 1959 Dunhill pop up in the inventory list – one of Joe’s pipes which had yet to be posted in the For “Pipe Dreamers” ONLY! online collection. What amazed me was that I don’t have many Dunhills in my inventory and to have the specific year, 1959, was providential. I sent pictures of the 1959 Dunhill Shell Briar Bulldog to Chanel, and we were set. Bob’s birthday is October 13 and Chanel was satisfied that it would be a great birthday and anniversary gift from her. As is always the case, I like to find out about a new potential steward and when I asked Chanel to tell me more about Bob, she sent a picture. You can tell a lot about a man from his Man Cave. In this case, Bob’s ‘Man Corner’.
Yes, one picture is worth a thousand words.
 On the top shelf is a chess timer and several chess books behind. To the right I can only assume, chess pieces and boards.
Second shelf – books of various histories – WWI, WWII, Crusades, Pirate genre, AND an assortment of waiting pipes lying on the shelf.
Third shelf – MANY books from the English fantasy author, Terry Pratchett, JRR Tolkien’s Lord of the Rings, Shakespeare, and Jules Verne AND a few pipes more waiting on the shelf including a reclined Churchwarden (Channel’s ‘Skinny Pipe’).
Forth shelf – MANY western genre books by Ralph Cotton.
Fifth shelf – more books too small to make out.
Sixth shelf – Books of the Civil War genre….
I discovered from Chanel that she and Bob met for the first time, here in Colorado, “in the back of a truck!” when they were both loaders for UPS! They have one son. Bob retired as of 2022 and had worked at Haliburton for 10 Years and before that was a project manager for commercial construction for 30+ years. Bob also served when he went into the Army right out of high and was an MP; most of that time being in Germany.
From Joe now to Bob, here are pictures of the Dunhill Shell Briar Bulldog continuing his story:

 The Dunhill’s provenance is stamped on the lower smooth briar panel. Stamped on the far left is: OXS. To the right of this is stamped: DUNHILL [over] SHELL BRIAR. Continuing to the right of this is stamped, MADE IN [over] ENGLAND. To the immediate right of ENGLAND is stamped the dating suffix: a raised 9 . All of these Dunhill indicators will be explained more below.
 The stem has the classic Dunhill White Dot on the upper left panel.
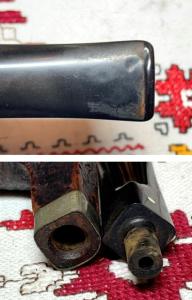
 Since this is the first time that I have had a close look at the Dunhill, I noticed that something was amiss. A Dunhill nomenclature usually has more indicators than what I’m seeing here. This is when I took a closer look at the nickel or silver (?) band wrapped around the base of the shank which would be covering the additional nomenclature. This usually means that the band is not original, and is probably a fix for a cracked shank. Another picture reveals this was indeed the case.
 I wanted to see if the support band would come off and after gingerly working it, it slipped off. I could now see the missing nomenclature: a circled 4 – ④, indicating the Dunhill size being a medium to large. To the right of the ④ was stamped S. From the look of things, I believe the band has been on the Dunhill for some time. It appears that it originally had been glued given the debris underneath the band. Whether Joe did this or someone else, the band did a good job reinforcing the shank and keeping problems from developing. After the pipe is cleaned, we’ll decide the best approach to this discovery.
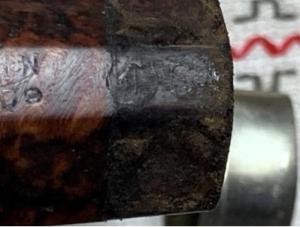 One of the reasons Dunhills are in such demand by enthusiasts is the detailed nomenclature each pipe possesses. First, stamped on the far left is: OXS which is the designation for a Bulldog shape (See: Dunhill Shape Chart – Pipedia).
 To the right of this is stamped: DUNHILL [over] SHELL BRIAR. SHELL BRIAR refers to the finish or style of the pipe. The period ad below is great to get a peek into the past to see the finishes Dunhill has offered through the years. The Shell Briar is included and was introduced in 1917 as a Black Sandblast.
 The invention of sandblasting the surface of a briar bowl was introduced and patented by Alfred Dunhill in 1917 and was quite an advance in the pipe making industry. For those wanting to drill down and look at the patent itself, Pipedia is the place to go (The History of Dunhill’s Shell – Pipedia). This short article from Pipedia explains the sandblasting process itself:
A deep craggy sandblast with a black stain finish. Dunhill patented the sandblast finish in England in 1917 (Patent No. 1484/17) and the U.S. in 1920 (Patent No. 1,341,418). See The Art of Sandblasting, by R.D. Field, for in depth look at Dunhill’s revolutionary new finish. The deepest and craggiest finishes were from Algerian briar, which is softer and yields more to the blasting. These are found in circa 1920’s, 1940’s, and 1960’s Shells. The pipes were double blasted until the 1960’s, and then the double blast technique resumed in the 1980’s calling it the “Deep Shell” finish. During the 1960’s and 70’s Dunhill could not acquire the Algerian briar. Consequently, the company’s sandblast pipes were much shallower and less distinct. Once again Dunhill showed itself to be innovative, inventing the “double blast” technique to bring about a deeper blast even with harder briar. The black shell sandblast finish uses a stain that was developed for the color, not the taste. They have a bitter taste, even when well smoked.
In the Dunhill ‘World’, Shell and Sandblast are synonymous. Here are a few examples of the Dunhill Shell finish from the same article: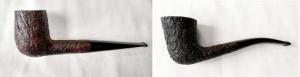 Continuing to unpack the nomenclature of the Shell Briar on the table, to the right of Shell Briar is stamped, MADE IN [over] ENGLAND – the COM or country of origin. To the immediate right of ENGLAND is stamped the dating suffix: a raised 9. I’ve taken several pictures of this at different angles and used a magnifying glass to make sure this is indeed a ‘9’ and it is. I thought when I first looked at it that it might be a zero… nope.
 The dating of Dunhill pipes is fun to do and interesting. Pipephil.eu’s Dunhill Dating Key (Dunhill dating key — Logos & Markings (pipephil.eu)) is a great tool to drill down to determine the dating of the pipe on the table. The first test in the Key below asks if there is a ‘year suffix’. We do have one, so we follow the ‘yes’ path. The next question is for the presence of the ‘Patent number’ in the nomenclature. We do not have the patent number, so we follow the ‘no’ path. The next question refers to the COM stamping. Our COM is DUNHILL [over] SHELL BRIAR and not over LONDON. Again, the ‘no’ path takes us to the statement that our pipe was produced post 1954 and provides a link to narrow things down.
 The next panel of the Key appears and asks to Select your year suffix. Our suffix is a 9. Then the question is, ‘smaller raised suffix?’ The answer is yes which identifies our pipe in the decade of the 1950s. Next, to determine the specific year in that decade, the year suffix is added to the decade: 1950 + 9 = 1959. PipePhil then provides a link to investigate various specimens of that decade (Bruyere – Dunhill – Markings (pipephil.eu)).
 The final two parts of the nomenclature are the hidden circle ④ and S. As mentioned above, the circled ④ is used to indicate the size of the pipe. 4 indicates a medium to large. The ‘S’ points again to the finish – Shell.
 The Pipedia Dunhill article is a huge trove of information about the history of Dunhill and much more. For those desiring to drill down more, its worth spending some time to have a look (Dunhill – Pipedia). My impressions of the founder, Alfred Dunhill, are that he was a talented and creative businessman, who understood well that a quality product would create a financial boon along with understanding the ‘needs’ of a market. Per Pipedia, in 1893, he inherited a harness business at only
  age 21, but was savvy enough to see the approaching reality of the automobile and he leveraged his company to prepare for it. He started, “Dunhill Motorities” to capitalize on this new industry. His first experiment in pipe making was to accessorize for the ‘new’ and sophisticated needs of those now driving cars which were faster than horse and carriage. To me, this epitomizes Alfred Dunhill’s approach to business and perhaps, to life as well. With wind in the faces of potential customers, he birthed the idea of marketing a pipe with a windshield! We might laugh, but this says something about the man who guided his company through the Great Depression when many pipe manufacturers were closing their door. Dunhill expanded. Pipedia’s synopsis describes the worldwide growth of Dunhill Pipes and their association with quality – the preferred pipe of the rich and famous and the aristocracy. This ‘market share’ was due in part to Alfred Dunhill’s practice of giving pipes to the English military officers during WW1. Altruism or good marketing? During that time the aristocracy of England was awarded military commissions by birth-right. Dunhill was a smart businessman, there’s little doubt of this. I also read that it was Alfred Dunhill who kept Winston Churchill well-supplied in cigars. A very interesting man, Alfred Dunhill.
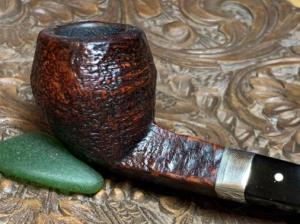
With a better understanding and appreciation for the Dunhill Shell Briar now on the worktable, it is time to look at the issues. The cracked shank discovered earlier needs to be addressed. After the cleaning, the approach will be decided. The chamber has a VERY thick cake which narrows as it moves downward toward the floor of the chamber. This needs to be reamed to be able to inspect the chamber wall as well as to allow the new steward to create a new protective cake which should be about the width of a U.S. dime. The blasted finish looks good and needs cleaning for usual grime.
 The stem is in good shape. I detect no oxidation in the vulcanite, but there are some tooth compressions on the bit, both upper and lower.
 To begin the restoration of this Dunhill, the stem’s airway is cleaned with isopropyl 99% and with pipe cleaners. One pipe cleaner was enough.
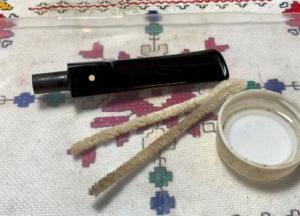 Even though I do not detect oxidation in the stem, to be thorough, the stem will soak in Briarville’s Pipe Stem Oxidation Remover for some hours.
 With the stem soaking, attention is turned to the stummel. The carbon cake in the chamber is uber thick. When the cake is too thick, it can cause damage to the chamber as the carbon expands and contracts with the heating and cooling of the pipe. The picture below marks the starting point.
 To remove the cake the Pipnet Reaming Kit is employed and 3 of the 4 blade heads available are used. The cake is hard as a brick and isn’t breaking up easily.
 While using the 3rd Pipnet blade, I became concerned that I might break the blade – they are hard to replace if they break! I decided to switch to another ‘old time’ reaming tool called the Kleen Reem Pipe Tool. I found this gem of a tool at a flea market somewhere in Kentucky when my wife and I were traveling through. It’s metal and can withstand the concrete this Dunhill is presenting.
 The arms expand or contract by turning the knob on the end. This tool is a marvel of engineering 😊. It does a good job breaking up the last layer of cake build up.
 Following the Kleen Reem Tool, the Savinelli Fitsall Tool continues to scrape the chamber wall and to reach the floor getting the hard-to-reach places.
 Finally, the last vestiges of carbon are removed using 220 grit paper wrapped around a dowel rod to sand the chamber.
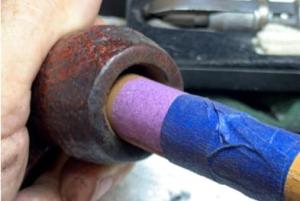 After the chamber is wiped with a cotton pad, an inspection of the chamber reveals some heating issues. Some lateral fissures have formed on the frontside of the bowl. These fissures start as small cracks and grow as the heating and cooling of the bowl creates the geology for this kind of damage. I’ve seen it worse and this can be remedied after finishing the cleaning process.
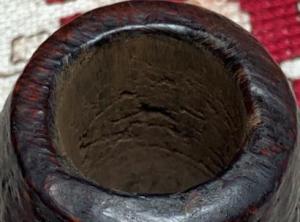 To continue cleaning, undiluted Murphy Oil Soap is used to scrub the external blasted briar. A few starting pictures show the starting point.
 A cotton pad is used to scrub the surface and with the nickel/silver (?) band removed, the area at the end of the shank will be cleaned as well. A brass brush helps with cleaning the rim where there’s some darkened briar from lighting.
 Next, the stummel is taken to the sink where the internals are cleaned using warm water and anti-oil dishwashing soap and scrubbed with shank brushes.
 After the stummel is thoroughly rinsed it returns to the worktable.
 The internal cleaning continues with isopropyl 99% and cotton buds. I do a lot of excavation of tars and oils by scraping the mortise walls using a small dental spoon. The more removed in this way shortens the work with the cotton buds.
 After many buds and excavation, the buds begin to emerge lighter, and the work stops. The internals have shaped up nicely.
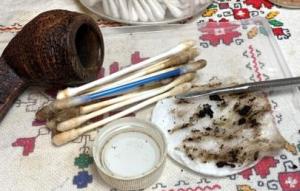 With the basic cleaning completed, the stummel is put on the side and attention is switched to the stem that has been in the soak of Briarville Oxidation Remover. After the stem is fished out, the surface is rigorously rubbed with a cotton cloth to remove the raised oxidation. A couple of pipe cleaners moistened with isopropyl 99% are used to clean the airway of the fluid.
 Looking again at the bit, there are a few compressions which need to be addressed. First, the compressions will be painted with a flame from a Bic lighter to heat the rubber vulcanite material. The heating causes the vulcanite to expand reclaiming its original shape – or closer to it. The goal is to minimize the compressions so that only sanding is necessary and not a patch. These before and after pictures tell the story. First upper:
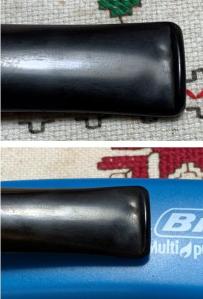 Next, lower bit:
 Unfortunately, the deeper compressions on the left side of the bit, both upper and lower, were not improved enough using the heating method. They are still too deep for sanding to remove easily. To remedy this, the compressions are patched by filling each with Black Medium-Thick CA glue. Before applying the glue, the bit is cleaned with a cotton pad moistened with alcohol. Then small drops are applied to each compression and the stem is put aside to allow the patch to cure.
 With the stem on the sideline, it’s time to assess the issues uncovered with the stummel. After cleaning the stummel, problem areas are easier to see and assess. First, the small crack on the shank that was covered by the band is more visible now. My first conclusion after the cleaning is that the discoloration remaining beneath the banded shank area is not going away. However, the hidden nomenclature was easier to see as the picture below shows. The band will be cleaned up and polished and continue to provide support to the shank. It’s a bummer that these stampings will continue to be hidden, but Joe’s fix (or whoever he got to do it) is a good one and will continue with the Dunhill Bulldog.
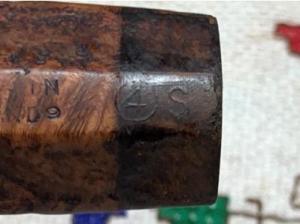 The crack itself is small. The picture below shows the shank facing (see arrow) and then the next picture follows the crack to its terminus point over the top of the shank beneath the band. The crack itself has not been repaired but simply bound up by the band.
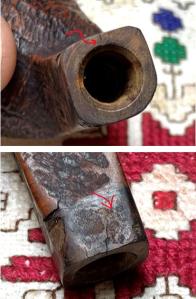 Even though the band will continue to provide its support to the shank, the crack will be ‘repaired’ so that it doesn’t progress – if there’s a chance of that. This is done first by drilling a small counter-creep hole at the very end of the crack. The hole does not go all the way through, but only a partial depth to head off the crack’s potential progress. The counter-creep hole is then filled with CA glue. I’ll also lay a line of thin CA glue to shore up the crack itself. Thin CA is almost like water and sinks into the crack and cures. That’s the plan. Before drilling the holes, a sharp dental probe presses a small hole to help identify the drill point and to guide the drill bit.
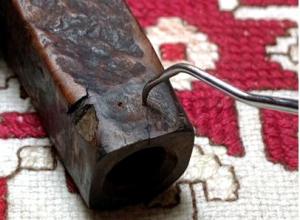 Notice that I pressed two guide holes. Using a magnifying glass, the main crack seems to end at the hole on the right. But I also could see a microscopic line that looked like the crack’s continuation. To be on the safe side, both will be drilled and filled. Now, before proceeding with the drilling, the attentive eye will see another pretty ominous crack to the left on the top of the diamond shank. Yep.
 I saw this earlier, and it could become a problem. In the next two pictures you can see the crack on both sides of the shank point. The concern is that the briar will falter and chip off on that vulnerable point – and that wouldn’t be good.
 What I believe is happening here is that when the band was originally mounted on the shank, it was pressed on and the top edge of the band dug into the briar like a trim chisel. The picture below was taken earlier, and I’ve zoomed in on the band before it was removed. The band is beneath the briar – ugh – and pushing the briar up which created the cracks on both sides of the shank point. You can see that the briar beneath the band was trimmed on the top to form a flat space to help the fit of the band (see picture above). The band went a bit too far when it was mounted.
 To remedy this the first thing is to take a squared needle file and file down the edge of the briar on the vertical point that the band was pushing up.
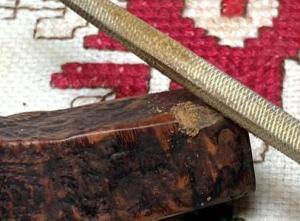 What this does is release the pressure of the band pushing on the briar which should minimize the worry of the briar chipping.
 I slipped the band back on to see what it looks like. The band’s fit is a lot more comfortable now. Later, when I remount the band, a bit of CA glue at this point will help secure the fix.
 Now, back to working on the shank crack. The guide holes are in place and a 1.5mm drill bit is mounted on the rotary tool. After holding my breath to avoid my hand shaking, the counter-creep holes are drilled.
 Next, CA glue is applied, and a toothpick helps to spread the glue over the area. I decided not to use the thin CA because it can get out of hand and run in places you don’t want. The regular CA will do the job adequately. The patch will cure in time.
 Next, moving to the heating issues in the chamber, a fresh picture reminds us of the fissures that have developed. It is difficult to picture what is more easily seen with the eyes.
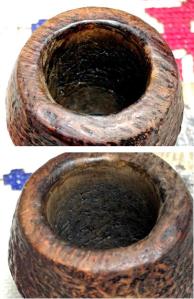 The plan is to apply a thin coat of J-B Weld over the problem areas filling the fissures. J-B Weld is an inert heat-resistant epoxy that does a great job with these issues. After applying the Weld, it is allowed to cure and then the chamber is sanded. The sanding removes all the excess Weld leaving only the needed application in the cracks and fissures. I start by putting scotch tape over a plastic disk used for the mixing. The tape makes clean up much quicker. J-B Weld comes with 2 components – Hardener and Steel. A small amount of each is placed in equal measure on the mixing disk.
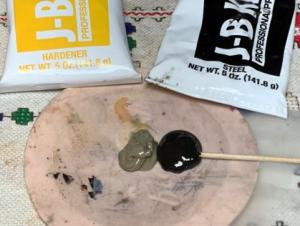 The parts are mixed with a toothpick. The directions say that the Weld starts setting at about 4 minutes after mixing. Using a combination of toothpick and spatula, the mixture is carefully troweled (not to get any on the external briar!) into the chamber and spread over the problem areas. I’m not concerned about excess at this point. It will be sanded away later.
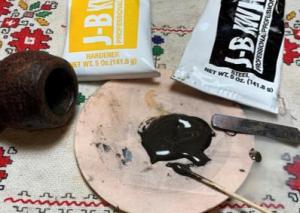 The coverage looks good. The stummel is set aside now for 4 hours which is the time needed to cure.
 The patches on the stem have fully cured and it’s time to work on the stem. First, the upper bit is filed. Using a flat needle file, the patch mounds are filed flush with the stem surface.
 A squared needle file is then used to refresh the button lip to give it a bit more definition.
 The flat needle file files the entire upper bit to even things out.
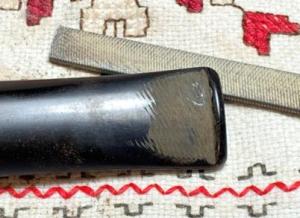 Next, the lower bit is filed starting with filing the patch.
 Again, the hang lip on the lower button is filed to give it more distinction.
 Finally, the lower bit is filed to even out the rough spots.
 Next, to remove the filing marks and to further smooth the bit, 220 grit paper is used – upper and lower.
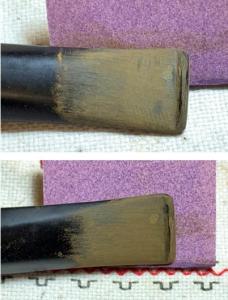 The sanding is next expanded to the entire stem using the finer 320 grit paper. A plastic disk is used on the shank facing to prevent shouldering during the sanding process.
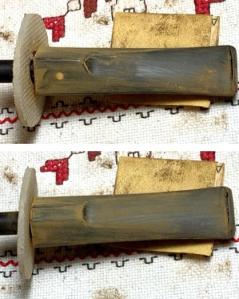 The stem is next wet sanded with 600 grit paper, and this is followed by applying 0000 grade steel wool to the entire stem.
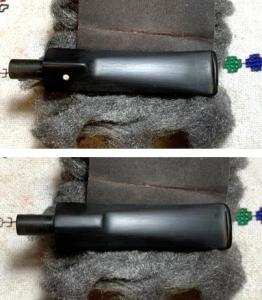 Next, the full set of 9 micromesh pads are used from 1500 to 12000. I dry sand with each pad and between each pad, Obsidian Oil is applied which helps condition the vulcanite and protect it from oxidation. First, pads 1500, 1800 and 2400. This is followed by pads 3200, 3600, and 4000. Finally, pads 6000, 8000, and 12000. The stem has shaped up nicely.
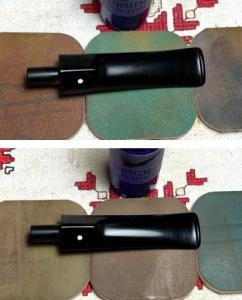
 To continue to condition and polish the stem, Before & After Extra Fine and Fine Polishes are used – a product produced by Mark Hoover. Starting first with the Fine Polish, some is placed on the finger and then worked into the vulcanite surface. After allowing it to set a few minutes, the excess is wiped off with paper towel and the same is repeated with the Extra Fine Polish. Nice.
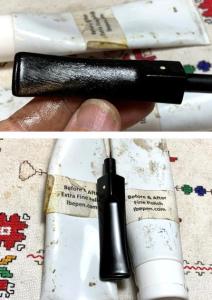 The J-B Weld applied to the chamber has had plenty of time to cure. It required 4 hours and got several hours through the night. To begin the initial sanding to remove the excess material, the sanding drum is employed mounted on the rotary tool. The drum is used gently, not putting a lot of torque on the chamber surface, allowing` the drum rotation to do the job.
 After using the sanding drum, the sanding is fine tuned with 220 grit paper wrapped around a dowel rod.
 I’m pleased with the results. All the excess J-B Weld has been removed and what is left are the fissures filled with cured J-B Weld. Running my finger over the chamber surface reveals a smooth surface. The bowl is ready to go. Later, after everything is about complete, a yogurt/activated charcoal mixture will be applied to the chamber wall surface to provide a cake starter to develop.
 A lot of dust was created with the chamber sanding. The bowl is wiped out and I blow through the mortise to remove dust. This is followed by a few cotton buds moistened with isopropyl 99% alcohol to make sure the internals are clean.
 Another issue needing attention is the dark, charred ring around the internal edge of the rim. The discoloration is a result from the lighting over the years.
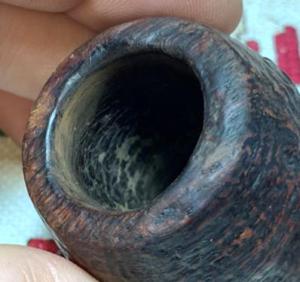 To clean this ring and to improve the rim presentation, a light sanding around the edge with 220 grit paper removes the blemish.
 The stummel has been through a lot in this process and we’ve come to the place to apply Mark Hoover’s ‘Before & After’ Restoration Balm to the Shell blasted surface. The Balm does a great job bringing out the rich, deeper tones of the finish. After placing some Balm on the finger, the Balm is worked into the blasted surface until thoroughly covered. The stummel is then put aside for about 10 or so minutes for the Balm to be absorbed.
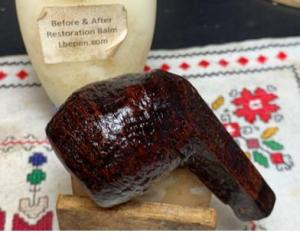 After the time has passed, a microfiber cloth dedicated to the removal of Balm, is used to wipe the stummel and buff it up. I’m pleased with the results. Not bad.
 Next, it’s time to work on the band and remount it. From the get-go, I have questioned the makeup of the metal. I’m not an expert on metals…. It’s soft, pliable, and non-magnetic. These are characteristics of several metals. I initially was thinking that the band was either aluminum or tin because of the way it was custom fitted around a less-than-normal shank profile. After sending a note and pictures to Steve with his vast www.Rebornpipes.com experience, he said that strong options are also nickel and silver with the oxidation as another indicator. My wife assisted me in looking up all the many sites giving directions on testing different metals and we’ve concluded, with about 90% confidence, that this band is silver-plated nickel. It would be very cool if our assessment is correct to correlate with a 25th wedding anniversary theme – SILVER 😊. It has a silver sheen for sure, but we’ll see how it cleaned up leading us to reach the silver conclusion.
 The first step I took in cleaning the band was to use a silver cream cleaner. The directions are followed and after rinsing a hand buffing, there is a stark improvement.
 The next step in cleaning/buffing will come after the band is remounted – applying Green compound to the band. But first, to remount the band, a test fit showed that the patch mound for the shank crack repair was a bit high. A flat needle file quickly addressed this allowing the band to fit easily.
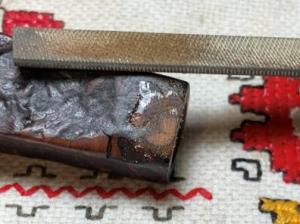 The test fit looks good. I’m not fully compressing the band onto the shank – that will come when it is mounted permanently.
 As I mentioned earlier, to reinforce the vulnerable area of the briar on the point of the diamond shank, a small drop of regular CA glue was placed on the flat area and spread with a toothpick. Only a small amount of CA glue is left to not be pushed up over the shank when pressing the band over the shank.
 While this first application of CA was still wet, a small amount of CA was also placed inside the band and spread again around the inside of the band with a toothpick. Placing the glue on the inside of the band prevents glue from being pushed up toward the shank facing when mounting the band. The band is then mounted, and I give it a firm vertical press with the shank against the table to seat the band firmly.
 The band looks good.
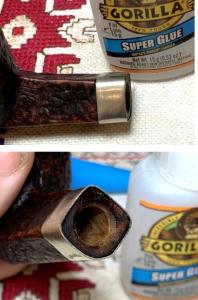 With the band now mounted, its cleaning/polishing continues. Next, Green Compound, a fine abrasive which I use for metals, is applied to the band to buff it up. A cotton cloth buffing wheel is mounted which is dedicated for working with metals. The reason for this is that polishing metals with a compound always produces a black residue that you don’t want on buffing wheels working on briar. For this same reason, painters’ tape is placed around the shank to protect the briar in that proximity from the black residue which can stain the briar.
 With the rotary tool at about 40% full power, I start applying the compound slowly to make sure there is no adverse reaction to the metal. Seeing none, the buffing continues with the compound and after application, the band is wiped and buffed with a cotton cloth. Not bad. At this point, I’m sticking with the silver-plated nickel composition of the band the way it has buffed up.
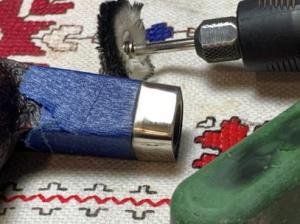 With the silver 😊 band mounted and polished, it’s time to reunite the stem and stummel and look at the progress. Unfortunately, another mini-project just materialized ☹. The fit of the tenon in the mortise is too loose. This happens sometime after a pipe has been thoroughly cleaned, the stem’s fit is not as snug as it needs to be. Bummer.
 What is seen in the next picture is not a rocket launch but the remedy for this issue. Using clear nail polish with the brush provided, the tenon is painted. Nail polish is an epoxy that can be used to build the girth of a tenon to fit more snugly in the mortise. It takes several cycles of painting and curing to build up the width. The picture captures the curing. I protect the stem with the tape and after painting the polish on, hang the stem vertically so that the polish dries evenly around the tenon.
 After 3 of these cycles, the stem is tested, and the fit is better. At this point, fine 600 grit paper is used to remove the polish that has been peeled off by the testing and rotating the tenon in the mortise. The sanding smooths out the new surface.
 After a few testing and sanding cycles, the fit is snugger. I would suggest that this Dunhill’s new steward wiggle the stem in and out instead of rotating it to maintain a snug fit.
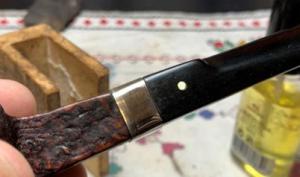 With the stem and stummel now looking good, the next step before applying wax to the stummel is to coat the chamber with a yogurt/activated charcoal layer. When these two ingredients are mixed and dry, the result is a surprisingly durable substance that acts as a good cake starter to help protect the chamber. A proper cake need not be more than the width of a U.S. dime. The yogurt is plain, non-flavored, with whole milk. A small amount is placed in a cup. Activated charcoal is the other ingredient.
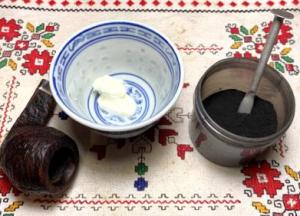 Charcoal is gradually added to the yogurt with the pipe nail and mixed. As Charcoal is added the mixture thickens.
 When the mixture gets to the viscosity that it won’t be runny and is firmer and will stay intact, it is then troweled into the chamber with the nail.
 A pipe cleaner is inserted through the draft hole to keep the mixture from blocking that airway. The pipe nail works great to spread the mixture evenly over the surface of the chamber. It really does not take much, and I always seem to have a good bit of the yogurt/charcoal mixture left over.
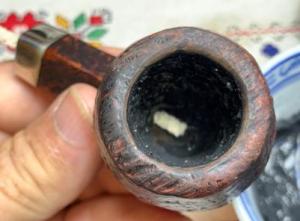 With the chamber thoroughly coated, the stummel is set upright in the egg carton to allow the mixture to cure. The reason to keep it upright is that if gravity can shift the coating, it is better to have it moving vertically to stay relatively even in the bowl and not pooling on a side. A word for the new steward: For the first several times the Dunhill Shell Bulldog is put in service, do not clean the residue with a metal tool scraping the chamber! This will damage the cake starter. What I do to clean during this developmental stage is to fold a pipe cleaner and gently rub the loose debris out 😊.
 Next, Blue Diamond compound is applied to the stem. Since the stummel is a blasted surface, the compound will not be used on it so as not to get compound dust caught in the rough surface. With a dedicated cotton cloth wheel mounted to the rotary tool, Blue Diamond is applied at a speed of about 40% full power. This is the final abrasive used on the pipe.
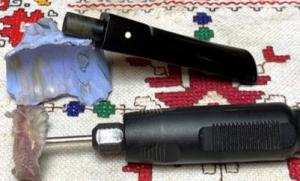 After the compound is applied, compound dust is removed from the surface with a felt cloth. This is done in preparation for the application of the wax.
 With the stem and stummel rejoined, Carnauba wax is applied with another cotton cloth buffing wheel mounted on the rotary tool. The speed is the same at about 40% full power. After application of the wax (minus the band), the pipe is given a rigorous hand buffing with a microfiber cloth to remove excess wax and to raise the shine.
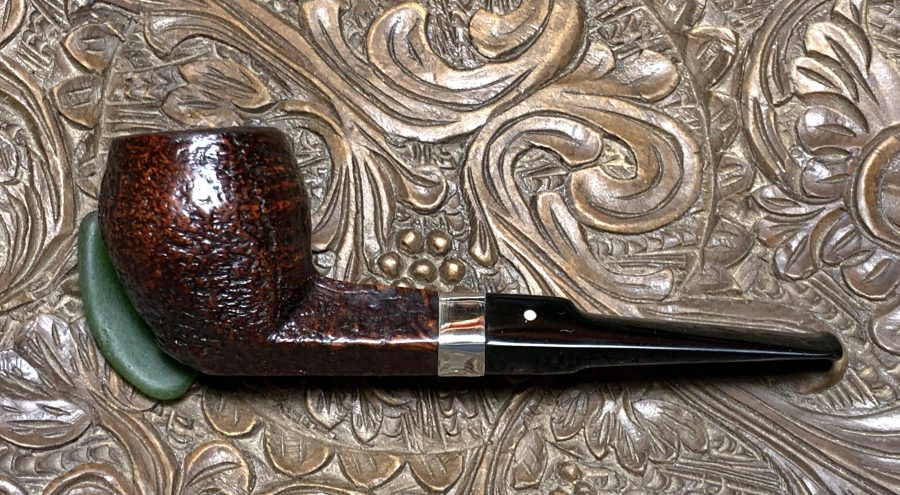
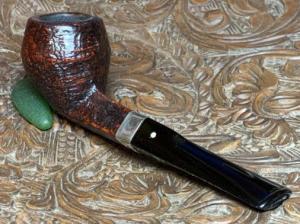
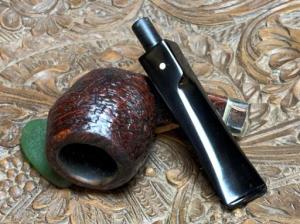
 All I can say is, ‘My, oh my.’ What a beauty. I believe this first of Joe’s pipes to be restored and passed on to a new steward, Bob, as a birthday/anniversary present from Chanel, is a worthy commemoration. The fact that it’s a 1959 Dunhill Shell Briar Bulldog, adds layers of frosting on the cake in my book. The (90% sure) silver band is a nice anniversary touch as well for Bob and Chanel. The pipe had several issues each taking a bit of TLC to remedy, but the result was well worth the effort. Chanel commissioned this pipe and part of the proceeds will benefit a work near and dear to my and to my wife’s heart, the Daughters of Bulgaria (now called, Spring of Hope) helping women and girls who have been trafficked and sexually exploited. I believe Joe would be pleased with this. Thank you, Jan, for providing the opportunity for me to acquire Joe’s pipes to set them on the path once again. So that we don’t forget how far we’ve come, here’s the ‘before’ picture of the Dunhill when we started. Thanks for joining me!
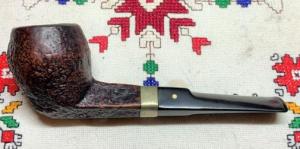


Great article, Dal. Hope all is well. I’m starting my new life at 71 with my new wife, YU, Tao, 60. She speaks no English but shows promise. Wonderful homemaker. Very athletic and positive lady. Life is good. How are you? Have you had a chance to post any of those pipes I sent you? I’m slowly selling my collection, but never selling my Dal Stanton’s! Best wishes, Todd
LikeLiked by 1 person
Todd, congratulations upon your wedding! So, happy for you, my friend. I will be posting your pipes this week. Thanks so much for your contribution to help the Daughters of Bulgaria 🤠.
LikeLike
Joe would have LOVED this, except for my gushing over how great he was. Your care of another man’s prized belongings says much about you and your understanding of the significance of that constant companion. I’m grateful to our Father for answering my prayers through your work and the ministry to the Daughters of Bulgaria. May He multiply and pour out His blessings on all of you.
LikeLiked by 1 person
Thank you, Jan. I appreciate your words. 🤠
LikeLike