
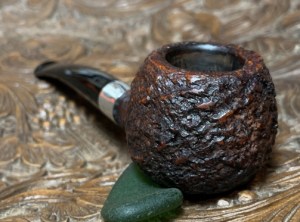
The next pipe on the worktable came to me from a generous pipeman, Patrick, who donated the pipe to help support the work of the Daughters of Bulgaria, now called Spring of Hope, which my wife and I co-founded when we lived in Bulgaria. Our goal? To help trafficked and sexually exploited women and girls. Patrick’s pipe was not long in the For “Pipe Dreamers” ONLY! online collection before North Carolinian, Gary, heard it whisper his name. Gary commissioned the Peterson to join a long line of pipes he has commissioned. I am thankful to Patrick and to Gary for their part in supporting the work for the Daughters. Here’s the Peterson’s Donegal that got Gary’s attention.
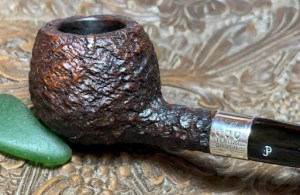
 The nomenclature is stamped on the smooth briar underside of the Prince shank. On the left of the panel is stamped: MADE IN THE [over] REPUBLIC [over] OF IRELAND [over] 406 – the shape number.
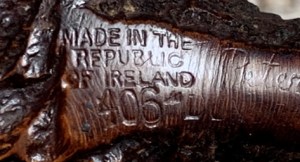 To the right of the COM stamping is stamped in cursive and thinning – Peterson’s [over a thinning] “DONEGAL” ROCKY.
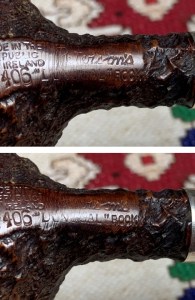 The P-lip has the classic cursive ‘P’ logo stamping. The band is stamped with ‘K & P’ in the shields Maker’s Mark [over] STERLING [over] SILVER.
 The silver hallmarks are also stamped beneath SILVER in a perpendicular fashion.
 I love the process of dating pipes – so frustrating, but when you discover when the pipe came into being in time and space, its story has a genesis, and our stewardship of that pipe begins. Mark Irwin’s essay on hallmarks is excellent (Hallmarks – Peterson Pipe Notes) and serves to help us identify the dating of the sharp Donegal on the worktable.The starting point is the K & P stamp. From Mark Irwin’s Hallmarks – Peterson Pipe Notes:
Pipe smokers new to Peterson sometimes wonder what the “K&P” stamp is all about, not realizing the company was known as “Kapp & Peterson” until the 1970s and is still referred to as “Kapps” by the old hands in the shop.
Most Peterson pipes with metal mounts (and all nickel-mount Systems) have a “K & P” Maker’s Mark, also called a Sponsor’s Hallmark, which is used by The Company of Goldsmiths of Dublin [aka Dublin Assay Office] (est. 1637) to identify the silversmith or goldsmith responsible for making the article.
The “K & P” maker’s mark was registered at the assay office shortly after Kapp & Peterson’s incorporation and appears either in all capital letters (on early sterling and later nickel mounts) or capital letters in shields (on sterling) …. The maker’s mark was later placed in shields, which may be flat or pointed at the top.
The picture of our band shows the ‘K & P’ in shields. The next step is looking at the sterling hallmarks. Again, from Hallmarks – Peterson Pipe Notes:
Irish sterling hallmarks denote the year in which a piece was made or hallmarked and began with the foundation of the Dublin Goldsmiths Company in 1683. Peterson hallmarked pipes have been documented by my co-author Gary Malmberg from 1891 to 1938 and 1969 to the present, leaving a 30-year gap, which K&P later confirmed. Approximate dating of a precious-metal mounted pipe made during these 30 years is possible, as I said at the outside, but requires The Peterson Pipe Book or an extensive collection of Peterson catalogs to understand the contextual history of shapes, lines, finishes and stains… It was a great effort but marred by the fact that, at the time, they didn’t realize that K&P hadn’t hallmarked any pipes from 1938 through 1968! The extra marks, at the bottom right of the chart, also perplexed many Peterson collectors for years, as these have never appeared on any Peterson pipe.
Mark’s post provided a picture of the K&P’s first hallmark dating chart appearing in 2005 in the Smoker’s Guild magazine.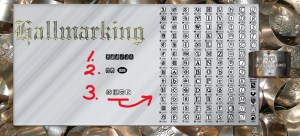 What I have numbered in the picture is further explained in the Irwin essay:
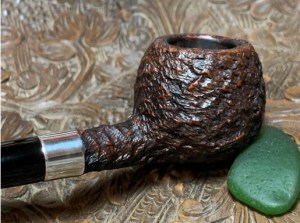
Three symbols appear on a Peterson sterling band or ferrule (note that sometimes only two appear on tenon end of a spigot or on a silver rim cap]. The first is Hibernia, the symbol of Ireland. She is depicted seated with one arm on the harp. This is the distinctive symbol of the Dublin Assay Office identifying sterling that has been assayed in Ireland.
The picture below of our pipe shows the Hibernia, symbol of Ireland. The essay continues: The second original symbol is the Harp Crowned, a fineness mark indicating the quality of the silver. It appeared on hallmarked Peterson pipes through 2002.
The ‘Harp Crowned’ was not a slam dunk until I saw other pictures of it. This stamp indicates that the sterling silver has a quality percentage of .925.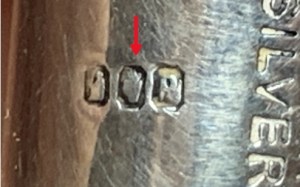 Continuing: The third mark is the date letter. These follow a system peculiar to the Goldsmiths of Dublin, sometimes using the Celtic alphabet, sometimes the English one. Quite often the date sequence will skip a few letters in each cycle that look too much like the letter next to it in the alphabet. Here’s a simple chart for your use. The one pictured below is eye candy, but you can click on the PDF below it to download a black & white version for printing or keep handy on your computer. It has all the information you’ll need to date Peterson Irish Sterling and Gold mounts from 1890 through 2026.
This is the fun part. Mark provides another Kapp & Peterson’s Irish Halmark chart as a PDF download. It is a bit clearer than the chart above. Here is the link (PPN Hallmark Chart.ai) and the chart: Taking a close picture of our dating hallmark, we find we have a Celtic P. I went back and forth between an ‘R’ and a ‘P’ taking pictures at different angles but landed on the ‘P’. The Celtic ‘P’ dates our Peterson’s Donegal in 1981 as referenced among the Celtic letters in the chart above.
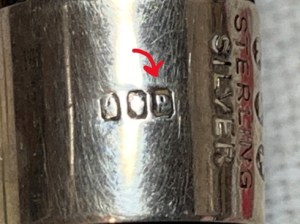 I can remember 1981 – I was the wise age of 26 😊! Here are other things that came up generated by an AI search:
Many things happened in 1981, including:
- Ronald Reagan became president: Reagan was sworn in as the 40th president of the United States on January 20, 1981.
- The Iran hostage crisis ended: The 52 American hostages held in Iran were released on January 20, 1981.
- The first London Marathon: The first London Marathon took place in 1981.
- Prince Charles married Lady Diana Spencer: Prince Charles, the heir to the British throne, married Lady Diana Spencer in 1981.
- The first microcomputer was launched: IBM launched its first microcomputer, the 5150 Personal Computer, in 1981.
- MTV debuted: MTV debuted with the broadcast of “Video Killed the Radio Star” by the Buggles.
- Sandra Day O’Connor became a Supreme Court Justice: Sandra Day O’Connor became the first woman on the United States Supreme Court in 1981.
- The first giant panda born in captivity outside of China: Tohui the Panda was born in Chapultepec Zoo in Mexico City in 1981.
- The first case of HIV/AIDS in the United States: The first recognized case of HIV/AIDS began in the United States in 1981.
- The space shuttle launched: NASA launched Space Shuttle Columbia, the first reusable space vehicle, in 1981.
- The Yorkshire Ripper was arrested: Peter Sutcliffe, known as the “Yorkshire Ripper”, was arrested in 1981.
Do you remember what you were driving in 1981? This is what I was driving 😊. Oh, how I wish I had hung on to this beauty! For information about the Donegal Rocky line of pipes, Mark Irwin’s essay, 148. The “Rocky” History of the Donegal Line – Peterson Pipe Notes was invaluable. What was fascinating about this essay was not only the timeline of the Donegal’s progression but also the evolution of Peterson’s rustication methods. Concerning this line of pipes, the article states:
The “Donegal Rocky” (in quotation marks), released in 1945 or so, was Kapp & Peterson’s first rusticated line. Not that K&P hadn’t rusticated pipes previously, they just that they hadn’t devoted an entire line to rustication. And they were apparently proud of it, because they gave it a sterling mount along with a black finish and white-stamped P on the mouthpiece… For nearly thirty years, from 1947 until 1975, the line continued uninterrupted, black rusticated finish with fishtail mouthpiece and sterling band… Then in 1976, just a year out from their Centennial celebration, Peterson (in an expansive mood) pushed the Donegal up a notch, giving the line a P-Lip… This rustication was done by a carver in Dublin, Paddy Larrigan told me this past June in Sallynoggin. The artisan did all of Peterson’s fantastic rustications from the period: the classic “Pebble Rustics,” the early Sherlock Holmes rustics, the Bond Street of Oxford Premier Systems, and the sterling-band P-Lip Donegals.
And that’s where this 1979 01s comes in handy, because we can see with much greater clarity the rustication as well as the details of a “Donegal Rocky” at its pinnacle of engineering and finish: The 1979 Donegal example above has the aluminum stinger matching ours. It was interesting to read Mark Irwin’s comments about this Donegal characteristic:
It’s worth remarking concerning the removable stinger. This spike-ended aluminum tube is easily removed, leaving the P-Lip mouthpiece strictly a graduated-bore regulation affair.
If I were more dedicated, I’d smoke this pipe a few dozen times with and without the stinger and give you a report on what purpose it serves. I wonder if the craftsmen at the factory installed the stinger to approximate the effect of the older bone tenon extensions routinely attached to Classic Range Dublin & London, Classic and Premier lines? With or without the stinger, the pipe smoker should enjoy the benefits of the “Sub-System,” which I talk about at length in The Peterson Pipe. As it is, I’ll leave that to someone else, and happily report their findings. *
The next bit of information nails where we are with the 1981 Donegal on the table. Up to this point in the history of the Donegal line, the finish was a rusticated black. Then the transition:
Seen above from the 1981 Mark Twain brochure, the sterling band resurfaced, this time with the line’s first change in stain color to what some of us have in our rotations or remember: the contrast brown over black (seen in the dutch 339 hallmarked for ’81 below). The catalogs indicate some fluctuation from sterling to nickel bands on through the Late Republic era (1969-90) into the Dublin era (1991-2018), with the sterling being used (as happens so often with Peterson lines) in conjunction with a P-Lip in the 1997 catalog, but also in that year available with a nickel band and fishtail.
The examples of color change which are referred to above are seen in this picture with the 1981 pipe on the top – brown over black. The Dublin on the bottom is from 1994 and represents the stain color changing again – burgundy over black. I look at the rustication of the ’81 above and it is very close to what I see on our pipe, especially on the heel where the finish is not as faded.
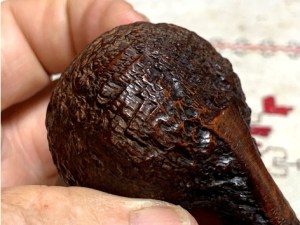 There were two other essays in Peterson Pipe Notes that were interesting marking the evolution of the rustication process within Peterson by Mark Irwin. I learned a good bit about the process of rustication and the differing approaches. They are 267. Peterson Rustication, Part 1: the Éire through Dublin Eras – Peterson Pipe Notes and 269. Peterson Rustication, Part 2: Wojciech Blaszczak and the Laudisi Era (2018- ) – Peterson Pipe Notes. In the second article, I discovered the answer to a question that I had not thought to ask, from where does the “Donegal” Rocky take its name? This was in the sub note of the picture below:
The Donegal Rocky takes its name from the sea rocks in southwest Donegal, in County Donegal. Shown [below], the famous Sea Stacks at dawn, low tide.
I’m ready to light the Donegal Rocky up and sit a spell 😊! One additional bit of information concerning our shape number 406. It is pictured below among the pipes of the Classic Range (https://www.peterson.ie/downloads/Peterson-Shape-Chart.pdf):
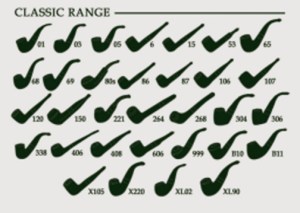 I’m calling the 406 a Prince shape which is to me, a very attractive, elegant shape. Here is Bill Burney’s panel on the Prince shape explaining its unique characteristics from Prince – Pipedia.
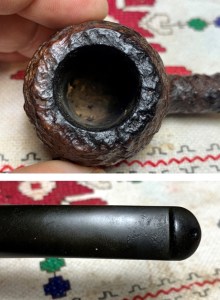
 With a deepened understanding and appreciation for the Peterson’s Donegal Rocky Prince on the worktable, it’s time to look at his issues. The Prince bowl is in good shape – the rustication is superb. The chamber has very little carbon cake buildup and the rusticated surface needs to be cleaned.
 The silver band needs to be polished up to increase its bling factor. The Peterson ‘P’ stem logo needs a refreshing. There appears to be enough tread in the P to receive a fresh application of white paint.
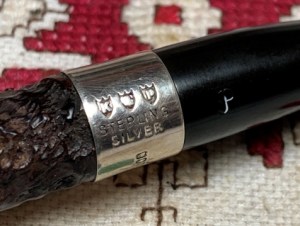 The stem has some issues – an understatement to be sure. There is a hint of oxidation. The upper bit has some normal tooth chatter which is easily addressed.
 The lower bit is a different story. It also has tooth chatter, but it appears that the former steward preferred a fishtail stem rather than a P-lip and did some modifications. It looks like he took out a knife and whittled the button so that the lower button lip was removed and the bit flattened. I’m not sure this is a practice among Peterson collectors, but this is what we have. The button lip will need to be rebuilt and the lower bit surface built up and rounded.
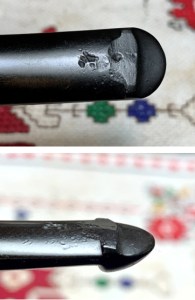 To begin, the stem needs to be cleaned. The aluminum dagger stinger is easily removed to allow the pipe cleaners to do their work.
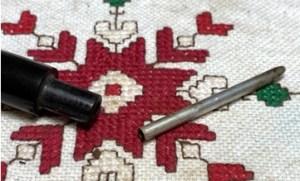 While the stinger is out, the airway is cleaned with a pipe cleaner moistened with isopropyl 99% and then it receives a polishing with 0000 grade steel wool.
 Using pipe cleaners and isopropyl 99% alcohol, the P-lip airway is cleaned. It takes a bit of effort, but a pipe cleaner will also clear the P-lips sloped airway in the button.
 To address the minor oxidation, the stem is placed in a soak of Briarville’s Pipe Stem Oxidation Remover for several hours.
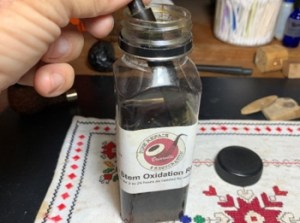 Switching now to the stummel, before cleaning I wanted to see if I could work the silver band off the shank. It slid off with no trouble. When I looked at the shank it appeared that there was scotch tape wrapped around it for what I assumed was a fix for a loosened hold.
 Upon closer examination, what I was looking at was dried wood glue that had been used to mount the band by Peterson. The stamping of the band was done with the band mounted since you can see the imprints of the shields on the shank surface.
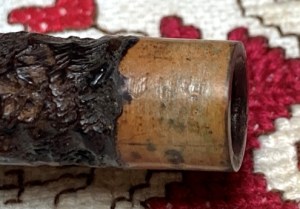 Looking at the chamber, there is very little cake build up.
 Because the chamber is so lightly soiled, the Pipnet Reaming Kit is bypassed and I go directly to scraping the chamber with the Savinelli Fitsall Tool. This is followed by sanding the chamber with 220 grit paper wrapped around a dowel rod.
 A quick inspection of the chamber reveals that the chamber briar looks good – no heating issues.
 Next, the external rusticated surface is cleaned using undiluted Murphy Oil Soap. A cotton pad was used initially to scrub, but the rusticated surface was not kind to it. A bristled toothbrush is used to scrub the craggy surface and does a much better job.
 There is some darkening from lighting around the inner edge of the rim. The soft brass brush helps to add some muscle to the cleaning without being too invasive to the briar.
 After the scrubbing, the stummel is taken to the utility sink where cleaning continues on the internals using warm water. Anti-oil liquid dishwashing soap is used with a shank brush to scrub in the mortise through the draft hole. After scrubbing, the stummel is given a thorough rinsing and returned to the worktable.
 The cleaning continues with the internals using cotton buds and pipe cleaners moistened with isopropyl 99% alcohol. A small dental spoon helps with the cleaning by scraping the mortise sides bringing out tars and oils.
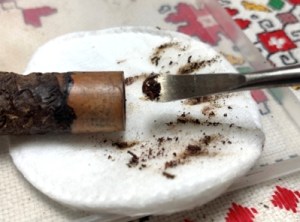 After a time, the buds come out lighter and the cleaning is brought to a halt.
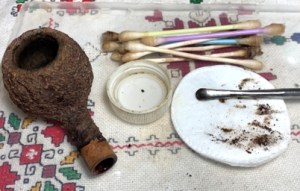 Looking next to the rim, there is a ring of dark briar circling the inner edge of the rim. The dowel rod wrapped with 220 paper is used to sand the edges with the hard backing of the rod. I do not want to create a bevel because craggy is king as far as the Donegal rustication is concerned and I want to leave the rim as craggy as possible.
 The rod and paper do a pretty good job. I like the results. The edge is clean with little impact on the rusticated rim.
 Now, the best part of this restoration… The rustication looks dry and lethargic at this point. This is where Mark Hoover’s ‘Before & After’ Restoration Balm does its magic.
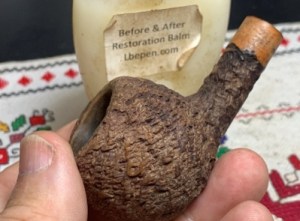 Putting a good bit of Balm on my fingers, the Balm is worked into the crags of the rustication. I work the Balm in rigorously pushing it into the rustication making sure the rough surface is covered. After this is done, the stummel is set aside for about 10 minutes to allow the Balm to do its magic.
 Mark’s Balm never goes to waste! With Balm residue left on my fingers, this beautiful Butz Choquin Maitre-Deluxe Briar Calabash gets a treatment as well. This is one of Steve’s restorations at www.RebornPipes.com that caught my attention and now his home is in Colorado 😊.
 After the time elapsed, a dedicated microfiber cloth is used to wipe off the excess Balm and to buff up the surface. All I can say is, ‘Wow!’ This Donegal Rocky rustication looks great.
 Switching focus now to the stem, it has been soaking in Briarville’s Pipe Stem Oxidation Remover for several hours and after it’s fished out of the fluid, a cotton cloth is used to rub rigorously the stem to remove the raised oxidation. A pipe cleaner moistened with isopropyl 99% is run through the airway to clear the fluid. The stem looks good.
 The most daunting issue of this restoration is rebuilding the P-lip button. The former steward appears to prefer a smooth surface on the underside of the button and sliced off the lower hang lip and some of the briar leading up to the button. The first picture below shows the slicing. The lower bit has significant bite pits. I’m assuming these pits are a result of some serious clenching going on! The second picture is the lower bit surface pointing upward showing the flattened surface.
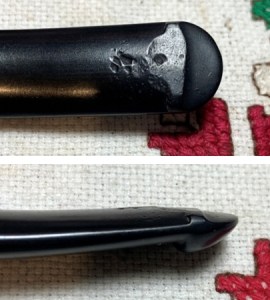 The P-lip is an interesting design which Peterson enthusiasts claim is superior to the usual tenon and slot stem. The airhole is placed on the upper side of the rounded button which helps distribute heat to avoid tongue burn. I’ve heard that it also distributes flavors over the palate of the tongue to enhance the taste of a tobacco. To rebuild the P-lip on this wounded Donegal Rocky, I pull a Peterson P-lip from a System that I have in my personal ‘need to restore’ collection to serve as a model. The left edge of the button is vertically parallel which is a helpful constant to shape a new lower lip. What I also notice is that the lower side of the rounded button slopes somewhat. I’ve marked these characteristics in the picture below. The picture on the right shows that the button itself is a football shape.
 The approach to rebuilding the lower part of the button will be to use Starbond’s Medium-Thick Black CA glue. The methodology is to use the glue gradually to build the hang lip by using an accelerator to quickly cure the glue thereby holding it in place. To begin, a dollop of glue is dropped into the large pits and sprayed with the accelerator.
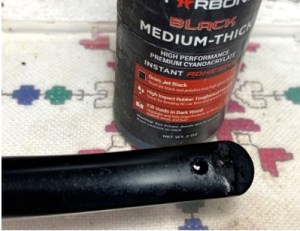 Following this, CA glue is placed laterally over the button where the lip needs to rise and sprayed with the accelerator. This serves as the first layer building the lower lip. It looks messy and ugly as the glue is applied, but the chaos will be filed into shape later.
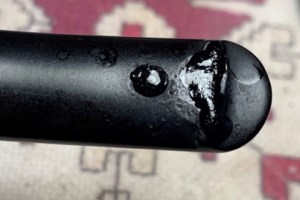 The following pictures show the progression of applying another layer of Black CA and then spraying with accelerator. The building process takes several cycles to achieve the needed width and height.
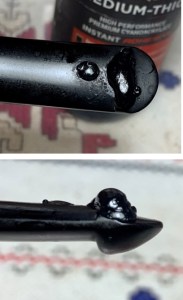
 After several cycles of CA application and spraying, the build up looks to be enough to begin shaping the button.
 I start with the round needle file to establish the sloped section in front of the lower lip. By starting in the front of the lower lip, it helps to establish the broad boundaries of the lip.
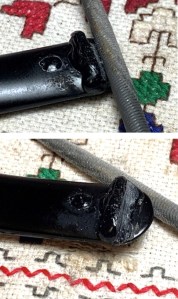 Next, the flat needle file is used to file the back of the lower lip to create the general shape of the lower lip. I’m guided in the process by lining the back of the lower lip with the invisible vertical parallel from the back of the upper rounded lip.
 The flat and squared needle files file the lower bit to remove the patch over the large bite pits and to round the lower bit surface which is facing up in the picture. The former steward not only removed the lower lip but shaved off the vulcanite moving towards the shank and flattened the surface.
 Next, with the lower lip roughly shaped, the flat needle file goes to work rounding the lip surface transforming the new button into a football shape.
 It took a bit of patience, but I’m pleased with the roughing out of the rebuilt button with the files shown.
 The next pictures show the target characteristics that were described earlier. I like the results.
 Next, to further fine tune and shape the button and to remove the remaining tooth chatter, the bit is sanded with 220 grit paper.
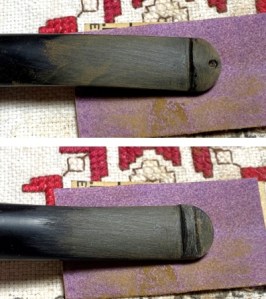 The 220 paper is followed by the finer 320 grit paper and the sanding is expanded to the entire stem. A plastic disk shoulder guard is used to keep the edges of the shank facing from shouldering the edges during the sanding process. Throughout the sanding, the Peterson ‘P’ stem logo is protected from the sanding.
 Next the stem is wet sanded using finer 600 grit paper and then 0000 grade steel wool is applied.
 The stem is sanded by the full set of 9 micromesh pads. After each pad, Obsidian Oil is applied to the stem to continue the conditioning and to guard against oxidation. First, pads 1500, 1800, and 2400 are used – upper and lower.
 Next, pads 3200, 3800 and 4000 are used – upper and lower.
 Finally, pads 6000, 8000 and 12000 are used – upper and lower.
 Taking a close look at the rebuilt button, I like what I see. FYI – the marks on the stem are dust not pits 😊.
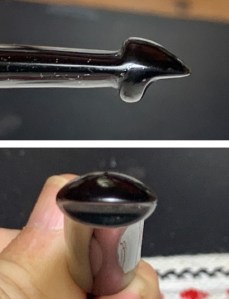
 The stem is looking good, and the next mini project is to refresh the ‘P’ logo.
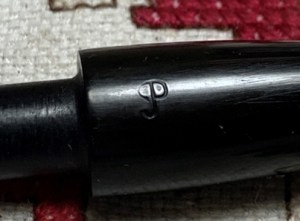 First, white acrylic paint is applied over the logo.
 A cotton pad then dabs the wet paint to remove the excess and to spread it more thinly. The paint dries very quickly.
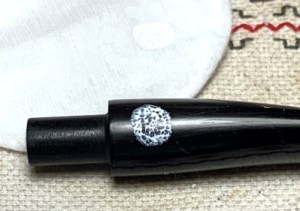 The shaft of the sharp cotton bud is used to scrape over the logo removing excess dried paint. The cotton point is also helpful getting in closer and cleaning around the ‘P’.
 Finally, a toothpick cleans the rest of the excess off using the point and getting closer to the logo. It looks good, but the swirl on the front of the P was too thin to hold the paint.
 The sterling silver needs to be cleaned and buffed up for more bling.
 I use Wright’s Silver Cream to clean the silver to start. The product directions are to apply the cream with the sponge provided and then after polishing the cream in with the sponge, the band is rinsed with water. The band is then buffed with a terry cloth to raise the shine.
 Next, a small amount of wood glue is applied to the inside of the band and then the band is slipped on, and the end is pressed to the hard surface to seat the band well. Some wood glue squeezed out the shank facing side of the band but was easily wiped off with a paper towel.
 The band looks great.
 Now the home stretch. A dedicated cotton cloth buffing wheel is mounted on the rotary tool, and with the speed set at about 40% full power, Blue Diamond compound is applied to the stem and to the smooth briar nomenclature panel on the underside of the shank (not shown).
 Compound dust accumulates when applied. To prepare the stem for the wax, the dust is wiped off using the felt cloth.
 To buff the silver band more, another cotton cloth buffing wheel is mounted dedicated to metals. I do not apply any compound but use the wheel alone which has residue green compound in it. The buffing stays on the band and does not wander onto the briar which can leave the black residue created when puffing metal.
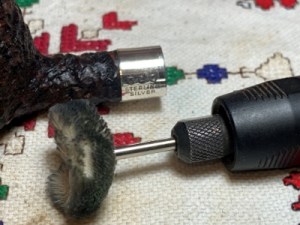 After the aluminum stinger is replaced in the tenon, stem and stummel are reunited. Another buffing wheel is mounted with the speed the same and carnauba wax is applied to stem and rusticated stummel. It is possible when applying wax to a rough rusticated surface to get wax stuck in crevasses and not be absorbed. Using a rotary tool allows me to see what’s going on up close during the application of the wax. I make sure the wax is dissolving and is being worked into the briar as I methodically move across the surface. After the wax is applied, the pipe is given a rigorous hand buffing with a microfiber cloth to remove excess wax and to raise the shine.
 I thoroughly enjoyed learning about the “Donegal” Rocky line and some of the finer nuances of the rustication artform. This 1981 Donegal Rocky Prince is a good example of an excellent Peterson pipe. The Prince is an elegant shape with a ball shaped bowl and a slightly bent stem. I’m very pleased with the rebuilding of the P-lip button – this Donegal Rocky is ready to go again. The dimensions are Length: 5 7/8 inches, Height: 1 3/8 inches, Rim width: 1 1/8 inches, Chamber width: 3/4 inches, Chamber depth: 1 3/16 inches. Gary commissioned this pipe and will have the first opportunity to acquire him from The Pipe Store. A large portion of all the pipes restored help to benefit the Daughters of Bulgaria, now called Spring of Hope – helping women and girls who have been trafficked and sexually exploited. Thanks for joining me!
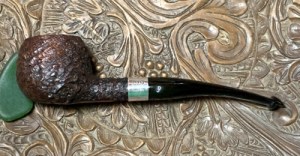


This was an especially great write-up.
LikeLiked by 1 person
Thanks, Michael! Yours are next 🤠.
LikeLike