
Middle Earth Churchwardens are cool, and truth be known, I don’t think I’ll achieve either the Hobbit or Wizard standard when this project is completed, but I like to fashion Churchwardens out of the orphaned, tossed away bowls. A simple search in Google of ‘Pipes in Middle Earth’ produces many Tolkien worthy pipes and Lord of the Rings memorabilia. Perhaps the best depiction of Middle Earth Pipedom, or at least, my favorite, is Gandalf (still) The Grey puffing on his Churchwarden with the weight of Middle Earth on his shoulders. And of course, who doesn’t smile when one thinks of the naive innocence of the Hobbits, Merry and Pipin, smoking away their weed, and of Bilbo, in his later years, still enslaved in degree to darkness by his time as the Ring Bearer but who proves in the end to be a noble survivor loved and respected? We associate these characters with their pipes and are drawn into the epic purpose they were all committed to, even to death – to thwart evil’s grasp of Middle Earth and to show that the ‘small and insignificant’ can change what seems to be the inevitable drift into darkness to good. Those pipes that Tolkien’s imaginary characters smoked represented calm and contemplation in the eye of Middle Earth’s storm encircling them. Is that not the grail we all seek in the eye of our own storms and the storm of our own, not ‘Middle’, but Post-Modern Earth?
J.R.R. Tolkien wrote the Lord of the Rings between 1937 and 1949 amid a questioning time after the ‘Great War’ was fought – the war that was supposed to end all wars– but that hope was melting away. Tolkien’s masterful work was stitched together during the rise of the darkness in Germany, through the subsequent Second World War to defeat it and then through the rebuilding of a continent ravaged by its past. Perhaps we feel the same pressures today that were felt in the late 30s. Will our pipes and the fellowship within that community share the same bond that became the impetus that fueled the pen of J.R.R. Tolkien? Perhaps 😊. We shall see.
I’ll give a book plug for Mark Irwin who has written several books and is considered one of the foremost experts on Peterson Pipes. I met Mark virtually when I reached out to him asking for help dating the Peterson’s De Luxe I was working on (New Life for a Pre-Republic Peterson’s De Luxe MADE IN IRELAND 6 Billiard (updated!) – The Pipe Steward). He graciously responded to my questions. I  enjoyed our emails back and forth digging into the fine art of discovering the provenance of a pipe. He has co-authored the tome on Peterson Pipes, The Peterson Pipe: The Story of Kapp & Peterson and another pipe book which I have ordered and am looking forward to reading, The X Pipe and Other Mystagogic Stories for the Pipe Smoker.
I also discovered that he wrote yet another book that hits the sweet spot of this Churchwarden project conjuring up images of Middle Earth, Pipe Smoking in Middle Earth: The Fellowship of the Smoke Ring. I decided after starting this project that my library, with all its well-worn and cherished Tolkien books, needed to have Mark’s ode to the Middle Earth pipes as a companion. I will look forward to reading this work as well.
When Kevin reached out to me about fashioning a Churchwarden for him, he had Middle Earth on his mind as well. I met Kevin when my wife and I visited his church, Evangelical Presbyterian Church in Newark, Delaware. We were speaking at their missions conference about the war in Ukraine and of our churches in Ukraine that continue to serve amid the darkness that has invaded their land. After living in Ukraine for several years, my wife and I have dear friends there. Kevin is an elder in the church and an accomplished cellist. With all commissions, I ‘warn’ commissioners that patience is needed while waiting for their pipe to rise to the top of the queue. During that time of waiting, Kevin shared with me the challenges he went through with his daughter’s problem pregnancy and the subsequent birth of a healthy grandson 😊. So grateful for this. Kevin also shared with me a tobacco he discovered – Westminster by G. L. Pease, a splendid English blend with Virginia and Latakia which I promptly forgot to order when Kevin first told me about it. However, when I reread our email correspondence to refresh my mind of our communications for this Churchwarden project, I saw his email about Westminster and the picture he sent of the tin (yes, I removed the ugly warning label). Well, I promptly ordered a tin to see what Westminster has to offer. For Presbyterian pipe smokers, Westminster is a desirable affiliation because of our affinity for the Westminster Confession of Faith😊.
Churchwardens are interesting in that they are the only pipe shape not determined by the bowl but by the stem. Here is Bill Burney’s helpful info panel from Pipedia (Churchwarden – Pipedia): How did Churchwardens come by their name? I don’t know where I read or heard this, and it probably has a little ‘legend’ wrapped in the story, but the name harkens from a day when churches did not lock their doors. However, as human nature inevitably goes, the elders of churches felt it would be prudent to at least hire men who would keep a watchful eye over the premises. These ‘wardens’ were required to remain vigilant inside the hallowed walls of the church and lighting one’s pipe ‘inside’ the church was certainly a sacrilege. So, the innovative pipe smoking warden community fashioned and fitted their bowls with longer stems that would reach out through the open window. Therefore, their pipes would technically be outside the sacred confines of the church enabling them to enjoy a bowl while standing guard through the watches of the night… so, goes the story as I have heard it.
My approach to fashioning Churchwardens is to use orphaned stummels that I have collected over time. These stummels can be from basket pipes that have little chance of being commissioned in their current states or bowls whose stems are lost. Bowls that look to me like possible CW candidates are placed in a cardboard box waiting for their chance to be mounted on a long stem and be transformed into a glorious Churchwarden! It reminds me of the Rise of the Phoenix or of Cinderella – the lowly and tossed aside are magically transformed into something which becomes the envy of all… A lowly bowl becomes a mighty, elegant, and coveted Churchwarden 😊. What could be better than this for orphaned bowls?
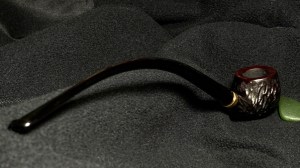
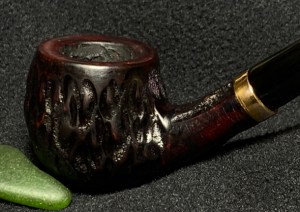
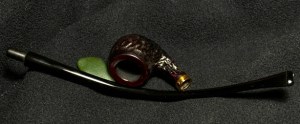
When Kevin inquired about a Churchwarden, I sent him pictures of potential candidates. In the picture below, I happened to have (still do!) a Churchwarden on the top that needs a new tenon on the stem waiting to be commissioned. The orphaned bowls are straight and bent. Usually, CW bowls are on the smaller size. I also included a picture of the prefabricated stems I get from Tim West (www.JHLowe.com) which are 8 ½ inches from tenon to button.  Kevin chose the black bent rusticated bowl which had more potential to conjure up reflective thoughts about Middle Earth and life in general. Here are some current pictures of the bowl he chose. I don’t keep copious notes on orphans and have no idea where he came from and when I found him. There are no markings on the bowl to identify origins. He is an orphan poised for greatness 😊. What appears to be the case is that this bowl had never been put into service. The chamber is clean. I like the rustication which is large and can almost be described as a sculpted bowl.
  From the picture below, there are globs of dried black paint that someone lazily applied – it would seem. The black finish appears also to be paint and not a dye. That will be interesting to see how it behaves. I like the solid black stummel but it’s possible to maintain the black as an undercoat base and apply another color, like brown, burgundy or red over the black to leverage the black in different directions. This can give a bowl a bit more contrast and depth. I brought this possibility to Kevin to see if he had any preferences that could be incorporated, and his response was to leave it to me.
 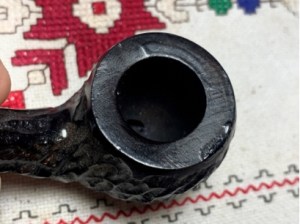 Before drilling down on the approach with the bowl, the stem needs to be fashioned to fit the mortise and bend it to a proper orientation. Before bending the stem, the first step is to fit the raw, rough tenon in the mortise.
 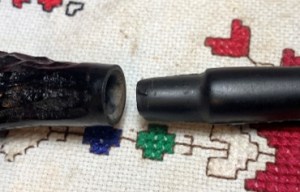 Using the electronic caliper, the mortise diameter is measured at 8mm. The raw tenon needs to be reduced to almost this size. I like to leave the tenon measurement a little ‘fat’ and then sand the tenon to customize the fit. The thing I don’t want to do is cut too much off the tenon.
 The rough tenon is roughly 10mm which gives the general reduction amount at just under 2mm.
 The Tenon Turning Tool (TTT) has been a great addition to my chest of tools that I acquired from Vermont Freehand (Pipemaking Supplies – Vermont Freehand). The first step in the tenon sizing process is to drill the stem’s airway with the drill bit provided to enlarge the airway so that the stem can be mounted on the guide pin of the TTT.
 With the TTT mounted on the hand drill, the stem is slid onto the guide pin. The carbide cutter arm is then adjusted so that the carbide cutter is snug against the rough tenon. The larger allen wrench on the top adjusts the cutter position and the smaller allen wrench on the side clamps the cutter arm in place. When the larger allen wrench turns to the left it reduces the space and to the right, increases the space between the cutter and the tenon.
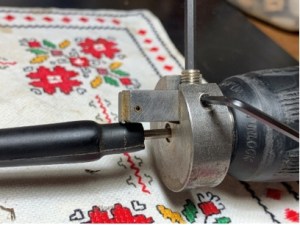 With the cutter snug against the tenon, the stem is pulled off the guide pin and the top adjuster closes the distance a bit by turning about a quarter turn to the left. The power drill is powered up some and the stem is slowly pushed down the guide pin for the initial tenon cut. It is advisable to hold tightly to the stem when the cutter engages the tenon!
 The cut goes all the way to and cutting the stem facing which provides a nice perpendicular angle with the tenon and the stem facing. Pre-molded stems are not perfect as the picture shows. There were parts of the rough tenon bypassed during this initial cut.
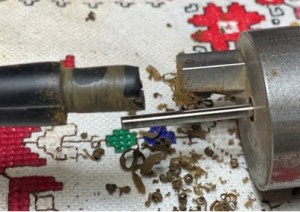 Another measurement of the tenon diameter is taken and some progress has been made from a starting point of 10mm.
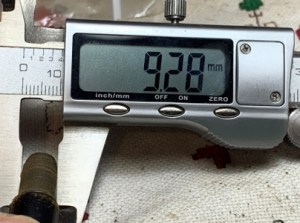 The procedure of withdrawing the stem, closing the space with the carbide cutter arm incrementally and slowly cutting the tenon continues. After a few cycles another measurement shows we are only .09mm off the shank diameter of 8mm. Time to put the TTT away and start sanding to customize the fit.
 To fine tune the sanding, 220 paper is used. The paper is wrapped around the tenon, and the stem is rotated, and then the process of sanding and testing commences – many times! A good fit is snug but not loose. The following pictures show the slow process.
 Success. The tenon is seated nicely – snug, not too tight nor too loose.
 The shank diameter and the stem facing are in sync from this view looking down.
 Looking from the side of the stem, the drilling of the mortise is off a bit with the stem facing overage either on the top or bottom as you rotate the stem as the next two pictures show.
 I settle on leaving the fat part of the stem facing on the top which should blend better when the stem is sanded and when a band is mounted. My plan is to find a band or a shank cap to help support the shank with the long Churchwarden stem.
 The preformed stem is not perfect. The pictures show the seam along the sides of the stem. These ridges also result in small valleys in the vulcanite running on either side of the seams. The stem needs to be sanded until it’s rounded. Protective painters tape is wrapped around the shank while the stem is sanded.
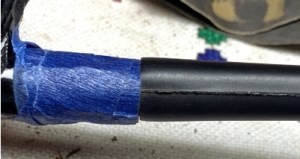 To do the heavy lifting, a sanding drum is mounted on the rotary tool, and this quickens the removal of the seams and helps to round the stem and smooth the imperfections. I’m carful to keep a light touch with the rotary tool. Bearing down and putting too much pressure on the vulcanite will surely leave an indentation we don’t want!
 After the sanding drum has done the job, 220 grit paper sands the entire stem smoothing the vulcanite further.
 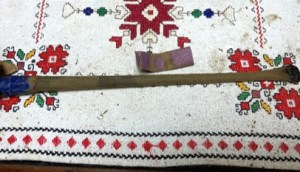 The button was not sanded so that the rough button can be better defined.
  Needle files are used to first define and sharpen the button lips – upper and lower, and to gently flatten and slope the bit to blend with the newly forming button lips.
 The bit looks good. The pictures show the marks left by the filing which need to be sanded out.
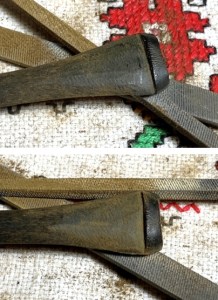 The bit is next sanded wit 220 grit paper – upper and lower.
 I have found during previous CW projects that pre-molded stems often can have indentations where the side seams emerge at the stem facing. This is a by-product of the molding process. This stem has a large gap which if I were to continue sanding to remove it, would deform the roundness of the stem facing.
  To address this, the indentation is filled with Black CA glue and the patch is allowed to fully cure.
 When the patch has cured, the flat needle file brings the patch mound to near flush with the stem surface.
 Then 220 grit paper smooths the patch further blending it with the rest of the stem’s 220 sanding.
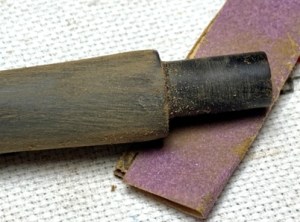 I decided after continued sanding to patch the other side of the stem at the seam. With this patch I want to fill and build up the area which has sanded down. I didn’t get a ‘before’ picture but here is the outline of the patch to give an idea.
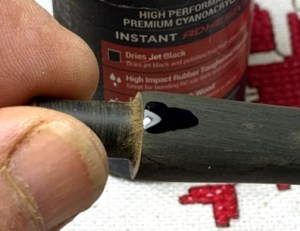 With this patch I did not use a file but went directly to sanding with 220 paper then 320. By only sanding I was able to spread the patch to get the ‘fill’ I was hoping for to build up the stem facing.
 The sanding process continues by sanding the entire stem with 320 paper using a shoulder guard on the stem facing. The picture of the long CW stem doesn’t provide much detail since the picture is more distant!
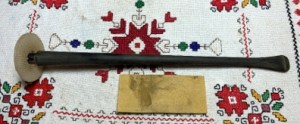 Next, the stem is wet sanded with 600 grit paper, and this is followed by applying 0000 grade steel wool. This sanding process has been a bear! What I do not describe is how when progressing to the finer grades of paper, the sanding reveals blemishes which were hidden with the rougher grades of sanding paper. So, when a blemish appears on the vulcanite surface, I must go back to 220 grade paper and again work through to the finer grade papers. For this set the pictures, they are of the bit alone where we can actually see something! – upper and lower.
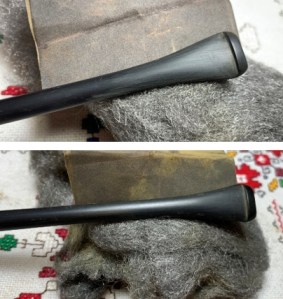 Finally, the next step is applying micromesh pads to the stem. Between each of the 9 pads, Obsidian Oil is applied to condition the vulcanite and to guard against oxidation. The sanding/polishing start with pads 1500, 1800 and 2400 – top:
 And bottom:
 Next pads 3200, 3800, and 4000 are applied – top:
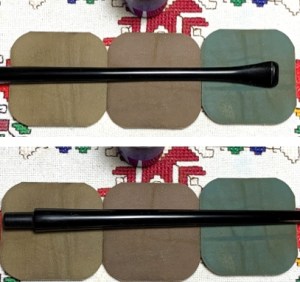 And bottom:
 Finally, pads 4000, 8000, and 12000 are applied – top:
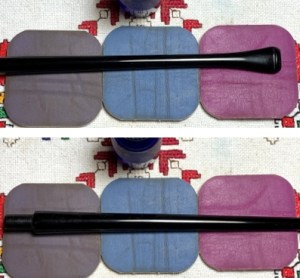 And bottom:
 The stem looks great and the next step with the stem is to bend it into a proper orientation with the stummel. This will wait for now and I’m looking forward to working on the rusticated or sculpted stummel. Kevin had given me the green light to finish the bowl as I chose regarding the black finish. My thoughts at this point are to add some depth to the jet-black painted bowl by applying Fiebing’s Red Leather Dye over the black. However, I don’t like the black that was used – the stummel appears to have been painted not dyed. I will remove the black paint or as much as I can and replace it with a dye. I’m thinking that this will open the grain more to nuances of the two dyes and look better overall.
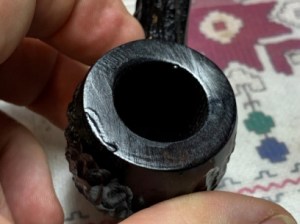 To remove the black, I use acetone. I start by scrubbing the surface with some steel wool and acetone, but it doesn’t make a dent and so the stummel goes into the acetone for a soak to see if this loosens the black finish.
 After several hours of soaking, the paint on the stummel is still in place requiring sanding and brushing. A brass brush is used to get into the crevasses and steel wool is also employed to remove or roughen up the stubborn paint.
 In the end, all the paint will not be removed, but all the paint is roughed up so that it will better accept the dye (I hope!).
 While working on removing the paint, a divot on the inner rim edge is discovered. To patch this a drop of Black CA glue is applied and then the stummel is set aside giving time for the patch to cure.
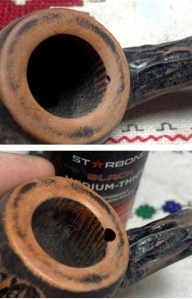 The patch is then sanded with 220 paper to smooth it out.
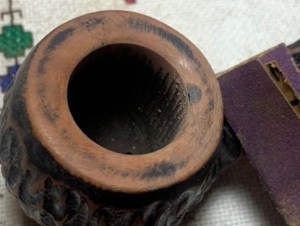 Next, the stummel is sanded using sanding sponges – coarse, medium, light and fine grade sponges. This will be the extent of the sanding for the stummel. At this point I would usually apply micromesh pads to achieve a sharper gloss, but I want to leave the stummel a bit rougher for the rusticated, sculpted effect.
 Before going further, the stummel is taken to the utility sink and the stummel internals and surface are cleaned. The shank brushes are used on the internals with anti-oil liquid dishwashing soap. The stummel has never been smoked so the cleaning is simply to address any dirt, dust or whatever may have gotten inside the stummel.
 Next, it’s time to apply the dye. The under-coat will be Fiebing’s Black Leather Dye. This will be followed by dye washing with Fiebing’s Red Leather Dye. First, the stummel is warmed with the hot air gun to expand the wood helping it to be more receptive to the dye.
 Next, black dye is applied with a folded pipe cleaner over the entire surface and getting into the sculpted crevasses. The stummel is set aside allowing the dye to settle in.
 After the dye had dried, a cotton pad moistened with alcohol is used to wipe the stummel surface helping to even out the application of black dye and to remove excess. Fiebing’s is an aniline dye which means alcohol can be used after the dye’s application to clean/blend it or lighten the application. My purpose is not to lighten the black dye but simply to even out the application.
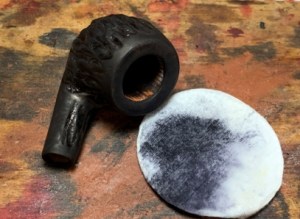 My goal for the finish is not to have a high gloss finish but to soften it. To rough up the black dyed finish a bit, the stummel is lightly sanded with the 1500 grade micromesh pad.
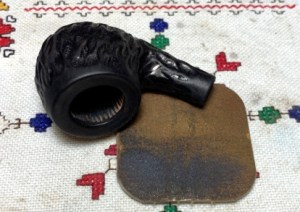 After giving the stummel a quick buffing with a cotton cloth to remove the dust from the sanding, Fiebing’s Red Leather Dye is next applied to the stummel as the over-coat. A few applications are applied and the stummel is set aside allowing the dye to settle in.
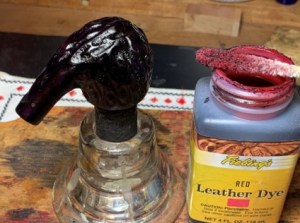 After a few hours, the dye dried. To remove the excess dried dye, the stummel is wiped with a microfiber cloth.
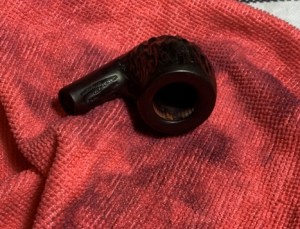 To create more definition in the rustication, using the 1800 grade micromesh pad, the peaks of the rustication are lightly sanded. This lightens the peaks and allows more red definition to emerge.
  One of the challenges of applying a dye wash, is that there’s a lot of residual dye left on the stummel which if not removed can leach off onto the fingers with the heating of the stummel when the pipe is put into his inaugural smoke. Wiping the stummel lightly with a cotton pad moistened with alcohol helps to reduce the residue dye.
 Another step in helping to remove residual dye is to warm the stummel with a hot air gun. This helps to emulate the heating of the bowl when it is first put into service. After the stummel is heated, it is rubbed aggressively with a cloth to remove more dye residue.
 One more step in removing the residue – a clean cotton cloth buffing wheel is mounted and the stummel is buffed with the wheel.
 At this point, the work transitions to the stem. The stem needs to be bent to a proper orientation. The goal for the bend is for the last quarter or so of the stem to run parallel with the plane of the rim. I sketched the current shape of the pipe and the projected bend to run parallel with the rim’s plane.
 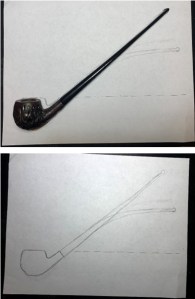 To bend the stem, the vulcanite is warmed with the hot air gun. To protect the integrity of the airway during the bending, a pipe cleaner is inserted from the button side. To heat the stem, the stem is moved back and forth over the hot air more toward the center to the button. After the vulcanite becomes supple, it is bent toward the proper orientation. Before heating, a cake pan was filled with water and placed next to the worktable. When the bend is made, holding it in place, the stem bend is placed in the water to cool the rubber and hold the bend in place.
  The heating and bending process was repeated a few times to get the best-looking orientation. I like a gentle mid-stem bend. The final orientation is shown in the next picture. I like it.
 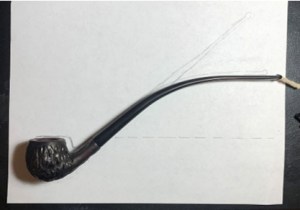 Next, the smooth areas of the stummel and the stem receive an application of Blue Diamond compound. After a dedicated cotton cloth wheel is mounted on the rotary tool and set at about 40% full power, the compound is applied.
 To remove the dust created by the application of compound, a felt cloth is used to wipe the stem and stummel. Again, the stummel is buffed with the clean (now with old dye on it) buffing wheel.
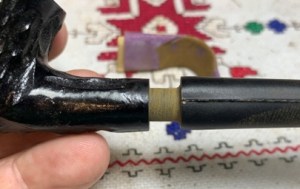
 From the beginning of the project, I intended to mount a band or a shank cap on the stummel. This will add some support for the shank as the CW stem is used. Cracked shanks are more prevalent with Churchwardens. The band also adds some classy bling to the pipe. I found a copper cap in my collection which fits the shank nicely.
 To mount the cap, a small amount of CA glue is placed on the inside of the cap and using a toothpick, the glue is spread around the inside of the cap. The cap is then mounted, and the shank is pressed down on the table surface to seat the cap. The cap ring looks great with the stem mounted.
 To polish the copper cap, green compound is used with a dedicated cotton cloth buffing wheel. This wheel is only used with metals because of the black residue that results from buffing metals.
 After application of the compound, the band is buffed with a microfiber cloth. Nice – the band look great.
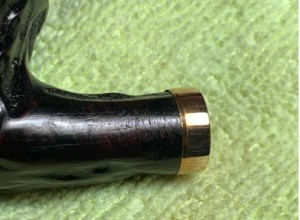 Finally, with another cotton cloth mounted on the rotary tool at the same speed, carnauba wax is applied to the stem and rusticated stummel. After application of the wax, the pipe is given a rigorous hand buffing with a microfiber cloth to remove excess wax and to raise the shine.
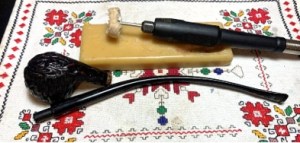 With the dark stummel, the bare wood on the upper part of the chamber stands out.
 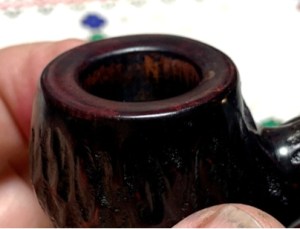 To make a more aesthetically pleasing presentation, and to create a starter cake on the chamber wall, a mixture of activated charcoal and plain yogurt is used. Sour cream can also be used to form the cake starter mixture.
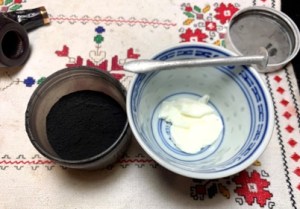 Charcoal is added to the yogurt and mixed. As more charcoal is added and mixed, the mixture thickens. When the mixture is thick enough so that it will not run, the mixture is troweled into the chamber and spread with a pipe nail tool.
 After the chamber is covered, the stummel is set aside for the coating to dry. The mixture dries into a durable crust which provides a starter cake for the pipe. One word to the new steward: after the first few sessions with the Churchwarden, do not scrape the bowl with a metal tool which will damage the starter cake. Simply use a folded pipe cleaner to rub the chamber walls to clean the ash.
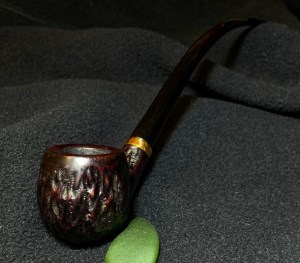
 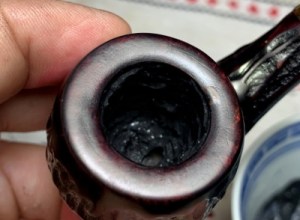 I had a good time fashioning this ‘Middle Earth’ Churchwarden. I love to see an orphaned bowl rise out of oblivion and be re-purposed. The dual application of dyes worked out nicely. I like how the dark, red-nuanced rusticated stummel provides a deeper, richer perspective of the bowl. The peaks of the rusticated briar provide subtle specks of red that look good. The copper band provides a touch of class and provides a nice transition from the half bent rusticated stummel to the long sweeping stem. The dimensions are Length: 10 7/16 inches, Bowl height: 1 1/2 inches, Rim width: 1 1/4 inches, Chamber width: 3/4 inches, Chamber depth: 1 3/16 inches. Kevin commissioned this ‘Middle Earth’ Churchwarden project and will have the first opportunity to claim him from the Pipe Store. A large portion of the proceeds of restored pipes benefit the Daughters of Bulgaria, now called Spring of Hope – helping women and girls who have been trafficked and sexually exploited. Thanks for joining me!
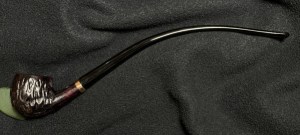


Dal, if I put as much love and effort into writing legal briefs as you do in this article, I’d shame every jurist into seeing every case my way! Bravo. Todd
LikeLike
Todd, I appreciate that! I had a good time with this delving into Middle Earth 🤠.
LikeLike
Dal, what a great job of work. I really enjoyed the whole piece and learned a lot, esp. about the mortise and tenon fitting. I know the new companioner will be pleased! And thanks, also, for the shout-out to Pipe Smoking in Middle Earth!
LikeLiked by 1 person
Thanks for your words! I’m looking forward to reading Pipe Smoking in the Middle Earth and The X Pipe.
LikeLike
Pingback: An Exquisite Ben Wade Preben Holm Prominence A 4 Hand Made in Denmark Freehand – The Pipe Steward