
Well, after about a month of fighting off sickness and finally getting some antibiotics, I’m able to get back to the restoration of this Barok Pickaxe. Here we go! The next pipe on the worktable came to me in what I call the Lot of 68 that I acquired in February of 2019 from a seller in West Hartford, Connecticut. Lately, I’ve restored quite a few pipes that came from this Lot and the Pickaxe is easy to pick out in the picture below provided by the seller. Pipeman Micheal, a teacher of 14- to 16-year-olds from Sante Fe, New Mexico, heard the whisper of this unique Pickaxe and commissioned him. This is Michael’s second commission. The first was a beauty – a Sixten Ivarsson Stanwell Hand Made (Restoring a Sixten Ivarsson Stanwell Hand Made in Denmark 23 Strawberry) which came out great.
 When Michael reached out to me about commissioning the Barok Pickaxe, what drew him to this pipe were the crisp, clean lines created by the pipes’ bend from the lower point of the axe to the button. Here are pictures of the Barok Bruyere of St. Claude, France, benefiting the Daughters of Bulgaria (now called Spring of Hope) that my wife and I co-founded several years ago in Sofia, Bulgaria – helping women and girls who have been trafficked and sexually exploited.


 The nomenclature stamped on the left flank of the shank has fancy lettering – BAROK. The right side is stamped, BRUYERE [over] ST CLAUDE – located in the COM, France.
 The stem is stamped with the Barok logo, a fancy ‘B’.
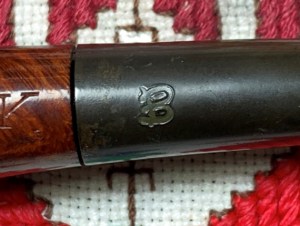 What we know without question is that this pipe was produced in the French city of St. Claude, the place where briar was first used to manufacture pipes. It is also the undisputed center of French pipe production. The interactive map below is from Pipephil (Document: Saint Claude France — Pipes: Logos & Markings –) showing location markers for all the French pipe name’s through the years. Go to the link above for the interactive version allowing you to drill down into the details of the workshops and factories indicated. Pipephil describes St. Claude with this blurb:
Nowhere in the world has a so little place gathered so many briar pipe workshops and factories. Some places have been successively occupied by different makers having produced several brands. Some of the buildings mentioned on this map are now (2010) abandoned or devoted to other purposes or even sometimes destroyed. This is about all we know for certain about this pipe marked Barok. I checked Google translate and discovered that Barok probably comes from the Turkish rendering of the French Baroque which has been imported into our English language. Synonyms of Baroque from my Word document tool renders words like, ornate, decorative, extravagant, ornamental. From Wikipedia (Baroque – Wikipedia):
The Baroque is a Western style of architecture, music, dance, painting, sculpture, poetry, and other arts that flourished from the early 17th century until the 1750s.[1] It followed Renaissance art and Mannerism and preceded the Rococo (in the past often referred to as “late Baroque”) and Neoclassical styles. It was encouraged by the Catholic Church as a means to counter the simplicity and austerity of Protestant architecture, art, and music, though Lutheran Baroque art developed in parts of Europe as well.[2]
What’s interesting about this definition is that at its core, the Baroque style was a ‘counterculture’ of bringing some style into what was perceived as the ‘austerity Protestant architecture, art and music’. Perhaps this was the sentiment behind labeling this ‘line’ of pipes. Pipephil has an info panel describing the Barok line of the Pickaxe on the worktable (Baro-Bd — Pipes : Logos & Markings).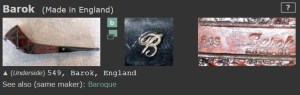 The Chimney shaped Churchwarden shown has the exact markings as our Pickaxe. Our pipe and this example of our Barok line give us a feel for what the line ‘Baroque’ was meant to convey – classically unique shapes. In the panel, Pipephil cites Wilczak and Colwell’s, ‘Who Made That Pipe?’ of which I am privileged to have a copy. In that reference book, this Barok is attributed to Stanwell, which is not correct. Stanwell has a different distinctive line also called ‘Barok’ and to my knowledge, historically Denmark based Stanwell (but now unfortunately produced in Italy) never had pipes manufactured in France. Pipedia’s Stanwell article (Stanwell – Pipedia) has a catalog showing various line offerings offered by Stanwell which included the Stanwell ‘Barok’:
 The Stanwell Barok examples are distinctively different from our French made Barok pipes. Based upon this information, the Pipephil Wilczak and Colwell’s reference should not be attributed to this French made Barok. Pipephil also shows an English made Barok (Baro-Bd — Pipes : Logos & Markings) which does not match our Barok nomenclature.
 I searched in all the sources and forums that I know but found no information pointing to a specific pipe manufacturer in Saint Claude. Some pipes leave us scratching our heads and this one is one such pipe.
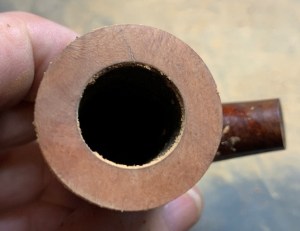
With a better understanding of what we do not know about this Barok Pickaxe of St. Claude, it’s time to take a closer look at the pipe itself. The long cylindrical Pickaxe shape has a long conical chamber measuring 1 7/8 inches deep. The chamber will be reamed to make room for fresh briar. The rim also has significant lava flow which will be cleared.
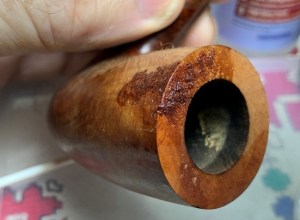
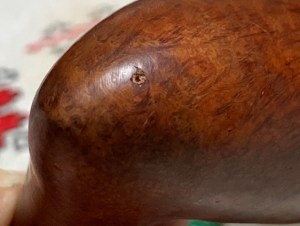
 Well, if you were looking closely at the picture of the rim above, you would have noticed something amiss. This is why a close inspection happens before the work is started and it’s evident that the lava layer masked the problems beneath. I had not noticed previously a crack on the rim running over to the briar surface. Ugh. There are methods to arrest the growth of cracks, but at this point, developing an approach will need to wait till after the pipe is cleaned to understand the extent of the issue – to see if the crack extends into the chamber.
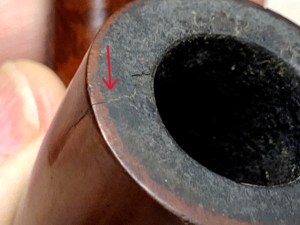
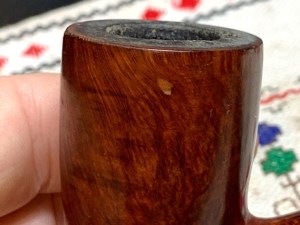
 The stummel has some attractive grain patterns which can be coaxed out more distinctively to showcase the long vertical Pickaxe shape. There are a few small fills that need to be looked at more closely to determine if they should be replaced – this, too, after the cleaning.
 The finish on the stummel appears to be what I call, a ‘candy apple’ finish which is more like a shellac rather than a natural briar finish. After cleaning we’ll see what needs to be done.
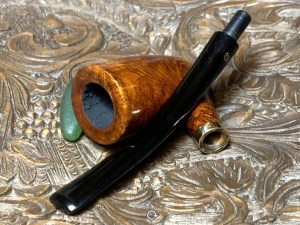
 The stem has deep oxidation and needs to be addressed. The olive green of the oxidation is better seen with the picture lightened.
 The upper bit appears that someone sanded or scraped it in an attempt to clean it. The lower bit has calcification and tooth chatter that will be addressed.
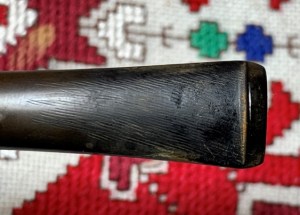
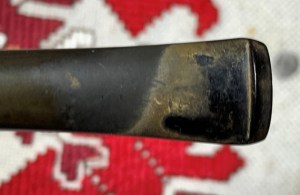 One other potential issue I noticed is a small gap between the shank and stem facing. This may be remedied by the cleaning process. I’ll keep an eye on this.
 To begin the restoration process, the stem airway is cleaned with pipe cleaners and isopropyl 99%. Only a few pipe cleaners are needed.
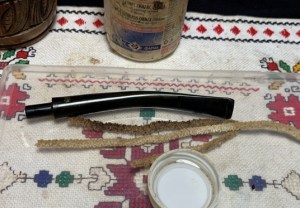 Next, to address the deep oxidation in the stem, it is given a soak in Briarville’s Pipe Stem Oxidation Remover (www.Briarville.com). The stem will soak for several hours with the hope that the soak does the job.
 Switching now to the stummel, the chamber needs to be cleared of the cake to see if there is heating damage and to understand better the nature of the crack. First, only the smallest of the Pipnet Reaming Tool’s blades fits the chamber, and this blade was only able to go down the chamber about a quarter of the way. I’m careful not to force the issue because I do not want to put too much torque on the bowl itself which could exasperate the crack.
 The Savinelli Fitsall Tool was made for this kind of situation. It scrapes the chamber wall without the outward pressure or force. It reaches down to the floor of the long narrowing chamber to remove cake.
 Following the Fitsall Tool, the chamber is sanded starting first with 220 paper wrapped around a dowel rod, but the rod was too wide to reach further than about a quarter of the way down. I taped some 220 paper around a narrower Sharpie Pen and it was able to sand the entire chamber removing the last vestiges of carbon cake.
 This picture shows all the tools employed to clean the chamber and the pile of carbon cake.
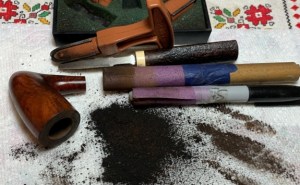 An initial inspection of the now cleaned chamber shows no heating issues – the briar is healthy. However, the crack is now plainly visible, and I estimate that is runs about 2/3s of the way down the chamber – ugh. What caused this crack? I’m only speculating at this point, but it appears that the crack’s ‘epicenter’ started on the inside of the chamber and the force went outward. The reason for this hypothesis is that the crack has only traveled on the external side a small distance whereas the internal side travels down a good piece. My GUESS is that perhaps a former steward put too much force on the chamber while cleaning it and it cracked. There are no signs of heating damage like fissures and spidering in the chamber. Over heating can cause a crack in the bowl as the wood overtly expands, but this would probably leave other heating issue clues. These possibilities are informed theories but whatever the cause, the primary question now is: Can the bowl be salvaged and how?
 As the noggin works over this problem, the cleaning continues with the rim and external briar. The external briar is cleaned with undiluted Murphy Oil Soap and a cotton pad. We’ll see if the cleaning removes the candy apple glossy finish.
 The thick lava flow on the rim is scrubbed with the cotton pad as well as a brass brush. The brass does a good job adding to the cleaning strength and is not overly invasive to the briar.
 The crust is also scraped using the edge of the Savinelli Fitsall Tool.
 The stummel is next taken to the sink and the internals are cleaned with warm water using shank brushes and liquid anti-oil dishwasing soap. I use Dawn soap which does a good job. After scrubbing, the stummel is thoroughly rinsed and is returned to the worktable.
 To continue the internal cleaning process, pipe cleaners and cotton buds are used with isopropyl 99% alcohol to scrub. A small dental spoon also scrapes a small amount of tar and oils off the mortise wall.
 After the cleaning, a few fills were more evident. A larger fill was near the rim and a few other blemishes – one a dent and the other a smaller fill.
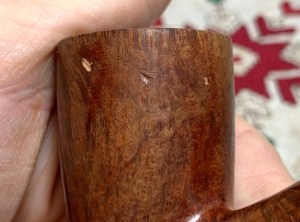 Two more small fills are on the heel of the Pickaxe.
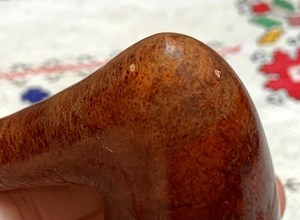 The crack on the external side and in the chamber is more fully seen with the rim cleaned. The rim needs to be sanded to clean it up from the heavy lava crust damage.
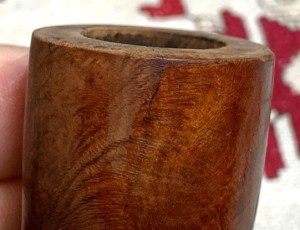
 The edge of the rim has also seen better days. One very large divot can be seen, and more smaller dents and nicks circle the rim.
 There’s a lot to do to bring this Barok Pickaxe back to an acceptable serviceable condition. The daunting task is to address the bowl crack that is not a small issue. As I thought about how best to mend the crack or better said, to reinforce and protect the bowl from cracking more, I sent a note to Steve (www.Rebornpipes.com) to see what he had to say. His response confirmed the path I was considering. The external crack will be addressed by drilling a ‘counter-creep’ hole at the end of the external crack. Super thin CA glue will be applied to the external crack on the rim and on the side of the bowl. The idea is for this thin CA to seep into the crack as much as possible to buttress and fill the wood as much as possible. CA glue is not used for the internal crack in the chamber. As Steve reminded me, CA glue can give off a gas of sorts when exposed directly to fire as is the case in the chamber. Instead, J-B Weld will be spread over the crack. J-B Weld is an inert, heat-resistant epoxy that not only will seal the crack, but also provide a protective heat layer and help strengthen the bond holding things together. This is the general approach to the bowl crack, but other mini projects will lead up and follow this main repair. First, after the cleaning, much of the finish came off the bowl leaving shiny splotches. To remove the rest of the old finish, isopropyl 99% alcohol is used with a cotton pad. After some rigorous scrubbing, the finish came off and the briar looks better.
 The external side of the crack will be addressed first, but it’s a good idea to work on the rim condition first so that when the crack repair commences, I’ll be working on a clean and restored rim. The rim surface is rough, and the external edge has divots. The inner edge also is darkened from charring.
 To address these issues, the rim is topped first with 220 grit paper on the chopping board. The aim is to remove the blemishes but sanding as little briar as possible from the rim. With the bowl inverted on the board, it is rotated several times.
 After several rotations and checking the progress cycles, enough briar has been removed.
 To smooth the rim further, 320 paper is used then the finer 600 grit paper finishes the job. The topping did a good job cleaning the rim surface and erasing the divots on the edge.
 Next, the external crack is addressed.
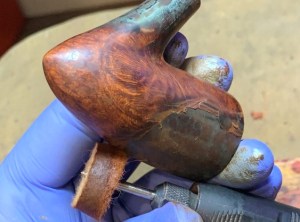
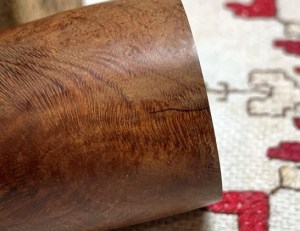 First, a counter creep hole is drilled at the terminus of the external crack on the side of the bowl. To help with the drilling, a sharp dental probe is used to press a guide hole for drilling at the end of the crack.
 After creating the guide hole, the hole seemed to be large and deep enough to serve as the counter creep hole and drilling would not be necessary. The counter creep hole works on the same principle as starting fires in front of a forest fire to create a buffer that stops the advance of the fire. Starbond Super Fast CA glue is used with briar dust which helps to hold the glue in place and blend the repair.
 I do not like using the Thin CA because as the label says, it is fast and easily runs amuck. Thin CA is first run over the crack and briar dust is sprinkled over it.
 The following pictures show the result which proves once again that Thin CA is a pain to work with. It will clean off later with sanding.
 Next, the internal crack which goes down about 2/3’s of the way in the chamber is addressed.
 The crack area is first cleaned of debris by running a sharp dental probe along the crack. The crack and surrounding area are then cleaned with a cotton bud and alcohol.
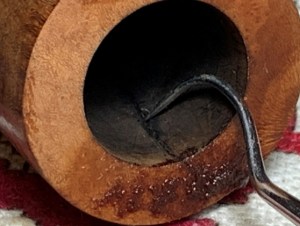 J-B Weld is an inert, flame-resistant epoxy which works well with chamber repairs. The J-B Weld comes in two components – ‘Steel’ and ‘Hardener’. After placing some scotch tape on the plastic workspace for easier clean up, the Steel and Hardener are measured out in equal parts. The parts do not look equal, but they are close. The Steel spread out more.
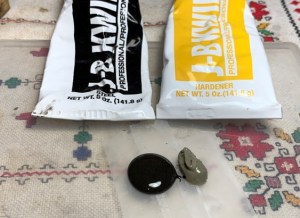 The components are mixed with a pipe nail tool. It always seems to be the case that more is mixed up than will be needed. Earlier, I had put on a surgical glove so that I could use my pinkie finger to spread and smooth the Weld in the chamber.
 Using the pipe nail, some of the mixed Weld is troweled to crack, closer to the rim. I then pushed and spread the Weld down the chamber over the crack with my finger. The amount of Weld first troweled into the chamber was just enough to cover the crack completely and ‘run out’ as I pushed it down the chamber before getting to the floor. It is difficult to take a picture in the chamber, but this picture gives an idea of how wide the Weld was spread. The intent was to have a wider barrier over the crack area for strengthening and reinforcing and not simply to fill the crack. The directions say that the Weld begins to harden after about 4 minutes. At this point the stummel was put aside to allow the J-B Weld to cure thoroughly.
 The J-B Weld has set up enough after an hour to handle the stummel. It will be fully cured in 4 hours. Work continues next with the old fills and one dent which requires a different approach. After inspecting and poking at the fills with the dental probe, only two fills needed to be refilled. Starting with the larger fill and then the smaller, each is excavated with a sharp tooth probe to remove the old fill material.
 Next, a small batch of briar putty is mixed with briar dust and regular CA glue.
  After laying some scotch tape down on the plastic work area for easier cleaning, a mound of briar dust is placed next to the CA glue.Using a toothpick, small amounts of the briar dust are drawn into the CA and mixed. As more dust is added, the putty thickens. When the mixture gets to the viscosity of molasses, the briar putty is troweled to the pits using the toothpick. The stummel is set aside allowing the patches to cure.
 After a time, the patches have cured, and filing commences. The two patch mounds are filed down flush with the briar surface.
 Following the filing, the patches are further smoothed using 220 grit paper.
 With the patches sanded, the attention is now on the dent that is next to the large fill near the rim. The difference between a dent and a pit is that with the dent, the briar has been compressed with a trauma whereas the pit is an imperfection in the briar grain which is usually a natural phenomenon. When the wood has been compressed, a good method to mend the dent is to infuse water into the wood which is microscopically porous like a sponge.
 The method of infusing water is to use a moistened cotton cloth which is placed over the dent and then a hot clothes iron is pressed over the cloth super-heating the water into steam which is then forced toward the wood. The wood absorbs the water causing the dent to soften and expand toward the original pre-trauma condition – or close to it.
 Several cycles of moistening the cloth and heating did the job – amazing. What’s left of the dent would not be noticed unless I drew attention to it as with the arrow below.
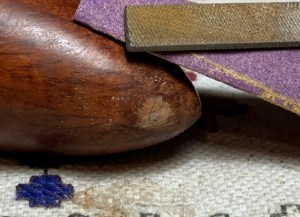
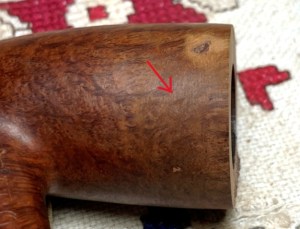 Next, filing and sanding commences to clean up the patch area on the rim and side of the bowl. First the rim. Using a flat needle file, the patch mound excess is carefully filed down flush with the rim surface.
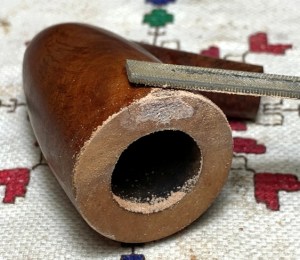 The filing is followed by lightly topping the rim with 320 grit paper then 600 grit paper. I filed the patch mound first so that the topping would be level. If I had not filed first, the potential of an out of kilter rim plane would be possible.
 The rim looks great. Yes, the crack is out front and center but with a very distinctive difference. Filling the crack with Super Thin CA glue filled the gap. The crack now cannot be detected when running a fingernail over it. Before, the gap was easily detected with a bump. To blend and hide the eyesore external crack presents, the stummel will be treated to a darker dye hue later.
 Moving next to the side of the bowl, the excess patch material is filed down with the flat needle file.
 The patch area is further cleaned using 220, 320 and 600 grit papers.
 The external crack sanding is complete. The J-B Weld patch in the chamber is fully cured having set through the night. The feel of the cured Weld patch is too smooth for the chamber andboth sides of the patch descending into the chamber are slightly rounded. To ‘rough up’ the Weld patch and to blend the rounded edges of the patch, the patch area is sanded with 220 grit paper wrapped around the Sharpie Pen.
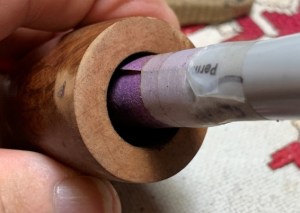 This sanding does a good job of blending the patch with the rounded chamber wall. I’m encouraged by the results of addressing the bowl crack. Later, the chamber will be given a protective starter coat of a yogurt and activated charcoal mixture.
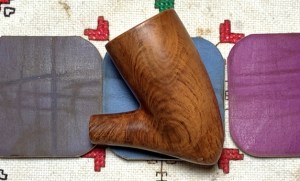
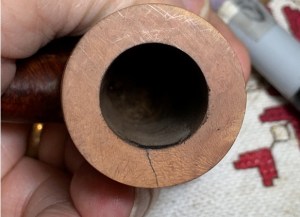 The sanding continues to be fine tuned by using sanding sponges. Sanding sponges help to continue to smooth the briar and remove small scratches and imperfections. The sanding sponges start with the coarse sponge, then medium grit, light grit and lastly, fine grit.
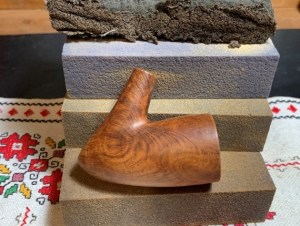
 The sanding transitions to more of a polishing using the full set of micromesh pads. Between each pad the stummel is wiped with a damp cloth to remove dust and to improve the traction of the following pad. First, pads 1500, 1800, and 2400 are used.
 These are followed by 3200, 3600 and 4000 grit pads.
 Finally, 6000, 8000 and 12000 grit pads are used. The micromesh process darkened the briar and brought out the grain and hues.
 Next, to mask the repairs, crack and bring out the grain further, Fiebing’s Dark Brown Leather Dye is used. As an aniline dye, it is possible to lighten the hue using a cotton pad with alcohol if needed. We’ll see how it turns out and go from there. To open the grain helping it to be more receptive to the dye, the stummel is warmed using a hot air gun.
 After the stummel is heated, the dye is applied to a section of the stummel with a folded pipe cleaner and then ‘flamed’ with the lit candle. With the dye still wet, the dye is ignited with the candle flame and the alcohol in the dye immediately combusts leaving behind the dye hue embedded in the grain. The process of painting a section and flaming continues until dye has been applied to the entire stummel. A second time around applying the dye and flaming assures that the application is thorough.
 The stummel is then put to the side for several hours – through the night in this case, allowing the new dye to settle in.
 With the stummel on the side, the stem has been soaking in Briarville’s Pipe Stem Oxidation Remover. When it is fished out, the raised oxidation is removed by rigorously rubbing the surface with a cotton cloth. A pipe cleaner moistened with isopropyl 99% is run through the airway to make sure it is clean after soaking in the Oxidation Remover. The soak did a good job removing oxidation.
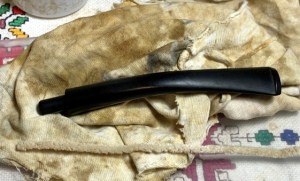 There is no serious bit damage from tooth chatter or biting but the pictures show scratching and a rough vulcanite surface.
 To remove the roughness and minor blemishes, the stem is sanded with 220 grit paper. A plastic disk is used to guard the stem facing from shouldering during the sanding process. To protect the stem logo, the sanding dances around it.
 The finer 320 paper is used next with the shouldering disk.
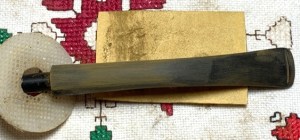
 Next, the stem is wet sanded with 600 grade paper and this is followed by applying 0000 grade steel wool
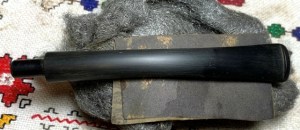
 Micromesh pads are used next. After each pad, Obsidian Oil is applied to the stem to further condition the stem and to guard against oxidation. First, pads 1500,1800, and 2400 grades are used.
 Next, pads 3200, 3600, and 4000 are used.
 Finally, pads 6000, 8000 and 12000 finish the job. The glossy pop looks great.
 The newly dyed and flamed stummel was set aside through the night allowing the dye to settle in. It’s time to ‘unwrap’ the flamed crust revealing the briar. You never quite know what the results will be! The coarser Brown Tripoli compound is used along with a coarser felt buffing wheel. This more ‘heavy duty’ combination plows the crust with the rotary tool set at about 40% full power.
 The goal is to clear the excess crusted dye allowing the grain patterns to emerge. As the unwrapping proceeds, the felt buffing wheel is purged often with the end of a wooden clothes pin arm to clear the dye gung and to soften the wheel. I have been asked how long it takes to ‘unwrap’ the stummel. With this Pickaxe, it took about 1.5 hours. It is a slow process to get it right. The pictures below show the ‘revealed grain’ and how the dye gives the grain more distinction and before. I like it.
 To fine tune the compound process, the felt buffing wheel is exchanged with the softer cotton cloth wheel to apply another round of Brown Tripoli. For this, the rotary tool speed is increased to about 50% full power. This is done for two reasons: First, the second round removes more excess flamed dye from the surface and the result is the briar grain is brought out more clearly and sharper.
 The second reason is that the felt wheel is not able to reach into the very tight crook of the shank and bowl. The cotton wheel can do this and clear away the blotch of flamed dye.
 After the application of the Brown Tripoli compound, the stummel is wiped with a cotton pad moistened with alcohol. This helps to blend the new dye. If needed, the wiping could continue, and the alcohol would lighten the dye. However, this is not needed.
 The next step is to apply the finer Blue Diamond compound to the entire pipe – stem and stummel. When mounting the stem, I discovered that the fit was a bit too tight. This can happen after a thorough cleaning with water. The shank on the Pickaxe shape is small and thin and forcing the tenon into the mortise would crack the shank. This is not a job I want to add to the agenda.
 To remedy the tightness of the fit, 320 grade sandpaper is pinched around the tenon and then the stem is rotated. The sanding action microscopically reduces the diameter of the tenon.
 After a few sanding/fitting cycles, the tenon is seated in the mortise not to loose and not too tight. With the size of the shank/mortise, the stem needs some care when mounting and dismounting so it isn’t cracked!
 With the stem and stummel rejoined, another dedicated cotton cloth buffing wheel is mounted, and Blue Diamond compound is applied to the pipe – stem and stummel.
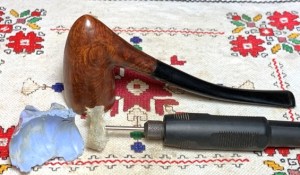 After application of the compound, there is a lot of compound dust on the surface. A felt cloth is used to clean the dust in preparation for the application of wax later.
 With the smaller and thinner shank that perhaps is a bit more vulnerable to cracking if not careful, I decided to see if I might find a copper shank cap or band that would fit the shank but not cover the nomenclature. The shank cap will provide more support to the shank/tenon fit and add a nice touch of class to the Pickaxe.
 I found a cap that was a perfect fit over the shank. To affix the cap onto the shank a very small amount of regular CA glue is used. After placing a small bead of glue on the end of a toothpick, the toothpick spreads the glue around the inner circumference of the band. A little is used so that when the cap is pressed onto the shank CA glue is not squeezed out making a mess on the briar.
 After spreading the CA, the cap is placed over the shank and pressed firmly downward against the table to seat the cap securely onto the shank.
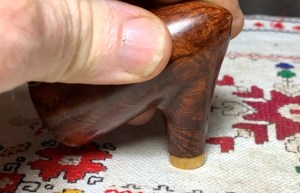 Next, to give the band more bling, Green compound is used. A cotton cloth buffing wheel dedicated to the application of compound on metal is mounted on the rotary tool at about 40% of full power. The briar shank is protected using painter’s tape. When the compound is applied to metal it produces a black residue that can stain the briar.
 The compound buffed up the shank cap nicely. I like how it blends with and sets off the briar. Nice!
 A few more mini projects before finishing. The Barok stem logo, ‘B’ has crisp and strong lines. It needs to be refreshed with paint. I do not know what the original color was. With this stem and the Barok example from Pipephil shown earlier, there was no paint in either logo. My guess that the original color was white, but in keeping with the copper band, European Gold Run n’ Buff paint is used. This paint goes on well and will complement nicely the copper band.
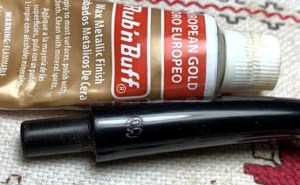 A small amount of the paint is placed over the logo. The excess is wiped off with a cotton pad and and trimmed with the point of a toothpick.
 I like what I see. The logo pops very nicely.
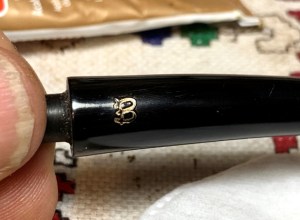 With the stem and stummel reunited, another dedicated cotton buffing wheel is mounted at the same speed. Carnauba wax is applied to the pipe except for the band. After applying the wax, the pipe is given a rigorous hand buffing to remove excess wax and to raise the shine.
 One more step and this Barok of Saint Claude will be ready to go again. I mentioned earlier that a protective ‘cake starter’ would be used to create a buffer for the chamber crack patch using J-B Weld.
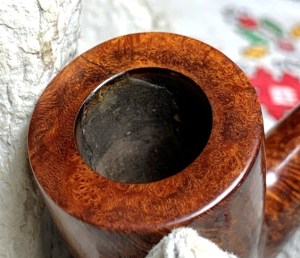 The cake starter is made by mixing activated charcoal with regular, non-flavored yogurt. Sour cream can also be substituted for the yogurt. Yogurt and the charcoal are placed in a small mixing cup.
 A pipe cleaner is run through the mortise to the draft hole to keep the mixture from entering the airway.
 A pipe nail tool is used to mix the charcoal and yogurt together. Adding additional charcoal will thicken the mixture but my original amount was sufficient. When the starter is thoroughly mixed, the pipe nail is used to trowel some of the mixture into the chamber. The pipe nail does a good job spreading the mixture out evenly over the chamber wall.
 The mixture will dry into a hard surface around the chamber, and this helps a new durable cake to form serving to protect the chamber wall and the patch. A cake only needs to be the width of a U.S. dime. A word to the new steward: Avoid using a metal tool to scrape the chamber which will damage the starter. To clean the chamber after using, use a folded pipe cleaner gently rubbing the chamber wall to dislodge the ash. The stummel sat for a few hours to allow the charcoal/yogurt mixture to harden.
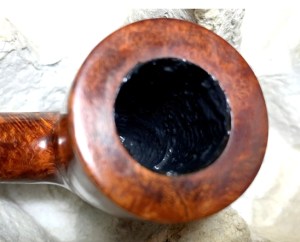
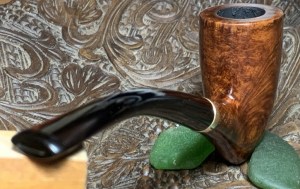
 This Barok Bruyere Pickaxe of Saint Claude has eye catching grain and these dimensions: Length: 5 9/16 inches, Height: 2 1/2 inches, Rim width: 1 1/4 inches, Chamber width: 11/16 inches, Chamber depth: 1 7/8 inches. The Pickaxe experienced the mother of all pipe injuries, an injury that usually sends a pipe to the wood pile – a cracked bowl. Since every indication is that this was not a heating problem, which would mean weakened wood because of the heat, but a torque injury, is good news. The briar is healthy but was most likely stressed while cleaning. For this reason, the patch should give this Pickaxe years of continued service. Michael commissioned this Barok Pickaxe and as the commissioner has the first opportunity to claim him from the Pipe Store. A large portion of the proceeds of all pipes restored help to support the Daughters of Bulgaria (now called, Spring of Hope) which my wife and I co-founded in Bulgaria to help women and girls who had been trafficked and sexually exploited. Starting with ‘before & after’ pictures reminds us of how far we’ve come. Thanks for joining me!
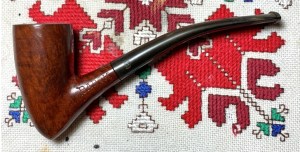


A masterful job, Dal. Todd
LikeLiked by 1 person
Thanks, Todd! It turned out better than expected 🤠. Have a blessed holiday season!
LikeLike
Lovely work and a beautiful restoration…even if it’s provenance remains mysterious!
LikeLiked by 1 person
Thank you! I suppose a little mystery in life is good 🤠.
LikeLike