
The next pipe on the worktable was donated from a pipeman who wished to stay anonymous and who appreciates that pipes that I restore help others in unfortunate circumstances. My wife and I co-founded the Daughters of Bulgaria several years ago when we lived in Bulgaria and since then, now residing back in the US, contributing a portion of the proceeds for pipes restored is a way that I can make known the issue of human trafficking to primarily a man’s world and to help support those who are actually doing the work today in Bulgaria. The name of the ministry was changed from Daughters of Bulgaria to ‘Spring of Hope’ because the work has expanded and developed beyond women and girls who have been trafficked and sexually exploited. Another reason my pipeman friend donated his pipes to The Pipe Steward is because he’s thinning his collection and knows that I’ll take good care of his old friends😊.
Pipeman Jack from the Houston, Texas, area saw this pipe along with two others. One of these, a Pipe Pub Zulu, I just completed (Revisiting the Provenance of a Pipe Pub Imported Briar Zulu) and came out great. The other pipe Jack commissioned still waiting in the queue is hefty Bertram Washington DC 30 Billard.
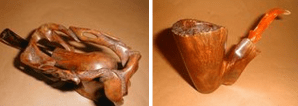
  The third pipe, which was the pipe graciously donated, is a special collectable fashioned by American pipe maker Larry E. Comeaux II. Jack saw this pipe, and even though it has a few issues – mainly a cracked shank, was glad to have the chance to become its new steward and commissioned it. Here are pictures of the striking Comeaux USA 3-00 Canadian that got Jacks attention.
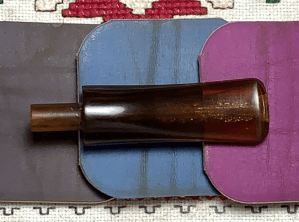

 The nomenclature is found on the underside of the Canadian shank – a fancy arched script: Comeaux. Beneath Comeaux is what appears to be the symbol for ‘The Second’ name bearer from his father. To the right of this the COM: USA. To the far right is stamped 3-00. At first, I thought this was a shape number, but after looking at several Comeaux pipes once for sale (they’re all sold!) on Smokingpipes.com, I discovered that this was a dating stamp. 3-00 or March 2000.
 Pipedia has a small amount of information from Jose Manuel Lopés’ book, From Pipes, Artisans and Trademarks (Comeaux – Pipedia) which I’m pleased to possess a copy. The article starts with an update that Larry Comeaux passed away in 2015 at the age of 72. This is then followed by the excerpt from Lopés:
North American brand of the Tennessee artisan Larry E. Comeaux II, known as “The Pipe Doctor”, who took up the activity on the encouragement of two artisan friends from Knoxville, M.O. Vickers and Robert Blackwell. He has been making pipes professionally for 35 years, having produced many freehands, exotic and sculpted pipes, as well as being a highly respected repairer. In 1986, he won the best freehand contest at the PCI Members Convention and was recognized by the Confrérie des maîtres-pipiers de Saint-Claude. He works with Greek briar and vulcanite and lucite stems, producing between 100 and 250 pipes a year.
According to his business card Larry E. Comeaux II, Master Pipemaker, offers:
- One of a Kind Masterpieces
- Quality Repair & Refinishing
- Classes Available
The Pipedia article also includes some examples of Comeaux pipes which are quite exceptional.
 I did a quick search to see if I could find more information about Larry Comeaux through his two compatriots who encouraged him to start creating pipes. I found one Worthpoint listing for a Robert Blackwell pipe that stood out: AWARD
  WINNING 8 1/4″ ROBERT BLACKWELL LOVAT WITH 4 1/2″ SHANK- RARE & PRISTINE! (see: LINK). One becomes accustomed to the hoopla associated with sales ads, but this listing surprised me with good information that caused me to think: “If this was the kind of mentor artisan encouraging Larry Comeaux, I can see some of the style and creativity rubbing off.” Here is a portion of what the ad said about pipe creator, Robert Blackwood:
ROBERT BLACKWELL is one of the American Craftsman most closely associated with the “Freehand-Style” pipes that dominated the American scene from the 1970s through the 1980s. His handcrafted Pipes were labeled “objects of art” and a limited production of no more than 50 – 100 pipes per year contributed to their rarity and collectability! Using exclusively plateau briar from the Mediterranean, he provided many outstanding straight grains in virtually every shape imaginable! However, it was his signature “Coral Briar” Hand-Rusticated Finish that made his reputation so well-known in the last generation! One of his ardent followers quipped: “If you can imagine it, he can make it!” And, this BIG, LONG LOVAT is an outstanding example! BLACKWELL Pipes ranged from individual pieces to 7-Day Sets and were priced from $35 to $1,500!!! He is a long time pipe smoker himself and fashioned his pipes with the goal of pleasing every pipe smoker!
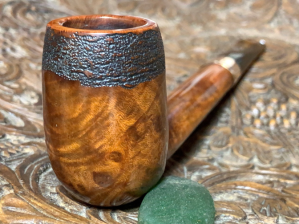
With a better appreciation of the Comeaux pipe on the table, it is time to take a closer look at the pipe itself. This LONG Canadian is beautifully grained with a delicate rusticated band around the upper chimney. This pipe is a beauty with dimensions: Length: 7 3/16 inches, Height: 2 inches, Rim width: 1 1/8 inches, Chamber width: 3/4 inches, Chamber depth: 1 7/8 inches.
The chamber has some cake build up and will be cleaned. The rim needs cleaning as well. The close up photo below shows the rustication in its minute details.  The short acrylic stem has a good bit of chatter, and the lower button lip has a compression that needs mending. The airway can be seen through the acrylic and shows signs of crazing – the little cracking which is often seen with older acrylic Perspex stems put out by GBD. Perspex is not resistant to alcohol and when exposed to alcohol can craze or crack. For our stem, it only impacts the aesthetics.
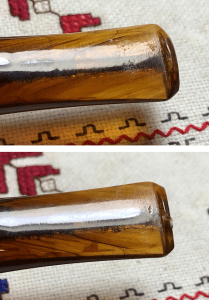 The primary issue with this Comeaux is a malady that overtakes many a Canadians, and with this Canadian’s 7 3/16 inches length – a cracked shank. The long shank which is the hallmark characteristic of the Canadian family of pipes seems to be more vulnerable to shanks cracking. This crack is on the upper side of the shank measuring about 5/8 inches – not a small crack. The crack will need mending, and I’ll need to find a reinforcement band that can be molded around the oval shank. I’ll work through the cleaning process before addressing the crack.
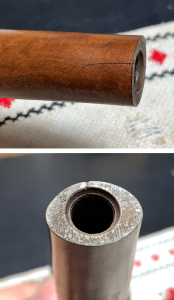 To begin, the chamber is reamed using the Pipnet Reaming Kit. Of the four blades available, 3 were used.
 To fine tune the reaming, the Savinelli Fitsall Tool is used to scrape the chamber walls and getting to the more difficult angles at the floor of the chamber.
 Finally, the chamber is sanded with 220 paper wrapped around a dowel rod.
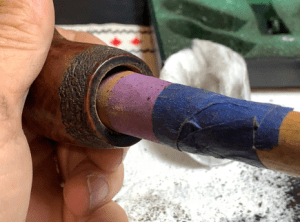 All the tools necessary to clean the chamber are shown and after a quick inspection, there were no signs of heating issues. The chamber looks good.
 Next, the external surface is cleaned with Murphy’s Oil Soap.
  The rim has charring stain on it and the brass brush helps to address this. The great thing about brass brushes is that they are softer and while they help with more aggressive cleaning, they are not too invasive to the briar.
 From the worktable, the stummel is taken to the utility sink where the internals are scrubbed with anti-oil liquid dishwashing soap and shank brushes. My soap of choice is Dawn. After scrubbing, the stummel is thoroughly rinsed and returned to the worktable.
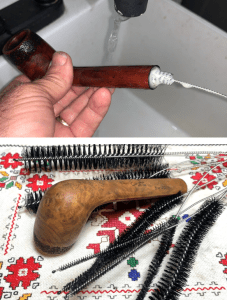 Cleaning continues with the internals with cotton buds and pipe cleaners moistened with isopropyl 99% alcohol. The buds were only useful to clean the mortise, and the cleaners cleaned the shank’s expanse. What I discovered quickly was that the internals were pretty much clean already. Moving on!
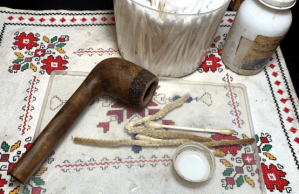 After the cleaning, the rim cleaned up well but needs a facelift. There are remnants of a slight sharp bevel on the inside of the rim. This bevel has deteriorated over time and use. The bevel and rim have staining from the charring/lighting/burning in the chamber.
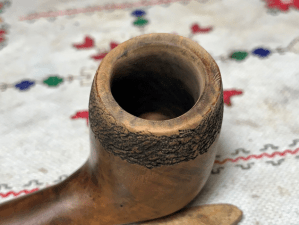 To clean and refresh the bevel, which will improve the entire rim presentation, a strip of 320 sanding paper is used by pinching it around the wooden orb and pressing it into the inner cavity of the chamber. The orb is rotated around the inner rim creating a nice, clean smart bevel. This is followed in the same way with 600 grit paper.
 The bevel came out beautifully, but the rim proper now needs to be lightly sanded to clean it and to match the bevel.
 Since the goal is simply to clean the rim and sharpen its lines, rather than removing briar, the pipe is topped with the fine 600 grit paper. After inverting the stummel on the paper, the stummel is rotated several times until things look good.
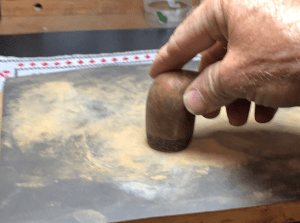 I like what I see! I’ll wait till after applying micromesh pads to the pipe to see if there’s a need to touch up the rim with a dye.
 Before proceeding further, I need to address the shank crack. The crack is about 5/8 inches long and it looks like it could easily continue creeping up the shank if not blocked. To block the crack from ‘creeping’ the approach is to drill a counter-creep hole at the end of the crack and fill it with CA glue. After this, CA glue will be applied to crack itself to help shore up the damage. Following this, later, a band will be mounted over the shank to reinforce the shank. First, using a magnifying glass to find the very end of the crack, a sharp dental probe is used to press a small hole at that point. This helps as a guide for the counter-creep hole drilling.
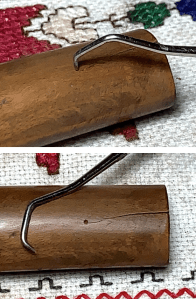 Next, a small drill bit is mounted in the rotary tool. If I remember correctly, the drill bit is 1.5mm.
 I always take a deep breath before drilling the hole. The hole is not meant to go through the briar into the mortise! However, that’s the fear of what could happen if not paying attention. This time the drilling came out perfectly.
  Next, a small amount regular CA glue is dropped into the hole and then briar dust is sprinkled over it. This helps the patch to blend though it will be visible.
 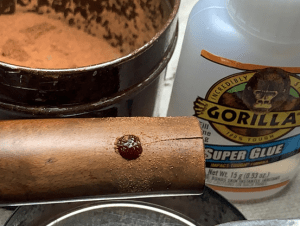 In the picture above the crack is separated a small amount. I use thin CA glue first to place it in the crack. This glue is very light and seeps nicely into the crack to put a deep seal in place. I pinch the shank as tightly as I can for a few minutes while the initial glue cures – it cures quickly. Next, regular CA glue is placed over the crack while the shank is pressed together, and the patch is sprayed with an accelerator to seal the deal. I’m not too concerned about the aesthetics of the end of the shank because most of the crack should be covered (hopefully) by a band.
 After the patch cures, the process is slow and careful to file the patch flush with the briar surface. My goal is to keep the file on top of the patch so that there’s no collateral impact on the surrounding briar.
 After the filing, 220 grit paper cleans the remaining glue over the hole area.
 The sanding is completed with 320 grit paper then the finer 600 grit paper. The crack repair looks good.
 With the main sanding on the shank repair completed, micromesh pads are used. The fine rusticated area on the top of the stack is avoided. A damp cloth is used to wipe down the pipe after each pad. This is done to wipe off the dust and to give the following pad more traction. First, pads 1500 to 2400 are used, then 3200 to 4000, and finishing with pads 6000 to 12000.
 After the micromesh process, the lightened repair area blended very nicely.
 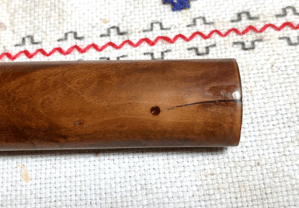 A band is necessary to reinforce the shank repair. I have many brass bands to look through to choose the best fit. I like brass bands because they give a more rustic, relaxed vibe and they can be pliable. The challenge is to have a wider or longer band to cover the crack repair as much as possible. The other challenge is choosing a round band that can be mounted onto an oval shank.
  I found a band that I think will do the job. It is pliable and will flex over the oval shank. The front part of the band just fits over the shank and then tightens as the band is pressed up the shank. That’s good. If the band is too big, it will not seat well.
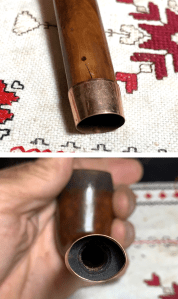 The band is tight at this point on the shank with just working it up the shaft. There remains a lip that will need to be pushed up the shank with some help.
 Heating the band with the hot air gun helps the band to expand so that it can be seated fully without ripping the material.
 To help with the seating, a small amount of CA glue is placed around the inner band and then the band is firmly seated by planting the shank end down and gently but firmly pressing the shank down into the cloth.
 With the new band in place, an attempt to mount the stem reveals that the mortise is a bit too snug.
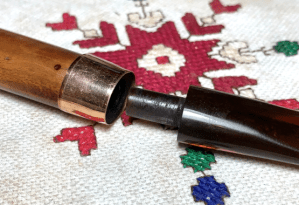 To reduce the tenon slightly to create a snug fit, 220 paper is pinched around the tenon and the tenon is rotated. After a few rotations and tests, the stem was seated.
 The meeting of the stem facing and band is not perfect. The stem facing is a wee bit larger than the band at different point and this creates a rough lip between the transition.
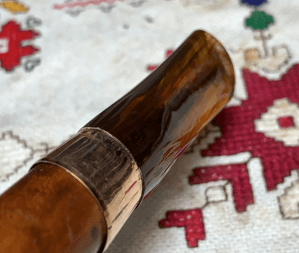 To address the lips and to help shape the stem so that it tapers a little bit more in an ‘hourglass’ fashion requires some sanding. Painter’s tape is used to protect the band.
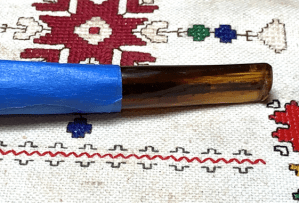 220 grit paper is used to do the sanding and shaping.
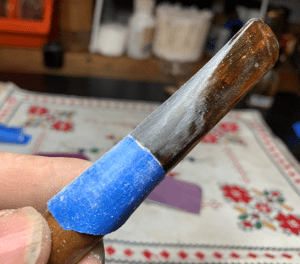 After quite a bit of sanding and examining, the lips have been removed so that there is a smoother transition between band and stem. I also like the additional taper that creates a wee bit more of a fishtail stem. It looks more natural now.
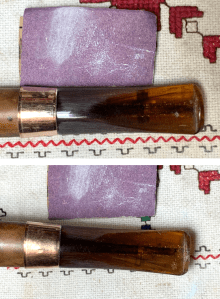 Before continuing with the stem, the stummel is treated with Mark Hoover’s ‘Before & After’ Restoration Balm. I like how it helps to protect and enliven the briar and brings how the natural hues. With some Balm placed on the fingers, the Balm is worked into the briar and then set aside for about 10 minutes for the Balm to do its magic.
 Using a dedicated microfiber cloth, the excess Balm is wiped off and the stummel is buffed up. What a beauty!
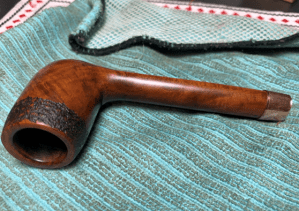 The stummel is off to the side and focus now shifts to the tortoise shell acrylic stem. The airway is first cleaned with a couple of pipe cleaners and isopropyl 99% alcohol. One of the cleaners was a bristled cleaner to address the stain in the airway.
 The bit has tooth chatter on both the upper and lower sides. This should be dispatched with sanding without the need of patching.
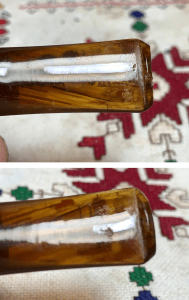 I noted earlier that button lip had a compression that needs some help.
 A small amount of regular CA glue is used to fill the divot on the lip and is allowed to cure thoroughly.
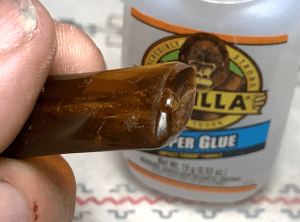 After the lip patch has cured, the excess is filed down.
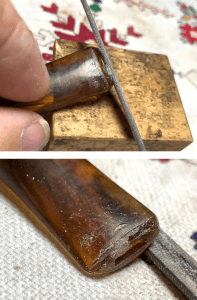 Next, the bit and button are sanded with 220 grit paper to remove the tooth chatter and to blend the button patch.
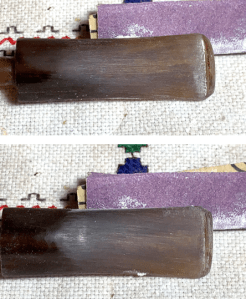 The sanding transitions to the whole stem with 320 grit paper.
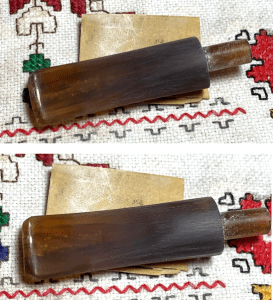 Next, the stem is wet sanded with 600 grit paper and then 0000 steel wool is applied.
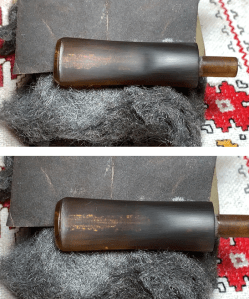 Next, micromesh pads are applied beginning with pads 1500 to 2400, 3200 to 4000, and 6000 to 12000. Even though acrylic does not oxidize, I like applying Obsidian Oil between each pad.
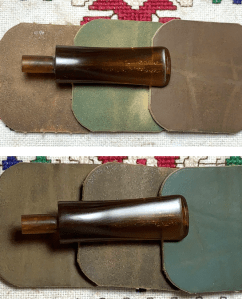
 The brass band needs some ‘blinging’ up. Green compound is applied using a dedicated cotton wheel for metals. Polishing metals create a black residue which requires a dedicated buffing wheel. I am careful to keep the wheel on the band and not overrun onto the briar. This will spread the black residue, and this can stain the briar – not good.
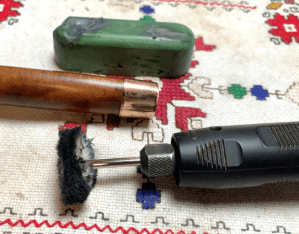 Wow! I love how the compound brings the gloss to another level.
 Well, somehow, I missed taking a picture setting up the application of Blue Diamond compound to the pipe. The compound is not applied to the metal band nor to the rusticated stack. I avoid the rustication because the powdery residue will get lodged in the crevasses and this I don’t want. Following the application of the compound, the pipe is wiped with a felt cloth to remove compound dust in preparation for application of the wax.
 With another dedicated cotton cloth wheel mounted, carnauba wax is applied to the entire pipe minus the band. After applying the wax, the entire pipe enjoys a rigorous hand buffing to remove excess wax and to raise the shine.
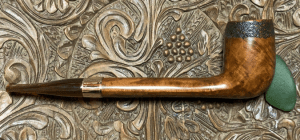
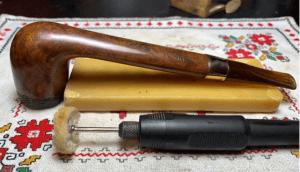 This is the first time I have come across a pipe crafted by the Larry Comeaux of Tennessee. His story is interesting, and I appreciate how he came to be the recognized artist that his pipes reflect. The year 2000 Comeaux creation on the worktable is a fine example of his craftsmanship. This is the longest Canadian I personally have worked on, and the natural briar grain gets one’s attention. The fine, minute rustication is a touch of class with the brass band blending well with the darker hues. Pipeman Jack commissioned this pipe and will have the first opportunity to claim him from the Pipe Steward Store. A portion of the proceeds of all pipes restored go to help the Daughters of Bulgaria, now called ‘Spring of Hope’ – helping women and girls who have been trafficked and sexually exploited. Again, my thanks to the pipeman who donated this pipe. Thanks for joining me!
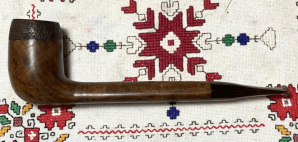


As always, I continue to admire and respect your work…and the REAL work you’re using to support Bulgars.
LikeLiked by 1 person
Thanks!!
LikeLiked by 1 person
Just emailed 3 possible commissions!
LikeLiked by 1 person
I’ll be in touch
LikeLiked by 1 person
Great work…as usual!
LikeLike
Thanks, Todd!
LikeLike
Pingback: A Survivor of the Now Gone Bertram ‘The Nation’s Pipemaker’ – a Bertram Washington DC 30 Billiard – The Pipe Steward