
The next pipe on the table is a workhorse Billiard without doubt. It was found along with a few other treasures November 2021 at The Antique Market in Michigan City, Indiana. We were traveling from Colorado to my son’s home in Dearborn, Michigan for Thanksgiving celebrations. My wife and I always like to explore the local treasures one might find in an antique or second-hand store, so we stopped along the way. The Antique Market had all the right bells and whistles as I made my way from display to display looking for my holy grail – a pipe.  I found several pipes that kept the adventure stoked until time was beckoning us to continue making our way to family in Dearborn. The 3 pipes that I could not leave behind were a Guildhall London Pipe Made in London England F297B Billiard (top), a Rusticated Bullmoose nose warmer and the pipe on our table, the Bertram Washington DC Billiard. Both the Bullmoose and Guildhall are in the For “Pipe Dreamers” ONLY! ‘Help Me!’ baskets waiting to be adopted! I love looking for pipes in the wild almost as much as restoring them and placing them into the hands of new stewards. A photo posed of the booty at the checkout desk at The Antique Market.
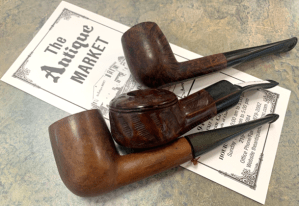 The Bertram is the 3rd pipe commissioned by pipeman Jack who works in the oil industry (along with his wife and daughter!) and resides in the Houston, Texas area. The other pipes Jack commissioned came out great – a Pipe Pub Zulu (Revisiting the Provenance of a Pipe Pub Imported Briar Zulu) and a Comeaux Canadian (A Cracked Shank Repair Brings a Comeaux USA 3-00 Canadian Back to Life).
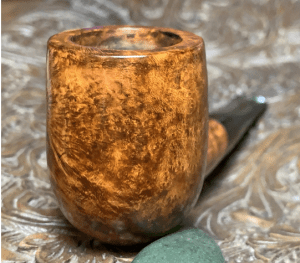
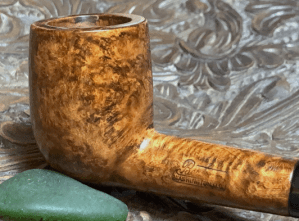
 As always, a portion of the proceeds of all the pipes I restore help to support a work my wife and I co-founded in Bulgaria, the Daughters of Bulgaria (now called, Spring of Hope) helping women and girls who have been trafficked and sexually exploited. The Bertram Billiard is a hefty pipe with these dimensions: Length: 6 inches, Height: 1 7/8 inches, Rim width: 1 3/8 inches, Chamber width: 7/8 inches, Chamber depth: 1 3/4 inches. Here are pictures of the Bertram that got Jack’s attention.
 The nomenclature stamped on the left shank flank is fancy cursive, Berthram [over] WASHINGTON.D.C.. The Washington DC is enclosed in what almost looks like a canoe created by the line design. What I assume is a shape number is stamped on the underside of the shank: 30.
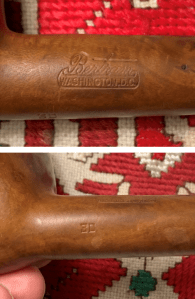 I remember looking at the Bertram through the glass in the antique shop and doing a quick search in Pipedia to find any information that would encourage me to make the purchase. I didn’t read it all then, but what I found was intriguing. It reveals the story of an iconic American tobacconist going back to the 1800s (Bertram – Pipedia).
The story of Bertram pipes begins with a German pipemaker named Bertram Goldmann who emigrated to the United States in 1874 and settled down in Washington D.C.
In 1927 Sydney Bertram Goldman opened a new factory, the Bertram Pipe Shop. The strategically favorable situation in the political center of the USA procured many illustrious customers from politics and fine arts to the well-respected brand: Joseph Stalin, General Douglas MacArthur, Edward G. Robinson or Red Skelton just to name a few. President Franklin D. Roosevelt ordered his cigarette tips there. Bertram acquired the surname “The Nation’s Pipemaker” (Photos from Pipedia, Courtsy, Doug Valitchka)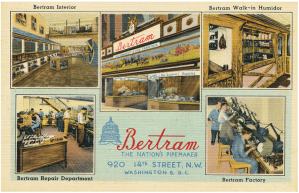 Over three generations Bertram’s enjoyed such a good reputation in the USA that their own production wasn’t able to keep up with the demand and pipes had to be bought in addition from notable suppliers. In reference to this Bertram in later years was also apostrophized “The Astley’s of America”.
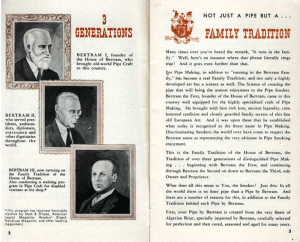 Their pipes seem have been graded by a numbering system, i.e. 10, 20, 30, 40, 50, 60, etc., with the higher numbers being more desirable. The grading system also indicated the price for which it was to be sold. A ’10’ sold for $1.00, a ’20’ for $2.00, and so on.
 The company suffered a tragic blow at the end of the 1960s. During the riots following the assassination of Martin Luther King Jr. the factory was plundered and set on fire. Though some efforts – mainly by Bertram employees – were made to restart Bertram never really recovered and the owning family decided to quit pipe production and close the shop in 1977.
It seems that this is the story for many traditional, family run tobacconist and pipe manufacturers. There were several examples of Bertram pipes in the Pipedia article (Courtesy, Doug Valitchka). This photo shows the exact stamping as our Billiard with the shape number of 30. From the article above, we discover that the 30 is not a shape number but a quality indicator. The 30 would make our Billiard to be a mid-range quality production of Bertram and depending on when it was made, valued at a whopping $3. We have no indicator of dating except that it would pre-date Bertram’s demise in 1977.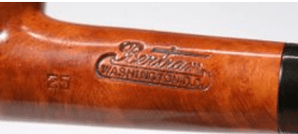 With a better understanding and appreciation for the Bertram name and legacy, it’s time to take a look at the Billiard on the worktable. The cake buildup in the chamber is thick and needs to come out so that a fresh cake can be formed.
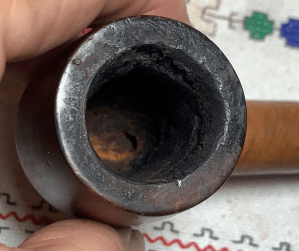 The crusted lava flow over the rim is also thick and needs to be cleaned.
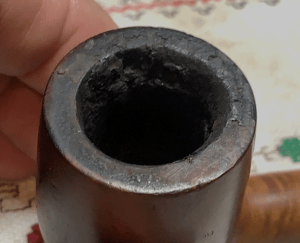 There is also a chip on the left side of the shank right at the shank facing. This will be patched.
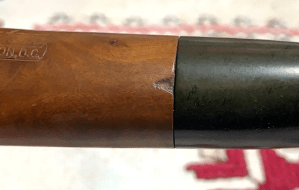 I also found this small splitting of the briar on the back side of the bowl. This is not an injury crack but a natural imperfection in the briar.
 The bit both upper and lower have some biting compressions that will be addressed.
 To begin the restoration of this Bertram, the stem’s airway is cleaned with no problems.
 The vulcanite shows oxidation which is addressed by giving the stem a soak in www.Briarville.com ‘s Pipe Stem Oxidation Remover. The stem will soak through the night.
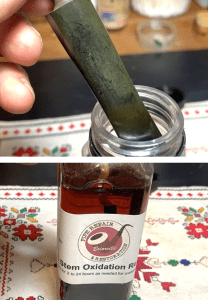 Next, the thick cake needs to be cleaned out using the Pipnet Reaming Kit.
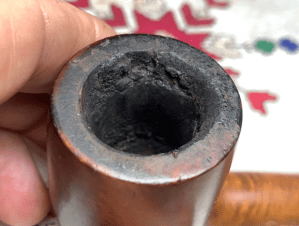 The chamber is reamed with all 4 blades of the Pipnet Reaming Kit. The cake is like brick, and it took a bit of patience so that the blades were not broken in the process.
 After the heavy lifting by the Pipnet blades, the chamber is scraped with the Savinelli Fitsall Tool to get at the more difficult angles on the floor of the chamber.
 Finally, the chamber is sanded to remove the last vestiges of carbon cake and smooth the chamber surface. Not shown is using a coarse 120 grit paper to sand a bit more aggressively the chamber floor which was uneven with some rough spots. After this, the chamber was sanded with 220 paper wrapped around the dowel rod.
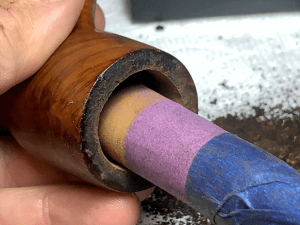 The full arsenal is shown. Afterwards, a look at the chamber shows no issues with burning or heating. This chamber is a cavernous chamber that will accommodate a lot of one’s favorite blend!!
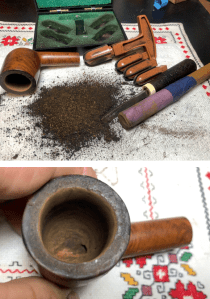 Moving next to cleaning the exterior stummel surface, undiluted Murphy Oil Soap is used with a cotton pad. The surface was grimy and the lava crust on the rim was stubborn.
 To address the lava crust, the Savinelli Fitsall tool is used to scrape the crust. The important thing in cleaning the rim like this is not to gouge the rim briar during the scraping. The Tool does a good job.
 Next, the rim is scrubbed with the brass brush which helps to give some additional leverage in the cleaning but is not invasive to the briar.
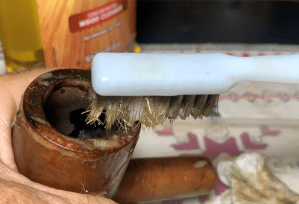 From the worktable the stummel is taken to the sink where the internals are scrubbed with shank brushes and anti-oil liquid dishwashing soap and warm water. After the scrubbing, the stummel is thoroughly rinsed and brought back to the worktable.
 The cleaning of the internals continues with pipe cleaners and LOTS of cotton buds moistened with isopropyl 99% alcohol. This was a dirty one…. The mortise wall was also scraped using a small dental spoon. There seemed to be no end to the crud being excavated out of the mortise.
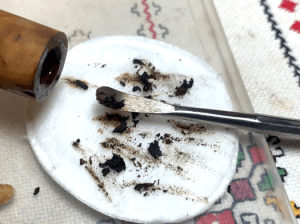 At the end, the buds started coming out lighter, so progress had been made but we’re not finished.
  Since the hour is late, it’s a good point to continue the internal cleaning using a kosher salt and alcohol soak. The first step is to pull and twist a cotton ball to form a wick that will help to draw out the tars and oils.
  The stiff wire (from an old clothes hanger) helps to guide the wick through the internal cavity through the draft hole at the base of the chamber.
  The bowl is filled with kosher salt. Kosher salt is used because it leaves no aftertaste unlike regular iodized table salt. I also like using salt because it freshens the briar and clears away ghosts. With the stummel situated in the egg crate with the rim and shank’s end parallel, the chamber is filled with isopropyl 99% alcohol until it surfaces over the salt.
 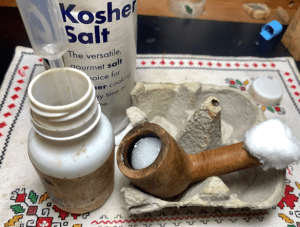 After some minutes, the initial filling with isopropyl 99% is absorbed into the salt and wick, and the chamber is again topped off with alcohol. The stummel is then put aside for the soak to work through the night.
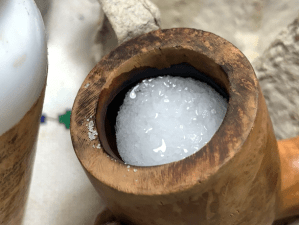 The next morning, the salt and wick are discolored which tells me that the cleaning made more progress.
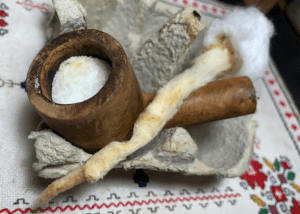 A few cotton buds moistened with isopropyl 99% confirms the internals are clean, refreshed and ready for a new steward.
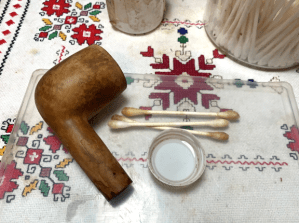 After cleaning, another closer look at the stummel follows. The rim is cleared of the lava crust, but the rim is stained. The edge of the rim has also been dinged and chipped and there is pitting on the rim as well.
 The small crevasse that is on the backside of the bowl is more pronounced after the cleaning. While this imperfection was not caused by a trauma but just part of the briar, to be on the safe side, it will be filled with CA glue.
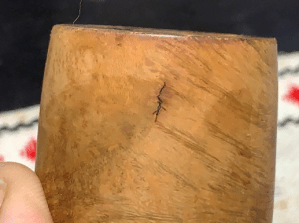 The stummel is splotched from some of the old finish remaining. The stummel needs to be cleaned.
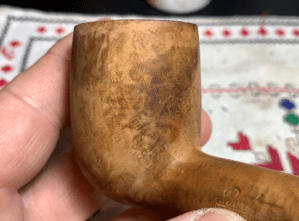 The shank facing has a small divot that needs attention.
  Using Medium Brown CA glue, a small drop is placed in the divot and then sprinkled with briar dust. The patch will be given time to fully cure before sanding.
 With the CA out, the small crevasse also is filled with the Medium Brown CA. Just a small amount of CA is placed on the crevasse and after allowing the CA to expand over the crevasse, briar dust is sprinkled on the patch. This helps to blend and to hold the CA in place.
 After the patches have cured, a needle file goes to work filing the patch mound.
 The filing is followed by 220 and 320 grit sanding paper. The goal is to remove all the excess patch material on the briar surface so that all that’s left is what is on the patch itself.
 Filing carefully reduces the crevasse patch flush with the briar surface.
 After the sanding with 220 and 320 grit papers, the patch looks good. There’s no longer any gap in the crevasse shoring up the imperfection.
 This rim has seen better days. The rim is dark from charring stain and there is a lot of pitting on the right side of the rim and chips and nicks around the perimeter.
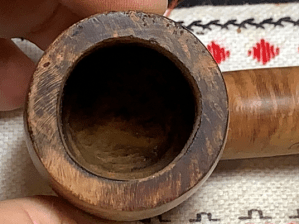 To clean the rim and to reestablish clean, crip lines, the stummel is topped by inverting the stummel on the topping board.
 The photos show the topping progress in progressing first with 220 paper, then 320 and finally with 600 grit paper.
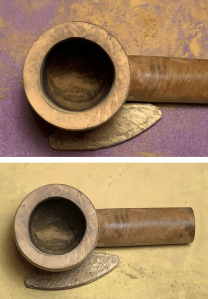 The difference is stark. The rim will see better days ahead.
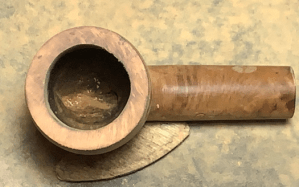 Next, to clean up the briar surface removing small nicks and scratches, sanding sponges are used. Four sponges are used: coarse, medium, light and fine.
 Continuing with the sanding, micromesh pads are used. Between each pad the stummel is wiped down with a moist cloth to remove the dust and to improve the traction of the following pad. The first 3 pads are 1500, 1800 and 2400 grades.
 The second set of pads are grades 3200, 3600 and 4000.
 The final set of pads are grades 6000, 8000 and 12000.
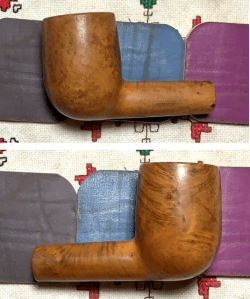 While I was applying the micromesh pads, I studied the grain patterns and took stock of what I was seeing. Sometimes a block of briar doesn’t showcase the grain as one would hope and the stummel looks a bit blah. I’ve come to this point with this stummel. The grain is there but it seems to be subdued and milk toast. My choice at this point is to take a pass on the what I am sensing and put some of Mark Hoover’s ‘Before & After’ Restoration Balm and start working on the stem. Or a dark dye can be applied to create more grain distinction, contrast and depth. And if one should decide in this direction, how dark a dye – light brown, dark brown or even black?
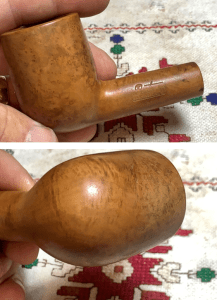 After going back and forth, my decision is to apply a dark stain – Fiebing’s Dark Brown Leather Dye and see how the grain responds. The first step is to heat the stummel with a hot air gun. Heating causes the briar grain to heat and expand, encouraging it to be more receptive to a dye pigment.
 After heated, the dye is applied to the stummel in sections and then ‘flamed’ with the lit candle. The flame ignites the alcohol in the aniline dye, and it combust and burns off leaving the dye pigment behind. This is done repeatedly section by section until the entire stummel has been stained. The cycle is repeated a second time just to make sure the surface is thoroughly covered.
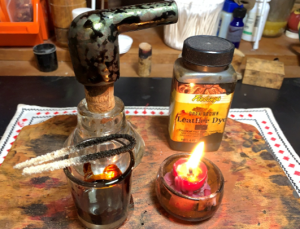 The dyed stummel is set aside for several hours allowing the new dye to settle in.
 The stem has been in a soak of Briarville’s Pipe Stem Oxidation Remover and when it is fished out, the raised oxidation is visible but not too bad.
 The airway is cleaned of the fluid with some pipe cleaners and isopropyl 99% and the surface of the stem is given a rigorous rubbing with the cloth to remove the raised oxidation.
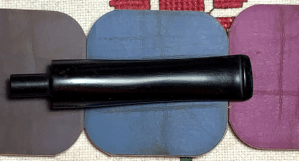
  The bit is not in too bad a shape. There are some compressions from biting on both the upper and lower sides. The heating method of painting the bit with a Bic lighter helps to reduce the compressions and regaining the original form, or part of it. The before and after pictures show a marked improvement on the lower bit. The upper bit still has a compression, but I believe this will be erased by simple sanding. Upper bit:
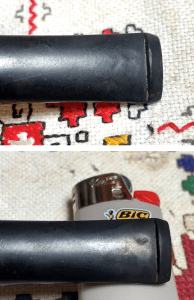 Lower bit:
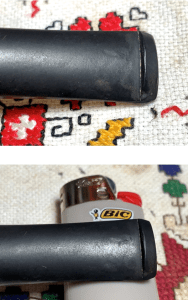 Using 220 grit paper, the bit is sanded – upper and lower.
 The 220 grit paper is followed with 320 grit paper expanding to the entire stem. To guard against shouldering the shank facing, a plastic disk is used to sand against.
  Next, 600 grit paper is used to wet sand the entire stem and this is followed by applying 0000 grade steel wool.
 Moving next to the micromesh pads, after sanding with each pad the stem is wiped with Obsidian Oil which helps condition the stem and guard against oxidation. First, pads 1500, 1800 and 2400 are used. Next, pads 3200, 3600 and 4000 are used. Finally, pads 6000, 8000 and 12000 are used.
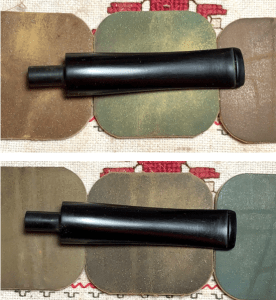
 The stem looks good, and it is put aside with focus now on the dyed stummel. It has rested though the night allowing the new dye to settle in. It is time to unwrap the flamed dye using a more abrasive felt buffing wheel and a coarse brown Tripoli compound with the speed of the rotary tool set at about 40% full power.
 I enjoy the unwrapping process which takes about 1.5 hours – it’s not a quick process. As I apply compound and plow through the crusted, flamed dye, the goal is to remove all the excess dye leaving only that which is in the grain. When I see a blotch of dark, the wheel focuses on this and when the excess is removed, the grain appears. The contrast is amazing from where the stummel was.
 After the main plowing with the felt wheel, the felt wheel is replaced with a cotton cloth wheel increasing the speed to about 50% full power. Again, Brown Tripoli is applied to the stummel. The cotton wheel can reach into the crook where the felt wheel was not as well. The cotton wheel also fine tunes the grain presentation by removing more excess dye and sharpening the lines.
 After the Tripoli application, the stummel is wiped with a cotton pad moistened with alcohol. This helps to blend the new dye as well as to lighten the finish a small amount.
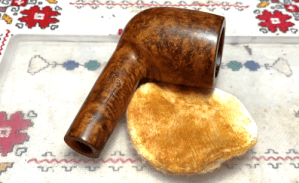 After the Bertram stem and stummel are reunited, another dedicated cotton cloth buffing wheel is mounted on the rotary tool with the speed set at 40% full power. Blue Diamond compound is next applied to the pipe.
 A lot of dust is generated by the compound and a felt cloth is used to wipe the pipe down to remove the dust and to prepare the surface for the application of wax.
 The final step is to apply carnauba wax to the pipe. After another dedicated cotton wheel is mounted at the same speed, the wax is applied to stem and stummel. After the application of wax, the pipe is given a rigorous hand buffing with a microfiber cloth to remove excess wax and to raise the shine.
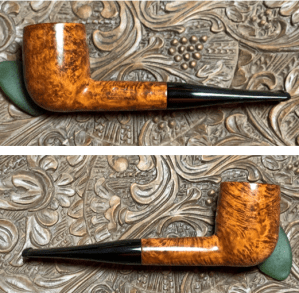
 This Bertram Washington D.C. Billiard is a flag bearer for the once present iconic Bertram Tobacconist in Washington D.C. The picture below shows the stark grain contrast between the stummel as it was and what the application of dye produced. This is a large straight Billiard shape and has a bowl that will afford his new steward much time of reflection and fellowship. Pipeman Jack commissioned this pipe and as the commissioner, has the first opportunity to acquire him from the Pipe Steward Store. A portion of the proceeds help support the Daughters of Bulgaria (now called, Spring of Hope). Thanks for joining me!


Dal, that’s an absolutely stunning restoration. Lovely work.
LikeLike
Thanks, Doug!
LikeLiked by 1 person