
Even as I begin this project, I’m not sure if this Big-Ben Crosley is going to come out on the other side ready to go again. It came to me in February 2019 as part of a Lot of 68 pipes from a seller in West Hartford, Connecticut. My final bid was sufficient and the Lot of 68 made its way eventually to be posted in the ‘For “Pipe Dreamers” ONLY!’ online collection where pipemen and women can commission pipes and give them a new home. When I’m processing new pipes that I acquire, it takes a good bit of time to record each pipe, take pictures and post each online. During this process, I don’t look too closely at each pipe. I didn’t see the Big-Ben’s issues until after Bill inquired about it. The Big-Ben is the first pipe in the upper left corner in the picture below posted by the West Hartford seller.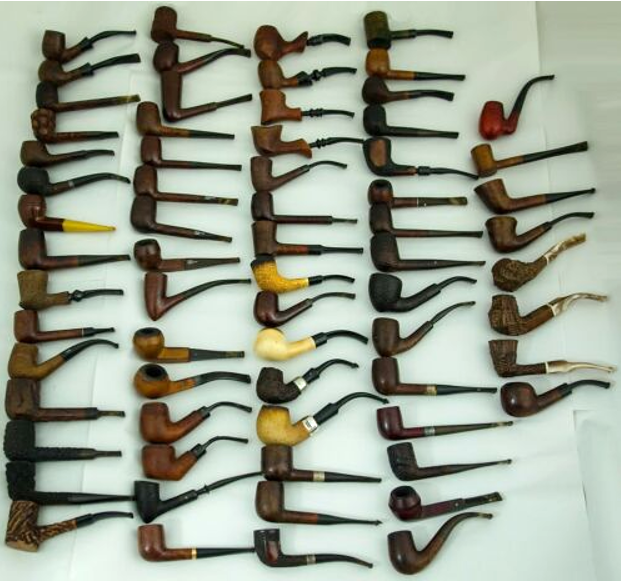 Bill has commissioned pipes from me before benefiting the Daughers of Bulgaria (now called, Spring of Hope), and it was good to hear from him again. Here are pictures of the Big-Ben Crosley 340 MADE IN HOLLAND when it arrived from West Hartford.

 The nomenclature is crisp and clear. The left shank flank has stamped BIG-BEN [over] Crosley [in fancy cursive].
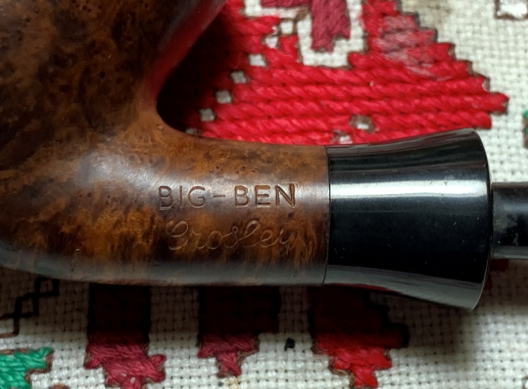 The right side has stamped the shape number: 340 [over] MADE IN HOLLAND.
 The black acrylic stem has a bold encircled ‘B’ in gold.
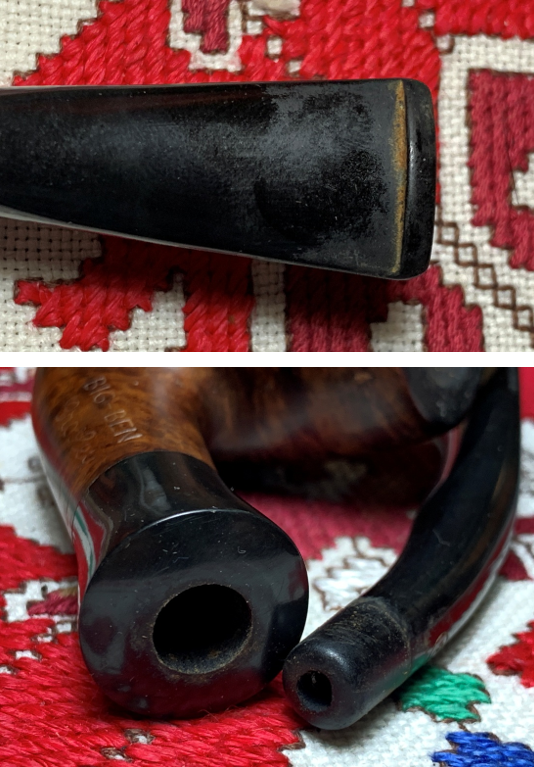
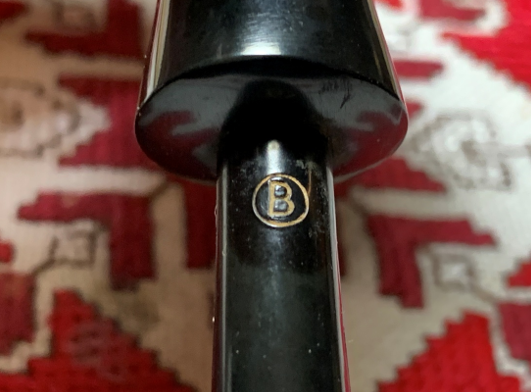 When Bill reached out to me, inquiring about the Big-Ben provided the impetus to take a closer look. Ugh… This is what I wrote after seeing the hole in the heel:
Well, I just finished looking at the Big Ben and the word is not good. When I get large lots of pipes, I do not take the time to examine each one closely as I’m processing the pipe in and taking pictures. Your inquiry allowed me to take a closer look, and I discovered that the airway in the stummel is blocked, and it appears that someone tried to unblock it by sticking a drill bit down the mortise into the airway. Unfortunately, the driller got a little too rambunctious and it appears that he drilled a hole through the heel. The driller did not consider that for a bent pipe; there are two drillings. The airway coming through the mortise is the first drilling. Then there’s a second drilling angled upward toward the floor of the chamber. This second drilling was possible only before the acrylic shank extension was mounted allowing a shorter shank for an upward angled drilling. It’s a shame that since Big Ben went out of business in 2012**, Big Bens are becoming fewer and fewer. I believe this BB can be restored, but it might not be worth the effort. I don’t know what is blocking the airway and I would need to figure this out first and get a pipe cleaner all the way through. With a pipe cleaner guarding the integrity of the airway, the hole in the heel can be filled I believe…. I suspect that I would need to remove the acrylic shank extension to get at the blockage problem – not sure, but that is my guess. A new shank extension would need to be shaped and mounted. I’ve attached a couple of pictures for you to see. I would love to give this a shot but if this is more than you want to bite off now, there are other pipes in the baskets. Let me know what you think.
(**this information was incorrect – Big Ben reorganized in 2012 and continues today)
The pictures I sent on to Bill were not pretty…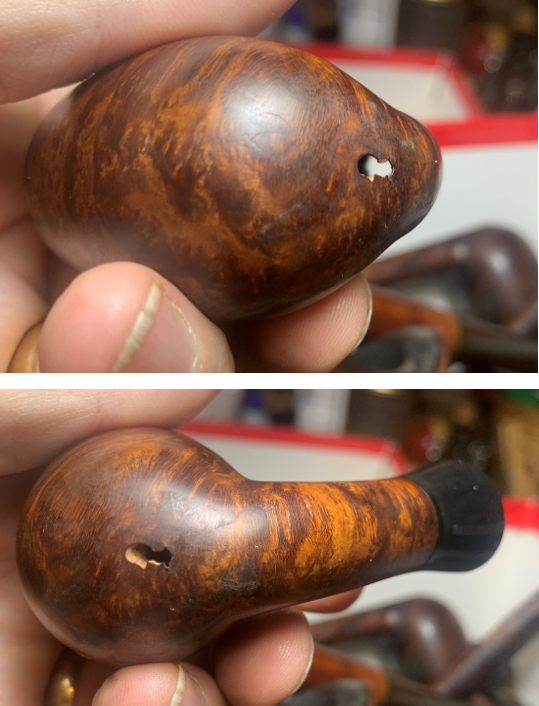 All I can say is that Bill is truly a ‘Pipe Dreamer’ because he was willing to give me a crack at giving this Big Ben a new lease on life. While we were communicating back and forth, Bill returned to the ‘For “Pipe Dreamers” ONLY!’ collection and decided to add another pipe to the queue – an AMPHORA X-tra 732 AMPHORA-Holland GENUINE BRIAR Blasted Pickaxe – a sweet looking pipe which will be fun to work on.
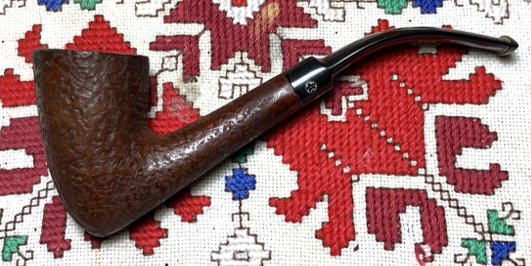 In our discussion around the Big Ben, Bill also asked whether fashioning a ‘plug’ might work on this wound, where a piece of briar could be fashioned and inserted into the area. My brain had been running on hyper drive, and I had thought about doing a ‘plug’ repair which I’ve seen Steve at Rebornpipes do before. My concern about this approach was that the hole was at the end of the airway system and not at the floor of the chamber where the damage usually is located which might warrant plug repair. My thinking at this point is that I am going to try to fill the damage with J-B Weld on the inside and a briar putty patch on the visible side with the hope of not expanding the exit hole any larger than it is. By doing this, the patch footprint will be minimal. The KEY to this approach is unblocking the airway and getting a pipe cleaner through the draft hole. The pipe cleaner will provide the internal block to help fashion the J-B Weld patch on the inside. This is the theoretical plan – we’ll see how it works out when all the facts come together 😊.
When one has a Big Ben Made in Holland on the worktable, it beckons one’s attention to the history of the Gubbels family business. Pipedia’s article is helpful to understand how Big Ben came to be (Gubbels – Pipedia):
 With the help of his family the father of Elbert Gubbels Sr. started a retail shop for tobacco pipes and other smoker’s equipment in 1870.
In 1924 Elbert Gubbels Sr., now father / grandfather of the present owners, transformed it into a wholesale trade business. The company grew steadily and imported pipes from various countries as there were no factories producing briar pipes in the Netherlands. The most important suppliers came from France and England.
When German troops occupied the Netherlands in May of 1940, a period of almost five years began in which the Gubbels family could hardly operate their business at all. During this years of forced rest Elbert Gubbels had a notion to become independent of foreign suppliers and he drew up plans to start his own production of tobacco pipes after World War II.
Immediately succeeding the war it was very difficult to obtain good pipes for the import of foreign pipes was limited and so the time was right to go for something new. In 1946 he launched pipe production at Godsweerdersingel No. 20 in Roermond with a couple of new machines and some workers, a couple of them being foreign specialists and considered himself to commence. Yet the cramped accomodations and the needy equipment of the workshop showed the limits all too soon. It was obvious that the workshop was inadequate and Mr. Gubbels invested in another building covering an area of 900m² that also offered a sufficient warehouse. Now the production could be increased going hand in hand with developing new models and improving the quality of the pipes being produced.
The production grew steadily but it showed now that an “international” brand name was required for further expansion on international markets – obviously no one cared too much for pipes made in the Netherlands. Feeling that the time involved to get a new brand established was too lengthy, Mr. Gubbels bought a small trade company in Amsterdam which owned all the rights to the brand Big Ben and was already well established in other countries selling pipes among other goods. A real happenstance – Gubbels products could be marketed now in all European countries, the USA, Canada and many other countries, and nowadays they can be found in almost every country world-wide.
In December 1972 the company opened new and very modern factory in Roermond at Keulsebaan 505. With the official opening by the Governor of the Province of Limburg, the Gubbels company was, on behalf of Her Majesty Queen Juliana of the Netherlands, granted the title “Royal” so that the official name became: Elbert Gubbels & Zonen – Koninklijke Fabriek van Tabakspijpen (Elbert Gubbels & Sons – Royal Dutch Pipe Factory).
In honour of this title, a new brand was designed and named Royal Dutch. This brand was also created, to negate the belief that Big Ben was of English origin.
At the end of the 1970’s, there were only two briar pipe factories in the Benelux countries: Gubbels in the Netherlands and Hillen in Bree, Belgium. When the latter encountered major financial difficulties in 1980, Gubbels bought the company together with its brand Hilson – a well established brand, which was selling better on the most important German market than Gubbels’ mainstay Big Ben. The factory in Bree was closed soon, so Gubbels is presently the only briar pipe producer in the Benelux countries. (Exept less than a handful of pipemakers!)
More recentely Gubbels got known as producer of the Porsche[1] and Bugatti design pipes. Elbert Gubbels & Zonen B.V. is one of the worldwide biggest pipe producers today. Annually 250,000 – 300,000 pipes are made by ca. 60 employees. More than 70% of the production is exported.
In march 2012 Elbert Gubbels & Sons filed for bankruptcy.
You might also enjoy listening to Brian Levine’s interview of Elbert Gubbles on the PipeMagazine Radio Show
The first time I worked on a Big Ben, I did a deep dive into the research beyond Pipedia’s article. The Pipedia article closes with Gubbels filing for bankruptcy. What I discovered was that the company was restructured. If one wants to take a look at the more extensive research, it’s at this link: A New Button After Amputation for a Big-Ben Commodore 413 A S Made in Holland. The Big-Ben website continues to offer pipes at Webwinkel – bigben.
 I could find nothing regarding the specific Crosley Big-Ben line on Pipedia or Pipephil, my usual first-stop sources. After doing a broader search on the internet, the Crosley name came up as a notable automobile producer in the US during the first half of the 1900s. The picture is from Wikipedia (Crosley – Wikipedia) and is it likely that Gubbels commemorated Crosley Motors by naming a pipe after it? It’s possible, and I like the picture!
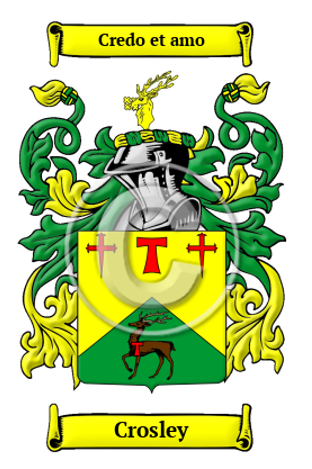 Another possible Crosley candidate could be the family crest of an old English name. This perhaps could be another marketing effort to connect the Made in Holland Big Ben with English ties. The copyrighted Crosley crest is attractive (from: Crosley Name Meaning, Family History, Family Crest & Coats of Arms). At this site, I liked what it said about the etymology of the Crosley name.
What does the name Crosley mean?
The ancestors of the name Crosley date back to the Anglo-Saxon tribes of Britain. The name is derived from when the Crosley family lived at a region known as the cross or for the dweller at the cross.
A good creed for us all to live by.
With a better appreciation of Gubbels and the Big Ben name, it’s time to take another look at the pipe on the worktable. I have been thinking a good bit about how to conquer the hole in the heel – maybe even dreamed about it! I will dive into the hole repair first and then follow with cleaning, etc. I will start by reaming the chamber so that a least this part will be cleaned. A starting pictures is taken to mark the progress. To ream the chamber, 2 of the 4 available blades are used from the Pipnet Reaming Kit.
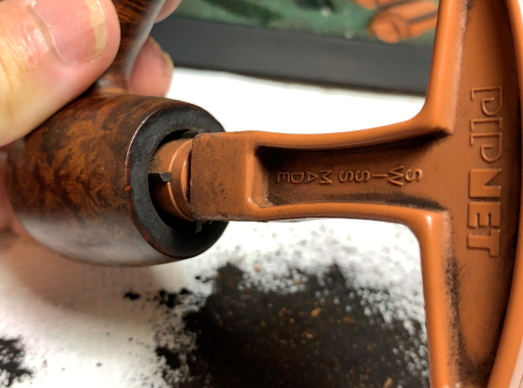 The reaming is followed by scraping the chamber with the Savinelli Fitsall Tool.
 To finish, the chamber is sanded with 220 grit paper removing the last vestiges of carbon from the wall.
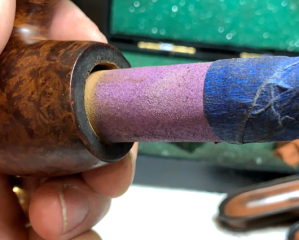 The full arsenal of tools is shown with the pile of carbon removed.
 An inspection of the chamber wall shows no heating issues.
 I mentioned earlier that my first goal in the repair of the hole is to get a pipe cleaner through the airway out the draft hole at the floor of the chamber. This VERY rough sketch gives an idea of what the issue is. A bent stummel like this requires two drillings. Drill #1 forms the mortise down into the shank. Drill #2 builds onto drill #1 by angling above the first drilling at a trajectory that has it emerge at the floor of the chamber creating the airway to the draft hole. For some reason, the airway is blocked – represented by the X in the picture. Without success I have attempted to penetrate the blockage through the mortise by bending pipe cleaners at the tip to angle up into the second drilling airway. Using a dental probe in the chamber, I have also tried to backdoor the metal probe back up the draft hole to see if anything would give. What I detect is a blockage of some sort in the draft hole and it will not give…
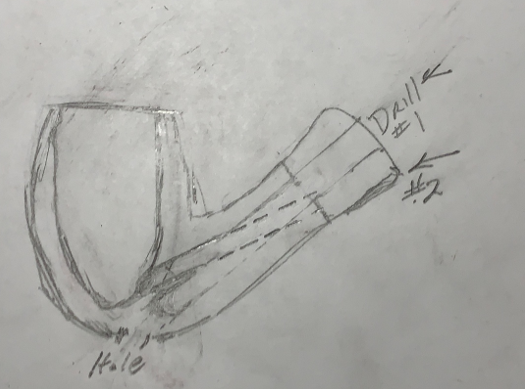 My guess is that the former steward was trying to clear the blockage and when pipe cleaners would not work, he tried to drill out the blockage without realizing he was missing the #2 drilling hole. Instead, he drilled through the heel of the stummel through the mortise (drilling #1). Another look at the (horrific!!) photo below shows a perfectly rounded section where a drill bit probably punched through. The smaller area above the marks is collateral damage where thin briar chipped off.
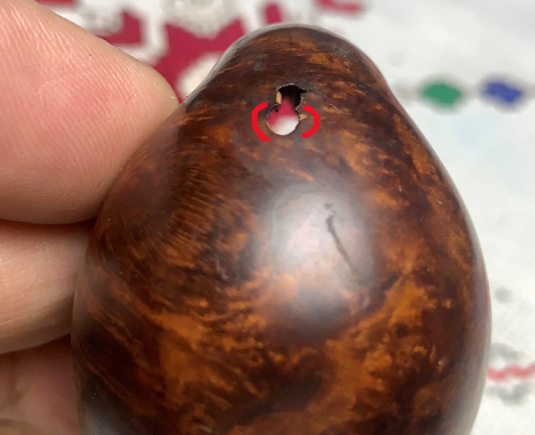 Like the former steward, I’m unable to clear the blockage. Yet, to improve my odds in drilling out the blockage, it will be necessary to remove the black acrylic shank extension and refashion an extension after the hole (hopefully) has been repaired. In anticipation of this, I ordered and received a black acrylic saddle stem from Tim West at J. H. Lowe & Co. | Tobacco Smoking Pipe Maker. Tim is always helpful in acquiring the right materials for the job. The dimensions of the current extension are measured to help in matching the dimensions of the extension to be fashioned.
 My hope is that once the old extension is removed, the shortened shank will provide the needed angle to redrill #2 to clear the blockage. Using the rotary tool with the sanding drum mounted, carefully and patiently the extension is removed.
 The acrylic dust is nasty. I end up using a face mask to give my breathing a little break and the paper towels are moistened to catch the dust below the sanding.
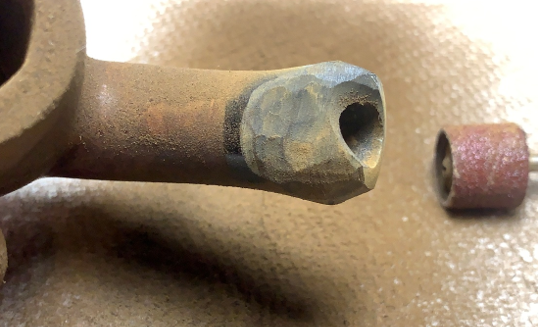 The following pictures show the progress of sanding down the acrylic extension.
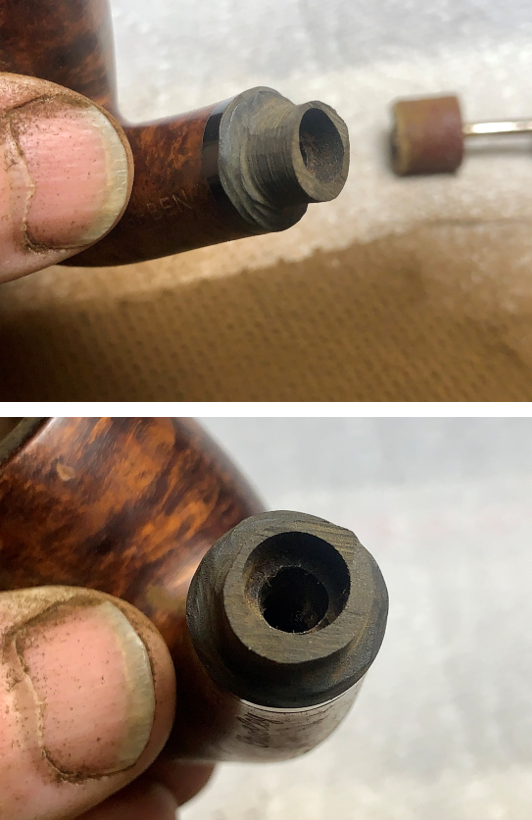 I’ve sanded down enough to start being careful around the nub.
 The sanding drum continues very slowly to remove the acrylic that is flush with the briar shank facing. Sanding into the briar and damaging the level plain is not wanted.
 With more careful progress, two things happen. The acrylic adhering to the shank facing is becoming brittle enough and starts to chip off. The other thing that happens is that part of the nub has broken off. On other projects, the nub has been a protrusion of briar. This does not appear to be briar but acrylic which could mean that there is no briar nub, but the acrylic extension was seated in the shank mortise drilling. That makes things a bit more complicated.
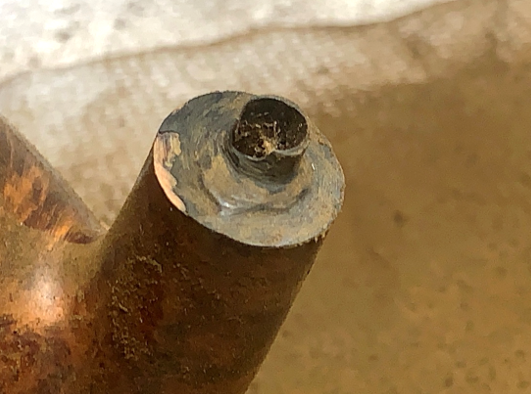 More careful sanding with the sanding drum confirms my suspicion that the acrylic extension is seated in the mortise.
 At this juncture, a drill bit is used that is a standard 3mm airway diameter to see if the #2 airway drilling can be detected. The probing does detect some indentation bumps where I think the opening should be, but rotating the bit fails to gain traction.
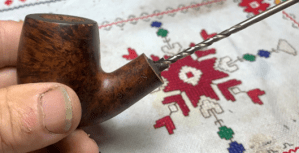 Next, the decision is made to remove the acrylic which I mistook as the nub. With it gone, the acrylic seated in the mortise is clearly visible.
 To remove this remaining acrylic, several drill bits are used starting first with the bit next larger than the bit that fits the hole. The bit is mounted on the hand drill and then hand turned. After getting the bit started, a small amount of power is applied to the hand drill to remove a layer of the acrylic. I’m careful to only penetrate the mortise about an inch. I don’t want to go too far potentially removing briar – or worse, creating a new hole in the heel!
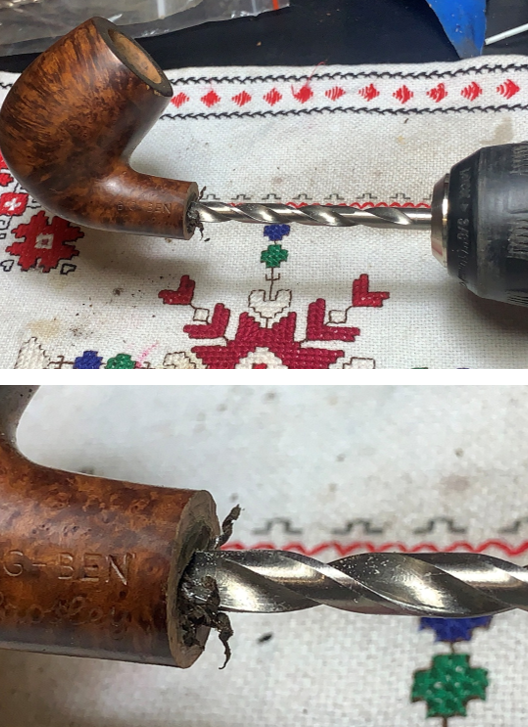 With each next larger bit widening the bite, the acrylic was finally removed from the mortise.
 Now, with the full angle available, again the 3mm bit probes and finds what I believe is the opening to the airway drilling.
 After mounting the bit on a hand grip, the bit is gently rotated. What came out appearing to be the culprit looked like debris from the cotton and shaft of a broken cotton bud used to clean. Be warned!!
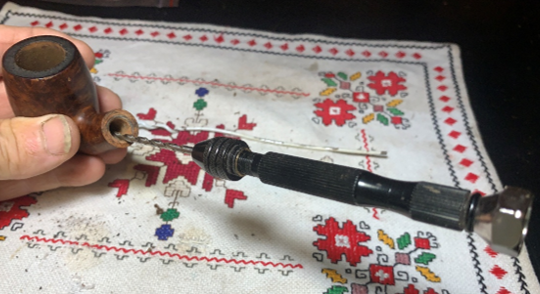 Finally, the bit broke through. You can see some of the bud debris at the draft hole. The bit was followed by passing a pipe cleaner easily though the airway to the draft hole – Yes! There’s light at the end of the tunnel for this Big-Ben Crosley.
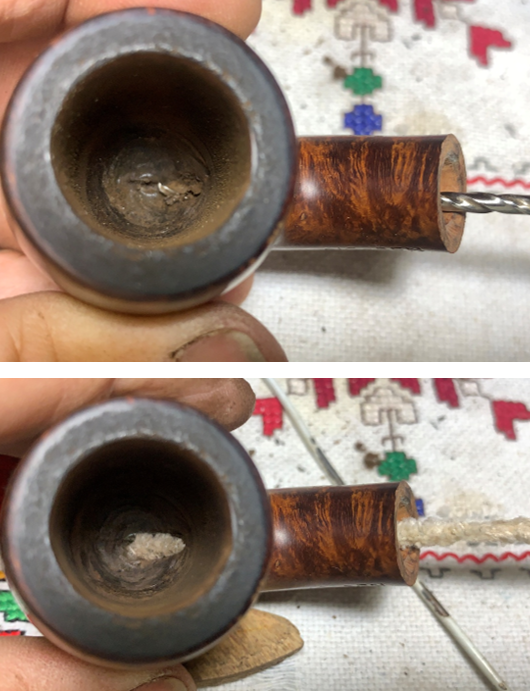 With the airway cleared, the next step is to clean the internals using cotton buds and pipe cleaners moistened with isopropyl 99%. The small dental spoon is also used to scrape the walls. After some scrubbing, the buds started to emerge lighter. Moving on.
 The following pictures show in close detail the hole from different angles. My concern is that the briar is thin around the injury. While the hole will not be exposed to the direct heat in the chamber, it will be closer to the fire in the chamber situated at the end of the #1 mortise drilling (or the well or reservoir). For this reason, simply filling the hole with briar putty – a mixture of CA glue and briar dust, is not a good idea. A better approach is to apply a layer of J-B Weld covering the inner area of the hole and then patch the external presentation of the hole with briar putty. J-B Weld is a heat-resistant inert epoxy which will also reinforce the briar. The challenge is how to deliver the J-B Weld to where it needs to be? It could possibly be troweled on the small dental spoon through the mortise, but the risk is getting the Weld smeared down the mortise. The other option is to press it up through the hole and spreading it with a stiff wire. The challenge with this approach is making sure that the Weld is cleared from the exterior section of the hole before it sets. Leaving room for the briar putty patch on the surface is needed.
 The decision made is to deliver the JB-Weld through the hole. Tape is placed on the plastic mixing surface to help with clean up. Equal parts of Steel (left) and Hardener (right) are placed on the mixing surface.
 A toothpick is used to mix the parts. After mixed, the mixture starts to set up in about 4 minutes. When thoroughly mixed, a small screwdriver shaft is used to trowel a small amount of Weld through the hole and then is scraped off inside using the edges of the hole. This is done several times, pressing the J-B Weld up through the hole. I can’t see what going on inside, but the Weld should be spreading and settling over the hole area. A stiff wire is also used to press the Weld up along with toothpicks. Excess Weld is wiped off the surface while it is still malleable.
 I think it looks good. The injury appears to fully filled on the internal side.
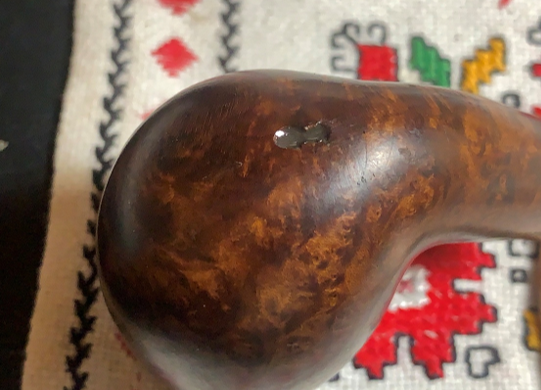 The stummel is set upright to allow the J-B Weld to settle over the hole and to cure through the night. After 4 minutes, the Weld has set enough so that it won’t drop through the hole. It is late and it’s time to turn off the lights.
 The next morning the J-B Weld was fully cured. The surface of the Weld material is smooth. To help the next layer of patching with briar putty to a have better grip, a small burr is used to rough up the patch surface. To give the patch hole a bit more definition the burr is also used to deepen the hole.
 Along with deepening the surface of the patch, the outer edge of the hole is touched very lightly with the burr. I did this to make sure no J-B Weld would remain on the surface and be visible after the briar putty patch is applied. The hole now has a more distinct edge to help define the patch.
 One more burr is used to rough up the surface of the patch to help with the adhesion of the briar putty.
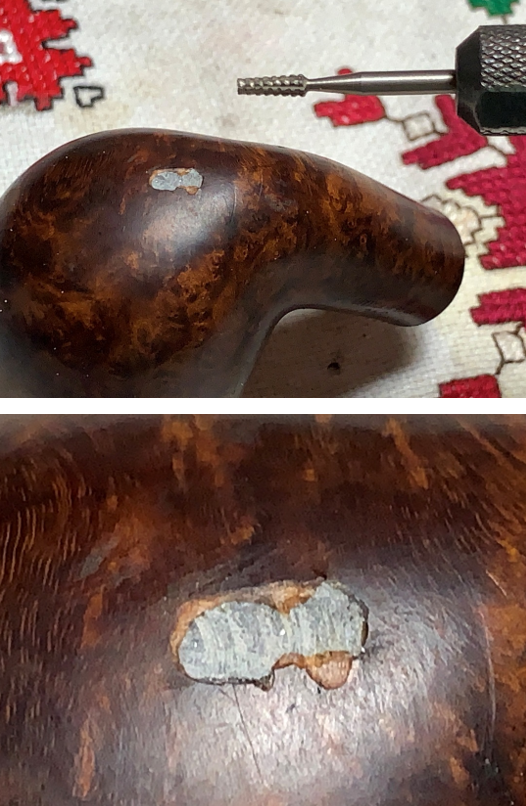 Briar putty is made by mixing briar dust with regular CA glue
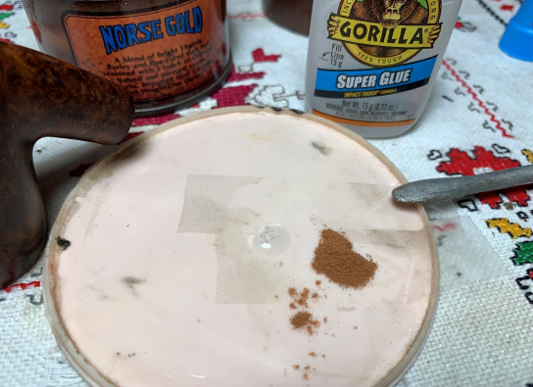 A toothpick is used to pull the briar dust into the CA while mixing. When the mixture thickens to about the consistency of molasses, the toothpick is used to trowel the putty to fill the hole.
 The patch is sprinkled with briar dust and then set aside to allow the patch to fully cure.
 The patch has fully cured. Before filing off the excess patch material, I have detected another old fill on the stummel surface that needs to be addressed. Before working on this patch, I’m backing up a bit to do the external stummel cleaning which I bypassed earlier. A few pictures show the issues with the stummel. The rim has lava flow which needs to be cleaned along with normal grime on the briar surface.
 On the back of the bowl, the rim has some chips on the outer edge. The old fill needing attention can be seen as well.
 Another fill is on the lower right side of the stummel is detected and it looks solid. After cleaning, this fill will be assessed.
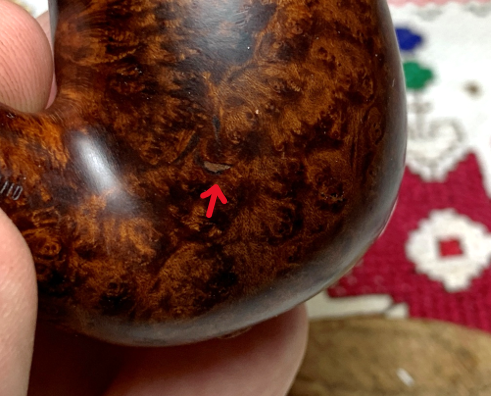 To clean the external briar surface, undiluted Murphy Oil Soap is used to scrub the surface with a cotton pad.
 The Savinelli Fitsall Tool helps to scrape off the thick crusted lava flow from the rim.
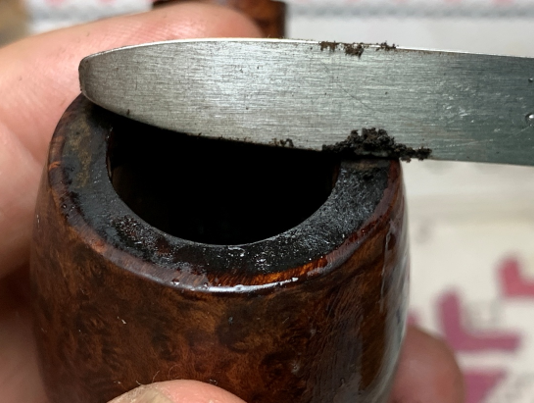 A brass brush also is used to clean the rim by providing more muscle, but the soft brass bristles do not damage the briar. After the scrubbing, the stummel is given a thorough rinsing at the sink.
 With the stummel cleaned, a dental probe removes the old fill material from each pit. I decided to address the second fill as well.
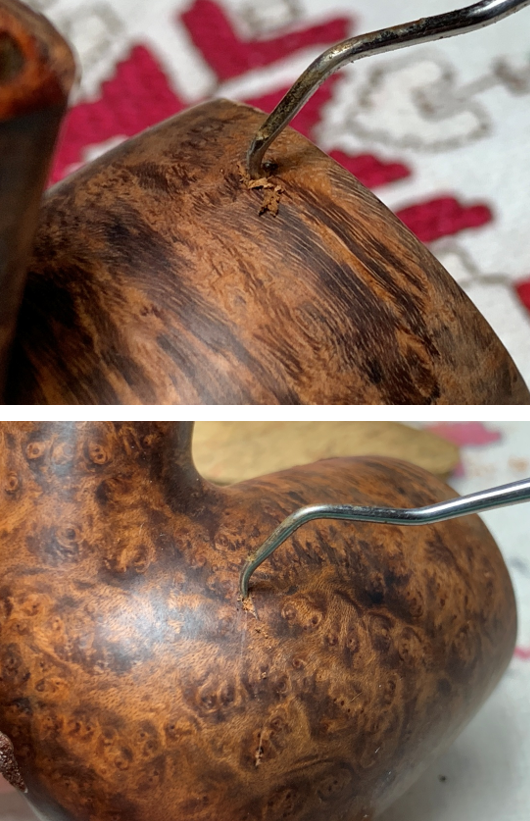 Next, a small drop of CA is placed on each pit and then sprinkled with briar dust to help blend the patches.
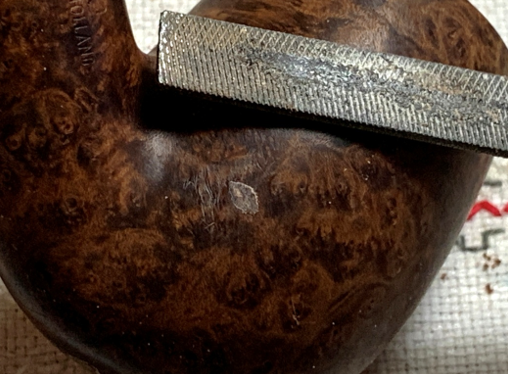
 After all the patches have thoroughly cured, the needle files are used to file down the patch mounds flush with the briar surface – the hole patch and the two smaller fills.
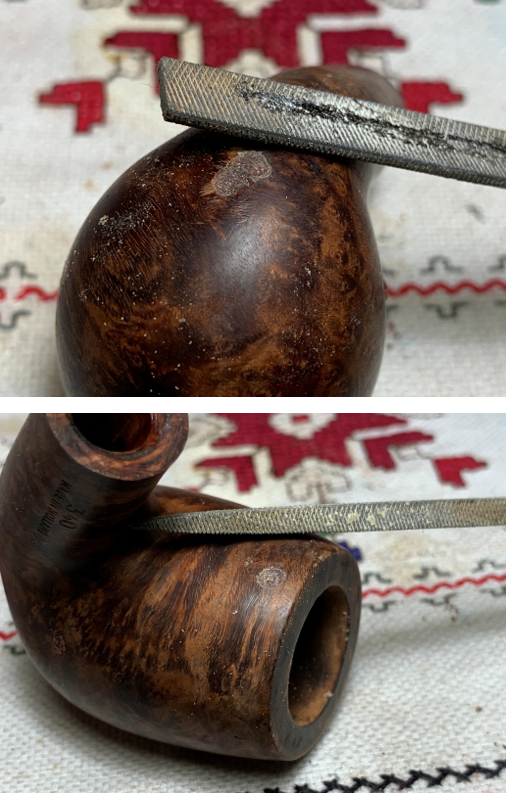
 Next, 220 grit paper is used on each patch.
 Finally, both 320 and 600 grit papers are used.
 All three grit papers are also used on the divots on the outside edge of the rim. All the patch sanding has created light spots in the dark briar patina. The sanding/polishing process should darken and help blend these areas.
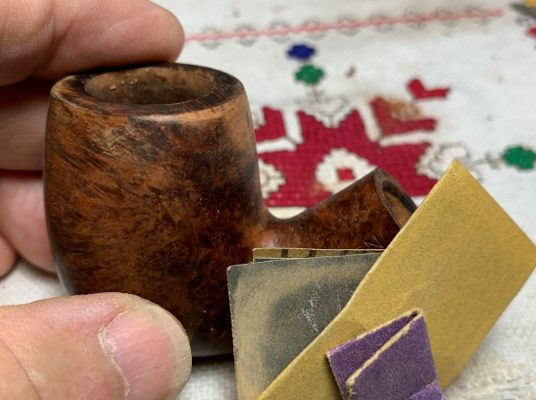 To clean up the small scratches and blemishes, the stummel is sanded with sanding sponges. The coarse sponge is not used, but the medium, light and fine are.
 The airway was unblocked, the hole was patched and now it’s time to fashion a new acrylic shank extension. A black acrylic saddle stem was ordered from Tim West at J. H. Lowe & Co. | Tobacco Smoking Pipe Maker.
 The long saddle of the stem will be repurposed as a shank extension. Before cutting off the bit side of the stem which serves as a good handle for the time, about ½ inch will be downsized to be inserted into the shank. The rotary tool mounted with a sanding drum is used to do the job. Tape is placed on the saddle at ½ inch to serve as a marker.
 The process is slow and acrylic dust in the air is nasty – a facemask was used. The approach to shape the insert is with stem on the table, the stem is slowly rolled on the protruding saddle. During this rolling motion, the sanding drum rotates over the emerging insert. The rolling and rotating motion forms a very surprisingly rounded insert.
 As progress creeps, the size of the insert is reduced growing closer to the mortise dimensions.
 The insert has been shaped so that a partial fit in the mortise is achieved.
 Next, the more aggressive sanding drum is put aside and a coarse 120 paper is used to continue the sanding. I don’t risk taking too much off using the sanding drum, and the 120 takes the acylic off quickly but not too quickly.
 Sanding and fitting continue until the facing of the extension meets the shank facing.
 I mentioned before that the nub in my previous projects fashioning a shank extension protruded from the shank. With this project requiring an insert, the biggest challenge is not downsizing the extension insert but creating a flat facing that will bond with the shank facing. Using the sanding drum to form the extension facing is pretty rough. The arrow shows a small gap which needs to be closed. The entire plain of the extension facing needs to be flattened and smoothed.
 The goal is to sand the extension facing so that it is perpendicular with the extension and flush with the shank facing – no easy task with hand tools!
 The approach to accomplishing this is to use a hole in the board to place the extension insert while rotating the stem with coarse 120 grit paper pinched between the flat board and the extension facing. That is the plan.
 The catch is this: the extension facing must stay flat on the board so that slopes are not created in the facing. If this happens….not good. This would result in larger gaps visible between the shank facing and extension facing. The second picture below shows the uneven surface of the facing at this point.
 The progress is slow. During the process, a number of new sanding areas are used on the 120 grit paper. The number of acrylic circles shows this. The surface of the extension facing is smoothing and looking better.
 Finally, the extension facing is about as flat and flush as I’m able to make it. I can see no gaps between the two facings.
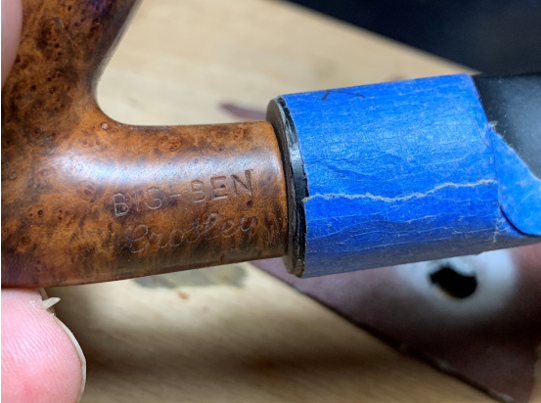 The next step is to cut the excess length of the saddle stem to leave what will be fashioned into the new extension. The visible length of the original extension was 13/16 inches. When the remainder of the saddle was measured, there’s just enough to provide the length for the new extension.
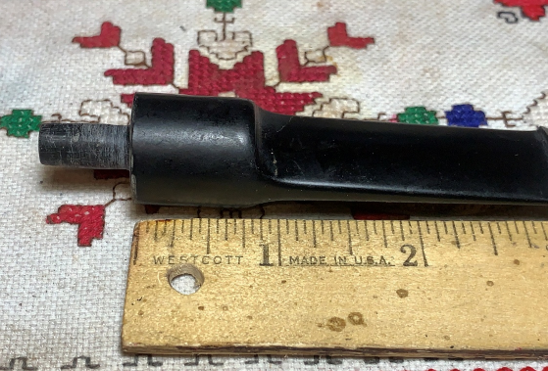 After the stem is placed in the table vise, a small hand saw is used to cut the stem leaving the saddle.
 After fiddling with the roughed-out extension, the best orientation in the mortise is determined for the best seating. A piece of tape was placed on the top to remember this orientation. While doing this fine-tune fitting, on a hunch, I wanted to see if I could find the #2 airway drilling through the extension with a pipe cleaner. Even though I curved the pipe cleaner to angle upward, I was unable to push the pipe cleaner through the draft hole into the chamber. Ugh! This is not good for future efforts cleaning the pipe.
 After giving it some thought and getting a sense of how far the shank extension inserted into the mortise, it came to me that possibly shortening the extension insert a bit would provide a better pipe cleaner trajectory and improve the odds of finding the airway with a pipe cleaner. A saw blade was mounted on the rotary tool and the extension was shortened.
 With the pipe cleaner bowed and inserted so that the cleaner would move upward beyond the extension, amazingly the cleaner went through the draft hole on the first try. I hope this wasn’t a fluke or good marksmenship!
 Next, it’s time to glue the extension to the shank. Regular CA glue was spread sparingly around the insert and extension facing. Too much CA would run the risk of it being squeezed out over the briar. With the tape on the top side marking the best seating orientation, the extension was pressed on in good fashion.
 Next begins the process of fashioning the rough saddle into a tapered extension – emulating the original. The first step is to shape the extension with the sanding drum mounted on the rotary tool. After putting protective tape around the shank, the work begins.
 The general approach is to start at the base of the extension and move the sanding drum toward the end while leaving the end unsanded. This is done to create the taper which will be flush with the shank surface then expands out as it reaches out to the end of the extension where the stem is mounted.
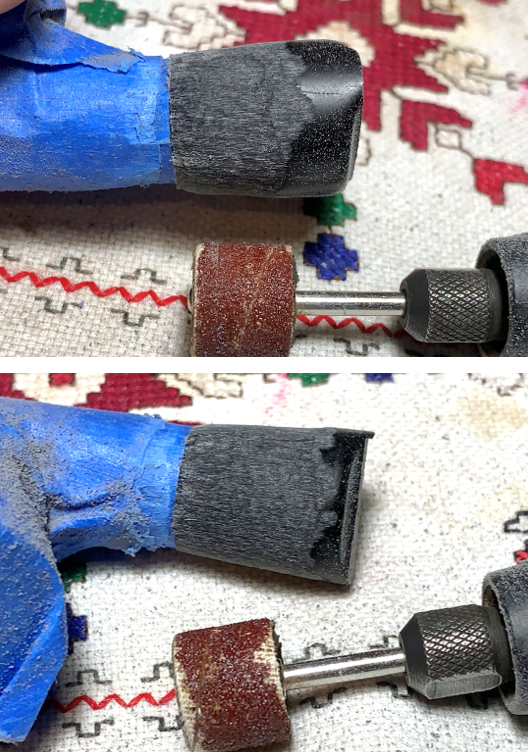 The sanding drum continues after the taper is fashioned to then shape the end. Somewhere along the line tape was added to protect the bowl as well from possible errant sanding.
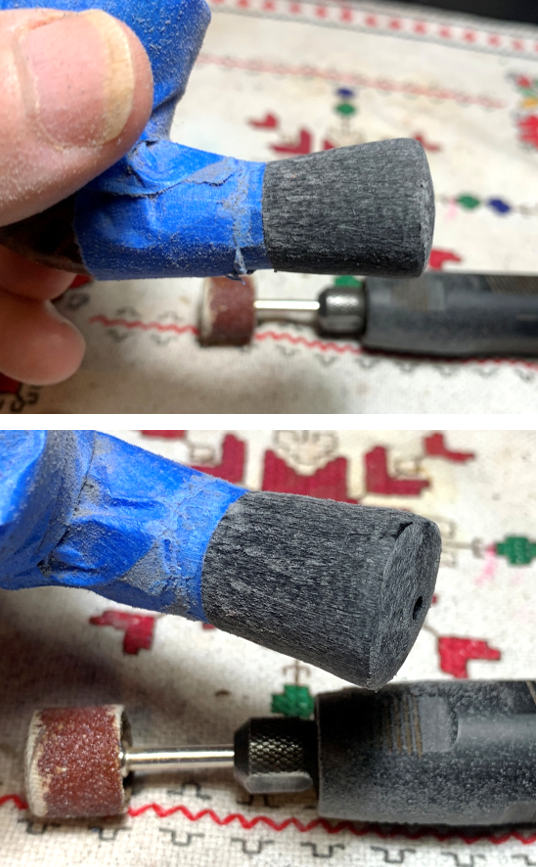 After the sanding drum does the primary shaping, fine tuning continues with 220 grit paper. The goal with the sanding is to smooth out the roughness from the sanding drum and to sand the acrylic extension lip so that it is flush with the shank.
 After removing the tape to get a better look, the picture below shows a lip which needs to be sanded further. Not shown is the repeating process of removing the old tape and placing a new strip of tape around the shank. One layer of tape is the goal to make the depth as shallow as possible so that the result is a smooth transition from the shank surface to the extension surface.
 After a lot more sanding with 220 grit paper working on reducing the lip around the circumference of the extension, I’m satisfied with the progress with tape removed.
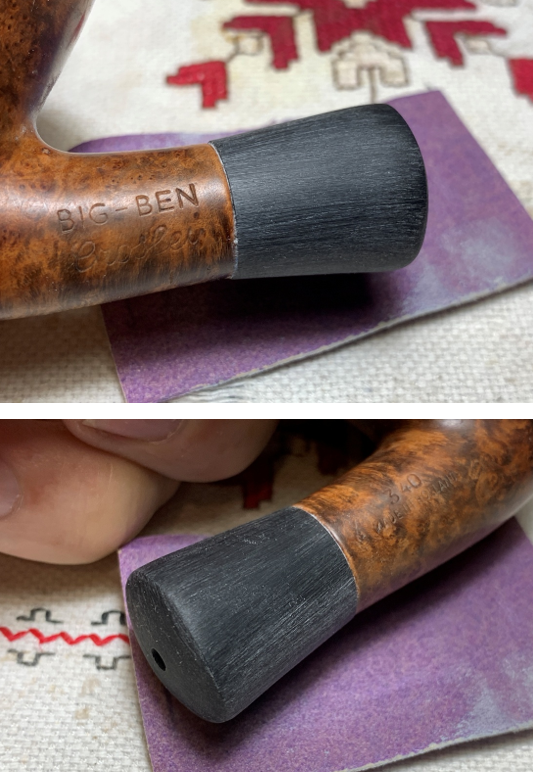 Next, the smoothing of the black acrylic continues with 320 paper with tape again protecting the briar.
 Finally, 600 grit paper is used and followed by applying 0000 steel wool. The acrylic gloss is starting to come out.
 Before proceeding with micromesh pads, which would be next, it’s necessary to enlarge the extension airway to accommodate the acrylic stem.
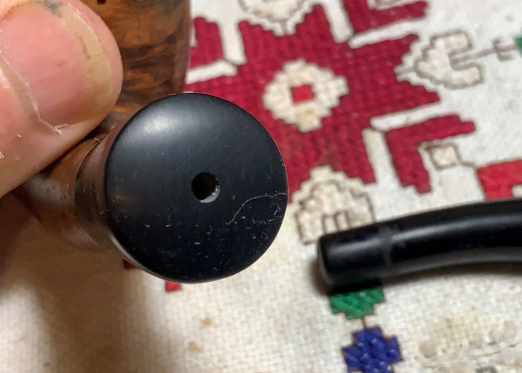 To enlarge the hole, a slow and tedious process is used. The acrylic material can break and chip, so care is taken to go slowly. The process is taking the next larger sized drill bit than the size of the hole and hand turning it to remove a small amount of acrylic thus enlarging the hole microscopically with each bit.
 The first and smallest drill bit goes to work. The acrylic is sliced by the bit and the acrylic ribbons are worked out the drill troughs. In the second picture this is seen more clearly along with a piece of tape on the bit that helps with the depth of hand drilling.
 It took a good deal of time to work through all the bits to reach the size needed to seat the stem. It was especially nerve-racking turning with the larger bits and hoping the acrylic hangs in there. It was a relief when the stem was seated.
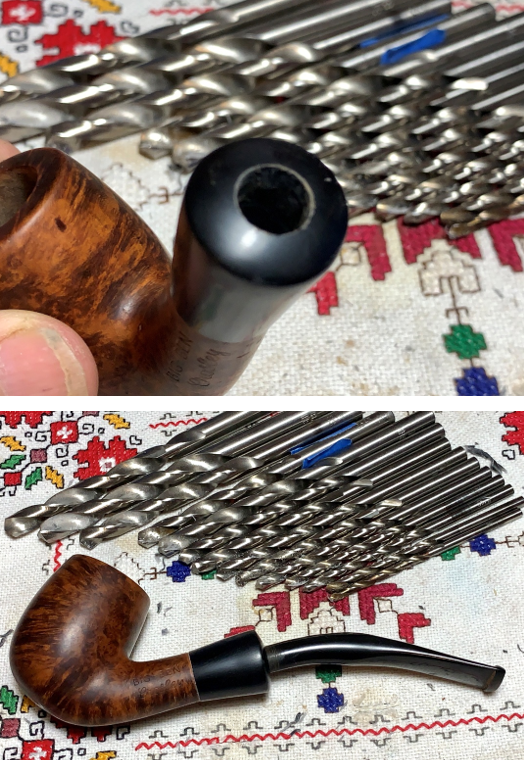 With all the repairs needed, the stem has been on the sideline. Usually, cleaning the stem is one of the first parts of the process. The acrylic is in good condition with very minor tooth chatter.
 First, the airway is cleaned with one pipe cleaner.
 To clean up the acrylic, 320 grit paper sands the entire stem while guarding the circled B stem logo.
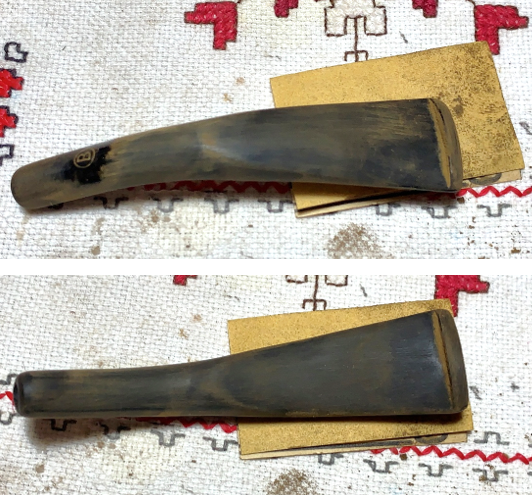 The 320 grit paper is followed by wet sanding with 600 grit paper and then 0000 grade steel wool is applied.
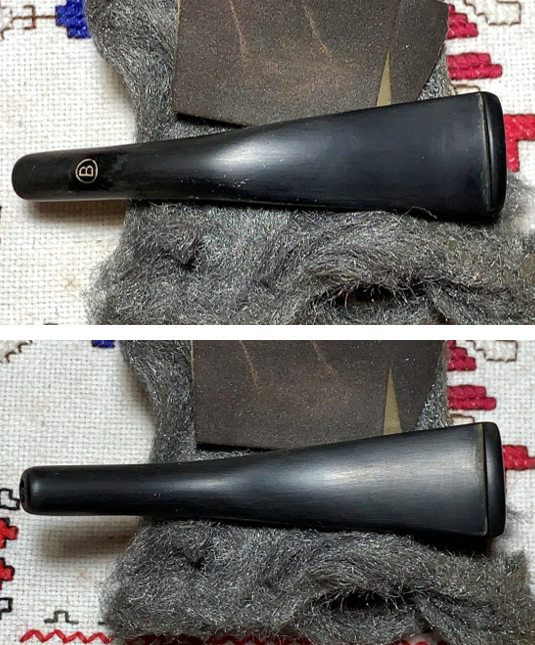 We have arrived at the micromesh process for briar and acrylic. After each pad, Obsidian Oil is applied to help condition the stem and then wiped with a paper towel to not gum up the pad. Starting with the stem, pads 1500, 1800 and 2400 are used.
 Next, pads 3200, 3600 and 4000.
 Finally, pads 4000, 6000 and 12000.
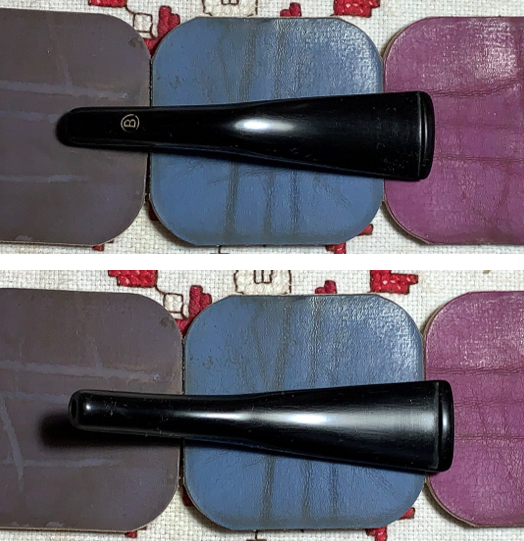 Next, the stummel and newly fashioned acrylic extension receive the micromesh treatment. After each pad, the stummel is wiped with a damp cloth to remove dust and to give the next pad traction. The acrylic extension also is wiped with Obsidian oil after each pad and then wiped off with a paper towel. First, pads 1500, 1800 and 2400.
 Next, pads 3200, 3600 and 4000.
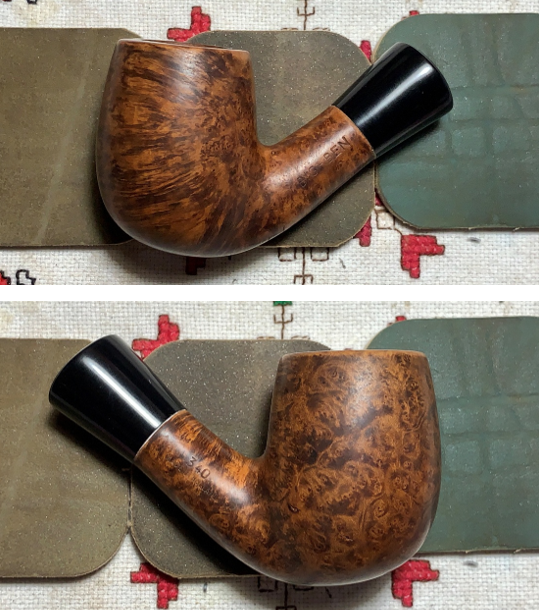 Finally, pads 6000, 8000 and 12000 are used. I love watching the acrylic pop emerge.
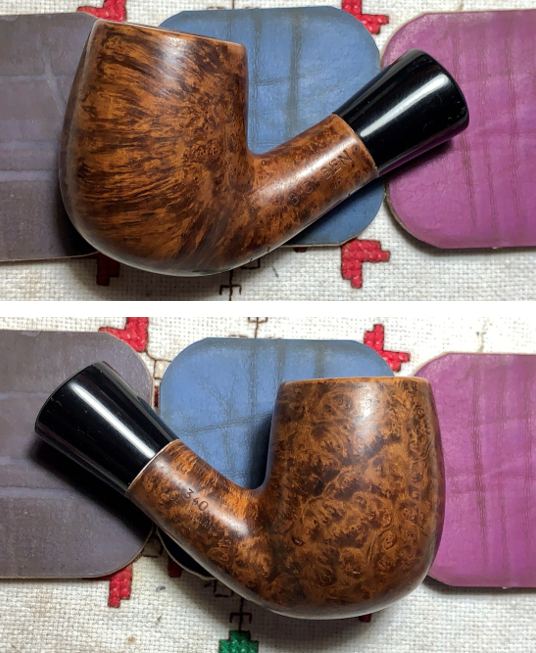 I enjoy applying Mark Hoover’s ‘Before & After’ Restoration Balm to the briar and acrylic. For the briar, it does a great job bringing out and deepening the natural hues. After placing some Balm on the fingers, it is worked into the briar and acrylic thoroughly and then set aside for about 10 minutes to allow the Balm to be absorbed.
 After the time has passed, a dedicated microfiber cloth is used to wipe away the excess Balm and to buff up the shine. I like what I see. The grain is eye catching.
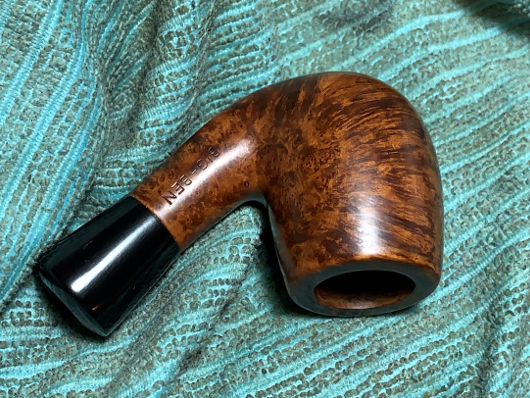 The Big-Ben stem logo needs some refreshing. European Gold Rub’n Buff is used to do the job.
 A small amount of the Gold is rubbed over the logo.
 It is then wiped with a cotton pad to remove the excess paint. It looks good.
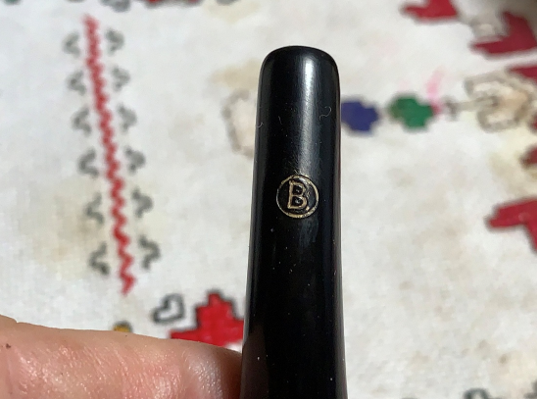 Finally, with stem and stummel reunited, a dedicated cotton cloth buffing wheel is mounted on the rotary tool and Blue Diamond compound is applied.
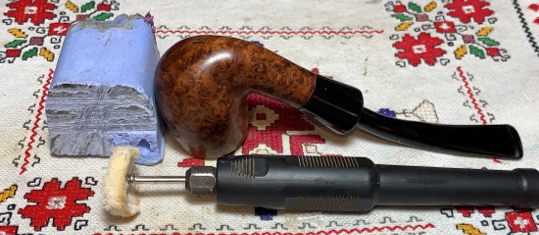 Compound leaves a lot of dust. A felt cloth is used to wipe the dust to prepare the surface for the wax.
 Another dedicated cotton cloth buffing wheel is mounted on the rotary tool and carnauba wax is applied to the pipe. Afterwards, the pipe is given a rigorous hand buffing with a microfiber cloth to remove excess wax and to raise the shine.
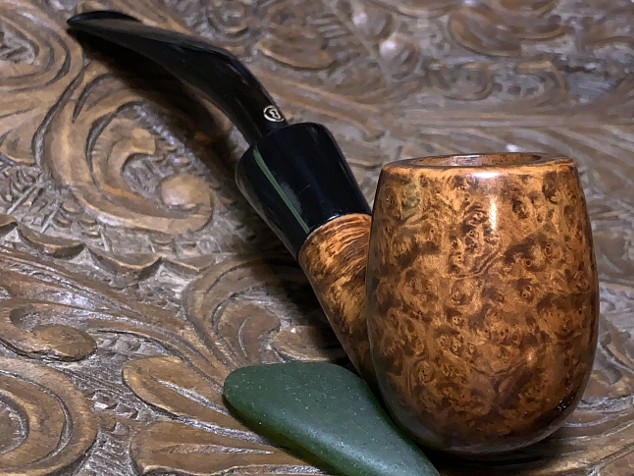
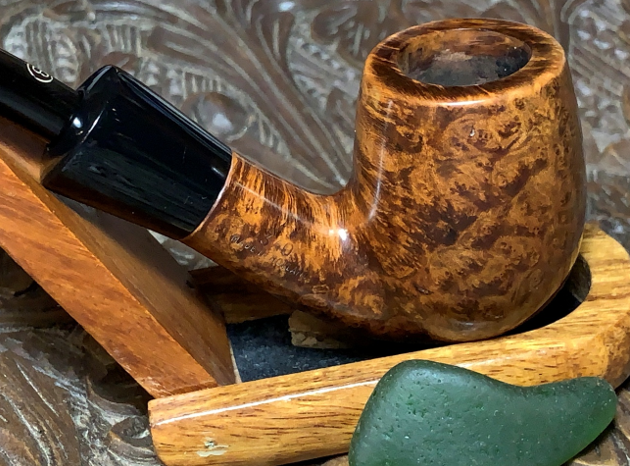
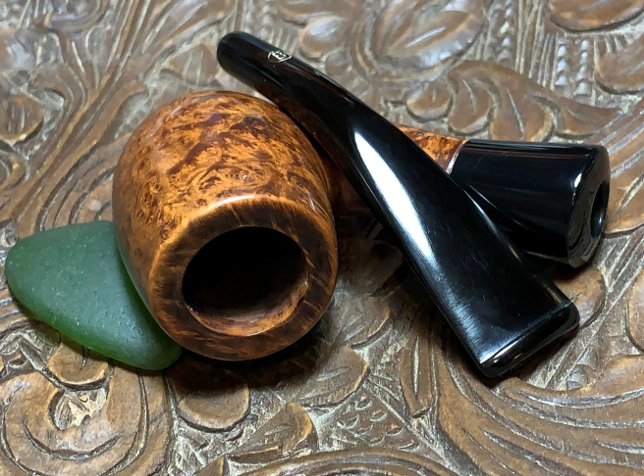
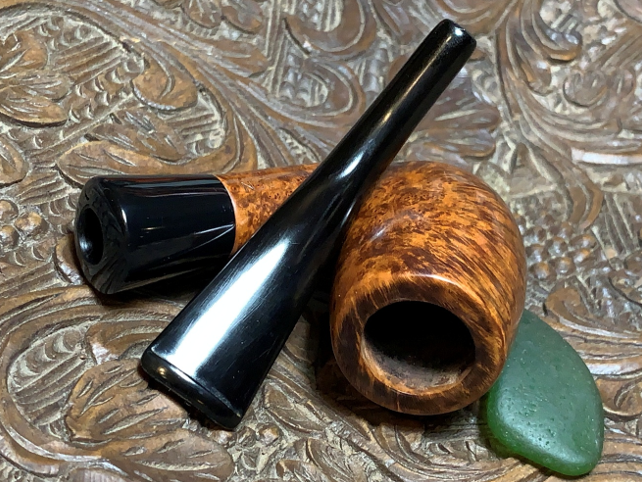
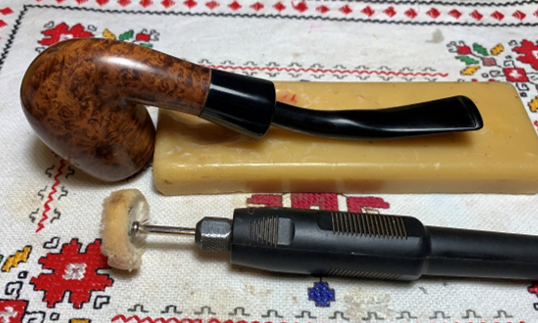 My, oh my! This Big-Ben Crosley lives to serve again. The trifecta of repairs took a good bit of time but well worth the effort. With all the attention on the repairs, little attention has been given to the beautiful dark briar grain patterns. The lines created by the half bend of the shank, extension and stem are classy. The dimensions are Length: 5 9/16 inches, Rim width: 1 1/8 inches, Chamber width 3/4 inches, Chamber depth: 1 1/2 inches. Bill, with great faith as a pipe dreamer, commissioned this Big Ben and will have the first opportunity to claim him from the Pipe Steward Store. A portion of the proceeds of all pipes restored go to help the Daughters of Bulgaria, now called Spring of Hope, a work my wife and I co-founded when we lived in Bulgaria working with trafficked and sexually exploited women and girls. Thanks for joining me!
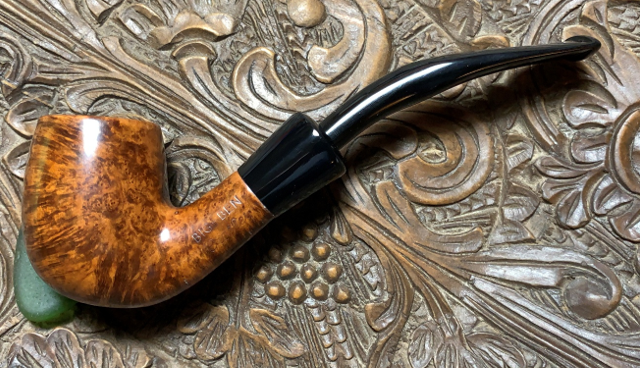


This was a very interesting (and messy!) error to clean up. You did a wonderful job, Dal!
LikeLike
Thanks Doug! It was a challenging project to be sure. I’m glad that it came out ready to go again 🙂
LikeLiked by 1 person
Beautiful write up and beautiful work! I can’t wait to see it “in person”!
LikeLike
Thanks Bill! I’ll get on the Amphora soon.
LikeLike
Pingback: Refreshing an AMPHORA X-tra 732 Made in Holland Blasted Pickaxe – The Pipe Steward