
The next four pipes on the worktable were commissioned by pipeman Justin from the great state of Alabama. Justin should receive a reward for being the most stalwart Pipe Dreamer that I know! His fame comes from his pipe dreaming when he commissioned what I called a ‘Bless his heart’ pipe. I would say, Justin had a whole lot of faith – more than I (Quite the Find in Burgas, Bulgaria: Resurrecting A Lorenzo Spitfire Goliath Oom Paul)! I found Justin’s miracle Oom Paul in Bulgaria at my favorite antique shop in the coastal city of Burgas. After Justin had received the pipes he had commissioned, he reached out to me asking whether there were any other pipes left to commission from the 7 pipes I had acquired which included his Oom Paul? My reply was that there were 4 pipes left from that pipe picking expedition in August 2021. Justin commissioned these 4 pipes. He wrote:
I’ve got three guys in my homegroup (including Drew) who have been amazing friends and I thought it would be meaningful to be able to have pipes all from the same trip/with the same story.
Three of the pipes were commissioned for his friends, which included Drew who, with his wife and kids, had lived and worked on our team in Bulgaria and were profoundly missed when they returned to the US. It was this relationship that connected Justin with The Pipe Steward at the start. Justin originally commissioned 3 of the 4 but later commissioned #4 saying that his dad needed a new pipe too! I appreciate Justin’s heart and his desire to corral all the Burgas, Bulgaria pipes under one roof for great fellowship and bowl sharing. But for the sake of the 4, I must again tell the story of that day in Bulgaria.
In August 2021, I found the pipes during a pipe picking visit to an antique shop in Burgas, Bulgaria. My wife and I revisited our former home in Sofia, and returning to the Black Sea coast where we had spent numerous summer holidays over the years. One of my favorite day trips from Sozopol, where we stayed, was to go to the main walking street in the nearby city of Burgas where my favorite antique shop was located. I had visited this shop several times over the years and almost always secured pipes for the For “Pipe Dreamers” ONLY! collection. Looking at the front window of this small one-room shop was like a siren call to me! Inside, the clutter of treasures was everywhere. This visit was also fruitful. I found a pipe-ladened coffee can and a few pipes scattered here and there. Of the specimens I found, seven were pulled out for closer inspection. The lady manning the shop that day was not the owner. I had met him on previous visits. When it came to negotiation, the lady called the owner to discuss my offer. After a few back-and-forth conversations, the deal was sealed. Justin’s Oom Paul was the obvious monster in the picture below!
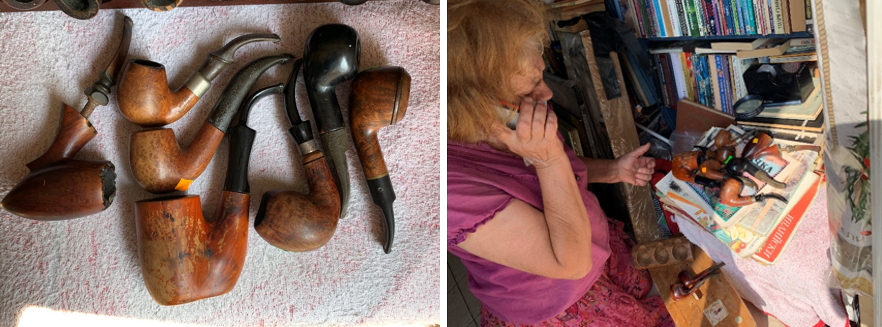 The lady wrapped the pipes in newspapers and gave me the bag with warm parting words – I had made her day. When my wife and I returned to the US, I took this picture of the lot of 7 Burgas pipes. The 4 commissions heading for special people are marked with the check.
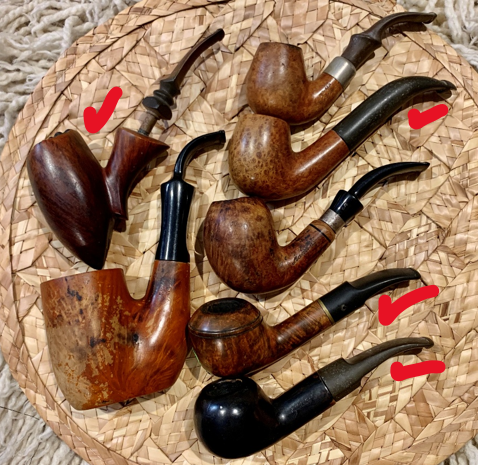 The first on the worktable is a beautiful Danish made Freehand – a Prince Amled Danmark Freehand Picaxe. Here are pictures of the Prince.
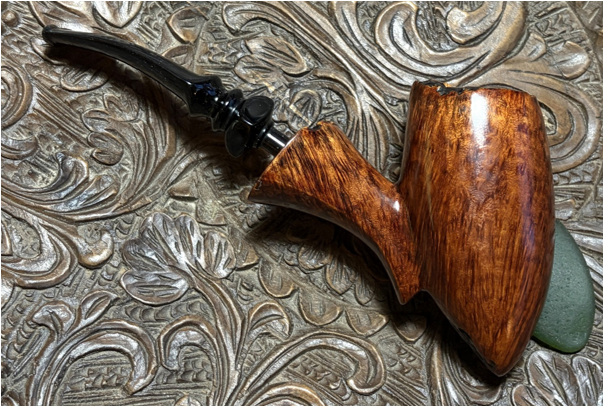

 The nomenclature is stamped on the top of the shank – a fancy cursive: Prince Amled [over] DANMARK – the COM.
 This is the first Prince Amled I have worked on and the first stop to gather some information did provide much. Pipedia’s Prince Amled section provides some pictures of Prince Amled pipes but no information about its maker. The next stop was Pipephil’s information panel (Pr-Pz — Pipes: Logos & Markings) which I’ve clipped below.
 Pipephil provided an example of a classic shape with the crown logo, but nothing more. I broadened my search by checking out Rebornpipes (www.Rebornpipes.com) and I discovered that Steve had worked on several Prince Amled pipes and for each post included the same information as I had from Pipedia and Pipephil. The only thing conclusive about the nomenclature is that Prince Amled is Danish made and the manufacturer is unknown. Next, I did a general search and Prince Amled came up in a January 27, 2024 thread in Pipesmagazine.com (Prince Amled Pipes :: Pipe Talk :: Pipe Smokers Forums of PipesMagazine.com) that asked, ‘Who made Prince Amled’? I was surprised to see Steve’s name mentioned that he had ‘guessed’ that the pipe was made by the Danish manufacturer, Kriswill. The poster provided a link back to Rebornpipes (Prince Amled Hand Made in Denmark Pipes). The first thing I learned (and I have learned a lot from Master Restorer Steve Laug!) that the Prince Amled he was working on he called a ‘Peewit’ shape – a shape I’d never heard before. Here’s the pipe:
 Both Steve and his brother, Jeff, have a good eye for pipes and during one pipe picking expedition together, Steve wrote this:
This past January Jeff and his wife Sherry and Irene and I made a pipe hunting trip down the Oregon Coast. At least that is what Jeff and I called it. We stopped in a lot of the small towns up and down the northern part of the coast and picked up some nice pipes. This little pipe was obviously Danish, and I think both Jeff and I thought it was a Kriswill. We were hooked so we picked it up and added it to the finds of the trip. This pipe is stamped on the left side of the shank and on the underside at the shank/stem union. On the left side it is stamped with Prince Amled over Danish Hand Made.
Based upon Steve and Jeff’s hunches, I decided to jump over to the Pipedia Kriswill article (Kriswill – Pipedia) to see what I could find. What I discovered were pictures of Prince Amled pipes – the same photos from the Prince Amled article) with this qualifier: Prince Amled, Likely made by Kriswill.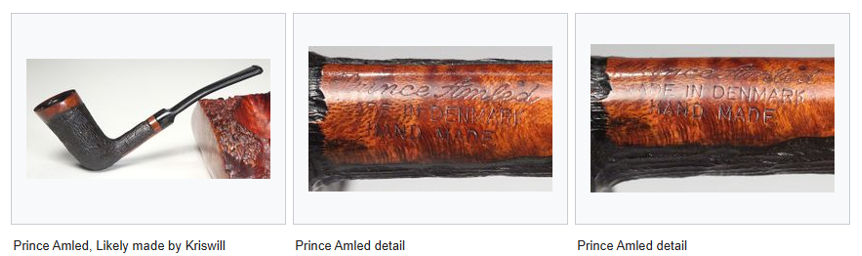 The Kriswill connection is interesting and from the mid-1950s, when Kriswill was started, into the 1960s Kriswill became a competitor of the largest Danish manufacturer, Stanwell. It’s possible that they produced pipes for third parties, etc., but without documentation, it is only interesting conjecture. If one is interested in conjecture, this is Pipephil’s very short rendition of the Kriswill story (Kn-Kz — Pipes : Logos & Markings). Might Prince Amled fit somewhere?
Kriswill is a brand of Kriswork Briar Trading, in Kolding (Denmark) established about 1955.
Some of Kriswill pipes were designed by Sigvard Bernadotte, Swedish prince and brother to the late Queen Ingrid of Denmark. He collaborated with his Danish partner Acton Bjørn.
When the company went bankrupt in the late 1970s it was on a level with Stanwell. Dan Pipe Cigar & Company (Hafenstrasse 30 D-21481 Lauenburg/Elbe, Ge) bought the rights to use the name and it is Holmer Knudsen and/or Poul Winsløw who make the Kriswill line. Nørding, on its side, bought the plant and introduced a Kriswill line.
Kriswill’s seconds: Danish Crown, Navigator
Kriswill’s sub-brand (for a short time): Lillehammer
There is one interesting characteristic of our Prince Amled Freehand that I found in no other example of Prince Amled on Pipedia, Pipephil, Smokingpipes.com or Rebornpipes. Our COM is listed as ‘DANMARK’ not ‘DENMARK’. What I know generally, it that Danmark is how the Danish would spell their country. ‘Denmark’ is an anglicized version. But what could this mean? I have my ideas, that the ‘Denmark’ COMs were for export and ‘Danmark’ was for local distribution. I decided to ask ChatGPT. This is what it said:
When a Prince Amled pipe (or others from mid-century Danish production) is stamped “Danmark” rather than “Denmark,” it typically means one of two things:
- It was made for domestic or European sale, not for export to English-speaking markets.
- “Danmark” is simply the Danish spelling of the country’s name.
- Danish-language stamps were common on pipes sold within Scandinavia or continental Europe.
- It could indicate a smaller or independent Danish maker, using local stampings instead of export-standard ones.
- Some smaller workshops used “Danmark” stamps in the 1950s–1970s before exporting became a priority or before they had English dies made.
- So your pipe was definitely Danish but likely intended for sale in Denmark or nearby countries, not the U.S. or U.K. market.
To add a small nuance: during the mid-century Danish pipe boom (roughly the 1940s–1970s), larger brands like Stanwell, Kriswill, and Bari typically used “Denmark” on pieces meant for export, while “Danmark” often appeared on pipes that stayed within Scandinavia or continental Europe.
What I had on my mind was #1. With our Prince Amled being found in Bulgaria, what is described as a ‘Danmark’ COM meant for pipes NOT heading to the US or UK markets, makes sense. Whoever produced the Prince Amled line, our pipe most likely was meant for the European markets. ChatGPT’s #2 above is interesting – unfortunately ChatGPT did not give any sources for this information…. take it or leave it!
 There’s one elephant in the room question that I have yet to ask? Who was Prince Amled? I searched in Wikipedia and found that Prince Amled is a precursor to the well-known creation of Shakespeare, Hamlet. Here’s what is said about Prince Hamlet and the etymology of the name Amled (or, Amleth) (Prince Hamlet – Wikipedia):
Prince Hamlet is the title character and protagonist of William Shakespeare‘s tragedy Hamlet (1599–1601). He is the Prince of Denmark, nephew of the usurping Claudius, and son of King Hamlet, the previous King of Denmark. At the beginning of the play, he is conflicted whether, and how, to avenge the murder of his father, and struggles with his own sanity along the way….
The name Hamlet occurs in the form Amleth in a 13th-century book of Danish history written by Saxo Grammaticus, popularised by François de Belleforest as L’histoire tragique d’Hamlet, and appearing in the English translation as “Hamblet”. The story of Amleth is assumed to originate in Old Norse or Icelandic poetry from several centuries earlier. Saxo has it as Amlethus, the Latin form of the old Jutish Amlethæ, In terms of etymology, the Old Icelandic name Amlóði comes from the Icelandic noun amlóði, meaning “fool”, suggestive of the way that Hamlet acts in the play. Later these names were incorporated into Irish as Amlodhe. As phonetic laws took their course, the name’s spelling changed, eventually arriving at Amlaidhe. This Irish name was given to a hero in a common folk story. The root of this name is ‘furious, raging, wild’.[2]
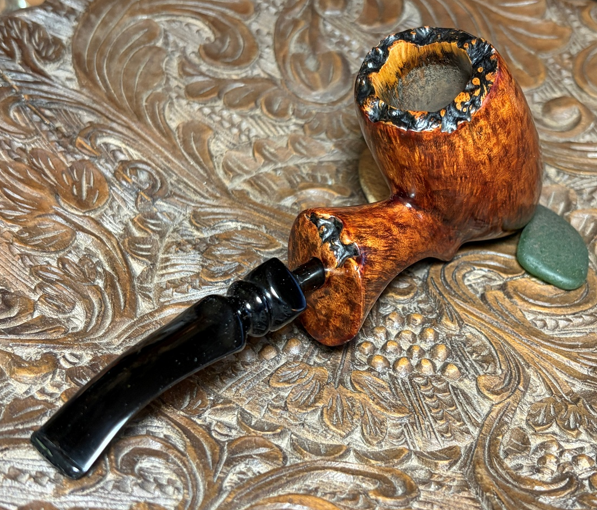
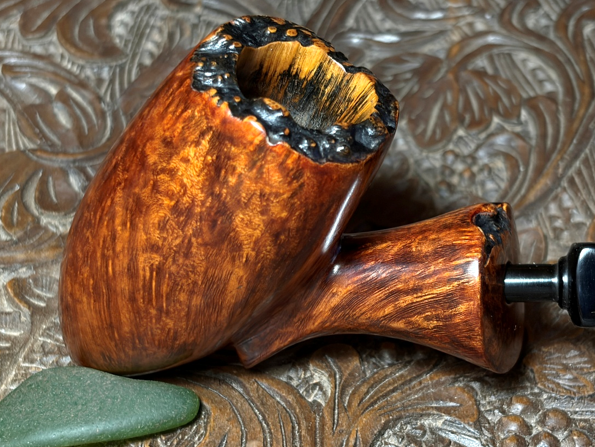
There remains one question that will not be answered: Who made this pipe? Perhaps one day more information will be unearthed that provides a satisfactory answer. Today is not that day. It’s time to look at our Prince Amled on the worktable. It is a beautiful Danish Freehand which I have described as a Pickaxe shape mainly because of the triangular shape of the bowl coming down to a sharp point. But as a Freehand, I like how Bill Burney describes this unique shape in the panel below (Freehand – Pipedia).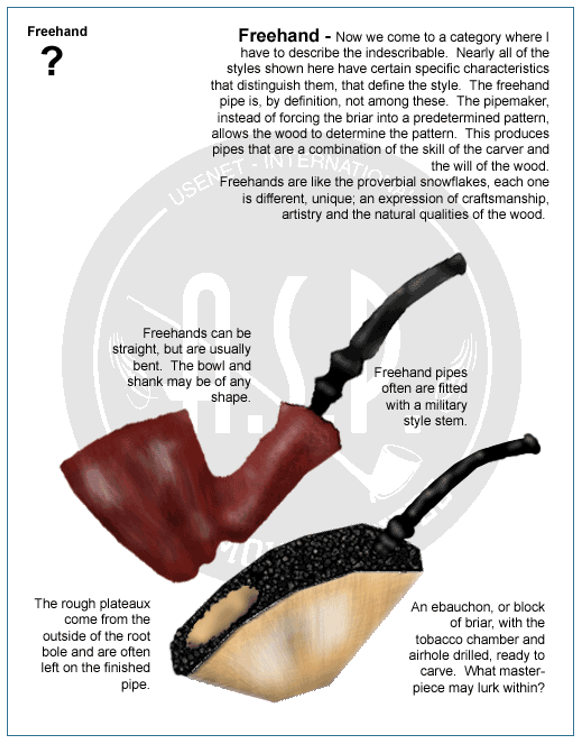 The general Danish credo that has shaped many Freehands is, ‘Follow the grain!’ and this Prince Amled is a nice example. Looking at the issues, the cake buildup in the chamber looks a bit thick and needs to be cleared away to allow fresh briar to surface and to see if there are any heating issues.
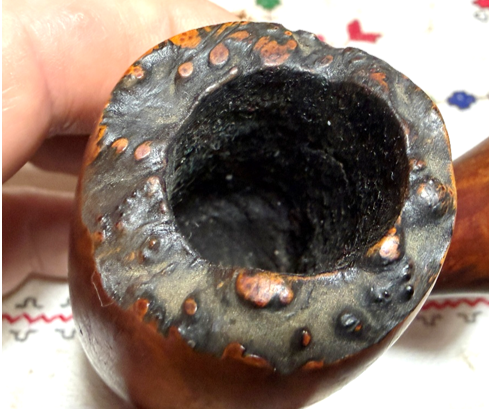 The plateau is expansive and will look great after cleaning and refreshing.
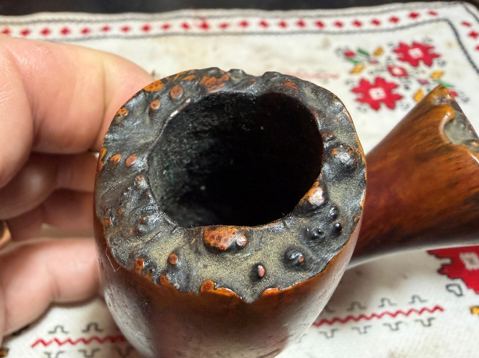 The long Pickaxe shaped bowl is dirty, and the grime needs cleaning. It has nicks and scratches which one would expect from normal wear.
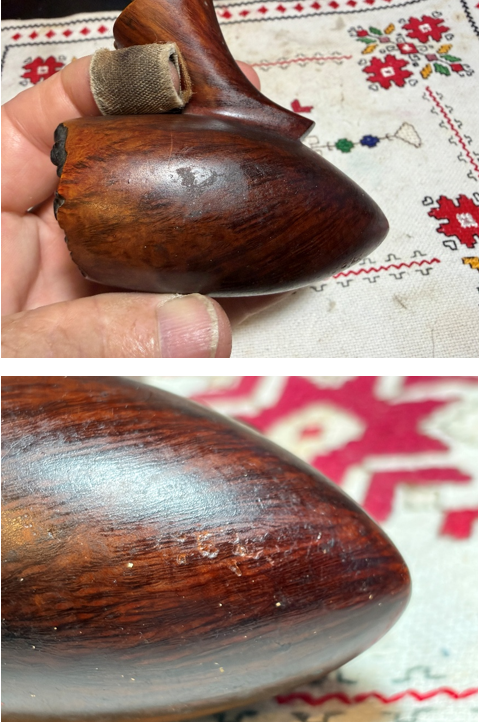 The fancy stem has oxidation that reaches another level. It is very thick and this needs addressing.
 The upper button lip has a compression from biting. The lower bit also has some bite compressions but not as deep.
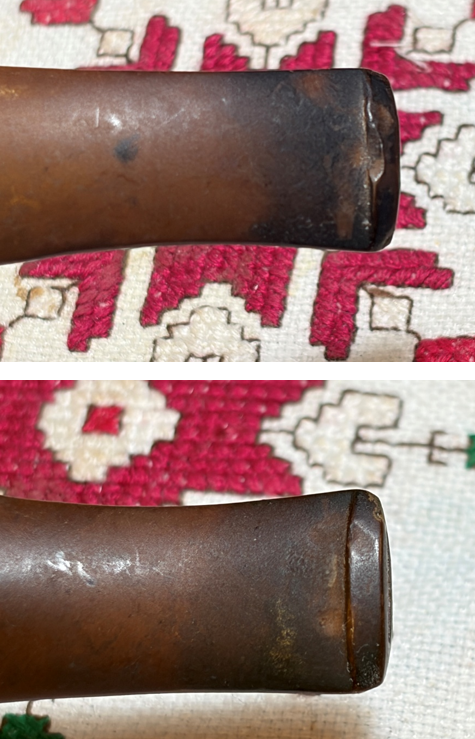 To begin the restoration process, the fancy stem airway is cleaned with only a couple of pipe cleaners moistened with isopropyl 99%. I’m surprised that the internals aren’t dirtier.
 Next, to address the oxidation, the stem is placed in a LONG soak of Briarville’s Pipe Stem Oxidation remover. We’ll see how Briarville does with this test!
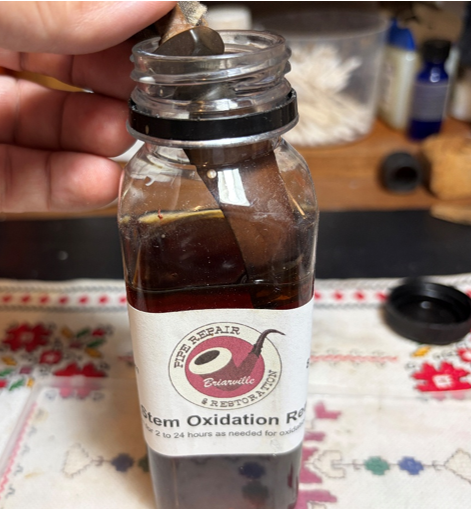 Turning now to the bowl, there’s a moderate amount of carbon cake buildup in the chamber. A fresh picture of the chamber shows the starting point.
 Due to the long cylindrical chamber, I don’t use the usual Pipnet Reaming Kit, but I go directly to the Kleen Reem Pipe Tool which I found some years ago at a Flea Market in Kentucky during one of our road trips. The Kleen Reem Pipe Tool has expanding metal arms that fit and expands commiserate with the chamber angle. The knob in the end of the Tool turns to expand the arms a bit at a time as the Tools works from the floor up.
 Next, the Savinelli Fitsall Tool scrapes the chamber wall and reaches down to the floor to address the angles.
 To remove the last vestiges of cake, the chamber is sanded with 220 grit paper wrapped around the dowel rod.
 All the tools used are shown and after a quick inspection, the chamber wall shows no heating issues.
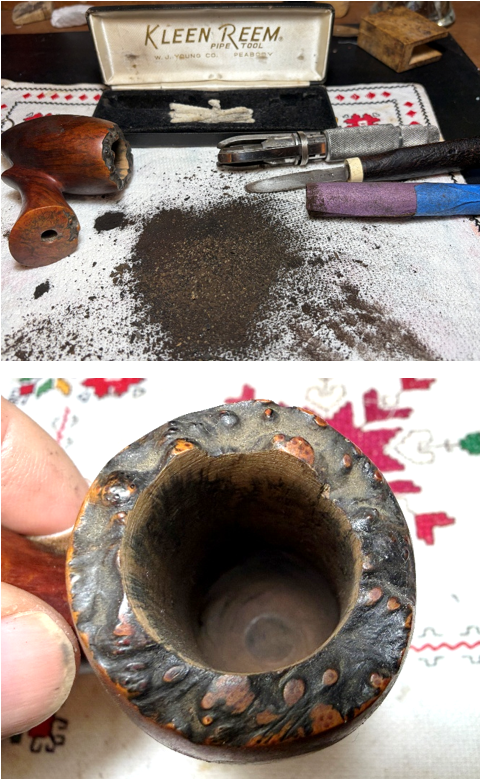 The Freehand stummel has a lot of grime on the briar surface which needs to be cleaned.
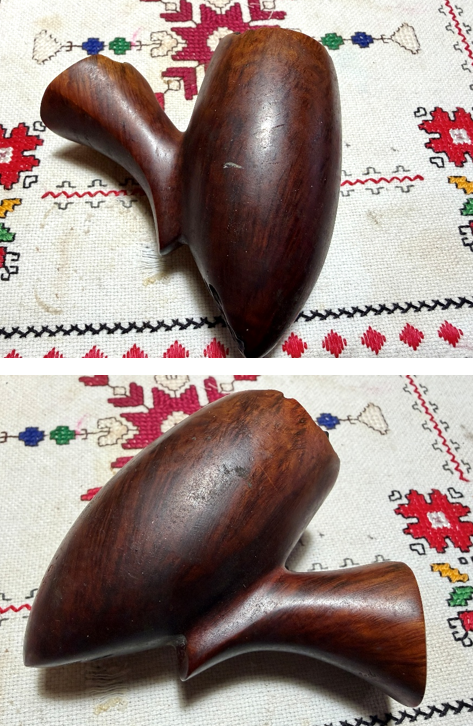 Murphy Oil Soap is used to scrub the surface with a cotton pad. The cotton pad shows the level of grime coming off the surface revealing very nice grain beneath. A bristled toothbrush helps to clean the plateau and the small patches of rustication on the point of the bowl and the shank plateau.
 The stummel is then taken to the sink where cleaning on the internals begin. The internals are scrubbed with shank brushes and anti-oil, liquid dishwashing soap. After scrubbing, the entire stummel is rinsed thoroughly and returned to the worktable.
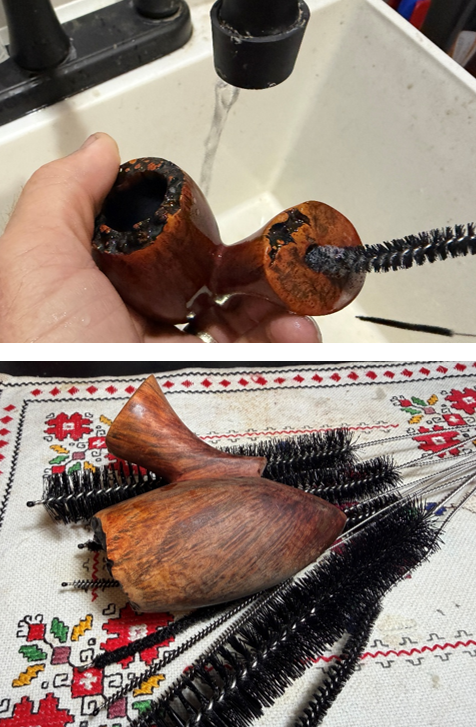 The internal cleaning continues with pipe cleaners and cotton buds moistened with isopropyl 99%. The mortise and airway were loaded with tar and oils and took a good amount of effort to get things clean. A small dental spoon was used to scrape the mortise and remove a lot of gunk. After a time, the pipe cleaners and cotton buds started lightening up indicating that the internals were clean.
 The fancy stem has been soaking through the night in Briarville’s Pipe Stem Oxidation Remover. After fishing it out, the stem was rubbed vigorously with a cotton cloth to wipe away the oxidation that had been raised. Steel wool at 0000 grade was also used to add some abrasion. The airway was cleaned of the fluid with pipe cleaners and isopropyl 99%. The stem looks much better, but I still can detect some residual oxidation which will be addressed with sanding.
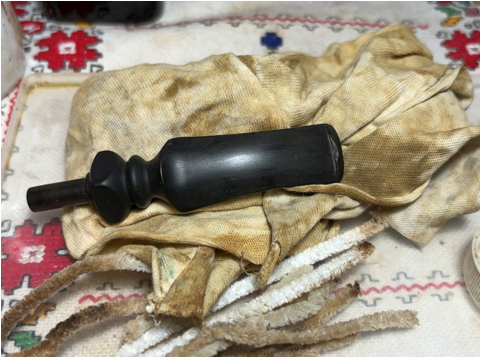 Taking a closer look, the compression on the upper button lip is more easily seen. The compressions on the lower bit are less severe but more numerous.
 Before sanding, Black CA glue is applied to the upper lip and lower compressions. To hold glue in place and to quicken the curing process, the patches were sprayed with Starbond Accelerator.
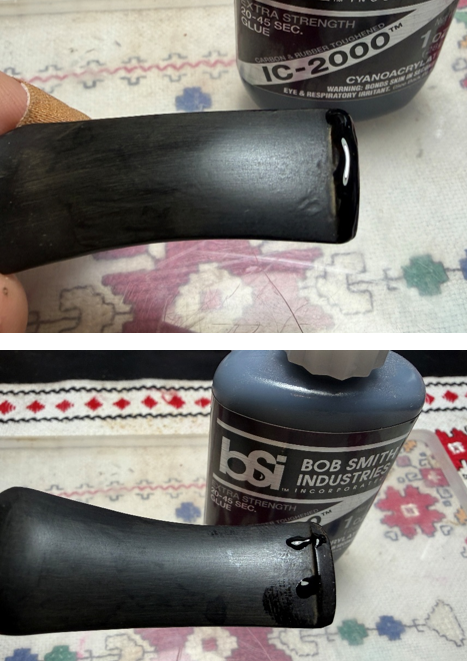 After the patches have cured, the excess patch material is filed down with a square needle file.
 The button lips are also refreshed in the process providing a bit more hang edge.
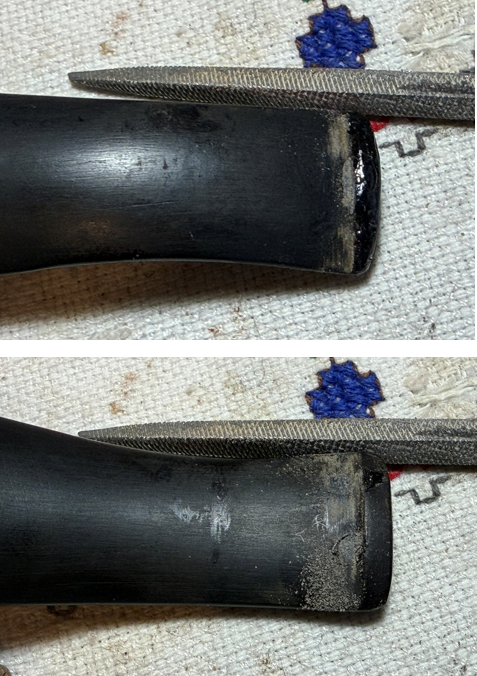 Next the bit and button are sanded with 220 grit paper. This smooths out the filing marks and helps to shape the button. The orange hue of the sanding dust could point to oxidation still being present and/or the vulcanite rubber could simply be dried and needs conditioning.
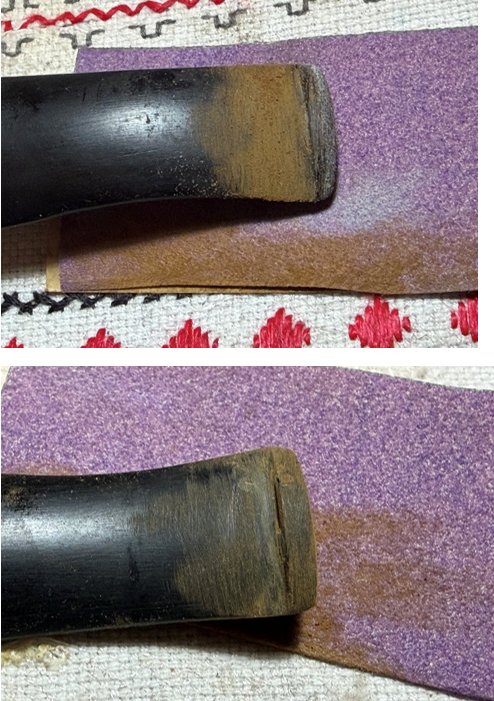 The sanding with 220 grit paper expands to the entire stem. This sanding is tedious because it must navigate all the peaks, valleys and plains of the fancy stem ornamental contours. This part is not fun but necessary!
 The same approach is used with 320 grit paper sanding the fancy stem.
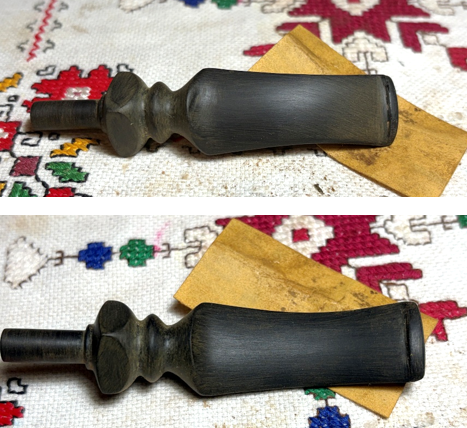 Next the stem is taken to the sink and wet sanded with 600 grit paper. This is followed by applying 0000 grade steel wool.
 I’m pleased with how nicely the stem is shaping up. I decided to apply a rich coat of Paraffin oil to the stem to get a jump on reconditioning the vulcanite rubber. The vulcanite drinks it up and it looks great. Yes, the language on the bottle is Bulgarian – I use it sparingly 😊.
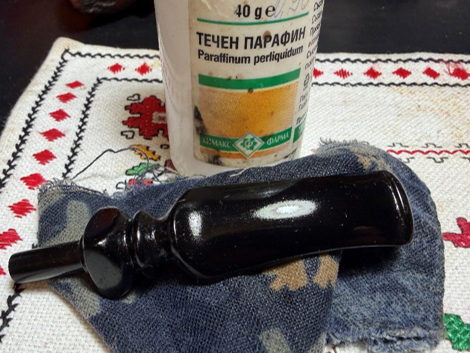 The next project is to apply micromesh pads to the stem. To continue conditioning the stem and protecting it from oxidation, between each pad Obsidian Oil is lightly applied to the stem. The first set of pads are grades 1500, 1800 and 2400.
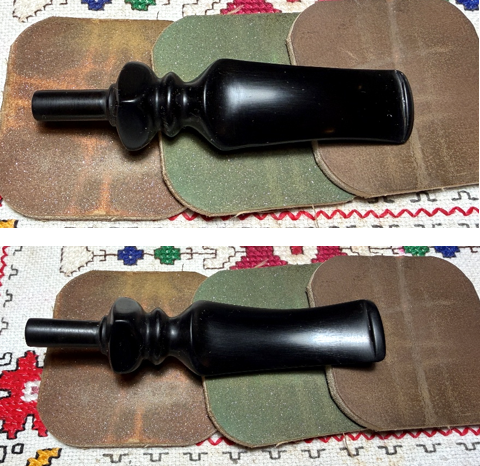 The second set of 3 pads are 3200, 3600 and 4000.
 The final set are grades 6000, 8000 and 12000. Whew! Bringing this stem back to life was a challenge, but it’s looking great. I love seeing the glossy sheen emerge through the micromesh process.
 Now for the fun part after putting the stem to the side! The Freehand stummel has been cleaned. Now, looking at the exterior briar surface for a fresh look, there are various small scratches over the surface which are normal wear and tear. Pictured below, on the front lower side, there is more significant pitting which looks like the results of sitting in a coffee can or being placed on a hard surface.
 The plateau will be refreshed. What I also like to do is to more finely sand the upper chamber briar. I do this to reveal briar grain on the upper chamber – I call this the Steward’s Peek. This to me is a nice enhancement to Freehand plateaus. During the reaming process, the upper chamber was also sanded with a bit more with a coarse 120 grit abrasion to clean it and to prepare for further sanding.
 The rustication on the back of the point and on the shank plateau will be refreshed as well.
 There is also a very small chip on the mortise opening that will be addressed. This is where I will begin. A small amount of briar putty will be placed in the chip.
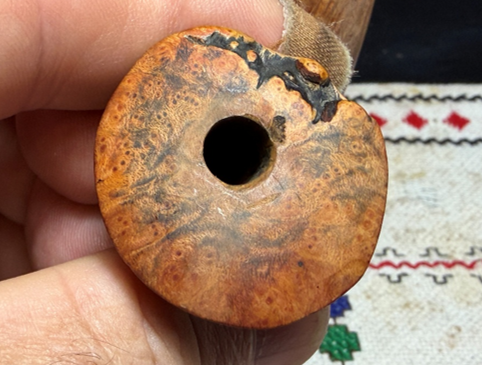 The Briar Putty is made with regular clear CA glue and briar dust. After placing some strips of scotch tape on the plastic work palette, a small amount of briar dust is placed next to the dollop of CA glue.
 Small amounts of the dust are drawn into the CA with the toothpick and mixed. When the mixture thickens to about the viscosity of molasses, it’s ready to go.
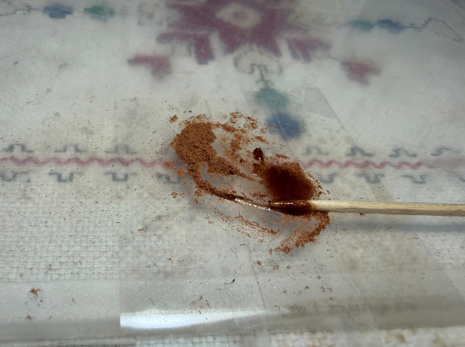 A small amount of the Briar Putty is placed in the chip with the toothpick and allowed to cure.
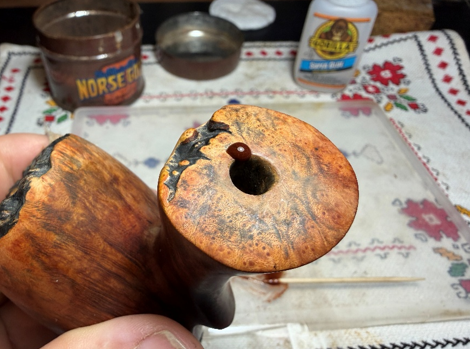 A bit of the patch expanded over the mortise cavity edge, and it is filed away with a round needle file.
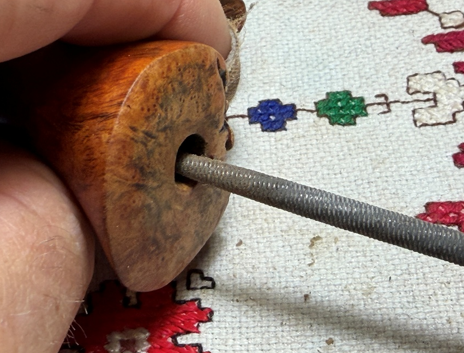 Next, to remove the patch mound on the shank plateau, a square needle file is used.
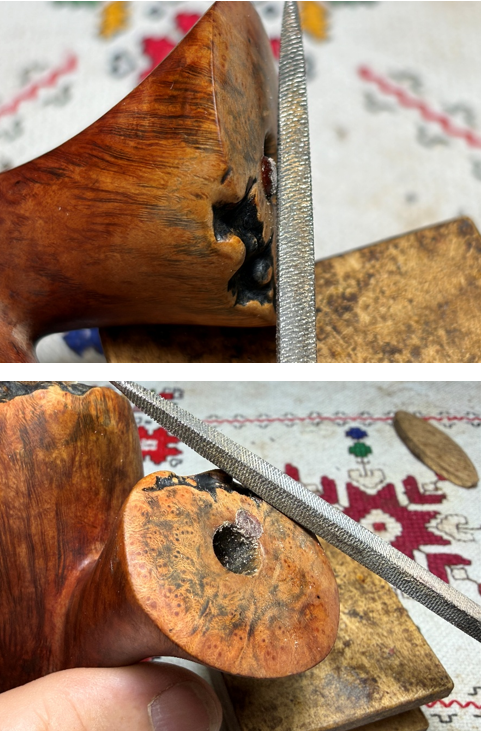 The patch is then sanded with 220 grit paper to smooth until flush with the briar surface.
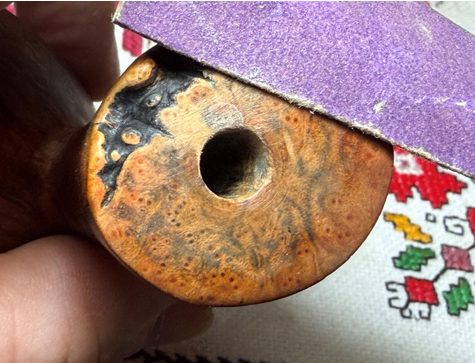 Next, to address the small scratches and pits on the briar surface, sanding sponges are used on the entire smooth briar surface starting with a coarser grade and this is followed by medium, light and fine. The briar is cleaning up nicely.
 I like sanding the upper chamber briar for a fringe benefit of finished briar. As I said before, I call the ‘Steward’s Peek’ which allows a nice view while the pipe is in service.
 This upper chamber briar has already been sanded with a coarse 120 grit paper during the reaming process. This is followed by sanding with 220, 320, and 600 grit papers. All 3 were wrapped around a dowel rod to get better leverage on the sanding, The picture below shows the final sanding with the 600 grit paper.
 Micromesh pads are employed next. A moistened cotton cloth is used to wipe the stummel down after using each pad to remove the briar dust and to give the next pad more traction. The first set of 3 pads are 1500, 1800 and 2400.
 Next, pads 3200, 3600 and 4000 grades are used.
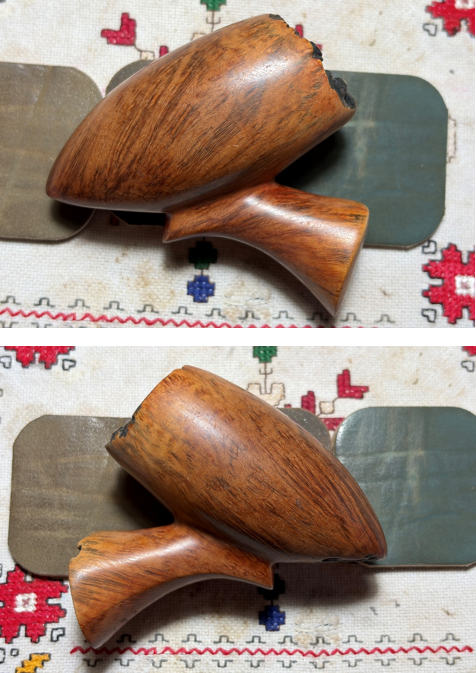 Lastly, pads 6000, 8000, and 12000 are used.
 During the sanding process I noticed vestiges of old finish in the tight crook where shank and bowl merge and under the notch on the underside of the lower shank. I was surprised that it appeared to be a reddish hue. To remove these spots, I used alcohol first scrubbing with a cotton pad. When this didn’t work acetone was used next and it also was not removing the old finish.
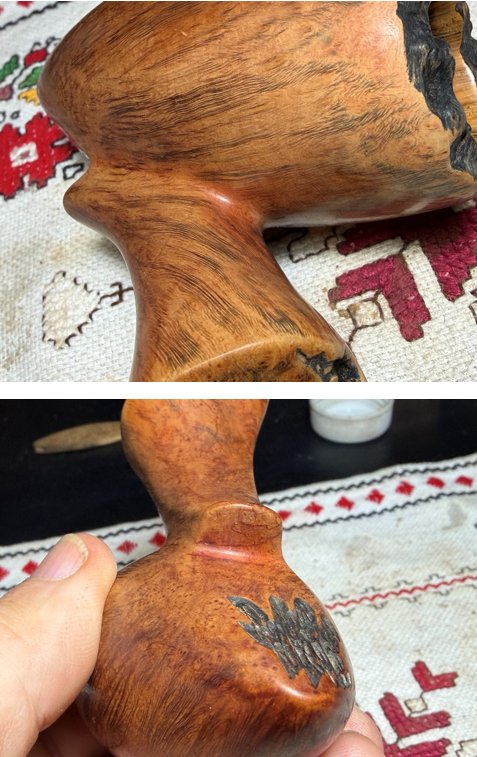 I pulled up the pictures of the pipe before working on it to get an idea of what I was seeing regarding the hue of the old finish. The stummel was much darker, but this could be contributed to the grime too. However, the more I looked at it – and I pulled my wife in on this one – I could see that the original finish was darker and had a hint of red to it. We both concluded that the finish appeared to be a Mahogany finish. To aim as much as possible to achieve the original look and to mask the old finish, the decision was made to apply Fiebing’s Mahogany Leather dye, but I will add a dash of Red dye to the mix to push the hue a bit in that direction. Dyes, hues and knowing what the finished product will look like is often more like and educated dice roll! Here we go.
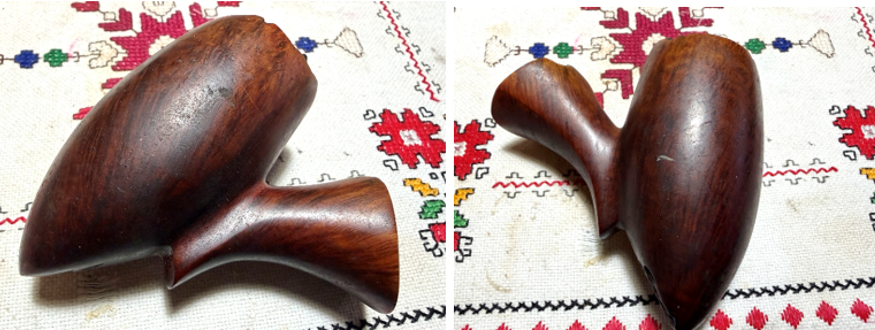 First, the dyes are mixed. I pour some Mahogany in the glass – not much because I don’t want to waste it. Then, using a large eye dropper, Fiebing’s Red Leather Dye is introduced into the glass and it is mixed.
 The Freehand stummel is next warmed with the hot air gun. This heating expands the grain helping the briar to be more receptive to the dye pigment.
 The dye is then painted on a section at a time with a folded pipe cleaner and then the wet dye is flamed with the candle. As an aniline dye mixture, when in contact with the flame the alcohol immediately combusts and burns quickly off leaving the pigment behind. The rusticated areas and the plateau are avoided as they will be refreshed with black dye later. There’s a lot of briar real estate to cover so it took a bit of time.
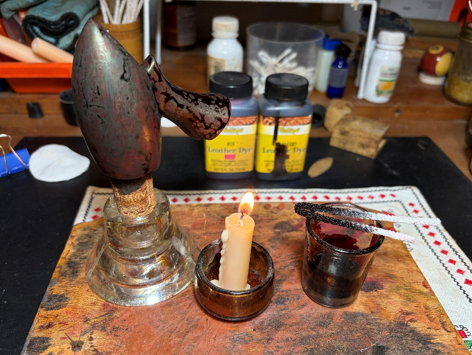 After the dye has been applied thoroughly, the stummel is set aside to ‘rest’ to allow the new dye to settle in. In this case, the stummel rested through the night.
 My favorite part of applying a new dye is ‘unwrapping’ the flamed, crusted dye from the briar surface to see the results. To do the unwrapping, a coarser felt buffing wheel is mounted on the rotary tool and Brown Tripoli compound is applied.
 To show the progress of the emerging grain, the picture below shows the contrast. I like what I’m seeing.
 Removing the flamed crust took a bit of time. Following use of the felt buffing wheel, a cotton cloth buffing wheel again applies the coarser Brown Tripoli to the briar surface. The speed of the rotary tool is set faster at about 50% full power. This additional application of Brown Tripoli with the cotton wheel is done for a couple of reasons. First, the cotton wheel can reach more efficiently into the tight crook where the shank and the bowl meet. The felt wheel could not do this and left flamed crust in the crook. The second reason is that the cotton wheel removes more excess dye from the briar surface which helps to sharpen the grain even more. It takes more time, but I like the results.
 To blend the new dye and to remove more excess dye, the stummel is wiped down with a cotton pad moistened with isopropyl 99% alcohol. This also has the effect of lightening the finish a bit.
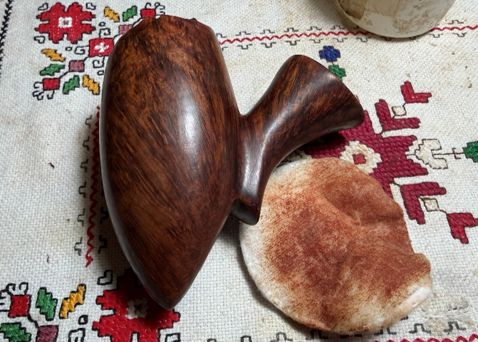 Next, a different cotton cloth buffing wheel is mounted onto the rotary tool with the speed set to the normal 40% full power. Blue Diamond compound is then applied to both stem and stummel.
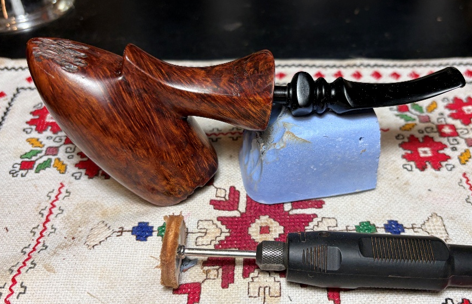 The compound creates a lot of dust on the surface. This dust is wiped away with a felt cloth.
 I almost forgot to refresh the rusticated parts of the Freehand.
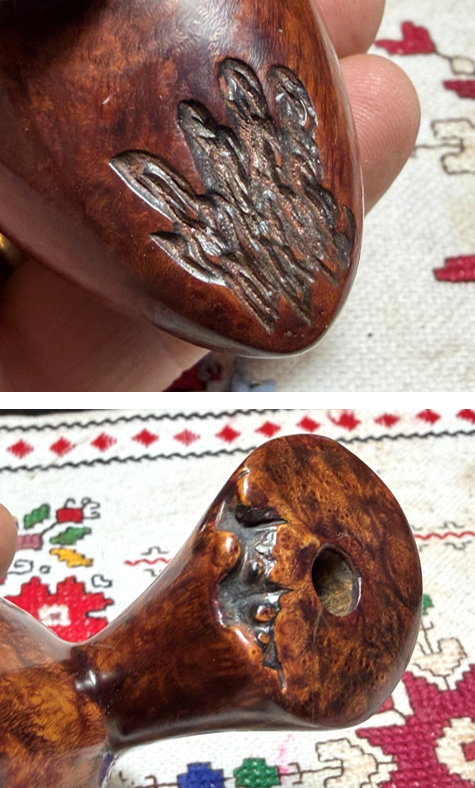 To refresh the rusticated areas, first a black dye stick is used to color the areas carefully. A 2400 grade micromesh pad then sands over the areas to give them more of an aged look and to lighten the peaks of the higher parts of the rustication.
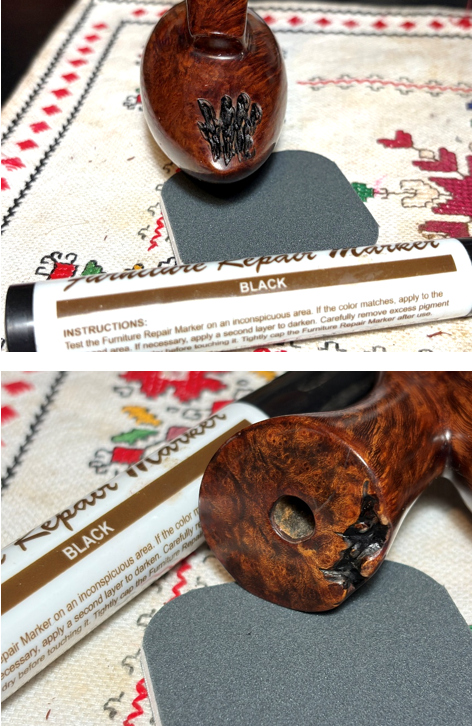 The plateau is refreshed next in the same way.
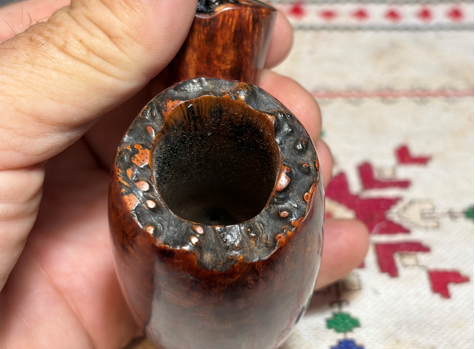 The plateau is darkened with a black dye stick and then the 2400 micromesh sands the peaks for that rustic look. After looking at the lightened peaks, they looked a bit too light in contrast to Mahogany finish. To remedy this, the peaks were darkened a bit using the Mahogany dye stick. I like the result a lot!
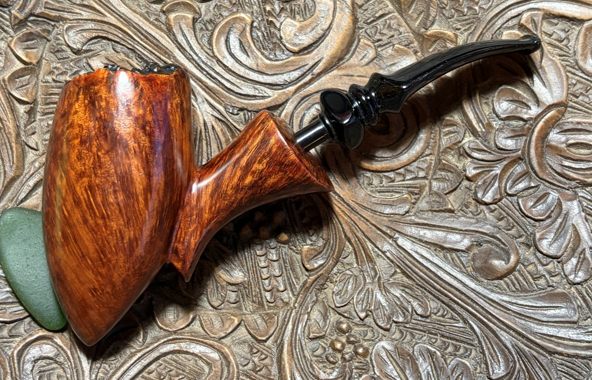
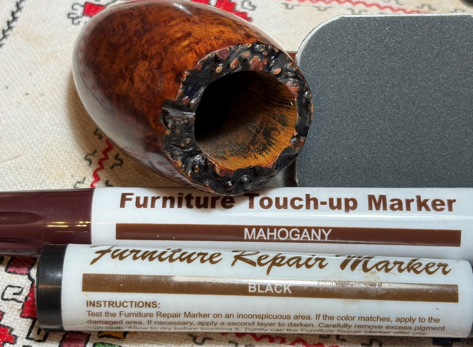 The final step is to apply Carnauba wax to the stem and stummel. After a dedicated cotton cloth buffing wheel was mounted onto the rotary tool set at about 40% full power, the wax was applied to the pipe. Afterwards, the pipe was given a rigorous hand buffing with a microfiber cloth to remove excess wax and to raise the shine.
 The maker of this Danish Prince Amled will remain a mystery. However, there is little doubt regarding the skill and vision of the artisan who crafted this Freehand that ‘follows the grain’! The long Pickaxe shaping of this Freehand was made to rest in the hand and has a chamber capacity for a LOT of one’s favorite blend. The vertical grain stretches over the bowl, and the fancy stem simply finishes the pipe. Justin commissioned this first of four from the Burgas lot to give as a gift to one fortunate friend or father. A ‘before’ picture helps us to remember how far we’ve come. Thanks for joining me!
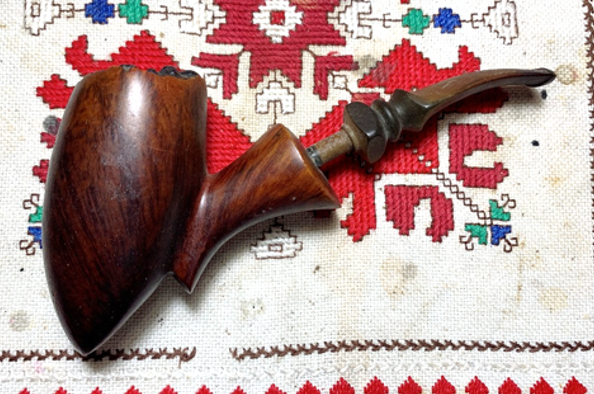


Spectacular restoration!!
LikeLike
Thanks Doug! It came out well.
LikeLike
Pingback: The Second Gift of Four From Bulgaria: A Denicotea Absorba 2164 Bent Rhodesian – The Pipe Steward
Magnificent! You have the patience of Job.
LikeLiked by 1 person
Thanks, Todd! Maybe a bit of biblical overstatement 🤠.
LikeLike
Pingback: The Third Gift From Bulgaria: Rusticating an Almost Hopeless Lorenzo Arceto 8778 Bent Tomato – The Pipe Steward
Pingback: The Last Gift From Bulgaria – An Unexpected Repair of a Meerschaum-lining with an Old Time Recipe – The Pipe Steward
Pingback: Mending a Huge Shank Crack for a Nørding Danmark A Freehand – The Pipe Steward