This Kiko came to me in January 2018 on an online auction block from a seller in Hillsdale, Indiana. I was attracted to it not only because it was a Kiko, but mainly because it was in desperate shape. The leather had potential and hope extended to what I assumed was an intact Meerschaum lining beneath the thick cake. The stem also seemed on the brink, but I was attracted to the challenge of bringing another life to this forlorn pipe. Not many people were bidding and when the timer ran out of seconds, the Kiko was claimed and added to the online collection, For “Pipe Dreamers” ONLY! for pipe men and women to commission. Here are the pictures I saw online of the Kiko:

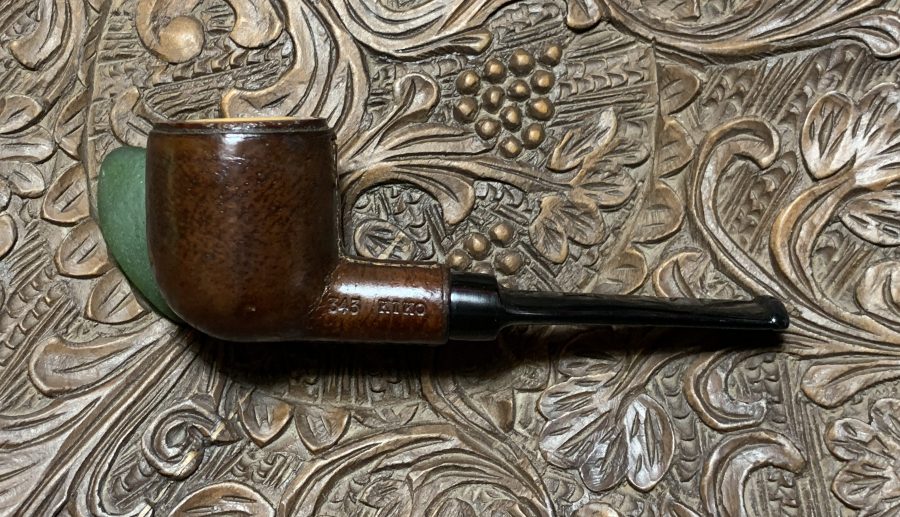
 The nomenclature is embossed on both sides of the shank. On the left: 543 KIKO. The right side: MADE IN TANGANYIKA.
 The stem has the last vestiges of a Kiko animal. Most of their lines were identified with different animal stampings. I’ll have to figure out what this one was:

The Kiko got the attention of Darren, a pipe man from Landenberg, Pennsylvania, who has commissioned many pipes from me in the past. Most of the pipes he commissioned were destined for others as gifts. This one is also a gift – hopefully for Christmas if I can move along with an elf’s haste! What also is special about Darren is that I was able to meet him personally in October. My wife and I were on a 2-month 7546-mile road trip pulling our small travel trailer and visiting churches that have supported our work abroad for many years. When Darren heard that I would be visiting a church nearby in Landenberg, he invited me to attend a bi-monthly meeting of the Holy Smokes Cigar & Pipe Club that meets in his open (weather permitting) garage around good food, drink, a movie (Lord of the Rings – Two Towers was scheduled to show that night) and good fellowship among a diverse, eclectic group of cigar/pipe loving men.
 My visit to the Holy Smokes was truly a highlight for me getting to speak with folks there. Why did it surprise me when I met men who had become stewards of pipes I had restored? They had been gifted to them by Darren. In the picture that Darren sent me to commemorate my visit, are pipe men who have received pipes commissioned by Darren. On the left is Darren (See: Pipe #1 of 7 – An Amazing Transformation of a Bruyere Extra Paneled Billiard), then Chris (See: New Life to a French Chapuis-Comoy Sunrise 729 Acrylic Bent Stem Dublin Sitter), yours truly, then Dave (See: Giving New Life to a Classic French Billiard – A Butz Choquin Régate 1601 of St. Claude).
Another highlight was when Darren gave me 5 minutes during the movie intermission to talk about my work as ‘The Pipe Steward’ and our work in Bulgaria for the Daughters of Bulgaria – where we helped women and girls who had been trafficked and sexually exploited. Thank you, Darren, for a great time of fellowship!
Pipedia has a good amount of information about this pipe’s provenance in the article about the Tanganyika Meerschaum Corporation:
From Pipes, Artisans and Trademarks, by José Manuel Lopes
Tanganyika Meerschaum Corporation is a company that formed in 1955 by Kenyan businessmen from Nairobi after the discovery of a meerschaum mine relatively close to the surface on Kilimanjaro. The meerschaum is tougher, less porous, and cheaper than the Turkish variety. Another mine was soon discovered in Sinya, in the famous Amboseli Game Park.
The company, previously based in Arusha (Tanzania), became an associate of a Belgium firm, but closed some years after. It produced the Caveman, Countryman, Kiko, Killimanjaro, Sportsman, Townsman, and Wiga brands. It maintained a link with GBD for the making of the GBD Block Meerschaum series, and after its closure, the English firms, London Meerschaum and Manx Pipes (Manx Meerschaum) continued producing with African meerschaum.
From this excerpt, the dating of the Kiko on the table would be from 1955 on. There is additional information in the Kiko article from Pipedia (See: LINK):
Kiko, meaning “pipe” in Swahili-Kiswahili to English translation, is probably the best known of the various brands listed below. In East Africa Meerschaum is found in Tanganyika, once known as German East Africa, and since 1964 part of the United Republic of Tanzania. The main deposit comes from the Amboseli basin surrounding the Lake Amboseli. Tanganyika Meerschaum is normally stained in shades of brown, black and yellow, and is considered to be inferior to Meerschaum from Turkey. Eventhough, the raw material is mined by the Tanganyika Meerschaum Corporation and to a large extent used for pipemaking. Uncounted pipemakers throughout the world were supplied with Amboseli Meerschaum, preferentially used for Meerschaum lined briars or leather-clad pipes. In Tanganyika the Kilimanjaro Pipe Company Ltd. produced (afak):
- Caveman Fashioned from a piece of natural meerschaum. Every pipe is unique and – is in fact a geological specimen over a million years old. Attractively boxed.
- Countryman (Elephant logo ) Block meerschaum with rustic finish either yellow or black. Individually boxed with protective chamois bag.
- Huntsman Block meerschaum black or yellow rustic bowl. Bamboo and vulcanite stem. Individually boxed with chamois bag.
- Hillibilly Block meerschaum, black or yellow corncob style finish.
- Kiko Rough (Elephant logo) Old seasoned briar. Block meerschaum lined with black rustic finish. Individually boxed.
- Kiko plain (Elephant logo) As for Kiko Rough but with smooth plum colour finish.
- Kikob (Elephant logo) Hillibilly style Briar block meerschaum lined.
- Kilimanjaro (Rhinoceros logo) East African pipewood Meerschaum lined and individually boxed. Available in black rough finish and natural smooth or rough finish.
- Kilimanjaro Giant (Rhinoceros logo) Finish as for standard Kilimanjaro, but available in three shapes only. Bent, Billiard and Oval Pot.
- Kudu (Giraffe Logo)
- Makonde (Rhinoceros logo)
- Merlin (Flying bird or Antelope logo)
- Sportsman (Logos Elephant) Block meerschaum, covered with hand-sewn English pigskin. Individually boxed.
- Tembo
- Townsman Block meerschaum with plain glossy yellow finish. Individually boxed with protective chamois bag. The Townsman is also available in the new styles. Townsman Crater, Townsman Scallope and NSC.
- Twiga (Giraffe Logo)
- White elephant (Logos Elephant)
From the paragraph above, we receive another clue to bracketing the Kiko. Tanganyika became part of Tanzania in 1964. With Tanganyika stamped as the COM, our dating brackets are from 1955 to 1964. I was born in 1955 so that makes the earlier age of the Kiko a grand young 68 years 😊. Many production lines of the Tanganyika the Kilimanjaro Pipe Company Ltd. are listed with the animals associated with the lines. These animals are embossed on the stem. Here are the logos from the links above all from Pipephil’s extensive collection: Of the lines listed above, the only one listed that is described as leather wrapped is the Sportsman line which is also identified with the elephant logo:
Sportsman (Logos Elephant) Block meerschaum, covered with hand-sewn English pigskin. Individually boxed.
Pipephil (LINK) has a panel giving specific information about the Sportsman line. I can find no stamping of GENUINE BLOCK MEERSCHAUM on the pigskin nor the ‘TANGANIYKA’ on the bottom of the stem. The Kiko Pipedia article also has an extensive recounting of the colonial past of Tanganyika which became an independent country with a different name in 1964:
Independence Tanganyika achieved autonomy in September 1960 and became a fully independent state within the Commonwealth in December 1961, with Nyerere as premier. In December 1962, when Tanganyika became a republic, he became the nation’s first president. There were communist-inspired army mutinies in January 1964, but these were quelled with British assistance. In April 1964 Zanzibar united with Tanganyika, and in October 1964 the composite state changed its name to the United Republic of Tanzania.
Looking now at the Kiko Sportsman Meer-lined Billiard on the table, the Meerschaum has carbon cake build up and this needs to be cleaned. The leather covering needs to be cleaned and reconditioned. The stem has some significant issues with a fractured button. It has deep oxidation which needs addressing. The button has been broken on the upper side and needs to be rebuilt. There are also compressions on the upper bit and chatter on the lower.
 The threaded tenon has worked itself out from being properly seated in the stem. This creates a gap between the stem and stummel.
 The saddle has also received a burn that needs to be addressed.
 To begin the restoration of this Kiko Sportsman, the stem’s airway is cleaned using pipe cleaners and isopropyl 99%. The metal threaded tenon is also scrubbed with a brass brush and 0000 steel wool.
 It didn’t take many cleaners to clean the airway. Moving on.
 Next, the oxidation in the stem will be addressed using Briarville’s Pipe Stem Oxidation Remover. I’m hopeful that it doesn’t impact the already almost invisible Elephant logo. It is placed in the solution to soak for several hours.
 Turning next to the stummel, a picture looking down into the chamber is not pretty. The cake/grunge build up is thick. There’s no way to determine the health of the Meerschaum-lined chamber until it’s cleaned.
 Care must be taken not to chip the Meerschaum, especially on the rim. No reaming blades are used because they have too much torque and may fracture the Meerschaum. The Savinelli Fitsall Tool is the tool of choice to work on the Meerschaum. As I started the scraping process with the Fitsall tool, there was a sudden release of debris out of the chamber. My heart skipped a beat because my first thoughts were that the Meer-lining had failed. Taking a closer look, I discovered the formers steward’s choice of baccy for his final time of fellowship with this guy. I was relieved, to say the least. Carefully, the scraping continues to scrape the cake off the chamber wall.
 The Savinelli Fitsall Tool is followed by sanding the chamber using 220 paper wrapped around a Sharpie Pen.
 The sanding expands to the rim with a light sanding with 220 paper. My goal is to uncover the surface of the rim – to reveal the border between briar and Meerschaum.
 The rim is exposed now and there remain some spots on the border. At the front of the rim (right in the picture) there is a very small gap between the Meerschaum and rim.
 The reaming is complete, and the rim is visible.
 An inspection of the Meerschaum chamber reveals no problems – a discovery for which I am thankful and a bit surprised considering the cake. Meerschaum neither needs nor wants a carbon cake buildup.
 To further clean the rim and to reestablish clean lines, the rim is topped beginning with 220 paper on the board.
 After several rotations on the paper, an inspection shows progress.
 After several more rotations in 220 paper, enough has been sanded.
 The 220 paper is exchanged for 600 paper and several more rotations follow. After several rotation cycles and inspections, I like what I’m seeing.
 The rim sanding is completed by creating a clean bevel in the Meerschaum using 220 paper then 600 paper. This cleaned the inner edge of the Meerschaum nicely.
 Next, the full set of 9 micromesh pads are used to sand/polish the rim. Starting with 1500 to 2400, then 3200 to 4000 and finishing with pads 6000 to 12000. Between each pad, the rim is wiped with a wet cloth to remove the dust and to give the next pad more traction.
 With the rim cleaned and sanded, the leather encasing the stummel needs to be cleaned. After looking online, I found a simple way to clean pigskin that is gentle. With a cup of cold water in the bowl, 2 teaspoons of non-scented baby shampoo is thoroughly mixed into the water. Using a microfiber cloth (something lint free), a corner of the cloth is placed in the bowl and wrung out so that the liquid is not dripping. The pigskin is then wiped (not rubbed as this will remove the leather surface) with the moist cloth. Rinse the cloth in the gentle soap bowl to rinse out the dirt removed from the leather.
 When the pigskin is cleaned, use another lent free cloth to blot the leather dry. It appears that brown dye came off on the towel, but the stummel is clean.
 The directions I read said to use Mink Oil to condition the leather. I do not have Mink Oil, but Paraffin Oil is used instead. With a cloth, the oil is wiped onto the leather. The leather is dry, and it drinks in the oil, so a few coats of Paraffin Oil are applied. The stummel is then set aside to allow the oil to be absorbed.
 I let the oil soak through the night. An inspection the next morning showed a leather that was a richer hue, but the lighter patches on the leather revealed the wear and deterioration of the leather surface.
 It’s not possible to make the leather new again, but with a little help from Kiwi Brown shoe polish, we’ll do what we can. My approach to polishing shoes is old school which includes a spit shine.
 With the tin open and a bit of spittle to soften the polish, the foam applicator presses into the polish. The applicator then thoroughly applies the polish over the surface of the leather.
 With a little application of spittle on the leather during the buffing, the horsehair shoe brush goes to work to remove excess polish and to raise the shine. Wow! I’m liking what I’m seeing a lot!
 With a sigh of chagrin, I realized that I had yet to clean the internals of the stummel! Carefully so not to get alcohol on the leather, cotton buds and pipe cleaners moisten with isopropyl 99% alcohol are used to scrub. It didn’t take much effort.
 The stummel is put aside and the stem is next. It has been soaking in Briarville’s Pipe Stem Oxidation Remover through the night. It is fished out and a cotton cloth is used to vigorously rub the surface to clear away the oxidation that was raised during the soak.
 While the very faint impression of the Elephant logo can be seen, the flecks of white paint it had are gone and it is doubtful there’s enough definition left in the impression to grab the paint.
 Rebuilding a button is perhaps one of the more technical aspects of a restoration. Fresh pictures looking at the catastrophic break taking a high percentage of the upper button, show the challenges.
 The button on the top is nonexistent and the lower button lip is diminished.
 Looking directly at the button facing up the slot shows how thin the vulcanite is moving towards the bit.
 The first step is to fashion a slot form using an index card to fit into the slot expanding horizontally to form a new slot shape. The form must also provide a foundation for the button build up.
 It’s difficult to see, but scotch tape is placed around the front tip of the form and then Petroleum Jelly is applied to the tape. This helps the form not to stick to the glue/patch material when applied. A pipe cleaner is also inserted into the form after it’s placed in the slot. This is done to support the form, so it doesn’t collapse when the patch material is applied.
 The patch material is made from mixing activated charcoal and regular CA glue.
 Using a toothpick, some charcoal is pulled into the CA glue and mixed. This process continues by pulling more charcoal into the mixture a small amount at a time until the mixture thickens to the consistency of molasses.
 The mixture is then trowel to the stem to build the button layer by layer. After each layer of the charcoal/CA mixture is applied, it is sprayed with an accelerator to cure it more quickly and to keep the build up in place. I am intentionally creating a ‘fat’ button that extends over the slot form and the bit. The button is also higher. This over-building is to provide some excess for filing and sculpting of the button, but also to create a stronger, reenforced bit and button. The next few pictures show the progress.
 After the button has enough buildup, a little tug frees the slot form. Nice – I’m always wary that some glue mixture will seep through to the airway…, but all is good.
 My approach to filing the rough button gradually to sculpt and shape it is to start with the slot facing to file it down to create the baseline for the end of the stem. A flat needle file is used to do this.
 After the slot facing is roughly formed, the filing moves to the upper and lower button lips.
 As the button lips are being shaped, the filing also works on the sides of the button to create a straight seam down the stem to the end of the stem.
 This next picture shows the rough upper button lip shaped. I wait to start fling the ‘hang ledge’ util the lower button is roughly shaped.
 The same process is used on the lower button.
 After a lot of filing, shaping – sizing up, the upper and lower button lips look good. The sides of the button are also filed to form the seam down the side of the stem.
 The slot looks good after using a sharp needle file to smooth the inside edges.
 Next, the last step is shaping is to create a hang ledge that is uniform around the button – upper and lower.
 Along with the flat needle file, a squared file also helps.
 One of the challenges with rebuilding the button and using patch material is air pockets emerging as it is filed. This bubble is on the upper button. I don’t want to file too much to remove the air pocket in order to maintain a strong button structure.
 To remedy this, Black Medium-Thick CA glue is used to fill the pit.
 After the patch has cured, it is filed. The air pocket has disappeared.
 The next pictures show the finished filing phase. The button is shaped and looks good.
 Next, 220 sanding paper is applied to the button to further smooth and shape it.
 During the sanding, this small tooth compression becomes visible.
 To help to eradicate the dimple, the vulcanite rubber is heated by painting the area with a flame from the lighter. As the rubber heats, the physics takes over and the rubber expands to regain its original disposition – or closer to it.
 After heating was applied, additional sanding removed the compression.
 Next, the sanding with 220 paper expands to the entire stem. A picture is taken of the burn mark on the saddle which I noticed earlier.
 The sanding minimizes the burn mark on the saddle, but it still is visible if one is looking. To protect the Elephant logo, or what’s left of it, all sanding by-passes the left side of the saddle.
 After the 220 paper, 320 paper is used – upper and lower.
 Next, the stem is wet sanded using 600 grade paper.
 It’s at this point when finer sanding paper is used, that the air bubbles in the newly rebuilt button become visible.
 To fill in the bubble pits and to provide a smooth surface over the button, Black Medium-Thick CA glue is spread evenly over the upper and lower button lips. Before the CA sets up, a toothpick is used to help spread the CA evenly over the surface.
 After the Black CA glue cures, light sanding with 600 grade paper smooths the button and the finish is much improved.
 Next, the stem is sanded/polished with the full set of 9 micromesh pads starting with wet sanding with pads 1500 to 2400. Next, dry sanding using pads 3200 to 4000 and 6000 to 12000. Between each set of 3 pads, Obsidian Oil is applied to condition the vulcanite and to protect against oxidation. Wow! The button looks great.
 Before moving on to the fine polishing of the stem, earlier I noted that the metal threaded tenon was partially extracted from the stem. The consequence of this was a gap between the stem and shank. The arrows show how the tenon should be correctly seated into the stem facing.
 To rectify this, the metal tenon is heated with the lighter. As the metal heats it breaks the rubber grip and allows the stem to rotate around the insert of the tenon. After heating the tenon, the stem is screwed back into the mortise until it is tightened. Then with a bit more force turning, the vulcanite stem continues to rotate. As it rotates, I press the stem toward the shank as well. The stem is rotated until it reaches the proper orientation to the stummel.
 Yes, this is the way it should look 😊. I leave the pipe to sit for a time while the metal cools and the rubber reassert its grip on the tenon insert.
 Home stretch – next, Blue Diamond compound is applied to the stem and rim. With a cotton cloth buffing wheel mounted on the rotary tool, speed is set at about 40% full power and the compound is applied.
 The compound accumulates dust on the stem and rim. This is wiped off with a felt cloth in preparation for application of the wax.
 With another dedicated cotton cloth buffing wheel mounted, at the same speed, carnauba wax is applied to the entire pipe – including the pigskin. This will add a bit of luster to the leather. After the pipe received the wax, the pipe was given a rigorous hand buffing to remove excess wax and raise the shine.
 Sometimes I’m amazed at how a pipe can transform from something almost in the ash heap to a beautiful showpiece. The pigskin leather buffed up beautifully after conditioning and the wax. The deep rich leathery brown gives a truly rustic, relaxed vibe. The Meerschaum-lined bowl provides a nice contrast on the rim – from the bright Meerschaum to the rich tan of the briar finishing with the rough textured leather…nice. The button rebuild came out well, but my only regret is that the Elephant logo of the 1955 to 1964 Kiko Sportsman is too faded to be refreshed with paint. Darren commissioned this pipe as a Christmas gift and has the first opportunity to claim the Kiko from the Pipe Steward Store benefiting the Daughters of Bulgaria. Thanks for joining me!


Dal, as always, you completed another masterpiece! Thank you for your diligent efforts on this project, as well as you and Beth’s continued service to God.
As for your visit, it is an honor to host you, and an absolute delight for you to meet some of those who appreciate your work (firsthand). In particular, we appreciate the generosity with which you shared your time, your love for pipes, and creating venues where people have opportunity to encounter Jesus!
LikeLike
Thanks so much, Darren. Enjoyed being with you a good deal. I hope to return someday!
LikeLike
Incredible transformation!
LikeLike
Thank you, sir!
LikeLike
Nicely done, Dal. Those meer lined pipes are tough to beat for a windy day out working in the yard or out fishing.
LikeLiked by 1 person
Hard to argue with that. This has already been claimed by his new steward. Thanks for your words! 🎄
LikeLiked by 1 person
Hi Dal, my name is Charles DeLauro from the northeast Ohio area, fantastic transformation work that you do on these pipes. I am new to this site but I just wanted to let you know I recently acquired six pipes from a neighbor who passed and these are somewhat vintage I guess and I am only going to keep one and I was wondering your thoughts on placing these on eBay or another site and wondering if you were interested in acquiring any of these since one of them relates to what you just did in this article, a leather wrapped Sportsman I believe. I am not sure if I can post pictures on here or not. Don’t know if I can but if you email me I can send you pictures that way. I’ll try to send pictures after I finish this note. Sincerely Charles Delauro ccjden@gmail.com
LikeLike
Charles, thanks for the post. I will email you.
LikeLike
Pingback: Christmas Tree Bound: Renewing a Stout French Made Pickwick Arms Bulldog – The Pipe Steward
Pingback: Resuscitating a French-made ‘Pipe’ Dr. Geo DePosee Horn Stem Paneled Bulldog – The Pipe Steward