The next pipe in the queue is FINALLY on the ‘mobile worktable’ here at Dale’s Hollow Campground in Tennessee. My wife and I embarked on a 4-month road trip in April from Golden, Colorado, and we will not return until mid-July. We are visiting churches that have supported us over the years in Ukraine, Spain and Bulgaria, and we’re also connecting with family and friends along the way. As we travel, we are pulling our small 20’ travel trailer and camping along the way – having a great time enjoying God’s creation. The picture below shows our current site with me at the campfire getting ready to make s’mores – one of my favorites. All my pipe restoration tools and supplies are packed nicely into 3 DeWalt cases which have been waiting patiently to be opened. Up to this point, our speaking engagements and visits have been too short to unpack and relax a bit. The Cherrywood next in the queue was commissioned by pipe man Chris, who I met in Pennsylvania on another road trip we did last fall through the northeast US. I was invited by pipe man Darren to join in at a meeting of the Holy Smokes Club in Landenberg, PA, and this is where I met Chris. The picture below was sent to me later by Darren (on the right) with Chris (left) and Chris’ son in law, Mark (center) all enjoying bowls together with pipes that were all restored by me. Darren has commissioned many pipes and most were intended as gifts for others. The pipes in the picture were gifted by Darren and this is what Darren sent with the picture:
Chris’ son-in-law (Mark) is enjoying Kiko Countryman MeerschaumI’m enjoying Edwards Sculpted Panel, and Chris is smoking the Dublin Sitter (this was part of the original group I purchased and gifted to him in December 2021).
I love to know that my efforts contribute in a small way to the broader fellowship of the pipe!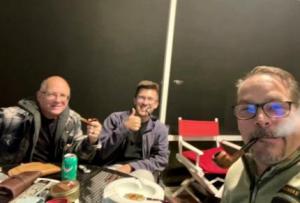 Chris is not only a man who enjoys the ‘fellowship of the bowl’ but he is also a jazz trumpet player. I was intrigued when I heard that he is setting up a YouTube channel where he hopes to produce jazz music ‘Speakeasy’ style. I’m waiting for the link! He also shared why he was drawn to commissioning the Cherrywood. He shared that he was constructing a ‘Man Cave’, and the Cherrywood would be a theme of the room. Chris no longer lives in Pennsylvania but had moved to New Hill, North Carolina, and was visiting when I met him at the Holy Smokes gathering last fall. I appreciate meeting pipe men virtually when they commission pipes, but it’s a special blessing when I’m able to meet them in person.
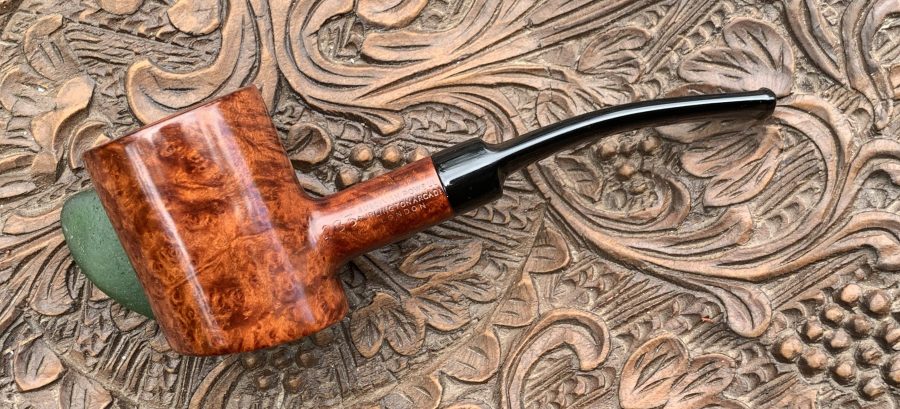
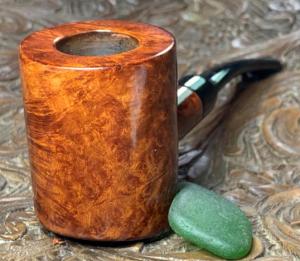
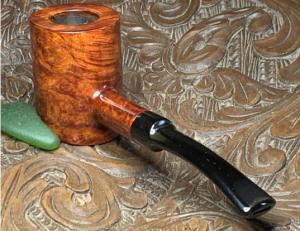
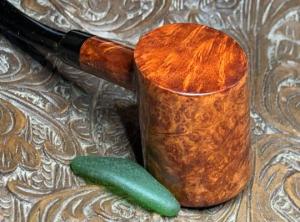
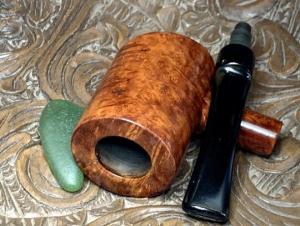
Here are pictures of the Cherrywood that got Chris’ attention. I acquired it in a Lot of 68 pipes in February 2019 from a seller in West Hartford, Connecticut. The dimensions of the Cherrywood are Length: 5 3/8 inches, Height: 2 inches, Rim width: 1 7/16 inches, Chamber width: 3/4 inches, Chamber depth: 1 3/8 inches. 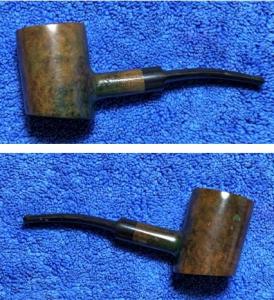
 The nomenclature is stamped sharply on the shank. The left flank is stamped: SULLIVAN POWELL [over] BURLINGTON ARCADE [over] LONDON. To the left of this tiered stamping is the shape number: 283.
 The right side of the shank is stamped: LONDON MADE.
 The provenance of this pipe beckons to a time that is no more – to a well-known tobacconist in London whose doors are no longer open. To set the stage, before getting into the origins of this pipe, the shape is interesting and worth a pause. A ‘Cherrywood’ is basically a ‘Poker’ but with a bend. Here is Bill Burney’s description from Pipedia:
 Our Cherrywood complies with the all the characteristics described by Bill. The first time I heard about a ‘Cherrywood’ shape I wondered how a Poker came to have this cousin shape with a name that was obviously a ‘misdirect’? The explanation Bill Burney offers is that Cherrywood beckons back to when pipes were made with cherrywood as an alternative to briar – basket pipes were not considered the same quality. I guess the bent Poker shape caught on and the name went along with it. The classic ability to sit on the table while playing poker is the iconic aspect of this shape – utilitarian at its core.
When I first looked at this pipe with the stamping, ‘Sullivan Powell Burlington Arcade’, as an American I thought that arcade was referring to an amusement park of sorts with coin operated games. However, when I started searching for Sullivan Powell Burlington Arcade, I discovered quickly that the British understand ‘arcade’ differently. The Oxford Dictionary information for ‘arcade’ even offered ‘Burlington Arcade’ as an example of its definition:
Arcade: a covered passageway with arches along one or both sides.
- a covered walk with stores along one or both sides: “a shopping arcade” · “Burlington Arcade”
A quick search of the Burlington Arcade in London offered up several pictures that gave a feel for the upscale surroundings of the now closed Sullivan Powell’s tobacconist shop. Additional searches turned up a great piece of history – a classy Sullivan Powell leaflet (LINK).
 I enjoy leaflets like these that give us a look into a past that is no longer with us. While this tobacconist seems to specialize in high-end cigarettes, the full scope of the offerings is mentioned in this ‘history’ which I’ve repeated for easier reading from the leaflet above:
In 1812, Lord George Cavendish, son of the Duke of Devonshire, built the Burlington Arcade in what was then a passageway between Burlington House, now the home of the Royal Academy, and Old Bond Street. Here in this elegant Arcade, connoisseurs of fine tobaccos will find Sullivan Powell’s celebrated shop.
Sullivan Powell’s was founded in 1880 by Jonathan J. Sullivan, a Master Mariner whose travels in the Mediterranean had taken him to many countries where the fashion of cigarette smoking was flourishing. Much impressed by this, he decided on his return to England to set up a small hand-rolling cigarette factory to supply quality cigarettes to the nobility. In this venture he joined forces with a certain Mr. Powell, a gentleman of some considerable wealth.
Sullivan & Powell made cigarettes from only the finest of exotic oriental tobaccos, and soon earned an unqualified reputation amongst the aristocratic cognoscente in Queen Victoria’s London. By the turn of the century, Sullivan’s Sub Rosa and other now famed cigarettes were being smoked by the leaders of Society, whilst officers of Her Majesty’s Forces in all parts of the British Empire demanded that their supplies of SULLIVAN’S be sent out to them regularly each month to bring civilisation to their out-posts.
Today the products that proudly bear the name SULLIVAN maintain the standards set nearly a century ago by the highly successful partnership of money and craftsmanship, combined to produce the finest of fine cigarettes. Today our shop in the Burlington Arcade still provides the best in smoking for the famous and for the discerning. Cigarettes of rare oriental tobaccos, cool to smoke, satisfying in flavour, fragrant of aroma; magnificent pipe tobaccos where choice Eastern leaves are blended with traditional Virginias to add spice and magic to a friendly smoke; hand-rolled cigars from the East and West Indies – you will find all these, as well as pipes and lighters and other accessories for the Compleat Smoker at Sullivan Powell’s.
I was interested to find references to tobacco tins of Sullivan’s in pipe forums where pipe men were pining away for a reproduction of now extinct blends – notably the Gentlemen’s Mixture which I found a picture below. Well, our travels have now taken us a week or so later to the Allegheny National Forest at the Kiasutha Campground in the northwest corner of Pennsylvania. The area is right on the border of New York State. Thankfully, today is beautiful and beneath the canvas in our outside gazebo, The Clam, I’m continuing to work on the Sullivan Powell Cherrywood. My wife, Beth, helped to capture me in my ‘Happy Place’ 😊 working on the Sullivan.
 As with other well-known tobacconists and pipe shops here in the US, pipes are stamped with the shop name but were often manufactured by other companies. I found nothing in Pipedia or Pipephil.eu that would help add to the understanding of Sullivan Powell, but there were mentions of the shop in the Pipe Tobacco Forum.
A post from Chris on May 6, 2012, was informative and more pieces of the puzzle are added – Sulivan & Powell | Brothers of Briar – Pipe Tobacco Forum:
The Sullivan Powell shop was in Burlington Arcade off Piccadilly in London.
It was an amazing little shop but has sadly been gone for many, many years. They produced fantastic Oriental and Turkish cigarettes, some of them with an oval shape, and the most amazing nutty flavour from the Oriental tobacco. Back in the 1970s they were sold in most up-market tobacconists and so were easily available.
 Sullivan Powell also had a connection with Sobranie – I don’t know if that included the famous pipe tobacco – but Sobranie Imperial Russian cigarettes were hand produced by two ladies upstairs in that Sullivan Powell shop. Unfortunately, I only discovered that fact when I visited the shop a few weeks after the ladies had retired so I never got a chance to see them in action or thank them for their cigarettes.
As I said the shop is long gone as have so many of the London tobacconists – a great pity.
Chris’ personal observations indicate that the shop located in Burlington Arcade was “long gone”. He references activities in the 1970s which indicate that Sullivan Powell was not only known for pipe tobacco, but perhaps more known for the production of hand-rolled up-scale cigarettes.
From this we can say that the shop was in business in the 70s. From the post date of 2012, we can only speculate what ‘long gone’ meant in Chris’ last comment.
More anecdotal information was mined from a ‘Hoppes’ in Who Made This One? :: Pipe Talk :: Pipe Smokers Forums of PipesMagazine.com who commented about a pipe he had with the Sullivan Powell provenance and mentions Ken Barnes:
 Ken Barnes was nice enough to comment on this pipe. He personally sold pipes to Sullivan Powell in the ’80’s. The manager at the time at the Burlington Arcade store was Harry Horowitz. Upshall sold their own pipes to Sullivan as well as making their store pipes. Ken thinks this was one of their store pipes from the early eighties since it has Upshall’s engraving that they did with a Pantograph engraving machine. Upshall also marked the store pipes with the Made By Hand on the right side of the pipe. Ken said these were made from Grecian Arta briar from the Arta Company in northern Greece. They ordered cross grain blocks to make Canadian pipes, so this was probably cut down because of a defect in the shank. The Arta briar was the best quality in the 80’s. Thanks Ken for the great history. Nice Upshall pipe for less than $25.00!!
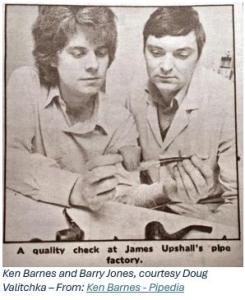
With this entry we understand that the Sullivan Powell operation continues into the 1980s. ‘Hoppes’ thanks Ken Barnes with appreciation for personally adding to the history of the Sullivan Powell story. What is interesting is that Ken Barnes was a well-known pipe maker and collector whose story is described very briefly in Pipedia – Ken Barnes – Pipedia. The Pipedia entry also includes some off-site links of other articles and interviews which I took the time to read and found enlightening to understand the value of Ken Barnes’ insights. What is relevant for the question of provenance is that the Hoppes post above indicates that Ken Barnes personally sold his pipes to Sullivan Powell as did Upshall – both sources to be remarkable for Sullivan Powell. The post also indicates that Sullivan Powell made their own shop pipes.
The question for the Sullivan Powell on the worktable is, can the maker of this pipe be established? Our pipe does not have ‘Made by Hand’, but ‘London Made’. This would discount an ‘Upshall’ source from the information above. We understand that Ken Barnes was also a contributor of Sullivan Powell pipes, but I don’t believe the grain quality of our Cherrywood meets the Ken Barnes quality. Here a few examples of Ken Barnes’ work (Ken Barnes – Pipedia), but we don’t know for sure.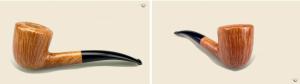 Another post in the same thread by a ‘guylesss’ (Who Made This One? :: Pipe Talk :: Pipe Smokers Forums of PipesMagazine.com) suggested that GBD as a possible manufacturer. To find a possible manufacturer, I searched the various English pipe manufacturers’ Pipe Shape charts to see if I could find a ‘Cherrywood’ 283 from other manufacturers that matched the Sullivan Powell shape number. I found no match, but it doesn’t mean there isn’t one out there. At this point, the exact manufacturer of the Cherrywood will remain a mystery, but to have a Sullivan Powell Burlington Arcade London Made in one’s personal collection is a very nice addition in my book.
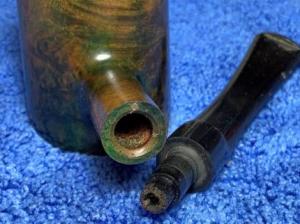
With a greater appreciation for the Sullivan Powell story and for the pipe on the worktable, it’s time to take a closer look at the condition. My first impression of the finish is that it’s dark and discolored in places – with my eye it appears to have a greenish hue. It reminds me of when brass tarnishes and turns a blue green. There is one larger fill which interestingly is the greenish hue that I see in the finish.
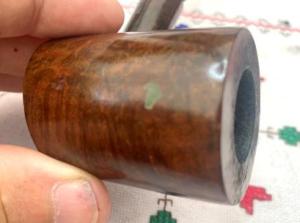 Toward the left of the fill toward the slanted heel, some skins in the briar surface can be seen as well.
 The plateau of the Cherrywood is broad and toward the aft section there is lava flow and grime that needs removing. The cake is thin but will be removed to allow the new steward to have a fresh start.
 The stem is in good condition with some indication of light tooth chatter and no overt signs of oxidation.
 To begin the cleaning process, the stem’s airway is cleaned using pipe cleaners and isopropyl 99%.
 To make sure all the oxidation is addressed, the stem is given a soak in Briarville.com’s Pipe Stem Oxidation Remover.
 Turning next to the Cherrywood stummel, a picture shows the thin cake in the chamber.
 The chamber is reamed with two blade heads from the Pipnet Reaming Kit. This is followed by scraping the chamber with the Savinelli Fitsall Tool. Finally, the chamber is sanded with 220 grit paper wrapped around a dowel rod.
 A lightened picture shows the chamber and with a quick inspection, there are no heating problems detected.
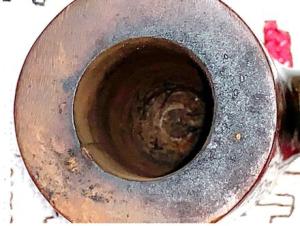 Next, turning to the cleaning of the external briar, undiluted Murphy’s Oil Soap is used and scrubbed with cotton pads.
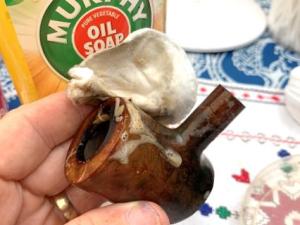 A brass brush is used to work on the lava over the rim. Brass is used because it is not invasive like sand paper but adds muscle to the cleaning.
 When the externals are scrubbed well, the stummel is taken to the sink in our 20’ R-pod travel trailer where the internals are scrubbed with anti-oil, liquid dishwashing soap and warm water using shank brushes. After the stummel is thoroughly rinsed, it’s brought back to the worktable. The discoloration is more visible now after the cleaning. Hmmm.
 To continue the cleaning process of the internals, cotton buds and pipe cleaners are used with isopropyl 99% alcohol.
 After the general cleaning process is completed, another close look at the surface shows the tarnished green hue still evident. The glossy finish has been removed but left is the darkened hue of the stummel.
 I decided to see if rubbing the briar surface would produce any lightening of the briar surface. With a cotton pad moistened with alcohol, interestingly, the white cotton pad is colored with ‘?’ coming off the briar.
 After several cotton pads, all looking like a color I would expect with cotton candy, I decided to give the stummel a full soak in acetone to remove the residue from the briar.
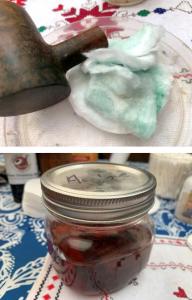 After soaking the stummel for several hours, an inspection shows remnants of the cotton candy color still embedded in the briar but much more localized to the heel. I can live with this and proceed with sanding and repairing the fills.
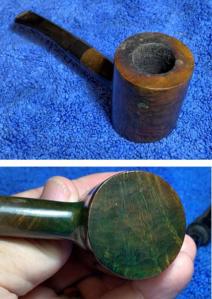
 The larger fill is located on the right side of the stummel along with a smaller blemish.
 Using a sharp dental probe, I go to work excavating the larger fill and the small one nearby. It wasn’t long before I realized that the dental probe would not do the job. The fill was hard as a brick. All I was doing was scratching the surface with the probe. I decided to sand the stummel with a coarse sanding sponge to see if it would sand off the green as well as to address other small dents and nicks in the briar. The result is what is pictured below. The briar is shaping up nicely, but the fill is taunting me.
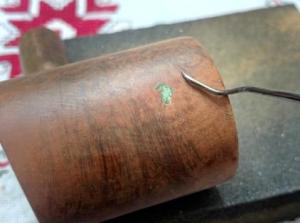 More is needed to excavate the green fill material. After mounting a sharp grinder on the rotary tool, the work begins again with good progress. Care is given to keep the grinder in the fill – like a dentist working on a cavity. To slip off would take away the good briar. The goal is to remove the hard fill material without enlarging the footprint of the original fill.
 Both fills are now properly excavated by the sharp grinder on the rotary tool.
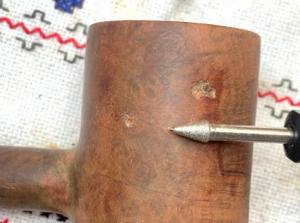 To refill the pits, Medium Light Brown CA glue is used by carefully applying the glue and then sprinkling it with briar dust. The briar dust holds the patch material in place and provides some texture. Both the larger and smaller pits are patched and the stummel is set aside allowing the patches to thoroughly cure.
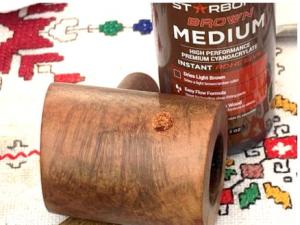 Turning now to the stem, it has been soaking in Pipe Stem Oxidation Remover for several hours and when fished out, the stem is rigorously rubbed with a cotton cloth which removes the raised oxidation. To clear the fluid from the airway, a pipe cleaner moistened with isopropyl 99% is run through the airway to make sure the new steward has a clean puff when the pipe is put into service.
 The tooth chatter on the upper and lower bit is light.
 To address this, 220 grit paper dispatches the chatter with no trouble.
 The bit is next sanded with 320 grit paper – upper and lower.
 The sanding is expanded to the entire stem by wet sanding using 600 grit paper and this is followed by applying 0000 grade steel wool.
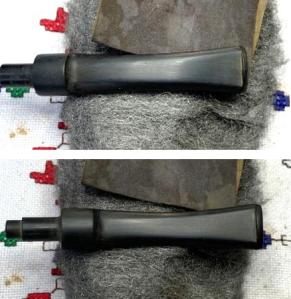 Continuing with the stem, micromesh pads are applied first by wet sanding with pads 1500 to 2400. This is followed by dry sanding with pads 3200 to 4000 and 6000 to 12000. To protect the vulcanite stem from oxidation and to further condition the stem, Obsidian Oil is applied between each set of 3 pads. The stem looks good.
 The patches on the stummel have cured and the patch mounds are removed using a flat needle file.
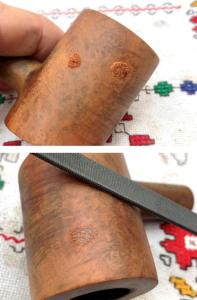 The filing is followed with 220 and 320 grit papers.
 With the stummel patches completed, I look at the stummel overall. The rim/plateau has a dark ring around the rim’s edge from charring.
 The heel of the Cherrywood still shows discoloration from the mystery green hue in the grain. It also has some small scratches and dents.
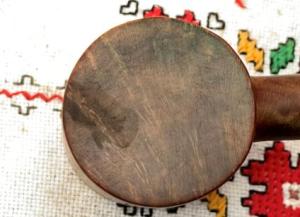 To address cleaning up the rim and heel, both rim and heel will be ‘topped’ on the topping board starting with 220 grit paper.
 First, the stummel is inverted and then the rim is rotated several times over the 220 grit paper.
 The rim is cleaning up nicely but a fill that I didn’t see earlier is clearly visible now after the initial revolutions on the board. The worst part of this discovery is that this fill also has the green concrete fill material. After several rotations hoping that the rim fill would disappear, the process was halted. I’ll need to dig out the old green fill material and patch the pit.
 With that project on hold for the moment, the heel is next ‘topped’ on the board with 220 grit paper.
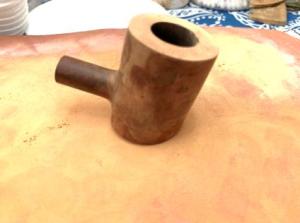 After a few revolutions on the board, the contrast between the greenish dark area and the fresh briar is easily seen. The emerging grain is nice.
 After sufficient revolutions, the heel looks good.
 After the 220 grit paper, 600 grit paper is used to further smooth the heel. The grain is looking really nice – lots of potential.
 Back to the rim. To remove the char ring around the inner rim and hopefully reduce the green fill, a smart bevel is cut.
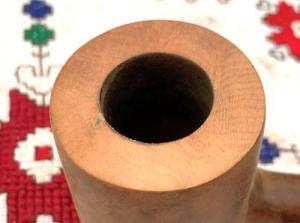 To do this, a small wooden sphere is used with a strip of 220 grit paper between the sphere and the chamber opening. The strip of paper is pinched and then the sphere is rotated inside the chamber rim. I call this bevel ‘smart’ because the cut that is made is sharp and uniform – not rounded if I simply were to pinch the paper with my soft thumb.
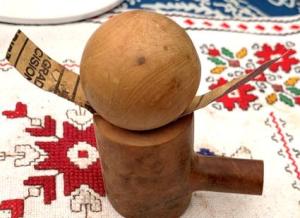 The result is great for the bevel, but the green fill on the edge is glaring at me.
 I have no option but to excavate it with the sharp grinder on the rotary tool as I did before.
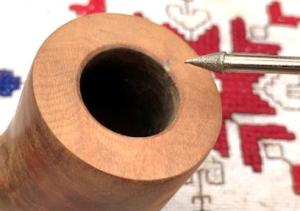 After some careful work, the old fill is removed keeping the footprint as small as possible.
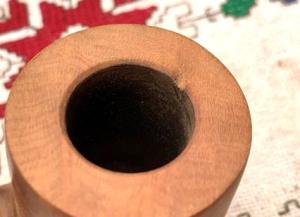 Next, light brown CA glue is applied to the pit and again sprinkled with briar dust. The stummel is put aside for a time to allow the patch to cure.
 When cured, the patch mound is reduced to the briar surface with the flat needle file.
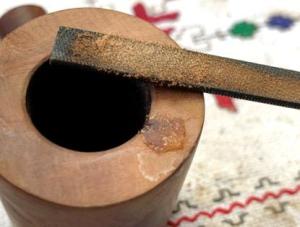 After the filing, the stummel again is topped with 220 grit paper and this is followed 600 paper.
 Again, the smart bevel is cut using 220 paper and then 600.
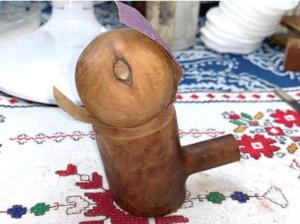 The results are good. The new patch looks good and the grain coming out on the rim shows potential.
 Next, to clean the briar from nicks and blemishes, the stummel is sanded with coarse, medium, light and fine sanding sponges.
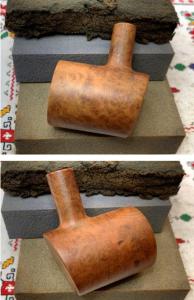
 The sanding/polishing process continues with micromesh pads from 1500 to 2400, 3200 to 4000 and 6000 to 12000 grades. To improve the traction of each pad, the stummel is wiped down with a dampened cloth between each pad.
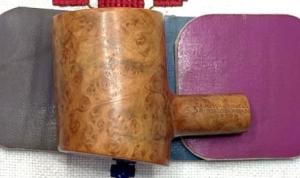 The grain has come out nicely through the process of sanding/polishing with the micromesh pads. The grain is wavy and expressive with large looping bird’s eye grain patterns. As I look at the grain, it is there but the overall appearance is that the briar is pale, and the contrasting of the grain patterns could be better. My eye also catches the larger fill.
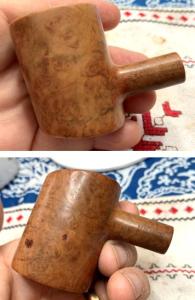 To improve the grain contrasting so that it pops more and to mask the fills, I decided to apply Fiebing’s Light Brown Leather Dye to the stummel. To prepare the stummel for the dye, it is warmed with a hot air gun so that the grains expand and are more receptive to the dye pigment.
 After the stummel is warmed, the light brown dye is applied in sections with a folded pipe cleaner. While the dye is still wet, it is flamed with the lit candle. As an aniline dye, the alcohol immediately combusts leaving the pigment deep in the grain.
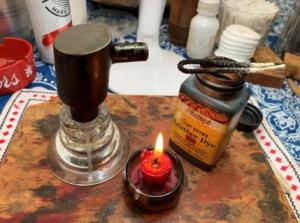 After the entire stummel has received the dye and flamed, it is set aside to ‘rest’ through the night to allow the new dye to settle in.
 It rained through the night here in the Kiasutha campground in the Allegheny National Forest. The weather app says it should be sunny until 6PM when the rain will start kicking up again. Yesterday, my wife and I took a road trip to the nearby Kinzua Dam over the Allegheny River, which was completed in 1965 creating Allegheny Reservoir, the body of water on which our campground is located. A few travelogue pictures to share!
 Back under The Clam canvas, I’m ready to ‘unwrap’ the Cherrywood stummel and to see how the light brown dye was received by the grain. A more abrasive felt buffing wheel is mounted on the rotary tool with the speed at about 40% full power. Brown Tripoli compound is applied to the crusted flamed dye to plow it off. The picture shows the contrast of the grain emerging as the buffing takes place.
 After the felt wheel does the primary job of clearing the flamed crust, to fine tune the polishing process, the coarser Brown Tripoli is again applied to the stummel but with a cotton cloth wheel with the speed set a bit faster at about 50% full power. The purpose of this is to further remove excess dye from the surface which sharpens the grain presentation. The focus is removing small ‘dye blobs’ on the surface. The other reason is to remove excess dye from the crook where the shank and bowl come together. The felt wheel is not able to navigate this tight area.
 After the Brown Tripoli application, the stummel is wiped with a cotton pad moistened with alcohol. Doing this helps to blend the young dye and to remove excess dye. It also lightens the hue if this is desired.
 Before the application of Blue Diamond compound, the stem is reunited with the stummel. It often is the case, after a thorough cleaning the mortise tightens making the fitting of the tenon too tight for comfort. We don’t want to crack the shank.
 Too remedy the tight fit, 220 grit paper is wrapped around the tenon and while pinched in place, the stem is rotated. The sanding reduces the diameter of the tenon a bit. After a few tries and test fits, the proper seating is achieved.
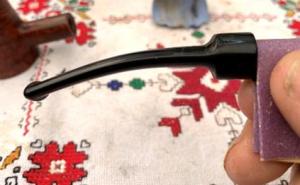 With the stem reunited with the stummel, another cotton cloth wheel is mounted at about 40% full power and Blue Diamond compound is applied to the pipe – stem and stummel.
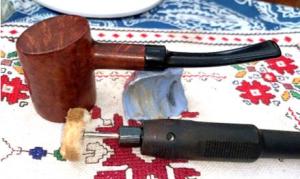 After the application of Blue Diamond, the pipe is wiped with a felt cloth to remove the compound dust in preparation for the application of wax.
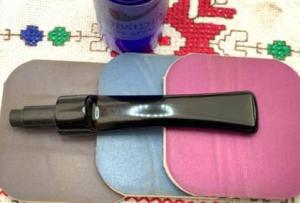
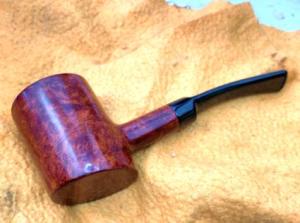 With another cotton cloth wheel mounted at the speed at 40%, carnauba wax is applied. After application of the wax, the pipe is given a rigorous hand buffing with a microfiber cloth to remove excess wax and to raise the shine.
 I’m enjoying our travels and the opportunity to finish this first restoration on the road. I hope I’m can do more! I enjoyed the research on this Sullivan Powell of London Cherrywood. The Sullivan Powell tobacconist situated in the Burlington Arcade would have been a visit to put on the bucket list if one found themselves in London. As it is, this Cherrywood carries with it a small piece of the Sullivan Powell history and legacy. The Cherrywood’s grain came out in spectacular fashion with lively waves and large bird’s eye swirls. The iconic shape will serve a new steward well as it sits on the table as the cards are dealt, and the drinks poured. This Sullivan Powell is a nice addition to a pipe man’s collection. Chris commissioned the Sullivan Powell Cherrywood and will have the first opportunity to acquire it from the Pipe Steward Store with a portion of the proceeds benefitting the Daughters of Bulgaria which has become ‘Spring of Hope’ – helping women and girls who have been trafficked and sexually exploited. A ‘Before & After’ reminds us how far we’ve come. Thanks for joining me!


Dal, This was a spectacular refurbishment. I can’t wait to get this pipe and try it out in the new Lounge. It is so impressive the detail you take in the process and documenting all the steps.
Thank You for all you do. Enjoy the RV life.
Chris
LikeLiked by 1 person
Thanks, Chris! I’m looking forward to when you put the Sullivan Powell into service!!
LikeLike