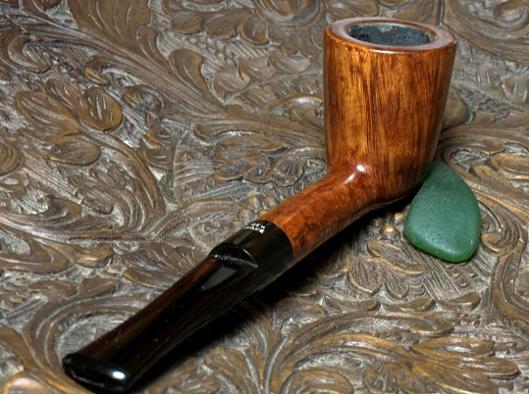
I describe this next pipe on the worktable as a Dublin shape. The bowl is slightly canted and has nice lines. It has beautiful vertical grain and that is the main draw-factor of this pipe. This is the second pipe that pipe man Bill from Pennsylvania has commissioned. The first was a Tribune Rusticated Dublin that came out very nice (A New Beginning for a Tribune 909 Rusticated Dublin).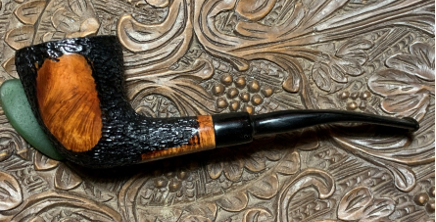 The second pipe is a Ben Wade Made in London, England 23, which has some issues. I received the Ben Wade in 2019 in a lot of 16 pipes from a pipe man in the Kansas City area. John reached out to me wondering if he could donate some of his collection to help support the Daughters of Bulgaria. I appreciate John’s donation of pipes that went into the For “Pipe Dreamers” ONLY! collection for pipe men and women to commission. The Ben Wade that got Bill’s attention is the last pipe in the middle row. The dimensions of the Dublin are Length: 5 3/4 inches, Height: 2 inches, Rim width: 1 1/2 inches, Chamber width: 13/16 inches, Chamber depth to be determined.
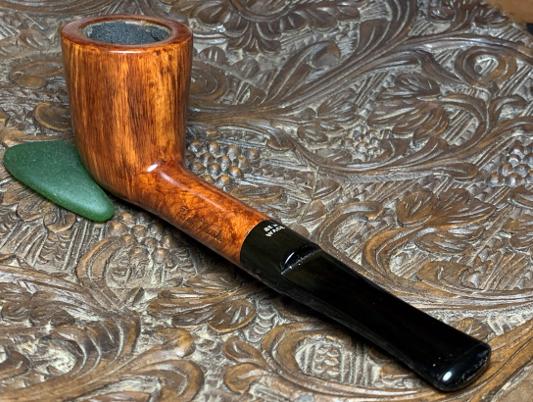
 When I the Ben Wade made it to the worktable to take a closer look, I found an issue that is daunting. The chamber has significant heating and charring issues so much so that there appears to be a small burn through on the right side that I hadn’t noticed before. Here are pictures of the Ben Wade when I first received the pipes from John.

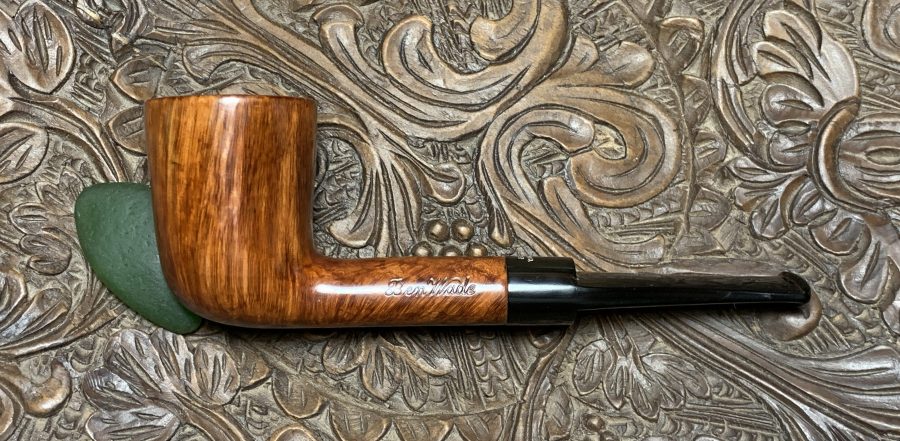
 The stamping on the left side of the shank is crisp and strong in cursive: Ben Wade. The right side of the shank has stamped, MADE IN [over] LONDON, ENGLAND. To the right of this is stamped the shape number, 23.
 The upper side of the saddle on the stem is stamped, BEN WADE.
 Before jumping into the issues of the Dublin on the worktable, I enjoy refreshing my understanding of the Ben Wade name. Pipedia’s article on Ben Wade is interesting and very helpful in explaining the history. The ‘Family Era” (1860 to 1962) is described as the ‘hay day’ of the British pipe maker:
The company was founded by Benjamin Wade in 1860 in Leeds, Yorkshire, where it was located for over a century. Ben Wade started as a pipe trader, but yet in the 1860’s he established a workshop to produce briar pipes. The pipes were made in very many standard shapes – always extensively classic and “very British”. Many models tended to be of smaller dimensions. Ben Wade offered a very high standard of craftsmanship and quality without any fills. Thus, the pipes were considered to be high grade and a major competitor to other famous English brands.
The article describes that along with most pipe manufacturers, the Second World War was a difficult time for Ben Wade. German air raids destroyed the factory in Leeds, but the Ben Wade Co., quickly rebuilt after the war. The Pipedia article gives several examples of the Ben Wade based in Leeds nomenclature during the Family Era (courtesy of Doug Valitchka): The ’Family Era’ ended when the business was sold in 1962. The Pipedia article continues:
…the owner family decided to leave pipe business and sell off the firm. The family went into negotiations with Herman G. Lane, president of Lane Ltd. in New York at about the same time as the Charatan family. Lane Ltd. bought both firms in 1962. Herman G. Lane had been Charatan’s US sole distributor since 1955 and Charatan always remained his pet child. But Ben Wade was treated in another way by its new owner. The fabrication of pipes was reduced and the factory in Leeds was closed in 1965 finally. So, this was the end of Ben Wade pipes stamped “Made in Leeds, England”.
The ‘Lane Era’ is described as a time when the historic quality of Ben Wade declined to a ‘second’ with reference to the production of standard shapes:
Alas the “new” Ben Wades were quite usual series pipes, copies of well-known standard shapes. The pipes often showed hardly masqued fillings and were processed quite coarsely with hardly polished pre-moulded Ebonite stems. Therewith Ben Wade degenerated definitively to a second brand.
According to the Pipedia article, after the death of Herman G. Lane, the business was sold to Dunhill Pipes Limited in 1978 and the new owner had no need to produce ‘seconds’ coming from the acquisition.
The Pipedia article continues with the ‘Danish connection’ of Ben Wade. I had one other question regarding the name ‘Ben Wade’ – the Danish connection? In 1971, the young, Danish pipe maker, Preben Holm, came to Lane with financial difficulties and in need of a new US distributer of his pipes made in Denmark. The new partnership put the Ben Wade name on the Freehand production coming from the Danish factory into the burgeoning US ‘Freehand’ market with a commitment to quality rather than quantity. The market grew through the 70s until 1985, when the market for these pipes fell resulting in the downsizing of the factory in 1986 but the production of Danish Ben Wade pipes came to an end in 1989 after the death of Preben Holm. The Pipedia article concludes by describing the status of the Ben Wade name. Duncan Briars purchased rights to the Ben Wade name from Dunhill Pipes in 1998 and continues to produce pipes at the same factory where Dunhill pipes are made:
The bowls are carved at the world famous 32 St. Andrews Road, Walthamstowe pipe factory, in London, England. The same factory where Dunhills are made. Every pipe is drilled spot on and exhibits a good blast and all have high quality German Vulcanite mouthpieces. Every pipe is stamped “Ben Wade, Made in London, England”. The craftsmanship and smokability have always been superb.
From this information, we can assume that the Ben Wade Dublin on the worktable comes from the ‘Lane Era’ produced between 1965 and 1978 matching the nomenclature during this period. “Made in London England” or just “London” replaced “Leeds” with the characteristic cursive script and ‘Ben Wade’ stem stamp (again courtesy of Doug Valitchka): Looking now at the Ben Wade on the worktable, the small fill on the right side of the bowl with the darkened briar surrounding it was my first inclination that there were problems ‘under the hood’.
  The following pictures show the floor of the chamber seemingly crumbling with charred briar. A pipe cleaner is inserted to locate where the draft hole is amid the crumble. Not pretty…after the wincing subsided looking at the Ben Wade cavern, I noticed that the briar was gray on the bottom of the chamber. My concern at this point is that this gray briar is all charred which means it will all crumble with a little help. Can this pipe be salvaged?? If I start digging will the chamber turn into the Grand Canyon?
 I decided to send a note to Bill letting him know that there was a problem along with a few pictures. I shared that I ‘thought’ that it could possibly be repaired by filling the cavern in using JB Weld, but I’m not sure at this point if the chamber is too far gone to be reclaimed. Bill’s response was to proceed…. We’ll see. The first step is to start by reaming and then digging out the bad wood in the chamber to see where it lands us. The Pipnet Reaming Kit is used with 3 of its 4 blade heads.
  The Savinelli Fitsall Tool does the heavy lifting digging and scraping out the charred briar. The pile shows the progress.
 A few pictures show the progress and the condition of the chamber even though it is difficult to have ‘depth perception’ of the positioning of the chamber. The pipe cleaner marks the draft hole and a ridge can be seen which marks the place where the digging out of charred wood was progressing toward the shank. The ridge is marked by an arrow. In the second picture, the red dots show the general edge of where the bulge is located toward the shank.
 Next, I want to see if the fill on the exterior which is surrounded by darker briar is a burn through. If so, it’s important to determine where it burned through on the internal chamber side so that it can be properly addressed and repaired. The good news is that when digging with a sharp dental probe, the briar behind the pit is solid. I was expecting to see the probe to appear in the chamber! It is indeed a fill, and it doesn’t go through. That is GOOD news indeed, but the darkened briar means that the bowl was overheated.
  The cleaning of the chamber transitions into smoothing the areas where the charred wood has been removed.
 It’s difficult to picture the chamber to convey what is going on, so I employ some artistic skill to explain. In the sketch below, above the draft hole, the darker coloring represents the charred briar that was removed. At the top of this area, with a circle, is what now juts out unevenly since the briar beneath is gone forming a rounded indented area. Since the bad wood has been removed and there are no fissures or cracks evident, repairing with JB Weld isn’t the best approach at this point. What makes more sense is to smooth the area circled in the sketch to fashion a more tapered descent into the chamber. The possible downside to this is that the tobacco may not burn down evenly as the draw dynamics have been somewhat altered. This isn’t ideal but provides the path for this Ben Wade to have another life.
 To sand and taper the chamber wall, the sanding drum is mounted on the rotary tool to do the job. This makes the work much easier, but care is taken not to overindulge!
 After the sanding drum, the dowel rod wrapped with 220 paper is again utilized to fine tune to make sure the wall is smooth and nicely tapering down the chamber. I feel much better about the chamber condition now. With the chamber in better order, the normal cleaning continues.
 A few pictures show the external surface that needs a general cleaning.
 The stummel is scrubbed first with undiluted Murphy’s Oil soap using a cotton pad.
 Next, the stummel is taken to the sink using warm water and liquid anti-oil dishwashing soap, shank brushes work on the internals of the stummel. After a scrubbing, the stummel is thoroughly rinsed and brought back to the worktable.
 Continuing with the internal cleaning, cotton buds and pipe cleaners are moistened with isopropyl 99% alcohol. Well, as the picture shows below, the internals were treated with purple stuff. I’m not sure what it is, but its been there a while. The progress of cleaning did show some improvement, but the purple stuff is still there. The decision is made to bring this phase to a halt with the intention of giving the stummel an alcohol and kosher salt soak later to see if this will draw out the purple stuff…
 Looking now at the issues of the stummel, the rim has darkened briar from lighting practices. The briar is darker on the aft part of the rim and on the very front edge.
  The rim also has some chips on the rim’s internal edge.
 As shown earlier, the dark briar on the right lower side is overheating of the briar. The good news is that the hole is not a burn through. Sanding may not help the darkened part of the briar because the heating originates internally. The fill needs to be cleaned further and filled.
 Starting from the top and working down, the stummel is topped to clean the rim and reduces the charring footprint. It also reduces the chipped area on the inner rim.
 With the stummel inverted, 220 paper is placed on a chopping board, and the stummel is rotated several times.
 After a few cycles of rotation and checking, enough briar has been removed.
 Next, the 220 paper is exchanged for 600 grade paper and the stummel is rotated several more times. The results are good.
 The topping has left the ring of dark on the inner rim as well as the chip.
 To address these issues, a smart bevel will be created on the rim edge. To create an even, sharp bevel, 220 paper is wrapped around a wooden orb and then rotated in the mouth of the chamber.
  The process is then repeated with a strip of 600 grade paper wrapped around the orb and rotated in the chamber.
  I really like the look of the bevel and it has removed most of the dark briar and the chip is gone.
 Next, time to address the pit on the right lower side of the stummel.
  The pit is cleaned further using a sharp dental probe and then the area is cleaned with alcohol and a cotton pad.
 Regular, clear CA glue is placed on the pit and then sprinkled with briar dust. The dust helps to blend and to cure the patch.
 After the patch has cured, the mound is filed with a flat needle file.
 After the filing, the patch is sanded with 220 grit paper then 600 grit paper.
 To clean the external surface and to blend the sanded patch area, the stummel is sanded with sanding sponges next. Starting first with the coarse sponge, then medium, light, and fine.
 To continue the sanding, next micromesh pads are used which transition to the polishing phase. The stummel is sanded with pads 1500 to 2400, then 3200 to 4000 and finally with pads 6000 to 12000. Between each pad, the stummel is wiped with a moistened cotton cloth to clear the briar dust and to give the following pad better traction.
 After the micromesh process, the dark area is still evident… The hour is late, and I’ll give thought to what should be done with this, but at this point the stummel will be given a kosher salt and alcohol soak.
 Using isopropyl 99% alcohol and kosher salt the internals are given further cleaning. A cotton ball is pulled and twisted to form a ‘wick’ that is inserted into the mortise and airway with the help of a firm wire which I cut from a wire hanger. The ‘wick’ helps to draw out the tar and oils from the internal briar. I’m hoping that it will also draw out the purple coating that is in the mortise. What I discovered on closer examination is that the coating with the purple stuff is only as far as the tenon would be engaged in the mortise. It would not get into the hot air passing through the airway. This was my main concern when I discovered it.
 Kosher salt is used because it is unlike regular salt or iodized salt which leaves an iodized aftertaste. The soak also addresses possible ghosting and refreshes the briar nicely. The salt is poured and fills the chamber.
  After the stummel is situated in the egg crate, the rim and end of the shank are leveled. After this, isopropyl 99% fills the chamber slowly with a large eye dropper until the liquid surfaces over the salt. After 10 or so minuetes, the alcohol is absorbed into the salt and cotton wick and again the isopropyl 99% is topped off.
 The stummel is set aside to soak through the night.
 The next morning the salt is slightly soiled, and the cotton shows the ring of purple at the very end of the shank. The deeper parts of the wick show normal soiling. This is good.
 A few more cotton buds continue to show hints of the purple stuff, but the internals are clean and ready to go.
 We’ve come to the time of decision. The plain truth is that the dark area from heating damage bothers me, and I wouldn’t want to look at it amid the beautiful vertical flame grain that this Ben Wade displays. The grain is the wow factor that this Dublin has going. The decision is made to apply Fiebing’s Light Brown Leather Dye to help mask the problem area. The upside of applying a dye, is that it has the potential to ‘pop’ the grain even more.
 To prepare the stummel to receive the dye, it is first heated with the hot air gun to expand the grain. This helps it to be more receptive to the application of the dye.
 Next, the light brown dye is applied in sections with a folded pipe cleaner and then immediately ‘flamed’ with the lit candle. The flame immediately combusts the alcohol in the dye (since it’s an aniline dye) and it burns off leaving the pigment behind. This process is done repeatedly until the entire stummel has received the new dye.
 The stummel is then set aside to ‘rest’ for several hours while the new dye settles in.
 Turning now to the stem, it is in pretty good shape. There is no indication of oxidation which is nice for a change! The upper button has 2 bite marks, but the bit looks good – a few indications of chatter.
 The lower button has a compression at the center edge and there is light tooth chatter on the bit.
 To address the issues with the bit, the upper and lower bit and button are sanded with 220 grit paper.
 This is followed by sanding the lower part of the stem with 320 grit paper. The saddle is in good condition, and I don’t want to mess with the BEN WADE stem logo.
 After the 320 grit paper, the lower stem is wet sanded with 600 grit paper and this is followed by applying 0000 grade steel wool.
 Next, the micromesh regimen – first, the lower part of the stem is wet sanded with pads 1500 to 2400.
  This followed with dry sanding the lower stem with pads 3200 to 4000.
 Finally, the entire stem is sanded/polished with pads 6000 to 12000. Between each set of 3 pads, Obsidian Oil is applied to help condition the vulcanite stem and to guard against oxidation in the future. The stem looks great.
 The next morning, the newly dyed stummel rested through the night. To ‘unwrap’ the crusted flamed surface, a coarser felt buffing wheel is mounted on the rotary tool with the speed set at a bit slower than the normal 40% full power. I put on a new felt wheel because after a while, they lose their suppleness. The speed is slowed to avoid too much friction on the briar surface. Brown Tripoli is used to plow the crusted flamed shell encompassing the stummel. During the process, the felt wheel is purged a lot on the edge of the chopping board that serves as a lap board while I use the rotary tool. This purging helps to keep the wheel soft.
 This picture shows the contrast between what has been ‘unwrapped’ and not. The goal of this phase is to remove excess dye – not only the crusted flamed dye, but also to remove blotches of dye after unwrapping to sharpen the grain patterns.
 After the initial unwrapping using the felt wheel, the Brown Tripoli application is repeated with a cotton cloth wheel. The speed of the rotary tool is increased to the normal 40% full power. As I have developed the techniques of staining, I repeat this process with the cotton wheel for two reasons. The next picture shows the crook of the shank where the shank and the bowl merge. The felt wheel is not able to squeeze into these tight areas but the cloth wheel can. The other reason for repeating the Brown Tripoli with the cotton cloth wheel is to continue removing the excess wax to sharpen the grain patterns.
 Next, the stummel is wiped with alcohol and a cotton pad. This is done to remove excess dye and to blend the new dye over the surface. It can also lighten the hue a bit.
 With the stummel and stem reunited, and another dedicated cotton cloth wheel mounted at the same speed, Blue Diamond compound is applied.
 To remove the compound dust in preparation for the wax, the pipe is wiped with a felt cloth.
 One mini project remains before application of the wax. The chamber has been through quite a bit and lost some of its briar real estate above the draft hole. The chamber has been gently tapered and smoothed to remove the damage caused by the charring. To help protect the chamber, Pipe Mud will be used to create a cake starter.
 Pipe Mud is made from a SMALL amount of water mixed with valuable cigar ash 😊. It takes a good amount of time to collect a substantial amount of cigar ash and I try not to use it more than necessary.
  Using a pipe nail tool, ash is shoveled into the water and mixed. The mud thickens as more ash is introduced and mixed in. When the viscosity of the mud does not run (like molasses), the pipe nail is used to trowel the mud and spread it evenly around the chamber.
 A pipe cleaner is inserted through the draft hole to keep the mud out. Once the mud has been spread, the stummel is inverted and allowed to dry. The mud dries into a surprisingly tough layer and provides the new steward with a starter for a new cake. A healthy cake only needs to be the depth of a US dime. WARNING for the new steward: After putting the pipe into service, DO NOT use a metal pipe tool to scrape the chamber! This will remove the Pipe Mud starter. Instead, simple rubbed the chamber wall with a folded pipe cleaner for several sessions to allow the cake to develop 😊.
 After a few hours, the Pipe Mud has thoroughly cured, and next Carnauba is applied to the pipe. Using a dedicated cotton cloth wheel mounted on the rotary tool, the wax is applied. Afterwards, the pipe is given a rigorous hand buffing to remove excess wax and to raise the shine.
 This was truly a save for this Ben Wade Made in London, England. My first impressions were that the damage to the chamber was insurmountable, but the cleaning and sanding provided what was needed. There is still a ‘cloud’ on the outside of the bowl where the heating damage was, but the new dye helped to mitigate the ‘in your face’ and helped to blend with the rest of the briar. The vertical flame grain on this pipe is a beautiful sight to see. As expected with such distinctive vertical grain, the rim reveals the tight cross-section view of the vertical flow with bird’s eye grain. The Dublin shape always seems to convey a bit of stiff attitude. The pipe nestles well in the palm and should provide a new steward with good fellowship. This Ben Wade was commissioned by Bill, and he will have the first opportunity to claim him from the Pipe Steward Store. A large portion of each pipe purchased helps the work of the Daughters of Bulgaria – helping women and girls who have been trafficked and sexually exploited. Thanks for joining me!