The Kiko on the worktable came to me on a pipe picking expedition on December 27, 2019. My wife and I were still living in Sofia, Bulgaria, where we had lived for 15 years. In the center of the city is erected a majestic Orthodox church called Nevski Cathedral. Just a small distance from Nevski is an outdoor bazaar called Nevski Bazaar which I often visited checking out the tabletops of vendors who had gotten used to my pipe searches. Just after Christmas that year, we were in the center showing visitors the various historical buildings. Of course, I took advantage of the opportunity to walk through the bazaar to see if any pipe treasures had emerged. One particular vendor’s table was a Christmas bonanza! I love the ‘wild’ environments where pipes might be found. This table was a beautiful site holding some new pipes. The negotiations were successful, both the vendor and the pipeman were happy. When I got home, the three pipes acquired were all Meerschaums – 2 Kikos and a Brebbia. After they posed for a picture, they went into the ‘For “Pipe Dreamers” ONLY!’ collection where pipemen and women can commission them benefiting the Daughters of Bulgaria – a Christian effort helping women and girls who have been trafficked and sexually exploited that my wife and I co-founded.
 Pipeman Mark, of North Carolina, heard the whisper of the Kiko dark stained Meerschaum. This is the 3rd pipe that he has commissioned. Both of the previous 2 commissions were distinctively rusticated or sculpted pipes. The first was a Whitehall Gulfstream (See: Bringing Life to a Whitehall Gulf Stream Imported Briar Sculpted Dublin).
 The second was an Italian Sculpted Billiard that turned out to have a Meerschaum lining (See: A Surprise Discovery of a Meerschaum Lining for a Sculpted Billiard of Italy).
 With these two commissions and with the Kiko, with its rock surface style, it appears that Mark likes textured pipes. Here are pictures of the Kiko now on the worktable.
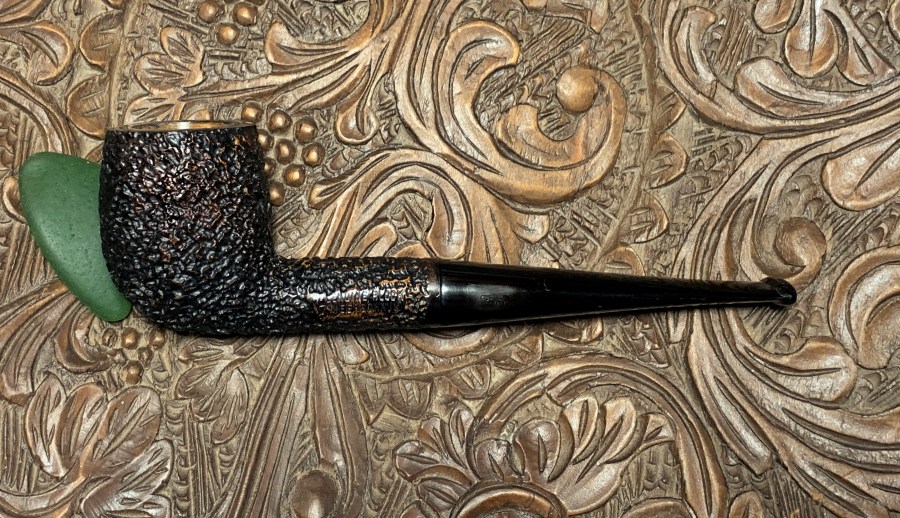


 The nomenclature is stamped on a smooth panel on the left shank flank. It is stamped, GENUINE BLOCK [over] MEERSCHAUM. To the left of MEERSCHAUM is the number ‘7’ – presumably a shape number.
 The COM of this Kiko is the now nonexistent country of TANGANYIKA, which is stamped on the underside of the stem. The stem is also stamped with a recognizable Kiko logo, an elephant. The elephant is ghosted and I’m doubtful that he can be refreshed with new paint.
 I’ve worked on Kikos previously and I enjoy refreshing my understanding of the name. Dating the minimal age of this pipe is made easy by the fact that Tanganyika is no longer a country. According to the Wikipedia article, in 1922 the Tanganyika Territory was taken by the British as their share of German East Africa under the
  League of Nations Mandate. After WW 2, Tanganyika became a United Nations Trust Territory yet remained part of the British Commonwealth. Claiming independence from the crown, Tanganyika adopted a new constitution in 1962 that abolished the monarchy and became present day Tanzania. The picture to the left shows the location of Tanganyika – marked #11. This puts the date of this Kiko at no later than 1962 which gives a bit of vintage as it carries its former Commonwealth history to the present.
On a previous Kiko restoration, I posted some pictures of that Kiko during the restoration on the Facebook group, The Gentlemen’s Pipe Smoking Society. Fellow member, Jonny Mullis, commented on the Kiko name that they were wonderful pipes with the animal stamping. He also said that they were becoming quite collectable and affordable. That was all good news to me!
Looking for additional information, Pipedia’s Kiko article is helpful:
Kiko, meaning “pipe” in Swahili-Kiswahili to English translation, is probably the best known of the various brands listed below. In East Africa Meerschaum is found in Tanganyika, once known as German East Africa, and since 1964 part of the United Republic of Tanzania. The main deposit comes from the Amboseli basin surrounding the Lake Amboseli. Tanganyika Meerschaum is normally stained in shades of brown, black and yellow, and is considered to be inferior to Meerschaum from Turkey. Even though, the raw material is mined by the Tanganyika Meerschaum Corporation and to a large extent used for pipe making. Uncounted pipe makers throughout the world were supplied with Amboseli Meerschaum, preferentially used for Meerschaum lined briars or leather-clad pipes. In Tanganyika the Kilimanjaro Pipe Company Ltd. produced (afak).
Interesting factoids included first is that Kiko means pipe in English. Also described is how Ambroseli Meerschaum is considered to be inferior to Meerschaum mined in Turkey. Even so, the Pipedia article describes how this Meerschaum was used in arrangements with Comoy’s and GBD. The article goes on to list the various Kiko lines and the corresponding descriptions and associated animal logo. This is both interesting and helpful. I include this listing here:
- Caveman Fashioned from a piece of natural meerschaum. Every pipe is unique and – is in fact a geological specimen over a million years old. Attractively boxed.
- Countryman (Elephant logo ) Block meerschaum with rustic finish either yellow or black. Individually boxed with protective chamois bag.
- Huntsman Block meerschaum black or yellow rustic bowl.Bamboo and vulcanite stem. Individually boxed with chamois bag.
- Hillibilly Block meerschaum, black or yellow corncob style finish.
- Kiko Rough (Elephant logo) Old seasoned briar. Block meerschaum lined with black rustic finish.Individually boxed.
- Kiko plain (Elephant logo) As for Kiko Rough but with smooth plum colour finish.
- Kikob (Elephant logo) Hillibilly style Briar block meerschaum lined.
- Kilimanjaro (Rhinoceros logo) East African pipewood Meerschaum lined and individually boxed. Available in black rough finish and natural smooth or rough finish.
- Kilimanjaro Giant (Rhinoceros logo) Finish as for standard Kilimanjaro, but available in three shapes only. Bent, Billiard and Oval Pot.
- Kudu (Giraffe Logo)
- Makonde (Rhinoceros logo)
- Merlin (Flying bird or Antelope logo)
- Sportsman (Logos Elephant) Block meerschaum, covered with hand-sewn English pig-skin. Individually boxed.
- Tembo
- Townsman Block meerschaum with plain glossy yellow finish. Individually boxed with protective chamois bag. The Townsman is also available in the new styles. Townsman Crater, Townsman Scallope and NSC.
- Twiga (Giraffe Logo )
- White elephant (Logos Elephant)
In this list, the animal logos listed are Elephant, Rhinoceros, Giraffe, and Flying Bird or Antelope. The Elephant logo is the most used in the list. Looking at the differing Elephant logo line descriptions, the line that fits the Kiko Elephant on our table seems to be the Countryman line with our black stained rustic finish. In the list above, each of the animal logos is linked to the corresponding reference at Pipephil.eu. The Countryman shown on the panel below from Pipephil.eu is a close Billiard match to our Kiko. The example has a shape number of 20, ours is 7 – the difference probably having to do with Billiard size. With a renewed appreciation for the Kiko name and the pipe on the worktable, I take a closer look at the pipe. From the lightened picture below, one can see the layer of cake on the Meerschaum chamber wall. Meerschaum generally does not need a protective cake. One of the great things about Meerschaum pipes is that they generally are a cleaner or purer and cooler smoking experience. Meerschaum also does not need to rest between uses, as is the case with briar pipes. The chamber will be cleaned down to fresh Meerschaum and the rim will be scrubbed.
 The rusticated, rock effect, Meer bowl gives a distinctive rustic feel – nice. The question that comes to mind at this point is what restoration looks like for a bowl like this. The Meerschaum received a black dye that has worn off and thinned in places. The next picture shows how the black finish has lightened at where you would expect the thumb to rest cradling the bowl. The rim also has wearing around the edge from normal wear. One would expect this from a pipe dating back to at least 1962 – at least a 60-year-old Kiko, getting close to geezer status 😊. At this point, I’ll wait through the cleaning process to decide on how to proceed.
 The stem has deep oxidation, and the upper button lip has been compressed as well as significant compressions on the lower side.
 To begin the restoration of this vintage Kiko Genuine Block Meerschaum Billiard, the stem airway is cleaned with pipe cleaners moistened with isopropyl 99% alcohol. It doesn’t happen often, but I’m thankful when it does, the airway was essentially clean and only one pipe cleaner was needed to confirm this.
 Next, to address the thick and deep oxidation, the stem is placed in Mark Hoover’s ‘Before & After’ Extra Strength Deoxidizer. The stem will soak overnight, and we’ll see how well the Deoxidizer does with this challenging test.
 After the stem soaked sufficiently, it is fished out of the soak and with surgical glove clad hands, the thick fluid is squeegeed off the stem and then wiped with a paper towel to begin removing the raised oxidation. From the picture below you can see how dense the raised oxidation is by looking at the soiled paper towel. The paper towel is followed by rubbing the stem’s surface briskly with a cotton cloth to continue removing the oxidation and cleaning the stem. The airway was also cleaned using a pipe cleaner moistened with isopropyl 99%.
 The vulcanite stem next is conditioned with an application of Paraffin Oil. Paraffin Oil is a mineral oil which is preferred over ‘live’ oils of plants or animals which can become rancid. The vulcanite seems to drink it up. The stem is set aside to allow the oil to be absorbed.
 The cake is thick in the chamber which is difficult to see in the picture. I do not ream Meerschaum bowls with the usual tool I use – the Pipnet Ream Kit. The reason for this is that reaming applies a torque to the chamber wall that may be too much and crack the Meerschaum. Thankfully, this has never happened to me, but I don’t want to have a first time!
 Instead of the reaming kit, the chamber is scraped using the Savinelli’s Fitsall Tool. With the Fitsall Tool, there is more control over clearing the cake, but the downside is that it takes longer. This downside is overcome by learning the discipline of patience😊.
 A lot of carbon cake is removed by the Fitsall Tool. This is followed by sanding the chamber using 220 grade paper wrapped around a Sharpie pen. The sanding helps to remove the last vestiges of the cake.
 An inspection of the chamber reveals a healthy bowl. Moving on.
 Moving next to cleaning the external Meerschaum surface, a couple pictures are taken to mark the starting point.
 Using undiluted Murphy’s Oil Soap on a cotton pad, the rock-like surface is scrubbed.
 A bristled toothbrush is also used to get into the troughs of the rusticated Meerschaum. After the scrubbing, the stummel is taken to the sink to thoroughly rinse the soap off the stummel.
 The internals are cleaned using pipe cleaners and cotton buds moistened with isopropyl 99%. A small dental spoon also is used to scrape the mortise, and a small amount of tars and oils are removed. I move on after the buds and cleaners begin to emerge lighter.
 The rim is shown in the next couple of pictures. There are scratches evident on the rim and the inner rim edge is full of scratches as well – normal wear. The external rim edge has worn so that the raw, white Meerschaum is exposed.
 To clean the rim and to refresh the lines, the stummel is lightly topped using 220 grade paper on the chopping board.
 With the stummel inverted on the paper, the stummel is rotated over the paper evenly. Only a few rotations are needed.
 The same is done with 600 paper on the chopping board. Only a few rotations are needed to smooth things out more.
 Next, to reintroduce the black finish to the rim and to darken the edges, a black dye stick is used.
 To ‘weather’ the rim a bit so it will blend with the rustic environment, the last 3 micromesh pads are used to create a non-new look.
 The normal way of treating Meerschaum is to coat it with melted beeswax instead of applying carnauba wax. This protects the Meerschaum and gives it the healthy shine that is nice.
 Using the hot air gun, the beeswax is melted in the mason jar.
 Using a horsehair paint brush, the melted beeswax is applied to the stummel. Horsehair is used because it will not melt with the heat – I’ve learned the hard way. Not shown here because I only have 2 hands is that I propped the hot air gun in such an angle that hot air was blowing on the stummel as the beeswax is applied. This helps in keeping the beeswax thinner and in its melted state. When the beeswax cools it can congeal in thick clumps on the surface. This is why keeping the hot air gun aimed at the stummel helps.
 After the stummel fully cools, the beeswax finish is given a hearty hand buffing to remove the excess wax in the nooks and crannies of the rusticated ‘rock’ finish.
 Turning now to the stem, the metal threads of the tenon are compacted with gunk. A sharp dental probe is used to dislodge the grime.
 This is followed by applying 0000 grade steel wool to the threads. This shined the tenon nicely.
 The button, both upper and lower, has been chewed and I am doubtful that the heating method will help much. The upper and lower bit have also been compressed. I’m hopeful that the upper bit will be improved by the heating method, but lower, doubtful. The heating method uses the flame of a Bic lighter to paint the upper and lower bit several times to heat the vulcanite. The rubber compound, when heated, seeks to recover its original position which hopefully minimizes the compressions. The before and after pictures show little improvement to the button. The lower bit will also need to be patched. The upper bit is sanded to see if that will remove the compression. First, the upper bit:
 Next, the lower bit:
 Without improvement from the heating, the button needs to be rebuilt. Rebuilding the button is done by applying Black Medium-Thick CA glue to the button lip and spray accelerator is immediately used which quickly cures the glue and holds it in place. This is done with both the upper and lower button lip to rebuild it. Several layers of CA glue are placed over the lip and between each layering, accelerator was used – both upper and lower.
 The lower bit also needed to patch the bit compression.
 The next pictures shows the building of the button. Excess patch is created to give enough ‘meat on the bones’ to then file down into a proper button.
 Next, using squared and flat needle files, the button shaping starts by first filing the button facing.
 With the boundaries of the button facing established, next the button lip is filed down. I’m not concerned with the stem side of the button lip at this point. I just want to shape the button circumference.
 The results look good – upper and lower.
 With the upper and lower button defined in depth, next the hang lip is defined.
 The next picture shows the process used. In ‘cutting’ the hang lip, I start by ‘sawing’ a ledge at the right side (top of the picture) of the button and gradually bringing the ledge to the center, then to the left side of the button. I’m careful to keep the sawing action straight. You can see the initial sawing of the ledge and there still is excess patch material underneath the forming edge. This is gradually removed as the edge is created and the patch material is filed down to the stem surface.
 The results look good. The button has been roughed out with filing, and sanding is next to erase the file marks and to smooth.
 To remove the file marks and to smooth the bit further, 220 grade paper is used.
 Before the sanding is expanded to the entire stem, the elephant logo and the COM, Tanganyika, are covered with painters’ tape to protect them during the sanding.
 The sanding is expanded next to the entire stem with the 220 grade paper. The sanding is to remove scratches and any residual oxidation.
 Next, the stem is taken to the sink where it is wet sanded using 600 grade paper. After this, 0000 grade steel wool is applied.
 More tape is applied to the COM and logo, and the full regimen of micromesh pads are applied starting by wet sanding with pads 1500 to 24000. This is followed by dry sanding with pads 3200 to 4000 and 6000 to 12000.
 With the stem and stummel reunited, a cotton cloth buffing wheel is mounted to the rotary tool and Blue Diamond compound is applied to the stem alone.
 The stem is wiped with a felt cloth to remove compound dust before applying the wax.
 With another cotton cloth wheel mounted, carnauba wax is applied to the stem alone. After application, the pipe is given a rigorous hand buffing to remove excess wax from the stem and to raise the shine.
 This Kiko Genuine Block Meerschaum Billiard is a unique, one-of-a-kind pipe. It predates 1962 when Tanganyika ceased to exist as a country in Africa. The name of this Kiko’s line, Countryman, fits well. The black stained ‘rock’ Meerschaum with the flecks of Meerschaum peaks is a nice contrast and gives a relaxed, rustic vibe. The bowl is of ample size fitting well in the hand and also will provide a new steward with plenty of room to pack his favorite blend. Mark commissioned this Kiko Countryman Meerschaum and will have the first opportunity to acquire him in the Pipe Steward Store benefitting the Daughters of Bulgaria – helping women and girls who have been trafficked and sexually exploited. Thanks for joining me!


 Please pray for the people of Ukraine
Pingback: Discovering a 1950s Brebbia Portofino 830 Sea Rock Pear with the help of Luciano Buzzi of Brebbia Pipes – The Pipe Steward
Pingback: Road Trip Restoration: A Sullivan Powell Burlington Arcade London, London Made 283 Cherrywood – The Pipe Steward