January of 2018 was when I saw this Mastercraft Bulldog on the eBay auction block. The Bulldog seemed to have good ‘bones’ from the seller’s pictures, but the straight saddle stem was a bit out of kilter mounted on a bent shank. The stem seemed to be begging to be bent to the proper orientation. The question did come at that point of whether the stem was an original, but from what I could see on the pictures, the fit looked good. The stem’s oxidation was the other thing that was beckoning attention. In the end, the bid I submitted was the winner and the Mastercraft found its way to me from Warsaw, New York – a Warsaw that I didn’t know existed on this side of the Atlantic Ocean. Here are the pictures that I saw on eBay.

 The left upper shank panel has the nomenclature with a ghosting ‘MASTERCRAFT’ stamped. The right upper shank panel has stamped, ‘IMPORTED BRIAR’. I could find no other markings on the stummel or the stem.
 After the Bulldog arrived, it founds its way into the online ‘For “Pipe Dreamers” ONLY!’ Help ME! Baskets where pipe men and women can commission pipes to be restored and added to their collections. This was where Jim, a Scotsman, heard the Mastercraft whispering his name. As I’ve shared before, I subscribe to the Harry Potter wand philosophy, except it’s not wands choosing their wizards, but pipes choosing their stewards. Jim reached out to me about the Mastercraft Bulldog and after he commissioned it with the pledge of patience, he wrote to me with a bit about himself. I always try to find out more about potential stewards receiving the pipes I restore which benefit the Daughters of Bulgaria. Here is what Jim wrote:
A little bit about me: I’m a 64-year-old Scotsman born and bred in Aberdeen, Scotland, who relocated to Houston, Texas, almost 20 years ago. I’ve been in the Drilling equipment business all my life, starting out as an apprentice and ending up as President of a small Company. That Company was bought by the biggest drilling equipment manufacturer in the world, based in Houston and here I am. At the age of 35 I was Engineering Manager for an electrical equipment manufacturer, supervising the implementation of the company’s first formal quality system, studying for final exams for an associate degree in business management and writing a thesis. For no apparent reason I fell over and woke up three days later. Doctors couldn’t find out why but told me I better slow down! Searching for something that it was impossible to do well and quickly I remembered an uncle of mine who was always calm and contemplative and, you guessed it, smoked a pipe. I started out with Hardcastles and after working in Holland several times got into Big Bens. Eventually moved up to a Barling and splashed out on a Peterson.
About 4 years after moving to Houston I slowly went from the pipe to cigars. I probably hadn’t smoked a pipe for about 8 years until last Christmas when for no apparent reason I decided I needed a change from cigars. Digging out my old pipes I wasn’t impressed with their condition, even after the usual ream and clean. I turned to the Internet and found a wealth of information, oh and the term “estate pipe” which I had never heard of. After giving my pipes a thorough going over and finding the process very satisfying, I’ve bought and cleaned up (would not class them as restored) a few cheap estates as well as going back to pipe smoking. Whilst researching pipe makers and brands as well as restoration methodologies I have come across Bare Pipe, Pipedia and of course your good self. I do like the way you turn your restorations almost into stories. I have also found the information invaluable in my own small restoration endeavors.
These days I am mainly smoking a Savinelli Alligator and a Barling, The Escort. I have also come to appreciate some of the Weber’s and Mastercraft pipes. Hence my interest in the Mastercraft.
Very Best Regards
Jim
I appreciate Jim’s story that brought him from Scotland to Texas and how he came into the pipe world. Through some medical challenges he needed to slow down. The example of his easy-going pipe smoking uncle taught him that a pipe was one enjoyable avenue to a calmer and more contemplative life. For me it’s a privilege to work on the Mastercraft Bulldog that Jim has commissioned and to learn more about the name.
 The interesting thing to me about the Mastercraft name is that Mastercraft is not a pipe producer. Any pipe with Mastercraft stamped on it came from other pipe houses in the US or Europe and even from Israel. Mastercraft receives these pipes and then distributes them for sale. Pipedia’s Mastercraft article actually came in large measure from a thread posting by a ‘Ted’ (his last name was not listed as far as I could find) who was the former vice president of Grabow/Mastercraft. His recollections are fascinating to me because this kind of information is not usually available. What is also fascinating is that the ‘Mastercraft discussion’ was on ‘The Dr. Grabow Collector’s Forum’. I include the initial recollection from Ted with the interesting story about Mastercraft from his perspective and its interaction with the Grabow company:
It doesn’t appear it was ever a manufacturer and bought pipes from multiple factories — mostly French and English. It survived briefly the post war recovery and then was acquired by Grabow.
The following is quoted from the thread:
 First a confession. From 1974 till 1984 I had several positions with Mastercraft including Executive Vice President. I also worked for Grabow From 66 till 74 and from 84 till I retired in 91. In 91, with retirement, I was President and COO for the corporation that was called “Sparta Industries”. I have seen both sides of the “fence”, and even though I never left the “employ” of Grabow, my loyalties for 10 years were with M/C.
United States Tobacco (UST) (Skoal and Copenhagen) bought Grabow in 69′ from the Lavietes family. In 74′ they bought M/C from Bernard Hochstein and moved it into the EXACT facility Grabow occupied. I was named “operations manager” and we were in the basement of a 4-story building in Sparta, NC.
M/C was STRICTLY an importer of pipes and pipe related merchandise. In 74′ when M/C moved from NYC to NC the inventory of finished goods was stored in a facility in Winston Salem, NC. Lentz Moving and Storage. Stacked 10 feet high the inventory covered 180,000 square feet…. FINISHED. In my time at Grabow I had never seen that much finished stock, and the shapes, manufacturers, finishes. Heaven for a pipe smoker…. Damn right. You would have had to slap me really hard to get the grin off my face.
I’ll just list a few Manufacturers/names of the inventory.
- England Parker/Hardcastle (Dunhill)
-
- Orlick
- France JeantetJimaCherrywoods
- Italy GIGI pipeRadicaRossiFederico RoveraEmilio Rovera
- Santambrogio
- Brebbia
- Meerschaums from Austria Strambach
- Lighters from Japan
- Pouches and accessories from Hong Kong
- and the Israeli pipes from Mr. Hochstein’s sons.
Trust me…This is only a small sample of the things M/C had, and bought into inventory.
 Now the connection. Since M/C and Grabow shared a building, and I was an employee of Grabow we compared notes. Grabow copied a BUNCH of M/C items fully with my help and some skills I had developed.
First was Omega…A copy of a well pipe made by Federico Rovera (FERO.com) …. Freehand by the Alpha/Shalom factory… Meerschaum Lined from M. Gasparini, and later GIGI PIPE. These were originally imported by M/C for Grabow and stamped Grabow, but also stamped ITALY. Later models. Better finishes were made in the USA. Bucko…copied from M. Gasparini… (Gasparini, to my knowledge is the only maker of leather covered in the world). If you buy a leather covered pipe it was, most assuredly covered by M/G. And you thought the wood in the Grabow COLOR was bad….outta unrap one of these scrappers. There is a lot more. Questions will be answered following the presentation.
Now the other way. Grabow to Mastercraft. M/C never really had a source of continuing supply. The foreign manufacturers would make a line for a while and then quit. Never do it again, no matter how well it sold, no matter the demands we put on em’. Grabow gave M/C a source of stability, and a nice profit for both companies. A lot of these you will not have heard of, but maybe…. Seville, for M/C all smooth, for Grabow all rustic. Hillcrest…. Freehand, For M/C Andersen and (a few Mastersen), for Grabow, Freehand with a DRB tamp on. New finishes…New shapes, New bits…. Mastercraft showed Grabow how to use LUCITE for stems…. Royalton…. Again, these are just examples.
Ted also said: Several years before UST bought Mastercraft, M/C had acquired Marxman Pipes. A wonderful kind man, Bob Marx was still working as a salesman in NYC, and I was fortunate to make a few sales calls with him. You all remember Charles Atlas? Bob Marx was about 76 and had just been awarded the (I think) Atlas Award for being the finest speciman of manhood over 70 years old in NYC, or maybe the state.
M/C had some inventory of Marxman stuff, but not a lot. I know very little about Marxman. Did they make, import, or both?
 M/C was included in all the major Christmas catalogues… Sears… Spiegel…. Penney… Ward… Aldens. This was from about 70′ till 80′. We usually would have a 2 pc. Massa (pressed) Meerschaum set from Robert Strambach, A water pipe from Brebbia, a huge Well pipe (saw one on e-bay a few days ago), and various odds and ends to fill about 6 – 8 spaces.
Let me also say one more thing about the 180,000 sq. ft. That wasn’t all pipes. It included display cases for our sets, which were made in England, and took up lots of space. Regular boxes, bags, and display material were a part, and pouches and accessories took up quite a bit.
In about 78′ UST put together a “premium products” salesforce. They sold, mostly to pipe shops, products that UST owned. Tobacco from a plant in Richmond, Don Tomas cigars from Honduras, House of Windsor cigars from Red Lion PA., and M/C pipes. I think the force was 11 or 12 men and this was the heyday for M/C. What we had what EVERYONE in the pipe business wanted.
After the salesforce was disbanded, M/C struggled some. This is about the time that Grabow and M/C realized what an asset we were to each other. Sales stayed pretty good for a while because of the relationships Judy Weinberger (NYC sales office and VP Mastercraft) and I had developed with the pipe shop owners. -TED-
Most of the Mastercraft pipes I have seen/bought at the bid place have an Algerian Briar stamping which makes them an attractive buy in this era. They are very reasonable, and everyone has been well made with a nice draw and fine centering.
____________________________________
Wow! I encourage anyone interested in the Mastercraft/Grabow story to read the thread in its entirety. Ted’s initial post above was August 1, 2008 (see: LINK). A ‘JoeMan’ in the thread above commented on the plethora of pipe names attached to Mastercraft that Ted referenced (above). Ted responded to this question in another thread on ‘The Dr. Grabow Collector’s Forum’ (see: LINK). I include his more exhaustive response below. This information is interesting because I recognize pipe names that one might see in old Tinderbox catalogues that are not identified as from a particular source, but simply a ‘Tinderbox Special’. Here is Ted’s list of names associated with Mastercraft:
Joe asked how many names I could remember from my time at Mastercraft. I’ll try. You’ll see that Mastercraft was much more than a branded line of pipes. Some names may surprise.
 Mastercraft…
Handmade, Custom Made, Deluxe, Original, Executive, Colossal, Drycool, Compact, Bark Grain, Satin Grain, Sculptured, Popular, Standard, Custom Deluxe.
Factory in Israel…
Shalom (had several sub names but we sold so few that I only remember Handmade, Satin Grain, Sandblast)
Alpha…. Andersen, Mastersen, Rex, Esprit, Ultra, Caprice, Handmade, Freehand, Comfit, Classic, Calabash, Citation, Pedistal, Supreme, Burl King, Dialite, Allegro, Century, Magnum, Tinder Box Jura, Nobility, and a few others, 721, 722, 723, 724 Narghilia (sp) depending on the number of hoses.
Warehouse…. Hardcastle (seconds from the Dunhill factory), Orlik, covered metal gift boxes for 1, 2, 4, 7, and 12 pipes, Jeantet, Jeantet Jumbo, Jima (saw one on Ebay yesterday). Bunches of unstamped natural finish pipes from France (we sold 4 dozen of these to every Tinder Box store in the country in 1979 and still had a bunch left), Small Cherrywoods, Tyrolean Cherry, Giant Cherry (Bowl the size of a football, 2 ft. shank). Lloyds, Old Vic, Derby pigskin covered, Calfskin covered, Something fuzzy covered (didn’t want to know), Meerschaum lines from everywhere.
 Seville, Seville Convertible, Seville Lucite, Seville Twin Bore, Royal Ascot, BB Ascot, Lido, Lectura, Iceberg, Water Pipes..711,712,713,714 (depending on the number of hoses), Vest Pocket, Rolex, Mini Rolex.
Olive, Small, Medium, and Large Well Pipes (from FeRo), Tom Thumb, Brewster, Stetson, Stetson Southern, Dryfilter, Mellow Root, Carved Heads (bull, walrus, deer, etc.).
Massa Meerschaum, Massa Meerschaum Oil Cured, Meerschaum Top Bowls (for Viking like pipe), Calabash, Block Meerschaum Heads and standard shapes.
Shelves…. Hurricane, Sparkproof, Doodler, Golf, Legion of Honor, Dr. Bernard, Cigar Pipe, Jet Pipe, Radiator, Filtermaster, Syncromatic, Millard, Aldo Velani (several sub names that I don’t recall), Ladies Pipes.
0100, 0200, 0300, 0400, 0400R. Made by Grabow and used by Mastercraft as Private Label Pipes.
Whitehall…. Don’t remember many of these… Stubby, Sterling, Darby, Thermofilter, Several more. Sir Walter Raleigh Head.
Several Marxman brands in small quantities. Irish Green (yes it was), Peeps (Had a girlie picture in a small hole in the pipe).
5 kinds of vinyl pouches, 6 leather pouches, Watch Lighter, Rocket Pipe Lighter, and another 6 or so lighters, 2 disposable lighters. Every tool that could be imagined.
I’ll probably add a few more as I remember them. Not bad for 30+ years ago… ted
______________________________________________
A few take-aways for me from Ted’s reflections – first, as I stated above, so many of the ‘brandless’ pipes seen in catalogues such as Tinderbox and shop publications are actually pipes supplied through Mastercraft. Mastercraft did not produce pipes but relied on other manufacturers. I was also intrigued by the inter-connectedness between Grabow and Mastercraft and the mutually beneficial relationship. I am also intrigued by the listings of pipes above – what caught my attention is that Hardcastle was a second from the Dunhill production line.
Turning my attention to the Mastercraft on the table, I have some questions now that I’ve examined the Mastercraft production. The stamping of MASTERCRAFT on the shank is straight capitalized lettering. From all the examples of Mastercraft pipes I’ve seen in both the Pipedia article, and the panel included below from Pipephil.eu (see: LINK), the Mastercraft stamping was in a fancy, Old English type of script, not the bold capped lettering of the Mastercraft on the table. This doesn’t change the fact that the pipe on the table is a Mastercraft pipe. I have no trouble contemplating the myriads of productions run through Mastercraft from the myriads of vendors that there were other stamping styles out there. Ted did say, when describing the vast inventory in stored in Winston Salem, North Carolina: “Trust me…This is only a small sample of the things M/C had and bought into inventory.” There are a few other things that surface in the panel above – the creation of the Mastercraft brand is listed as 1941 which is interesting information added to the Mastercraft name not mentioned in Ted’s information above. The last question involves the stem. In all the examples I have seen of Mastercraft stamped pipes, the stems also have a stamping which are shown in the panel above. The saddle stem on the worktable has no stamping which raises the question regarding whether it is a replacement stem? I would say that it most likely is. Contributing to this conclusion is the fact that the stem is straight. I don’t think any Mastercraft manufacturer of pipes would allow a factory pipe to leave without the proper bend orientation – the bend should run parallel to the plane of the rim. The other thing that seems to confirm this is that the fit of the stem’s facing against the shank facing leaves something to be desired. The shank edge has experienced some shouldering which the photo shows below on the upper and lower points. The sides are meeting up pretty well, but this needs addressing.
 With an expanded understanding and appreciation for the Mastercraft name, I continue to take a closer look at the issues of the Mastercraft on the worktable. The chamber has some cake build up and this will be removed to inspect the chamber and to allow fresh briar to emerge. The rim has crusted lava flow to be cleaned.
 There are also a number of pinhole fills that are small and have lightened over time. The first picture below shows the majority of the fills populating the nomenclature shank panel which is a pain. The Mastercraft stamping is already ghosting considerably and sanding on this panel will only exacerbate this thinning. If possible, I will avoid this panel as much as possible and make-do with the fills. The picture below also shows a dent in the left edge of the Bulldog diamond shank.
 A few more fills on the lower left side.
 The stummel has normal dents and scratches from wear. The dome grooves are dented here and there, and the grooves have crud lodged in them at places. The grooves need to be cleaned and spruced up.
 The stem is about as oxidized as one stem can get with complementing bit compressions on the upper and lower – not a pretty site!
 To begin bringing this Mastercraft Bulldog back to life, the stem airway is cleaned with pipe cleaners moistened with isopropyl 99%. It takes several pipe cleaners, and the cleaners begin to emerge lighter.
 To give the Oxidation Remover some help, the stem is scrubbed first with 000 grade steel wool. The picture below shows the thickness of this oxidation. Oxidation is a ‘normal’ process that happens to rubber products exposed to elements and especially to the sun. The steel wool helps some, but we’ll see if a soak will do the job.
 Briarville’s Stem Oxidation Remover is used to address the oxidation. The stem is placed in the soak for a full 24 hours.
 The next day, the results are great. After fishing the stem out of the soak, a cotton cloth is used to vigorously rub the stem removing the raised oxidation. The picture below shows the vulcanite regaining some health.
 To remove fluid from the airway, another pipe cleaner and isopropyl 99% is used to clean.
 In order to help condition the vulcanite, Paraffin Oil is applied to the entire stem and put aside to allow the oil to be absorbed.
 Turning now to the stummel, the chamber is reamed with the Pipnet Reaming Kit. Two of the 4 blade heads are used. Following this, the chamber wall is further scraped using the Savinelli Fitsall Tool and then sanded using 240 paper wrapped around a Sharpie Pen.
 The chamber is then wiped with a cotton pad and an inspection reveals healthy briar in the chamber.
 Moving to the external briar cleaning, undiluted Murphy’s Oil Soap is used. After a few starting pictures to show progress, the stummel is scrubbed with Murphy’s and a cotton pad.
 A few tools are called into service as well. A brass brush works on the rim. It adds more abrasion than a cotton pad but is pretty gentle with the briar and not invasive.
 A sharp dental probe also plows the accumulated and compacted grime from the dome grooves encircling the bowl.
 When scrubbing is finished, the stummel is taken to the sink and rinsed thoroughly. While at the sink using hot water, shank brushes are employed with anti-oil liquid dish washing soap in the internals. When rinsed, the stummel is returned to the table.
 Continuing with the internal cleaning, cotton buds with pipe cleaners moistened with isopropyl 99% are used to clean. Another tool used to clean is a small dental spoon. The spoon scrapes the internal wall helping to excavate the tars and oils accumulated. The picture below shows the beginning of the effort. This helps to reduce the cleaning time immensely.
 After a good bit of pipe cleaners, buds and excavating, the cleaning is done for now. As with most of the pipes I restore, at the end of the workday the stummel will be given a cotton ball and alcohol soak to further draw the tars and oils from the internal briar.
 With the basic cleaning completed for now, a closer look at the stummel is next. There are no vestiges of finish remaining on the stummel. It looks like acetone has been used. The rim cleaned very nicely.
 The rest of the stummel is clean as well. The miniscule pinhole fills seem to be intact after the cleaning. The fills seem smooth to the touch, and at this point, they will remain. This is good news to not have to do repairs in the proximity of the nomenclature on the shank. They should be able to be blended nicely into the briar landscape as the restoration progresses.
 Before continuing with either the restoration processes for the stummel or stem, addressing the issue of the stem’s seating properly in the shank is needed. Earlier this issue was described. The shank has shouldering on the upper point and a bit more pronounced on the lower point of the Bulldog’s diamond shank. After reuniting stem and stummel, the picture below shows daylight between the shank and stem facings. The seating has loosened considerably through the cleaning process.
 To improve the seating between the stem and shank, the usual approach is to pinch a piece of 240 sandpaper between the facings and sand evenly at the points where the shank and stem facing meet. As these areas are removed through sanding, the gaps of sunlight will be diminished and hopefully come together. This approach is frustrated a bit by the loosened grip of the tenon in the mortise. The picture shows the concept. To be honest, it always makes me nervous working on the shank facing like this. I’ve had experiences using this method that seemed to complicate the fit further as the sanding proceeded. Here we go.
 Well, in the interest of full disclosure, this was one of those times that no matter what I did, nothing allowed me to close the gaps or reduce the shouldering that I could see on both the shank and the stem facings – ugh. I started working on this Mastercraft in Nashville visiting my daughter and her family. When my wife and I travel, I often pack up my pipe tools and supplies in 3 DeWalt utility containers. While there I came to a point where I realized that I didn’t have some of the tools needed to slay this dragon. So, now I’m back at home base in Golden, Colorado, continuing to resolve this issue to my satisfaction. The sanding process pictured above and below would not resolve the issue. The shoulders would not dissipate, and it seemed sanding was creating the shoulders.
 After sanding didn’t help in the customary way, to remove the shouldering on the shank facing and to flatten it, a flat needle file was used. This was precarious because there was no way for me to keep the file perfectly parallel with the facing with microscopic ‘jiggling’ of the file because it was handheld.
 Another attempt aimed at erasing the raised areas on the shank facing by ‘topping’ the facing on the chopping board. A hole was drilled into the chopping board – again, by hand. Unfortunately, I do not have a drill press which would assure a straight hole. After poking a hole in the 220-sanding paper, the tenon was forced through and inserted into the hole. As carefully as possible, without tipping the stem one way or another, the stem was rotated to sand the facing. After doing this several times, the fit was still off kilter.
 Next, to try to stabilize the stem movement, a piece of sanding paper was pinched between the stem and shank facings. Holding the paper stationary facing the shank, the stem was pressed and the stummel rotated back and forth to sand the shank facing.
 The same was done with the paper facing the stem facing – inserted, paper held stationary, and the stem rotated back and forth. I saw some progress with this, but still, not enough.
 As noted earlier, after the general cleaning the tenon seating was not snug enough. I thought that perhaps if I addressed this issue, it might help to stabilize the stem to improve the sanding and seating process. The drill bit on the top shown in the picture fits the airway. To expand the tenon’s circumference to have a snugger fit, the next larger drill bit is used to expand the tenon. Expanding the tenon is done by heating the tenon with the flame of a Bic lighter – painting the flame on the tenon but careful not to scorch it. As the vulcanite heats, it becomes supple and when this happens, the larger drill bit is gently forced into the airway expanding the soft vulcanite. With the drill bit inserted into the heated rubber, to hold the expansion, the stem is then taken to the sink and cool water is run on it.
 This procedure tightened the fit nicely. Now, back to working on a good fit with the stem and shank.
 The dragon slaying continued. After more sanding and fitting, sanding, and fitting…. I was beginning to think that it was not going to be resolved. My suspicion was that the problem was actually with the drilling of the tenon and that the tenon itself was off center and throwing everything off. I was at the hail Mary stage and came up with another idea. The best I could tell, it seemed that the stem was the greater culprit – the shoulders were in check on the shank, but my efforts could not tame the stem facing and the shoulders on the points of the diamond shank. I decided to repurpose the Tenon Turning Tool. This tool is used to size a tenon diameter to fit the mortise diameter. Another secondary effect is that the carbon blade is able to push up against the stem facing and shave off the high spots. The blade was expanded to miss the tenon and then pushed against stem facing. I first used this with the power drill but then found that hand-turning the tool gave me more control over the process.
 Progress! For the first time, what seemed like a quantum leap in progress. I also confirmed that the tenon itself was off kilter when the Tenon Turning Tool was mounted on the stem. The rotation of the blade head around the tenon revealed that the tenon was not plumb in the center of the stem facing.
 With all the sanding to the shank facing, the mortise bevel had thinned. The bevel allows the fit of a tenon that expands at the stem facing. I refreshed this bevel with the stone grinding ball mounted in the rotary tool.
 In this world, perfection remains only in one’s hopes. At last, I’m satisfied with the results. The wedding of the stem and shank is completed, not perfect, but it looks so much better than it did. Shoulders are gone. Moving on!
 Next, the sanding created a lip around the panels of the shank with the shank being on the fat side.
 Leaving the stem and stummel united, 220 paper is used to sand the seam as well as the stem panels. My thumb is used as a barrier protecting the ghosting nomenclature on the upper panels.
 The results are good – first upper then lower panels.
 Switching now to the stem restoration, fresh pictures are taken of the bit showing significant tooth chatter and bite compressions. The upper side seems to have the most damage. The first step in addressing these issues is the heating method. The upper and lower sides are painted with the flame of a Bic lighter and as the rubber compound warms, it expands allowing the compressed areas to regain to a degree their original orientation.
After flaming the upper and lower bit, the before and after results are shown first for the upper bit. Then the lower bit.
 The results of the flaming showed some improvement, but we’re still in need of some patching. Sanding alone will not resolve the compressions on the bit and the button lip. To address this, after wiping the bit off with alcohol to clean, using Medium-Thick Black CA glue, drops are placed on each of the compressions – upper and lower and the stem is set aside to allow the patches to cure.
 With the workday closing, the internal cleaning is continued with an alcohol and cotton ball soak. Two cotton balls are used. One is placed in the chamber and the other is pulled and stretched to create a wick that is guided down the airway. This wick helps to draw tars and oils out of the internal briar leaving the briar fresh and ready for a new steward.
 The stummel is situated in an egg carton to provide stability and to angle the orientation so that the rim and end of the shank are roughly level. Next, the chamber is filled with isopropyl 99% using a large eyedropper. The alcohol fills until it surfaces over the cotton ball.
 After five or so minutes, the alcohol is absorbed into the cotton and the chamber is again topped off. The stummel is put aside and it will soak through the night.
 The next morning, indicator of the cleaning process through the night is the soiling of the cotton.
 A few cotton buds and a pipe cleaner confirm the refreshed and cleaned internals. A whiff test also is good. Moving on.
 Turning the attention to the stem, the patches have fully cured and needle files are used to file down the patch mounds flush with the vulcanite stem. The button is also refreshed during the filing process.
 After the files, 220 sanding paper is used to erase the file marks and to further smooth out the stem surface.
 Next, the sanding is expanded to the entire stem using 220 paper except for near the stem facing which was sanded earlier.
 Next, 600 grade paper is used to wet sand the stem. During this process the shoulder guard was used. Following the 600 grade paper, 0000 grade steel wool is applied.
 The full regimen of 9 micromesh pads is used next starting by wet sanding with pad 1500 to 2400. This is followed by dry sanding with pads 3200 to 4000 and 6000 to 12000. This stem has come a long way and the gloss looks great.
 Next, the straight saddle stem needs to be brought into a proper orientation with the Bulldog stummel. After reuniting the stem and stummel, the picture below shows the approach. The general rule of thumb is that a bend should aim to line up parallel to the plane of the rim. The final bent stem orientation of the stem can be on the same line or above the rims plane, but it should be parallel.
 A pipe cleaner is inserted into the stem to serve as a handle and protect the integrity of the airway as it is bent. The stem is warmed with a hot air gun. The heating of the vulcanite softens it enabling it to be bent. The hot air is painted on both sides above the saddle about midway toward the button. As the stem is heated, gentle pressure on the stem lets me know when the rubber is ready. The bending is a gentle action bringing the stem into proper orientation with the rim. While holding the bend, the pipe is taken to the sink and cool tap water is run over the stem cooling the rubber and holding the bend in place. The picture shows the result. It looks great.
 Now, focus is turned to the Mastercraft Bulldog stummel. The vertical flame grain circling the dome is great. In the next two pictures, the small fills are visible but seem to continue to be solid. You can also see the lightening around the shank panels where sanding was focused during the seating project.
 There are nicks, dents and scratches from normal service that need to be addressed.
 The rim edge also has dents, and the briar is darkened.
 At this point, the jury is still out on whether applying a stain is necessary – I’m thinking that it will probably be helpful to blend the small fills and bring out the grain. The starting point is sanding with a special dispensation to protect the thin Mastercraft nomenclature on the upper shank panels. Starting with sanding sponges, coarse, medium, then light grade sponges are used to clean up the dents and scratches.
 Continuing next with micromesh pads, wet sanding starts with pads 1500 to 2400. This is followed by dry sanding with pads 3200 to 4000 and 6000 to 12000.
 After the first set of pads, looking at the rim, I notice that the rim has lost crisp lines around the circumference as it transitions to the dome. There is more rounding of the rim’s edge than I like.
 Before continuing with the finer micromesh pads, the decision is made to give the rim a light topping with 600 grade paper. The stummel is inverted onto the paper and rotated several times.
 I like the results. The rim line has been refreshed and it looks good.
 After bringing the topped rim back up to speed with the first set of pads, the micromesh sanding continues with dry sanding with pads 3200 to 4000 and then 6000 to 12000. The results are good.
 Generally, the grain looks great over the Bulldog briar real estate. The only problematic areas are the pinhole fills that are not blended and the nomenclature panels are off color because of the lack of sanding over the area to protect the ghosting Mastercraft stampings. The decision is made to apply a light brown dye to the briar to help with the blending. This will also help the grain to pop even more.
 The first step in the process is heating the stummel using a hot air gun. This heating expands the grain helping it to be more receptive to the dye pigment.
 After the stummel is heated, a folded pipe cleaner is used to paint the stummel surface with Fiebing’s Light Brown Leather Dye. The dye is applied in sections and then with a lit candle, the wet, aniline dye is ‘flamed’. The alcohol in the dye immediately combusts and burns off leaving the pigmentation behind absorbed by the grain. Section by section the dye is applied and then a second time around the stummel to make sure the entire surface has been painted and flamed.
 After applying the dye, the stummel is put aside to rest through the night allowing the new dye to settle into the briar.
 The next day has come, and it is time to unwrap the stummel. Using a felt buffing wheel mounted on the rotary tool with the speed set a bit slower than usual to reduce heating, Tripoli compound is applied to the stummel. Tripoli compound is a coarser compound and coupled with the coarser felt buffing wheel, it does a good job ‘plowing’ off the flamed dye crust.
 Stopping midstream to take a few pictures, it shows how the newly dyed grain is popping. On the edge of the plow line, you can see the compound building with the residue crust being removed.
 The next picture shows the different phases to the approach. As the unwrapping proceeds, an initial movement over the area removes the upper flamed crust but leaves clouds or blotches of excess dye on the briar surface. You can see these marked by the arrows below. When these dark blotches are seen, more rotations of the felt wheel and Tripoli compound remove the cloudy patch revealing the grain beneath. The grain has absorbed the dye and pops now.
 After the felt wheel finishes the initial unwrapping, I repeat the application with coarser Tripoli compound, but a less coarse cotton cloth wheel replaces the felt wheel. The speed of the rotary tool is also increased a bit more than the norm of about 40% full power. The reasons for this repetition with the Tripoli compound are, first, the cotton cloth wheel is able to reach into the crook of the shank where it meets the bowl. The felt wheel is not able to reach into this tighter angled area and so leaves excess dye that needs to be removed. The second reason for the repetition is that it continues to remove excess dye across the stummel surface and the result of this is sharper, crisper grain presentation. All that I want to see is the fine grain patters not clouds of dye.
 To remove excess dye and to blend the new dye, the bowl is wiped with a cotton pad moistened with alcohol.
 Next, the cotton cloth wheel is replaced with a cotton wheel dedicated to the application of Blue Diamond compound, a finer compound. The speed is set at about 40% full power. After the stem and stummel are reunited, the compound is applied to the entire pipe.
 In preparation for the application of the wax next, the surface is buffed/wiped with a felt cloth to remove the vestiges of compound dust resulting from the application of the compounds. The compound is in dust form, but compound can also be crusty pockets that have collected on the surface. The surface needs to be clean for the application of the wax.
 The last step in the restoration process is the application of carnauba wax. Another cotton cloth wheel is mounted on the rotary to and is dedicated to the application of the wax. With the speed remaining the same at 40% full power, the wax is applied to stem and stummel. After this, the pipe is given a rigorous hand buffing to remove excess wax and to raise the shine.
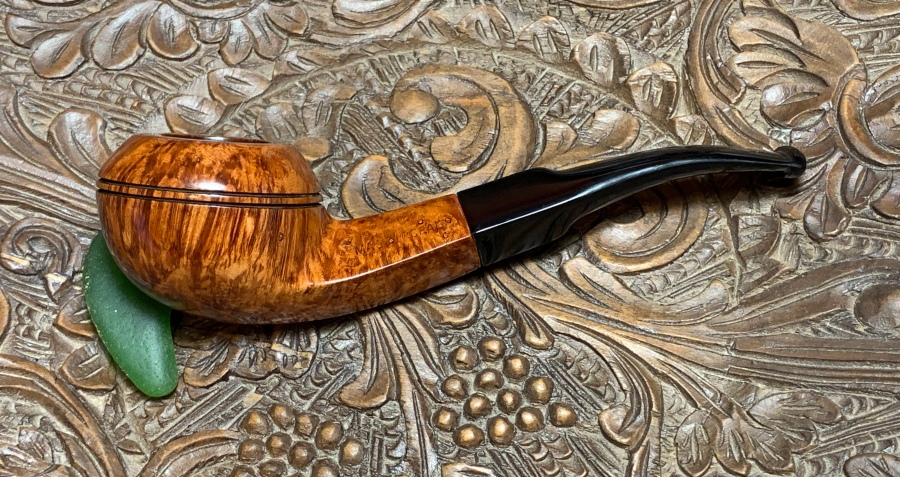
 The restoration of this Mastercraft Bulldog was a challenge. The fitting and seating of the stem with the shank was not a slam dunk, but perseverance paid off. The simple cosmetic correction of bending the stem also adds a lot to the final presentation. The most amazing part that I enjoy the most was witnessing the hidden, tired grain transformed. Now, a steward can meditate while viewing the bowl’s beautifully encircling vertical grain. The presentation is striking. This classic Bulldog shape is a shape with some attitude and this Mastercraft has nothing to be ashamed of now. Jim commissioned this pipe and will have the first opportunity to claim him in the Pipe Steward Store benefiting the Daughters of Bulgaria – helping women and girls who have been trafficked and sexually exploited. A before and after picture helps us to remember how far we’ve come. Thanks for joining me!


Please pray for Ukraine. I also moderate the website www.Voice-of-Ukraine.com


Pingback: Reviving a Mastercraft Imported Briar Bulldog – Urban Fishing Pole Lifestyle
Pingback: A New Button After Amputation for a Big-Ben Commodore 413 A S Made in Holland – The Pipe Steward
Pingback: Rescuing a Lowly Mastercraft Pot of Italy from Basket Pipe Oblivion – The Pipe Steward