
In September of 2017, I landed on eBay the first large lot of pipes which helped to stock the ‘For “Pipe Dreamers” ONLY!’ online inventory where pipe men and women seek pipes that whisper their names and then commission them. The ‘Lot of 66’ pipes have contained many treasures that have already been restored and taken up residence with new stewards – all benefitting the Daughters of Bulgaria – helping women and girls who have been trafficked and sexually exploited. Here is the picture of the Lot of 66 posted by the seller representing another NGO, a thrift store helping a community in Georgetown, Texas, called ‘The Helping Place’. I wrote the seller asking if there was any information about where the Lot of 66 originated. A response came from Pat who said that they did not know the history, but they believed the Lot to be a single donor since the pipes were all in the same boxes. Besides the vast selection and quality of the pipes that I could see in the pictures, the byline underneath the picture on the eBay posting seemed to imply what I suspected was true: Huge Lot Of 66 Smoking Pipes Pre-Owned Pre-Smoked and Deeply Loved. The situation most likely was that a steward had passed from this life to the next and the family didn’t know what to do with the pipes the steward had left behind. So, they decided to donate them to a good community cause so the legacy of the steward could continue. I hope that this has been the case during my stewardship of this Lot of 66 of ‘deeply loved’ pipes.
Gary, a pipe man from Four Oaks, North Carolina, found this GBD Poker whispering his name from the ‘For “Pipe Dreamers” ONLY!’ collection, along with another Poker and a few other pipes. Often pipe men perusing the ‘Help Me!’ baskets keep coming back and adding pipes to the queue. As is my usual practice to get to know the pipe men (and women!) who commission Pipe Steward pipes, I asked Gary how he heard about The Pipe Steward and a little about himself. I appreciate so much Gary’s great response:
 You asked how I heard about The Pipe Steward. I saw a post on Facebook in the Old Codgers Smoking Pipe of you and your friend Mel that looks like it was posted September 16. You and he were having a pipe together in Vladimirska Park in Kiev, Ukraine. You had a wee bit of Hobbit Weed in your bowl. In that post the link to The Pipe Steward was listed. I followed the link and spent about a hour clicking on this pipe then that pipe. I enjoyed looking at all the pipes you have listed. I have your page bookmarked and visit your page about once a week to see if there is something new. I can sit for hours just looking at pipes and looking at tobacco blends.
I smoked a pipe when I was younger when I was in my 20’s but then I put them aside until about March of last year when on a whim I ordered a pipe and some Captain Black Cherry tobacco. After that the bug bit me again and it has been quite the journey since. I have several briar pipe (several Grabows) and a good collection of corn cob pipes. I thought the corn cob pipe was a novelty but the more I smoked one and the more I read about them the more I enjoyed them. I like collecting the Dr. Grabow’s because they were widely popular during the time I was growing up which was the 60’s and they are made right here in North Carolina.
I am 63 years old. I do smoke one of them every now and then, but I just like having them in the rack on display. I do receive a little bit of grief from my wife about my pipe and tobacco collections but for the most part she tolerates it and lets me play on. I am still a full-time worker and I work for one of the largest electric utility companies in the US. I have been with them now for 36 years. I hope to retire in about 4-5 more years and live the rest of my days here on our farm.
I was intrigued by Gary’s email address that included an accolade to the Boston Red Sox and asked him about it. Again, his response was great:
You asked about my email address that is just an old story about a father liking one team and the son liking that team’s biggest rival. I have been a Red Sox fan since I was eight or nine years old. The always friendly ribbing that my dad and I did about the Yankees and Red Sox was something that we enjoyed up to the time of his passing.
Gary concluded with this which I appreciate:
I am very pleased that I will be getting some truly amazing looking pipes but also will be is a small way helping out the Daughters of Bulgaria. I look forward to hearing from you and again and looking at your amazing talent of restoring pipes. Until then my friend be well and keep piping.
The first pipe Gary commissioned is a classic Poker shape produced by GBD. Here are pictures of the GBD Flame: 

 The nomenclature has crisp lines on the left side, a circled ‘GBD’ [over] FLAME, and to the right is the GBD circled stamp on the stem.
 The right side of the shank holds to shape number, 1344, and the COM is on the underside of the shank, ‘MADE IN FRANCE’.
 The GBD history begins in the 1800s and the company has historically existed as both an English and French company, though it all started in France. An extensive history can be read at Pipedia (LINK), but Pipephil.eu’s GBD short history gives the basics:
Brand created in 1850 in Paris by Ganneval, Bondier and Donninger.
Marechal & Ruchon Cie first, then C.J. Verguet Frères (closed in 1970) owned GBD from 1903 to 1970 and manufactured these pipes in the St Claude (Fr) plant.
Sometime in the 1970s Cadogan company (Oppenheimer group) took over GBD. Prior to this time, the pipes were stamped “London England” in a straight line, even if they were sometimes crafted in France.
Even though English production of GBD pipes most likely outnumbered the French, the pipe on the worktable is of French origin made in Saint Claude, France. The dating also is pretty straightforward. When the Cadogan merger took place in 1981, the traditional brass stem rondel was replaced by stamps, which is indicative of the GBD Poker on the worktable. An interesting thing I also found was that in a 1963 GBD pipe shapes chart (From now defunct Chris’ Pages), shape number 1344, which is consistently designating a Poker shape in various GBD pipe shape lists, indicates that this specific shape number was made exclusively in France. The 1344 Poker is circled. I found no reference to the ‘Flame’ line designation except that there is a GBD English made line called, ‘Flame Grain’. Pipephil.eu lists an example of this English GBD production (See: LINK). Jerry Hanna’s Pipedia article on GBD Model Information references the ‘Flame Grain’ line and says that it was unknown whether this line was also produced in France. If the ‘Flame’ nomenclature on the Poker on the worktable is equivalent to ‘Flame Grain,’ I guess we can say that it was also produced in France. The Jerry Hanna listing:
Flame Grain — England, unknown if also made in France: Natural finish
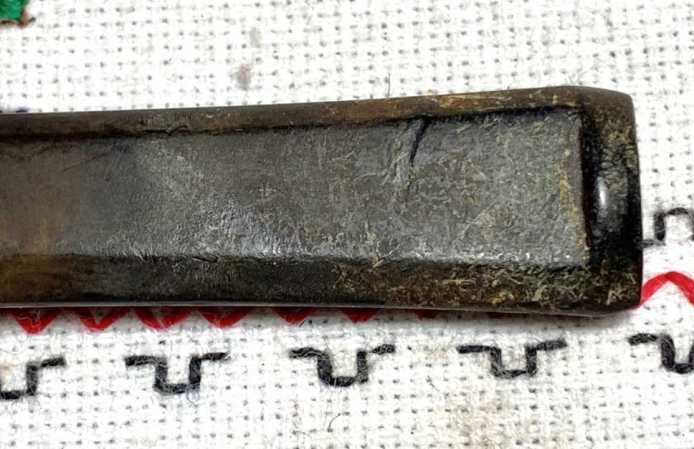
With a better understanding of the post-1981 French GBD Flame Poker on the worktable, a look at its condition is next. I like the iconic Poker shape and so does Gary. The ‘bones’ of the Poker are good. The chamber has some cake build up and grime on the rim. The stummel is dark with grime buildup and needs cleaning. The briar landscape has a few fills that need to be examined more closely after the stummel is cleaned to see if they need addressing – most likely they will.
 The saddle stem has significant oxidation, and the bit holds tooth compressions and chatter that also need addressing.
 To begin, the stem’s airway is cleaned with a single pipe cleaners moistened with isopropyl 99%.
 It is difficult to see the oxidation without lightening the photo.
 To address the oxidation, the stem is placed in a soak of Briarville.com’s Stem Oxidation Remover for several hours.
 After several hours, the stem is fished out of the jar and using a cotton cloth, the stem is aggressively rubbed to remove the raised oxidation. The soak did an excellent job. Another pipe cleaner wetted with isopropyl 99% is used to remove the excess fluid from the airway.
 To begin the process of conditioning the vulcanite stem, Paraffin Oil is applied to the stem and then the stem is set aside to absorb the oil.
 Switching now to the stummel, a couple of pictures show the darkness of the briar and the fills.
 The first step with the stummel is to ream the moderate cake to allow fresh briar to surface. A starting picture shows the chamber as it is.
 The chamber cleaning starts with using 2 of the 4 available blade heads from the Pipnet Reaming Kit. To fine tune, the Savinelli Fitsall Tool follows by scraping the chamber walls. It also reaches down to the tighter angles on the chamber floor. The final stage is sanding the chamber with 240 grade paper wrapped around a Sharpie Pen which provides additional leverage.
 After wiping the chamber with a cotton pad to clear out the carbon dust, a quick inspection confirms that there are no burning problems in the chamber.
 The cleaning expands next to the exterior briar using undiluted Murphy Oil Soap. A couple fresh pictures show the darkened stummel with age and grime as well as the rim lava.
 The surface is scrubbed with cotton pads and a brass brush does a respectable job on the rim. Brass bristles are not too aggressive with the briar but adds cleaning muscle.
 Not pictured is taking the stummel to the sink using hottish water with anti-oil liquid dish washing soap and shank brushes, the internals are scrubbed. After the scrubbing and after a thorough rinsing, the stummel returns to the worktable.
 Cleaning continues on the internals with cotton buds and pipe cleaners moistened with isopropyl 99%. It does not take much effort and the pipe cleaners and cotton buds come out lighter. Later, the internal cleaning will continue with an overnight cotton ball and alcohol soak to further clean and refresh the internal briar.
 With the stummel completing the cleaning phase, except for the soak, I take another look at the issues. The cleaning of the rim came out great. There’s a bit of dark briar on the forward inner rim edge which should clean up with sanding.
 The grain is interesting with darker cloud-like pattern with very tight bird’s eye scattered. Sanding/polishing should sharpen the grain nicely. The light fills are in sharp contrast to the darker patina of the stummel.
 As one would expect, the heal has a few scratches from normal wear.
 In order to evaluate the integrity of the 3 fills, a sharp dental probe is used to test the structure. The fill material in all of the fills is strong, but with 2 of the fills, the patches have shrunk resulting in a lip around the patch which is detectable to the touch.
 After removing as much of the patch material as possible from the 2 fills by carefully digging with the dental probe, new patches are applied using regular clear CA glue. After cleaning the areas with alcohol, glue is spot dropped on each pit. To spot drop, a small amount of CA glue is placed on a toothpick and then gravity pulls the glue to the end and then with a light touch of the end of the toothpick, a small amount of glue fills the pit. There is more control using this method than applying glue directly from the spout. Then briar dust is sprinkled on the patch to help with blending. Both patches are shown. The stummel is then put to the side for the patches to fully cure.
 Looking again at the stem, the oxidation has been addressed and that looks good. There remains tooth damage on the bit. The upper bit has a sharp cut and a compression near the cut. The lower bit has two large compressions that need to be addressed as well. To begin addressing these issues, the heating method is first used. Using a Bic lighter the upper and lower sides of the bit are painted with the flame. As the vulcanite rubber heats the physics takes over. The rubber expands reclaiming to some degree its original position. This helps to minimize patching or sanding. The before and after pictures show the results. The results are good – a much lessened footprint of the damage on the top side first.
 And the lower bit shows a distinctive improvement.
 The bit compressions are reduced enough so that sanding will erase them without patching. Using 240 sanding paper, the upper and lower bit are sanded. It’s important fully to erase the damaged spots during the coarser sanding before the finer sanding. If any residual damage (compression) is left, the finer sanding and polishing will enhance the imperfections.
 Next, 600 grade paper is used to wet sand the entire stem. To be on the safe side, painters’ tape is placed over the GBD oval stem stamp. Following the 600 paper, 0000 grade steel wool is applied to the stem.
 Continuing with the polishing, the finer micromesh pads are used starting with wet sanding with pads 1500 to 2400. This is followed by dry sanding with pads 3200 to 4000 and 6000 to 12000. Between each set of 3 pads, Obsidian Oil is applied to the stem to condition the vulcanite and to help prevent future oxidation.
 Putting the stem aside, the stummel is waiting for attention. The two patches are now thoroughly cured, and a flat needle file is used to bring the patch mounds down flush with the briar surface.
 Filing is followed by using 240 paper to remove all the excess glue leaving only the filled area patch.
 Finally, 600 grade paper is applied further to smooth the area and an inspection does not show any excess glue left on the surface.
 I come to somewhat of a decision point. The briar surface appearance is dark and cloudy. The broad Poker rim has scratches and there remains charred staining along the forward inner rim edge. The rim needs to be cleaned up and the lines of the rim refreshed. I decide to create a small smart bevel to clean the inner edge but also to sharpen the lines.
 To accomplish this a strip of 240 paper is wedged between a wooden orb and the edge of the rim and rotated to provide the sanding necessary to create the bevel.
 The same is done after switching to finer 600 grade paper. I like the results – the bevel looks great and gives a touch of class with the clean lines reestablished.
 Next, the rim receives a topping. I take a starting picture to show the progress.
 First, 240 paper is placed on a chopping board which then becomes my topping board. The inverted stummel is rotated only a few times.
 The 240 paper is exchanged next with 600 grade paper and the inverted stummel is rotated again a number of times and the results are shown.
 Next, beginning the sanding/polishing phase, micromesh pads are used. Starting with pads 1500 to 2400, the stummel is wet sanded. Following this, dry sanding is applied with pads 3200 to 4000 and 6000 to 12000. Through the process, the grain comes out more, but I have questions.
 The questions I have are regarding the finish on this GBD stummel. Through the sanding/polishing process, I’ve concluded that the fogginess or cloudiness that I see in the grain are vestiges of stain, but now very much worn and inconsistent. The dark, black grain is uneven. When I topped the stummel, the black grain disappeared from the rim which means, I believe, that it was dye in the grain. As you can see in the next picture, the grain is very tight, but the overall effect is bland. The grain doesn’t pop.
 The front of the stummel has very tight and distinctive lateral grain terminating on the side of the stummel with tight, pinwheel bird’s eye grain as the next picture shows. Yet, to me, as the grain presentation progresses around the stummel, it is bland and gives an inconsistent hue presentation.
 From right to left in the next picture, the transition is very distinct – the dark, tight horizontal grain terminates with bird’s eye, but the briar hue falls off in a way that leaves my sensory perception unsatisfied.
 After requesting the input of my wife and my daughter, who we’re visiting now in Nashville, the decision is made to apply a black dye. Our discussion went back and forth between a black dye or a deep brown dye. To me, the original GBD motif appears to have been a black application to bring out the grain. I hope to do the same with a new application of black dye. The aniline dye of choice is Fiebing’s Black Leather Dye. The first step is warming the stummel with a hot air gun to heat the wood. This expands the grain helping it to be more receptive to the dye.
 Next, using a folded pipe cleaner, Fiebing’s Black Leather Dye is painted onto the stummel, one section at a time. After the aniline dye is applied to a section, the wet dye is then flamed with a lit candle combusting the alcohol and leaving the dye pigment in the briar. This process is repeated, section by section, until the stummel is thoroughly covered with dye. The process is repeated a second time just to make sure that the stummel has been covered.
 The stummel is then set aside to ‘rest’ through the night, allowing the new dye to settle in the briar grain.
 After a few hours, as I described earlier, the internal cleaning continues with an alcohol and cotton ball soak. I’m careful not to drip alcohol on the newly dyed briar surface. The soak helps to draw out the tars and oils from the internal briar. Two cotton balls are used.
 One is pulled and stretched to form a ‘wick’ that is then inserted into the mortise and guided down the airway to the draft hole with the help of a stiff wire. The ‘wick’ draws the tars and oils out through the soaking process.
 Next, after a cotton ball is put into the chamber and the stummel is placed in an egg carton, Isopropyl 99% is then placed into the chamber with a large eye dropper until the alcohol emerges over the cotton in the chamber. The egg carton is used for stability and to angle the stummel so that the rim and the end of the shank are level.
 After a few minutes, the alcohol is absorbed into the cotton and then the chamber is topped off with additional isopropyl 99%. The stummel is then put aside to allow the soak through the night.
 The next morning has arrived, and the soak did the work of drawing out more tars and oils from the internal briar. The cotton wick and ball in the chamber show soiling but not a lot. This hopefully means the previous cleaning was effective.
 To make sure the internals are clean, a cotton bud and pipe cleaner moistened with isopropyl 99% confirm that the internals are clean. A whiff test also confirms that the pipe is fresh and ready for a new steward.
 Admittedly, one of my favorite parts of the restoration process has arrived. The newly applied black leather dye has rested through the night and the flamed crust needs to be ‘unwrapped’. To do this, a felt buffing wheel is mounted onto the rotary tool which has more abrasion than the normal cotton cloth wheels used. The speed is set at about 35% full power slowing the rotary tool down a bit to decrease the friction and heating as the compound is applied. Coarser Tripoli compound in then used to ‘plow’ the flamed crust.
 A pause in the ‘plowing’ process shows what I was hoping to see. The grain contrast is crisper and more uniform. Applying black dye was not done so much to darken the stummel but to create more contrast in the grain. The process requires periodic purging of the felt wheel to remove the caked dye. This is done by running the felt over the edge of the wooden chopping board which is the portable work desk resting on my lap.
 When the felt wheel is finished with the major plowing, it is replaced with a cotton cloth wheel and again, the coarser Tripoli compound is applied. I do this to continue to remove excess dye leaving behind only the fine grains.
 To blend the new dye and to help remove excess dye, a cotton pad moistened with alcohol is used to wipe the stummel.
 Next, after reuniting stem and stummel, and changing to another dedicated cotton cloth buffing wheel with the speed at 40% full power, Blue Diamond compound is applied to the entire pipe.
 In preparation for applying wax, a felt cloth is used to remove compound dust left behind.
 One mini project remains before applying wax. The GBD stem stamping needs to be refreshed with white paint.
 Using white acrylic paint, paint is applied over the stamping and then a cotton pad daubs the wet paint to spread it and to quicken the drying process.
 After dried, the side of a toothpick is used to run over the stamping removing the excess and leaving behind the paint in the troughs of the stamp – at least in theory.
 What I discovered after several attempts, was that the troughs were too thin on the shank side of the stamping to hold any paint. Because of this, I switched to using European Gold Rub ‘n Buff paint which has an ability to adhere to the thinner stamp profile. Even though the original GBD stamp would have been white, this gold lettering to me is a bit classier. The left side of the stamp is still thinner, but overall, it looks good.
 Another dedicated cotton cloth buffing wheel is mounted onto the rotary tool and carnauba wax is applied to the pipe. After the application of wax is completed, the pipe is given a rigorous hand buffing with a microfiber cloth to both remove excess wax and to raise the shine.
 I’m pleased the way the briar came alive and now is ready for another lifetime. The comparison of the grain before and after the black dye application is striking. This French made GBD Flame Poker is a classic, iconic shape that will fit well cradled in the hand or sitting alongside one’s choice of adult beverage on the card table. Length: 5 11/16 inches, Height: 1 7/8 inches, Rim width: 1 5/16 inches, Chamber width: 3/4 inches, Chamber depth: 1 9/16 inches. Gary commissioned the GBD and will have the first opportunity to acquire him from the Pipe Steward Store benefiting the Daughters of Bulgaria. Lest we forget how far we’ve come, before and after pictures are shown. Thanks for joining me!
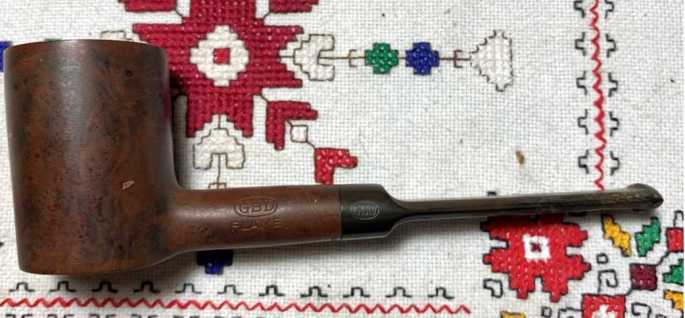


Pingback: New Life for a Spanish Everest Master ‘Bing’ Billiard – The Pipe Steward
Pingback: Restoring a Gubbels Amphora 815 X-tra of Holland Poker – The Pipe Steward
Pingback: New Life for a Classy Big-Ben Royal-Silver 445 Made in Holland – The Pipe Steward