The next pipe on the worktable came my way as a gift in March of 2019. Nicky is the eldest son of dear friends in Bulgaria, Svetly and CC, who I’ve written of before. He is also brother of El, who lived with my wife and me in Sofia, while she studied Chinese language and culture at the university. Like his parents, Nicky would often accompany them to the local Flea Market in Sofia where they would look for treasures – and when one of those treasures happened to be a pipe, they would snag it for The Pipe Steward to help the Daughters of Bulgaria – helping women and girls who have been trafficked and sexually exploited. On one expedition, Nicky found this Billiard. Here are pictures of the Everest Master Billiard that came from Nicky – Thank you! 

 The nail-like stinger will find its way to the stinger can – not needed.
 The nomenclature is crisp and on the left shank flank is stamped ‘Everest’. The picture below also shows ‘E’ stamped on the stem. The second picture shows the right side stamped with, ‘MASTER’. I could find no COM.
 Pipe man, Gary, saw this Billiard from Bulgaria in the online ‘For “Pipe Dreamers” ONLY!’ collection and it whispered his name. Along with other pipes, he added the Everest to the queue. Gary is from Four Oaks, North Carolina, and a member of the Old Codgers Facebook group. The last pipe he commissioned came out nicely and the GBD Poker has already made his way to his new steward (See: A Fresh Start for a GBD Flame 1344 Poker Made in France).
 I have never worked on a pipe with the ‘Everest’ name and I’m hoping to find some information about it. A quick look at Pipedia came up with good information, but very brief (Pipedia ‘Everest’):
From Pipes, Artisans and Trademarks, by Jose Manuel Lopés’ Everest is a Spanish brand created in 1933 and made by Pipas Nubió but apparently discontinued. More recently, Everest is a second for Iberica de Pipas.
From this information, I am able to determine the COM of Spain. I have not worked on too many pipes manufactured in Spain and my interest is piqued. There are two possibilities regarding the provenance of the Everest name. There is the Everest line belonging to Nubio’ but this line was discontinued. The other source is Everest as a second of Iberica de Pipas. Following the link provided to the Pipedia Iberica_de_Pipas article, I find more helpful information about this company from what seems to be a blurb from the company:
“Founded in 1919, Iberica de Pipas is a company dedicated to the manufacture of pipes and gift items in wood. More than eighty years of presence in the market guarantee our products. Our accumulated experience has strengthened and allowed us to both continue making improvements and maintain the professional standards which our name inspires throughout the years.
In our effort to maintain client satisfaction, we offer an increased variety of quality products ranging from smoking to gift and home articles at an excellent price-quality relationship.
Thanks to our professional standards and transparency, we can also manufacture any personally designed specialty items that our clients so desire. Contact us, we are eager to discuss how we can fulfil your needs.”
Brands (afak):
- Anfield
- Brio
- Bronx
- Commodore
- Coral
- Everest
- Galerna (contract production)
- Gester
- Gravina (contract production)
- Swensson
The listing of brands produced by Iberica de Pipas is helpful which includes Everest. The address provided for the company is Torello’ (Barcelona), Spain. The Pipedia article also provided a website link for the Iberica de Pipas company but unfortunately, the link is no longer working. To find out if there is a more recent link, a search on the internet follows. Many pictures of pipes produced by Iberica de Pipas came up in the search and most are marked it seems with a two dot stem logo. Steve referenced the company on a few pipes he restored and also discovered that Kriswill pipes were made for a time in the 1980s in the factory in Barcelona, but the quality proved to be inferior to the original (LINK). Steve in another post where he restored an attractive Churchwarden (LINK) found that Iberica de Pipas also had the name ‘Swensson’ stamped on the shank from a auction pipe ad he found (LINK). I still could find no current website for the company and my suspicions that the company had gone out of business seemed to be confirmed. A listing on a Spanish site, INFORMA Directorio de Empresas: https://www.informa.es/directorio-empresas/Empresa_IBERICA-PIPAS.html, listed that the company ceased to be on April 4, 2016.
Pipephil’s information on Everest only makes mention of the Joseph Nubio connection and does not mention Iberia de Pipas (http://pipephil.eu/logos/en/logo-e4.html). The examples of nomenclature stampings for the Nubio Everest are similar to the pipe on the table. The interesting question is also regarding the stamping on the right side of the shank of the Everest on the table – MASTER. The second pipe shown below has ‘EXTRA’ stamped on the shank and apparently, like the Everest on the table, it’s not next to the Everest stamp but probably on the opposite side since there are two different pictures. The capital ‘E’ stem logo is also very similar to the stem stamping on the table. The Everest Master on the table could possibly be connected to either source. With Iberia de Pipas, as a ‘second’ it’s possible that it did not receive the same two dot stem logo as the first line pipes had. I also searched for a current Joseph Nubio’ link to a website and found none. I lean toward the Nubio connection for the Everest on the table, but either way, we know the pipe is of Spanish origin.
With a deeper appreciation of the Everest Master Billiard on the table, I take a closer look at the issues it has. This Billiard is attractive, and its tapered stem reminds me of the ‘Bing’ Billiard style. The pipe was very lightly smoked. The chamber has almost no cake. The stem has light oxidation if any and a little tooth chatter on the bit. The biggest challenge is with the bowl. The stummel has very promising grain but a number of imposing fills as well. Some of the fills are large and the old fill material is either shrunken or gone. Some pictures are taken to show what I’m seeing. This workhorse Billiard needs some attention but has good bones.
 Restoring the Everest begins with cleaning the stem airway using a few pipe cleaners moistened with isopropyl 99% alcohol. It did not take much effort.
 To address any oxidation in the stem, the stem is put in a soak of Briarville’s Stem Oxidation Remover for several hours.
 After the soak is finished, the picture shows the raised oxidation from a stem that appeared to have no oxidation.
 The raised oxidation is first addressed with rubbing the stem briskly with a cotton cloth. This is followed by applying 0000 steel wool. The soak did a great job. The stem looks good.
 Another pipe cleaner and isopropyl 99% clears the stem airway of Oxidation Remover fluid.
 To aid in conditioning the vulcanite stem, Paraffin Oil is applied, and the stem is set aside to allow the oil to be absorbed.
 Turning now to the cleaning of the stummel, a picture shows the almost pristine chamber though difficult to see.
 Using on the Savinelli Fitsall Tool to scrape the chamber and sanding with 240 paper wrapped around a Sharpie Pen, the white paper towel tells the story. This pipe was barely used, but other markers show it has some issues.
 Next, the external briar surface is cleaned using undiluted Murphy’s Oil Soap and cotton pads. A few pictures show the briar condition.
 The cotton pad is used to scrub the stummel. The pad shows a mixture of grime and old finish coming off.
 From the worktable the stummel is taken to the sink and the internals are scrubbed using shank brushes and liquid anti-oil dishwashing soap. After the stummel is thoroughly rinsed, it returns to the table.
 Continuing with the internal cleaning, only a few cotton buds and a pipe cleaner confirms that the internals are clean.
 With the stummel clean, next the attention is on the pits and crevasses on the briar surface and the need for fill repairs. Using a sharp dental probe, each of the old fills is cleared of the old fill material.
 The bowl is next cleaned with a cotton pad moistened with alcohol. The craters in the briar tell something about the briar block from which this pipe was fashioned. The grain is absolutely mesmerizing and expressive with all kinds of movement. This active grain usually is from a block of briar taken from outer edges of the briar bole when the briar was harvested. The grain has more eye-catching beauty but with the downside – this briar tends to have more pitting and imperfections that have to be addressed.
 To patch the pits and crevasse on the heel, briar putty is used. After placing scotch tape on the mixing palette for easy cleanup, a small mound of briar dust is placed next to regular clear CA glue. Using the toothpick, the putty is made by drawing small amounts of the briar dust into the glue and mixing.
 Gradually, more briar dust is pulled into the mixture and mixed in until it thickens. When the putty has the consistency of molasses, the toothpick is used to trowel the briar putty filling the pits.
 With the large fill on the heel, to make sure the putty seeps deeply into the crevasse, the toothpick is used to knead the putty by sticking the toothpick into the crevasse while the putty is still wet. This kneading also helps to remove air bubbles (I hope 😊).
 All the pits are filled with briar putty and the stummel is set aside allowing the patches to cure through the night.
 With the patches curing, attention is directed now to the stem. A take a few pictures to take a closer look at the bit, but I also see a distinct hole/pit on the underside of the stem close to the shank facing. I’m not sure how this hole came to be, but it’s too deep to simply sand. It needs to be filled.
 To do this, after the area is cleaned with alcohol, CA glue is spot dropped to fill the pit using a toothpick. Some CA is placed near the end of the toothpick, and I allow gravity to push the drop toward the tip. This allows me to have more control over the application. To hasten the curing time, an accelerator is used.
 Before filing and sanding down the hole patch, I first address the tooth chatter. The tooth chatter is very light and using the heating method first should erase or lessen some of the chatter. ‘Before’ pictures are taken then the upper and lower bit are painted with a Bic lighter. As the vulcanite heats it expands resulting in the rubber compound seeking to reclaim its original shape. The following pictures show the results. Sanding will still be necessary. Upper:
 And lower:
 Next, using a flat needle file, the stem patch is filed down flush with the stem surface. The filing is followed by sanding with 240 paper.
 The 240 paper is also used to sand the upper and lower bit to erase fully the tooth chatter.
 The sanding is next expanded to the entire stem using 470 grade paper. A sanding disk is used to protect shouldering the shank facing edge during sanding. Care is also given to avoid sanding the Everest ‘E’ stem logo.
 Next, the stem is wet sanded using 600 grade paper followed by application of 0000 grade steel wool.
 The sanding/polishing continues by applying micromesh pads starting with wet sanding using pads 1500 to 2400. This is followed by dry sanding with pads 3200 to 4000 and 6000 to 12000. To condition the stem and to guard against oxidation, Obsidian Oil is applied between each set of micromesh pads. The popping gloss came out very nicely during the micromesh process.
 The stem is put aside and the patches on the stummel have fully cured. Starting with a flat and squared needle file, the patches are filed down flush with the briar surface. A few pictures are taken to show the progress.
 The filing is complete with the three main areas looking pretty ragged at this point.
 Sanding continues with 240 paper to remove the file marks and to smooth the patches. There is little doubt at this point that the stummel will need to be dyed to help to mask and blend the fill patches.
 After the patch areas are sanded with 240 paper, the sanding continues with the whole stummel using sanding sponges. Starting first with a coarser sponge and followed with medium then fine grade sponges. Care is given when working around the nomenclature stampings on both sides of the shank.
 The sanding of the stummel continues using micromesh pads starting with wet sanding with pads 1500 to 2400. This is followed by dry sanding with pads 3200 to 4000 and then 6000 to 12000. The grain has come out nicely during the process.
 The contrast between the dark fill patches and the surrounding briar is stark. The advantage of briar putty patches is that the compound is strong – it will not erode over time. The downside is that it will not ‘take’ a dye and bend to the dye hue. For this reason, a dye has to be used that will blend toward the color of the patches. I have experimented with wood fillers that would accept a dye, but they tend to not be as strong and even erode during the restoration process and are water soluble. The pictures show the contrasting.
 To mask the patches, dye will be applied to the stummel. Fiebing’s Dark Brown Leather Dye is the dye of choice. It is an aniline dye that can be lightened if needed by wiping the surface with alcohol after the dye has been applied. To begin the process of applying the dye, the stummel is heated with a hot air gun. This heating expands the briar which helps the grain to be more receptive to the dye pigment.
 Next, with the stummel heated, a folded pipe cleaner is used to ‘paint’ a section of the stummel with the dye. Immediately after the dye has been applied to a section, while the dye is still wet, a lit candle is used to ‘flame’ the wet aniline dye. The alcohol in the dye immediately combusts and burns off leaving behind the dye pigment in the grain. The stummel is painted, section at a time and flamed until the entire surface has been covered. For good measure, the entire stummel is painted with the dye and flamed again.
 To allow the newly applied dye to settle in and season, the stummel is put aside to ‘rest’ through the night. The lights go off!
 The next morning, the dye has rested through the night and the next step is to ‘unwrap’ the crusted, flamed dye encasing the stummel. To do this, a felt buffing wheel is mounted onto the rotary tool with the speed slowed a bit to about 35% full power. The coarser Tripoli compound is then applied to the stummel to do the major ‘plowing’ by removing the excess dye from the briar surface.
 The next two pictures show the unwrapping in process. The main goal of using the coarser felt wheel along with the coarser Tripoli compound is to remove excess dye. As I’m proceeding to work the compound around the bowl with the felt wheel, as you can see in the next picture, there is a line of compound. This line is ‘pushed’ forward by the buffing wheel. As the compound dissipates, more is added to the wheel and applied to the ‘front line’.
 The goal is to remove all the surface ‘blotches’ of dye. These ‘blotches’ are excess dye which are acting more like paint over the grain rather than in the grain. The goal is to remove this excess so that all that is remaining is the grain that has absorbed the dye. This absorbed dye will not be removed by compound. The next picture shows the darker areas of briar which will continue to be buffed by the felt wheel and compound until the grain emerges. This entire process with the felt wheel and Tripoli compound takes about 1.5 hours.
 After the felt wheel has done its work, it is exchanged for a softer, cotton cloth wheel. The speed of the rotary tool is increased to faster than normal, and another round of Tripoli compound is applied. The reason I again apply Tripoli compound but with a faster, softer application is that it seems to fine tune and sharpen the grain. It also is able to get into the crook of the shank and bowl where the felt wheel has difficulty.
 Well, it happens. While applying the compound to the rim, I noticed an indentation and lined compression, or a grain split on the rim surface that I hadn’t seen before. Ugh – this is where my OCD perfectionism goes into overdrive! This will not do. The detour will mean I back-track the process but for the rim only.
 The first step in the detour is to top the stummel using 240 paper. This is followed by 600 grade paper.
 The rim is then sanded with the full regimen of 9 micromesh pads from 1500 to 12000.
 Fiebing’s Dark Brown Leather Dye is next applied as before – this time with a cotton bud.
 The crusted dye is then removed by using the cotton cloth wheel and Tripoli compound.
 The detour is done. Next, the entire stummel is wiped with a cotton pad moistened with alcohol. This is done not so much to lighten the finish but to remove additional excess dye and to blend the new dye.
 The next step is to apply Blue Diamond compound to the reunited stem and stummel. As happens often when the briar goes through the cleaning process, it can absorb the water and the fit of the tenon in the mortise can become a bit snug. To address this, the tenon is wrapped in a piece of 240 paper and rotated to sand down the vulcanite and loosen the fit.
 After a number of sanding/test fit cycles, the tapered stem seats nicely into the mortise.
 With another dedicated cotton cloth buffing wheel mounted on the rotary tool set at about 40% full power, Blue Diamond compound is applied to the pipe. This finer compound continues the process of shining and fine tuning the grain by removing more excess dye.
 The compounds are not absorbed by the briar like wax, which is. What this means is that a lot of compound dust accumulates on the pipe and also areas where the compound has become caked on the surface. This all needs to be removed in preparation for the application of the wax. The felt cloth does a good job doing this.
 Before moving on to the application of the wax, I have two mini projects left to do. Both of these projects are aimed at upscaling this Spanish Everest Master tapered Billiard. The first project is to freshen the ‘E’ stem logo. The original was white, but I will use the Rub’n Buff Euro Gold for this. To me it will add a bit more class to this Billiard that is looking really good.
 A small amount of the Euro Gold is placed over the ‘E’ stamping. And as advertised, using a cotton pad the excess is rubbed off.
 It looks great.
 The next mini project is to fit the Everest with a brass band. A band always gives a pipe a touch of class in my view. The brass also ties the ‘E’ gold with the rich, deep dark brown finish. I have a container full of brass fittings and found one that fits the shank perfectly. A test fit is good.
 Only a very small amount of regular CA glue is smeared on the inner band and then carefully pressed onto the shank.
 The brass band looks great – just as I thought it would 😊.
 Before waxing the pipe, a cotton cloth buffing wheel dedicated to the application of compounds with metal is mounted on the rotary tool and the band is carefully buffed with Blue Diamond compound. Care is taken because black metal residue that results from buffing metal with a compound can stain the briar. For this reason, the buffing stays on the brass and does not wander off into the briar.
 The home stretch – another cotton cloth buffing wheel is mounted on the rotary tool and set at about 40% full power. Carnauba wax is then applied to the stem and stummel (minus the band). After the wax has been applied, the pipe is given a rigorous hand buffing to remove excess wax and to raise the shine.
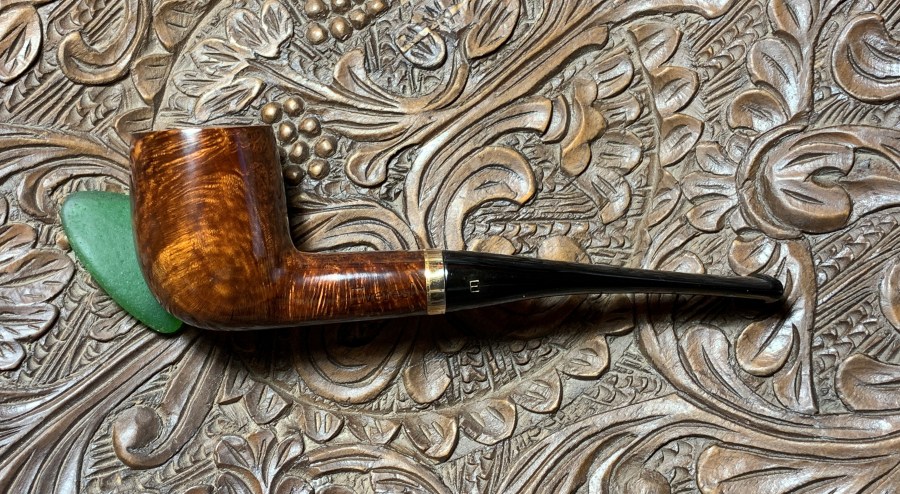
 Restorations like this one bring a smile to my face. This Spanish Everest Master Tapered Billiard, most likely from Pipas Nubio’, has come a long way from the flea market in Sofia, Bulgaria, where Nicky rescued him. The pipe had a number of issues – the most daunting was the moonscape of fills that had to be replaced on the stummel. The new finish does a fantastic job masking these blemishes as they blend in nicely with a landscape of eye-catching grain. The style of Billiard is very reminiscent of the tapered Billiard that has become known as the ‘Bing’ – made famous by actor and pipe man Bing Crosby. The finish, the brass band, and Euro Gold stem logo have transformed this pipe from the consummate basket pipe to a Billiard with class destined now to provide a new steward with much fellowship. Gary commissioned this pipe and will have the first opportunity to claim him from the Pipe Steward Store benefiting the Daughters of Bulgaria – helping women and girls who have been trafficked and sexually exploited. We start with where we began to remind us how far we’ve come. Thanks for joining me!


