It’s fitting that the next pipe on the worktable is another well-known Italian pipe name, Savinelli. Pipe man Gary from North Carolina added this Italian to the Brebbia Portofino, which came out great. In the research drilling down to understand the origins of the Brebbia Portofino line, I discovered that this production line was an inaugural line after Brebbia and Savinelli parted in 1953 after 7 years working together. The Brebbia Portofino turned out to be a diamond in the rough after Brebbia head, Luciano Buzzi, confirmed that it was a valuable pipe in this note I received:
Dear Dal,
You made a great job with the Portofino.
Portofino in that finish that we named “Rocciata naturale” that means ” rock natural finish” was an expensive pipe with a limited production and is to consider rare.
This because of the top quality of the briar and the hand work of this peculiar rustic.
The production stopped in the early 70ies.
As there are no marks on mouthpiece it should be of the early production.
Best regards
Luciano
Here is a picture of that Brebbia Portofino diamond (See: Discovering a 1950s Brebbia Portofino 830 Rock Natural Pear with the help of Luciano Buzzi of Brebbia Pipes): The Savinelli Silver now on the worktable came to me from Dustin, a fellow pastor and pipe man who lives in Magnolia, Arkansas. After seeing some of my restoration posts and that these restored pipes benefit a work near and dear to my heart, the Daughters of Bulgaria, Dustin reached out to me:
Hey Dal, I am a pastor at a church and my wife, and I have a heart for supporting some of the agencies that Daughters of Bulgaria works with in the area of human trafficking. I am an avid pipe collector. What could I do to help out? I have pipes or even sealed tobacco that I can donate. I have pipes that I would like to see restored and would be willing to pay for if I knew some of the proceeds were going to such a good cause. Thanks, Dustin
After communicating back and forth a few times, Dustin also wrote this:
I am in south Arkansas. I have four daughters and I have done quite a bit of mission work in Kathmandu Nepal, the Philippines, Belize, Honduras, and I’m going to Ghana west Africa this fall. In each location especially Nepal there is a blatant disregard for human dignity and the value of life. Human trafficking is a big part of the business in Nepal, and it disturbed me especially being the father of 4 girls, husband of an amazing wife, and the pastor of a church half full of women whom God created. We spent a little time and money working with a pastor in Nepal to help some girls that he knew of that were in the “massage” business and looking for a way out. We supplied jobs, safety, career training, daily needs, etc. This is a good thing you are doing. I believe that anything we can do to fight against injustice is no sacrifice, but it is a privilege.
I appreciate Dustin’s convictions as they resonate with my own. Dustin’s commitment to help The Pipe Steward’s effort for the Daughters of Bulgaria materialized when he sent these exceptional pipes that are now posted in the ‘For “Pipe Dreamers” ONLY!’ collection. Thank you, Dustin! The Savinelli Silver Billiard, that whispered pipe man Gary’s name is on the bottom of the lineup above. Here are more pictures of this Savinelli.
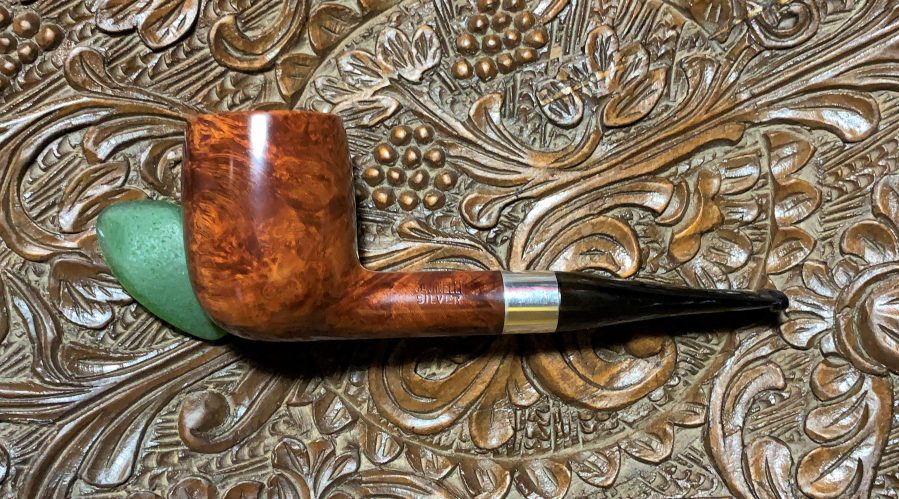

 The nomenclature is fresh and crisp. On the left flank of the shank is stamped, SAVINELLI [over] SILVER.
 The shank’s right side is stamped, 111 KS [over] ITALY. To the left of this is stamped the traditional Savinelli logo. The shape number, 111 KS is a ‘King Size’ Billiard with classic lines.
 My first impression of this Billiard was that it had some muscle to it – stout and solid and perhaps the reason why the Billiard is considered the most popular shape. I spliced together the 8 straight Billiard shapes listed in the Savinelli Shapes Chart to size up the subtle differences. The 111 KS has an ample bowl and a thicker shank profile – only the 101 looks to be larger in the examples given. I like the shape of the 111 KS as a quintessential Billiard shape.
 The ‘Silver’ designation for this line of Savinelli pipes is for the band which has the sterling silver grade of .925 inside a flattened quadrangle [over] SAVINELLI. On the opposite side of the band is stamped, STERLING [over] MOUNTED. The band needs some attention to spruce up the bling of this classic Billiard.
 The upper side of the stem is stamped with the Savinelli logo as well. It’s thinning and I doubt it can be refreshed.
 The story of the Savinelli name has been well-documented. The brief description of Savinelli at www.pipephil.eu is good and covers the large sweep of the basics:
 Achille Savinelli Sr. opened in Milano (1876) a store dedicated to smokers. In 1890 his son Carlo Savinelli succeeded him for about 50 years. The grandson of the founder, Achille Savinelli Jr. (1918-1987) in association with Enea Buzzi started pipe production in Brebbia. They split in 1953, Savinelli setting up its own factory in Molina di Barasso.
Giancarlo Savinelli (4th Savinelli’s generation) is currently (2011) managing the company.
Pictured to the left are Achille Savinelli Jr. and his son, Giancarlo Savinelli. After just completing the restoration of the Brebbia Portofino, and delving into the business relationship between Enea Buzzi of Brebbia Pipes and Achille Savinelli Jr., who were cousins, I want to explore more of this relationship which was formalized in 1947 and severed 7 years later in 1953. I’m curious to find out more of this overlapping and seminal period on the Savinelli side of things. The Pipephil description describes the basics – the corporate relationship that produced pipes from 1947 to 1953.
In the restoration of the Brebbia Portofino, I was grateful for the note from the present head of Brebbia Pipes, Luciano Buzzi, that helped to clarify the provenance of the Portofino. Looking back at his note now, focusing more on the corporate relationship between Brebbia and Savinelli, I see some interesting things that I didn’t see before. Here again is Luciano Buzzi’s note to me:
The series Venice, Portofino and Florence were the early series produced with the MPB logo after the partnership separation of my father Enea Buzzi from his cousin Achille Savinelli in the 1953. As you probably know the Savinelli & C. pipe factory production was born in the 1947 “& C” was my father partnership. They  decided to use the well-known shop brand name in Milan (our commercial capital city) to promote sales. Achille was the seller, and my father was the maker. After 7 years of cooperation, they separated the original agreement, and my father started the distribution of the new brand MPB under his direction with the series I named before.
The final divorce came 3 years later when Achille finished to build up his new factory with his own machinery and they finally severed the staff too.
The Buzzi/Savinelli corporate production name was ‘Savinelli & C’. Luciano describes the ‘& C’ as signifying his father’s side of the partnership (his name was Carlo). Also interesting is that they kept the name of the Savinelli shop in Milan as the companies’ name to improve sales – this building on the Savinelli operation from the 1800s which was exclusively in smaller, local tobacco shops. After the separation in 1953, Enea Buzzi continued the Brebbia operation under the name, M.P.B. producing the innaugural series of pipes, Florence, Venice and (our) Portofino (Pipedia ‘Brebbia’). Achille Savinelli Jr. openned a new factory with his own equipment in another region.
From the ‘Brebbia side’, I find two comments that seem to describe that a difference in business vision and/or values was behind the severing of the partnership and to the birthing of two Italian pipe manufacturing icons. The first comment comes from Luciano Buzzi above when he described the two main players:
“Achille was the seller, and my father was the maker. After 7 years of cooperation, they separated the original agreement…”
The other statement was from the more extensive Brebbia history on their website:
Bernardo Papa, as the uncle was called, thought highly of his nephew. The idea for the pipes wasn’t bad at all, and meanwhile the machinery had arrived, and the family power plant would supply electricity for free, and they would also provide the premises. Bernardo also had a niece who was the wife of Achille Savinelli, who was slightly older than Enea and worked with his parents in the shop in Milan that had been established in 1876. Indeed, the Savinelli family also aspired to produce pipes. Under the auspices of the uncle who also funded them, Enea Buzzi and Achille Savinelli began working together in 1947 with three expert artisans, full of enthusiasm and good ideas. The problem was that the ideas of one did not exactly match the ideas of the other, concerning product type and how to market it. They realized this almost immediately and so, while Enea went to London to seek out his first foreign clients, Achille established his own factory in Molina di Barasso.
When turning more to the ‘Savinelli side’ of things, I looked at the history page on the Savinelli website called, “Our Story”. I enjoyed reading through the history and encourage those wanting to know more about the Savinelli name to spend a few minutes reading the article which began in 1876, when Achille Savinelli Sr. opened one of his first stores selling tobaccoria and designing his first pipes. In the present line of thinking, I’m interested to see in this article how the period in partnership with Enea Buzzi from 1948 to 1953 would be described. I was surprised to find that this partnership and family relation is not mentioned in the history – I was a bit surprised. The following is from “Our Story” covering the pertinent period of time:
When Achille Jr’s came back from the war, he understood that the only commercialization was not enough, so he decided to leave the father’s shop and he started to produce its own pipes. It was a very important decision for the young Achille, he was willing to continue and improve the family tradition of Savinelli. Achille Jr’s decision was based on one fact: that the best-selling pipes in Italy at that time were made abroad while Italy grew the best quality briar.
 This point bothered him so much he decided to start up his own production of high-quality pipes, at a time when all other Italian pipe makers mass-produced poor quality, shoddy pipes. He had tremendous confidence in his ability to produce a quality product, which, coupled with national pride, proved successful. He immersed himself in the development of the company and, with the help of his best friends Amleto Pomé and Mario Vettoruzzo, started up the new business in the Varese district in north-west Italy.
1948 saw the opening of the Savinelli factory/workshop, and the pipes produced there rapidly began gaining prestige in markets all over the world. Previous to the opening of the factory, millions of pipes had been exported worldwide from Italy, but the quality of such pipes was very poor. As a result, when Savinelli began the production, it was seen as dubious how an Italian could compete with foreign brands. He did however succeed in making a luxury product that went head-to-head with the big names and even surpassed their quality of production, to the point where Savinelli has since become the mark of highest standard for pipes on a global basis.
I believe that Achille Jr.’s passion to produce an Italian branded pipe which was of high quality has been achieved by Savinelli – no doubt. My first Savinelli pipe was a Tortuga which held up the standard of high-quality pipes. I believe the Savinelli Silver on the worktable now raises the bar even further. With a deepening appreciation for the histories of Savinelli and Brebbia, it’s time to take a closer look at the Silver Billiard. The pipe is in good shape generally and the grain is exceptional with a rich dark patina. The stem has very little in the way of tooth damage, but the following lightened picture shows the oxidation. After cleaning the airway with pipe cleaners moistened with isopropyl 99%, the stem is placed in a soak of Briarville’s Stem Oxidation Remover. The stem will soak through the night to address the oxidation.
 Looking now at the chamber, there is very little carbon buildup.
 Even with light carbon cake in the chamber, my practice is to ream the chamber to allow a new steward to establish a fresh cake on briar. Using the Pipnet Reaming Kit, three blade heads are used to ream the chamber. This is followed by scraping the chamber using the Savinelli Fitsall Tool – a tool that I’m thankful to Savinelli for producing! Finally, the chamber is sanded using 220 grade paper wrapped around a Sharpie Pen.
 A picture after the chamber cleaning shows healthy briar – no heating difficulties.
 Before cleaning the external briar surface, a few pictures give a tour of some of the issues I see. The rim has some lava flow toward the aft of the rim.
 There is also grime over the surface that needs cleaning. The grain is beautiful and I’m looking forward to how it cleans up. There are also a few small nicks which I’m hopeful light sanding will address.
 Cleaning the briar commences with undiluted Murphy’s Oil Soap scrubbing the surface with a cotton pad. The rim lava patch is addressed with a light touch of a brass wire brush. Using brass wire brushes on briar is not as invasive as other mediums but adds a bit more to the cleaning.
 The stummel is next taken to the sink (not shown) where shank brushes work on cleaning the internals using hottish water and anti-oil, liquid dishwashing soap. After the scrubbing and after a thorough rinsing the stummel is brought back to the worktable.
 The cleaning of the internals continues using cotton buds and pipe cleaners with isopropyl 99% alcohol. A small dental spoon also helps the cleaning by scraping the internal walls removing tars and oils. When the buds start coming out lighter, the job is called to be continued later with an alcohol and kosher salt soak to help draw out more tars and oils from the briar and to freshen the briar.
 The cleaning did a good job. The rim has been freed of the lava discoloration. The briar has lightened at the point of this scrubbing, but this should again blend nicely with mild sanding and polishing.
 One fill is found on the heel, but I don’t believe it needs to be addressed except for possibly darkening it with a dye stick later.
 The sterling silver band cleaned up a bit, but there’s still a yellowish film over it.
 Before progressing further with the stummel, the band needs to be cleaned carefully with a tarnish remover. Using a cotton pad, a small amount of the fluid is applied to the band careful to avoid getting the fluid on the briar – I don’t want to risk discoloration. A product called Tarn-X is used and it does a good job. The results are good! The band should bling up a bit more when polished with compound.
 Turning again to the stem, it has been soaking through the night in Briarville.com’s Stem Oxidation Remover. After fishing the stem out, the picture shows the raised oxidation which now needs to be rubbed/wiped off the vulcanite rubber. A cotton cloth is used to do this.
 While using the cotton cloth to work on removing the oxidation, a thought came to me regarding Mark Hoover’s Before & After Fine and Extra Fine Polish for stems. Mark has said that the polish ingredients will continue to remove oxidation in the polishing which is a bit gritty. Usually, Mark’s polish is used after the sanding and repairs just before applying wax. The decision is made to use them now to help clean the oxidation. Using first the Fine then the Extra Fine, some is applied to a finger then rubbed heartily into the rubber compound. A paper towel is used to scrub the polish into to the raised oxidation.
 After each polish is applied and wiped off with a paper towel, I’m pleased with the results. Not bad at all.
 The only ‘bummer’ at this point is the Savinelli logo stamped on the upper side of the stem. It has seen better days and its too thin to revive. Avoiding sanding over it will be the first order of the day. The stem has no tooth damage at all to repair so the process will move directly to applying micromesh pads.
 Using micromesh pads, the process is started, but as I look more closely at the stem button, the less satisfied I am with the ‘hang’ capacity. The button has almost flattened out and there’s not much of a lip to hang on to.
 To remedy this the button needs to be built up. Medium-Thick Black CA glue is used to do the job. The approach is to place a layer of Black CA over the button one layer at a time – upper, then lower. After each layer of CA is placed on the button, it is sprayed with an accelerator that immediately cures the glue keeping it in place. Each layer is applied in the same way.
 The picture following is a little blurred, but it shows the building process as the button grows with each layer. More depth is created than is needed. This is done so that the button can be filed and sanded down to a good shape.
 After the button building is completed with the CA, the filing process starts with a flat needle file filing the button facing or the slot face. I start the process here to begin shaping that parameters of the button.
 Next, again using the flat needle file, the circumference of the button is shaped. This is a slow, gradual process while the filing works around the button with a lot of eyeballing to size up the emerging shape.
 With the button now in a general shape, the lip is then defined from the bit side. A squared needle file is used for this.
 The filing is completed – even though it doesn’t look pretty at this point, the shape of the button looks good.
 Sanding begins with grade 220. The sanding erases the file tracks and continues to smooth and shape the button.
 After 220, 470 grade paper is used.
 Next, the stem is wet sanded with 600 grade paper and then 0000 grade steel wool is applied.
 The button rebuild was a detour, but I believe the detour was very much needed. This button will be appreciated much more by a new steward.
 Back to where the detour began – micromesh. The stem is first wet sanded with pads 1500 to 2400. Following this, the stem is dry sanded with pads 3200 to 4000 and 6000 to 12000. Between each set of 3 pads, Obsidian Oil is applied to further condition the stem and to guard against oxidation. Throughout the process, I’m careful to guard against sanding over the ghosting stem logo.
 With the day ending, the cleaning of the internals of the stummel continues with an alcohol and kosher salt soak. This process helps to refresh and ‘sweeten’ the internal briar and to deal with any residual ghosting. To begin, a cotton ball is pulled and twisted to fashion a wick that serves to draw tars and oils from the mortise. The wick is guided down the mortise to the draught hole with the help of a stiff wire.
 Kosher salt is then used to fill the chamber. Kosher salt is used instead of regular household iodized salt because it leaves no taste behind. Iodized salt does. The stummel is placed in an egg crate to give stability and to angle the rim and shank end so that they are level. Isopropyl 99% alcohol then fills the chamber until it surfaces over the salt.
 After a few minutes, the alcohol is absorbed into the salt and cotton wick. The alcohol is then topped off once again.
 The next morning the stummel has soaked through the night. The cotton wick and kosher salt show the yellowing that indicates further tars and oils were extracted from the internal briar.
 The expended salt is put in the waste and the chamber is cleared of any remaining salt crystals. To make sure the internals are finally clean, one cotton bud moistened with isopropyl 99% alcohol confirms this.
 Turning now to the external briar surface, a single fill on the front of the heel is lighter and stands out. Applying a maple dye stick does the job of masking the fill.
 A quick survey of the briar surface shows some scratches on the rim and rim’s edge.
 Before sanding, the sterling silver band is covered with painters tape for protection.
 I had started the micromesh process using the first, and more abrasive 1500 grade pad, but was not satisfied with the results with the scratching on the rim nor the edge. A bit more abrasion is necessary to clean up these issues.
 I decide to apply a ‘light’ topping to the rim using 600 grade paper. This should remove the scratches and refresh the rim lines. With the stummel inverted on the paper, the stummel is rotated over the paper several times.
 After a few rotations, the rim looks much better.
 With the topping of the rim, the beveled inner rim comes into view. Refreshing the bevel as well will complement the rim facelift.
 To refresh the bevel, a wooden sphere is used which rests in the circle of the chamber mouth. A strip of 600 grade paper is pressed by the sphere against the beveled edge and rotated several times.
 The results are great – a much better-looking rim presentation which should darken nicely as it’s sanded.
 Next, returning to the micromesh process, the stummel is sanded/polished starting with pads 1500 to 2400, 3200 to 4000 and 6000 to 12000. Between each of the nine pads, the stummel is wiped with a damp cotton cloth to remove the sawdust from the sanding.
 When a rim is topped, it’s normal for the sanded area to lighten a bit. Using only 600 grade paper on the topping board, I was hopeful that it wouldn’t lighten too much and that the micromesh sanding process would darken the rim to blend better with the patina. After the micromesh sanding/polishing, the rim is still a bit out of sync with the darker patina of the bowl.
 To remedy this, the maple dye stick is again used. The hue was a good match for the fill that was touched up, it proved to be a good match for the rim as well.
 Next, the painter’s tape is reversed to protect the shank briar from applying Blue Diamond compound to the sterling silver band. A dedicated cotton cloth buffing wheel is always used when applying compound to metal. As you can see on the wheel and the dedicated area on the block of Blue Diamond, the polishing of metal gives off a black residue. I’ve learned the hard way that this black residue can very easily stain nearby briar.
 The Blue Diamond compound is applied to the band with the rotary tool at about 40% full power. I took the following picture to try to show the significant difference between the metal that has received the compound treatment (to the right) and the metal not polished (on the left). The unpolished side is shiny, but the polished side becomes mirror-life.
 The job is done. After buffing the band with the cotton cloth to remove residue, the picture shows the black residue overrun very clearly on the tape. The band has been restored to the adequate stage of bling for this classic Billiard 😊.
 Next, it’s time form Mark Hoover’s ‘Before & After’ Restoration Balm to do its work. The Balm does a great job of taking the natural hues of the briar and bringing them out even more distinctly. After placing some Balm on my finger, the Balm is aggressively worked into the briar. The Balm begins more like a creamy substance but thickens and becomes waxier as it’s work over the briar surface. After the Balm is thoroughly applied, the stummel is set aside for about 10 or 15 minutes for the Balm to do its magic.
 After the time has passed, a dedicated microfiber cloth is used to wipe off the excess Balm and to buff up the surface. Again, great results!
 With the Savinelli stem and stummel reunited, another cotton cloth buffing wheel is mounted on the rotary tool at about 40% full power. Blue Diamond is then applied to the stem and stummel (minus the band).
 A felt cloth is used after application of the compound to remove compound dust before waxing.
 Well, I didn’t take a picture of the set up to apply wax, but carnauba wax was applied to stem and stummel. This was followed by giving the pipe a rigorous hand buffing with a microfiber cloth to remove excess wax and to raise the shine.
My, oh my. This Savinelli Silver 111 KS presents the image of a Billiard with all the classic lines and a sterling silver band thrown in to match one’s cufflinks. The grain is beautiful with swirls and tight bird’s eye scattered. The size of the Silver is: Length: 5 1/2 inches, Height: 2 inches, Rim width: 1 3/8 inches, Chamber width: 7/8 inches, Chamber depth: 1 3/4 inches, and weighing in at 52g. Gary commissioned this Savinelli Silver Billiard and will have the first opportunity to claim him from the Pipe Steward Store benefiting the Daughters of Bulgaria – helping women and girls who have been trafficked and sexually exploited. Thanks for joining me!
ADDENDUM
I wrote to Savinelli to see if I could find more information regarding the production dating of the Silver. I’m grateful for this response from the ‘Savinelli Team’:
Silver has been released in 1973 and around the late ’80-early ‘90 went out of production.
It was in 3 different model, rusticated, sandblasted and smooth with a true silver 925 band on the shank. Was quite popular back then, silver was very common for high-end pipes, especially in the English spoken markets.


