This Republic era Kildare came to me in one of my first larger acquisitions in September of 2017 when I landed a lot of 66 pipes on the auction block. The ‘Lot of 66’ came from an NGO in Texas called ‘The Caring Place’ – an organization that takes donations and resells to help the disadvantaged in their community. I found out from the seller that this was an estate lot from one pipe man whose family made the decision to donate ‘Pop’s’ pipes after he passed. This fact grounds me in one of the reasons why I chose the moniker, ‘The Pipe Steward’ for my restoration work – God has only given us so much time in this life and we are to be stewards of what He has given. So, once again, one’s pipes are passed on to others. Of this Lot of 66, only a handful are left in the online ‘Help Me!’ baskets where pipe men and women can peruse pipes to commission from the ‘For “Pipe Dreamers” ONLY!’ collection benefiting the Daughters of Bulgaria – a work that my wife and I co-founded in Bulgaria helping women and girls who have been trafficked and sexually exploited. Here is the picture of the Lot of 66 that caused me to put in my bid. I had the privilege of working with Joshua in Krakow, Poland. He commissioned the Peterson’s Kildare now on the worktable. When the latest aggression of Russia commenced February of last year, my wife and I responded by going to Krakow and helping with the placement of Ukrainian refugees in Europe and to help with bringing aid into Ukraine to help. Joshua also came to help in Krakow in a very special way – to help with the education of a young teenage son of colleagues of ours who are missionaries in Ukraine. Josh’s assistance was invaluable to these parents, enabling them to function more efficiently in very difficult circumstances. Joshua’s heart for people has extended to his current work with Reformed University Fellowship – a ministry to students on college campuses which is part of our Presbyterian denominational affiliation. After Joshua’s return to the US, I received this note while my wife and I were still in Poland:
I think I told you I was thinking of getting one of my best friends from college, Spencer, a pipe as a graduation gift. He was in North Carolina State’s RUF and was a Political Science major, him being a fellow humanities major in a community of mostly engineers made the two of us close. He’s very interested in the Balkans region (especially Montenegro and Bosnia).
I was looking through the baskets of unrestored pipes on the website, and I was drawn to #B3230 Peterson’s “Kildare” in basket 3. I was drawn to the manufacturer’s history, operating through multiple eras of modern Irish history (the British Empire, the Free State, and the Republic). Is it possible to commission this particular one?
Of course, my response to Joshua was ‘yes’! Here are the original pictures of this Republic Era Kildare Apple shape as I unpacked it from the Lot of 66:

 The nomenclature is in good shape with the left shank stamped in cursive, ‘Peterson’s’ [over] “KILDARE” in quotes. The stem is stamped with the Peterson’s ‘P’. The right shank side is stamped, MADE IN THE [over] REPUBLIC [over] OF IRELAND. To the right of this stamping is the shape number, 86.
 Peterson’s shape chart confirms the 86 pointing to an Apple shape listed in the ‘Classic’ category of Peterson pipes:
 Before diving into the issues of the Kildare on the worktable, I enjoy refreshing my understanding of the Peterson’s name and history and discovering more about the Kildare Peterson line of pipes which I’ve wondered about and never had the opportunity to drill down. The brief history summary from Pipephil.eu is indeed brief considering the century of Peterson history in view:
 The Peterson brand is issued from the association of the brothers Friedrich and Heinrich Kapp with Charles Peterson. The Dublin tobacco shop first named “Kapp Brothers” (1865) became the “Kapp & Peterson” Company.
Tom Palmer bought the Peterson business in the early 1990s.
Production (2006): ~ 120 000 Pipes / year.
Also listed with the (VERY) brief history are the ‘era’ breakdowns that encompass every pipe produced by the Peterson name since the genesis in 1875. It was this historical development that attracted Joshua to commission the Kildare. The Kildare is stamped as a Republic Era pipe which would therefore place it broadly from 1950 to the present. The links next to the three eras go to the Pipephil.eu’s exhibits exemplifying of pipes produced during each time period – a nice touch.
 1875 – 1915: Patent Era
1915 – 1949: Pre Republic Era (Irish Free State, Made in Eire, Made in Ireland)
1950 – Present: Republic Era (Made in the Republic of Ireland)
1991 – Present: Modern Era (Tom Palmer buys over Peterson)
Pipedia’s Irwin Rewrite-Peterson article (See LINK) is huge and for anyone wanting to drill down into the Kapp & Peterson history further, this is a profitable read, especially focusing on the ‘Pre-Patent’ and ‘Patent’ eras (1865-1914) to appreciate the earliest developments.
However, I jump forward to drill down a bit with Pipedia ‘Irwin Peterson re-write’ article’s description of the ‘Republic Era Pipes’ which spans from 1950 to present:
At the start of the 1950’s, all pipes at Kapp & Peterson were stamped with “Made in the Republic of Ireland” stamp and also starting off the decade with the hallmark letter I on any silverware.
To help simplify and clarify the various grades and iterations of Peterson pipes over the years, 4 simple qualitative groupings are put forward in the article:
Group 1, Straight Grains, Gold and Silver Mounted – which I would describe as the top-shelf pipes.
Group 2, High Grades – This grouping is described:
The pipes in this range are amongst the best and most select briars that Peterson produce. They vary in price from the Grafton, Rosslare Royal Irish and Silver Spigots starting at around $250. To the slightly more expensive Silver Caps and Lids, Plato, Royal Irish and Celtic Naturals and on up to $800 plus for Gold spigots.
Group 3, Collections, Series – This grouping is described as perhaps the most popular grouping for the modern Peterson pipes. The various series, commemorative productions, and limited editions have created a following of collectors and loyal patrons. Some of the collections listed are River collection, Writers collection, Golf collection and Mark Twain collection. Other series very popular were the Sherlock Holms series, House pipes, Darwin series, and Kapp Royal series.
Group 4, Basic Entry Level Pipes – This grouping is where we are getting warmer in our quest to find out more about the Kildare Apple on the worktable. The description given for this grouping is helpful:
In this group you will find the basic entry level pipes which many smokers desire and are most comfortable with for every day and rotation use. The two most famous and popular issues probably being the System and the Classic shape pipes. All of the pipes in this group can be purchased for relatively little cost and probably accounts for the majority of Petersons worldwide pipe sales.
In this grouping two ‘issues’ of entry level pipes are the Peterson System pipe and the Classic shape pipes. What’s interesting to me is that System pipes or ‘Dry System’ pipes are considered entry level. Though, this is probably accurate because when most people hear “Peterson”, they are thinking about acquiring a System Pipe which is the backbone of Kapp & Peterson history – it seems to me. Here is a description of the Peterson System Pipes:
 System Pipes: Perhaps the most notable design from the Kapp and Peterson factory was Peterson’s famed ‘Dry System’ pipes. The original patent was issued in Great Britain and Ireland on Aug. 8, 1890, Featuring a small reservoir intended to collect moisture before it reaches the smoker, the ‘System Pipe’ makes for a cool smoke that minimizes tongue bite, the bane of every pipe smoker. Indeed, it is on this ground breaking design that the worldwide reputation of Peterson grew.
As much as I would like to drill down more into the history of Peterson System Pipes, this would be an enjoyable rabbit trail 😊 and not bring us closer to understanding more about the Kildare. The other issue of Group 4 focuses on the Kildare – the ‘Classic Range’. The Kildare is listed along with several other lines of the Classic pipe range. Here is the description of this issue of Peterson pipes:
The following is a list of the pipes which fall mainly into the Classic Range. These are primarily Petersons basic ‘entry’ level pipes, which can vary considerably in price between $55 and $200, depending on the finish i.e. smooth, sandblast, rustic and if there is any nickel or silverware adornments. The list includes pipes which are currently identified on the main Peterson web site. The shapes are mainly based on those thirty-three examples shown on the main web ‘s Classic Shape Chart. The list is constantly changing as more new pipes are announced each year. All of the following series fall into the Classic range of pipes quality and will most certainly have some bowl fills or slight flaws. As previously stated, some of these listed pipes are unique to and only available in Europe or the US. Others are simply no longer in production. This is a robust listing of ‘Classic Range’ pipes where the Kildare is one of many! The questions remaining that pique my interest are: Can more be found out regarding the Kildare line specifically and is there any way of determining the age of the Kildare on the table which spans from 1950 to the present. The Kildare line is still being produced by Peterson. A quick search of their website confirms this (LINK). I clipped a sampling of the present-day Kildare pipes for offer by Peterson – a very nice line up of what I would consider, nice pipes! All the various shapes are silver mounted which provide a little bling for your buck 😊!
 While on the Peterson main site, I was interested in their ‘Resources’ page which had 3 sites linked that were promoted by Peterson. One blog I discovered was by the same person doing the Pipedia rewrite of Peterson, Mark Irwin. His blog is called, Peterson Pipe Notes. My first thought was that with a Peterson endorsement, Irwin’s blog might shine some light on the Kildare line. My hunch and hope were not left hanging in the winds of Peterson pipedom! A search for Kildare produced an August 6, 2018 article by Mark Irwin called, 101. A Look Back at the Kildare Patch Line (1979).
 The main focus of the article was on a specific issue of the Kildare line called the ‘Kildare Patch Line’ which came out in 1979. The article had to do with questions about Peterson’s approach to quality control of pipes and marketing of those differing quality of pipes to different client demographics. What I gathered from the article is the ‘Patch line’ introduced Kildares with small patches of rustication to camouflage imperfections. The picture to the left was on the head of the article showing the pipe with the patch.
However, in setting the stage to discuss the issue above, Mark Irwin gave a cursory history and characteristics of the Peterson’s Kildare from its inception:
Kildare 1965 – First issue of line with matt finish smooth pipe in the Classic Range, P-Lip and fishtail. Second issue c. 1979 as Kildare Patch, with rusticated patches on pipe surface. Third issue 2010, brown matt, P-Lip or fishtail, no band. Fourth issue 2011–, burgundy sandblast, nickel army mount, fishtail, exclusive to Smokingpipes.com. See Etched.
From Mark’s description, the Kildare on the worktable was most likely from the first issue in 1965 and not the similar run in 2010 – the pipe on the table is older than this empirically speaking! The description fits too – a Classic Range with matt finish smooth and a P-Lip stem. There’s no indication how long the first run of Kildare went, but the next line, the ‘Kildare Patch Line’ came out in about 1979. My sense of the look and feel of the Kildare Apple on the worktable, and the wear and tear it has experienced, I would put my money on an earlier production date – in the 60’s.
With a better appreciation of Peterson pipes and the Kildare line, it’s time to look more closely at the pipe on the worktable. Without a doubt, this Kildare has seen better days, but the wear it has experienced is evidence that a former steward loved his Peterson so much that he ran him into the ground! The most daunting issue is the deterioration of the rim. My, oh my. A few fresh pictures help to show the challenges. The charring is significant. In the second picture, it is easier to see the up and down of what is left of the rim. In the following picture, I have bracketed the only portion of the rim that is the actual rim remaining. The rest has deteriorated almost into oblivion. I’ve been thinking about how to approach this for some time, I will continue to think!
 The bowl itself shows some nice-looking grain patterns. The following picture shows the darkening effect of the charring downward.
 The heel shows a lot of scratches, but I don’t see too many fills. This is good news.
 The classic Peterson P-Lip stem is knee deep in oxidation and calcification.
 To start the restoration of Joshua’s choice for a gift, the stem is first addressed. Using pipe cleaners moistened with isopropyl 99% alcohol, the P-Lip airway is cleaned. It takes some effort to clean through the orific button, but things clean up nicely.
 To address the oxidation and calcification on the bit, Mark Hoover’s Before & After Extra Strength Deoxidizer is used. The stem is placed in the soak for several hours.
 After the time has passed, the stem is fished out and the gooey fluid is squeezed off with my fingers. As the stem drains, another pipe cleaner moistened with alcohol runs through the airway to clear any residual fluid.
 The stem is then rigorously wiped with a cotton cloth to begin removing the raised oxidation. I found that applying 0000 grade steel wool also helps clear away the oxidation.
 The Before & After Extra Strength Oxidation Remover worked well. To begin reconditioning the vulcanite stem, a mineral oil, Paraffin oil, is applied to the stem and then put aside to absorb the oil.
 Before making any decisions about the repair of the bowl, the first order is cleaning. After the bowl is thoroughly cleaned, I’ll be able to better assess the rim damage – to see what’s left of it. First, after a starting picture is taken, the chamber is reamed using the Pipnet Reaming Kit.
 The reaming requires 2 of the smaller blade heads available in the Kit. The reaming is followed by scraping the chamber with the Savinelli Fitsall Tool. The Tool also works on the rim by removing charring to reveal briar beneath.
 The final step is to sand the chamber using 220 grade paper wrapped around a Sharpie Pen for leverage.
 There’s some good news to appreciate – after a quick inspection of the chamber briar, it shows no signs of heating damage with the telltale fissures and cracking. This almost surprises me, but I’m thankful the chamber is in good shape.
 The cleaning next focuses on the external briar using Murphy’s Oil Soap with a cotton pad. The brass wire brush is also used to work on clearing the charring from the rim.
 The stummel is then taken to the sink where the internals are cleaned with hottish water and shank brushes using anti-oil liquid dishwashing soap. After the internals are scrubbed and the bowl is thoroughly rinsed, it comes back to the worktable.
 The internal cleaning continues using pipe cleaners and cotton buds moistened with isopropyl 99% alcohol. A small dental spoon also helps to scrape tars and oils off the mortise walls. After a time, the buds and cleaners start emerging lighter. I call the cleaning to a halt. Moving on.
 The cleaning did a great job. More good news – only two small fills detected at this point. We’ll see if sanding dispatches them. There are many scratches and a few dents that have accumulated over the years, but the briar shows some promising grain patterns.
 The rim cleaned well and it’s easier now to see where the charring ended, and the briar begins. What I described before regarding the rim’s discontinuity is overtly confirmed now.
 To gauge the gaps in the rim a plumb line of sorts needs to be established to define the plane of the rim. After placing 600 grade paper on the chopping board, the inverted stummel is placed on the flat, level surface and the stummel rocks back and forth because of the uneven surfaces. The picture below shows a large gap between the sanding surface and the briar.
 With a bit of rotation, the picture below shows the ‘high’ briar meeting the sanding surface. What is needed is a very light topping to reveal the high briar which will enable me to see more clearly the briar deficits that need addressing.
 To do this, instead of rotating the inverted stummel as is the normal practice to top, the stummel is dragged across the paper after I make sure the high briar is making the contact and the stummel is not tipping into one of the gaps.
 The lightened briar shows the high points of the rim after the dragging in the picture below. The parts of the rim untouched by the sanding paper show the gaps. How to restore this badly damaged rim and yet save as much briar as possible? This is the question I’ve been mauling over since beginning this project – but in full disclosure, when I first saw this pipe when it arrived with the Lot of 66, I thought, yes, a Peterson, whoa, what’s the deal with the rim. I’m thankful that Joshua had a very strong case of ‘Pipe Dreamers’ ONLY! when he saw this pipe, giving me the opportunity to bring this old boy back to life and ready for a new lifetime. One approach is to top the bowl until all the damage is sanded, and a solid rim reappears. This would be the easiest way to go, but the cost is a lot of briar off the top and the possibility of sacrificing the Apple shape. Removing that much of the briar through topping might transform the Apple into a Pot shape – and this may indeed be the case when it’s all said and done! Another approach is to use briar putty and ‘recreate’ a rim in the rough and then sand and top to shape the rim so that it looks as good as possible. In the end, it may require more briar to be removed than wanted, but this approach gives the possibility of salvaging more of the rim. Yet…, even if a solid rim can be recreated, the other concern is the darkened briar. Vestiges of this stained briar will probably persevere the ‘re-creative rim’ process.
 After thinking and writing a lot, the rim is again drug over the topping board a few more cycles to give the emerging high briar a bit more definition. Through this process, I’m very careful not to allow the stummel to dip or rock into a briar gap. At the point pictured below, enough of a lev
 el plane has been established to keep the stummel level more easily.The sanding paper is changed to 220 grade to make more headway in the topping process. My goal is to remove enough briar to reestablish a rim plane over the entire circumference. The widths of the rim will still be uneven.
 At the point shown by the next picture, a rim plane has been established around the circumference. At the 2 o’clock position, the rim is established but significantly thinner than the rest of the rim.
 The reason for this thinness is that the briar on the chamber side of 2 o’clock deteriorated due to the charring. The picture also shows a dent on the side of the bowl that needs to be addressed later.
 The result of the thinning of the rim is a downward slope where briar should be.
 The approach I take is to fill the gap between the cork and the thin part of the rim with briar putty. I’ve never tried this method of using the roundness of a cork to act as a mold before, but it should work well. The second picture shows the gap and the form that the briar putty will fill with the cork acting as a mold.
 Next, scotch tape is placed around the end of the cork that will be inserted into the chamber. A small amount of Petroleum Jelly is then spread over the tape to help the briar putty patch not to stick.
 After putting scotch tape over a portion of the plastic disk to help in cleanup, a small puddle of clear CA glue is placed next to the mound of briar dust.
 Briar putty is made by gradually pulling the briar dust into the CA with a toothpick and mixing it. As more dust is added to the mixture, it gradually thickens. When the putty gets to the viscosity of molasses, where it’s thick enough not to easily run, but thin enough to fill the mold – it’s then ready to go. The toothpick trowels the putty and fills the mold. The toothpick is also used to knead the briar putty to settle it fully into the gap as well as to release air pockets that may be trapped. I’m not concerned about overflowing onto the top of the rim. This will be sanded off later.
 To allow the briar putty fill to cure fully, the stummel will sit overnight propped on the sides to keep it vertical. The lights go off.
 The next morning, after getting other matters and projects out of the way, I’m anxious to see how the briar putty mold worked. With a little twisting and a pull, the cork comes out as hoped with the help of Petroleum Jelly over scotch tape.
 The cork’s curvature seems to have worked well as a mold. There is excess patch material on the top which is expected.
 A flat needle file is used to remove the excess cured briar putty from the rim. Taking the stummel immediately to the topping board is not a good idea with the thickness of the patch throwing the topping ‘level’ off kilter. The goal of filing is to bring the cured patch material down flush with the rim surface.
 The filing is finished. The patch material is very thin at this point – translucent so that the darkened briar beneath is visible bordering the patch.
 With the patch flush with the rim surface, the inverted stummel is rotated a number of times over 220 paper on the topping board. This clears all the excess patch material from the rim. The patch is visible and the continued darkness of the thin part of the briar rim. Sanding will probably not remove the dark charred remnants because of the heating damage in the briar itself. The remedy for this may be to apply a dye to darken the stummel to camouflage the char stain – more to consider.
 To sand and round the chamber circumference, 220 paper wrapped around a Sharpie Pen is used. The goal is to restore a round chamber – as much as possible!
 The result looks good.
 In the picture above, the patch area is hard cured briar putty. The result of this is that the edge is sharp. To soften the inner rim edge appearance and to continue to improve the roundness, a strip of 220 paper is wrapped around a wooden sphere and with the sphere pressed into the chamber mouth, the sphere is rotated to sand a smart bevel.
 The picture doesn’t show the bevel well, but it looks good and achieved the desired effect.
 Next, the inverted stummel is topped on 600 grade paper on the topping board and followed in the same way to freshen the bevel with 600 grade paper.
 With the basic rim repair completed, I’m satisfied with the progress. Next, looking at the condition of the stummel, with all the scratches and dents, after covering the nomenclature on both sides of the shank with painters’ tape for protection, sanding sponges are used.
 Four sanding sponges are used starting with the coarsest graduating to finer grades. The sponges do a good job cleaning the scratches and dents.
 After the sanding, a couple of dents that I had my eye on are very small eye sores after the sanding sponge cycles. One is on the front left toward the rim and the other is on the heel. An arrow and circle mark the spots.
 After cleaning the areas with alcohol, using a toothpick, a small drop of regular clear CA glue is placed on the toothpick and gravity is used to push the droplet down to the point. The CA then touches the pit and fills it. The toothpick approach allows more control over the amount of glue that is used.
 The patch is then sprinkled with briar dust to help blend and allowed to cure.
 The same process is used to apply the patch to the heel.
 After the patches are cured, a flat needle file is first used to file the patch mounds flush with the briar surface.
 Next, 220 and 600 grade papers are used successively to further smooth and blend the patches.
 With the patches sanded, they will blend further during the micromesh process. Continuing with the sanding and moving toward polishing, nine micromesh pads are used starting with pads 1500 to 2400 grade, then 3200 to 4000 and finishing with pads 6000 to 12000. Between each pad, the bowl is wiped with a wet cotton cloth to remove dust and to give the next pad more traction. The protective nomenclature tape is removed for the last 3 pads to help to blend the covered patches.
 The micromesh process did a great job bringing out the grain on this Peterson Kildare. The bad news, but not unexpected, is the scorching on the rim are scars that this old guys will continue to carry into his next lifetime. Little thought is needed to determine the next step. To try to mask the scars a dark dye will be applied to the stummel. I’m hopeful that this will not only mask the charring scars but also liven up the grain.
 To prepare the bowl to receive Fiebing’s Dark Brown Leather Dye, the bowl is wiped with alcohol and then warmed using a hot air gun. Warming the bowl has the effect of causing the briar grain to expand making it more welcoming of the aniline dye as it’s applied.
 The process of applying the dye starts with a folded pipe cleaner which is used to paint swatches of dye to the stummel. The wet aniline dye, which is alcohol based, is then ‘flamed’ with a lit candle. This immediately combusts the alcohol in the dye, and it burns off leaving behind the dye pigment in the grain. This process is continued methodically around the bowl until the dye has been thoroughly applied. Then, for good measure, dye is again applied and flamed a second round.
 After the application of the dye, the bowl is set aside for several hours allowing the new dye to settle in. Waiting and allowing the settling process helps the new dye to stabilize and is less likely to leech off onto one’s fingers when the pipe is put into service.
 The Peterson P-Lip stem has been waiting in the wings. Taking some fresh pictures of the bit reveal one small compression on the upper side and a few bites on the lower side. The pictures also show a roughness generally over the entire stem’s vulcanite surface.
 To assure that all the oxidation has been eradicated, and to remove the light bit tooth damage, 220 grade paper is applied to the entire stem. A shouldering guard is also used to protect the stem facing edges from sanding.
 The 220 sanding is followed by wet sanding with 600 grade paper and then applying 0000 grade steel wool.
 The stem is now ready for the micromesh sanding/polishing by starting with wet sanding with pads 1500 to 2400. This is followed by dry sanding with pads 3200 to 4000 and 6000 to 12000. Between each set of 3 pads, Obsidian Oil is applied to condition the vulcanite and to protect the stem from oxidation.
 The morning has come and the newly dyed Peterson’s Kildare stummel has been resting through the night. To ‘unwrap’ the flamed dye shell, a more abrasive felt buffing wheel is mounted to the rotary tool with the speed set a bit slower than normal to avoid heat buildup. The more abrasive Tripoli compound is used to plow through the crusting. A few pictures show the contrast between the wrapped and unwrapped briar.
 Tripoli compound is once again applied, but this time using a cotton cloth buffing wheel. This second round continues to clear the excess dye and creates a sharper grain definition. The speed of the rotary tool is increased to the normal speed of about 40% full power.
 After the application of Tripoli, the bowl is wiped with a cotton pad moistened with alcohol. This helps to blend the new dye as well as to remove excess dye.
 With the speed the same, another cotton cloth wheel is mounted, and Blue Diamond compound is applied to the reunited stem and stummel.
 The application of the compound creates a lot of fine dust which needs to be removed before application of wax. The pipe is buffed with a felt cloth to do this as well as to remove any clumping compound still adhering to the briar surface.
 One last mini project before applying wax. The Peterson ‘P’ stamping on the stem needs refreshing.
 Using regular white acrylic paint, a drop of paint is applied over the ‘P’ with a toothpick and then daubed dry with a cotton pad.
 Using the smooth side of the toothpick, the excess paint is gently scraped off. The ‘P’ still had very crisp lines, so the paint set in very nicely.
 What I failed to take a picture of was the set up for applying carnauba wax to the entire pipe. With another cotton cloth buffing wheel mounted and at the same speed, carnauba wax is applied to the pipe. After finishing, the pipe is given a rigorous hand buffing to remove excess wax and to raise the shine.
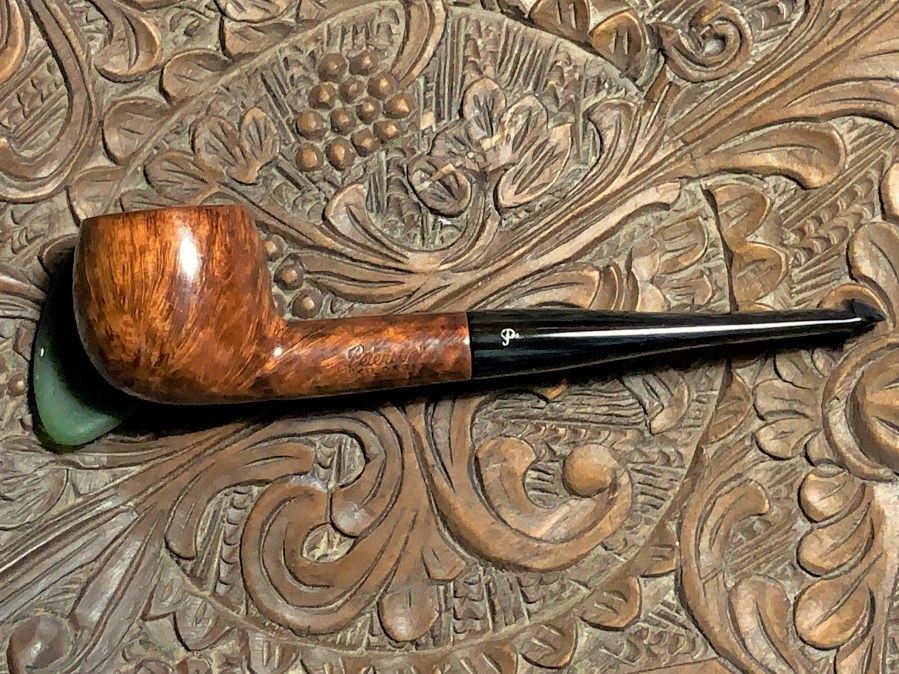
Wow, I’m pleased to see this 1965 inaugural series of the Peterson’s Kildare line not go to the trash heap as a basket pipe beyond hope. With the significant rim burning damage, it is closer to the truth to say that the Kildare was resuscitated not merely restored. The rim looks great and the loss of briar on the top was minimal so that the Apple retained its shape and wasn’t transformed into a Pot shape. Joshua commissioned this renewed Peterson’s Kildare Republic era 86 for his friend, Spencer – for his graduation from college, and Joshua will have the first opportunity to claim the Kildare from the Pipe Steward Store benefitting the Daughters of Bulgaria. The before and after picture doesn’t do justice to how far this Peterson has come 😊. Thanks for joining me!


Please, pray for the people of Ukraine
www.Voice-of-Ukraine.com
