This shapely Sculpted Briar Calabash found its way to me in the first large lot purchase I made. As I began to collect pipes and restore them several years ago, I found pipes in antique shops and bazaars in Sofia, Bulgaria, where we lived. Along with these ‘finds’, I also found pipes here and there on online auction blocks that were affordable and could be added to the growing inventory of pipes to be commissioned in the ‘For “Pipe Dreamers” ONLY!’ collection. I had looked at larger lots of pipes online but had been skeptical about filling my chest with pipes that were not as desirable. I decided to take a chance with a lot of pipes I had been watching on the auction block. The seller in Georgetown, Texas, represented a community-based foundation called ‘The Caring Place’. The eBay billing caught my attention: “Huge Lot Of 66 Smoking Pipes Pre-Owned Pre-Smoked and Deeply Loved”. Further reading revealed that the Lot of 66 was from the estate of one owner whose family, after his passing, donated his collection to the foundation to help their community. I have never regretted placing the final bid that secured what I have called the Lot of 66 that has supplied many treasures that are now in the collections of new stewards world-wide. Here is the Lot of 66 showing most of the pipes that got my attention.  Yet again, another pipe man’s name has been whispered by one of these pipes. This was the second pipe that Brandon had commissioned. The first, A Stem Replacement for a French Jeantet Bruyere Jumbos Since 1807 960 Needle Carved Satin Grain Billiard, came out great.
  The pipe that called Brandon’s name from the Lot of 66 is an attractive Sculpted Briar Calabash with only IMPORTED BRIAR marking the provenance. I appreciate that Brandon is a career US Navy man who has served command positions as a submariner. He hopes to be retiring in the next few years and I appreciate his service. Here are a few of the original pictures I took of the Sculpted Briar Calabash Brandon commissioned benefitting the Daughters of Bulgaria – helping women and girls who have been trafficked and sexually exploited.

 With no traceable nomenclature, this Sculpted Briar Calabash joins the throngs of pipes with the basic, ‘IMPORTED BRIAR’ stamping. The condition of the pipe reveals that it has been well loved and put into service often. The chamber has thick cake build up. The rim has some lava flow but the main issue I see is that the chamber has been worn with charring damage so that it is now out of round. The stummel has very attractive horizontal grain flow on the left and fore sections. The right side is populated with bird’s eye. The sculpting is attractive depicting I believe, leaves. The 3/4 bent stem has heavy oxidation and calcium buildup – it will be a bear to clean. There are some tooth chatter and tooth compressions on the bit and button and after cleanup, I’ll take a closer look.
To begin the restoration of this attractive Sculpted Briar Calabash, I begin with the stem. Looking more closely at the pictures from above, the calcium deposits are significant. The oxidation is deep as well.  The internal airway is first cleaned with pipe cleaners wetted with isopropyl 99%. To get a head start on cleaning the stem’s oxidation, 00 steel wool is used with SoftScrub to work on the vulcanite surface.
  The stem is then placed in Briarville.com’s Pipe Stem Oxidation Remover to soak for several hours. I’m hopeful that this will clear the oxidation.
  With the stem soaking, I turn to the Calabash stummel. I take a few fresh pictures of the chamber to show the cake buildup in the chamber as well as the rim issues.
  The rim is in bad shape. There is a lot of burn damage that has resulted in the rim eroding becoming disfigured and out of round. After cleaning, we’ll see what should be done.
  The cleaning starts with the Pipnet Reaming Kit. The Briar Calabash’s chamber is shaped conically and is reminiscent of a Dublin shape which makes reaming with a straight blade difficult and apt to cut into the briar wall. I start with the smallest blade head to ream the chamber and we’ll see how it goes. When I graduated to the second, larger blade head I decide that the angle of the chamber is too sharp, so I break out my ‘old man’ reamer, the Kleen Reem Pipe Tool which I found at a Flea Market in Kentucky several years ago. I use the Kleen Reem Tool with chambers like this one and Dublins that are more of a cone than other pipe shapes. The Kleen Reem Tools cutting arms expand with the turn of the knob so they can expand proportionately with the chamber’s wall.
  After the Kleen Reem Tool did its job, the Savinelli Fitsall Tool is employed to continue scraping the chamber getting carbon cake that was left behind. Finally, the chamber is sanded with 240 sanding paper wrapped around a Sharpie Pen.
  After wiping the chamber with a cotton pad, a quick inspection reveals healthy briar. Moving on.
  Continuing next with cleaning the external surface and the rim, undiluted Murphy’s Oil Soap is used with a cotton pad to scrub. A bristled toothbrush is also used to scrub the leaf sculpting. To address the rim lava crusting, a brass brush is used to scrub. Brass brushes are helpful to add more abrasion without damage to the briar.
  The stummel is then taken to the sink where the mortise and airway are scrubbed with hot water using shank brushes and anti-oil liquid dishwashing soap. After scrubbing, the stummel is thoroughly rinsed and transferred back to the worktable.
  Continuing the internal cleaning, cotton buds and pipe cleaners are used with isopropyl 99%. To help with the cleaning, a small dental spoon is used to scrape the tars and oils off the mortise walls. Quite a bit was excavated. When the buds and pipe cleaners begin to emerge lighter, I call a halt to this phase of cleaning. I will continue at the end of this workday with a kosher salt and alcohol soak to further clean the internals and to freshen the briar.
  With the primary cleaning completed, I take a closer look at the rim and briar surface. As noted, the rim is in bad shape. The picture below shows the deterioration of the right side of the internal rim lip (marked with pen). The obvious culprit is right sided lighting over the rim’s edge. The width of the rim at this point is noticeably narrower. The front of the rim (left side in picture) is narrower due to the flattened sculpting on the face of the stummel.
  The stummel cleaned up well. The finish is thin after the cleaning. There are normal wear and tear scratches and dents over the surface. The grain is distinctive, and I look forward to help bring it out more.
  The heel also has some scrapes.
  I start with addressing the issues of the rim. There is no question about needing to top the stummel to try to regain some balance and proportion in the rim presentation and cleaner lines. It will take a good bit of briar real estate off the top to remove the gap, but I’m thinking that the style of this pipe will look good with a plateau-like rim as a briar Calabash. For this reason, I’m not as concerned about removing more briar than usual. I take a picture to mark the original start.
  Inverting the stummel on the topping board, which is a chopping board, the stummel is rotated over 240 grade sanding paper.
  I stop to check the progress often and show the progress step by step with the following pictures.
 At this point I stop (pictured below). With the topping, the rim has widened as the worn area has dissipated. The briar at this point is dark from charring as is the inner rim edge around the circumference. Before removing more briar through topping, I will introduce a sharp internal rim bevel that will hopefully lessen the difference between the worn area remaining and the rest of the rim. A bevel will also help to remove the damaged darkened briar.
  I use 240 grade paper to cut the bevel using a hard piece of wood pressing behind the paper to create a sharper bevel that is not rounded. I like the results. The bevel has created a more rounded chamber and cleaned the dark char ring around the internal edge.
  The stummel goes back to the topping board for some additional revolutions to see if it will improve the rim a bit more.
  The paper is next switched to 600 grade paper to continue the topping. After several revolutions to smooth the rim further, I’m satisfied. Wow! What a transformation in the rim. I bring down the starting picture just to see the improvement. The grain can be seen now moving laterally across the rim. The plateau, which usually is how we describe the rim of a Freehand, works here very nicely. The only downside I see is that there continues to be darkened briar at the damaged area. I believe this will remain and be a reminder of the wounds of the past.
  Continuing with the stummel, to remove the scratches and dents on the briar surface, sanding sponges are used. Starting first with a coarser sponge, the sanding graduates to less coarse then to fine sponges. The results are shown. I’m liking what I’m seeing.
  I continue with the sanding of the stummel. Next, the full set of 9 micromesh pads are used. First, starting with pads 1500 to 2400, the stummel is wet sanded. Then using pads 3200 to 4000 and 6000 to 12000, the stummel is dry sanded.
 To bring out more grain definition, I decide to apply Fiebing’s Light Brown Leather Dye to the stummel. I do this not so much to darken the stummel or hide imperfections, but to create more definition and contrast in the grain. After assembling the components for applying dye on the desktop, I warm the stummel with the heat gun. Heating the briar opens the grain helping it to be more receptive to the dye pigment.
  Next, a folded pipe cleaner is used to apply the light brown dye to the stummel in sections. After each section of dye is applied, while still wet, the aniline dye is ‘flamed’ using a lit candle which ignites the alcohol in the dye. When the alcohol burns off, left behind is the dye pigment. After the dye has been thoroughly applied, the stummel is set aside through the night allowing the new dye to settle in.
  Since it is at the end of the workday, I decide to multitask with care. While the dye is settling through the night the cleaning will continue with the internals of the stummel using a kosher salt and alcohol soak. First, a cotton ball is pulled and twisted to create a wick that serves to draw tars and oils from the internal briar walls. With the help of a stiff wire, the wick is guided down the mortise into the airway.
  The bowl is then filled with kosher salt and set in an egg crate to keep the stummel steady and to place it at an angle where the rim and shank’s end are roughly level. Kosher salt is used because it does not leave an aftertaste as regular iodized salt. Using a large eye dropper, next isopropyl 99% fills the bowl until surfacing over the salt.
  After a few minutes, the alcohol recedes into the salt and cotton wick and is topped off one more time. The day is done, and the lights go out.
  The next morning, the salt and wick are soiled indicating the soak did its job through the night.
  After clearing out the expended salt and wiping the chamber with paper towel to remove salt crystals, I also blow through the mortise to clear away any rogue salt crystals. To make sure things are clean, I use pipe cleaners and cotton buds again wetted with isopropyl 99%. I discover that there continues to be a good bit of crud to be cleaned. In time, the buds and cleaners emerge lighter, and I call the job done. For good measure I do the whiff test and as expected, the chamber smells fresh and ready for a new steward.
  Next, its time to ‘unwrap’ the stummel after applying Fiebing’s Light Brown Dye the night before. After a felt cloth buffing wheel is mounted on the rotary tool, and the speed set a bit slower than norm – about 30% full power. Tripoli compound is then applied to the crusted briar surface to ‘plow’ the excess flamed dye.
  Admittedly, I enjoy the ‘unwrapping’ process to see how the grain has responded to the dye application. The goal is creating more contrast in the grain so that it pops more. The added benefit for this Sculpted Briar Calabash is that the sculpting is refreshed as well. The higher peaks in the sculpting are smooth briar which will lighten in contrast to the rougher valleys which will absorb the dye differently and remain darker. These pictures show the contrasting emerge as the unwrapping progresses. I know that I’ve hit the bull’s eye when the grain emerges with a luminescence that is eye catching.
  After completing the main ‘plowing’ with the more abrasive felt wheel, this is exchanged for a cotton cloth wheel to continue applying the more abrasive Tripoli compound. I do this for two reasons. The cloth wheel can reach into the crook of the shank/bowl junction where the felt wheel is unable to reach. The second reason is that repeating the application of the Tripoli over the entire stummel fine tunes the grain by removing a bit more of the excess dye leaving behind a more detailed picture of fine grains.
  When I finish with the second round of Tripoli, the stummel is wiped with a cotton pad wetted with alcohol. This is done to blend the dye and to continue to remove excess dye.
  I put the stummel aside and turn again to the stem. The stem has been soaking for about 24 hours in the Pipe Stem Oxidation Remover. After fishing the stem out of the bottle, the stem is briskly wiped with a cotton cloth to remove the raised oxidation. Pipe cleaners wetted with isopropyl 99% also are used to clean the airway of the deoxidation fluid. The oxidizer remover did an OK job, but the stem surface continues to be rough, and I see vestiges of oxidation remaining.
  To help condition the vulcanite stem, paraffin oil, a mineral oil, is applied to the stem and set aside for a time to allow the oil to be absorbed.
  Continuing with the stem, next begins the sanding process. Before sanding, I take a closer look at the bit and button. The upper bit has some small compression ridges, and the lower button has a distinct bite. To lessen these the heating method is used. Using a Bic lighter, the upper and lower areas are painted with flames. As the vulcanite rubber heats it expands and retakes its original shape – at least in part. As I was heating the bit with the lighter, I recalled that the bend and the bit area of the stem were difficult to navigate with a pipe cleaner. I decide to slide a pipe cleaner through the airway during the heating to expand the airway while the vulcanite is softer.
  After heating several cycles, the heating may have help some, but not much. The before and after pictures show the results. I believe the upper bit ridges will sand out without difficulty, but the button bite needs to be repaired before sanding.
 To repair the lower button bite, a small drop of black CA glue is applied, and this fills the compression. I put the stem aside for a time for the patch to thoroughly cure.
  When the patch to the lower button has cured, I go to work with the flat needle file. The excess patch material is filed down to the button surface. The lip edge is also filed to remove excess patch material. I take this opportunity to freshen the button by filing the lip on the lower and then upper – second picture.
  After filing, to erase these scratches and to smooth further, the bit and button are sanded with 240 grade paper – upper then lower.
  Next, the 240 sanding is expanded to the entire stem. When the sanding nears the stem facing, the plastic disk is pinched up to the edge to prevent shoulder – sanding over the stem facing and rounding it.
  Next, the stem is wet sanded with 600 grade paper and then 0000 grade steel wool is applied.
  Next, the stem receives sanding from the micromesh pads starting with wet sanding with pads 1500 to 2400. This is followed by dry sanding with pads 3200 to 4000 and 6000 to 12000. After each set of 3 pads, Obsidian Oil is applied to the vulcanite stem to further condition it and to guard against oxidation. The stem has some pop now!
 After reuniting the stem and stummel, another cotton cloth buffing wheel is mounted onto the rotary tool with the speed set at about 40% full power. Blue Diamond compound is then applied to the pipe.
  After applying the compound, a felt cloth is used to wipe/buff the pipe to clear any remaining compound dust. This is done in preparation for applying the wax.
  The style and quality of this Sculpted Briar Calabash has emerged through the process. This is a classy pipe which deserves a bit of bling in my opinion. I’ve been thinking about mounting the shank with a decorative brass ring/cap to add a touch of class. I was able to find a perfect fit for the Calabash.
  The brass ring just fits over the shank facing but no further, as the picture below shows. In good fashion, the ring tightens so that it will not fully seat over the shank facing without help. The picture below shows the gap remaining on the inside of the brass ring before it is seated properly.
  To expand the brass ring and enable it to expand easier without tearing, the ring is heated with the hot air gun.
  When the ring is hot, I rotate the stummel shank down over the work cloth and firmly press down on the stummel to seat the brass band. As the band cools, it will contract and tighten to secure the mounting.
  The stem is reunited, and it is a beautiful fit and the touch of class. The bling is added successfully.
  One last step – after mounting another cotton cloth wheel on the rotary tool, with the speed the same, carnauba wax is applied to the entire pipe. After a thorough application, the pipe is given a rigorous hand buffing with a microfiber cloth that removes excess wax and raises the shine.
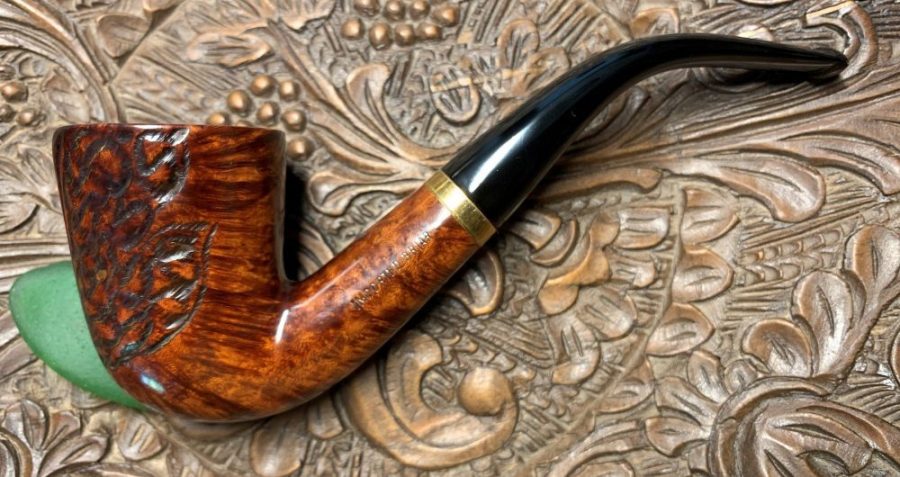
  My oh, my! This Sculpted Briar Calabash has come a long way. The grain simply sings now. The sculpted leaf patterns are set off more crisply providing relief with horizontal grain on the left side of the bowl and bird’s eye on the right. The lines of the Briar Calabash are graceful and with the three-quarter bent stem, it promises to provide a nice angle for cradling the bowl and taking reflective sips. The addition of the brass ring completes the ensemble. Brandon, a Navy man, commissioned this Sculpted Briar Calabash and as the commissioner, will have the first opportunity to claim it in The Pipe Steward Store which benefits the Daughters of Bulgaria – helping women and girls who have been trafficked and sexually exploited. With transformations like this, I like to post the ‘before’ picture to remember how far we’ve come. Thanks for joining me!


Beautiful work!
LikeLiked by 1 person
Thanks, Ed! It came out quite well.
LikeLike
Love the refurbished pipe’s new look. The amount of work you put into it, and the documenting of each step, is tremendous.
LikeLiked by 1 person
Thanks Todd! I love the way the grain comes out with a little TLC.
LikeLike
I’d say it was a lot of TLC.
LikeLiked by 1 person
Reblogged this on rebornpipes and commented:
Here is a restoration Dal did… I have been without internet for 9 days now and I missed this one. Give the blog a read. Thanks.
LikeLike