Nick is the elder brother of Ellie, who lived with us as an ‘adopted daughter’ while she studied at Sofia University completing her degree in Chinese Language and Culture. Their parents, CC and Svetly, good friends of ours, loved to go to flea markets and poke around to find treasures. I became the benefactor of more than a few pipes that they found in the ‘wild’ which were both gifts for me as well as donated pipes to benefit the Daughters of Bulgaria – they knew of my love of pipes and that these restorations helped a good cause. The pipes they personally gifted to me were actually treasures – Renewing a Treasured Swan Neck Meerschaum, a Gift from Treasured Friends was an esteemed older fellow that now provides fellowship on special occasions.  Another treasure that came to me that I restored was a gift from Svetly. The Churchwarden pictured below belonged to his father who, along with his mother, were dancers performing in a truly Bulgarian artform, traditional dance and costume. In many ways, this unique traditional artform resonates in the hearts of modern Bulgarians because of its connection to their common past. I restored this Churchwarden, which had belonged to Svetly’s father, as my last write up before my wife and I left Bulgaria over a year ago now during the opening salvos of COVID. Because of this, the pictures of Svetly’s parents dancing, which I wanted to include in the writeup were inaccessible. So, that final writeup still waits to be published telling the story of this beautiful and stately Churchwarden that was also added to my treasured friends from this special family.
  I started this story by mentioning their eldest son, Nick. Like parents, Nick was also at the huge Sofia Flea Market in 2019, and as he looked for his own treasures amid the tables and blankets spread out over acres of land. During this treasure hunt, he also saw the Butz Choquin Bulldog now on the worktable. Undoubtedly, he negotiated with the seller (which is what flea markets are!) and acquired the Bulldog, passing it on to his sister, Ellie, who passed it to me to benefit the Daughters of Bulgaria. Thanks, Nick! Here are the pictures of the Butz Choquin Rocaille Rusticated Bulldog that I took in Sofia.

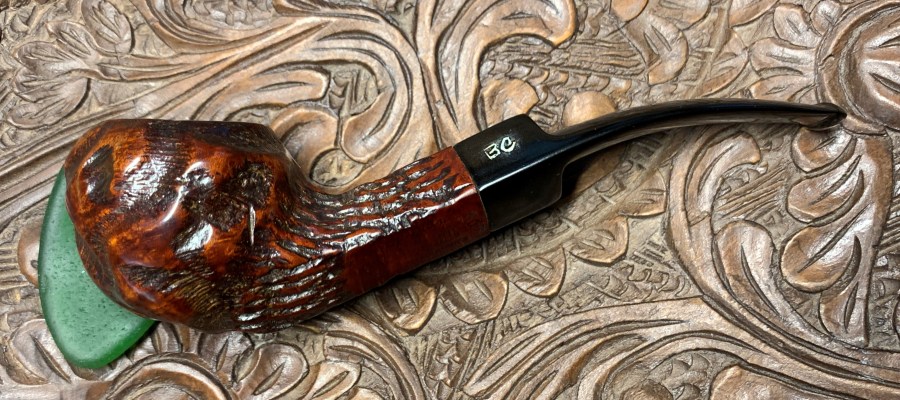
 The measurements of the Bulldog are compact and stout in good Bulldog fashion: Length: 5 5/8 inches, Height 1 1/2 inches, Bowl width: 1 5/8 inches, Chamber width: 1 inch, Chamber depth: 1 1/8 inches. The nomenclature on the lower left shank panel is ghosted and in danger of extinction. The panel is stamped with the recognized fancy cursive, ‘Butz-Choquin’ [over and set to the right] ‘Rocaille’ [over] ST CLAUDE-FRANCE. To the right and parallel to the shank facing is the shape number, 1027. The picture above shows the traditional ‘BC’ stem stamping.
  A short refresher of the history of the French Butz Choquin name is found at Pipephil.eu:
The origin of the brand reaches back to 1858 when Jean-Baptiste Choquin in collaboration with his son-in-law Gustave Butz created their first pipe in Metz (France). Since 1951 Butz-Choquin is a brand of the Berrod-Regad group (Saint-Claude, France).
Jean Paul Berrod managed the company from 1969 to 2002 when he retired and sold the corporate to Mr Fabien Gichon. Denis Blanc, allready owner of EWA, took over the S.A. Berrod-Regad in 2006.
The Bulldog is stamped with the line name of ‘Rocaille’. A quick look at Google Translate renders the French word in English as ‘Rockery’. The dictionary describes a ‘rockery’ as a ‘heaped arrangement of rough stones with soil between them, planted with rock plants, especially alpines’. I’m guessing that this name is expressive of the deep craggy rusticated design of the Bulldog. I have one other BC pipe in the inventory with the Rocaille name stamped on it. A very stout Billiard which shows the obvious similarities in the Rocaille BC line with a quick comparison. This Billiard is waiting for a new steward to commission him in the ‘For “Pipe Dreamers” ONLY!’ collection!  This craggy, carved Bulldog caught the attention of a pipe man with a mission in going to the For “Pipe Dreamers” ONLY! online collection. Ken, known as Ken ‘Bründle’ on the Facebook group, Brothers by Briar, which he co-moderates, is an interesting person, which some may say is an understatement. His FB page helps to explain the ‘understatement’ with this byline under his name: “I’m eccentric and you’re too boring to understand me anyway…” Ken had seen some of my restorations posted on other FB pipe groups and he reached out to me with an invitation to join the ‘Brothers by Briar’ group which I was happy to do after I looked at the posts and conversations on the group.
When I asked Ken where he was from, his reply was that he was from Kentucky but originally, he was from ‘The Shire, Hobbiton to be exact.’ He teaches 9th grade  English and is a prolific reader – favoring books describing Hogwarts and Middle Earth. Some could say that Ken is a Renaissance man, not only does he explore the worlds of literature, pipes and tobaccos, but he also is a knife maker, spends time fly fishing, restores revolvers, taking in the Cinema as a fan of the Big Screen, and he listens to an eclectic collection of music. His ‘man cave’ is also adorned with original ink portraits depicting the famous – mythical and of humankind, garnering their pipes – these all the creation of artist, Artur Lopes, also a well-known pipe man par excellence. Ken’s portrait was also captured by Artur Lopes as a commissioned Christmas present.
This brings us to the BC Bulldog now on my worktable which Ken commissioned. I received this short note which explained Ken’s unique mission and the reasons for commissioning the BC Bulldog: I would like to commission this old bulldog. My favorite pipe shape is a bulldog and my wife, and I own Bulldogs. We lost our Guinness in October to lymphoma, and I had a Short Peterson Bulldog made for him as a remembrance pipe. Now we have a rascal of a bulldog pup, Whiskey. I  think a “new” pipe for him is in order. I’m a teacher and I HATE anyone that would abuse children, so I think this commission serves two amazing purposes!
Thanks!
Ken
From that letter I discovered some important things about Ken. First, this BC Bulldog was to be a pipe forever associated with their newly adopted member of their family, Whiskey. This commissioning was especially meaningful after the loss of Guinness. One of the unique aspects of tobacco pipes and those who treasure them is that so often specific pipes carry with them the memories of loved ones and events. In this case, the memories of a special family member named Guinness, associated with a Short Peterson Bulldog. This exceptional pipe will be joined by the BC Rocaille Bulldog commemorating the newest family member, Whiskey. I found out from Ken that Whiskey also has his own FB page! I love it! The second thing I learned about Ken, the Renaissance Man, is that he likes his adult beverages 😊!
In Ken’s letter above he also mentioned ‘hating the abuse of children’. He was referring to the work that my pipe restorations benefit, the Daughters of Bulgaria – helping women and girls who have been trafficked and sexually exploited.
With this special commissioning of this Butz Choquin Rocaille Rusticated Bulldog on the table before me, I take a closer look at its issues. The chamber has thick carbon buildup. This will be removed to inspect the chamber briar and to allow a fresh start for the briar.  The rim, or what’s left of the rim, of the rusticated Bulldog is pretty gnarly – perhaps an understatement. It needs to be cleaned first to see how bad the condition is. There appears to be a divot on the internal, shank side of the rim, but I’m not sure at this point whether it’s a divot or the craggy rusticated carving (see circled below).
  Close ups of the stummel gives a great impression of the rustic, cragginess of this BC Bulldog. The briar mounds rising appear like stones in the ‘Briar Rockery’ and the inset carved swooshes reminds one of soil. I like it. There is also a combination of contrasting of the rough, carved patches with the smoother briar which should look good after things are cleaned up.
 I see two shank junction issues. First, the stem is very loose and wiggles and rotates without adequate friction against the mortise. This junction needs tightening. The other issue I see is that the lower point of the diamond shank has shouldered and there is a small gap between the stem and shank (the arrow in the picture below marks the spot). We’ll see if tightening the tenon/mortise junction helps this, but probably not enough to erase the gap. We’ll see.
  The stem is deeply oxidized, and the bit’s underside has been punctured with what appears to be with the canine tooth not of a bulldog, but of a hands-free smoking steward😊. The hole needs to be repaired and the oxidation removed.
  To begin the restoration, the stem is the focus. To get a head start on the deep oxidation, 00 grade steel wool is used with Soft Scrub. A cotton pad is also used to scrub the surface and is covered with the oxidation from the stem.
  Next, after rinsing the Soft Scrub solution off, to continue addressing the oxidation, the stem is placed in Briarville.com’s Pipe Stem Oxidation Remover for several hours – actually overnight. The next day the stem is removed from the solution and wiped briskly with a cotton cloth to remove the raised oxidation. A pipe cleaner wetted with isopropyl 99% is drawn through the airway to clear the excess Oxidation Remover fluid.
  Next, to condition the stem, paraffin oil is applied to the stem with a cloth. The stem is then put to the side to allow the mineral oil to be absorbed.
  Turning now to the stummel, a fresh starting point picture is taken.
  With every pipe, I go through the same process. Using the Pipnet Reaming Kit, I start by reaming the chamber using 3 of the 4 blade heads available in the Kit. This is followed by additional scraping of the chamber wall with the Savinelli Fitsall Tool then the chamber is sanded with 240 grade paper wrapped around a Sharpie Pen to give leverage.
  After the chamber is wiped with a cotton pad, another picture shows the cleaned chamber. A quick inspection reveals healthy briar in the chamber.
  Next, the external cleaning begins by using undiluted Murphy’s Oil Soap with a bristled toothbrush to get into the rough craggy surface. The brass brush is also utilized on the rim. From the worktable, the stummel is next taken to the sink.
  Using long shank brushes and anti-oil, liquid dishwashing soap, the internals are scrubbed with hot water. When the internals are scrubbed and the stummel is thoroughly rinsed, the stummel is taken back to the worktable.
  The internal cleaning continues with cotton buds wetted with isopropyl 99%. Along with the cotton buds, a small dental spoon excavates the tars and oils by scraping the mortise walls. After some effort the buds begin to emerge much lighter. I call a stop to the cleaning with a plan to give the stummel a soak later using instead of kosher salt and alcohol, I will test the use of cotton balls and alcohol instead.
  With this phase of the cleaning completed, I take a closer look at the stummel starting with the rim. The rim has seen better days without doubt. The cleaning shows the wearing away that the briar has experienced. The forward outer edge has rounded, and the rustication has been worn off so that the briar is smooth. The shaft-side of the rim is narrower with a small chip on the inside rim edge.
  What cannot be seen from the top-down perspective is the unevenness of the rim. The left side dips down. The picture below shows the rim’s left side in the foreground in contrast to the higher right side in the background.
  The challenge with this rim is not so much the damage done to the rim but restoring it in the likeness of what it was originally. If this were a smooth briar Bulldog, the decision to top the rim to even it out and to create fresh lines would not require much thought. With this rusticated Bulldog, to top it to regain the rim requires then re-rustication of the rim trying to emulate the straight front-to-back, linear patterns.
I mentioned earlier that I had another BC Rocaille in my inventory – a Billiard. I decide to pull it out and look at it to see if it helps to envision what the Bulldog’s rim is supposed to be. With a bit of effort, I manage to take a comparison picture of the Rocaille Billiard and the Bulldog. Looking at the picture below, I’m not convinced that the tight, ribbon rustication on the Billiard is the same on the Bulldog. From the residual rusticated patterns running over the rim, the rustication appears to be more deeply furrowed and less intricate than the Billiard’s pattern. This could be the case because the Billiard has more flat briar real estate on its rim for artistic license compared to the smaller Bulldog profile. The question remains, to top or not to top. If the topping is bypassed then the Bulldog will definitely have a rustic, earthy presentation!  In the end, I decide to top the rim to create new, fresh lines and then try to emulate the linear rustication pattern. To top the Bulldog, a chopping board serves as my topping table with 240 grade paper placed on the board. Topping the Bulldog requires a bit of care. With the soft dip in the rim, it would be easy to tip the stummel in that direction which would result in a slanted rim – not what I want! I start rotating the stummel lightly checking the progress quickly to make sure the topping is level.
  After some initial rotations, an inspection shows that the topping so far is level. The low spot on the rim is untouched by the topping. The remnant of the rustication on the top of the picture remains as well.
  The topping continues with rotations on the 240 paper with stops coming often to inspect the progress.
  At this place of the picture below, the decision is made to stop topping with 240 paper. There is still the remnant of old rustication on the top of the picture and some roughness on the lower side of the picture where the dip had been.
  I finish the topping by rotating the stummel a few times on 600 grade paper.
  In the picture above, the inner rim edge is darkened from the heating of the chamber. To help clean this up a bit I introduce a small smart bevel by pressing 240 paper against the inner rim edge with a piece of wood. This hard surface press helps the bevel to be sharper and not to round the rim. The bevel helps not only to clean the darkened briar but also to round the chamber.
  Next, using the rotary tool and burrs, rustication will be reintroduced on the rim. First, to get a feel for the results of differing burrs, I use old stummels to experiment with test cuts using different burrs at differing speeds. It took some time and input from my wife to decide how to approach emulating the flow of the original rustication.
  The linear sculpting from the shank flows toward the bowl and the old rustication on the rim mimicked that front/back flow. The challenge is to emulate this linear ‘flow’ on a very small rim platform. I decide in the end to keep it simple by applying the rounded burr in short motions and touches that generally flow parallel with the shank. I like the results. Sanding will soften the cuts and I believe create a pattern that will complement the original rustication ‘Rocaille’ intent.
  With the rim rustication finished up to this point, there’s a bit to do regarding sanding the stummel. The rough craggy surface is the goal of the Rocaille – ‘Rockery briar garden’. However, there are smooth briar patches throughout the landscape which will provide nice smooth/rough contrasting which I always like. Smooth briar can be seen on the upper peaks of the sculpting on the shank and the ‘stone mounds’ on the stummel that sanding will bring out hints of grain. There are also smooth briar panels bordering the shank facing that could be spruced up. I will not touch the nomenclature panel with any sanding to guard against any further erosion of the Butz Choquin stampings. Using sanding sponges, I begin sanding with the coarsest sponge and then graduate to the medium and fine grades. The grain teasing begins.
  Next, I run the stummel through the full set of 9 micromesh pads, dry sanding from 1500 to 2400, 3200 to 4000, and 6000 to 12000.
 In preparation for applying dye to freshen the stummel, the stummel is scrubbed with a cotton pad wet with alcohol. The fine carving is scrubbed well to make sure that the dirt and debris is removed, and the briar is clean.
  The hot air gun is used next to warm the briar in preparation for applying the dye. The warming expands the briar helping it to be more receptive to the dye application.
  Fiebing’s Light Brown Leather Dye is then applied to the rusticated stummel using a folded pipe cleaner. With the deep crags, care is taken to apply dye adequately to cover the crevasses and cuts in the briar. After a section of the stummel receives the aniline dye, it is then ‘flamed’ using the lit candle. The flame immediately combusts the alcohol in the dye leaving behind the pigment in the briar. This painting and flaming are done methodically around the stummel and a second time for good measure, so that the dye is thoroughly covering the stummel. The stummel is then put aside to allow the newly applied dye to settle in.
  With the workday coming to a close, while the new dye is ‘resting’ through the night, I decide to multitask carefully by giving the internals of the stummel additional cleaning through the night. My usual practice is to use a soak of kosher salt and isopropyl alcohol which is rated at 99%. This week I read a thread in the Facebook pipe group, The Philosophical Gentleman’s Pipe Smoking Society, a group I enjoy very much and a group on which I post my restorations. The thread was started by pipe man, John Offerdahl, an administrator of the group and an active contributor.
His thread essentially was a warning about using salt in the deep cleaning process that I have used with kosher salt. His basic argument was that using lower rated alcohols (potable and non-potable) introduced a high water content into the process and this excess water could dissolve the salt leaving it in cracks, etc. The concern is amplified when the pipe is then put into service and the bowl is heated, the residual salt could expand, and this could cause the stummel potentially to crack. John’s caveat to this was that using a higher rated alcohol, at least 99%, would not have enough water content to have this adverse effect, BUT, his second caveat, repeated often in the thread was, why take the risk at all even with the higher-grade alcohol? John’s alternative to salt is to use cotton balls instead. When I read a comment in the thread that my mentor Steve, from Rebornpipes, had stopped using salt some years ago and was using cotton, I decided to give cotton a try.
As several others in the thread echoed, I’ve never known any problems coming from my use of kosher salt and 99% grade isopropyl alcohol, but John’s argument essentially is that only after time and use could a problem potentially occur. Essentially, if I could summarize, using salt is planting a time bomb in the pipe. I like using kosher salt because it leaves the briar fresh, removing any residual ghosting. The salt/alcohol cleaning practice is usually only used for deep cleaning and does not replace regular prophylactic cleaning of a pipe. Yet, when I receive a pipe with no idea how or who has used it, and I’m preparing it for a new steward to add to his collection, I want the pipe as clean as possible and kosher salt and isopropyl 99% has been my practice with no cognizant problems. Yet, if I can achieve the same ‘refreshed and clean’ results using cotton, I’ll give it a try, even though my use of kosher salt and 99% grade alcohol is acceptable under John’s standards.
Having never using cotton balls stuffed in the bowl, I was surprised that the BC Bulldog only required one which filled the chamber adequately. My normal practice of pulling and twisting another cotton ball to form a ‘wick’ which absorbs and draws out tars and oils, is guided down the mortise with the help of a stiff wire.  After putting the cotton-stuffed stummel in the egg crate to keep is stable and to angle it so that the rim and shank’s end are roughly level, a large eye dropper helps to fill the chamber with isopropyl 99% alcohol. As with salt, the alcohol eventually surfaces over the cotton.
  One of John’s thoughts also was that the alcohol that was being used by people was possibly NOT higher grade, but people thought it was. This prompted me to post this picture in the thread regarding the quality of the alcohol that I use – 99%. If one were to look closely at the smaller bottle I use on the worktable, you will see that it’s label is in the Bulgarian language and that it says, 70%. I have used the smaller bottle on the worktable and refill it with isopropyl 99%. Here is the product I have used and continue to use.
  After waiting a few minutes, the alcohol is topped off allowing King Cotton to do its thing through the night. The lights go out.
  The next morning the cotton wick and ball are pulled out showing the soiling of the tars and oils pulled out through the night.
  Two cotton buds are expended to check on the results of the process. As hoped, the cotton buds reveal a clean mortise. The whiff test also confirms that the briar is fresh, but I do detect a slight difference. The kosher salt leaves more of a seaside freshness which I like. The cotton ‘freshness’ smells fresh like alcohol but lacks that subtle difference. I will probably continue to use cotton instead of kosher salt, not because my practice was bringing harm to the pipes I worked on according to John’s informational standards, but because I don’t want to risk pipe men and women becoming ill-tempered toward me or the work I do and why, if I use kosher salt. I suppose this is a mild form of cultural canceling in the pipe world to which we’ve, unfortunately, become accustomed. I appreciate John’s thread bringing up the discussion and what I’ve been able to learn from it. Thanks, John!
  Through the night, the new dye was also resting and now it’s time to ‘unwrap’ the stummel’s flamed crust. The challenge will be to remove the crusting debris from rusticated surfaces. I begin this process by mounting a cotton cloth buffing wheel to the rotary tool, and setting the speed faster than normal, to about 50% full power. Normally with a smooth briar, I would have used a more abrasive felt wheel at this point, but the cotton wheels is much more able to reach into the cracks and crevasses than the less malleable felt wheel. The more abrasive, Red Tripoli compound is applied to the stummel.
  I take a picture during the unwrapping process to show the contrasting that is emerging. Using a rotary tool buffing allows me to rotate the stummel in my hand and more easily leverage the buffing wheel in a parallel direction with the feather carvings, cracks, and crevasses to remove the excess dye.
  After applying the Tripoli compound, a cotton pad wetted with alcohol is used to wipe down the stummel to help remove excess dye and to help blend the dye over the surface.
  The stem has been waiting patiently in the wings and it is now on the worktable. Earlier I had observed that the stem was loose and needed to be tightened.
  The method to tighten the seating is to heat the tenon with a Bic lighter and after the vulcanite tenon softens, the smooth end of a drill bit is gradually inserted into the airway. When this is done, the softened vulcanite expands outwardly, thus closing the gap between the tenon and mortise.
  The process is repeated a few times before the ends are achieved. First, a drill bit is chosen that is just larger than the next smaller bit that easily fits the airway. The tenon is rotated as the flame of the Bic lighter heats it so not to burn the rubber. The first heating cycle, the drill bit is inserted a small bit. The tenon is then again heated with the bit inserted and when the vulcanite is again softened, the drill bit is forced down the airway a small bit more. This heating cycle process is done four times when I decide to test the fit. Leaving the bit in the tenon after the last heating, the stem is taken to the sink and the heated tenon is cooled with tap water to solidify the expansion.
  After the expansion is solidified, the stem is taken back to the worktable where a pair of plyers helps to grip the drill bit and carefully and slowly is pulled out of the mortise while gently rotating the bit. The test fitting results in a snug fit with the tenon in the mortise, but not too tight. Success.
Yet, as I also noted earlier, the shouldering of the diamond shank was not rectified by the tenon tightening process. The bottom point is the most acute, but this picture shows shouldering on the other points as well. I’m hesitant to ‘top’ the shank facing to try to flatten it. The seating of a stem in the shank can be messed up even more if the shank facing isn’t perfectly flat and corresponding to the stem facing. I decide to pass on this repair because it would require too much briar to be taken off the shank facing to erase the shoulder – too much can go wrong. It becomes a badge of this BC Bulldog’s past which will limp along in the future.  Moving next to the stem’s issues. The oxidation has been removed in large measure from the Briarville Oxidation Remover soak. There is almost no tooth chatter damage to the bit except for one catastrophic bite hole in the center of the lower bit. A fresh picture is taken of the lower bit showing the hole. My first concern is how much of the airway has been blocked by the breech as the vulcanite material was forced downward.
  A sharp dental probe helps to reach into the slot to feel for a lip surrounding the hole in the airway. What could be felt with the probe was also removed and smoothed with the probe’s sharp tooth on the end.
  The next step is to fashion a piece of index card stock to be inserted into the slot to act as a block on the floor of the hole patch. The ‘blocker’ is also fashioned around a pipe cleaner that provides the pressure to keep the block in place. The inserted part of the ‘block’ is also covered with a layer of scotch tape to help prevent the CA glue patch from sticking.
  One additional help to keep the glue from sticking is to apply a thin film of petroleum jelly over the tape which is inserted into the slot and blocks the hole.
  Next, the patch material is a mixture of regular CA glue and activated charcoal powder. A small amount of each is placed on the mixing palette after scotch tape was put down to help in the cleanup.
  A toothpick helps to mix the patch material by drawing a small amount of the charcoal powder into the CA glue. This is done gradually while mixing and watching for the patch to reach the viscosity of molasses. When the right thickness is achieved, the toothpick is used to trowel the patch material to fill the hole. Once this is done, the stem is set aside to allow the patch material to fully cure.
  As designed and hoped, the block successfully was removed from the slot with a few tugs. The coloring on top of the fashioned index card stock shows the contact point of the patch material with the block. It looks like a bull’s eye to me! A test blow through the tenon confirms that the airway is clear.
  With the patch fully cured, the flat needle file is used to bring the patch down flush to the stem surface.
  With the file out, the button lips are refreshed on the upper and lower.
  Switching next to sanding with 240 grade paper, the upper and lower bit are sanded. On the second picture, the hole patch on the lower bit shows some pitting in the patch from trapped air bubbles.
  The sanding with 240 paper is expanded to the entire stem to smooth the rough vulcanite. The stummel is brought in to help wedge the sanding guard against the stem facing to help guard against shouldering the edge of the stem facing. The BC stem logo is mindfully sanded around as well.
  Next, the stem is wet sanded using 600 grade paper. This is followed by applying 0000 steel wool to the entire stem – again avoiding the BC stem logo.
  At this point, another application of CA glue is placed on the bit patch to fill the air bubbles that have emerged in the patch.
  Thin CA glue is spread over the patch using the toothpick then set aside to allow it to cure.
  After the glue cures, 600 grade paper and 0000 grade steel wool are again used to sand the patch area to smooth out the additional CA glue to fill the air pockets. This time, the air pockets look much better.
  Next, moving on to applying micromesh pads to the stem starting first by wet sanding with pads 1500 to 2400. This is followed by dry sanding with pads 3200 to 4000 and 6000 to 12000. Between each set of 3 pads, Obsidian Oil is applied to the stem to condition the vulcanite and guard against oxidation.
 To get a bird’s eye look at the Butz Choquin Rocaille Bulldog, the stem and stummel are reunited. What a transformation and yet, my eyes can’t unlock the stair on the shank and stem junction.
  Taking a closer look at the gap, looking from the side a large gap opens on the bottom point of the diamond shank. I saw this before and decided not to address it because more problems could result.
  Flipping the pipe over and looking from the underside, both sides (upper and lower in the picture) show small gaps. My OCD pipe restoration tendencies will not allow this a pass.
  With 240 paper on the topping board, instead of rotating the stummel like topping a rim, the stummel is dragged across the topping board in one, uniform direction. I do this because the shank facing is such a small surface, and because of this, it’s easier to tip one way or the other in a circular motion where changing direction is necessary. The one, uniform direction helps to maintain the pressure and to keep the shank flush. To do this, I place the stummel shank-down firmly planted on the level sanding board, making sure its planted and flush, then it is dragged/slid across the board about 3 inches.
  After one 3 inches ‘drag’, I check the shank facing to see the results. The worn corners did not contact the sanding paper because they are shouldered away from the sanding plane – this is great! The goal is to continue dragging like this until the high shank facing briar is sanded down closer to the shouldered level which should close the gap between the shank and stem facings.
  After several cycles of ‘drag sanding’ and testing, I arrive at this point pictured next. The fit is not perfect but its better than it was.
  The ‘skid’ patterns on the paper give an idea of the movement.
  As I said, the junction is not perfect, but better. I’m able to move on now.
  The raw shank facing briar need to be colored so that the edge of the shank doesn’t jump out and is better blended. A mahogany dye stick does the job.
  With the stem and stummel reunited, another cotton buffing wheel is mounted on the rotary tool with the speed set at about 40% full power. Blue Diamond compound is this applied to the stummel very lightly with a small amount of compound being used. This helps by keeping the compound dust to a minimum and less likely to become caught and compacted in the Rocaille’s crooks and crevasses. The stem is buffed with the compound in the normal manner.
  To remove the compound dust after application of the Blue Diamond compound, a felt cloth is used to give the stummel and stem a vigorous hand buffing. This does a good job clearing the dust in preparation for applying wax.
  Before applying the wax, the BC stem logo needs refreshing.
  To do this, a drop of white acrylic paint is spread over the logo with a toothpick.
  A cotton pad is then used to daub the paint to thin it and this quickens the drying.
  A toothpick’s side is used to then gently to scrape over the logo removing excess paint. The point of the toothpick is used to pick away excess paint closer to the lettering. The BC lettering looks good. Unfortunately, there is ‘clouding’ around the logo from the residual oxidation that could not be removed without sanding and possibly damaging the logo.
  Finally, after another cotton cloth buffing wheel is mounted maintaining the same speed, carnauba wax is applied to stem and stummel. As with the application of the compound, a very light application of wax is used with the stummel. Carnauba wax spreads very nicely and with the cotton wheel and rotary tool, it’s easy to rotate the stummel to run the wheel parallel with the crevasses and cracks to help apply the wax and not leave excess wax behind. After applying the wax, a microfiber cloth is used to give a rigorous hand buffing to remove excess wax and to raise the shine.
  The Butz Choquin line, Rocaille or, Rockery, lives up to the billing with this BC Bulldog. From a technical perspective, I’m very pleased with the transformation of the rim. The Bulldog came with his rim obliterated. Creating the new rim plane for the Bulldog and adding rustication which blended with the front/back, linear flow was a challenge, but I think it looks great.
  This BC Rocaille Rusticated Bulldog 1027 from Saint Claude, France, has a tight yet comfortable disposition cradled in the palm. The ‘Rockery’s’ landscape is truly a ‘Briar Garden’ with much to enjoy with the eyes and to feel with the touch. The Bulldog shape is iconic with an attitude of its own. Ken commissioned this hearty, expressive BC Bulldog, to commemorate Whiskey, his newest bulldog family member. He will have the first opportunity to acquire the Bulldog in The Pipe Steward Store which benefits the work of the Daughters of Bulgaria – helping women and girls who have been trafficked and sexually exploited. Thanks for joining me! Lest we forget:


I hope that Whiskey approves :-).


Reblogged this on rebornpipes and commented:
Have a look at Dal’s reconstructive surgery on this BC Bulldog. Great work. Well done.
LikeLiked by 1 person
Thanks, Steve!
LikeLiked by 1 person
Speechless.
LikeLiked by 1 person
An attorney that is speechless? I don’t believe it 🙂
LikeLike
Been a while since I’ve seen such a nice restore of rusticated. Well done!
LikeLiked by 1 person
Thanks, Darren. It was a good bit of work but came out surprisingly well. Thanks for noticing!
LikeLike