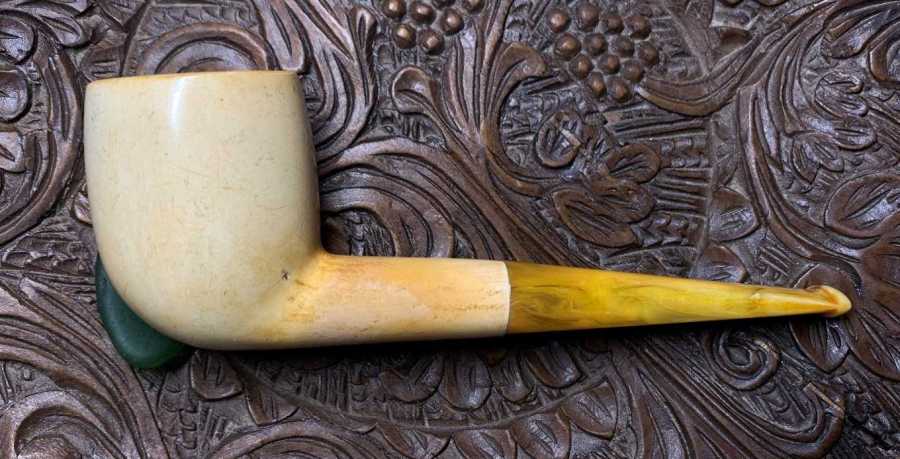
Darren has commissioned several pipes from the ‘For “Pipe Dreamers” ONLY!’ collection and has contributed a great deal to benefit the work that I support with the sale of restored pipes – the Daughters of Bulgaria. When Darren contacted me about doing some repair work on two pipes in his collection it was difficult to say ‘no’. I appreciate so much Darren’s love for vintage pipes I made this exception and so he sent to me two pipes that were important to him. One, a porcelain Tyrolean which Darren received as a gift from a ‘vintage’ and loved pipe man friend. The Tyrolean has some age to it, and we’ll see what I can do with a pipe that is way out of my area of expertise! The other pipe that arrived here in Golden, Colorado, from Pennsylvania, was a very attractive traditional Billiard shaped smooth Meerschaum. The reason for it being in the ‘pipe ER’ is a broken tenon. Here are pictures of the Meerschaum after unpacking and taking a closer look on the worktable. The bowl has the aged patina that marks its vintage. The honey-colored patina has darkened the shank nicely. 
 In our communications, I hadn’t talk to Darrin about the general condition of the Meerschaum. The focus was on the needed repairs. When I looked at the cake buildup in the chamber, I did an audible, ‘ugh’ grunt. The carbon buildup in the chamber is pretty thick and increasingly tapers conically toward the floor. Meers generally function quite well with no cake buildup as with briar pipes that need this protective layer in the chamber. I made a mental note to check with Darren about the need to free the chamber of the excessive cake. It is possible that this condition could crack the Meerschaum bowl as the cake heats and expands within the solid Meerschaum.
  A look at the mortise shows the remnant broken, threaded tenon which appears to be made of bone. Looking at the ‘white’ crusting around the mortise opening brought the thought that the tenon may have been glued in place which would create a bit more complexity to the project.
  Looking at the Bakelite stem, the first thing I note is how small the hole is. A quick measurement of the air hole diameter is right at 1/8 inch.
  Before addressing the general condition or cleaning of the Meerschaum Billiard, the first order of approach is to begin the tenon repair. I will need to acquire a tenon system that will fit the smaller quarters that this pipe presents. I pulled out the smallest ‘push/pull’ system I have on hand, and it was too large for both the stem and mortise openings.
  A new tenon system will need to be found but at this point I’m not sure what it might be. I decide to send Steve a quick note to get his input on the needed tenon and his approach to extracting the broken mortise receptor. Here’s my note:
I’m working on a repair of a Meerschaum and the threaded insert has broken off in the shank. I’m afraid that someone may have applied a little glue somewhere along the way. I’ve attached pictures of the stem and the shank. First, what are your thoughts on getting the broken off piece extracted from the shank without cracking the Meer, of course 😊. Heat shank, hand turn drill bit? If glued, I know that this won’t work, but thoughts?
The other question I had was what kind of connection goes in this? It’s very small compared to the push/pulls systems that I have on hand. Measuring the stem air hole, it’s only 1/8”. It almost appears to be one threaded tube connecting the shank and stem – I’m not sure there’s enough room for a push/pull insert set up.
Steve’s response came very quickly.
To me the only way of dealing with it is to drill it out slowly with increasingly larger bits… Once it is clear I then you will need to decide whether to use a bone style tenon with threads on each end (available through Tim at JH LOWE) or a small push stem system…
Knowing that the project will be waiting for a replacement tenon to be secured, as Steve recommended, I send a note to Tim West at J. H. Lowe & Co. (http://jhlowe.com). Tim has helped me several times in the past with finding stems for projects like this and for Churchwarden stems. Along with the same pictures I sent to Steve, the note describes the situation and Steve’s thoughts about the systems probably needed. Tim responded quickly with this note:
I need the OD both the stem and shank holes. It looks like ¼”. It might be a ¼ 20 threads. I remove bone pieces and then try tenons until I find one is my method. Get me the OD so I can focus on the right OD bone pieces for the assortment.
After a few more communications with Tim, I clarify that he needed the internal diameter measurements of the shank and the stem. Before the mortise measurement can be made, the remnant tenon in the mortise must be removed. I take a few fresh pictures to show the mortise.  As Steve recommended, the process of extracting the bone tenon is a slow one requiring a bit of patience. Using drill bits starting with the drill bit just larger than the bit that goes through the hole, the hole is gradually ‘drilled’ removing a small bit of the broken tenon’s mass. After each bit, the next larger continues the process. Without doubt, I approach this process with some fear and trembling. The last thing needed is to rush the process and crack the Meer shank.
  I find that in the early start of the process with the smaller bits, using the rotary tool is helpful set at a slower speed.
  After a couple bits, a picture shows the progress.
  As the process continues to larger bits too large for the rotary tool, a power drill is used simply to mount the bits. This holds the larger bits securely while the bits are hand turned. I’m not able to take the picture and turn at the same time, but this gives an idea of how I carefully, and slowly extracted the broken tenon from the shank.
  In all, 8 bits were used with the largest bit being 3/16 inches. Thankfully, the shank is intact!
  What I believe is old glue in the mortise opening, a pocketknife is used to carefully scrape if off.
  Near the end of process, it was difficult to remove all the old remnants, but it looks good. The thread seems to be in good shape.
  With the mortise now cleared, an electronic caliper is used to provide Tim with the exact information on sizing of the mortise diameter and the stem diameter. I send these pictures to Tim so that he can determine what the best tenon system will be. It did not take long for Tim to get back to me. He said that he would look in his assortment of bone tenons looking for a 3/16” step tenon to 1/4”. After he finds something, it will take some time for the tenon to arrive. I put Darrin’s Meerschaum aside for the time.
 It took some time, but the tenons arrived from Tim at J. H. Lowe. Tim sent me an assortment of bone tenons which are in the range of sizing that I need – 3/16” on the small side to 1/4” on the large side.
  I find one that fits well. It fits the threading in both the mortise and the stem.
  When the tenon was fully seated in the mortise, it leaves the stem at an orientation that was over clocked by 50%. This is the first time working with a bone tenon the question is how to seat it correctly. I’m not sure about using glue, so a note with the question is sent to Steve to get his thoughts.
  I’ll wait for Steve’s response, but in the meantime, I continue to work on the Meerschaum. Earlier, I reached out to Darren to find out whether he wanted me to restore the entire pipe along with the tenon repair. He was happy for me to spruce it up as I see fit. The first step is the cleaning. The chamber has a very thick cake, and this is not a good thing. A Meerschaum bowl needs no cake layer to protect the bowl as in briar pipes. In fact, the cake can cause cracking problems for the Meerschaum with the heating and expansion of the carbon putting stress on the bowl.
  To remove the carbon cake, with Meerschaum bowls I do not use a reaming tool as I usually do with a briar pipe. I don’t want to over stress the bowl and crack the Meerschaum. Instead, the patient and safer approach in my view is to do the job by scraping the chamber with the Savinelli Fitsall Tool. After scraping, the chamber is sanded using 240 grade paper wrapped around a Sharpie Pen. The good news is that during the process of removing the cake, I discover that the cake is not as thick as it appeared before. I discover that the chamber tapers inwardly toward the floor of the chamber. Without doubt, this is a hefty Meerschaum bowl.
  The bowl is then wiped out with a cotton pad and isopropyl 99%. The chamber looks good.
  Turning now to the rim. The backside of the rim is scorched from flame being pulled over it in lighting. I use the spittle method to soften the lava crusting and scrape the burned area with my thumbnail.
  There is a bit of the carbon scorching left on the inner lip of the rim and the aft rim surface.
  I lightly use a piece of 240 grade paper to sand the Meerschaum rim. The scorching is removed, and small cuts and dents are sanded out.
  Next, the external surface is cleaned using undiluted Murphy’s Oil Soap and a cotton pad. As I was getting ready to clean, I see a very small chip on the left back side of the bowl.
 I still have a small amount of Troy’s Old Time Meerschaum patch recipe material from working on another project. This recipe is a mixture of ground chalk and egg white. When they are mixed and applied, and cured, the result is a hard, Meer-like material that is great for Meerschaum repairs.
  While the Old Time Recipe cures, the Bakelite stem becomes the focus. The airway is cleaned using pipe cleaners and cotton buds wetted with isopropyl 99%.
  After cleaning the airway, fresh pictures show the condition of the bit. There are some compressions on the upper bit and button (first picture). The lower bit roughness should sand out.
  I decide to sand the stem with 240 paper first to see if the sanding will remove the compressions on the upper side. The sanding expands to the whole stem to remove roughness and small nicks.
  The lower bit cleans up nicely, but the compressions persist on the upper side.
  Regular clear CA glue is used to fill the compressions. The stem is put aside to allow the patches to cure.
  Later, after the patches have cured, a flat needle file is used to file down the patches to the Bakelite surface. This is followed by using 240 paper once again to smooth.
  Next, the stem is wet sanded with 600 grade paper and this is followed by applying 0000 grade steel wool.
  Continuing with the sanding, the full regimen of 9 micromesh pads is employed. First by wet sanding, pads 1500 to 2400 are used. Following this, dry sanding is with pads 3200 to 4000 and 6000 to 12000. Between each set of 3 pads, Obsidian Oil is applied to condition the stem it. Wow! I like the way the pop developed.
 With the stem on the side, the stummel is again before me. The Old Time Recipe Meerschaum patch is sanded to the Meerschaum surface. When the stummel gets a beeswax polish later, the small white spot should blend in a bit more, but it’s important that this hole is filled so that it’s not apt to chip more.
  This soap does a good job with a ‘gentle’ cleaning of Meerschaum. Darren’s pipe has nice patina development, and the light cleaning will not harm this. I put a small piece of painters tape over the Meerschaum patch so that the moisture during cleaning does not weaken it.
  Using the undiluted Murphy’s Oil Soap on a cotton pad, the stummel is scrubbed. I can see the grime come off. After scrubbing the surface, the stummel is taken to the sink to rinse with cool tap water.
  To further clean the surface and to address minor scratches, the last 5, finer micromesh pads are used – from 3600 to 12000. The more abrasive pads are not used to avoid damaging the patina. The finer pads are no problem with the patina but help to clean and shine the stummel further. With Meerschaum, the general rule of thumb is, ‘less is more’. The lighter sanding cleans the surface but does not remove all the landscape blemishes that develop over time – these remain as a testament to life of a vintage Meerschaum pipe 😊.
  Unlike briar pipes, Meerschaum does not use carnauba wax to finalize the finish. The practice of using beeswax to shine the Meerschaum is the standard practice of all the Meerschaum houses in Turkey. As Meerschaum pipes are smoked, they change color. This patina increases the value and beauty of the pipe. Not only does beeswax shine the Meerschaum but it also enhances the growth of the patina as one smokes the pipe. As the pipe is used, the tobacco oils are absorbed, and the color gradually changes. I have congealed beeswax in a mason jar for this purpose. I add a fresh cake of beeswax as well.
  The hot air gun heats the wax until it liquifies, and then the stummel is warmed with the hot air gun.
  A cork is inserted into the bowl to use as a handle. To keep the wax as thin as possible as it’s being applied, I prop the hot gun in a way that the hot air is blowing toward where I’m applying the wax over the hot mason jar. This keeps it liquefied as the beeswax is applied. Using a cotton swab, I paint the stummel with the liquified beeswax and am careful to cover the expanse of the stummel. After application is thoroughly spread over the Meer, the cork handle is placed in the candle stand to allow the wax to cool.
  I use a clean cotton cloth to remove the excess congealed wax on the Meer surface which is a bit of work. When the bowl is cleared of the excess congealed beeswax, it is then buffed to raise shine using a micromesh cloth.
  Steve’s email came regarding my question of how to install the replacement bone tenon. The challenge is how to seat the bone tenon tightly with the result of a stem in the correct orientation to the stummel.
  Steve’s input was very helpful, but it took a few emails back and forth and a video conference for me to finally figure out the approach. Since this is a first time for me using a step-down bone tenon, I wanted to get it right and to record the process so that it might be helpful to others. Once I understood Steve’s approach, talking it through with him, it worked like a charm. The first step is to screw the tenon fully into the mortise. When the tenon tightens in the mortise, a line is drawn on top of the tenon. A small mark is also placed on the shank facing showing this point. This becomes the nexus orientation to make everything work. The important thing is to mark the tenon’s up or 12 o’clock position once fully screwed into the mortise. This becomes the constant guide for the stem’s orientation.
  At this point, the tenon is unscrewed from the mortise and the pencil line is continued to the end of the tenon – over the mortise-side threading as shown in the picture.
  This next step originally was an approach Steve suggested to test the placement of the tenon before gluing the tenon into the stem. Using Teflon tape, the stem side threads are wrapped with the tape. This allows the tenon to be threaded into the stem and tighten but not permanently. Steve said that there are those who do not glue the bone tenon into place but use the Teflon tape instead. The advantages are that the tenon can be removed and again replaced making cleaning the stem much easier. My original thought was that I would be gluing the tenon in the stem with CA glue. Steve said that if one chooses to use glue that using white glue or Elmer’s Glue is better than CA glue. The white glue cures less quickly and allows more time to correct mistakes while seating the tenon. After discussing this back and forth, both Steve and I agreed that using Teflon tape seems to be a better final solution than permanently gluing.
  The pictures show the Teflon tape wrapped around the bone tenon’s stem side threading. Not showing in the next picture is that the stem bit is settled in the proper orientation. The tenon also shows the 12 o’clock orientation line.
  This next step was a little confusing and a bit difficult to explain. I discovered that it’s important that when the tenon is being threaded into the stem, it isn’t tightened as far as is possible. To do so would ignore the orientation line that the stem also needs to keep its proper orientation to the stummel (as pictured below). With this stem and tenon, to screw the tenon fully into the stem and then to thread the mortise would leave the stem overclock by about a half turn beyond the proper orientation (shown earlier). The tenon is threaded into the stem until almost the last rotation before fully tightening and stopped with the orientation line at 12 o’clock. This should be the correct stem placement – let’s see 😊.
  With the tenon threaded snugly into the stem and with the orientation line up, the stem is then threaded into the shank and just as Steve said, the stem tightens at the proper orientation. Nice. The good thing about using the Teflon tape, if the stem under or over clocks a bit, it is possible to rotate the tenon a bit to make an adjustment. If glued, this would be impossible. Thanks to Steve for walking me through this part of the project!
  With a sigh of relief, the primary challenge is completed successfully. The restoration continues with applying Blue Diamond compound to the Bakelite stem. With the speed set at about 40% full speed, a cotton cloth buffing wheel applies the compound to the stem.
  After wiping/buffing the stem with a felt cloth to clean it of compound dust, another cotton cloth buffing wheel is mounted on the rotary tool and carnauba wax is applied to the stem. After the wax is applied to the stem, it is reunited with the stummel, and the entire pipe is given a rigorous hand buffing to raise the shine.
  This stately Meerschaum Billiard is a gem of a pipe. I’m sure Darren has enjoyed its hefty bowl cradled in the palm as he has enjoyed a favorite blend. The patina on the Meerschaum is mature and growing over the stummel. The Bakelite stem was cleaned up and has a wonderful pop. Even though the removal and replacement of the bone tenon was a challenge, I’m glad it went well enabling Darren again to have good fellowship with his Meerschaum. This repair and restoration benefit the Daughters of Bulgaria – women and girls who have been trafficked and sexually exploited. Thanks for joining me!


Reblogged this on rebornpipes and commented:
This was an interesting restoration to walk through with Dal – at least on the removal and replacement of a new Bone tenon. It was probably the first tenon replacement done via Facebook Messenger Chat… Good job on it Dal. It looks great.
LikeLiked by 2 people
Thank you Steve! Perhaps it’s the only tenon replacement done on Facebook messenger chat ever! Thank you!
LikeLiked by 1 person