The Mountbatten Pot shape on the worktable came to me in December 2018 when my son, Josiah, came upon a lot of pipes for sale in an antique shop in St. Louis where he was studying. He sent me a picture of the ‘St. Louis Lot of 26’ with the proposal that he would split the purchase price with me to benefit the Daughters of Bulgaria on the one condition that I choose one of the pipes for myself. This pipe would be his Christmas present to me.  This was an offer I could not refuse. The St. Louis Lot of 26 was secured and I made my choice of a Christmas pipe of 2018. The box was wrapped and placed under the tree in Denver, where our family gathered that year. When the gifts were distributed, my name was on the wrapped package from Josiah. After unwrapping it, the Lot of 26 was spread out for a Christmas picture and my choice was the overgrown bent Billiard or perhaps, Churchwarden dominating the center. It was quite a Christmas!
  All the pipes, except for the chosen one, were placed in the ‘For “Pipe Dreamers” ONLY!’ online collection for pipe men and women to commission benefitting the Daughters of Bulgaria – an effort helping women and girls who have been trafficked and sexually exploited. I received the following letter earlier this year from one pipe man with whom I discovered that we had walked along the same path for a time back in the day:
Hello Dal:
I’ve recently discovered your website and your work in pipe restoration. I have looked over your list of pipes for commissioned restoration, and I will probably ask you to do one for me. You perhaps would not remember me, but I think we were at RTS together. I was there 76-80. I served a few Presbyterian churches, then for several years a parish in the Reformed Episcopal Church. A few years ago I swam the Tiber and am enjoying retirement as a Catholic layman here in Lynchburg, VA. Your ministry and life in Europe sound fascinating. I would like to support your ministry in Reclaiming Lives and the Daughters of Bulgaria. Please tell me more. I’ve been a pipe smoker on and off over the years since college/seminary. Recently I’ve had some success buying and reselling estate pipes. Right now I’m more of a collector than a smoker, but I do enjoy the pipe weed. I will follow up when I make a decision on one of those restoration pipes. So many possibilities!
God bless.
Ed
Ed and I sent emails back and forth describing our own paths over the 40 years since our seminary days at Reformed Theological Seminary in Jackson, Mississippi. I learned that Ed is now retired in Lynchburg, Virginia, and he and his wife not only enjoy their 3 grandchildren, but they own a couple of old Victorian homes – living in one and renting the other. Ed stays busy caring for their vintage homes.
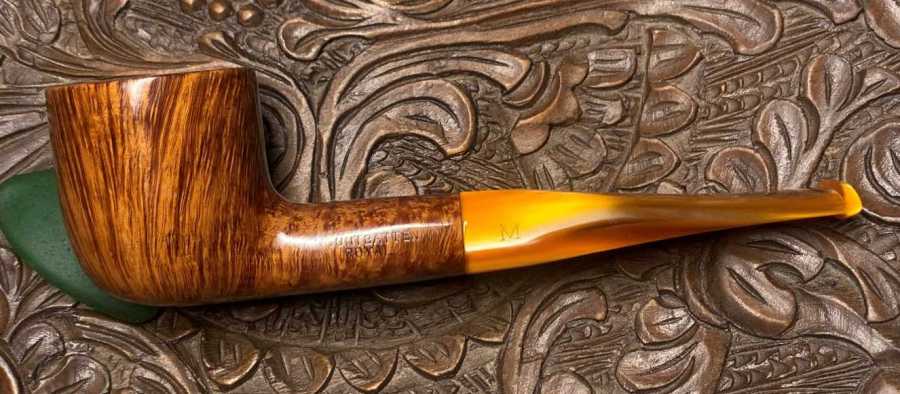
During this time Ed and I were communicating earlier this year, my wife and I were traveling leaving behind the snow blizzard of Colorado and trekking toward balmy Port St. Lucie, Florida, to visit family. During these travels we stopped off in Jackson, MS, to connect with other dear friends from seminary days in Jackson and fellow missionaries serving in Ukraine for several years. While with Clay and Darlene, Clay took me to visit and enjoy the fellowship and tobacco of The Country Squire. I later published a write up of that visit (see: A Road Trip and a Visit to The Country Squire Tobacconist in Jackson, Mississippi) where I enjoyed meeting Jon David Cole, the Country Squire’s master tobacconist. In one of our communications, Ed remarked that he had enjoyed reading the post and remembering Clay during our seminary days.  The pipe that whispered Ed’s name from the Pipe Dreamers trove was a striking Mountbatten Royal Made in London England 209 Pot. I expressed to Ed my surprise that the Mountbatten hadn’t been commissioned and given a new home sooner! Here are pictures of the Mountbatten Royal Pot on the worktable.

 The nomenclature is strong and distinct: MOUNTBATTEN [over] ROYAL is stamped on the left shank. The COM is stamped on the right shank flank: MADEINLONDON [over] ENGLAND. The beautiful acrylic stem is stamped on the left with the Mountbatten logo: ‘M’.
  Pipedia describes Mountbatten as a second of the longtime pipe enterprise of Charatan (See: Pipedia Charatan). An extensive description of the Charatan history can be found in the Pipedia article. A more concise history is found in PipePhil’s information (See: PipePhil Charatan):
Short history of the brand.
Brand founded in 1863 by Frederik Charatan. When his father retired in 1910, Reuben Charatan took over the family business.
All the pipes were handmade until 1973.
The brand name has been overtaken by Dunhill in 1978 and sold in 1988 to James B. Russell Inc. (NJ, USA). During the period 1988-2002 Charatans were crafted by Butz Choquin in St Claude (France).
Dunhill re-purchased Charatan brand name in 2002 and Colin Fromm (Invicta Briars, Castleford) follows up on freehand production.
Based upon the information, with the COM being from London, England, the Mountbatten’s dating could be earlier than 1988, when the name went to St. Claude, or later that 2002 when Dunhill repurchased the Charatan brand bringing it back to the UK.
PipePhil.eu also provides additional information about the sub-brand of Mountbatten. The ‘Royal’ is not listed, but other examples of Mountbatten pipes are shown. The first example, ‘Mountbatten Admiral’ has the greatest similarity to the ‘Royal’. The COM is identical, and the picture shows the bright acrylic stem also on the Royal.  Curious to know more about the origins or meaning of the name, ‘Mountbatten’, the chosen name by Charatan, I was fascinated by what I discovered from this article in Wikipedia:
The Mountbatten family is a British dynasty that originated as an English branch of the German princely Battenberg family. The name was adopted on 14 July 1917, just three days before the British royal family had its name changed to Windsor, by members of the Battenberg family residing in the United Kingdom, due to rising anti-German sentiment amongst the British public during World War I. The name is a direct Anglicisation of the German Battenberg (literally ‘Batten Mountain’), a small town in Hesse. The title of count of Battenberg, later prince of Battenberg, was granted to a morganatic branch of the House of Hesse-Darmstadt, itself a cadet branch of the House of Hesse, in the mid 19th century.
 The family now includes the Marquesses of Milford Haven (and formerly the Marquesses of Carisbrooke), as well as the Earls Mountbatten of Burma. Prince Philip of Greece and Denmark, the late consort of Queen Elizabeth II, adopted the surname of Mountbatten from his mother’s family in 1947, although he was a member of the House of Schleswig-Holstein-Sonderburg-Glücksburg by patrilineal descent. Lady Louise Mountbatten became Queen Consort of Sweden, after having married Gustaf VI Adolf of Sweden.
The Wiki article goes on to describe greater detail those in the Battenberg family, Prince Philip, Duke of Edinburgh, being among those most known by the public today. I found it interesting that when today’s Queen Elizabeth II accession to the throne took place in 1952, there was a dispute among some of the royals over the question, from which dynasty would the descendants of Elizabeth and Philip belong? The matter was brought to Winston Churchill who brought the question to  the English Parliament. The Parliament settled the dispute that the children of the royal family would be part of the Windsor family. However, in 1960, an order was issued which stipulated that the surname of the descendants would be ‘Mountbatten-Windsor’. While this has not been applied consistently, according to the article, it is noteworthy that today’s ‘once’ royal fascination for Prince Harry and his American, actress wife, Meghan Markle, now Duchess of Sussex, named their Archie Mountbatten-Windsor and Lilibet Mountbatten-Windsor. Just a little dip into the life of the British royal family.
Looking now to the Mountbatten Royal Pot on the worktable, the pipe is in decent shape. The chamber has a light carbon cake but a significant amount of lava flow over the broad Pot rim which needs to be cleaned.  The grain on this Pot bowl is striking and shows great potential. The briar surface is dark from grime but should clean up nicely. There is a burn area on the aft and just under the rim difficult to see in the picture. It’s interesting how the lighting practices of former stewards can be seen on the damage left behind!
  There are some old fills on the front of the stummel and on the heel. These fills will need to be examined to make sure they are solid. If not, they will be replaced.
  The acrylic stem is on fire. It has a very attractive spray of colors on the orange/yellow spectrum. The bit has tooth chatter on the upper and lower sides. The lower button also has a compression denting the button lip. Difficult to see, there is also a deeper compression in the center of the lower bit. If sanding doesn’t remove this, it will be patched.
  To begin the restoration, the chamber is reamed to clear the carbon cake. The Pipnet Reaming Kit is used. With the stem removed, 3 of the 4 blades available in the reaming kit are used to ream out most of the cake.
  Next, the Savinelli Fitsall Tool is used to scrape further the chamber wall. It does a good job getting into the angles on the floor of the chamber.
  The Savinelli Fitsall Tool is followed by sanding the chamber with 240 paper wrapped around a Sharpie Pen to give more leverage in sanding.
  The full arsenal of tools to clear the chamber of the cake buildup is shown here.
  After wiping the chamber with a cotton pad, an inspection reveals a healthy chamber. Moving on.
  Next, the external briar is cleaned with undiluted Murphy’s Oil Soap and a cotton pad. After taking a couple starting pictures, the scrubbing begins.
  A pocketknife also is used to scrape the rim helping to remove the thick lava crusting on the rim. Care is given not to gouge the briar with the sharp edge.
  A brass brush is also utilized to scrub the rim. The brass does not hurt the briar but helps to add some grit cleaning away the stubborn cake.
  The grime comes off with the scrubbing and is transferred to the sink to continue the cleaning on the internals.
  Using shank brushes and hot water, the internal mortise and airway are scrubbed with anti-oil liquid dish washing soap. After cleaning the internals for several minutes, the bowl is thoroughly rinsed and taken back to worktable.
  The cleaning continues with working on the internals with cotton buds and pipe cleaners. A small dental spoon is a good tool that is used often to help clean the internals. The spoon scrapes and excavates tars and oils off the mortise walls.
  After several bristled and regular pipe cleaners the stem airway cleans up well using isopropyl 99% alcohol. The staining in the airway was persistent but is looking good now. Moving on.
  With the basic cleaning completed, a closer look is taken at the external briar. Using a sharp dental probe, the fills are tested by scraping. The smaller fills are good to go. The largest fill on the front of the stummel had contracted to leave a ridge between the patch and the native briar. Using the probe, the old fill material is dug out.
  I’m trying another approach to patching pits and holes on the external briar surface. Up to this point the standard patch material was what I called briar putty – a mixture of briar dust and regular CA glue. What I often find with this patch material is that the fill will not receive dye and blend with the native briar environment. The patch often remains shiny after a dye has been applied causing it to stand out. I decided to use regular Elmer’s wood filler that can be stained or painted depending on the application. The downside is that it’s not as rock solid as with using CA glue, but it should blend better. We’ll see. Using the small dental spoon, the wood filler is pressed into the hole and smoothed. For small fills, the directions say sanding is good after a few hours. It has had several hours overnight to cure.
  Using a piece of 240 sanding paper, the fill patch is sanded down to the briar surface. Not shown is that this is followed with further smoothing with 600 grade paper. The fill looks good.
  Looking more closely at the stummel surface after the cleaning shows beautiful, expressive grain. The left side of the stummel shows uniform vertical grain in the first picture. The second picture showcases what I would describe as a tight flame grain.
  The heel and the rim show the termina of the vertical grains in very tight bird’s eye grain on the rim and a smattering of bird’s eye in swirls on the heel. Very expressive grain on this Mountbatten Royal Pot.
  To clean the rim and to reestablish sharp lines the rim will be lightly topped. The rim has a smart bevel on the inside of the chamber which will be refreshed as well. A picture shows the starting point before the topping process starts.
  A chopping board serves as a tabletop topping board and with 240 grade sanding paper on it, the stummel is inverted and rotated over the sanding paper.
  The topping cleans the nicks and cuts which normally occur on the rim edge. After several rotations, enough briar has been removed.
  With the 240 paper replaced with 600 grade paper, the stummel is rotated several more times to smooth the rim sanding.
 Next, the smart bevel on the internal rim is darkened and needs refreshing.
  I describe a bevel in two different ways. A smart bevel is when the lines are cut sharply. I also describe a bevel as being rounded which means the bevel is gentler, softer. For this stummel, a sharp internal bevel was its original design. Using a wooden ball with 240 sanding paper stretched over it, the ball is rotated in the chamber cavity and the curvature of the hard ball re-cuts the smart bevel.
  This same process is followed using 600 grade paper. The results with the rim are stellar. Moving on.
  To continue with the cleaning of the stummel, a coarse, medium, and fine regimen of sanding sponges is used on the stummel. Sanding sponges do a good job cleaning the surface of small nicks and scratches without being invasive.
  Well, the sanding sponges did a good job, but the picture immediately above caught a skin mark on the lower right of the stummel that I had seen earlier but had forgotten. A closeup of the area shows the skin more clearly. The two holes marked are larger and probably would take more invasive sanding to erase. The rest of the skin holes should be dispatched with sanding.
  The two holes are filled with a small drop of regular CA glue using a toothpick. I find that if I need a very small drop in a defined area, using a toothpick to run the glue down to the point, helps with the precision. The glue is spot-dropped, and this is followed by using an accelerator to quicken the curing so that work may continue.
  A flat needle file quickly brings the small patch mound down to the briar surface. This is followed by sanding the patches and the larger skinned area with 240 and 600 papers to smooth and blend the area.
  This is then followed by using the sanding sponges on the area to bring it to the same place in the sanding process as the surrounding briar. The patch looks good, and the skinned area has been erased. Moving on!
  The next phase of sanding is with the full regimen of sanding sponges starting by wet sand with pads 1500 to 2400 and then dry sanding with pads 3200 to 4000 and 6000 to 12000. Wow! This grain is making a statement. It is evident that the Charatan Mountbatten brand was not a lower end pipe. The briar is distinctive and worthy of an upper shelf exposure.
 At this point in the process, I’m considering a cosmetic application of Fiebing’s Light Brown Leather Dye. The reason for this is not to lighten or darken the stummel to any degree. This is not needed. It is primarily to bring out even more of the distinctiveness of the grain to an eye-popping level – I hope 😊. The other thing I’m watching is the use of the more utilitarian wood filler on the front of the stummel. I want to see how it absorbs the dye.
  With the dying process components assembled on the worktable, the first thing after wiping the stummel with alcohol to clean, is to warm the stummel with the hot air gun. This heats the briar and expands the wood. This seems to prepare the briar grain to be more receptive to the dye pigment. With folded pipe cleaners inserted into the mortise to serve as a handle the stummel is heated.
  After the stummel is warmed, a folded pipe cleaner serves to paint the aniline light brown dye onto the stummel in swatches and then ‘flamed’ with a lit candle. When the aniline (alcohol based) dye is lit, the alcohol combusts with a ‘poof’ sound. The alcohol quickly burns off leaving the pigment in the briar. This process is repeated swatch by swatch until the entire stummel has been thoroughly dyed and flamed. I go over the stummel a second time for good measure.
  The flamed stummel is set aside for several hours to allow the new dye to rest and settle into the briar grain.
  While the stummel is resting, attention is turned to the stem. Fresh pictures are taken of the bit – upper and lower. The roughness and tooth chatter on the lower side (second picture) should be erased with sanding. The upper bit has a tooth compression in the center next to the button – almost impossible to see in the picture below because of the ‘fire’ of the acrylic 😊, which gets me excited to see the final version of this Mountbatten Royal Pot. The button lip also has a bite mark more visible below.
  To repair this tooth damage, after cleaning the acrylic surface with a cotton pad and alcohol, regular, clear CA glue is placed on the tooth compression and on the button. To quicken the process, an accelerator is applied to the patches which cures the CA glue more quickly.
  Next, a flat needle file is used to file down the glue patches on the bit and button. A squared needle file also is useful to refresh the button lip.
  The files are replaced with sanding with 240 paper. The sanding paper further smooths and shapes the upper bit and button and removes the minor tooth chatter. The 240 also addresses the lower bit and button by removing the tooth chatter.
  The 240 sanding is expanded to erase the tiny scratches over the entire acrylic stem. Care is given to avoid the Mountbatten stem logo, ‘M’ and a disk is used on the stem facing to guard against shouldering the edges.
  The sanding is continued with wet sanding the acrylic stem with 600 grade paper followed by applying 0000 grade steel wool.
  Next, the full set of 9 micromesh pads are used in sets of 3 pads. Starting first with wet sanding, pads 1500 to 2400 are used. This is followed by dry sanding with pads 3200 to 4000 and 6000 to 12000. Between each set of 3 pads, Obsidian Oil is applied. My, oh my! The pop and fire in this acrylic stem is stellar.
 The newly flamed and dyed stummel is ready to unwrap allowing the dyed grain beneath to emerge. A felt buffing wheel is mounted on the rotary tool with the speed set to a slower than normal speed at about 35% full power and Tripoli compound is applied to the stummel. The speed is slowed because of the more abrasive compound with the rougher felt wheel could cause heating problems with the friction.
  Mid-course, I stop to take a picture of the unwrapping and the grain. It’s looking great.
  To remove more excess dye and to sharpen the grain further, a cotton cloth wheel is mounted onto the rotary tool and the speed is increased to about 50% full power. With the cotton cloth buffing wheel, Tripoli compound is again applied to the stummel.
  After the Tripoli has been applied, to blend the new dye and to remove more excess dye, a cotton pad wetted with alcohol is used to wipe the stummel.
  On the home stretch – another cotton cloth wheel is mounted for the purpose of applying the finer Blue Diamond compound. After the stem and stummel are reunited, the compound is applied to the pipe at about 40% full power.
  To prepare the pipe for the application of wax, a felt cloth is used to wipe/buff the pipe to remove the fine compound dust that remains.
  Another cotton cloth buffing wheel is mounted on the rotary tool, and with the speed remaining the same, Carnauba wax is applied to the stem and stummel. After a few rounds of wax are applied, the pipe is given a rigorous hand buffing to remove excess wax and to raise the shine.
  This is one of those pipes that was attractive before the restoration began, but then, BOOM! I’m pleased with the results. The testing of the regular wood fill material worked well. It blended very well with the surrounding briar, The only remark is that, as a less solid material, the subsequent sanding and polishing eroded the fill microscopically so that the fill can be detected by touch. Even though this is the case, the fill is solid and is masked well.
This Mountbatten Royal may be a second brand of Charatan, but the quality and presentation of the grain of this Made in London, England, Pot, is mesmerizing. The rim is peppered with distinctive bird’s eye resulting from the cross-section perspective of the arresting vertical and flame grain wrapping the ample Pot bowl and flanking the shank. Complementing this beautiful landscape of briar is a nicely tapered acrylic stem that competes for taking center stage from the briar. The fire of the yellows and oranges is radiant. The full and ample Pot bowl balances well in the hand promising much fellowship with a future steward. Ed commissioned this Charatan Mountbatten Royal and as the commissioner, will have the first opportunity to claim him in The Pipe Steward Store benefiting the Daughters of Bulgaria. A ‘Before & After’ reminds us of how far we’ve come. Thanks for joining me! 


Reblogged this on rebornpipes and commented:
Dal is experimenting with a stainable wood putty in this blog. I thought it would be an interesting read for rebornpipes readers. Give the blog a read. Nice work Dal.
LikeLike
I would be interested in that one
LikeLiked by 1 person
The Mountbatten was a beauty and is already with his new steward in Virginia :-). Thanks!
LikeLike