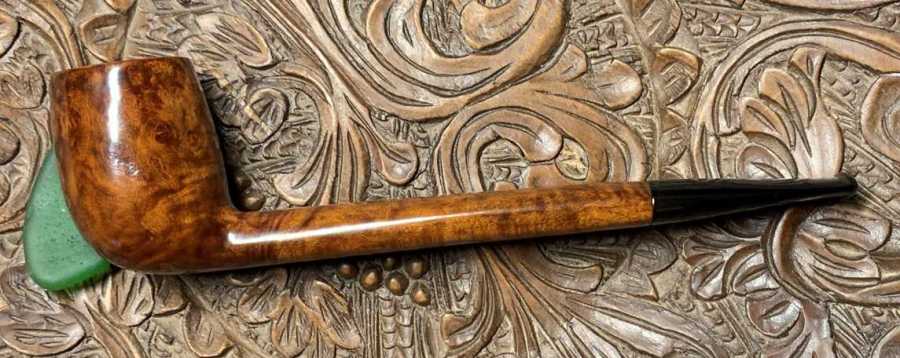
There’s something about the Canadian shape, and all its cousins, that is profoundly appealing to my pipe man eye. If I were to guess why this is the case, I would say that the long shank lines draw the attention to the elegant simplicity of the Canadian. Even though the house name is absent from this French made Canadian, the stately 6 and 3/4 inches stretch got my attention. The eBay listing was from a seller in Cave City, Arkansas, and when the bidding was finished, the Canadian was on its way to join other pipes in the ‘For “Pipe Dreamers” ONLY!’ collection available for pipe men and women to commission. Here are pictures of the French Algerian Briar Canadian from Cave City:


 The nomenclature is stamped on the upper shank in the middle, ALGERIAN BRIAR [over] MADE IN FRANCE. There are no other marks identifying the pipe.
 I just completed 2 other pipes for pipe man Darren, who has commissioned several pipes. Darren is from Pennsylvania and a member of the Chester County Cigar Club Holy Smokes . The other pipes came out well, a Yorkshire Standard (see: A Sears & Roebuck ‘Yorkshire Standard’ Sculpted Pot Comes Back to Life) and a unique, Edward’s Square Panel (see: Appreciating the Story of an Edward’s Algerian Briar Sculpted Square Panel).
  What I learned about the Edward’s pipe research was the claim that Algerian briar was a superior product. The French Canadian now on the worktable is stamped with this claim as well, Algerian Briar. The condition of the Canadian is a bit rough. The chamber has moderate cake buildup, and this will be removed to allow fresh briar to emerge and to inspect for heating problems. The rim is covered for the most part with a lava flow and needs to be cleaned.
  The following pictures show the multitude of old fills, dents, blemishes, and roughness covering the bowl. The finish is very dark from time, grime and dirt which obscures the presentation of any briar grain. This translates into a lot of work to bring this pipe back up to specs.
 The stem has minimal oxidation, but the bit has some tooth chatter and biting on the button.
  I start with the stem to begin the restoration of the Algerian Briar French Canadian. The first step is to remove the swivel stinger from the tenon. I’m not a fan of stingers in general and I will leave it to the future steward whether the stinger will remain in service. For the time being, it will be cleaned by soaking in alcohol and let the fate be decided later.
  The airway is cleaned with little effort with a pipe cleaner wetted with isopropyl 99%.
  To address the light oxidation, the stem is placed into a soak of Briarville’s Pipe Stem Oxidation Remover for several hours.
  After several hours, actually the next day, the stem is fished out of the soak and wiped vigorously with a cotton cloth to remove the raised oxidation. The Briarville product does a good.
  To help recondition the vulcanite stem, paraffin oil, a mineral oil, is applied to the stem and the stem is put aside allowing the oil to do the job.
  Turning now to the stummel, the first order of business is to ream the chamber removing the carbon cake buildup. A picture is taken to measure the progress.
  The chamber is reamed with 2 blade heads from the Pipnet Reaming Kit. This is followed by using the Savinelli Fitsall Tool to scrape the chamber wall. This is followed by sanding the chamber with 240 grade sanding paper wrapped around a Sharpie Pen. The full arsenal of tools is shown.
  A quick inspection of the chamber reveals nice, healthy briar. Moving on.
 Switching next to the external briar, undiluted Murphy’s Soap is used with a cotton pad to scrub the dark, grimy briar surface. I’m looking forward to seeing how the cleaning process goes. A couple pictures mark the starting point.
  Murphy’s Soap does a good job. The surface is scrubbed with the cotton pad and a bristled brass brush works on the lava coated rim. The brass brush helps to clean without damaging the briar but adds some cleaning leverage.
  The pipe is next taken to the sink using hottish water and anti-oil dishwashing liquid to scrub the internals. Long shank brushes were made with Canadians in mind! The airway is scrubbed with the brushes and after a thorough rinsing the Canadian stummel returns to the worktable.
  The cleaning did a great job. I can now see briar grain! The rim also cleaned nicely.
  A few pictures show the now cleaned condition of the stummel. Some of the fills lost the patch material and I’m sure that the fills left will be easily removed.
  This picture also shows patches of the old, residual finish. These patches should be dispatched easily with sanding.
  To clean the old fills on the stummel, a sharp dental probe is used. The probe digs into the pits removing the old fill material. This is done in preparation for applying new patch material.
  Before applying patch material, the stummel is cleaned with alcohol wetted with alcohol. The grunge on the cotton pad shows the result.
  A ‘briar putty’ is created from the mixture of briar dust and regular CA glue. After putting down some strips of scotch tape to help with cleaning, a small amount of glue is place beside the briar dust.
  Next, a toothpick is used to create the mixture by pulling a small amount of briar dust into the glue while mixing. More briar dust is pulled in until the mixture reaches the thickness of molasses. At this point, the putty is troweled to the pit by the toothpick and filled.
  Three pits are filled with the briar putty and the stummel is put aside to allow the patches to cure.
  Well, it is the next day and I was about to start working on filing the patches and realized that I had forgotten to continue the internal cleaning of the stummel after the sink cleaning. Putting things in neutral now, I start the cleaning using cotton buds, pipe cleaners, and shank brushes wetted with isopropyl 99%. A small dental spoon also is used to scrape the mortise walls to excavate tars and oils. After a good many pipe cleaners and buds, they started to emerge cleaner. I called a halt with this phase of cleaning to be continued later with a cotton ball and alcohol soak to extract more tars and oils from the internal briar.
  Back on track, a flat needle file is used to file down the cured patch mounds on the stummel surface. The filing takes the mounds down to the briar surface.
  Next, 240 paper is used to further smooth the patches and this is followed by 600 grade paper to do the final smoothing. The goal at this point is not appearance but smoothness. With each patch I run my finger over the surface to detect any texture at all with a patch ridge remaining. The goal is smoothness.
 And now, 600 grade paper.
  It doesn’t take long for me to decide to procced toward applying a new finish on the Canadian. The surface is rough with scratches and dents and the rim is discolored with dent’s and scratching as well.
  With the patches completed, I start from the top and work down. The rim will be topped. Using a chopping board as the topping board, a piece of 240 paper is placed on it. A starting picture is taken to mark the progress.
  With the stummel inverted, the stummel is rotated several times and checked.
  The topping is even, but more needs to be removed.
  This picture is taken several more rotations later and enough briar has been removed. The edges look good.
  The 240 paper is replaced with 600 grade paper and the stummel is rotated several times. I like the grain that is emerging. The topping is complete.
  Next, the stummel is sanded with sanding sponges. To protect the stamping on the upper shank, painters tape is used to cover the ALGERIAN BRIAR, MADE IN FRANCE lone nomenclature.
  Starting the sanding first with a coarse grade sponge, this is followed with medium then fine grade sponges. The sanding sponges clean the surface well.
 Continuing the sanding, next the full set of 9 micromesh pads are used. Starting first with wet sanding with pads 1500 to 2400. This is then followed by dry sanding with pads 3200 to 4000 and 6000 to 12000.
  The micromesh process darkened the natural briar, but as I look at the briar itself it reminds me of other briars I’ve worked with. The grain is less expressive, even listless, one could say. From my readings, I’ve discovered that the briar blocks cut from the briar bole have different characteristics depending on from where in the bole they were cut. Blocks cut nearer to the outside of the bole tend to have more expressive grain but often more imperfections. Whereas, blocks cut from nearer to the bole’s center have less expression in the grain but often fewer imperfections.
  This picture shows more of the wavy, flat grain. It also shows a blemish in the briar on the right side of the picture. Sandpaper was applied to this blemish, but it dips and to sand it smooth would result in a ‘roll’ on the surface. The sanding that was done already created a bit of a dimple at that point. I decided to leave it and allow the finishing process to mask what will be masked.
  I decide to apply dye to the stummel to see if I can liven up the grain, or at least bring some additional contrasting. I use Fiebing’s Dark Brown Leather Dye to do the job. As an aniline (alcohol based) dye, wiping the surface with a alcohol wetted cotton pad can lighten the finish somewhat. I think the darker hue will work best for the additional contrasting I want. After assembling the elements needed on the worktable, the stummel is first warmed using a hot air gun. This has the effect of heating the briar and expanding the grain to become more receptive to the dye pigment.
  After warmed, the dye is applied to the stummel in swatches with a folded pipe cleaner and then is ‘flamed’ using a lit candle. This immediately combusts the alcohol in the dye leaving behind the dye hue in the grain. The stummel is methodically painted and flamed until the dye thoroughly covers the briar surface.
  The dyed stummel is then put aside for the night, allowing the new dye to ‘rest’ which helps it to settle in.
  Before turning out the lights, I decide to multitask the night hours by continuing the cleaning of the internal briar. Using cotton balls and isopropyl 99% alcohol, not only will the new dye rest, but the internals will have a soak to draw out additional tars and oils. After stretching and pulling one cotton ball to form a ‘wick’ long enough to extend through the Canadian shank, it is guided down the airway with the help of a stiff wire. The other cotton ball is stuffed into the bowl.
  The pipe is then placed in an egg carton to keep it steady and angle the rim and shank end so that they are level. Isopropyl 99% then fills the bowl using a large eye dropper until it surfaces over the cotton.
  After a few minutes, the alcohol is absorbed into the cotton. The alcohol is then topped off and then the lights go off allowing the pipe to soak through the night.
  The next morning, the cotton ball and wick are extracted showing the continued cleaning through the night.
  Wanting to be finished with the cleaning, carefully, pipe cleaners and cotton buds wetted with isopropyl 99% are used to continue cleaning the vestiges of tars and oils remaining after the soak. It only took a couple cotton buds and pipe cleaners to determine that the internals are clean. I move on.
 With the stummel waiting to be ‘unwrapped’ revealing the newly dyed briar, the short Canadian stem is next. After taking fresh pictures, the oxidation has been nicely removed by the Briarville soak. The vulcanite is rough and the only thing I see is some compression damage on the upper and lower button.
  To correct this, a flat needle file and 240 paper are used to refresh the button and address these issues.
  Next, to address the roughness, the entire stem is sanded with 240 paper. A sanding disk is used to guard from shouldering the stem facing.
  The 240 sanding is followed by wet sanding with 600 grade paper and then applying 0000 grade steel wool.
  The next step in the sanding/polishing process is using micromesh pads. Using pads 1500 to 2400, the stummel is wet sanded. This is followed by dry sanding with pads 3200 to 4000 and 6000 to 12000. To condition the vulcanite stem and to protect it from oxidation, Obsidian Oil is applied to after each set of 3 pads. I love the pop that results from this process!
 Putting the stem aside, the stummel is again the focus. After resting through the night, the flamed, crusted dye is ‘unwrapped’ using an abrasive felt buffing wheel coupled with a coarse Red Tripoli compound. With the rotary tool set a little slower than normal, about 30% full power to keep from too much heat buildup, the stummel is slowly unwrapped revealing the results. I’m hoping that the new dark brown dye helps to bring out more contrast in what I described as a lackluster grain.
  As the process proceeds, the felt wheel is purged often with the rotary tool’s adjustment wrench to clear the crust material and to soften the wheel. A few pictures record the process.
  This picture shows the phases involved in unwrapping. The crusted surface on the bottom is the starting point. Just above this is the first swipe of the buffing wheel and compound. The patch is still darker with excess dye persistent. The upper section is after focused effort to clear excess dye revealing the new grain pigmentation. My goal is not so much to darken the surface but to create a contrast in the grain. I’m pleased with the way this lackluster grain is responding to the dye.
 After completing the ‘unwrapping’ process with the felt buffing wheel, a cotton cloth buffing wheel is mounted and the speed of the rotary tool is increased to about 45 to 50% full power. Tripoli is again applied to the briar surface. I switch to the cotton wheel and repeat the coarser compound for two reasons. First, to reach into the crook of the bowl and shank to remove excess dye that the felt wheel is unable to reach. Secondly, applying the compound with the softer cotton cloth wheel seems to fine tune and sharpen the grain contrasting. The entire process of unwrapping takes a couple hours.
  After completing the application of Tripoli compound, a cotton pad wetted with alcohol is used to wipe the stummel. This is done not so much to lighten the aniline dye but to blend the dye and to remove yet more excess dye.
  Another cotton cloth wheel is mounted onto the rotary tool with the speed set at about 40% full power. After the Canadian stem and stummel are reunited, Blue Diamond compound, a finer abrasive compound, is applied to the pipe.
  The compound leaves behind a dust or powder which must be removed before applying wax. A felt cloth clears the compound dust.
  Another cotton cloth buffing wheel is mounted on the rotary tool with the speed at 40%. Carnauba wax is applied to the stem and stummel. When completed, the pipe is given a rigorous hand buffing using a microfiber cloth to remove excess wax and to raise the shine.
  I’m pleased with the outcome of this French made Algerian Briar Canadian. Even though it has no house markings other than a country of origin, this classic Canadian has elegant lines and a bowl that balances nicely in the hand. The grain emerged in a striking manner. Darren commissioned this pipe and as the commissioner, will have the first opportunity to claim him in The Pipe Steward Store benefitting the Daughters of Bulgaria – helping women and girls who have been trafficked and sexually exploited. A before and after picture helps to see how far we’ve come. Thanks for joining me!


Reblogged this on rebornpipes and commented:
Nice work on a beautiful pipe. Thanks Dal
LikeLiked by 1 person