In January of 2018 I saw this fist-filling saddle stem Billiard on the online auction block from a seller in Hillsdale, Indiana. The obscured grain had great potential, but the stem needed a good bit of help. I put out a bid and brought this stout Billiard home to Bulgaria where we lived at the time. It found its way to the ‘For “Pipe Dreamers” ONLY!’ collection for pipe men and women to commission benefitting the Daughters of Bulgaria, an effort that my wife and I founded in Bulgaria that continues today helping women and girls who have been trafficked and sexually exploited. Pipe man Mike from Tennessee heard the whisper of this pipe and the McMillian Sports joined other pipes he commissioned. I appreciate Mike’s love of pipes and the fellowship that pipes create with likeminded folks. I also appreciate Mike’s other hobby of threading and creating flies for those who know the art of fly fishing. I took this picture from Mike’s FB page to show his skill. Mike is also a veteran and has served his country with distinction – this I appreciate so much.
 With the McMillan Sports now on the worktable, here are pictures of the next pipe Mike has commissioned.
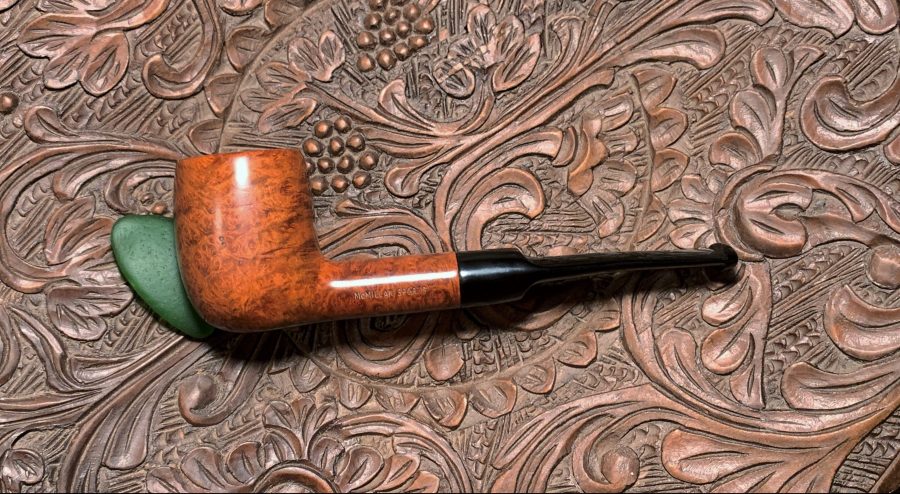


 The nomenclature stamped on the left side of the shank is: McMILLAN SPORTS. The right shank flank is stamped with: MADE IN ENGLAND [over] 60S, which I assume is a shape number from the manufacturer.
  From the outset, with the stamping, ‘McMillan Sports’, it is most likely that this pipe is a ‘shop pipe’ – a pipe specially manufactured for an establishment, business, or shop, and stamped with its name. Pipes like this rarely are referenced in the normal sources I frequent to learn of the provenance of the pipes I work on. After looking online for any information, this is exactly what I find – no specific information regarding a ‘McMillan Sports’. I search online for any specific connection with a sports club, pub, team, and come up empty. I focus this search in London, then England, and also Scotland and no specific hits. One last effort to gain some traction to ascertain the provenance is to research the shape number. Using the shape number 60S, I search the shape numbers lists for well-known English pipe manufacturers to see if I could identify a Billiard like the one on my table matching a shape number in use by a manufacturer. This also found no traction. And so, another pipe remains in mystery on my worktable.
Yet, it is a very attractive and what I would describe as a stout Billiard. The dimensions are length: 5 7/8 inches, height: 1 7/8 inches, rim width: 1 1/4 inches, chamber width: 3/4 inches, chamber depth: 1 5/8 inches. The condition of the pipe shows some challenges. The chamber has some thick carbon cake which will be removed down to the briar. The rim has grime and lava flow. The edge if the rim is nicked and has some small dents from wear and tear. There are also significant scratches over the rim plateau.
 There are some nicks and scrapes on the bowl, but generally, the dirt and grime are thick and need general cleaning to allow the nice-looking grain beneath to emerge.
 The big issue with the McMillan is the stem. The bit has been obliterated with a break that has removed about 7/16 inches off the left-side length of the stem. The width of the break is about 5/16 inches. This catastrophic break is too much to rebuild the missing bit and button. The only other options are to cut the stem and to build a new button on the amputated end or to find a replacement stem in my old stem can that will do the job. The stem also has deep oxidation and calcification on the bit. The pictures below show the deep brown/green of the oxidized vulcanite and the remnant of the bit.
 Without deciding on cutting the stem and rebuilding a button or seeing if I can find a replacement, I decide to continue with the stem cleaning to see how things shape up. Using pipe cleaners moistened with isopropyl 99%, work on the airway begins. I discover that the airway is partially blocked with gunk so once I was able to navigate a pipe cleaner through the stem, one end of the cleaner was clamped in the table vice to enable me to clean the airway more forcefully. Holding the pipe cleaner taut, the stem is moved briskly back and forth and rotated.
  After this, the cleaning continues in the normal way with pipe cleaners and isopropyl 99%. It takes a bit of effort, but the cleaners begin to emerge lighter.
 The next few pictures show the thickness of the oxidation in the vulcanite stem.
 To get a head start removing the oxidation, moistened with alcohol 000 grade steel wool is used to scrub the stem surface.
 Next, the stem is put into a soak of Briarville Pipe Stem Oxidation Remover to work on oxidation.
 After several hours, the stem is removed from the Oxidation Remover and briskly rubbed with a cotton cloth to remove the raised oxidation. Another pipe cleaner moistened with isopropyl 99% is used to clear the airway of the excess Oxidation Remover fluid.
 To help condition the vulcanite, Paraffin oil is applied to the stem and then put aside to allow the oil to be absorbed.
 Moving next to the stummel, the starting picture marks the progress removing the thick cake buildup in the chamber.
 Using the Pipnet Reaming Kit, 2 of the 4 blades available are used starting first with the smallest and then the next larger. Next, the Savinelli Fitsall Tool is used to continue scraping the chamber wall and the chamber is finished by sanding the chamber walls with 240 grade paper wrapped around a Sharpie Pen to give more leverage.
 After wiping out the carbon dust, a quick inspection of the chamber wall shows healthy briar and no heating problems.
 Turning now to the external cleaning, undiluted Murphy’s Oil Soap is used with cotton pads.
 After scrubbing the briar surface with the cotton pad, a brass wired brush is used to scrub the rim. The brass adds to the cleaning muscle but does not harm the briar.
 Next, the stummel is taken to the sink and using shank brushes and anti-oil dishwashing soap, the internal mortise and airway are scrubbed with hottish water. After a thorough rinse, the stummel is returned to the worktable.
 The internal cleaning continues with cotton buds and pipe cleaners wetted with isopropyl 99%. A small dental spoon also helps with the cleaning by scraping the mortise walls to remove the thick tars and oils that remain after the previous sink cleaning. To the degree that the gunk is shoveled out, it helps the pipe cleaners and buds do their part.
 The internals are pretty grungy. To help with the airway, a drill bit the same size as the airway is hand turned to scrape the airway beyond the mortise to the draft hole. I forgot to take a picture of the drill bit with gunk packed in the drill threads.
  After a good bit of effort, the buds and cleaners start to emerge lighter, and the work is called for the time. I’ll continue the internal cleaning later with a cotton ball and alcohol soak.
 With the primary cleaning completed on the stummel, a closer look at the stummel shows a very nice-looking batch of briar. I can find no fills on the surface. The patina is rich and dark. This stummel should spruce up very nicely.
 The rim cleaned up nicely as well. The grain is showing with only a small amount of dark briar from heating on the inner rim. The rim has a smart bevel which will be refreshed. The picture below shows the significant scratches over the rim on the lower side of the picture.
  To refresh the rim and to remove the scratches and dents on the edge, I top the rim using 240 paper on a chopping board. A starting picture is taken to show the rough condition of the rim and to mark the progress.
 With the stummel inverted on the paper, it is rotated a number of times over the 240 grade paper.
 The first check shows a level topping, and the rotating continues.
 The picture below shows that enough briar has been topped using 240 paper. There remains some roughness on the rim’s outer edge, but this should sand out later.
 The 240 paper is exchanged for the finer 600 grade paper and the stummel is rotated several more times to smooth the surface further. I’m liking what I’m seeing. The rich, expressive grain is coming out very nicely and the topping has left a balanced rim plateau.
 With the rim topped and looking good, the next step is to refresh the smart bevel to remove the darkened briar and to refresh the rim lines.
 What I call a ‘smart’ bevel is a sharply cut bevel versus a soft bevel which is more rounded. The way I create sharp bevels is to use hard surface sphere’s that will cut the briar and bevel sharply. I have two sizes of spheres that I use – a larger que ball and a smaller wooden sphere. The choice of sphere has to do with the general size of the chamber mouth so that the bevel emulates as closely as possible the original.
 For the McMillan Sport Billiard, the smaller sphere is used with a single layer strip of 240 paper pressed over the sphere and seated snugly in the chamber. The picture below shows the general idea, but it takes both hands to hold the paper in place on the sphere and then rotate it cleanly against the inner rim edge to make a sharp, uniform cut. I use a single layer of paper to help it to be hard against the briar. For this reason, it’s pretty normal for the paper to tear during the process.
 The same process is then repeated with 600 paper wrapped around the sphere. The results are great. The bevel is crisp with renewed lines and the dark briar has been removed.
 To continue cleaning the surface of the stummel and around the edge of the rim, the stummel is sanded using a coarser, medium, and then fine sanding sponges. I like using sanding sponges at this point because they are not as invasive as regular sanding paper, but they erase scratches and cuts without removing the patina. The results are good.
 Continuing with the stummel, micromesh pads are used next starting with wet sanding with pads 1500 to 2400. This is followed by dry sanding with pads 3200 to 4000 and 6000 to 12000. The natural briar patina comes out nicely during the micromesh process. Nice!
 Putting the stummel aside for now, I realize that I may have gotten ahead of myself by going so far in finishing the stummel before resolving the stem question. Often, sanding is required to size a replacement stem – we’ll see. Since the original stem has no markings to safeguard, I decide to look in my can of old extra stems to see if a possible replacement stem will work. I find a bent saddle that looks almost identical to the McMillan stem. It almost looks new, and I have no idea where it came from. I decide to go with the replacement instead of cutting the original and rebuilding the button.
 The first step to get the replacement stem ready is to straighten the bend. To do this a pipe cleaner is first inserted into the airway to guard its integrity. One end of the pipe cleaner is clamped in the table vice. Using the hot air gun, the stem is warmed and as it warms it becomes supple. Gentle tension is applied from the loose end of the pipe cleaner as I pull gently to straighten the stem slowly.
  Once the stem is fully straightened, the stem is taken to the sink and cool water is applied to the hot stem to cool the vulcanite and hold the new orientation of the stem. There remains a slight downward taper of the stem to help identify the top and bottom when seating the stem in the shank.
 Next, a test fit shows that the tenon is close to the correct size to seat in the mortise. It partially fits but tightens in the mortise.
 Using a coarse 120 grade paper, the paper is pinched around the tenon and the tenon is rotated evenly to sand the tenon to reduce its diameter a small amount.
 It didn’t take much, almost surprising me how quickly the tenon sized down. The stem seated perfectly into the mortise. Not bad!
 With the replacement stem ready to go, the next step is to wet sand the stem with 600 grade paper and then this is followed by applying 0000 grade steel wool. The stem must have been treated previously for oxidation because the stem looks good.
 Next, the full set of 9 micromesh pads is applied to the stem starting first with wet sanding with pads 1500 to 2400. This is followed by dry sanding with pads 3200 to 4000 and 6000 to 12000. Between each set of 3 pads, Obsidian Oil is applied to the stem to condition it and to guard against the development of oxidation. The pop on the stem looks great.
 Turning again to the stummel, the next step is to apply Mark Hoover’s ‘Before & After Restoration Balm’. After putting some of the Balm on my fingers, the Balm is worked into the briar. It starts out with the consistency of a cream but then thickens to a wax-like consistency. After fully applied, the stummel is set aside for about 15 minutes to allow the Balm to do what it does.
 After the time is up, the stummel is buffed with a dedicated microfiber cloth to remove the excess Balm and to raise the shine. I appreciate the way Mark’s Restoration Balm brings out the natural briar hues. Very nice.
 Earlier I indicated that the internal cleaning of the stummel would continue with a cotton ball and alcohol soak. Before going further, this needs to be done. Using 2 cotton balls, one is stuffed in the chamber and the other is pulled and stretched to form a ‘wick’ to insert down the mortise and airway. The wick helps to draw out more tars and oils from the internal briar.
 After the cotton is in place and the stummel is settled into an egg crate to keep it steady and to angle the stummel so that the rim and end of the shank are roughly level, isopropyl 99% alcohol is used to fill the stummel until it surfaces over the cotton in the chamber.
 After a few minutes, the alcohol is absorbed into the cotton, and it is topped off with more alcohol and set aside to soak for several hours. In this case through the night.
  The next morning, the soiling in the cotton shows the results of the cleaning activity through the night.
 To make sure all is clean, a pipe cleaner and cotton bud confirm that the internals are clean and refreshed and ready for a new steward.
  With the stem and stummel reunited, a dedicated cotton cloth buffing wheel is mounted onto the rotary tool with the speed set at about 40% full power. Blue Diamond compound is then applied to the pipe. Blue Diamond is a fine compound that does a great job erasing very small scratches to shine up the pipe very nicely. To me, this is an important step before applying wax. Yes, wax creates a temporary shine and protective coat over the briar, but the sanding culminating with the fine compound abrasive is what creates the grain contrasting that is what becomes the eye catcher that wax simply amplifies – like frosting on the cake!
 When applying the compound, a ‘compound line’ is established. Blue Diamond compound is an abrasive which is not absorbed into the briar like wax. It’s fine abrasive particles that the cotton buffing wheel gradually ‘pushes’ over the entire surface. As the compound is expended the ‘compound line’ grows thinner. Then, a bit more compound is added to the wheel by tapping the compound block.
  After the compound has been applied, to remove the compound dust left on the surface as can be seen on the picture above, the pipe is buffed with a felt cloth. This is done in preparation for applying the wax.
 A cotton cloth buffing wheel dedicated to applying wax is mounted with the speed remaining the same. Carnauba wax is next applied to the stem and stummel. After application of the wax, a microfiber cloth is used to give the pipe a rigorous hand buffing to remove excess wax and to raise the shine.
 I love it when a tossed-to-the-side basket pipe gets a second chance. The origins of this English made McMillan Sport will remain a mystery, but what is not ‘shrouded in mystery’ now is the beautiful briar that has emerged. This stout Saddle Stem Billiard is a handsome pipe with a cornucopia of briar grain to enjoy. The large looping bird’s eye patterns are sprinkled over both the left and right sides of the bowl. Layered horizontal grain flows between the bird’s eye creating a fluid briar landscape. Nice. The replacement stem has a slight downward taper that gives the pipe nice lines. This McMillan Sports is a classic workhorse Billiard that has a good feel in the palm and promises a good amount of fellowship with a new steward. Mike commissioned the McMillan Sports and will have the first opportunity to claim him in The Pipe Steward Store benefitting the Daughters of Bulgaria – helping women and girls who have been trafficked and sexually exploited. A ‘before & after’ reminds us how far we’ve come. Thanks for joining me!


As expected, it turned out beautifully my friend. As before, I will be happy to add this one to the collection as well. I have some news and will be sending you an email here in just a bit, so keep an eye out for it.
LikeLiked by 1 person
Mike, thank you so much! This one did turn out beautifully. Looking forward to your email.
LikeLike
Reblogged this on rebornpipes and commented:
Here is a well done restem and restore by Dal. Give it a read.
LikeLiked by 1 person
Thanks Steve!
LikeLike
Really great step by step story. Really helpful for a newbie at pipe restoration.
LikeLike
Thanks, Ken. I’m glad the write up was helpful!
LikeLike