ADDENDUM: After publishing this write up, Doug Bisbee of DK Metal Pipes, who has a wealth of knowledge about Kirstens, reached out to me indicating that the ramrod was on this Kirsten was broken off and would gladly send me a replacement mouthpiece with ramrod. Thanks, Doug!
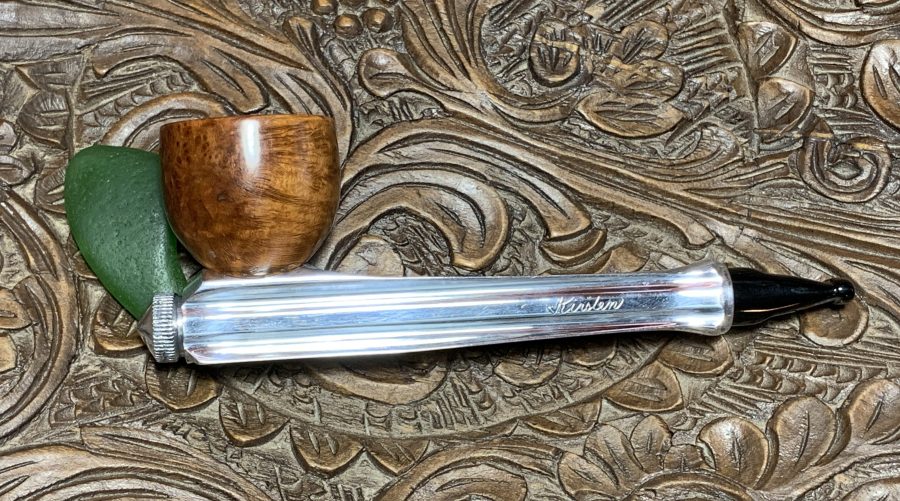
After again returning from a trip to Krakow, Poland, delivering several crates of supplies to be distributed throughout Ukraine, I’m back at the worktable here in Golden, Colorado. My wife and I have been privileged to serve the people of Ukraine during this time of crisis. Our prayer is that their plight does not simply become a passing story in the media news cycle. The picture below is our arrival in Krakow delivering several crates of medical supplies and water filters.  I am also grateful for the enduring patience of those pipe men who have commissioned pipes from the ‘For “Pipe Dreamers” ONLY!’ online collection benefiting a work near to our hearts, the Daughters of Bulgaria – helping trafficked and sexually exploited women and girls. I am amazed that each is willing to wait for their pipes to rise to the top of the queue – and this has taken a quite a chunk of time! Attorney by profession, writer and expert in Chinese affairs, pipe man Todd has commissioned several pipes before this and has waited for this Kirsten to come to the worktable. Here are pictures of the Kirsten he has commissioned:

 On the left, aft panel, is inscribed the brand in traditional cursive, ‘Kirsten’.
 On the underside of the ‘Radiator’ or barrel is stamped the patent information: ‘PATS & PATS PEND MADE IN U. S. A. – S’.
 Added to this Kirsten is some graffiti as well to the left of the patent information: ‘WC Sample WCS’. This inscription of a previous steward remains as this Kirsten is passed on. When I first read this added inscription, I thought it might indicate that this pipe was a ‘sample’ for a salesman or perhaps a shop. More likely, now that I look at it again, a pipe man with the initials WC and surname, Sample, put his own brand on the pipe for safe keeping.
 Steve collaborated with Sam Vior to post on Rebornpipes the 1965 – 27th Anniversary Kirsten Pipe Company Pipe Catalogue which is a wonderful dip into time looking at the iconic design of the Kirsten metal pipe. In that anniversary catalogue issue is this helpful page describing the novel design and functionality of a Kirsten pipe.
 The 4 parts of a Kirsten described are, 1) The bowl, 2) the valve, 3) the ‘Radiator stem’, and 4) the mouthpiece. From the description above, I have discovered in my reading that subtle variations in the design help to date the particular version of Kirsten one might possess – such as the presence or non-presence of O rings described as part of the ‘valve’ design. With the diagram above, I disassemble the Kirsten on the worktable to see what I can learn.
 With little effort, the pipe disassembles. What I notice initially is first, there appears to be no O ring in this design – the valve doesn’t have a channel where an O ring would be seated.
 The second thing I notice is that the mouthpiece is missing the ‘Duralumin’ ramrod. Unfortunately, the ramrod was broken off sometime in the past. The ramrod was only used for cleaning the inside of the Radiator stem, so the smoking functionality will not be affected.
  To learn more about the Kirsten name and history, the Kirsten website (https://www.kirstenpipe.com/history.html) has a tab describing the 80 years plus history of the invention of Professor Kirsten:
 It is by no means merely puffery to say that Professor Frederick K. Kirsten was a genuine American original. He first sailed to this country in 1902, as a cabin boy from Hamburg, Germany. After successfully rounding the Horn and eluding the shanghai gangs of the West Coast, he navigated the educational system at the University of Washington to become a Professor of Aeronautical Engineering. Here, his inventive spirit took wing. He created the world-famous Kirsten Wind Tunnel, Air-washing equipment for factories, an air-cooled Utopian Bed, and, most notably, a revolutionary propeller which enables boats to stop and turn on a dime. Today, in the same waters where he jumped ship almost 100 years ago, ocean-going vessels are landed by sturdy tugs driven by Kirsten cycloidal propellers, piloted by equally sturdy captains smoking cool Kirsten pipes.
Rightly called the coolest pipe in the world, this latter innovation came about when a doctor advised Professor Kirsten to switch from cigarettes. He quickly dreamed up a way to trap the moisture, tars and tongue-biting acids which attack the users of briar pipes. After 80 years and counting, Kirsten pipes are still produced by the Kirsten family, faithfully following the basic designs of this father of invention.
The motivation behind Professor Kirsten’s innovation was his need to stop smoking cigarettes and in switching to pipe smoking, his focus was to develop a design that would ‘trap the moisture, tars and tongue-biting acids which attack the users of briar pipes.’ I have never smoked a Kirsten, or a Viking, another metal pipe put out by Dr. Grabow, but I find the concept interesting.
 Steve also has posted on Rebornpipes (See: LINK) an excellent article collaborating with Dave Whitney’s information that later became a chapter in his book. The post is called, ‘Kirsten Generation 1, 1.5, 2, 3’ which delves into the question of dating the different versions of Kirsten production. Steve’s posting is worth the read to learn more about dating Kirsten pipes and more. The approach to dating is defined in terms of generations. After reading Steve’s descriptions of the generations’ characteristics, I have determined that the Kirsten on the worktable comes from Generation 1 which spans from 1936 to 1958. Below I have included Steve’s post’s descriptions of both Generation 1 & 1.5 which show the characteristics and evolution which help me to settle on a Generation 1 designation:
Generation 1 – 1936-1958
The wooden bowl on this generation connects directly to the metal barrel and there is no metal cup spacer. It is a pretty flush fit that goes flat against the barrel. On the underside of the metal barrel it is stamped with one or more of the following “Pat. Appl. For” (1936-38) and “Pats. & Pats. Pending” (1938-1958) over “Made in USA” – S” (or applicable size – S, M, L). There are no O-rings on the bit or metal shank insert. They came in the following models:
Straights
Companion First edition in rough finish.
S Standard 1st generation with full-length cooling fins
M Medium
L Large
A Aristocrat Extra large 1st generation
Generation 1.5 – transitional period – mid to late 50’s
This was an experimental stage. Kirsten realized that the bit and insert were prone to seizure as the condensate dried. This model always has O-rings on the metal insert, and later models can have O-rings on both. Same markings, as I remember it. There is no metal cup spacer under the bowl. This generation has O rings either on the valve or mouthpiece but no O rings on the other end. This transitional period is stamped “Pat. Pending” and “Pats. & Pats. Pending” some with “Made in U.S.A. It seems like the company was using surplus parts to combine into this series of pipes. They came in the following models:
Straights
K Companion
M Medium
L Large
They came in a polished finish and later white Heritage finish. There were a few other Transition Models:
Thrifty – a nice early model with black offset valve that works in reverse. There is an O ring on valve but none on the stem
No Letter/No Name – This one is an unmarked short pipe with a different valve and O ring. There is not an O ring on stem
The main defining characteristics of the Generation 1 on the worktable is that it has no O rings which is present in the G-1.5 and later generations. In G-1.5, there were O rings either on the valve or mouthpiece but no O rings on either end. The metal of the valve and the taper of the mouthpiece are machined to pressure fit into the barrel. Here is a comparison picture with the O ring design of a later generation Kirsten from the Pipedia article to show the difference between G-1 and later generations – the design changes are distinctive (picture courtesy of Doug Valitchka):
 Another design characteristic which is true of both G-1 and G-1.5 is that the wooden bowl connects directly to the metal barrel and there is no metal cup spacer. In the later generation example, the metal cup spacer is visible in comparison to the absence of spacer with our G-1.
 Regarding the nomenclature, both G-1 and G-1.5 share the same stamping ‘patent pending’ descriptions. According to Steve’s article, the ‘PATS. & PATS. PENDING’ would date this pipe from 1938 to 1958. What’s interesting, as you can see below, ‘PENDING’ is abbreviated to ‘PEND’ on the Kirsten on the worktable. I haven’t seen any reference to the abbreviation in the reading I’ve done or in other examples I’ve seen. The ‘S’ signifies Standard 1st generation with full-length cooling fins.
 I found another interesting factoid from the Pipedia Kirsten article regarding the manufacturing of the bowls:
As you can see there is an almost unlimited combination of Kirstens before you even get into the bowls they offer. In the early years a lot of the Kirsten bowls were made by Kaywoodie and fit the top of the pipe’s radiator stem tightly without the aid of a bowl adapter. Later models came out with a bowl adapter, somewhere during the transition period.
The Kaywoodie bowls are generally not stamped with anything. Bowls made by Kirsten have the Kirsten stamp on the bottom, but it is not clear when this stamping began.
As the picture shows of our Kirsten below, Kaywoodie did not manufacture this bowl, but it was manufactured by Kirsten. The imprint on the underside of the bowl is, ‘PATS.APPL FOR’ [over] ‘KIRSTEN’. With a greater appreciation for the provenance of this Generation 1 Standard Kirsten, I take a closer look at the issues it has that need some help. The bowl grain is dark from dirt and grunge but looks very promising. There is thick cake in the chamber which will be addressed. The barrel or the radiator metal needs cleaning and polishing. I have already noted the graffiti left by a previous steward by the name of Sample. This will remain as a hallmark of its history 😊. The vulcanite mouthpiece is in rough shape, with clinch scars on both sides of the bit and side. It appears to have been mauled.
To start the restoration of this G-1 Kirsten that Todd has commissioned, the mouthpiece is cleaned using pipe cleaner moistened with isopropyl 99% alcohol. There is no straight path navigating through the airway as the airway exits in the 2 air holes on the side of the metal tube. The pipe cleaner is inserted through the slot and goes up as far as the two air holes in the tube, but I find that as I use the pipe cleaners to clean, fuzz is being left in the airway. A few blows through the airway indicated that the fuzz was obstructing the airflow. With the use of a dental probe, the fuzz is excavated, and all was good. Something for a new steward to remember.
 Next, the staining on the metal airway tube is addressed with a 0000 grade steel wool. The staining is easily removed, and the results are good.
 To get a closer look at the condition of the vulcanite mouthpiece, these pictures show the compressions next to the button lip and other dents and scratches. It’s in pretty rough shape.
 Before addressing these issues, I decide to give the vulcanite a soak in Briarville’s Stem Oxidation Remover to deal with any residual oxidation in the stem. There doesn’t seem to be any significant indication of oxidation, but I like to run the stem through this process for good measure. I hook the air holes for easier retrieval and put the mouthpiece in the soak for a couple of hours.
 After the time has elapsed, the mouthpiece is taken out of the soak and rubbed aggressively with a cotton cloth to remove the raised oxidation. To remove any residue of the oxidation remover fluid, a pipe cleaner moistened with isopropyl 99% is run quickly through the airway. The soak did a good job.
 To help to start reconditioning the vulcanite, paraffin oil is applied to the mouthpiece and then set aside to absorb the oil.
 I turn next to the Kirsten-made bowl. First, the chamber is cleaned of the thick cake buildup. The rim is also covered by a thick crust of lava flow. A picture is taken to mark the progress from the start.
 I first use two of the smallest blade heads from the Pipnet Reaming Kit. I’m careful not to press down too much toward the floor of the bowl. The floor is a flat fashioned piece of briar where the bowl screw is seated (See picture above). I don’t want to inadvertently damage this area and have more problems!
 Following the reaming tool, the Savinelli Fitsall Tool is used to continue scraping the chamber wall, but also to get at the sharp angles on the floor of the bowl.
 Finally, the chamber wall is sanded with 240 paper wrapped around a Sharpie Pen to address the last remaining vestiges of carbon in the chamber allowing fresh briar to be exposed.
 After the bowl is wiped with a cotton pad, a picture shows the chamber. A quick inspection does not show any heating issues with the bowl.
 Next, a few starting pictures are taken of the bowl. The bowl is grungy, and the crusted lava flow is thick on the rim.
 The external briar is cleaned using undiluted Murphy’s Oil Soap and a cotton pad to scrub.
 To address the lava crusting on the rim, carefully a pocketknife is used to scrape the rim surface. Following this, the brass wire brush also was helpful in removing the crusting. After scrubbing, the bowl was taken to the sink and rinsed thoroughly of the Murphy’s Soap. The bowl cleaned up but still not looking great. Dark scorching stains persist on the rim.
 After the cleaning I’m also able to detect a small gouge on the inner lip of the rim.
 To address this, 240 grade paper is used to sand conservatively around the inner lip of the rime to help to remove the gouge as well as the dark ring circling the chamber.
 To clean the rim and to establish new, sharper lines, the bowl is topped. A picture is taken to show the starting condition.
 With 240 paper placed on a chopping board, the bowl in inverted and rotated several times over the paper.
 Enough has been removed to clean the rim – it looks good. The topping revealed vestiges of the gouging at 9 o’clock on the inner rim. I’m reluctant to spot sand at that point on the inner rim to remove the gouges. This will result in too much briar being removed at one point with the result of the inner rim being out of round. To cut a bevel to remove the cuts would also require a lot of briar around the circumference – not good. I’ll finish the topping process and think about a solution.
 The 240 paper is exchanged with 600 grade paper and the bowl is topped several more revolutions.
 To address the gouge in the inner rim, I decide to build out the damaged area with briar dust putty and then sand the new patch – perhaps cut a small bevel to clean the inner rim further and establish a clean line. To accomplish this, a very small batch of briar dust putty is made. A small mound of briar dust is placed on the tape covered palette. Beside this a small dollop of regular CA glue. The scotch tape is used to help with cleanup.
 Next, using a toothpick, briar dust is pulled into the glue and mixed at the same time. When enough dust has been mixed, a small amount of the putty in troweled into the gouged area with the toothpick. The bowl is then set aside to allow the patch to cure.
 With the bowl on the sidelines, I turn again to the stem. Fresh pictures are taken of the severe compression bites parallel to the button – on both sides. To lessen the compressions to avoid additional sanding and patching (perhaps), the heating method is used. A Bic lighter is used to paint each side with flame to heat the vulcanite. As the vulcanite is heated, physics takes over. The warmed rubber expands to recover its original shape – or closer to it. After applying several rounds of flame painting, the pictures compare the before and after. There was some recovery and lessening of the cuts, but we still have some work to do.
Before and after: Before and after:
 The next step is to use needle files to remove the cuts and compressions and shape the button and sides of the mouthpiece. In the interest of full disclosure, this shaping process was a bear. Not only filed were the obvious compressions on the bit (both sides), but there were also bite marks above the saddle stem taper. What’s more, and I’m not sure how the former steward accomplished this, but you can see in the older picture below the bite compression wrapping around the stem parallel to the button. The challenging result of this are concave sides of the mouthpiece – ugh! Normally, the ‘wings’ or the ends of the button run a tapered parallel along the side of the stem. In order to shape and blend the mouthpiece, the button will need to be reduced somewhat and the vulcanite humps to the left of the red carrot marks will need to be reduced. The goal is an even line tapering from the button ends along the sides of the stem/mouthpiece.
 Jumping into the filing, a flat needle file is used as well as a small square file. The button lips are filed to refresh them, compressions are filed, the button is shaped gradually, and the humps removed so that the button edge and side of the mouthpiece are more closely aligned.
 Next, using 240 sanding paper, all of the areas described above are sanded more and the shaping is more finely tuned. The progress is shown in the pictures.
 Next, 600 grade paper is used to wet sand the mouthpiece and this is followed with applying 0000 grade steel wool. Again, in the interest of full disclosure, after going through the steel wool cycle, I had to back track a few times because the fine tuning revealed residual cuts and pits that were masked by the dust. These ‘back tracks’ were sanded with 470 grade paper, then again, wet sanded with 600 and then 0000 steel wool. Finally, the results are satisfactory, and I can move on!
 Continuing with the mouthpiece, the full regimen of 9 micromesh pads is next used. Starting with pads 1500 to 2400, the mouthpiece is wet sanded. Following this, dry sanding is applied with pads 3200 to 4000 and 6000 to 12000. To prevent future oxidation and condition the vulcanite, between each set of 3 pads Obsidian Oil is applied to the mouthpiece. Wow! I’m pleased with the results of the micromesh process and how this mouthpiece has turned out. From where it was to where it is now – close to a resurrection 😊.
 Turning again to the Kirsten bowl, the briar dust putty has cured and ready to be shaped.
 First, a rounded needle file is used to file and shape the patch so that the curvature is in alignment with the inner rim. After this, 240 paper wrapped around a Sharpie Pen fine tunes the patch.
 To blend the patch more and to clean the inner rim edge, a strip of 240 paper followed by a strip of 600 paper wedged between the wooden sphere and the rim edge cuts a smart bevel.
 Not shown is a quick trip back to the topping board with 600 paper and a few rotations ties everything together with clean, crisp lines. I like it.
 To prepare the bowl for sanding with micromesh pads, sanding sponges are used. Sanding starts first with a coarser grade, followed by a medium grade then finishing with the fine grade.
 Next, starting with pads 1500 to 2400, the bowl is sanded. This is followed with pads 3200 to 4000 and 6000 to 12000. I like the way the grain emerges through the micromesh process. Nice.
 Mark Hoover’s product, ‘Before & After Restoration Balm’, is excellent to use at this juncture. The Balm brings out the subtle natural hues of the grain and adds a nice finish to the patina that has developed. After putting some Balm on the fingers, it is rubbed into the briar making sure all has been covered. The bowl is then set aside for 15 or so minutes allowing the Balm to work its magic.
 After the time has passed, the bowl is wiped/buffed with a micromesh cloth dedicated only to buffing the Balm. I keep this Balm dedicated cloth to give quick Balm treatments to other pipes in my collection. Nothing goes to waste. The bowl looks great.
 Now, turning to the metalwork. In the Pipedia article has a pamphlet of Kirsten Pipes that describes the metal of the Radiator/barrel and valve as ‘Duralumin’ – an aluminum compound of some sort that is ‘durable’.
 The cleaning starts with hot water, liquid dish washing soap and shank brushes. At the sink the brushes scrub the insides of the barrel and the valve.
 Focusing next on the valve, 0000 grade steel wool is used to remove the corrosion that has developed on the Duralumin surface. A before and after picture shows the progress.
 Next, the external surface of the barrel shows the staining and fine scratches.
 0000 grade steel wool is also applied to the barrel and bowl screw which is also the airway. Care is given to push the steel wool into the fins’ junctions around the Radiator to remove the staining and fine scratches. I’m surprised and pleased with how the metal is cleaning up.
 The next step in polishing the Duralumin is to apply Blue Diamond compound. A metal-dedicated cotton cloth wheel is mounted onto the rotary tool with the speed set to about 40% full power. A dedicated wheel is used because the compound causes a black residue which can stain or discolor briar if the wheels are mixed. Blue Diamond is applied to the valve, barrel and not shown, the bowl screw and the metal air tube of the mouthpiece.
 The results surprised me. I was not expecting the mirror-like sheen that resulted from the application of the compound on the Duralumin. Nice!
 After changing the cotton cloth wheel to a wheel dedicated to Blue Diamond on briar and vulcanite, the speed remains the same and Blue Diamond is applied to the bowl and the vulcanite mouthpiece.
 After the compound is applied, the pieces are wiped with a felt cloth to remove the compound dust in preparation for wax.
 Another wheel is mounted on the rotary tool and with the same speed, carnauba wax is applied to the bowl and vulcanite mouthpiece. The bowl and vulcanite mouthpiece are then given a rigorous hand buffing with a microfiber cloth. The Kirsten is then reassembled.
 I was not expecting the manner in which the Duralumin buffed up to a mirror-like sheen. This 1st Generation Standard Kirsten has at least 64 years of life under its belt with a possible maximum of 84 years of service going back to 1938. Now, it has another 80 years of service before it. For an old timer, the bowl, stem, and metallic finish are pristine and reveal a striking presentation of a novel pipe design. Todd commissioned this Kirsten and will have the first opportunity to claim him from The Pipe Steward Store benefitting the Daughters of Bulgaria – helping women and girls who have been trafficked and sexually exploited. A before and after to start to remind us how far we have come. Thanks for joining me!


 Please pray for Ukraine!

Magnificent work.
LikeLiked by 1 person
Thanks much. It surprised me how it polished up!
LikeLike
As always, a delight to join in the restoration journey. Delightfully documented, and beautifully restored.
LikeLiked by 1 person
Thanks so much!
LikeLike