Life can be rough and life has been a challenge for the Nørding Freehand now on the worktable. He has a huge, cracked shank that is daunting. I acquired this wounded beauty from pipeman Ron from Lakewood, Colorado – a next door neighbor to Golden. I have restored several of the pipes that I received from Ron, and I’ve mentioned in each write up that Ron was not too kind to his pipes. I met Ron in August 2021 when I went to his home to purchase a Zero Gravity recliner to have on our many camping expeditions. When I pulled into his driveway, he was sitting by the garage door in his own recliner, with my ‘soon-to-be’ recliner next to him. Yet, what was most interesting was the beautiful Freehand Ron had in his hand with tobacco lit. Of course, our conversation bent toward pipes after the recliner was secured. I discovered that Ron was selling most of his collection and that got my attention. I ended up purchasing 6 pipes that day and made the arrangements to return another time to give him time to consolidate his pipes.
My wife returned with me to visit Ron and to see his pipes. We discovered much about Ron on that visit. The well-worn Bible and devotional on the side table let us know that he also was a follower of Jesus. Many books on his shelves were the same on my shelves – many Tom Clancy books and other suspense novels. I enjoyed finding out that he was a family man with many pictures of grandchildren AND that he was a ‘Scotch’ man and one of his favorites I also shared, Glenmorangie, a scotch that I discovered at a pub in Edinburgh, Scotland.
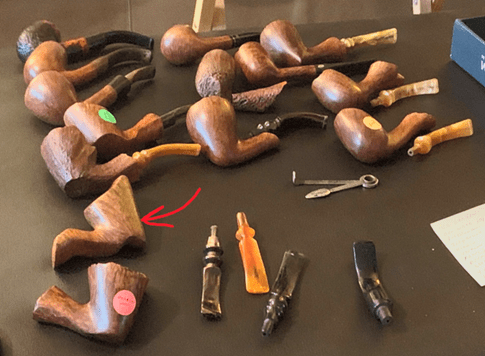
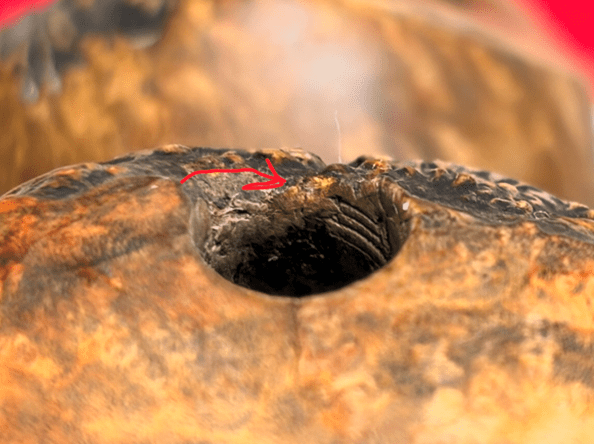
When Ron spread his pipes on the table there were more Freehands than I was expecting and several orphaned stems that were not mated with a stummel. The Nørding now on worktable (red arrow in picture below) was without a stem at that point. A few shanks had cracks and one Freehand, not shown in this picture, the shank had completely broken off…. Some of the pipes needed some TLC but overall, I couldn’t pass this many Danish made pipes! W
We came to a mutually beneficial agreement and the Lakewood Lot of 15 made it eventually to the For “Pipe Dreamers” ONLY! online collection waiting for pipemen and women to commission benefiting the Daughters of Bulgaria, a work co-founded by my wife and me during our 15 years living in Bulgaria. Now called, Spring of Hope, the ministry helps trafficked and sexually exploited women and girls and creates prevention programs protecting the vulnerable.
Chip reached out to me with a desire to add a Danish Freehand to his growing collection. I discovered very quickly from his email signature that he was a retired Chief in the U.S. Coast Guard. My appreciation and respect for those who serve our country and for their families is heart-felt. In this initial contact, I also discovered that he appreciates my practice of creating a ‘Steward’s Peek’ when I work on Danish Freehands! Today, Chip works with a company outfitting military and high security establishments with audio-visual systems, videowalls…. Chip said it gets too technical and he tells people that he sell furniture! 😊
It was in subsequent emails that I discovered more of Chip’s journey in life – a difficult one, but one that has found restoration through following and trusting Jesus. With Chip’s permission, he shared with me about his life as an alcoholic and how this resulted in the loss of his family. Sobriety began for him in 2018 when he found his way to an AA meeting and this support system and his faith in Christ enabled him to get back on his feet and start again. Chip shared with me that he was about to leave with his new wife to go to another state to meet for the first time his daughter-in-law and grandchildren after the sudden death of his son who had been estranged for some years because of Chip’s alcoholism. His son, having also served in the military, was provided an honor guard and 21 gun salute that Chip witnessed and this impacted him deeply. Chip said his hope is that he can be a part of his newly reunited daughter-in-law and grandchildren.
When Chip inquired about the broken shank Nørding, I made sure he knew this Freehand was wounded and that other Freehands without problems were available. His response to my warnings stayed with me:
I guess it spoke to me, as it’s a broken spirit and can be mended. Even though the Bjarne can be, I still want to move forward and commission the Nørding.
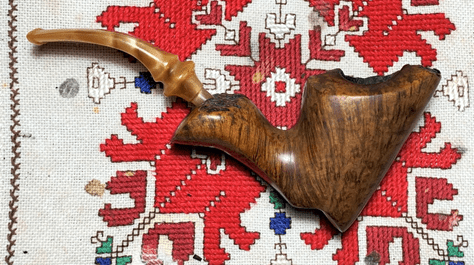
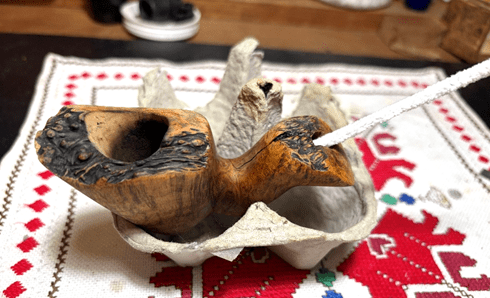
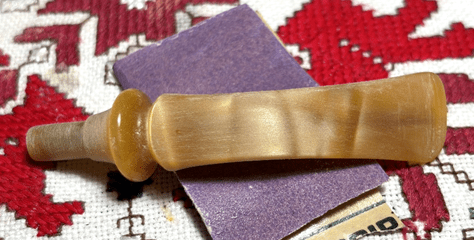
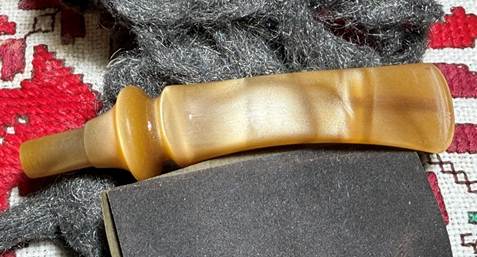
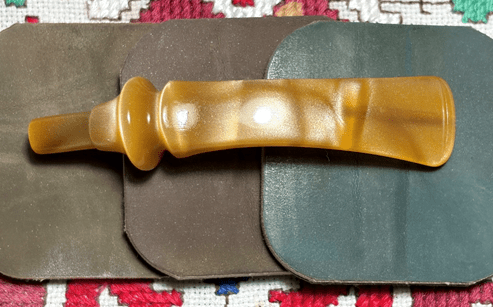
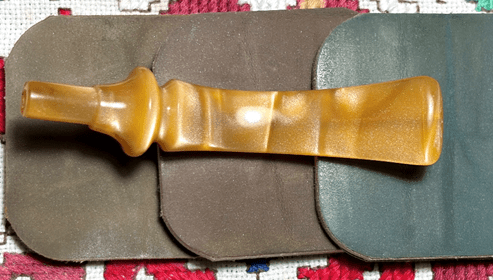
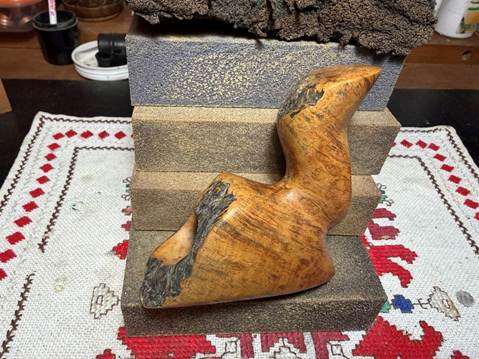
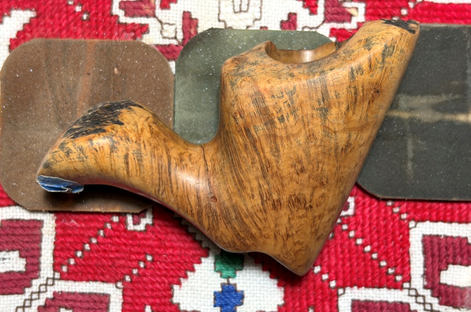
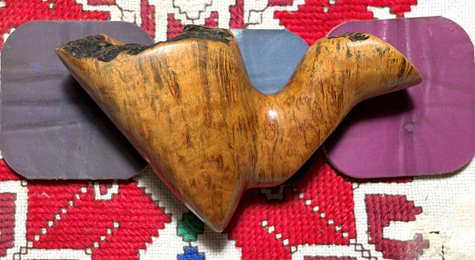
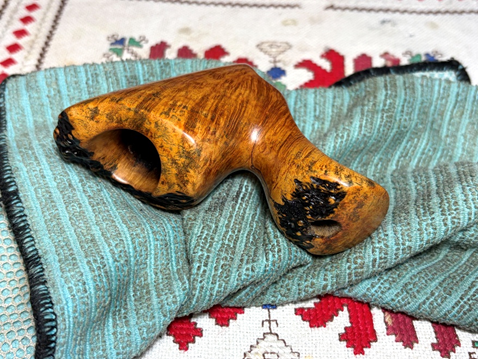
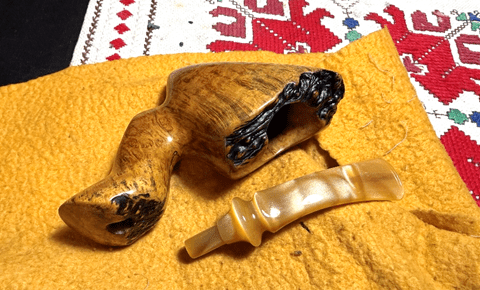
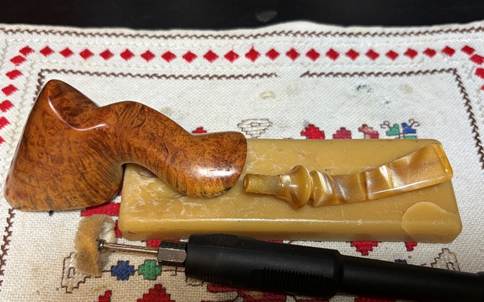
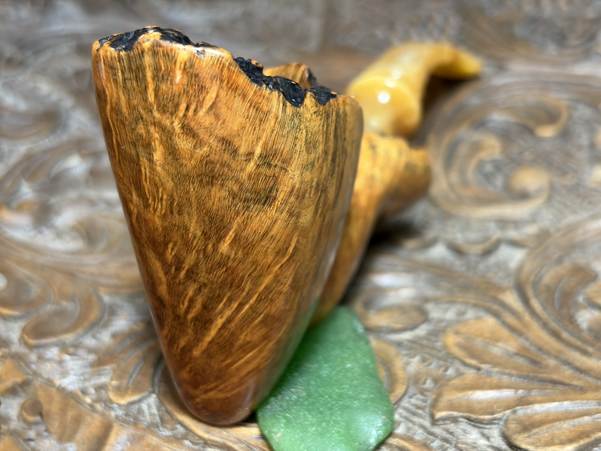
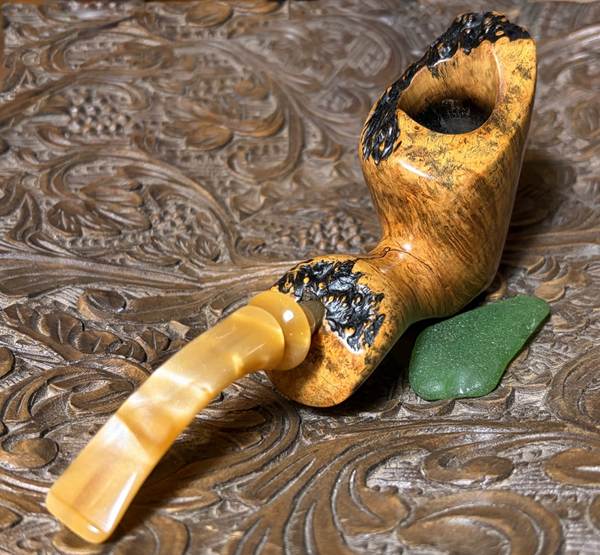
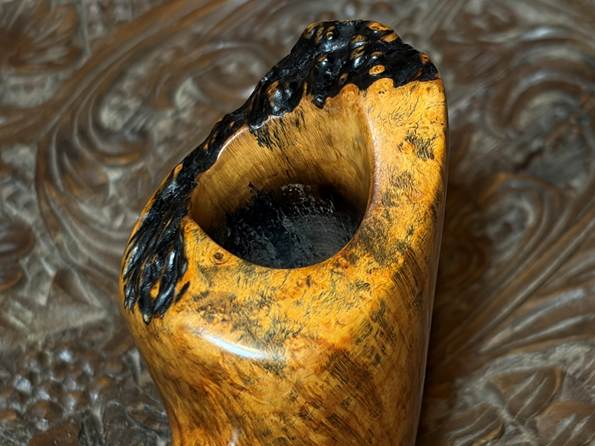
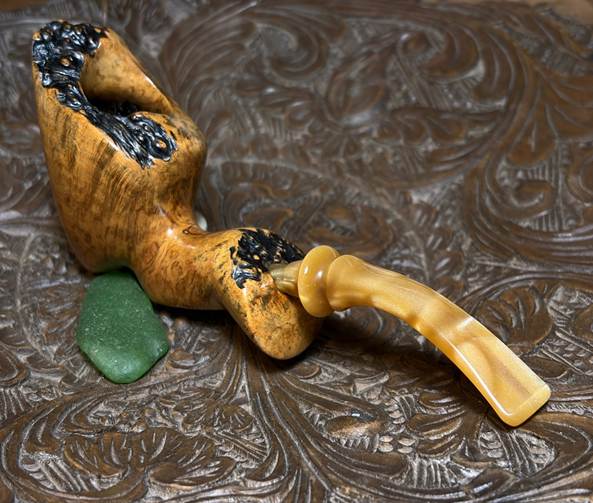
The wounded Nørding that got Chip’s attention has nice dimensions: Length: 6 inches, Height: 2 3/4 inches, Plateau width: 1 1/2 inches, Chamber width: 3/4 inches, Chamber depth 1 3/4 inches. It is next on the worktable and here are pictures.
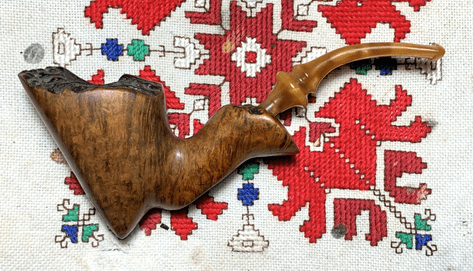
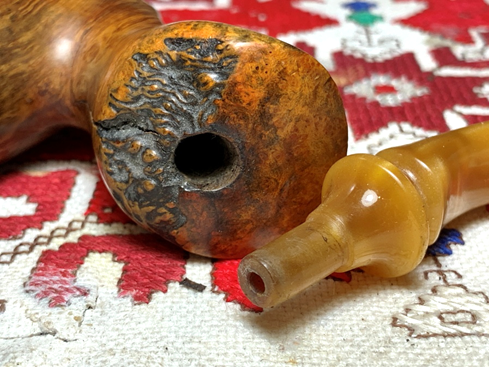
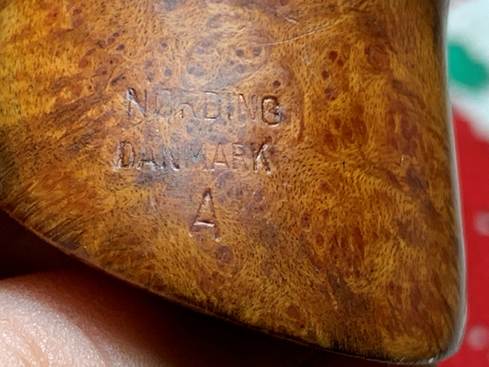
The nomenclature is stamped inverted on the back of the shank near the shank plateau: NØRDING [over] DANMARK [over] A.
The Erik Nørding story is an interesting one and it continues today. According to the Nørding Denmark website (Nørdingpipes.com/our-story) Erik Nørding was 86 years old in 2025 and continues to be active but has downsized his personal production and is enjoying life in his cottage. Bravo! He continues to enjoy life and makes some high-grade handmade pipes of his own. If my math is correct, he was born in 1939. The legacy of the Nørding story continues to the following generations with his son, Knud and grandson, Victor.
Pipedia’s Nørding article (Nørding – Pipedia) begins with this summary:
Erik Nørding was born in Copenhagen, Denmark. Originally educated in engineering. Pipe carving began as a hobby, but as time went by, he became more interested in pipe making as a profession. During the last 40 years Erik Nørding has built his own business, which today produces approximately 50.000 pipes a year, 90% of which are for the export market. From pipe design innovations to knife making to custom machinery and barbecue cookery, Erik Nørding´s inventiveness keeps expanding.
A blacksmith and engineer, Nørding knows his way around pipe making machinery. Strangely, it was not his love for woodworking that propelled Erik Nørding into the pipe making field — it was his terrific facility with machines.

Erik Nørding
Pipedia’s Nørding article also has an excellent interview by Chuck Stanion which was done in 2002 that describes the development of Erik’s passion for pipe making. The story is interesting and it begins with Erik reflecting on his beginnings and how he developed from a young blacksmith into one of Denmark’s best-known pipe makers. After his father — a blacksmith, engineer, and factory owner — died when Erik was 16, his mother pushed him to study engineering so he could eventually run the family razor blade and garden tool factory. Although he completed his engineering education, he lost interest in the factory after discovering pipe making, which he found far more creative and rewarding. He began smoking pipes as a teenager after his mother unsuccessfully tried to discourage him by making him smoke cigarettes. His father, a pipe smoker himself, taught him how to properly enjoy a pipe, helping create a lifelong love of pipe smoking and eventually pipe making.
The article continues with the strategic relationship developing with Skovbo when Nørding was 25 years old in 1964. He completed his first major job by building pipe-making machinery for the repairman Skovbo, expecting to be paid for the work. When the machines were finished, however, Skovbo admitted he had no money to pay him. Nørding, frustrated because he had invested borrowed money and hard work into the project, refused to hand over the equipment without payment and declared that he would simply use the machinery to make pipes himself.
Skovbo argued that Nørding knew nothing about pipe making, but after discussing the situation, he proposed that they go into business together instead. That unexpected partnership marked the beginning of Erik Nørding’s career as a pipe maker and the new company called “SON” which was the combination of both their names. The partnership only lasted a few years when Skovbo backed out of the arrangement. It was in the mid-1960s that Erik changed the company’s name to Nørding.
The Pipedia article describes the Nørding grades: Nørding’s were exclusively freehand shapes, graded from A, B, C, D, up to its highest grade, extra. Later an “F” grade was added — less expensive than the “A.”
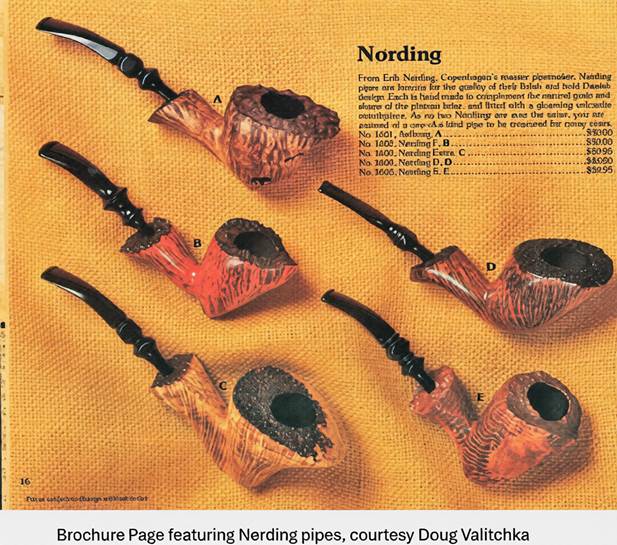
It is interesting to note that our “A” was among the more ‘economical’ Freehands Nørding produced. The grades increased in quality with ‘A’ being the lowest until the odd ‘F’ was introduced which was a bit more economical than the ‘A’. In the ad above the pipes are identified in bold text as A to E for the ad, but the Nørding grades are listed in regular text.
Pipe A: Aalborg (Nørding sub brand) – $30
Pipe B: F, B – $50
Pipe C: Nørding Extra – $69.95
Pipe D: Nørding D – $45
Pipe E: Nørding S – $39.95
This gives an idea of different values of the different lines. Our ‘A’ is not listed in this ad, and unfortunately, we have no date for the ad to be able to get an idea what our pipe would have cost in that period. With our pipe stamped with the Nørding name we know that it was produced no earlier than the mid-60s. When it was produced from that period to present, we can’t say for sure based upon the information I’ve seen, but my guess is that it was most likely produced during the heyday of Nørding pipe production – 70s to 80s. From the Pipedia article:
Consumer interest in Danish freehand pipes helped Nørding expand throughout the 1970s and early ’80´s. “They were easier for me to carve,” he says, “because nobody in those days knew the free-hands. We were making thousands and thousands of those.” The Nørding factory at that time reached its peak production, and Nørding employed 52 workers.
We have one more question regarding the COM of our Nørding: DANMARK, not the spelling that we’re used to: Denmark. On a previous project working on a Prince Amled (The First of Four Gifts From Bulgaria: A Prince Amled Danmark Freehand Pickaxe) it too, was stamped: DANMARK. This is what I discovered in that project:
There is one interesting characteristic of our Prince Amled Freehand that I found in no other example of Prince Amled on Pipedia, Pipephil, Smokingpipes.com or Rebornpipes. Our COM is listed as ‘DANMARK’ not ‘DENMARK’. What I know generally is that Danmark is how the Danish would spell their country. ‘Denmark’ is an anglicized version. But what could this mean? I have my ideas, that the ‘Denmark’ COMs were for export and ‘Danmark’ was for local distribution. I decided to ask ChatGPT. This is what it said:
When a Prince Amled pipe (or others from mid-century Danish production) is stamped “Danmark” rather than “Denmark,” it typically means one of two things:
- It was made for domestic or European sale, not for export to English-speaking markets.
- “Danmark” is simply the Danish spelling of the country’s name
- Danish-language stamps were common on pipes sold within Scandinavia or continental Europe.
- It could indicate a smaller or independent Danish maker, using local stampings instead of export-standard ones.
- Some smaller workshops used “Danmark” stamps in the 1950s–1970s before exporting became a priority or before they had English dies made.
- So your pipe was definitely Danish but likely intended for sale in Denmark or nearby countries, not the U.S. or U.K. market.
To add a small nuance: during the mid-century Danish pipe boom (roughly the 1940s–1970s), larger brands like Stanwell, Kriswill, and Bari typically used “Denmark” on pieces meant for export, while “Danmark” often appeared on pipes that stayed within Scandinavia or continental Europe.
In the Pipedia introduction above, it described that Nørding produced about 50K pipes per year and about 90% of those would be for export. With the Danmark COM stamping, we can assume that this pipe was among the 10% that stayed closer to home. If this Nørding could talk, it would be interesting to know how and when he crossed the pond and made it to the U.S. and eventually to pipeman Ron in Colorado!
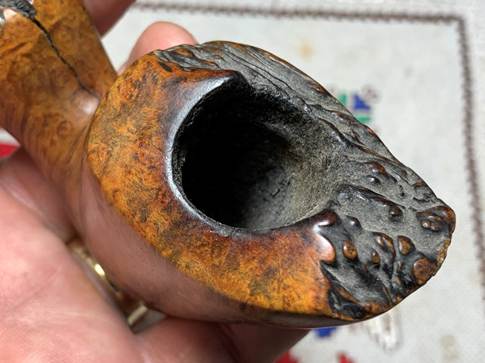
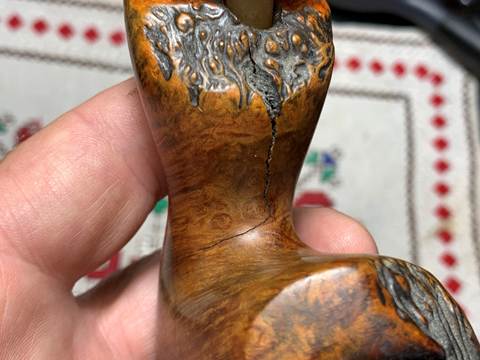
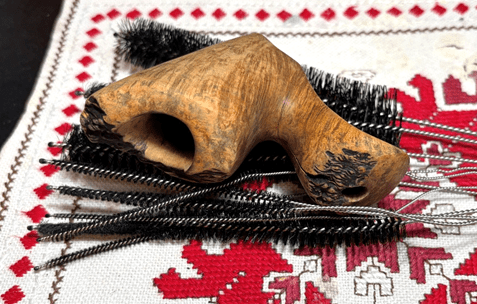
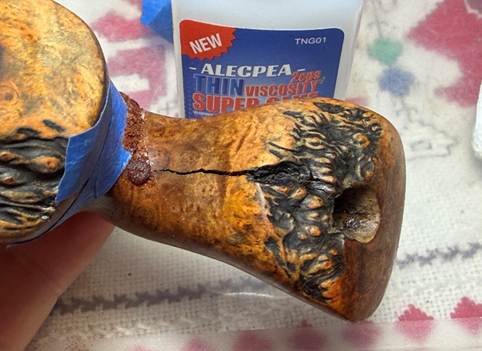
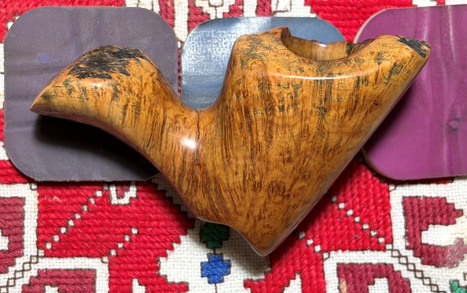
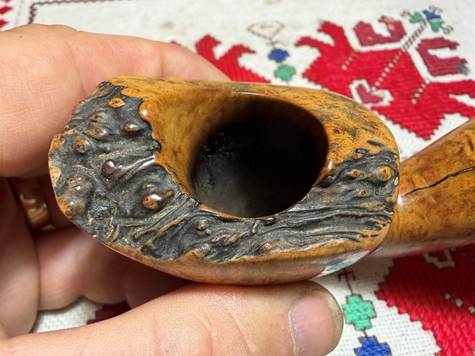
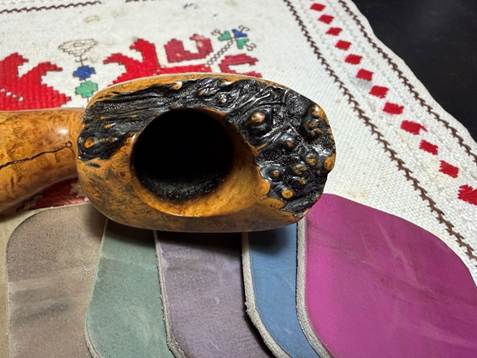
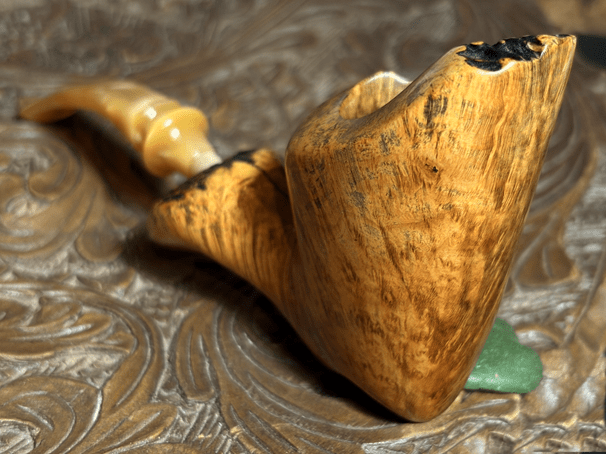
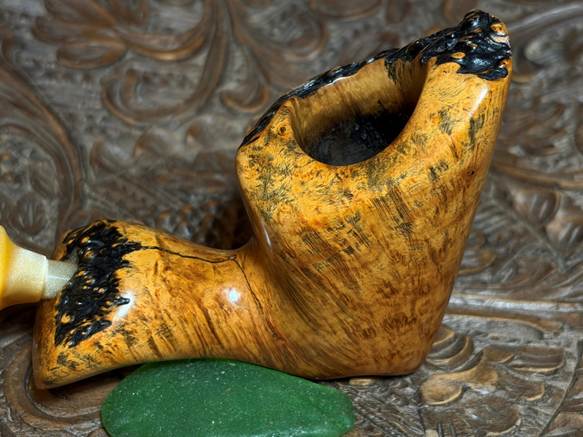
With a better appreciation for the Nørding Danmark A on the worktable it’s time to look more at the pipe itself. The elephant in the room regarding this Freehand is the huge crack. Here are some additional close up pictures of the crack before the general cleaning which I like to do first. More details will be coming later about this repair.
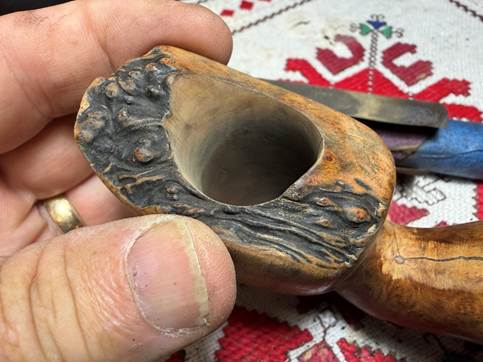
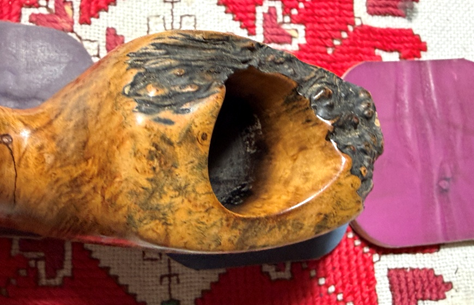
The chamber has moderate cake build up that needs to be cleared to inspect the briar and to allow the new steward to create a new protective cake. A cake needs only to be about the width of a US dime.
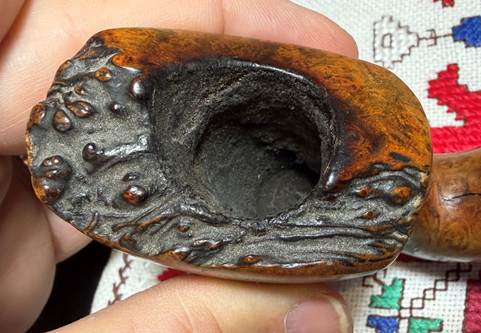
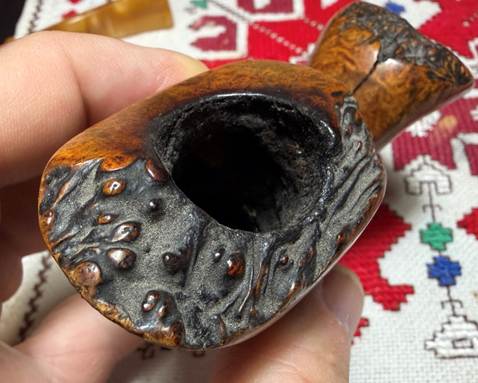
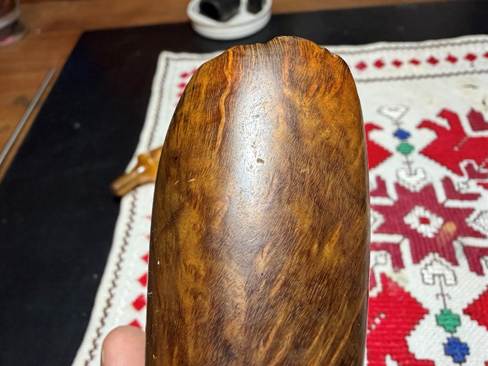
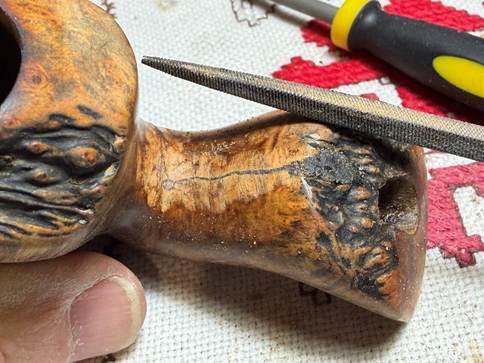
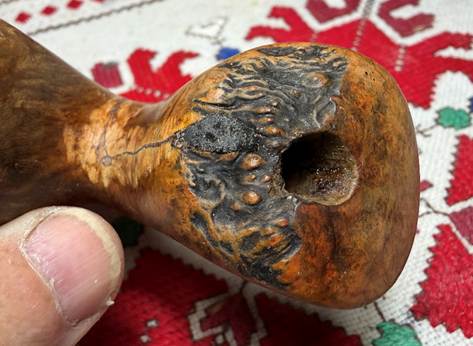
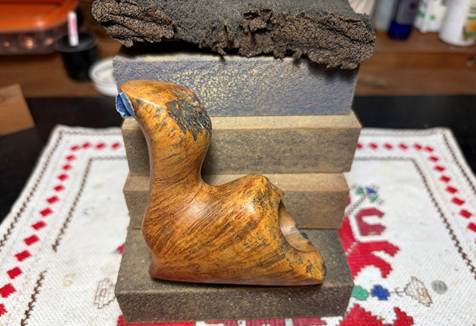
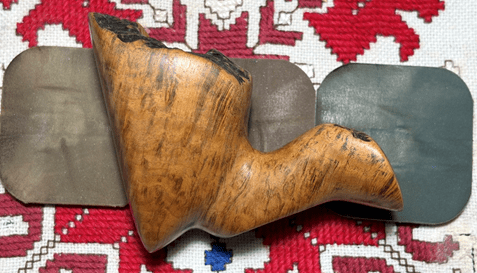
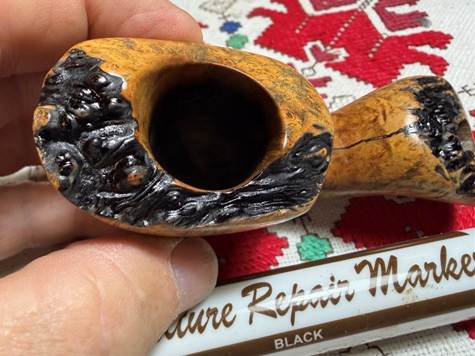
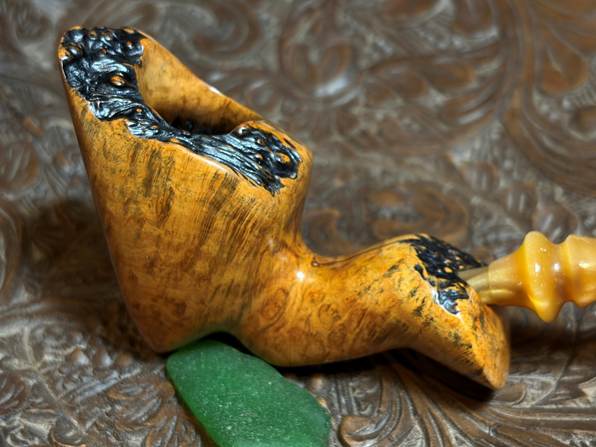
The plateaus on this Freehand are unique in that each displays the rough bark on roughly half of the plateau surface – both the bowl plateau and the shank plateau. Both plateaus are grimy and in need of cleaning. The crack that crawls through the shank plateau will also be addressed.
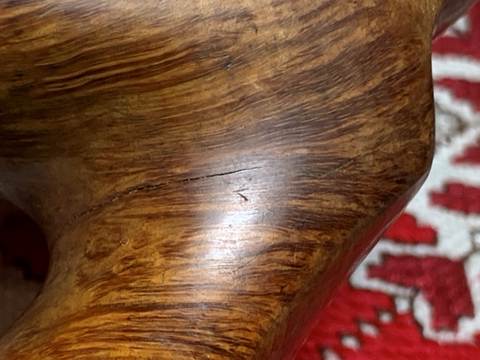
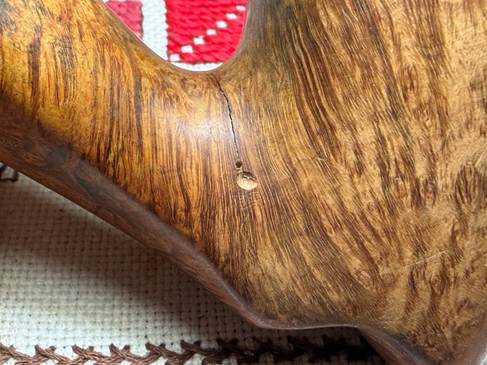
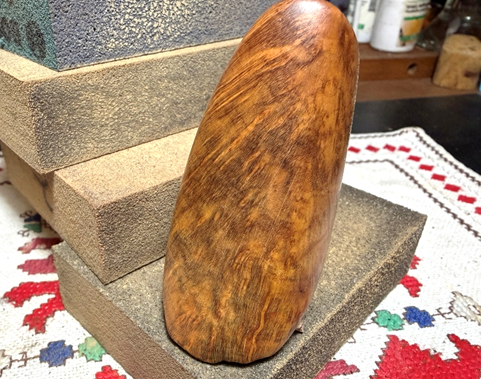
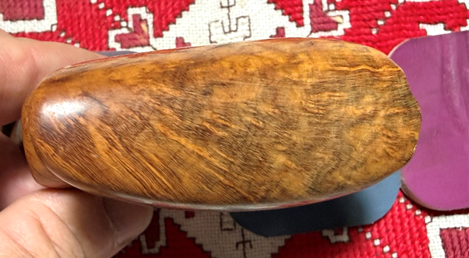
The smooth briar surface of the stummel has normal imperfections from wear – scratches and dents here and there.
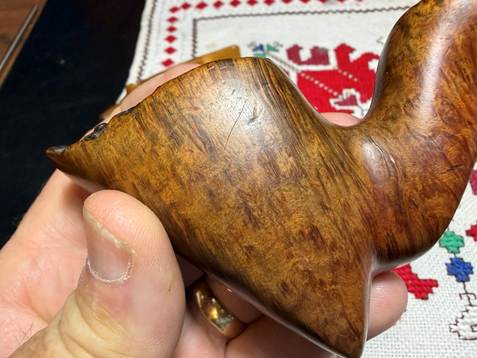
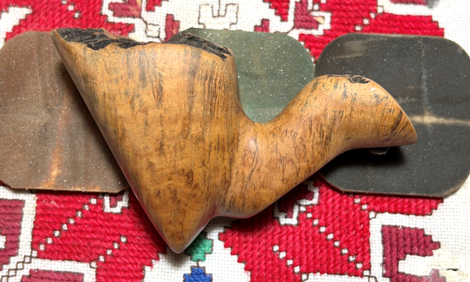
The lower left side of the shank has a deeper dent that will be assessed.
The smooth briar side of the plateau shows darker charring along the edge and grime discoloration on the surface.

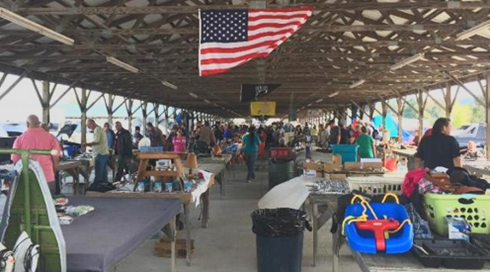
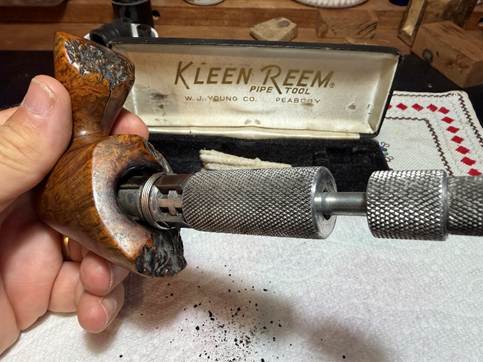
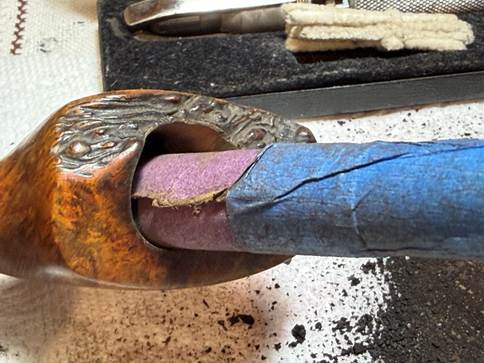
To begin, the chamber is reamed to clear away the carbon cake buildup. The chamber of this Freehand is a conical chamber which tapers with more angle that classical shaped stummels. For this reason, the Kleen Reem Pipe Tool is used rather than my usual reaming kit. I found this old boy in 2018 at a flea market in Summerset, Kentucky. After poking through 100s of tables, I found the Kleen Reem Tool waiting for me.
The tool has 3 heavy cutting blade arms that expand as the knob on the end is turned. This enables the Tool to navigate the canted chamber. As the knob is turned and the arms expand, they hug the surface nicely as the blades rotate upwardly.
Following the Kleen Reem Pipe Tool, the chamber is scraped using the Savinelli Fitsall Tool.
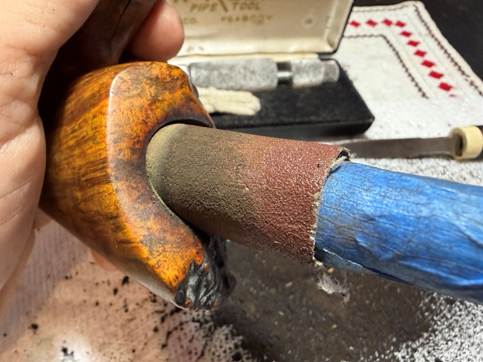
Finally, the chamber is sanded. First, to help clean the ‘Steward’s Peek’ a coarse 120 grit paper wrapped around the dowel rod is used. The coarser paper does a good job cleaning the char stain to allow the grain to be visible.
Next, the chamber is sanded with 220 grit paper around the dowel to clean more and to smooth the briar.
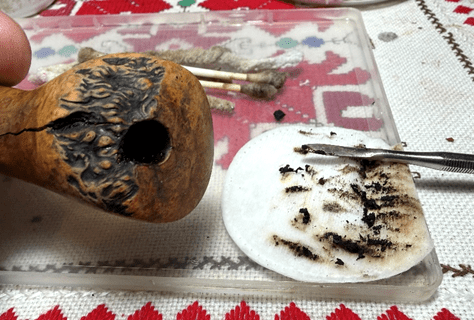
The picture shows the decent pipe of cake remove and the tools used.
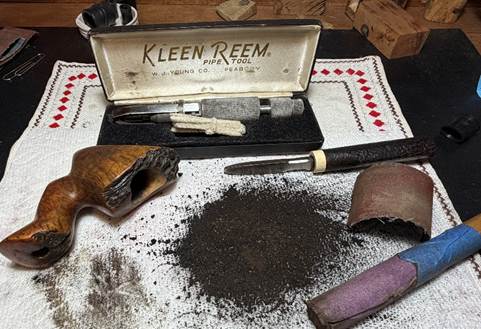
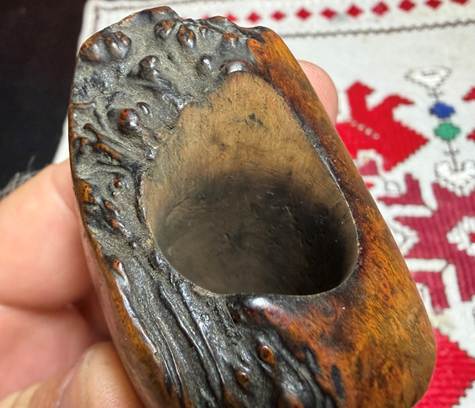
The chamber looks good – no heating issues.
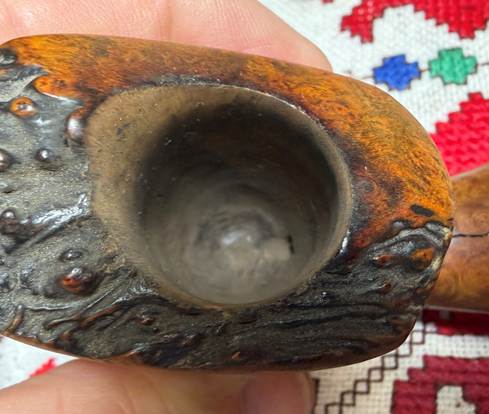
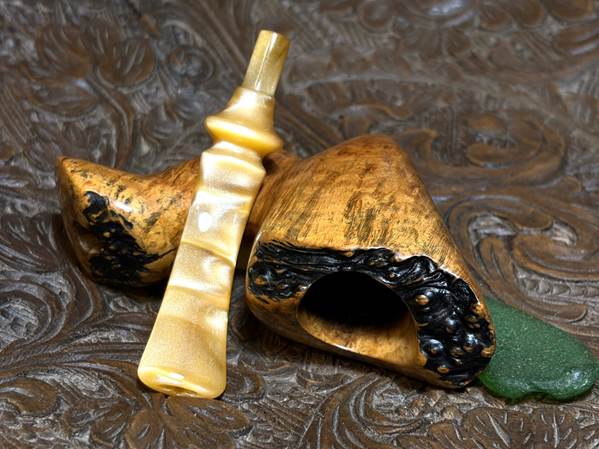
The Steward’s Peek starts to emerge as well. It’s always a surprise what the Peek vies will reveal.
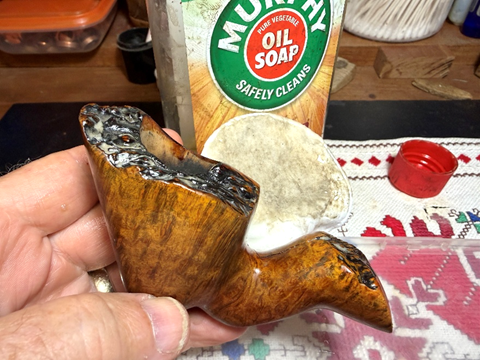
Next, the external briar and plateaus are scrubbed using undiluted Murphy Oil Soap with a cotton pad.
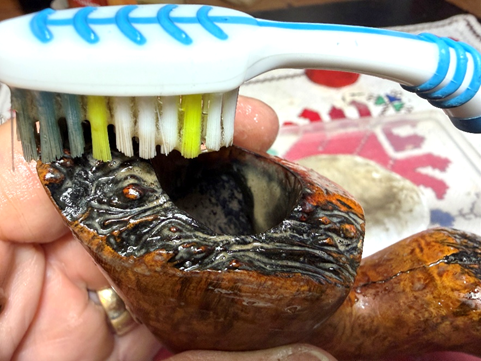
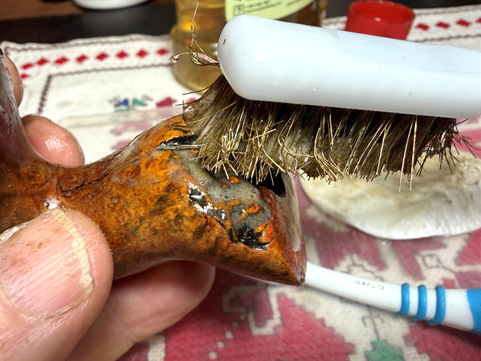
The plateaus are scrubbed first with a bristled toothbrush then a soft brass brush which adds some muscle to the cleaning.
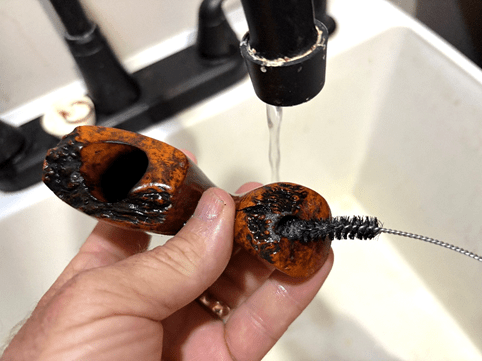
The stummel is then taken to the utility sink and the internal briar is scrubbed with hottish water, shank brushes and liquid, anti-oil dishwashing soap. I use Dawn soap. After scrubbing, the stummel is rinsed thoroughly and returned to the worktable.
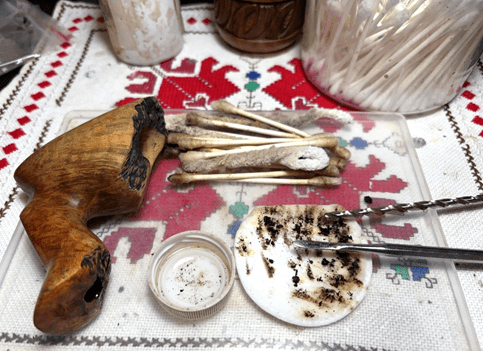
The internal cleaning continues with pipe cleaners and cotton buds moistened with isopropyl 99% alcohol. A small dental spoon is used to scrape the mortise walls.
A 4mm drill is also used to clean the airway. The 4mm diameter is the same size as the airway drilling. When the bit is rotated in the airway, it scrapes the briar which helps to clean things up.
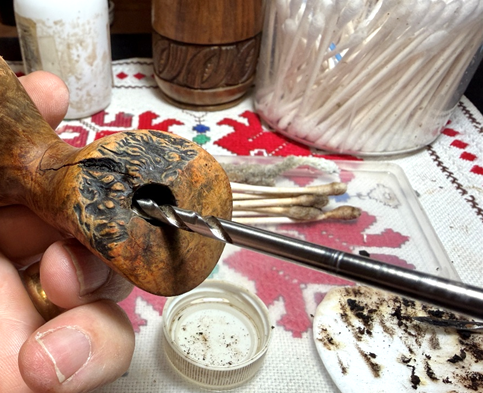
When the buds and cleaners emerge lighter, it’s time to move on.
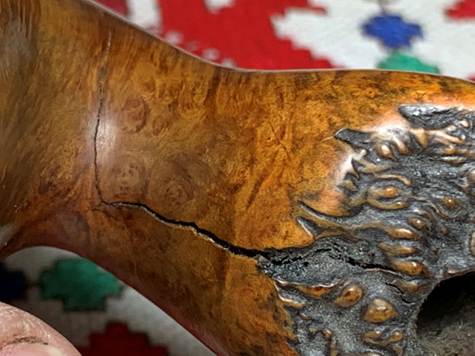
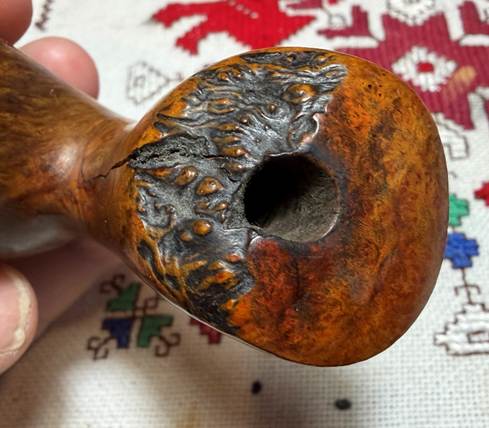
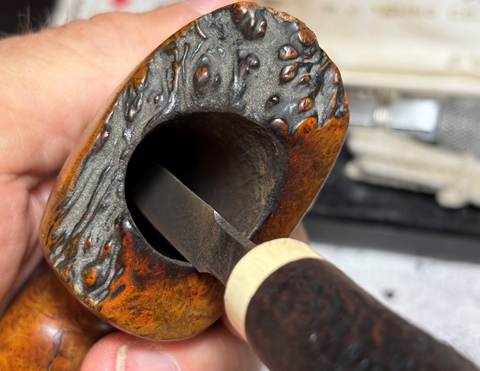
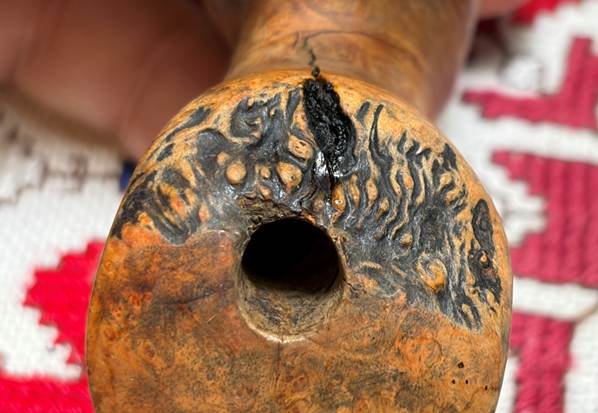
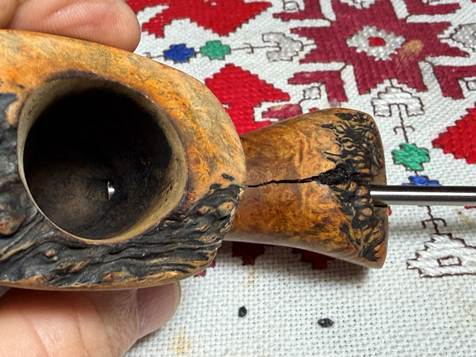
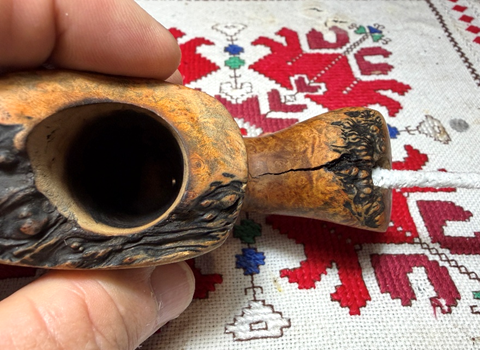
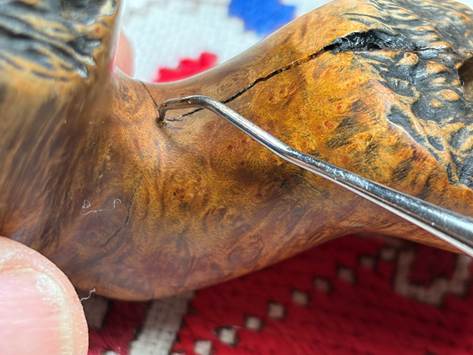
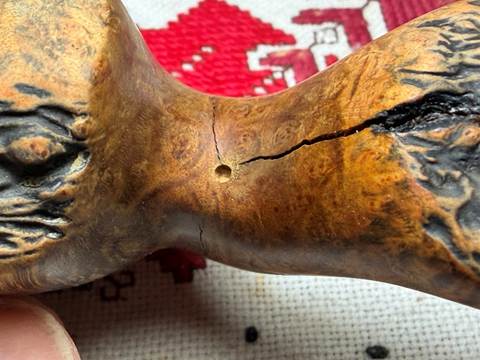
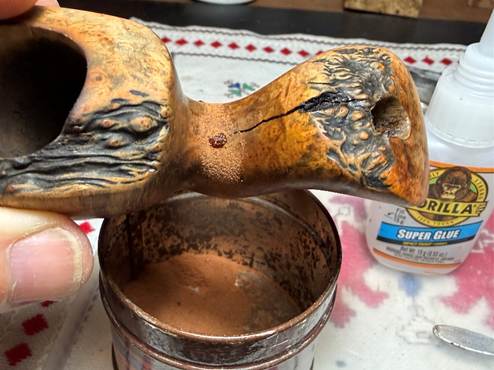
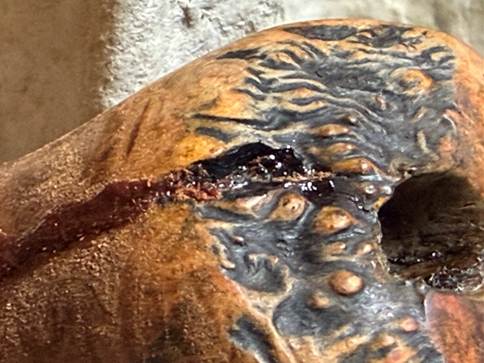
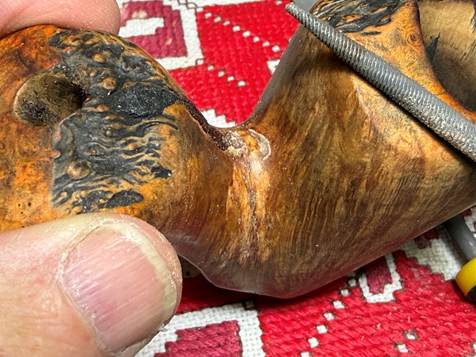
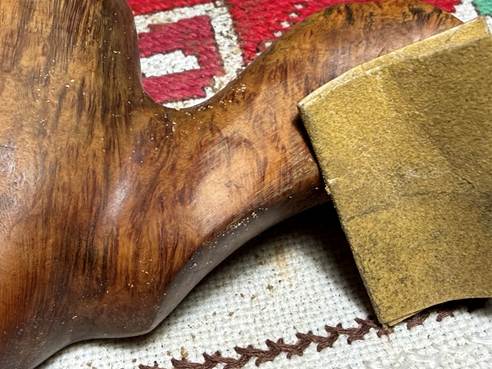
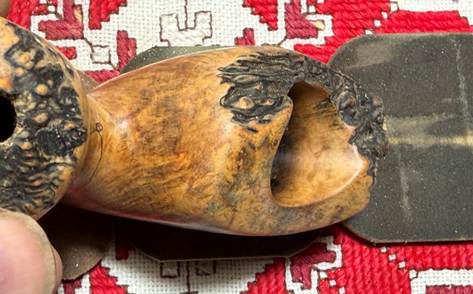
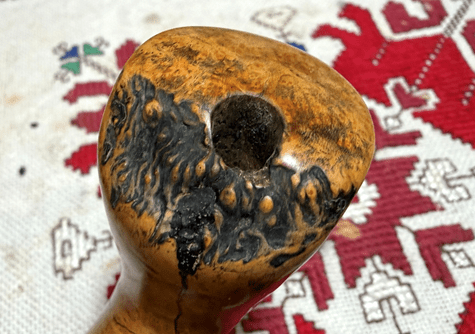
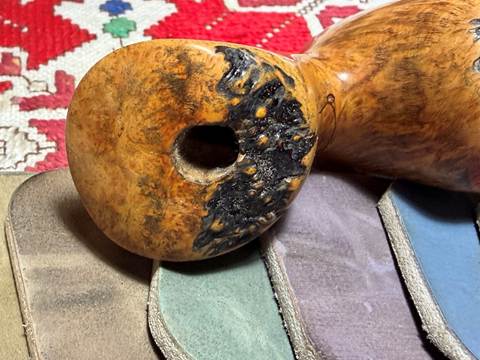
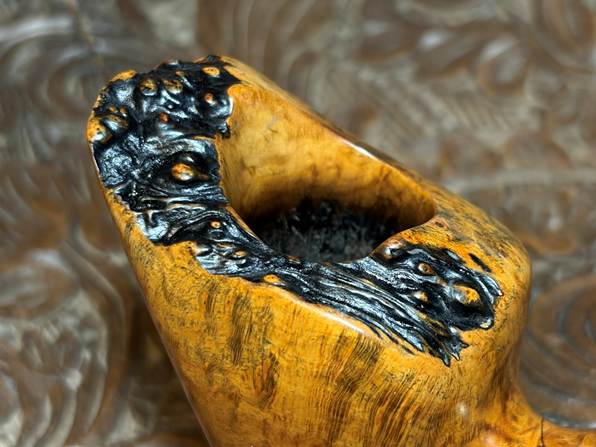
With the stummel cleaned, it’s time to take a closer look at the mother of all cracks. The crack obviously came from the acrylic stem tenon seated in the mortise. However pipeman Ron did it, what happened is that the stem end was flexed downwardly which forced the tenon in the mortise to push upwardly. The force was sufficient to start the crack at the end of the shank. The crack was guided down the top of the shank finding the path of least resistance. The epicenter of the crack can be made out inside the mortise as it climbs through the rough bark of the plateau. Using a sharp dental probe I could feel the ‘bump’ of the crack traveling down the top of the mortise. Yep, the crack goes all the way through but probably not too far down the mortise.
The force beneath the plateau caused a briar to chip out. It looks like a pretty decent divot in the bark.
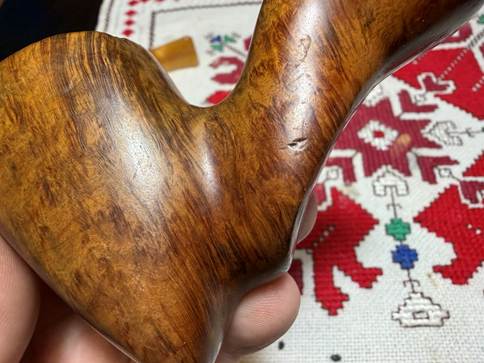
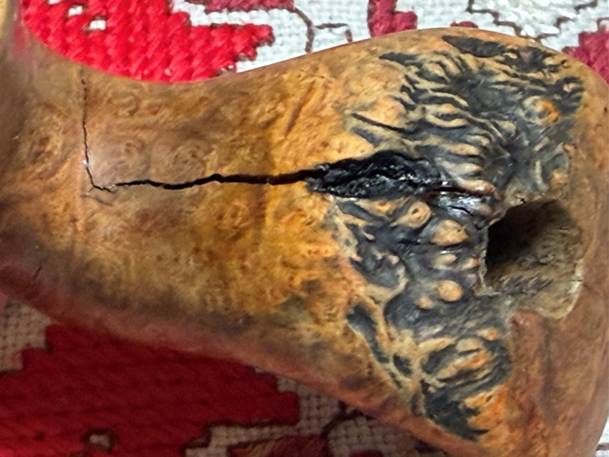
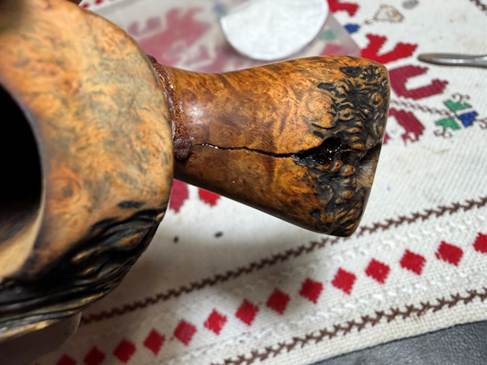
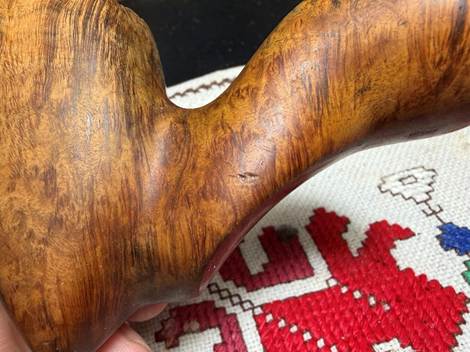
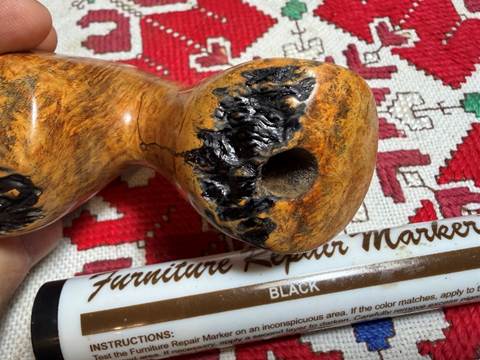
The next picture shows the widened gap at the top of crack and narrowing as it flows to the crook where the bowl and shank come together. At that point the crack take a right turn traveling down the side.
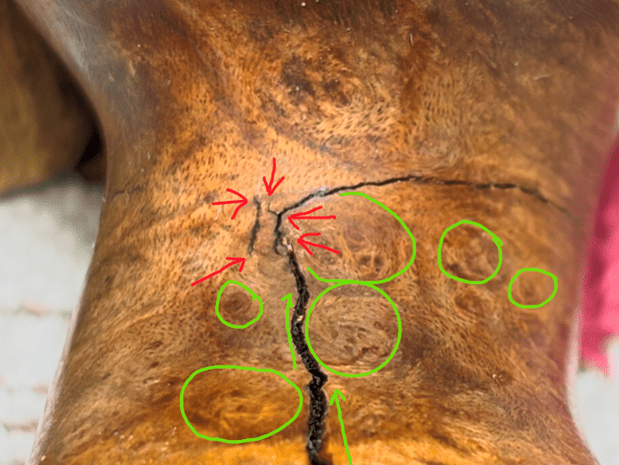
The following two pictures fascinate me because we are able to see the anatomy of a crack which one might miss just looking at the next picture.
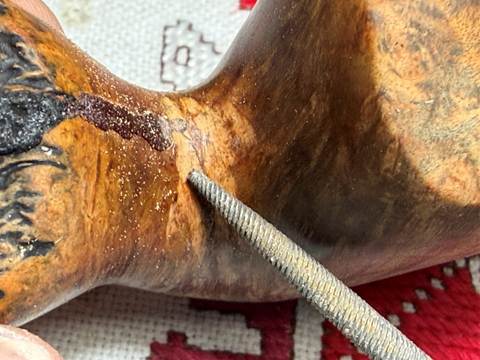
Earlier I described the movement of the crack as following the path of least resistance. The green arrows and circles below illustrate what happened. The green circles are circling what we call Bird’s Eye grain. When we look at the side of the shank you will see very distinctive vertical grain. Bird’s Eye grain is when you cut the vertical grain perpendicularly the perspective of the vertical grain changes to Bird’s Eye – same grain pattern but looking at it from a different perspective. If you had a regular yard hose dangling from your hand (vertical grain) and cut it in two, looking down at the end of the hose would be a ‘Bird’s Eye’ perspective. The crack flows around these bird’s eye patterns like a stream around rocks. When it takes it’s right turn, it transitions to following the vertical grain down which is like a stream without rocks. As part of the repair, to keep the crack from expanding a ‘counter-creep’ hole is drilled at the terminus point of the crack. In this case, cracks…. At the fulcrum of the crack, like water hitting a sharp turn, the crack splinters out (you can tell I live in Colorado where we have fast running streams coming out of the mountains!). The arrows are pointing at spots where I think a counter-creep hole could be drilled if I had small enough bits. This area is so small that a magnifying glass is used to help me see the crack closely. In the end, one counter-creep will be sufficient at the fulcrum of all the red arrows. I’ll start with the main points and see how it goes.
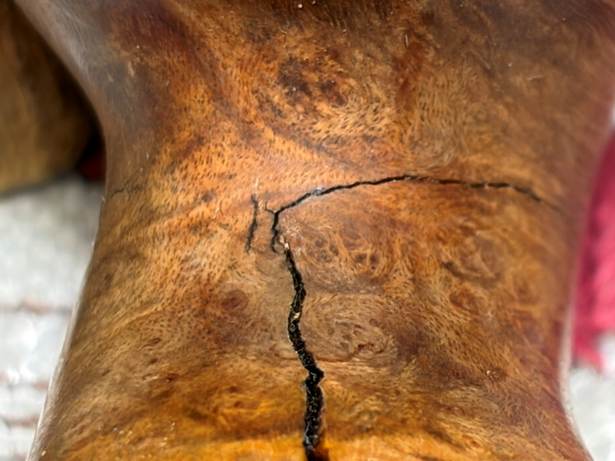
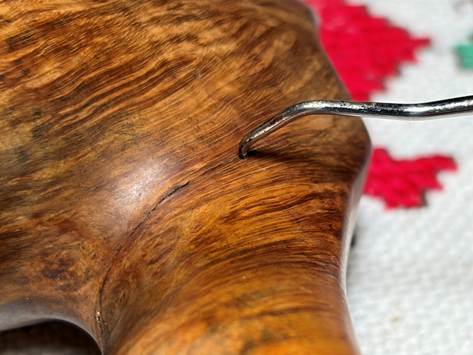
As the crack turns right it thins to hair width flowing with the vertical grain. This is the kind of grain that will most assuredly continue to creep.
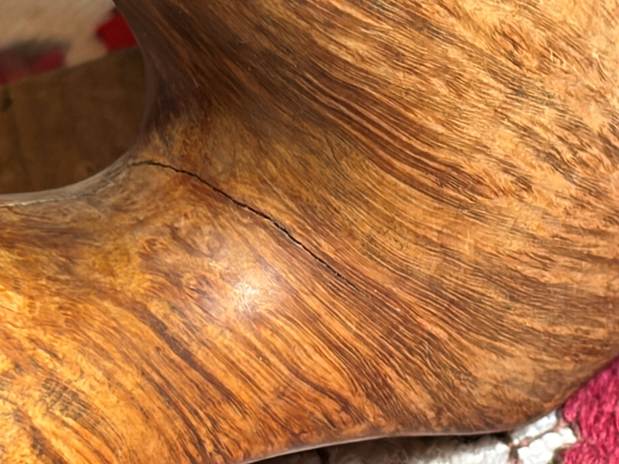
This crack will continue to creep if not arrested with a counter-creep hole. The arrow is pointing at what I think is the end of the crack.

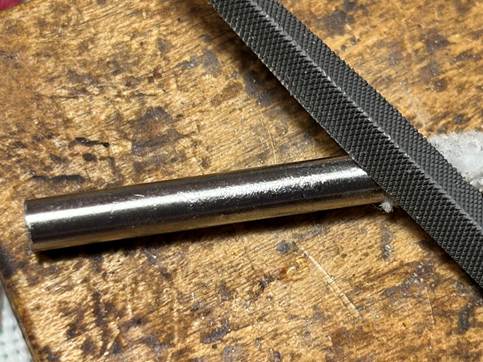
Since this is the ‘mother of all cracks’ I reached out to Steve Laug with his vast www.Rebornpipes.com experience to see if he could add any insight to how to approach this crack. Steve suggested using a metal or Delrin tube to insert down the mortise to reinforce the shank from the inside. It would be like creating a new vertebrae to support the whole structure. This was a great suggestion that I had not thought of. I have used this approach in other projects but only when the shank had fully broken off. He gave me a thumbs up on all that I had described to him focusing on the external crack – drilling counter sink holes and filling these with CA glue as well as lining the crack with CA and briar dust to help with blending cosmetically. Before dealing with the external crack, a 4mm stainless steel tube will be seated in the mortise and airway.
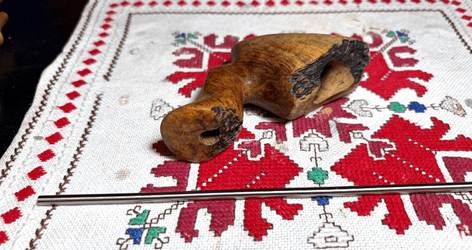
The drilling is also 4mm, so the tube slides in with a little gentle rotation.
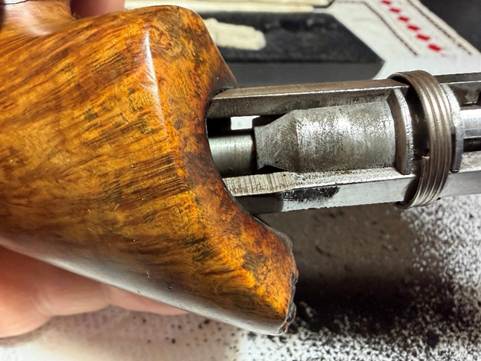
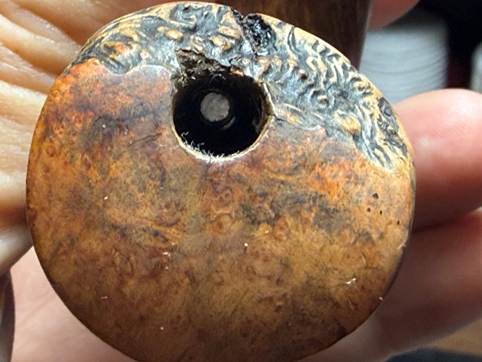
The first question is how long the tube should be? The mortise is drilled larger than the airway. This picture shows the change in diameter as the airway begins. There is a small ledge where this transition happens. The photo is lightened so that this ledge is visible. The distance from this ledge down to the draft hole opening is the length I’m shooting for.

To begin the measurement for the length of the tube, the 4mm tube extends to the draft hole but not protruding through. The tube shouldn’t be visible at the floor of the chamber. A piece of tape is then placed on the tube at the mortise opening.

Next, using a stiff wire, the end of the wire is butt up against the ledge where the airway begins after the mortise. A piece of tape is placed on the wire again at the mortise opening.
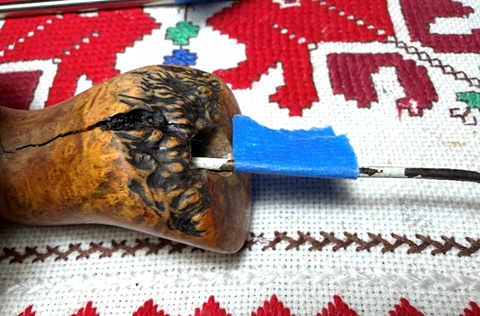
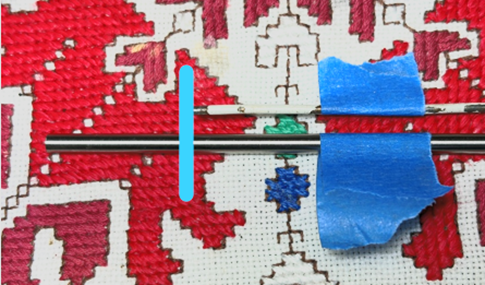
Here are the two measurements. The marked portion of the stiff wire represents the length of the mortise that needs to be removed from the 4mm stainless steel tube beneath. The blue mark is where I need to cut to leave the tube the length from the beginning of the airway to the draft hole.
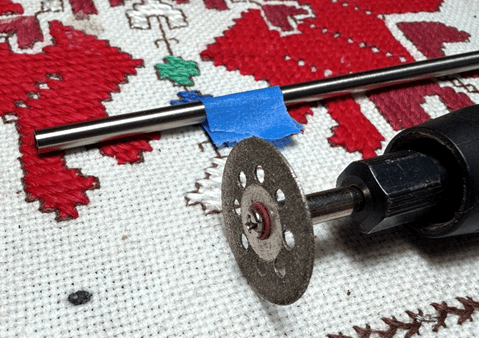
The diamond blade saw is mounted on the rotary tool, and the tube is cuts.
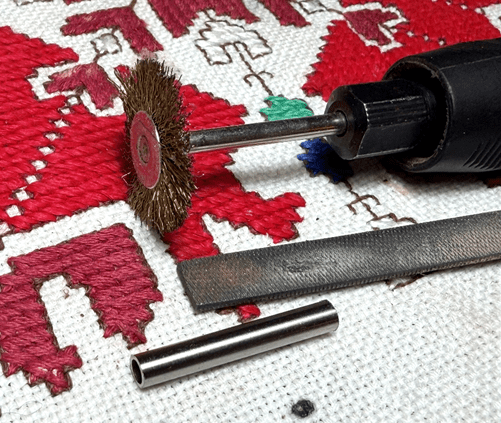
The ends of the tube are filed and buffed with a brass brush to remove any sharp edges left over from the cutting.
The next question is how to seat the tube in the airway with CA glue and not spread glue all over the mortise? I did a good bit of thinking about this and came up with a plan. With a fluffy pipe cleaner inserted into the tube, there was enough pressure from the 4mm tube that the pipe cleaner would not easily slip through or out. With several test attempts without CA glue on the tube, I was able to successfully guide the tube through the mortise without touching the sides and docking with the airway.
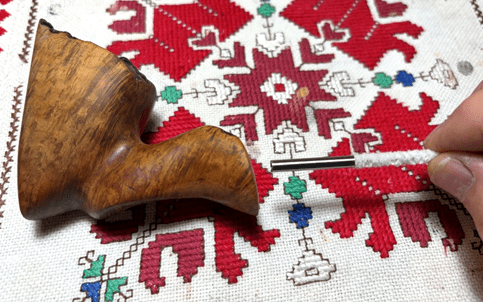
I push the tube through until it was visible at the draft hole and then slightly pull it back to hide it. My thinking is that I would place CA glue around the upper 1/3 of the tube so that when it finds the airway, there would be no glue getting in the way until after the insertion was accomplished. Then, hopefully there would be enough grip on the pipe cleaner to keep it moving down to the draft hole. Worst case scenario is that the tube is partially seated and the glue seizes!
After all the theories, plans and rehearsals, it’s showtime. To help the glue adhere to the stainless steel tube, the exterior of the tube is roughed up with the file.
Here we go. As planned, CA glue was spread over the top 1/3 of the tube – the end of the tube on the pipe cleaner. The tube was then carefully guided through the mortise and it cleanly found the airway opening. As the tube was inserted, I could feel the sluggishness of the progress when the glue started finding the wall of the airway and the cleaner started to move through the cleaner when the cleaner emerged through the draft hole and not the tube…. I wasn’t breathing…. I kept pushing the pipe cleaner and thankfully, the tube emerged and then disappeared when I pulled back slightly on the cleaner.
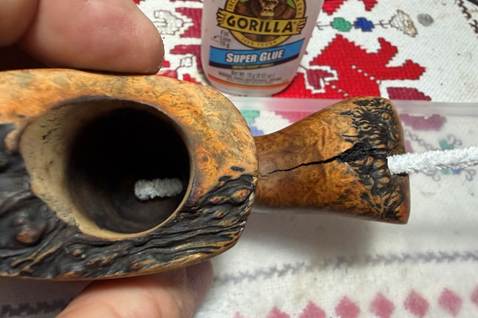
The stummel was placed in the egg carton to allow the CA glue to thoroughly cure. My hope is that tomorrow morning when I return to the worktable, the pipe cleaner will be removed without difficulty. Time to turn out the lights.
The next morning came and with a little tug the pipe cleaner dislodged from the tube. The picture below shows the tube successfully cemented in the airway which should add some support for the shank. Another pipe cleaner was inserted to make sure there were no obstacles and that there were no hang ups. There were none.
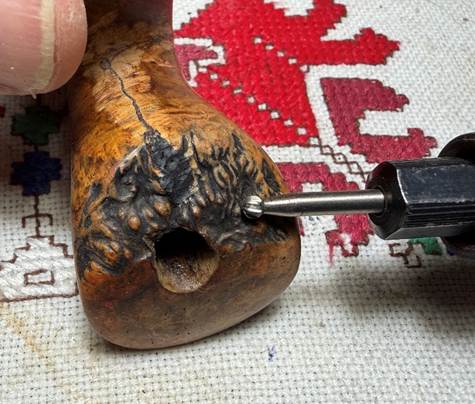
The next step in the process is to drill counter-creep holes. To help guide the 1.5mm drill bit, I identify the end points, or fulcrum in this photo, and press a guide hole using the sharp dental probe.
The second guide hole on the side of the shank running along the vertical grain took a magnifying glass to find the end point of the crack. Full disclosure: After pressing the hole you see below, I took another look in the magnifying glass and decided that I had missed the end point and pressed a second guide hole.
A 1.5mm drill bit is mounted in the rotary tool to do the job.
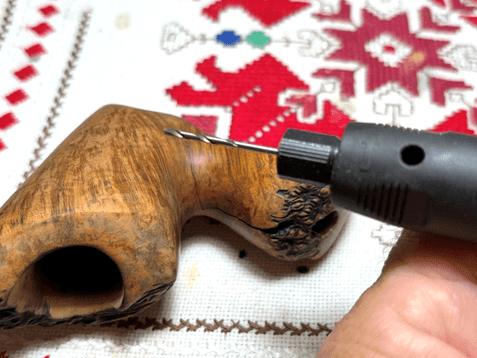
After taking deep breaths to hold the tool steady, 2 counter-creep holes are drilled. In the second picture you can see the errant guide hole which shouldn’t be an issue after the cracks are cemented.
Next, drops of clear CA glue are placed in each hole and then sprinkled with briar dust to help with blending. The stummel is put aside allowing these initial patches to fully cure.
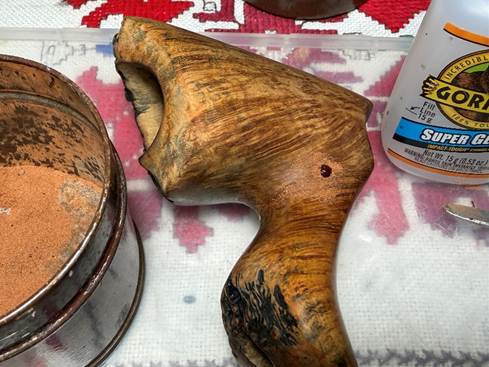
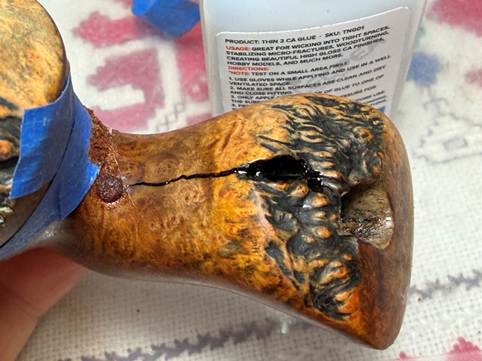
The counter-creep hole fills have cured. I had to wait a bit for a bottle of new glue to arrive before continuing with the crack repair. I ordered extra thin CA glue to apply to the cracks so that the thin viscosity allows the glue to penetrate more – to get down deeper to create a firmer foundation. That’s the good part. The bad part is that thin CA glue runs all over the place – it seems like its thinner than water. This time around using thin CA, I came up with the idea of putting painters’ tape along each side of the crack to corral any overrun that might happen.
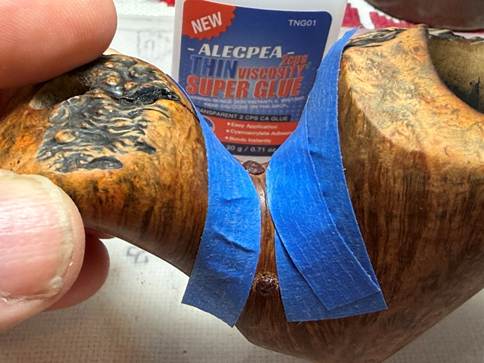
The CA glue came with a long spout applicator which helps to control the outflow. All is ready.

I was pleased and surprised how the thin CA glue behaved between the tape. Glue was applied a bit at a time starting at the top of the crack and then worked down.
It doesn’t take long for this glue to set up. A second application of thin CA was followed quickly by sprinkling the area with briar dust to help with blending.
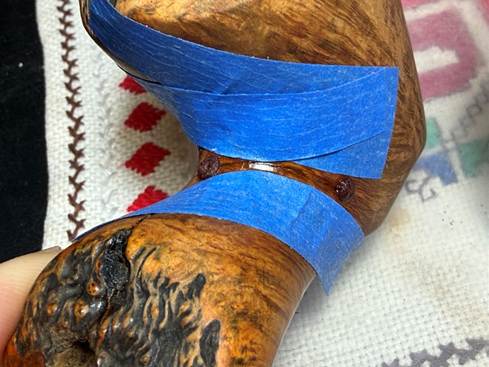
Next, the thin CA glue will be applied to the plateau and large crack. The goal is that the thin CA is able to seep down more deeply to help created a strong foundation.
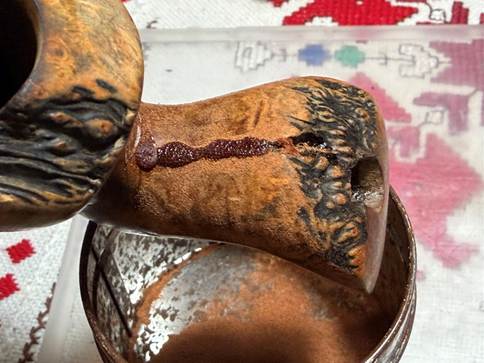
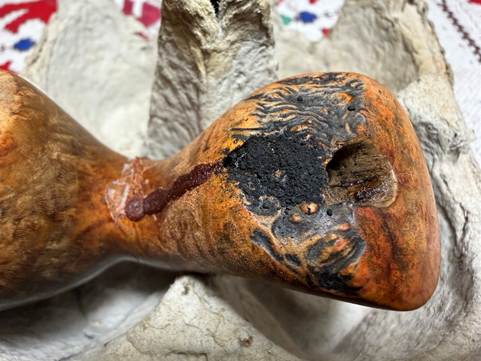
The long spout is placed in the large chip in the plateau which seems to be a good place for the flow to seep into the crack towards the shank facing. When I filled the chip with thin CA I had the satisfaction of seeing the glue go down as it disappeared into the lower regions of the plateau.
I filled the chip again a second time and something happened I wasn’t expecting. The flow of the CA glue ran down the main crack all the way to the counter-creep hole fill. You can see the reflection of the glue in the picture below. This was great because the glue seeped into the crack filling in deeper below the surface of the visible crack.
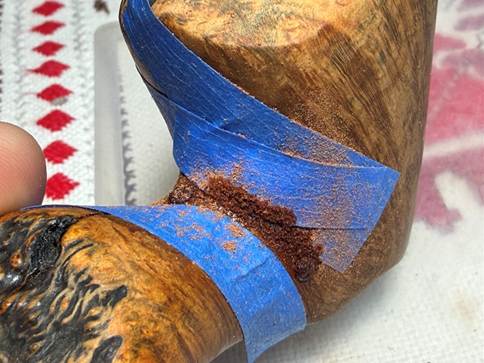
The main crack has not totally filled with the thin CA which is what I wanted. There is still a gap in the crack leaving room for regular CA glue. Regular clear CA glue is lined down the crack. After a small wait allowing the glue to settle, briar dust is then sprinkled to help with blending. The briar dust helps with blending, but this crack is too large to hide. It will be visible and this will be his badge of honor to have overcome.
I intentionally did not fill the chip in the plateau. The briar dust patching will be brown, but I want a black matte finish in the plateau.
To do this, a small amount of regular CA glue and activated charcoal are mixed on scotch tape on the plastic work pad. The tape helps with cleanup later.
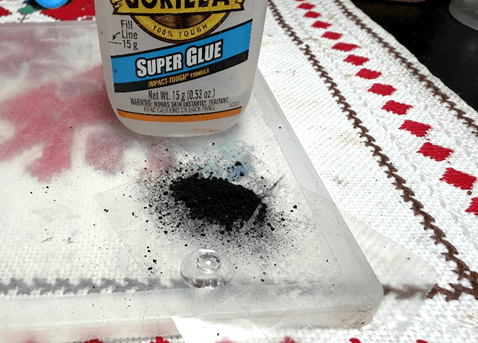
A toothpick is used to do the mixing. I mix a bit more charcoal in than usual because I do not want a shiny finish. When the mixture seem right, the toothpick trowels the mix and fills the chip in the plateau.
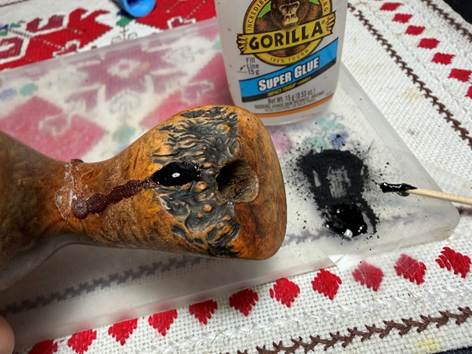
The wet patch is then sprinkled with some of the activated charcoal. The patching is done. Sanding will be later. Now, the stummel is put aside to allow the patching to cure.
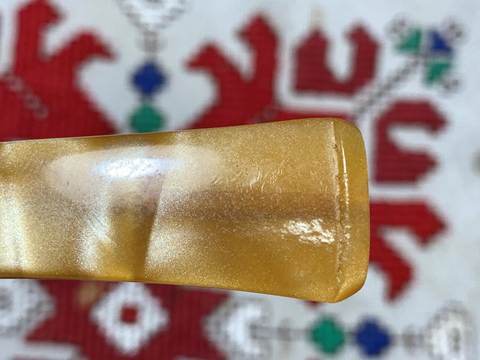
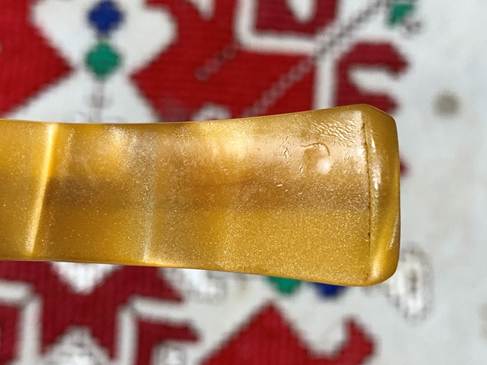
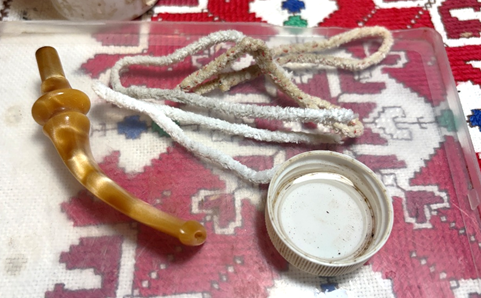
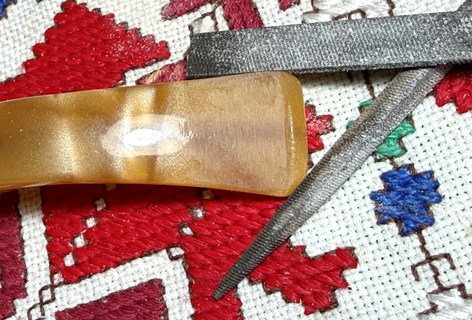
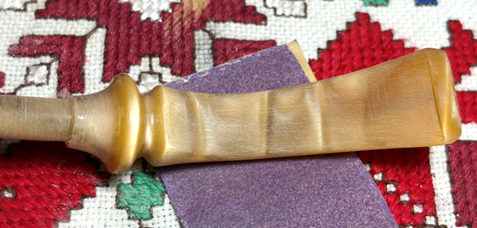
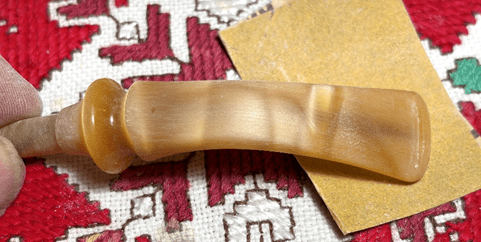
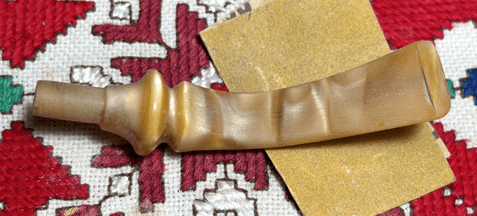
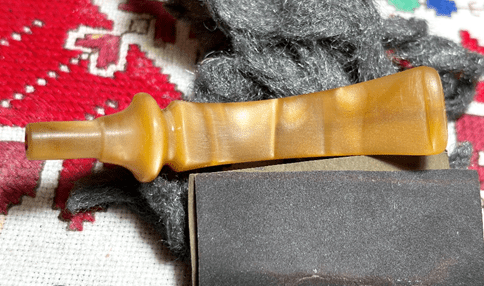
The focus is switched to the stem. The honey hued marmalade acrylic stem is a nice looking fancy stem. To start, the stem is cleaned with regular and bristled pipe cleaners moistened with isopropyl 99% alcohol.
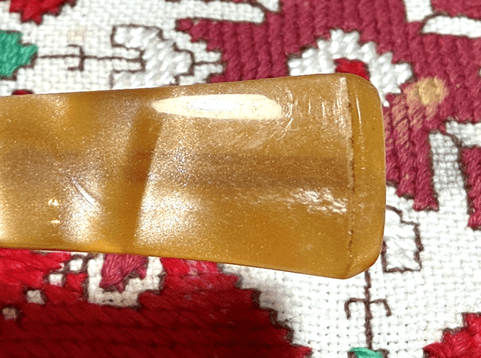
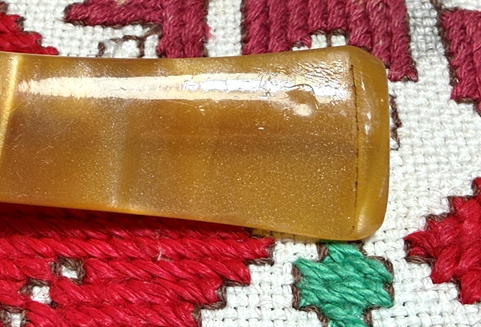
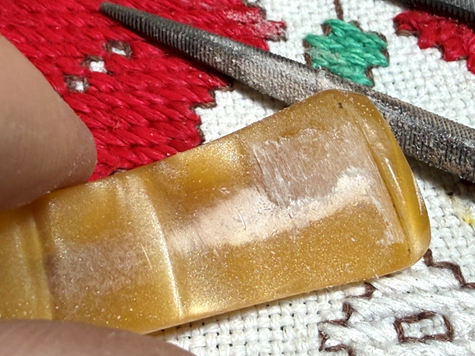
Looking more closely at the bit, the upper bit has a bite scrape that has roughed up the acrylic so that it a lighter hue. This should be able to be sanded off along with the other scratches and chatter. The lower bit has distinctive clench bite that sanding will not remove. This will need to be patched.
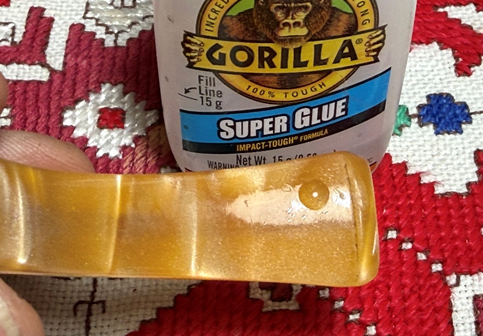
After wiping the lower bit with a cotton pad and alcohol, a small drop of clear CA glue fills the compression.
After the patch cured, both upper and lower sides of the bit were filed using needle files focusing on removing the abrasion on the upper bit and leveling the patch mound flush with the acrylic surface on the lower side.
Next, 220 grit paper sanded out the file marks and further cleaned the bit.
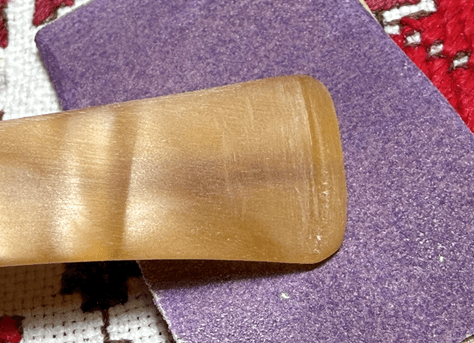
The sanding was expanded with 220 grit paper to the whole stem to remove scratches and blemishes.
The 220 paper was followed by sanding with 320 grit.
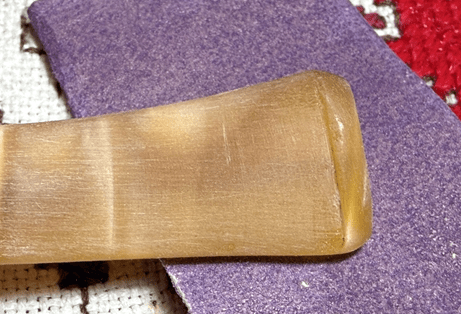
Next, the stem was wet sanded with 600 grit paper and this was followed by applying 0000 grade steel wool.
The sanding transitions to polishing during the micromesh process. To condition the stem, between each pad a light application of Obsidian Oil is applied to the stem. The first set of 3 pads are grades 1500, 1800 and 2400.
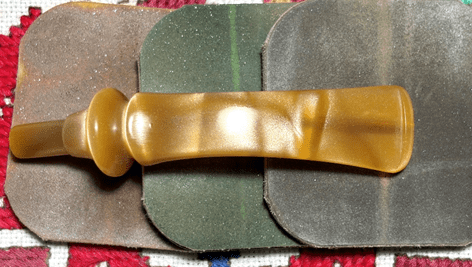
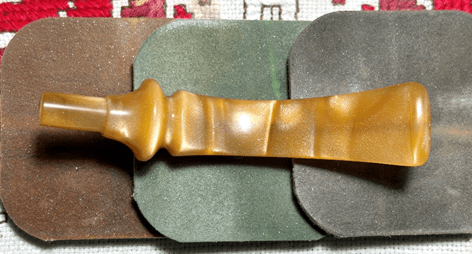
The second set of 3 pads are grades 3200, 3600, and 4000.
The final set of pads are grades 6000, 8000 and 12000. Not bad 😊.
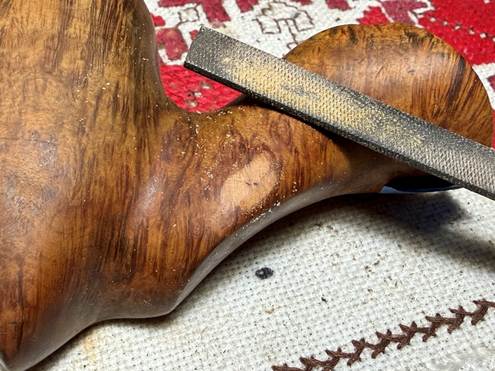
With the stem on the sideline, the stummel is waiting. The patching and fills are fully cured. First, the square needle file goes to work on the lower counter-creep fill bringing it down flush with the briar surface.

The filing continues up over the hairline crack to the crook. When the briar surface is curved in the crook half-moon and round files are used.
The large crack is filed with the square file up to the start of the plateau.
The dark fill in the chip in the plateau looks great. I was aiming for a matte, rough type of finish that might blend in a bit better.
To shape the fill to give it some texture, a small burr is used on the rotary tool. That completes the crack repair and now we shift to the restoration of the stummel as a whole.
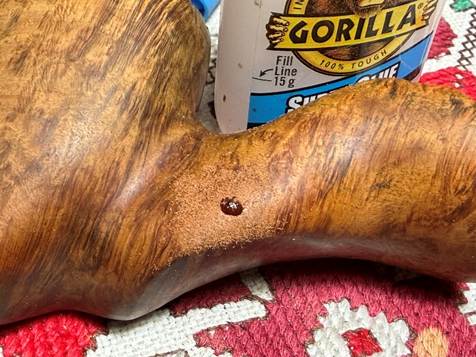
One other dent on the left, lower side of the shank needs some mending.
A small drop of clear CA glue is placed in the pit and then it is sprinkled with briar dust to aid in blending.
After the patch has cured, it is filed down with a needle file then sanded with 320 grit paper.
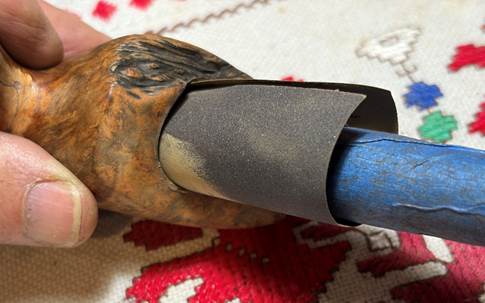
Before beginning the general sanding with sponges, the ‘Steward’s Peek’ is sanded using 320 grit paper (not shown) and then 600 grit paper. In both cases the paper was wrapped around the dowel rod for extra leverage.
Looking at other issues, the heel of the long Freehand stummel is nicked up. This should be addressed with sanding.
To address the imperfections on the briar surface, sanding sponges are applied. Grades coarse, heavy, medium, light and fine are used. During the sanding a small piece of tape was covering the nomenclature for its protection.
Continuing the sanding, which transforms into polishing, the full regimen of 9 micromesh pads are applied. Between each pad the stummel is wiped with a moist cloth to remove the dust generated and to give the following pad better traction. The first set of 3 pads are grades 1500, 1800 and 2400.
The second set of pads are grades 3200, 3600 and 4000.
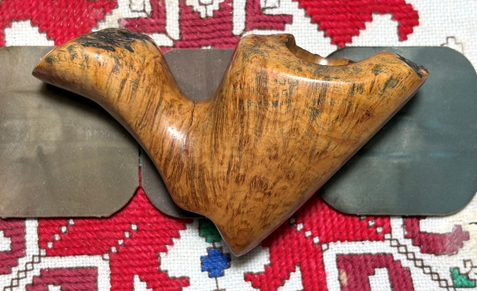

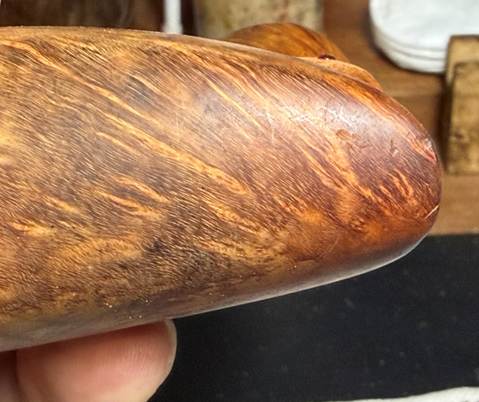
The final set are pads 6000, 8000, and 12000. I am amazed at the hues coming out of this block of briar. The word to describe this coloration is ‘stormy’. There’s a lot going on.
The bark plateaus also need refreshing. The dark has faded and the peaks do not pop.
To address this, first the black dye stick applies a new black finish to both plateaus.
The new dye is shiny and reflective and looks new. To soften the dye and to give more of the rustic vibe, the plateaus are sanded with micromesh pads starting at the coarser 2400 and running to the most find, 12000. This softens the finish, but it also shines up the peaks to give the plateaus more contrast. They look good.
Next, to bring out the natural hues and to condition the wood, Mark Hoover’s ‘Before & After’ Restoration Balm (www.Lbepen.com) is applied to the stummel. After putting some Balm on the fingers, it is worked into the briar, including the Steward’s Peek and the plateaus. After the Balm is worked in, the stummel is set aside for 10 to 15 minutes allowing the Balm to do its thing.

After the time has passed, a dedicated microfiber cloth is used to wipe off excess Balm and to buff it up. Mark’s product always does a great job and this application is no exception.
Next, the very fine abrasive, Blue Diamond is applied to the stem and stummel. With a dedicated cotton cloth wheel mounted with the speed of the rotary tool set at about 40% full power, the Blue Diamond is applied.
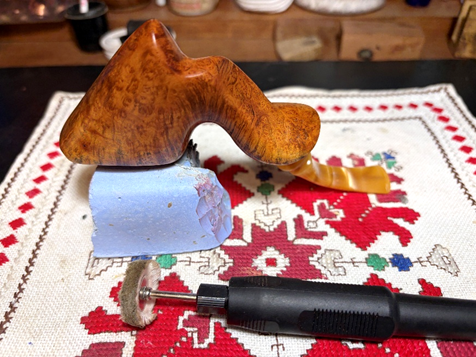
A lot of compound dust is generated and this is wiped off with a felt cloth preparing the surface for application of the wax.
With another dedicated cotton cloth wheel mounted and at the same speed, carnauba wax is applied to stem and stummel. After the application, the pipe is given a rigorous hand buffing to remove excess wax and to raise the shine.
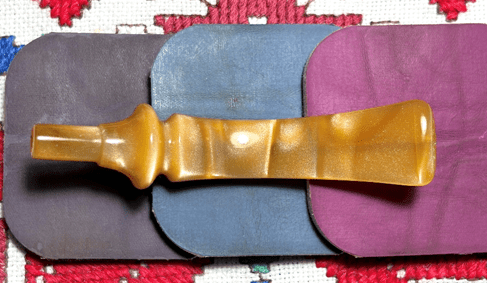
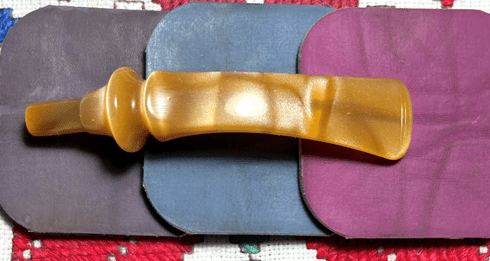
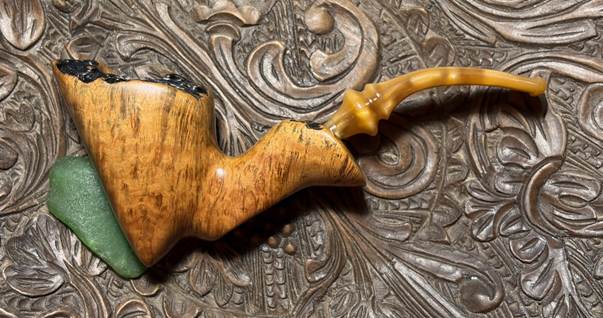
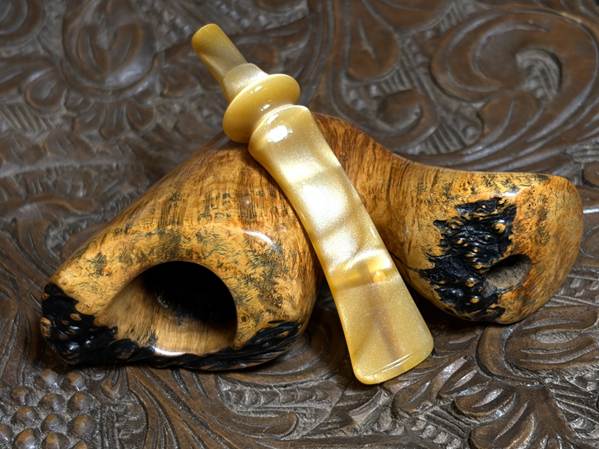
The huge shank crack was daunting, but I’m pleased with how this Nørding Danmark A Freehand came through the fire. My, oh my, the grain on this Freehand is superb, but what stands out to me is the color of the grains as they emerge on the smooth briar plateaus as bird’s eye. The ‘Steward’s Peek’ also provides a great view as the steward holds his pipe. This Nørding will carry his scars forward and will provide his new steward with lots of time reflecting with his favorite blend packed in its 1 3/4 inch deep chamber. Chip commissioned this Nørding and will have the first opportunity to claim him from the Pipe Store. A portion of the proceeds of all pipes restored go to help the Daughters of Bulgaria, now called Spring of Hope. Thanks for joining me!
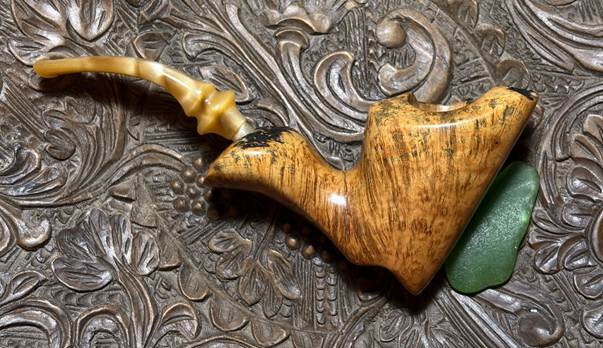

Thank you Dal, the stormy coloration of this pipe will symbolize the “Storm Force Winds” the Lord has helped me weather. I look forward to receiving it soon!
-Chip, CPO, USCG (Ret.)
LikeLike
It really is a great way to describe this pipe. I’m sure he will serve you well!
LikeLike