
The iconic ‘Poker’ is a fun shape that always seems to evoke images of why it became known as the ‘Poker’ – engaged in a game of cards or some other worthy board game with friends around a table and joined by one’s trusted and ‘lucky’ pipe ‘parked’ next to the glass holding one’s preferred adult beverage and packed with the familiar, comfortable aroma of one’s favorite blend. THIS is the Poker capturing a picture of the ‘Fellowship of the Briar’ that unites many and diverse men and women around a shared passion. Bill Burney’s great description of the Poker shape is worth repeating here from Pipedia:

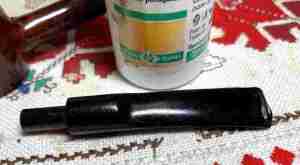
The Duca Carlo Poker now on the worktable got Darren’s attention in the For “Pipe Dreamers” Only! collection and he reached out to me commissioning this Poker along with other pipes calling his name. Here are pictures of the Duca Carlo on the worktable.


The nomenclature on the left side of the shank is stamped in formal cursive, ‘Duca’ [over] ‘Carlo’. On the underside of the shank parallel with the shank facing the COM: ‘ITALY’.

The stem is stamped with an attractive three riser crown which is beginning to ghost on the lower and left sides of the crown.

I acquired this Duca Carlo Poker in January of 2017 from an eBay seller in Raleigh, North Carolina, whose description of the pipe described it as a Dublin shape! In spite of the seller’s lack of knowledge of the Poker, my bid was sufficient and it was added to the For “Pipe Dreamers” Only collection benefitting the Daughters of Bulgaria – helping women and girls who have been trafficked and sexually exploited.
Whenever I work on a pipe, I’m always interested to know something of the pipe. My first stop at Pipedia reveals that the Duca Carlo is a second of Savinelli, the well-known Italian pipe manufacturer.

Savinelli’s history as an Italian pipe maker goes back to 1876 – a rich history and tradition which can be read in Pipedia’s Savinelli article. The Duca Carlo is listed in the main Savinelli article within an extensive listing of “Savinelli made sub-brands, seconds & order productions”. The Duca (Duke) Carlo is listed with the Duca di Milano and Duca di Paolo giving the impression that Savinelli produced these as special lines commemorating these historical figures. With a quick internet search brings me to a Wikipedia article. Duca Carlo reveals an interesting story of a child that died of smallpox at age 3 (See: Carlo, Duke of Calabria):
 Carlo of Naples and Sicily (Italian: Carlo Tito Francesco Giuseppe; 4 January 1775 – 17 December 1778) was Duke of Calabria as heir to Naples and Sicily. Born at the Caserta Palace near Naples, he was known as the Duke of Calabria at birth as the heir apparent to his father’s throne. His mother was a daughter of Empress Maria Theresa and thus sister of Marie Antoinette.
A member of the House of Bourbon, he was a prince of Naples and Sicily by birth. He was the hereditary prince of Naples. His birth allowed his mother to have a place in the Council of State, pursuant to his parents’ marriage contract.
Carlo died of smallpox[1] aged 3. Six of his younger siblings would die of smallpox also: Princess Maria Anna (in 1780), Prince Giuseppe (in 1783), Prince Gennaro (in 1789), Prince Carlo Gennaro (also in 1789), Princess Maria Clotilde (in 1792) and Princess Maria Enricheta (also in 1792). He was buried at the Church of Santa Chiara in Naples.
The only other reference to the Duca series in the Savinelli Pipedia article comes from a photo that does not mention a name, but the stem stamping is clearly from the Duca series of pipes listed. No dating on the picture can be seen.

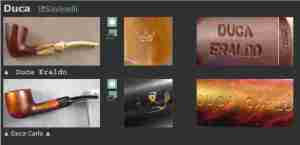
The Savinelli Duca line is confirmed by my next stop. Pipephil gives two examples of Savinelli Ducas – a Duca Carlo and Duca Eraldo. Consistent between each example is the crown stem stamping.
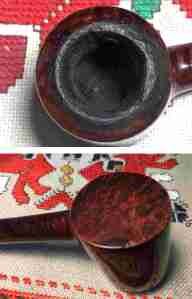
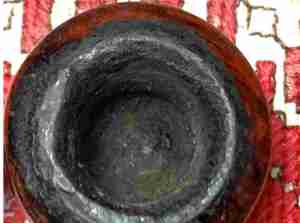
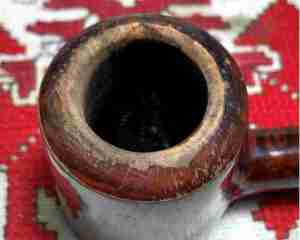
Looking at the Duca Carlo Poker on the worktable more closely reveals a chamber with heavy carbon cake build up which has also resulted in the rounded rim of the Duca Carlo to be covered with lava flow.

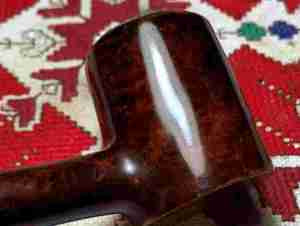
The Poker stummel has indications of nice briar underneath a varnish-like finish. The thick, heavy glossed varnish may be an acrylic finish which is difficult to remove.
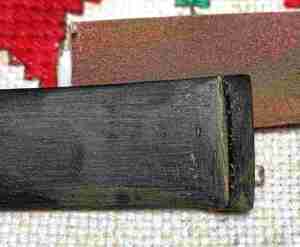
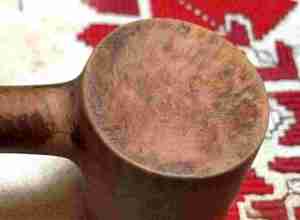
The heel of the Poker has been used as a nutcracker it seems, with dents and scratches.

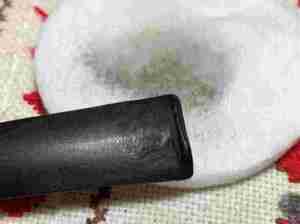
The stem shows heavy oxidation and calcification around the bit area. The vulcanite stem is rough, and the bit shows significant chewing and tooth chatter. The button also is compressed.

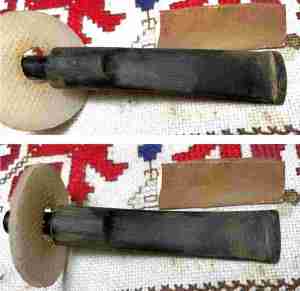
To begin the restoration of this Savinelli Duca Carlo Poker, the stem airway is cleaned with pipe cleaners wetted with isopropyl 99%. I discover that the tenon has an air restrictor inserted in it and it extracts easily. With the air restrictor removed, the 6mm tenon allows for a filter – the Savinelli balsa wood filter can be used with the Duca as I show. This is a nice addition to the Savinelli made Poker. I enjoy using the balsa wood filters in Savinellis in my own collection.

The filter cavity is full of gunk which is loosened with a sharp dental probe. After many pipe cleaners and help with the probe, the airway is finally clean.

Next, to address the oxidation and calcification, the stem is put into the Pipe Stem Oxidation Remover that I have been testing from www.Briarville.com. The Pipe Stem Oxidation Remover has been working well generally. I will leave it soak for several hours.
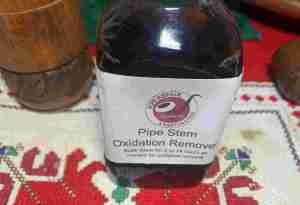
When the soaking is completed, the cotton pad wetted with alcohol, wipes the stem removing the raised oxidation. Again, the Briarville product seems to do a good job and is not messy.

To help condition the vulcanite stem, paraffin oil is then applied to the stem and put aside to absorb.
Next, to begin the cleanup of the stummel, the chamber is reamed using the Pipnet Reaming Kit. After a fresh starting picture is taken, I start with the smallest of the 4 blade heads available in the kit.
I use 3 of the blade heads to ream the chamber then transition to the Savinelli Fitsall Tool. The Tool continues scraping the walls and finally, the chamber is sanded using 240 paper around a Sharpie Pen.

After wiping the chamber with a paper towel, and inspection of the chamber shows healthy briar. There appear to be no heating problems.

Moving next to cleaning the external briar surface, undiluted Murphy’s Oil Soap is used with a cotton pad that does the scrubbing.

The shellac finish cleans off like cleaning glass. The rim area is a challenge utilizing both the brass bristled brush and a sharp edge of a pocketknife to scrape the rim to remove the caked lava. Surprisingly, what emerges from the cleaning and scraping of the rim is a sharp looking internal rim bevel.

The stummel is then taken to the sink to continue the cleaning using shank brushes and anti-oil liquid dishwashing soap. With hottish water, the shank brushes clean the internal mortise and airway. The brass brush is used more on the rim. After a thorough rinsing, the stummel goes back to the worktable.

Next, cotton buds and pipe cleaners are used to continue the cleaning of the internals. I decide to do the initial excavating of tars and oils using a small dental spoon. Scraping the internal mortise walls produces a lot of gunk. Since I know that I’ll be putting the stummel into a soak of acetone to address the candy apple finish, I do not continue this cleaning because the acetone should draw out the internal tars and oils.

Inspecting the rim after the cleaning shows a rounded rim that culminates in a smart internally sloped bevel. The bones of the rim look good but obviously the finish has come off the rim and showing raw briar.
For anyone who has read my blogs over the years, they know that I’m not a fan of what I call a ‘candy apple’ finish. The shellac/varnish that is put on some pipes is glossy, but the gloss is not coming from the briar, but the layer of hardened chemical encasing the stummel. I have read that this kind of finish also can result in the stummel not breathing or not being able to dissipate the heat. This I’ve read, but to me, the natural shine of briar is far superior to the candy apple finish which produces an artificial shine. The grain beneath the Duca’s gloss shows promise and removing the finish to release the natural grain is the path I will take.

These kinds of finishes – shellac or acrylic, can be a bear to remove. Before sanding, acetone may help break down the finish to allow its removal to be a bit easier – we’ll see.

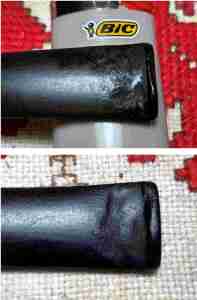
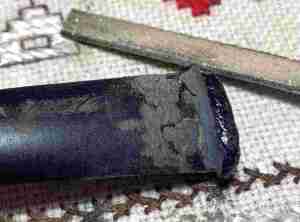
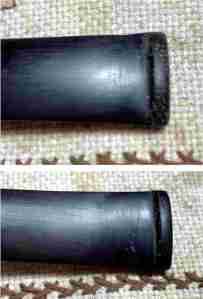
With the stummel in the soak, I turn again to the stem. The first two pictures below show the chewed-up state of the upper and lower bit. The other observation is the rough surface of the vulcanite on this Poker’s saddle stem. Even though the oxidation has been addressed with the soak in the Pipe Stem Oxidation Remover, the stem will still need sanding to smooth it.

To begin addressing the upper and lower bit, I start by using the heating method. A picture looking toward the slot-side of the button shows the degree to which this pipe’s stem has been mauled! It is evident that the former steward clamped down on the bit and button while he looked at the hand of cards that had been dealt him. Straightening this guy out will be a challenge.

Using the heating method allows the physics of the rubber to help the situation. Using a Bic lighter, the upper and lower bit are painted with flame. The flame heats the vulcanite which causes it to expand and reclaim its original state – or partially. I take before pictures then compared to these, the pictures after using the heating method. The comparison of the upper and lower before and after pictures shows negligible improvement – not enough to make much of a difference in what follows.


The approach will be to rebuild the button using a mixture of activated charcoal and CA glue. This will be first, then to fill the compressions on the upper and lower bit, black CA glue will be used. The first thing I do is clean the bit with alcohol.
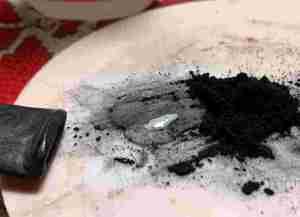
Next, a capsule of activated charcoal is opened on my mixing pallet which was covered with scotch tape to help quicken the cleaning later on.

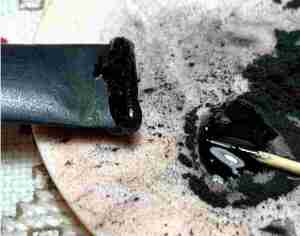
Next, some regular CA glue is place in a puddle next to the charcoal. The toothpick is then used to pull charcoal gradually into the glue while mixing at the same time. I draw more charcoal in slowly thickening the mixture, so it won’t drip off the toothpick. If too much charcoal is pulled in and the mixture becomes too dry, it will solidify resulting in smoke! Careful to keep the balance while mixing, when the mixture is thick enough, I use the toothpick to trowel the charcoal/glue mixture to the button.
The mixture is pulled across the button lip building it up higher than needed. This allows room to file and sand the button. To keep the material in place and to quicken the curing time, an accelerator is used.

The same is done for the lower button lip.
Next, the compressions, which are large, are filled with medium Black CA glue. I use glue on the compressions because, being thinner, it more easily spreads to fill the indentation. After the glue is applied, again an accelerator is used to keep the patch material in place and to quicken the curing time – upper and lower bits.


After allowing the patch material to cure thoroughly, the process of shaping the button commences. Starting with a squared needle file, the first step is to define the edge of the button lips. I do this first to establish the boundaries of the button.

After defining the button lip, the filing is expanded to the compression patches on the bit. These are filed down removing excess patch material until it’s about flush with the vulcanite stem surface.
After flipping the stem over, the same process is used with the lower button and bit starting first by defining the button.

Next, the filing expands to the bit.

Next, the file goes to work on the button lip itself to file it down, shape and make sure the symmetry is right. This is done on first the upper, then the lower.

When the heavy lifting is completed using the file, fine tuning begins with sanding the button and bit with 240 grade paper. At this point, the imperfections in the patches start to emerge. In the first picture, air pockets are showing on the button lip.

On the lower stem side, a few pockets are showing over the large compression patch on the bit along with air pockets on the button.
I will address the patch imperfections after completing the sanding of the entire stem first with 240 grade paper. I am careful to avoid the already ghosting crown stem stamping. A plastic disk is also used to protect the stem facing from shouldering during sanding.
Following the 240 sanding paper, 600 grade paper is used to wet sand the entire stem. This is followed by applying 0000 grade steel wool.

The air pockets are fine-tuned now on the button lips – upper and lower. On the lower side, there remain some ‘dimples’ on the bit on the side of the large fill patch.
To fill the pockets and dimples, thin CA glue is used. The CA glue’s viscosity is so thin it runs very easily. Not long ago I purchased it primarily to seep into cracks but I’m trying it out with this need. A small layer is placed over the button. When it sets up, the stem is flipped over and thinner CA glue is spread over the large fill area.

When the thin CA glue cures, 600 grade paper and then 0000 grade steel wool are used to sand and smooth the area. The lower bit area still has very slight dimples, but this is good enough to move on.

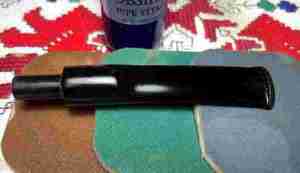
Next, the full set of 9 micromesh pads is applied to the stem starting by wet sanding with pads 1500 to 2400. Following this, I dry sand with pads 3200 to 4000 and 6000 to 12000. Between each set of 3 pads, Obsidian Oil is applied to condition the vulcanite stem and to guard against oxidation.

The stummel has been soaking in acetone to soften the ‘candy apple’ finish. With the help of a 00 grade steel wool, the finish is removed for the most part. I’m always careful around the nomenclature. The only thing that rubbed the stampings was the cotton pad wetted with acetone.

Taking a quick survey of the stummel – the rounded rim is looking good. The briar surface over the Poker stummel shows great promise.

I see two small fills on the shank, but they appear to be solid. Patches of old finish are persisting, but sanding will take care of it.

The heel of the poker has some nicks and dents – which one would expect.
Next, I will ‘top’ the heel of the Poker using the chopping board as my topper. With 240 grade paper on the board, the stummel is placed upright on the topping board and rotated several times.

It did not take much to clean up the heel and sharpen the edge. I like the bird’s eye grain beginning to show through.

The 240 paper is exchanged for 600 grade paper and the heel is rotated several more times over the paper. It’s look great.

Next, to remove the remaining old finish and to clean the briar surface sanding sponges are used. Starting with the coarsest sponge, then graduating to medium and finishing with the fine grade sponge, the stummel is sanded.

Following the sanding sponges, I return to the rim. The rounded rim is complemented by a sharp bevel sloping into the chamber. Using 240 grade paper pinched against the old bevel with a piece of wood, the bevel is refreshed. This is followed in the same way using 600 grade paper. The result looks great!

I’m looking forward to the next step of applying the micromesh process to the stummel. This is where, to me, the magic starts happening with the grain. Starting with wet sanding with pads 1500 to 2400, this is followed by dry sanding with pads 3200 to 4000 and 6000 to 12000. The grain comes out nicely during the sanding process.


After removing the varnish, candy apple finish, it’s time to apply dye to the stummel. To match the dark brown of the original color minus the shellac, Fiebing’s Dark Brown Leather Dye is used. After wiping the stummel with alcohol to clean it, the stummel is warmed using a hot air gun. Warming the briar helps the grain to be more receptive to the dye.

With the stummel warmed, dye is applied in sections using a folded pipe cleaner. With each section applied, the wet dye is then ‘flamed’ using a lit candle’s flame. The alcohol in the dye combusts when it contacts the flame, and the dye pigment is left behind. When the dye has been applied and flamed over the entire stummel, the stummel is put aside to rest allowing the new dye to settle.

After several hours, the stummel is ready to unwrap.

Unwrapping the crusted flamed dye is done using a felt buffing wheel mounted on the rotary tool and Tripoli compound. Because the abrasive nature of the wheel and Tripoli are greater, the speed of the rotary tool is reduced a bit to about 35% full power to avoid too much heat.

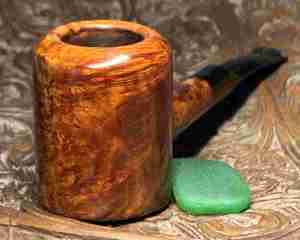
I pause to take a picture of the unwrapping process to exhibit the newly highlighted and contrasting grain as it appears. The grain on this Savinelli Duca Carlo Poker reminds me of tiger fur – the fine luminescent veins are never the same, always a picture that mesmerizes me! God’s gift to pipe restorers 😊. The felt wheel is purged often using the side of the lap board I work on. I also use the metal tightening wrench that is used with the rotary tool adjustments. This purging removes the old flamed finish being plowed in the process and to soften the felt.

To sharpened and fine-tune the grain definition, Tripoli is applied over the entire stummel again using a softer cotton cloth buffing wheel except the speed is increased to about 50% full power – a little faster than my ‘normal’. The cloth wheel is also able to reach into the crook where the shank and bowl meet – a bit too tight for the felt wheel to reach.

After applying the Tripoli compound, the bowl is wiped with a cotton pad wetted with alcohol to remove excess dye and to blend the new dye. It also lightens the bowl a bit, but the bowl is good as is.

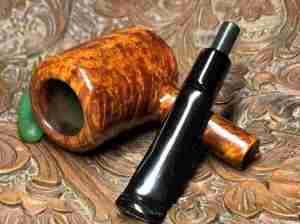
After reuniting stem and Poker stummel, a different cotton cloth wheel is mounted to the rotary tool with the speed at about 40% full power. Blue Diamond compound, a finer compound than Tripoli, is then applied to the entire pipe. This removes more excess dye and continues sharpening the grain definition.

Unlike a protective wax, compounds are an abrasive powder that do fine sanding of the surface and act like a polish. This powder is left behind and can cake on the surface. Buffing/wiping rigorously with the felt cloth helps in removing this compound debris from the surface of the stummel and stem. I like to do this before applying the wax to make sure the surface is clean.
Next, another cotton cloth buffing wheel is mounted to the rotary tool, and with the speed the same, carnauba wax is applied to the surface of the stem and stummel. The wax brings a greater gloss to the natural briar finish and acts to protect the wood and vulcanite. Application of wax is kept to a minimum – just enough to shine things and cover the surface.

Finally, the pipe is given a rigorous hand buffing with a microfiber cloth to remove excess wax and to raise the shine.
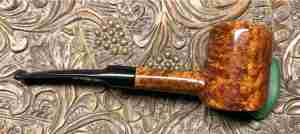
I am pleased with the results of this Savinelli Duca Carlo. The eye-pleasing grain emerged after removing the candy apple finish. The slightly bent saddle stem flowing from the slightly sloped heel provides nice lines when the Poker is resting comfortably on the table. The Poker is an iconic shape that gives life to images of it sitting patiently on the table while the steward is fully engaged in the game at hand AND images of the fellowship with others around that table. This Poker fits this bill beautifully and Darren, the commissioner, will have the first opportunity to claim him from The Pipe Steward Store which helps to benefit the work of the Daughters of Bulgaria – helping women and girls who have been trafficked and sexually exploited. I love starting with a ‘before’ shot to remember how far we have come. Thanks for joining me!


Great transformation.
LikeLiked by 1 person
Thanks, Todd! Your GVG is in the mail.
LikeLike
Did you do a write-up?
LikeLike
Working on it 🙂
LikeLike
Reblogged this on rebornpipes and commented:
Have a look at the latest from Dal.
LikeLiked by 1 person
Beautiful work! I’ve never been a big fan of poker pipes but that one just might change my mind.
LikeLiked by 1 person
I love how this blog post captures the essence of pipe smoking community.
LikeLiked by 1 person
I appreciate your words!
LikeLike